
MVC72FW - Vacuum Cleaner GORENJE - Free user manual and instructions
Find the device manual for free MVC72FW GORENJE in PDF.

| Product Type | Handheld Wet & Dry Vacuum Cleaner |
| Brand | Gorenje |
| Model | MVC72FW |
| Power Source | Rechargeable battery via adapter (100-240 V AC, 50/60 Hz) |
| Battery Charging Time | First charge: 12 hours; subsequent charges: 4-6 hours |
| Battery Indicator | Red flashing during charging, green when full |
| Dust/Liquid Bin Capacity | Approx. 0.5 L |
| Attachments Included | Narrow nozzle, rubber attachment, wall-mountable holder |
| Filter Type | Washable filter with rubber gasket |
| Noise Level | < 80 dB (A) |
| Suction Power | Not specified (typical handheld) |
| Body Material | Plastic |
| Safety Features | Do not use without filter; keep away from body |
| Warranty | 6 months on battery; standard warranty for appliance |
| Dimensions (H x W x D) | Approx. 40 x 10 x 10 cm |
| Weight | Approx. 1.2 kg |
| Suitable for | Dry and liquid vacuuming |
| Environmental Compliance | WEEE, CE, RoHS |
| Manual Languages | Multiple (EN, DE, FR, etc.) |
Frequently Asked Questions - MVC72FW GORENJE
User questions about MVC72FW GORENJE
0 question about this device. Answer the ones you know or ask your own.
Ask a new question about this device
Download the instructions for your Vacuum Cleaner in PDF format for free! Find your manual MVC72FW - GORENJE and take your electronic device back in hand. On this page are published all the documents necessary for the use of your device. MVC72FW by GORENJE.
USER MANUAL MVC72FW GORENJE
natural_image
White and gray handheld vacuum cleaner with visible branding and orange handle (no text or symbols on body)MVC 72 FW
| Navodila za uporabo | SI |
| Upute za uporabu | BIH HR |
| Uputstvo za upotrebu | BIH SRB MNE |
| Упатства за употреба | MK |
| Instruction manual | EN |
| Instrucțiuni de utilizare | RO |
| Návod k obsluze | CZ |
| Návod na obsluhu | SK |
| Instrukcja obsługi | PL |
| Használati útmutató | HU |
| Инструкции за употреба | BG |
| Інструкція з експлуатації | UK |
| Руководство по эксплуатации | RUS |
| Gebrauchsanweisung | DE |
| Instructionsmanual | DK |
| Käyttöuhjeet | FI |
| Bruksanvisning | NO |
| Bruksanvisning | SV |
SI Navodila za uporabo .... 3
natural_image
Technical line drawing of a mechanical component with mounting brackets and a small attached device (no text or symbols)UPORABA IN ČIŠČENJE APARATA
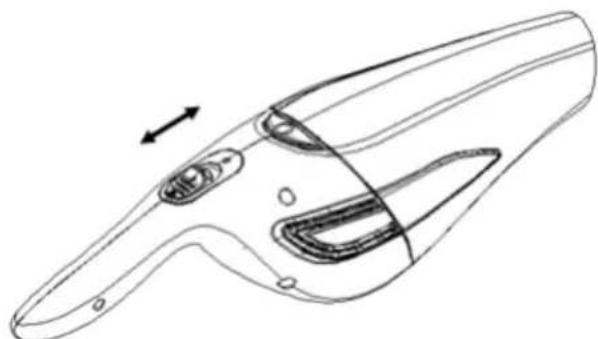
- Za vklop aparata potisnite stikalo za vklop/izklop naprej.
- Za izklop sesalnika potisnete stikalo za vklop/izklop nazai.
natural_image
Line drawing of a handheld device with internal components and an arrow indicating motion (no text or symbols)natural_image
Line drawing of a handbag with internal components and directional arrows indicating movement (no text or symbols)- Nato odstranite plastični pokrov pred filtrom.
natural_image
Technical line drawing of a mechanical component with an arrow indicating direction (no text or symbols)- Če je filter zelo umazan, ga očistite s krtačo ali običajnim sesalnikom.
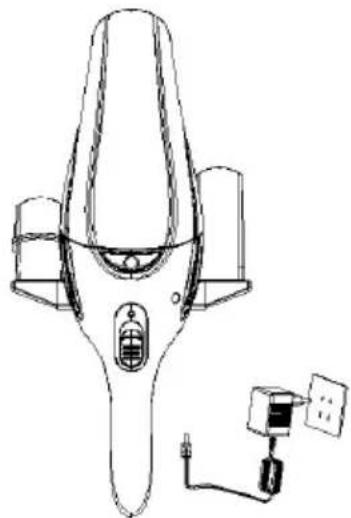
1 Adapter
2 Posuda za prašinu / tekućinu
3 Gumb za otvaranje posude za prašinu
4 Prekidač za uključenje / isključenje
5 Pokazivač napunjenosti baterije
6 Kućište
7 Filtarski komplet (plastični pokrov i filtar)
8 Uski nastavak
9 Gumeni nastavak
10 Nosač za pričvršćenje na zid
PAŽNJA:
Provjerite dali napon vaše kućne instalacije odgovara naponu koji je naveden na uređaju odnosno na pretvaraču!
VAŽNA UPOZORENJA
natural_image
Technical line drawing of a mechanical device with attached sensors and a sensor array (no text or symbols)UPORABA I ČIŠĆENJE UREĐAJA
natural_image
Line drawing of a handheld vacuum cleaner with internal components and directional arrow (no text or symbols)natural_image
Diagram of a handbag with internal components and directional arrows indicating movement (no text or symbols)- Nakon toga skinite plastični pokrov pred filtrom.
natural_image
Technical line drawing of a mechanical component with an arrow indicating direction (no text or symbols)- Ako je filtar izrazito zaprljan, očistite ga četkom ili usišite običnim usisivačem.
- Napomena: Ako je potrebno, filtar možete oprati i u hladnoj ili mlakoj vodi. U tom slučaju ga prije ponovne uporabe morate temeljito osušiti.
- Upozorenje: Savjetujemo Vam da filtar zamijenite nakon duže uporabe, odnosno u svim slučajevima kad ga ne možete primjereno očistiti.
- Napomena: Pazite da filtarski komplet bude pravilno sastavljen. Naročitu pažnju obratite na gumenu brtvu na filtru. Ukoliko brtva nije pravilno namještena, uređaj nećete moći pravilno sklopiti.
ZAŠTITA OKOLIŠA
Nakon završetka životnog vijeka uređaj nemojte baciti zajedno s ostalim kućanskim otpadom, nego ga odvezite na službeno zbirno mjesto za recikliranje takvih uređaja. Takvim ćete postupkom doprinijeti očuvanju okoline.
GARANCIJA I SERVIS
Za informacije ili u slučaju poteškoća pri korištenju uređaja obratite se Centru za pomoć korisnicima Gorenje u vašoj državi (spisak telefonskih brojeva naći ćete u međunarodnom garancijskom listu). Ukoliko u vašoj državi nema takvog centra, obratite se lokalnom prodavatelju proizvoda Gorenja, ili kontaktirajte Odjel malih kućanskih aparata Gorenje.
1 Adapter
2 Posuda za prašinu / tečnost
3 Dugme za otvaranje posude za prašinu
4 Prekidač za uključenje / isključenje
5 Indikator napunjenosti baterije
6 Kućište
7 Filter set (plastični poklopac i filter)
8 Uski nastavak
9 Gumeni nastavak
10 Nosač za kačenje na zid
PAŽNJA:
Proverite dali napon vaše kućne instalacije odgovara naponu koji je naveden na aparatu odnosno na adapteru!
VAŽNA UPOZORENJA
natural_image
Technical line drawing of a mechanical device with attached electrical outlet (no text or symbols)UPOTREBA I ČIŠĆENJE APARATA
natural_image
Technical line drawing of a mechanical component with internal features and directional arrows (no text or symbols)natural_image
Line drawing of a handbag being cut with arrows indicating motion (no text or symbols)- Nakon toga skinite plastični poklopac pred filterom.
natural_image
Technical line drawing of a mechanical component with an arrow indicating direction (no text or symbols)- Ako je filter jače prljav, očistite ga četkom ili usišite običnim usisivačem.
Napomena: Ako je potrebno, filter možete oprati i u hladnoj ili mlakoj vodi. U tom slučaju ga pre ponovne upotrebe morate temeljito osušiti.
Upozorenje: Savetujemo Vam da filter zamenite nakon duže upotrebe, odnosno u svim slučajevima kad ga ne možete primereno očistiti.
- Napomena: Kada završite, proverite dali je komplet filtera pravilno montiran. Posebnu pažnju posvetite gumenom zaptivaču na filteru. Ukoliko zaptivač nije pravilno fiksiran, aparat nećete moći pravilno sastaviti.
ŽIVOTNA SREDINA
Nakon završetka životnog veka aparat nemojte baciti zajedno s ostalim domaćim otpacima, nego ga predajte na službeno sabirno mesto za recikliranje takvih aparata. Time ćete doprineti očuvanju okoline.
GARANCIJA I SERVIS
Za informacije ili u slučaju problema u korišćenju aparata obratite se Centru za pomoć korisnicima Gorenje u vašoj državi (spisak telefonskih brojeva naći ćete u međunarodnom garantnom listu). Ukoliko u vašoj državi nema takvog centra, obratite se lokalnom prodavcu proizvoda Gorenja, ili na odeljenje malih kućanskih aparata Gorenje.
Napomena: Garancija na bateriju usisivača važi 6 meseci.
natural_image
Technical line drawing of a mechanical device with no visible text or symbolsnatural_image
Line drawing of a handheld device with internal components and an arrow indicating direction (no text or symbols)natural_image
Line drawing of a handbag with internal components and directional arrows indicating movement (no text or symbols)natural_image
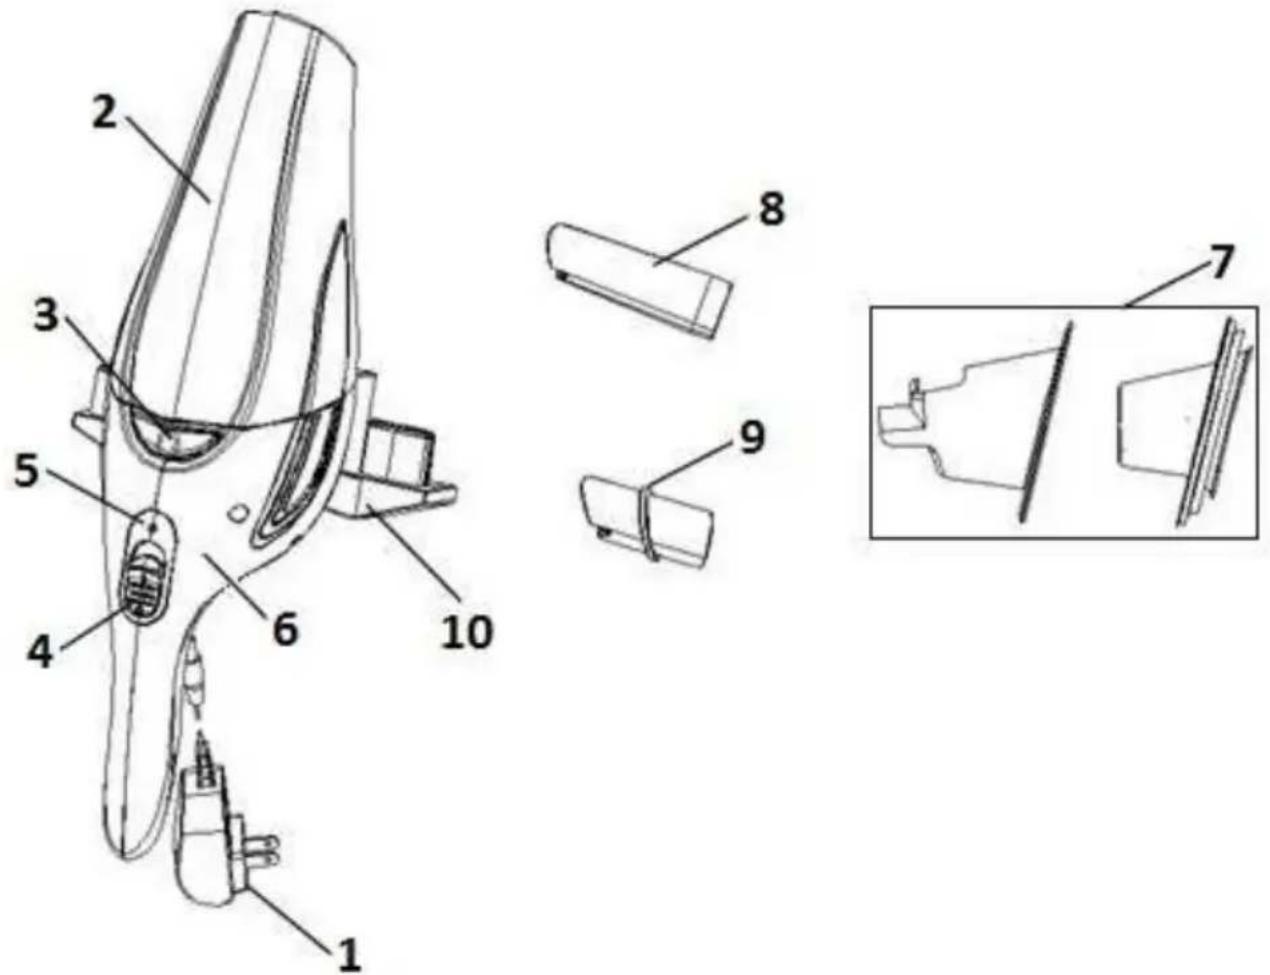
Technical line drawing of a mechanical component with an arrow indicating direction (no text or symbols)1 Adapter
2 Dust/liquid bin
3 Dust bin release button
4 On/off switch
5 Battery indicator
6 Housing
7 Filter unit (plastic cover and filter)
8 Narrow nozzle attachment
9 Rubber attachment
10 Wall-mountable holder
ATTENTION:
Make sure the voltage in your home corresponds to the voltage indicated on the appliance or the adapter.
GENERAL PRECAUTIONS
When using the vacuum cleaner always observe the following basic safety precautions:
- Carefully read this instruction manual and only use the appliance in accordance with the instructions herein.
-
Do not leave the appliance to operate unattended.
-
The appliance should not be used by children or persons with impaired physical or psychological skills, or persons with lacking experience and knowledge, unless such persons are supervised or advised by a person responsible for their safety. Do not let the children play with the appliance.
- Attention: before using the appliance, carefully assemble all of its parts.
- Only use the appliance indoors and in dry areas.
- Only use the appliance with the parts recommended by the manufacturer.
- Do not use the appliance if it has been dropped, if it is damaged, if it has been kept outdoors, or if it has been dropped or immersed in a liquid.
- Before cleaning the charger, disconnect the adapter from the power outlet.
-
Only use the adapter and the charging unit supplied with the vacuum cleaner to charge the appliance. During charging, the adapter may become warm. This is a normal occurrence.
-
Do not insert any objects into the vents.
- Keep the vents free from dust, hair or any other impurities that could clog the vents, decrease the air flow and reduce the suction power.
- Make sure your hair, loose parts of your garments, fingers or other parts of the body do not come into contact with the vents or moving parts of the appliance.
- Keep the suction vents away from your face and body.
- Keep the appliance in dry places indoors. Store the appliance after use.
- Do not use the appliance to vacuum construction material (such as fine sand, lime, cement powder etc.). If vacuumed, construction material can damage the appliance.
- Do not vacuum any flammable substances, corrosive liquids, or ashes before they are completely cooled down.
- When vacuuming liquids, do not hold the appliance with the dust/liquid bin pointing upwards, and do not tilt it to either side.
• After vacuuming liquids, empty and dry the dust/liquid bin before placing the appliance on the charging unit. - Do not expose the vacuum cleaner to direct sunlight, heat, or fire.
- Switch off the vacuum cleaner after use.
- Switch off the appliance during charging.
- The appliance complies with the effective German and European standards regarding electricity and radio interference regulations.
- This appliance may be used by children aged 8 years and above and by persons with reduced physical, sensory or mental capabilities or lack of experience and knowledge, if they are supervised during the use of the appliance or if they have been provided relevant instructions regarding the use of the appliance in a safe way and if they understand the hazards involved.
Keep children under supervision while they use the appliance and make sure they do not play with it.
Children should not perform any cleaning or maintenance tasks on the appliance, unless they are older than 8 years and do so under supervision. • Noise level: Lc < 80 dB (A)
SPECIAL WARNING:
Never use the vacuum cleaner without the filters in place!
Only use the appliance for household purposes and indoors!
Power cord
If the power cord is damaged, replace it with a suitable cord or cord winding device/assembly sourced from the nearest Gorenje service centre. If the power cord is damaged, it may only be replaced by Gorenje, Gorenje's authorized service and repair centre, or an adequately trained professional.
Appliance disposal and the environment
If you find you with to replace your appliance or that you no longer need it, consider the environment and ways to protect it.
COMPLIANCE WITH THE EUROPEAN STANDARDS
A test of this appliance has confirmed compliance with the following European directives:
2014/35/EU
2014/30/EU
2009/125/EC
2011/65/EU
This equipment is labelled in compliance with the European Directive 2012/19/EC on waste electric and electronic equipment – WEEE. The Directive specifies the requirements for collection and management of waste electric and electronic equipment effective in the entire European Union.
CHARGING THE APPLIANCE
- Charge the appliance for at least 12 hours before first use. For every subsequent recharge, charge it for approximately 4–6 hours.
Note: When the battery is full, the flashing red signal light on the appliance will turn green.
Tip: If you do not intend to use the appliance for a long period of time, disconnect the adapter from the power outlet to save energy.
- To charge the vacuum cleaner, connect the appliance to the adapter and plug the adapter to a power outlet.
- The charging indicator will be lit as long as the appliance is connected to the adapter and adapter is connected to a power outlet.
Note: The charge indicator does not indicate how full the vacuum cleaner battery is.
Note: Make sure the vacuum cleaner is always correctly connected to the adapter, and correctly and carefully connect the adapter to the power outlet.
- Your hand-held vacuum cleaner is supplied with a wall-mountable holder. This will allow quick and easy access to the vacuum cleaner as soon as you need it. If you decide to mount the holder onto a wall, we recommend mounting it near a power outlet. This way, you can charge the vacuum cleaner while it rests in the wall-mounted holder.
natural_image
Technical line drawing of a mechanical device with attached sensor and control panel (no text or symbols)USING AND CLEANING THE APPLIANCE
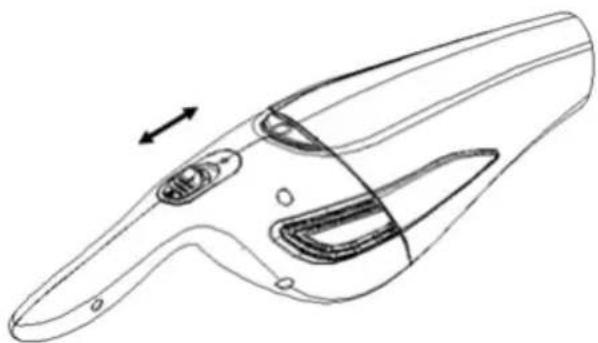
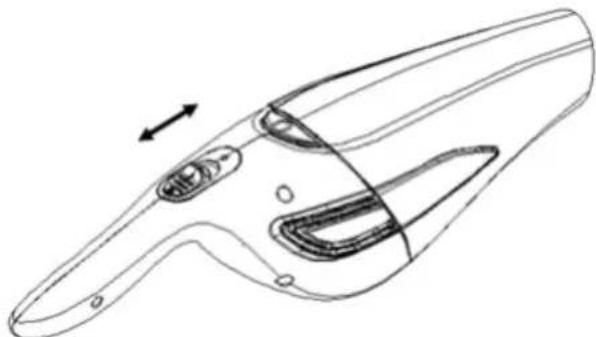
- To switch on the appliance, push the on/off switch forward.
- To switch off the vacuum cleaner, push the on/off switch backward.
natural_image
Line drawing of a handheld vacuum cleaner with internal components and directional arrow (no text or symbols)- Place the desired attachment onto the appliance nozzle. The narrow nozzle attachment is
suitable for cleaning corners and narrow slots or grooves. The soft rubber attachment is suitable for vacuuming liquids.
- If there is liquid in the dust/liquid bin, always hold the appliance pointing downwards (i.e. with handle part up).
Important: Make sure the liquid level never exceeds the maximum marking on the dust/liquid bin.
- After each use, empty the dust/liquid bin and clean the dust filter. Appliance suction power depends on how clean the filter is. The appliance will operate better if the filter is cleaned regularly.
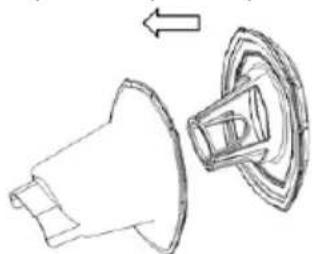
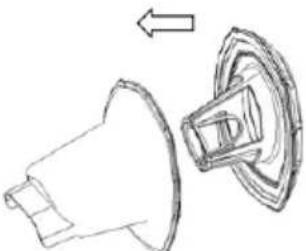
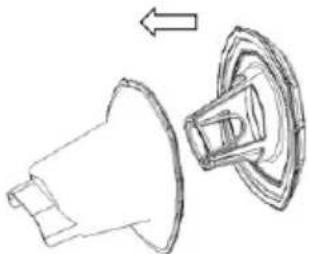
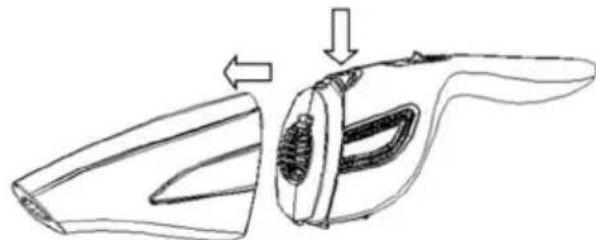
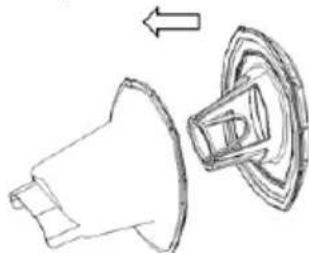
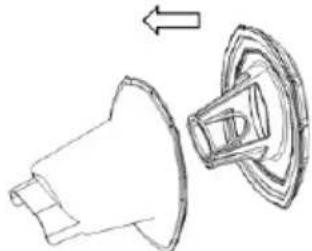
- First, remove the bin from the vacuum cleaner housing by pressing the bin release button.
natural_image
Line drawing of a handbag with internal components and directional arrows indicating movement (no text or symbols)- Then, remove the plastic cover in front of the filter.
natural_image
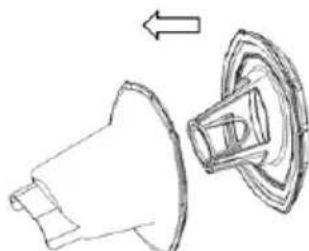
Technical line drawing of a mechanical component with an arrow indicating direction (no text or symbols)- If the filter is very dirty, clean it with a brush or a conventional vacuum cleaner.
Note: If necessary, the filter can be cleaned in cold or lukewarm water. In this case, however, make sure it is dried thoroughly before next use.
Note: We recommend replacing the filter after a long period of use or when it can no longer be cleaned.
- Note: Make sure the filter unit is correctly positioned and inserted. Also pay attention to the rubber gasket on the filter. If the filter is not placed correctly, the appliance cannot be assembled correctly.
ENVIRONMENT
At the end of the appliance's useful life, do not discard it with common household waste. Take is to an authorized recycling centre. This will help preserve the environment.
WARRANTY AND REPAIR
For more information or in case of problems, please contact the Gorenje Call Centre in your country (phone number listed in the International Warranty
Sheet). If there is no such centre in your country, please contact the local Gorenje dealer or Gorenje's small domestic appliance department.
Note: The vacuum cleaner battery has a 6-month warranty.
For personal use only!
GORENJE WISHES YOU A LOT OF PLEASURE USING YOUR VACUUM CLEANER
natural_image
Technical line drawing of a mechanical device with attached electrical outlet (no text or symbols)FOLOSIREA ŞI CURĂȚAREA APARATULUI
natural_image
Technical line drawing of a mechanical component with internal features and an arrow indicating direction (no text or symbols)natural_image
Line drawing of a handbag with internal components and directional arrows indicating movement (no text or symbols)natural_image
Technical line drawing of a mechanical component with a circular housing and an arrow indicating direction (no text or symbols)natural_image
Technical line drawing of a mechanical device with attached electrical outlet (no text or symbols)natural_image
Line drawing of a handheld vacuum cleaner with internal components and directional arrow (no text or symbols)natural_image
Line drawing of a handbag with two views showing internal components (no text or symbols)natural_image
Technical line drawing of a mechanical component with an arrow indicating direction (no text or symbols)natural_image
Technical line drawing of a mechanical device with attached electrical outlet (no text or symbols)POUŽÍVANIE A ČISTENIE SPOTREBIČA
- Aby ste vysávač zapli, stlačte tlačidlo ZAP/VYP smerom dopredu.
- Aby ste vysávač vypli, stlačte tlačidlo ZAP/VYP smerom dozadu.
natural_image
Technical line drawing of a mechanical component with internal features and directional arrows (no text or symbols)natural_image
Line drawing of a handbag with internal components and directional arrows indicating movement (no text or symbols)natural_image
Technical line drawing of a mechanical component with an arrow indicating direction (no text or symbols)natural_image
Technical line drawing of a mechanical device with attached electrical outlet (no text or symbols)OBSŁUGA I CZYSZCZENIE URZĄDZENIA
natural_image
Technical line drawing of a mechanical component with internal features and an arrow indicating direction (no text or symbols)natural_image
Line drawing of a handbag with internal components and directional arrows indicating movement (no text or symbols)natural_image
Technical line drawing of a mechanical component with an arrow indicating direction (no text or symbols)natural_image
Technical line drawing of a mechanical device with attached sensor and motor (no text or symbols)natural_image
Line drawing of a handheld device with internal components and directional arrows (no text or symbols)natural_image
Line drawing of a handbag with internal components and directional arrows indicating movement (no text or symbols)natural_image
Technical line drawing of a mechanical component with an arrow indicating direction (no text or symbols)natural_image
Technical line drawing of a mechanical component with internal features and an arrow indicating direction (no text or symbols)natural_image
Line drawing of a handbag with internal components and directional arrows indicating movement (no text or symbols)natural_image
Technical line drawing of a mechanical component with an arrow indicating direction (no text or symbols)natural_image
Technical line drawing of a mechanical device with a separate connected component (no text or symbols)natural_image
Technical line drawing of a mechanical component with internal features and an arrow indicating direction (no text or symbols)natural_image
Line drawing of a handbag with internal components and directional arrows indicating movement (no text or symbols)natural_image
Technical line drawing of a mechanical component with an arrow indicating direction (no text or symbols)natural_image
Technical line drawing of a mechanical device with attached electrical outlet (no text or symbols)natural_image
Line drawing of a handheld vacuum cleaner with internal components and directional arrow (no text or symbols)natural_image
Line drawing of a handbag with internal components and directional arrows indicating movement (no text or symbols)natural_image
Technical line drawing of a mechanical component with an arrow indicating direction (no text or symbols)natural_image
Technical line drawing of a mechanical device with attached electrical outlet (no text or symbols)natural_image
Technical line drawing of a mechanical component with internal features and directional arrows (no text or symbols)natural_image
Line drawing of a handbag with two views showing internal components (no text or symbols)natural_image
Technical line drawing of a mechanical component with an arrow indicating direction (no text or symbols)OPLADNING AF APPARATET
natural_image
Technical line drawing of a mechanical device with a separate sensor or sensor unit (no text or symbols)BRUG OG RENG∅RING AF APPARATET
natural_image
Line drawing of a handheld device with internal components and directional arrows (no text or symbols)natural_image
Line drawing of a handbag with internal components and directional arrows indicating movement (no text or symbols)- Afmonter derefter plastdækslet foran filteret.
natural_image
Technical line drawing of a mechanical component with a conical top and circular base (no text or symbols)natural_image
Technical line drawing of a mechanical device with attached sensor and control panel (no text or symbols)LAITTEEN KÄYTTÖ JA PUHDISTUS
natural_image
Line drawing of a handheld vacuum cleaner with internal components and an arrow indicating motion (no text or symbols)natural_image
Line drawing of a handbag with internal components and directional arrows indicating movement (no text or symbols)natural_image
Technical line drawing of a mechanical component with an arrow indicating direction (no text or symbols)natural_image
Technical line drawing of a mechanical device with attached electrical outlet (no text or symbols)BRUK OG RENGJ∅RING AV APPARATET
natural_image
Line drawing of a handheld device with internal components and directional arrow (no text or symbols)natural_image
Diagram of a handbag being cut with arrows indicating motion (no text or symbols)- Deretter fjerner du plastdekselet foran filteret.
natural_image
Technical line drawing of a mechanical component with an arrow indicating direction (no text or symbols)natural_image
Technical line drawing of a mechanical device with a connected electrical outlet (no text or symbols)ANVÄNDNING OCH RENGÖRING AV APPARATEN
natural_image
Technical line drawing of a mechanical component with internal features and an arrow indicating direction (no text or symbols)natural_image
Line drawing of a handbag with internal components and directional arrows indicating movement (no text or symbols)natural_image
Technical line drawing of a mechanical component with an arrow indicating direction (no text or symbols)- UPORABA IN ČIŠČENJE APARATA
- PAŽNJA:
- VAŽNA UPOZORENJA
- UPORABA I ČIŠĆENJE UREĐAJA
- ZAŠTITA OKOLIŠA
- GARANCIJA I SERVIS
- UPOTREBA I ČIŠĆENJE APARATA
- ŽIVOTNA SREDINA
- ATTENTION:
- GENERAL PRECAUTIONS
- When using the vacuum cleaner always observe the following basic safety precautions:
- SPECIAL WARNING:
- Power cord
- Appliance disposal and the environment
- COMPLIANCE WITH THE EUROPEAN STANDARDS
- CHARGING THE APPLIANCE
- USING AND CLEANING THE APPLIANCE
- ENVIRONMENT
- WARRANTY AND REPAIR
- FOLOSIREA ŞI CURĂȚAREA APARATULUI
- POUŽÍVANIE A ČISTENIE SPOTREBIČA
- OBSŁUGA I CZYSZCZENIE URZĄDZENIA
- OPLADNING AF APPARATET
- BRUG OG RENG∅RING AF APPARATET
- LAITTEEN KÄYTTÖ JA PUHDISTUS
- BRUK OG RENGJ∅RING AV APPARATET
- ANVÄNDNING OCH RENGÖRING AV APPARATEN
Brand : GORENJE
Model : MVC72FW
Category : Vacuum Cleaner