
50B HELIUM - Smartphone ARCHOS - Free user manual and instructions
Find the device manual for free 50B HELIUM ARCHOS in PDF.
| Product type | Smartphone |
| Brand | ARCHOS |
| Model | 50B Helium |
| Operating system | Android™ |
| Screen | Capacitive touch screen |
| Rear camera | Yes, with flash |
| Front camera | Webcam |
| Connectivity | 4G, 3G, 2G, WiFi |
| SIM card type | Micro-SIM for 4G/3G, standard SIM for 2G |
| Expandable storage | microSD memory card |
| Battery | Removable lithium-ion |
| Power supply | USB 5V charger included |
| Box contents | Device, battery, hands-free kit, USB cable, charger, quick start guide, warranty guide |
| Main functions | Calls, SMS, internet browsing, multimedia, Google apps |
| Care and cleaning | Clean with a soft, dry cloth. Do not use chemicals. |
| Safety | Use only approved accessories. Do not expose to water or moisture. |
| Spare parts and repairability | Battery and back cover replaceable. For repair, contact ARCHOS support. |
| General information | User manual available in several languages. Declaration of conformity at www.archos.com. |
Frequently Asked Questions - 50B HELIUM ARCHOS
User questions about 50B HELIUM ARCHOS
0 question about this device. Answer the ones you know or ask your own.
Ask a new question about this device
Download the instructions for your Smartphone in PDF format for free! Find your manual 50B HELIUM - ARCHOS and take your electronic device back in hand. On this page are published all the documents necessary for the use of your device. 50B HELIUM by ARCHOS.
USER MANUAL 50B HELIUM ARCHOS
Description of the phone. 3
Assembling. 6
Getting started. 8
4G & WiFi connection. 10
Google account & Contacts. 12
Hints & tips with AndroidTM 14
Troubleshooting. 16
For more information, please consult the FAQs on www.archos.com. Make sure to read them before considering any product return. As we are often updating and improving our products, your device's software may have a slightly different appearance or modified functionality than presented in this Quick Start Guide.
Consult the declaration of conformity on http://www.archos.com/products/declaration_conformity.html
Package Contents
Check your product box for the following items:
- ARCHOS 50b Helium
- Battery
- Headset
- USB cable
- Charger
- Quick start guide
Warranty Legal & Safety notices
The items supplied with your device and available accessories may vary depending on your region or service provider.
The supplied items are designed only for your device and may not be compatible with other devices.
Unapproved accessories may cause your device to malfunction.
2


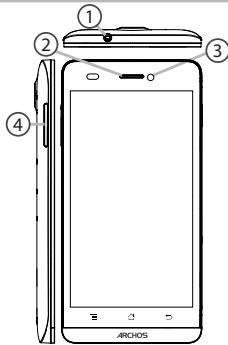
Description of the phone
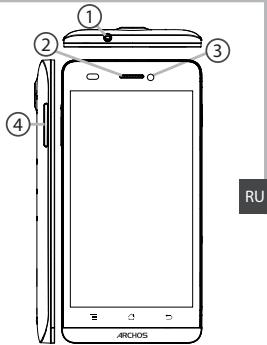
① Headset jack
② Phone speaker
③ Camera
Volume buttons
EN
3
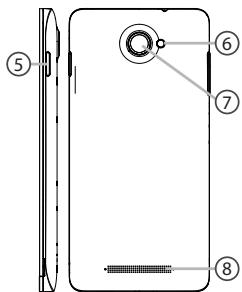
Description of the phone
⑤ ON/OFF button
⑥ Flash light
⑦ Camera
⑧ Loudspeaker
⑨ Micro-USB port
10 Microphone

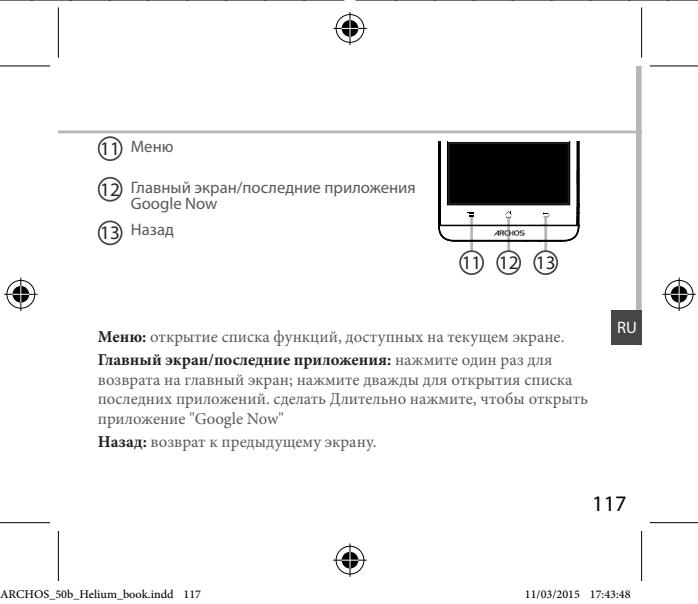
11Menu
12 Home/Recent apps/Google NOW
13 Back
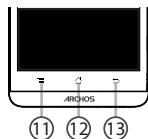
Menu: open the list of options available on the current screen.
Home/Recent apps/Google NOW: short press to return to the Home screen; double press to open the list of recent applications; long press to access Google Now.
Back: return to the previous screen.

EN
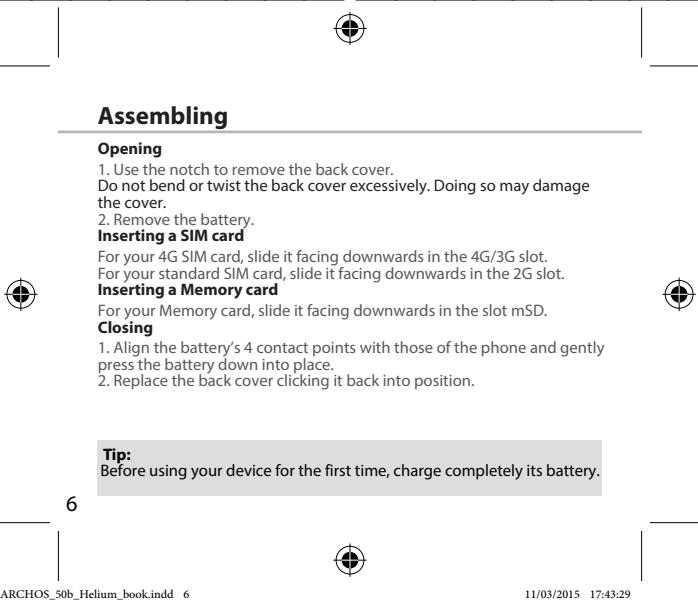
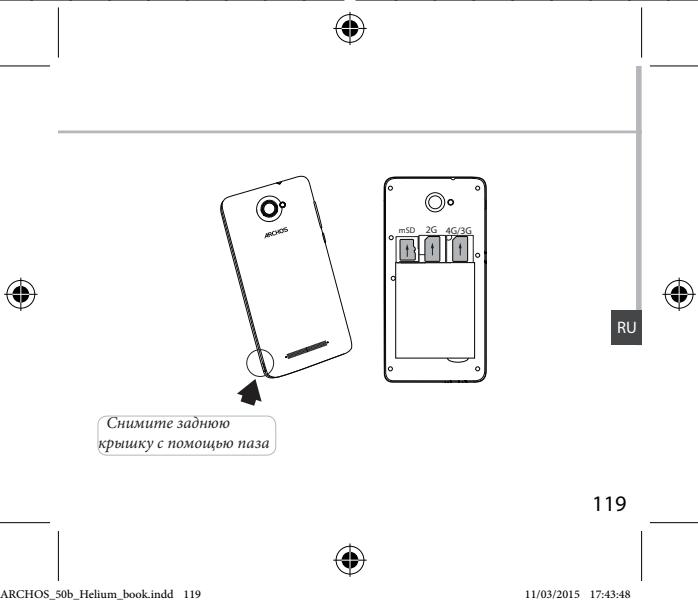
Lift the back cover using the notch


Getting started
Turn ON
- Press and hold the ON/OFF button to turn on the device.
When you turn on your device, a PIN code may be requested. - Type the PIN code supplied with your SIM card.
Beware of typing a wrong PIN code.
3. Select OK
Through the wizard
The first time you start up your ARCHOS, the installation wizard will help you set up your device:
- Language
- Date & time
WiFi connection - Location service options
Turn OFF
To turn off your device, press and hold the ON/OFF button, and then select Power off > OK.
8

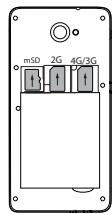
Sound & Notification profiles
- When the device is turned on, press and hold the ON/OFF button.
- Select an option.
Touch screen actions:
Tap: touch once to select or launch a menu, option, or application.
Tap and hold: tap an item and hold it for more than 2 seconds.
Drag: tap an item and move it to a new location.
Double-tap: tap an item twice quickly.
Flick: briskly scroll up, down, left, or right to move through lists or screens.
Pinch in/out: place two of your fingers far apart, and then pinch them together.
Tip:
Your device goes in standby mode when you do not use it for a specified period of time. To wake up your device, press the ON/OFF button. To set the duration, go to Settings > Display > Sleep.


3G & WiFi connection
4G & 3G connection
With your SIM card, you should be connected to the Internet without any further setup. The ARCHOS will only have signal if you are in an area covered by your provider's 4G or 3G network. When connected to the 4G network, the 4G icon is displayed in the status bar.
Activating the mobile data
To be able to access Internet, the mobile data icon must be activated.

- Touch and hold the time & battery icons to reveal the status bar.

- Pull the blue line down to display the status dashboard.

- Touch the status dashboard icon
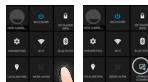
- Touch the mobile data icon to activate it.
Tip:
When you encounter connection problem's, see the FAQs on www.archos.com or contact your 4G network connection provider.

WiFi connection
WARNING: Make sure that you are in a WiFi zone. You can access the WiFi settings quickly from the status bar.
- Touch and hold the time & battery icons to reveal the status bar.
2.Pull the blue line down to display the status dashboard. - Touch the status dashboard icon
- Touch the "Settings" icon to open the settings menu.
- In the "Wireless & networks" section, if the WiFi is off, slide the WiFi switch to the "ON" position. Once the WiFi is on, the ARCHOS will scan for WiFi networks in range.
- Touch "WiFi" to display available networks.
- Touch the name of network you want to connect to.
Private networks are shown with a lock icon and will require you to enter your password.


Google & Contacts
Adding a Google account
A Google account lets you take full advantage of any Google apps and services that you may want to use.
- Go to "Settings" > "Accounts" > "Add account".
- Select the account type "Google" to add.
- Follow the onscreen instructions to enter information about the account. Once the account is created, you can access Play Store, Gmail, Hangouts, Maps and many other apps.
Synchronizing info
Information must be sync to be saved. Your data is backed up on Google servers.
- Go to "Settings" > "Accounts" > "Google".
- Select your account.
The list of information that can be sync are displayed.
Automatic sync should be activated. To launch the sync, press the Menu button, then Sync now. You can get them back in case of loss of your device or SIM card. When your Google account is added to a new device, all your saved information is transferred.
12


Saving your contacts
When your contacts are saved, they are always available on the web and can be syncsed to any Android phone that's set up with your Google account.
- Install the SIM card with your contacts in your phone.
- From a Home or All Apps screen, select the People app
- Touch the Menu button >"Import/Export".
- In Import/export contacts, select "Import from SIM card".
- Select your Google account.
- Check contacts to be imported and validate.
- Once the contacts are imported in the Google account, go to "Settings" > "Accounts"> "Google".
- Select you Google account.
- Select the Menu button, then "Sync now".
Your contacts are saved to via your Google account.

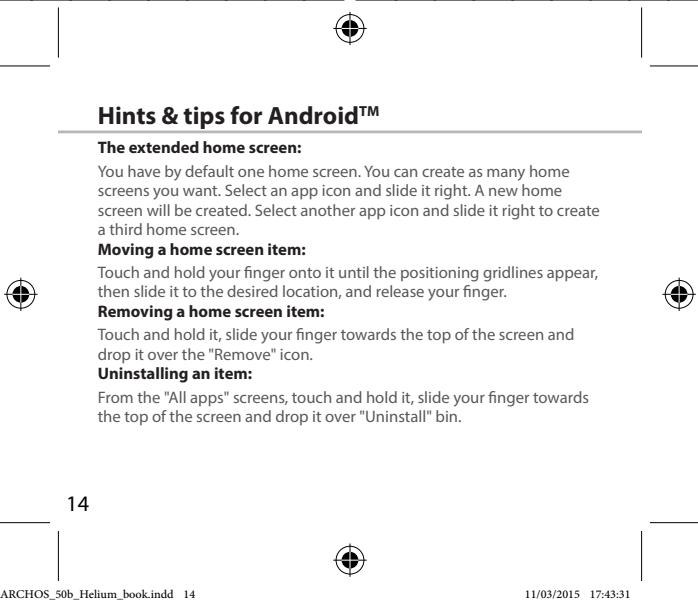
Creating application folders:
Drop one app icon over another on a home screen and the two icons will be combined.
Widgets:
Touch and hold your finger on your home screen. Touch "Widgets".
Changing your wallpaper:
Hold your finger on a home screen at an empty location, then choose from the list.
Locking the touchscreen:
From the quick settings dashboard in the status bar, touch "Settings". In "Settings", scroll down and touch "Security", Touch "Screen lock", Touch the type of lock you would like to use. After you set a lock, a lock screen is displayed whenever your screen wakes up, requesting the pattern, pin or other specified key.


Troubleshooting
My phone is frozen or cannot switch on
Check the battery contacts, remove and reinstall your battery, then turn your phone on. Check the battery power level, charge for at least 20 minutes.
My phone cannot connect to a network or "No service" is displayed
Try connecting in another location. Verify the network coverage with your operator.
Unable to make outgoing calls
Make sure your phone is connected to a network, and the network is not overloaded or unavailable.
Unable to receive incoming calls
Make sure your phone is switched on and connected to a network (check for overloaded or unavailable network).
SIM card PIN locked
Contact your network operator to obtain the PUK code (Personal Unblocking Key).
To configure a new 4G network:
On your device, tap Settings.
Select Wireless & networks > More... > Mobile networks.
Select Network settings. In Network operators, select your operator. In Access Point Names, select the correct access point name and enter the exact connection parameters provided by your 4G provider.
Table des matieres
KOMHOENTbI, BxOAniue B KOMNKeT NCTAbY cTPOIcTBa, INOCTyNB AKECCCyabP MOrTG pA3nWbTaB 3ABZNCIMOTC OT perNoHa INI NOCTaUHcKa YcNT. KOMHOENTbI, BxOAniue B KOMNKeT, npeNaH3aHbI bINCNIOBbAHNA TOLbQ C dAnhblM YCTPOIcTBOM IN MOrTG sbTbHECOBMECTMbIMbC D yDfrryM YCTPOIcTBAMn.
IcnoJIb3OBAHNe AkeccEyaPob, KOTOpBHe He b6JIi pa3peSeHbI K pIIMeHENIO C daHHbIM YCTPOICTBOM, M0KeT pIMBeCTn K eTO HENCPaBHOCTN.
114
Oncanhe yctpoictBa
1Ihe3oJnraRapHmTpyb
2rpoMkoROBopTrnB
③Be6-kamepa
KHOKNIpeyIpOBOKBINpOMKOCTN
Onncanhe yctpoCTBa
⑤ KHONKAKBKIOHEN/HyBKKIOHENH
6
⑦ Kamepa
8rpoMkoROOBopntB
⑨ Flopt micro-USB
10 Minkpofoh


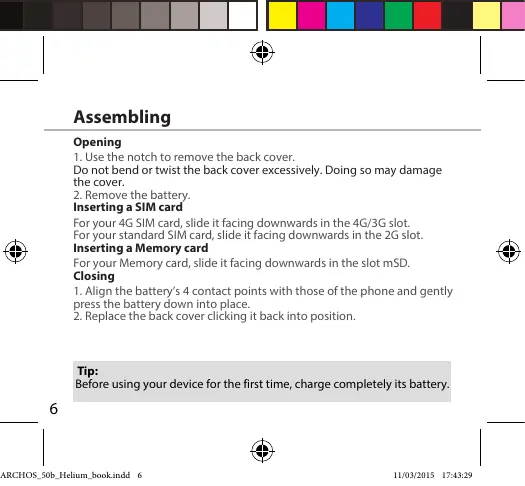
C6opka
OTKpbTne
- CHIMMTE 3aHIOIO KpbIiKy.
He m3n6baine i ne Kcypuivbaire KpbliuK cylniKOM cnIbHo. 3To MOKET pnpBCTe K keoNobekdienho.
2.ИЗВЕКNTe 6aTapeio.
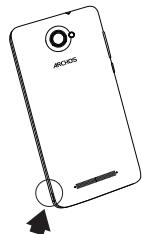
Bctabka SIM-kapt
YtOb6yctAHOBnBt 4G SIM-kapry, BCTaBtte ee liuueboBTo cTPOHOH BnH3 BTH3do 4G/3G.
Tc0b6y tachonobt 2G SIM-Kapty, BCTabte ee eee nuebeB CTOPHO BHN3 BTHe2O 2G. BCTabKa KaptbNaamrTa
BCTabte Kapy namy KOTAKTHOH 6nlaTb HIN3 B rH3e3do mSD. 3aKpbTbe
1.COBmectnte4TOUKNKoHTaKToB aKKymyIaTopa C COOTBeTCTByIOUMM
TOYAKMHI Na TELEFOHOI OCTOPKOHO NaHADBITE Na AKKYMJTROP BHN3, TTO6bI 3A2BNIHYb ERO HA MECTO.
2. Uctahobinte Kpblsky akymyjntopara, Tuk YTObI OHa co uienyKOM CTaHa Ha MECTO.
Iopcka3kn.
PereJnepBbMHCNOB3OBAHEMEyCTPOHTBaONIOHCTbO3a4pAITE akYMMYIANTOP.


Hauano pa60tbI
BkIoueHne
- Haxkmtte uIyderpKbnaite KHOINKY BKNIOCHENH yBkIOCHENH, YTO6bl BKNIOHNTy UCTPOCTHO.
PnBVKIOUeHInyUCTPOICTBaMOXETNOBUTbc3aIPOCHaBBOINDIN-KoJa. - BBeDnTe PIN-ko, npedocTabnembIc SIM-kapToI.
- HaxmTe OK.
MacTep HacTpoKu
He ydaetane noqknoyntb tepeohn He moket K cetn, nH oTo6paKaetane coo6eunene No service (Het cetn)
PnIbtaebyt cTahnohtb coedHneBn BpyrOm MecTe. PnpBoTey be oneopatra HnMaHn NoxpRTHa ceti. PnpBoTey be oneopatra, deMeCTBnEHa nBa aua SIM-Kapra. PnpBoTaBteB bUbpaTb doctYthyo cetb (cetii) brPyuHyo. PnpBoTaBteCytAhyohtb coedHneHnNo3e, eCcn cetb nepepyKha.
He ydaetcBbInonHrTbNcXoJaUne Bbl30Bbl
Y6eHNTcB, YTO TeneoH NOdkIouen K Cetn, IN TO CeTb DOCTynHa IN He nepeRpyKeHa.
He ydaetc npHHMaTb BXOJaIe Bbl3OBbl
U6yIeTbc. 0TO TELOEoHONKIOHOH NIOJKOHOH K cTei (nOPOBebte, NO tCb JocTyHNA H nepeperNyceh).
3a6loKIpOBaH PIN-KoD SIM-KapTbI
ObatitmeBcK O nopotary MPOuHbN BcHn DnnyuHnpu PUK-Koda (Personal Unbocking Key — nepoCahhBnB pabokKnOpouMcuKd)
HactpoKnHOBOcTn3GmN4G
Ha 3Kpahe yCTpoiCTBa KOCHNTecb nyHkTa Settings (HaCTpoiKn).
BuaBePurte Wireless & networks (BeCnPoBDoHna CBaBn cTeN) > More... (BoMbue...)> Mobile networks (MoBInMbHe bTeN).
Bb6epebiyNKT network Settings (Cetteue hactoikno). B p3adeep Network operators (Onetapobtycneti) Bb6epebiy Cb0ero noctaubuca ycnur. B p3adeep Access Point Names (Meha Toekdoctya) npabnHbW BBeDite IMM TOKIN DOCTYNA tNOTHYE napamETpy CoeqmHnHN, pnpOCTABENHbte nocTaubuCA omYCN Tset 4G.


Aids: 1. Edit the text in the text box.
2. Edit the text in the text box.
3. Edit the text in the text box.
4. Edit the text in the text box.
5. Edit the text in the text box.
6. Edit the text in the text box.


jol jolal aayjol baoi gao joi
aegjoo
. 1111111111111111111111111111111111111
JsswUuAaBaaBaaUuUcJuswUgOgOg:
ab > la
gao 1000000000000000000000000000000000000000000
<0000<0000<0000<0000


J
J
aaijll jauw jauw ltaa ool baw .1
.PIN joljI 111111111111111111111111111
.PIN j0j j0j 2
CauallPINjolldoSt
.3
wizard
aillg allusxwJyagj yae aai aai aal gll alssxwJgl ic
aJU
&g
aSswuUdSswuU
gall uuiu cuiu
.

169


4Gdd
olalg uol g 4G 4G 4G 4G 4G 4G 4G 4G 4G 4G 4G 4G 4G 4G 4G 4G 4G 4G 4G 4G 4G 4G 4G 4G 4G 4G 4G 4G 4G 4G 4G 4G 4G 4G
. allllb
aalld aod plad

ygl ciull aod jzuy, cjiyy4s w plsiy
. 1
.1jlll 10g lgl jol 10000000000000000000
1Jssalgagalb0a1.3
aaii jia jia jia jia jia jia jia jia jia 4


4b > 3a
www.archos.com cuiyjgogjgl aaiiwlalwlqy jy, jayl yd ala
. aai jia jui yiy gl,


a.suJU aS.JI & 4G aS.
aLwUd
1 11111111111111111111111111
aJbJ 10
. aIbI bJgJU JgJU g aJbU g aJU Jc dJbU bJdU .1
- 1
B 10
cilllalll ljjjll 1
aSLwUdAeWJgaw,aSLwUdAeWJgaw.5
aaiial kkiw jc wiy aillg ay
. aIaI 100000000000000000000000000000000000
.1gJgJdJgJdAeJgJgJgJgJg
.9gallalglldalalllgulbby,dlgolggolgolgolgolg


y


Google aas no aacall clabail gclalll oolwol oolwll lia
.1
. ^ Google"ulloolg joi1.2
Gmail, jzall aluwrj kow, gll Google wuw cuiy eliy dwl lalai y 3
. 1

lagoljolji
Google aoucuiuocucll bao, lqboollogal joiy
.1wJi 2
LgocjSsGdcloglallao
.ajolj lac aai wll clogall no Stily
jGc Google Cwll 1, clll oiaaiai aaiil gaiil gl aiill
.


slawl &Google
e 1
. 1
. . ka lw \& J ka lJ) aasllglae 3 . ailll o aokj
Google 山 ~ l ~ 山 ~ j ~ 山 .5
.14gLdlgllll220alcllaJ1j
. Google <clulawll <clulawll | | clulawll , , Google
```
bool('hello', 'hello', 'hello', 'hello', 'hello', 'hello', 'hello', 'hello', 'hello', 'hello', 'hello', 'hello', 'hello', 'hello', 'hello', 'hello', 'hello', 'hello', 'hello', 'hello', 'hello', 'hello', 'hello', 'hello', 'hello', 'hello', 'hello', 'hello', 'hello', 'hello', 'hello', 'hello', 'hello', 'hello', 'hell'

173


aaijll aaij
jgl jall aai jll alal lal jy jai jssaal say
:aaaijaiai jia
.aaaiyllolal ldoagall o1g 0jfo
.1goluswai jyll oj yll clalabill aqil l jssw gdo bdo
a 431y jll gl jnall gubill yai
:aaai jia aiai
g j 1000000000000000000000000000000000000000000000
. cleowl
aaiyll aalw jaoaic
a"ddal lall kall gdo yd a calixg uy daiy
.
:aaic
400000000000000000000000000000000000000000000
J 1
Jusyll
:
aolg dbol 3oas aaboll oos aow g sgl gubdi agal jgubdi agal gog y
: widgetsjolc
. widgets ralic jlll g nnll aill l y , "clalll J" aill Ugul
:bllll
.aaalal joo jol a, aayyjll aalw al 0kla bdoa
:

j<alallll jy, allll lgyll jx no gnnnll aaii
joJlsl qIaaw gaww gawll wle, aaswwd awll Jg jil, at
. j, PIN jəj, "JaaU 3gaw" jk algw aJauJ Jaa


[ \Leftrightarrow \frac{1 - k}{x} > \frac{\ln x}{x\left( {1 + u}\right) } - \frac{\ln x}{x\left( {1 + u}\right) }]
ailll jzj zj 0j
jy,aiilll jdyddyddyds ydo ydo ydo ydo ydo ydo ydo ydo ydo ydo ydo
.42220 2j jai y dol jxwll y, aylal l xw sgs
a a y y g a y jy Jy
a aaaa aaaa 2g> g no slll y, y| o k (s y | d y d y
aJbckcJzJd
. aio g jao ai wul 1g , ai wu ilal lail no sll u
alkkjlaaoljdo
.(aio g Jai aJg), aJU Jia g Jao ai jn nn ssll y
aIPIN jao
.PUK joo Jgaww Aww Jaa Jy
4G
jol, jogaoal dlgl lckw < wjoll < ckiwl & slwll 4kwl jol , cldlcyl
aagall cloglaal g aasall gssll abaa jai a, aai jaa jia xia a
.4GdoJJeao Jds Jo Jua
y jg jll 8 gaiall qilqllj y jy jy jy jy jy jy jy jy jy jy jy jy jy jy jy jy jy jy jy jy jy jy jy jy jy jy jy jy jy jy jy jy jy jy jy jy jy
.
![ARCHOS 50B HELIUM - [ \Leftrightarrow \frac{1 - k}{x} > \frac{\ln x}{x\left( {1 + u}\right) } - \frac{\ln x}{x\left( {1 + u}\right) }] - 1](/content/2025/01/87039/images/238be516b961b859e48b38616ee48ca63f58d3d23a4dbac85cc4806fa9b5626b.jpg)
![ARCHOS 50B HELIUM - [ \Leftrightarrow \frac{1 - k}{x} > \frac{\ln x}{x\left( {1 + u}\right) } - \frac{\ln x}{x\left( {1 + u}\right) }] - 2](/content/2025/01/87039/images/722482db56fe12b83cb0d03ff7d5991de069bb5df19d7ebb87ac9200c83ad8e3.jpg)
![ARCHOS 50B HELIUM - [ \Leftrightarrow \frac{1 - k}{x} > \frac{\ln x}{x\left( {1 + u}\right) } - \frac{\ln x}{x\left( {1 + u}\right) }] - 3](/content/2025/01/87039/images/022fc82ce48d7162dc772a703c7d50114446ad17d189d49c650d450f9b2becfe.jpg)
![ARCHOS 50B HELIUM - [ \Leftrightarrow \frac{1 - k}{x} > \frac{\ln x}{x\left( {1 + u}\right) } - \frac{\ln x}{x\left( {1 + u}\right) }] - 4](/content/2025/01/87039/images/a43b0bb8f6517bdde82906bf3aa0b7b5f2cda3c07ec584ef2aac4fc10f88ee96.jpg)
yulqulqulqulqoljoo
OJAL
S111 111 111 111 111 111 111 111 111 111 111 111 111 111 111 111 111 111 111 1

iJlEIOIigjUJIa:JUJIOELJUW:JUOEL
auiA
aaiiaaii aaiiaai iaiiaai iaiiaai iaiiaai iaiiaai
aLd

a00000000000000000119:oo
a-0gJ0JI
JU 10:00
b0
aJJIeJUgJGooJUwO:
ARCHOS
Entertainment your way
U
...
wJg o a Jn 9


Uni-Group

19043
www.uni-grp.com

ArchosEgypt

ArchosEgypt


aull aolal aolb uocgall llllloo aolglblu jx
jL
UoAulgUolalOjioUgbauuUeUaUgUaUaU
jua aooJUoJIOaOaJoojuooaJoooooo
JUeJIeIeIeIeIeIeIeIeIeIeIeIeIeIeIeIeIeIeIeIeIeIeIeIeIeIeIeIeIeIeIeIeIeIeIeIeIeIeIeIeIeIeIeIeIe
:baqJgUulalaiwUusagoooUuogoojaoauiuogugbglg:
auiu uo 100gugooallugjlljao jy jllluej
uullll juiuui ruiuall oio qieo joiil aull uiau uua uua uua
yjg j0 uuguagall a(jo (bdo dlaol) a
00000000000000000000000000000000000000
1000000000000000000000000000000000000000
JgOoIgQyUuUuUuUuUuUuUuUuUuUuUuUuUuUuUuUuUuUuUuUuUuUuUuUuUuUuUuUuUuUuUuUuUuUuUuUuUuUuUuUuUuUuUuUuUuUuUuUuUuUuU
yuljolaljioJlaoiJooJooJogUgOJIoo(aIJIIO)
J 1
UuuaUaUcU
gjll jui jui uuiuuiuuiuuiuuiuuiuuiuuiuuiuuiuuiuuiuuiuuiuuiuuiuuiuuiuuiuuiuuiuuiuuiuuiuuiuuiuuiuuiuuiuuiuuiuuiuuiuuiuuiuuiuuiuuiuuiuuiuuiuuiuuiuuiuuiuuiuuiuuiuuiuuiuui
aaiyjlljnlugicg100raoogaoaia jagcuuilylojjgucuuiyir
info@ntra.gov.eg jgjjlllglpE ojjjllgjlllqjll
jLjwJawu:
()uolgulogulogulgljlaalldjyjauucgagul
oogg 15 (uul uusuul uusu o juiu uuuu uuuu uuuu uuuu uuuu
Jaaolaljai jilqaiuiofo 1
auiugaiuiooJiaydiJIuaIjUjIbuiuIlaiojuoiEulabj/Uno
auiuuljollojgloljg 0d
UoOla
1 1
:JMLWol
auiuuljgolagcugdalljulglqalululoouulll
hao jia auij
.
:ullllullllulllllojio jgluJluuJusE Eoi
aalalalagcoglll 10 10
a auiu uuiu uua uua uua uua uua uua uua
L2oUcJgmou
llo polyll lioofo oaoa oao aoo
.
JUJIJIJIJUJI-JUJIJI-10JUJIWJUgU)UCaJUUGCJUJUJUJI
JU 1j q jq jlg q
oJyUglo-JaJUuJgaiJ-ooioocgogwolrO
LguluUulUulUulUulUulUulUulUulUulUulUulUulUulUulUulUulUulUulUulUulUulUulUulUulUulUulUulUulUulUulUulUulUulUulUulUulUulUulUulUulUulUulUulUulUulUulUulUulUulUulU
aaiiuiuuiuuiuuiuuiuuiuuiuuiuuiuuiuuiuuiuui
.8golrrnai gaauiuia 29g 0 uullglu


Open Source Software Offer
The software bundled with this product includes software files subject to certain open source license requirements. Such open source software files are subject solely to the terms of the relevant open source software license. Such open source software is provided on an "AS IS" basis to the maximum extent permitted by applicable law.
For the open source files contained herein, please access "Open source license" section located at: Settings\About phone\Legal information on the device for the relevant copyright and licensing terms. You may obtain a copy of Apache License, Version 2.0 at http://www.apache.org/licenses/License-2.0. You may also obtain a copy of GNU General Public License, Version 2 at the Free Software Foundation, INC, 51 Franklin Street, Fifth Floor, Boston, MA 02110-1301, USA.
Until the date that is three years after our last shipment of this product, you may obtain a copy of the source code corresponding to the binaries for any GPL-Licensed file by contacting ARCHOS customer service at http://www.archos.com and ARCHOS will send you a link to such source code or will provide instructions to get the source on a physical medium.
This offer is valid to anyone in receipt of this information.
National restrictions
This device is intended for home and office use in all EU countries (and other countries following the EU directive 1999/5/EC) without any limitation except for the countries mentioned below:
Country
Restriction
ReasonRemark
Bulgaria
None
General authorization required for outdoor use and public service
France
Outdoor use
Military Radiolocation use. Refarming of the 2.4 GHz band has been ongoing in recent years to allow current relaxed regulation. Ful implementation planned 2012
Italy
None
If used outside of own premises, general authorization is required.
Luxembourg
None
General authorization required for network and service supply (not for spectrum)

Norway Implemented This subsection does not apply for the geographical aera within a radius of 20km from the centre of Ny-Alesund
Russian None Only for indoor applications Federation
Note: Frequency 2454-2483.5MHZ are restricted to indoor use in France.
Consult the declaration of conformity on http://www.archos.com/products/ declaration_conformity.html
SAR
After the laboratory measurement, this mobile phone SAR value is:
Max Head SAR: 0.395 Max Body SAR: 0.711
Archos company declares that this device is in compliance with the essential
requirements and other relevant provisions of Directive 1999/5/EC
€0700
- Package Contents
- Description of the phone
- Getting started
- Turn ON
- Through the wizard
- Turn OFF
- Sound & Notification profiles
- Touch screen actions:
- Tip:
- 3G & WiFi connection
- 4G & 3G connection
- Activating the mobile data
- WiFi connection
- Google & Contacts
- Adding a Google account
- Synchronizing info
- Saving your contacts
- Creating application folders:
- Widgets:
- Changing your wallpaper:
- Locking the touchscreen:
- Troubleshooting
- My phone is frozen or cannot switch on
- My phone cannot connect to a network or "No service" is displayed
- Unable to make outgoing calls
- Unable to receive incoming calls
- SIM card PIN locked
- To configure a new 4G network:
- Table des matieres
- Oncanhe yctpoictBa
- Onncanhe yctpoCTBa
- C6opka
- OTKpbTne
- Bctabka SIM-kapt
- Iopcka3kn.
- Hauano pa60tbI
- BkIoueHne
- MacTep HacTpoKu
- He ydaetane noqknoyntb tepeohn He moket K cetn, nH oTo6paKaetane coo6eunene No service (Het cetn)
- He ydaetcBbInonHrTbNcXoJaUne Bbl30Bbl
- He ydaetc npHHMaTb BXOJaIe Bbl3OBbl
- 3a6loKIpOBaH PIN-KoD SIM-KapTbI
- HactpoKnHOBOcTn3GmN4G
- J
- a.suJU aS.JI & 4G aS.
- Google LLL
- lagoljolji
- slawl &Google
- Jusyll
- [ \Leftrightarrow \frac{1 - k}{x} > \frac{\ln x}{x\left( {1 + u}\right) } - \frac{\ln x}{x\left( {1 + u}\right) }]
- yulqulqulqulqoljoo
- ARCHOS
- UoOla
- Open Source Software Offer
- National restrictions
- SAR
Brand : ARCHOS
Model : 50B HELIUM
Category : Smartphone