
TRIO I-MOVE TOP, TRIO I-MOVE - Strollers and travel systems CHICCO - Free user manual and instructions
Find the device manual for free TRIO I-MOVE TOP, TRIO I-MOVE CHICCO in PDF.
| Product type | Stroller and travel system |
| Brand | CHICCO |
| Model | TRIO I-MOVE TOP / TRIO I-MOVE |
| Recommended age | 0 to 36 months |
| Maximum child weight | 15 kg |
| Basket capacity | 2 kg maximum |
| Materials | Removable fabric, plastic and metal parts |
| Front wheels | Swivel with lock (swivel/fixed) |
| Parking brake | On the handle, rotating lever with red/green indicators |
| Restraint system | 5-point harness with harness covers |
| Backrest adjustment | Reclining with button on backrest |
| Footrest adjustment | Side buttons, can be raised without button |
| Handlebar adjustment | Adjustable height with side levers |
| Configuration | Forward facing or parent facing (seat rotation or handlebar reversibility) |
| Compatible with carry cot/car seat | I-MOVE carry cot and car seat (only) |
| Opening/closing | Compact mechanism with lever and triggers |
| Included accessories | Convertible canopy, comfort kit, rain cover, footmuff, basket, diaper bag (depending on version) |
| Maintenance | Hand wash with cold water, no chlorine, no tumble drying, no ironing, no dry cleaning; lubricate moving parts with silicone oil |
| Safety | Do not leave unattended, apply brake every time you stop, do not overload, do not use unauthorized accessories |
| Spare parts | Use only approved CHICCO accessories and parts |
Frequently Asked Questions - TRIO I-MOVE TOP, TRIO I-MOVE CHICCO
User questions about TRIO I-MOVE TOP, TRIO I-MOVE CHICCO
0 question about this device. Answer the ones you know or ask your own.
Ask a new question about this device
Download the instructions for your Strollers and travel systems in PDF format for free! Find your manual TRIO I-MOVE TOP, TRIO I-MOVE - CHICCO and take your electronic device back in hand. On this page are published all the documents necessary for the use of your device. TRIO I-MOVE TOP, TRIO I-MOVE by CHICCO.
USER MANUAL TRIO I-MOVE TOP, TRIO I-MOVE CHICCO
natural_image
Illustration of a baby stroller with blue outline and black frame, no text or symbols present• ISTRUZIONI D'USO
• MODE D'EMPLOI
• GEBRAUCHSANLEITUNG
• INSTRUCTIONS FOR USE
• INSTRUCCIONES DE USO
• INSTRUÇÕES PARA A UTILIZAÇÃO
• GEBRUIKSAANWIJZINGEN
• ANVÄNDNINGSINSTRUKTIONER
• NÁVOD K POUŽITÍ
• INSTRUKCJE SPOSOBU UŻYCIA
• ΟΔΗΓΙΕΣ ΧΡΗΣΗΣ
• KULLANIM BİLGİLERİ
• ИНСТРУКЦИЯ ПО ЭКСПЛУАТАЦИИ
• УПЪТВАНЕ ЗА ПОТРЕБИТЕЛЯ
cdotims الاستعمال

IMPORTANTE: CONSERVARLO PER OGNI RIFERIMENTO FUTURO – LEGGERE ATTENTAMENTE
F IMPORTANT: LE CONSERVER EN VUE D'UNE EVENTUELLE CONSULTATION FUTURE – LIRE ATTENTIVEMENT
D WICHTIG: FÜR ZUKÜNFTIGES
NACHSCHLAGEN AUFBEWAHREN-BITTE
DIESE GEBRAUCHSANLEITUNG SORGFÄLTIG
LESEN
GB IMPORTANT: KEEP FOR FUTURE REFERENCE - READ CAREFULLY
E IMPORTANTE: CONSERVELO PARA FUTURAS CONSULTAS. – LEA ATENTAMENTE
P IMPORTANTE: CONSERVE-O PARA CONSULTAS FUTURAS – LEIA ATENTAMENTE
NL BELANGRIJK: VOOR LATERE RAADPLEGING BEWAREN – LEES DEZE GEBRUIKSAANWIJZINGEN
S VIKTIGT: SPARA FÖR FRAMTIDA BRUK – LÄS NOGGRANT
DÜLEŽITÉ: USCHOVESTE PRO PŘÍPADNÉ DALŠÍ POUŽITÍ – POZORNĚ SI PŘEČTĚTE!
PL WAŻNE: ZACHOWAĆ NA PRZYSZL·OŚĆ - PRZECZYTAĆ UWAŻNIE
GR ΣΗΜΑΝΤΙΚΟ: ΚΡΑΤΗΣΤΕ ΤΙΣ ΟΔΗΓΙΕΣ ΓΙΑ ΝΑ ΤΙΣ ΣΥΜΒΟΥΛΕΥΕΣΤΕ ΣΤΟ ΜΕΛΛΟΝ - ΠΡΟΥΤΙΤΕ ΒΝΙΜΑΤΕЛЬНО
TR ÖNEMLİ: ILERDE REFERANS OLMAK ÜZERE SAKLAYINIZ - DIKKATLICE OKUYUNUZ
RUS ОЧЕНЬ ВАЖНО: СОХРАНИТЕ ДЛЯ ПОСЛЕДУЮЩИХ КОНСУЛЬТАЦИЙ - ДІАВ'AЗТЕ ПРОЗЕХТІКА
BG ВАЖНО: СЪХРАНЯВАЙТЕ НА УДОБНО МЯСТО И ПРЕПРОЧИТАЙТЕ ПРИ НЕОБХОДИМОСТ.
natural_image
Mechanical linkage diagram showing a curved arm and base with a red arrow indicating rotation (no text or symbols)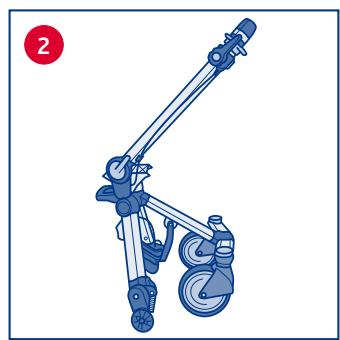
natural_image
Illustration of a mechanical device with articulated arms and wheels (no text or symbols)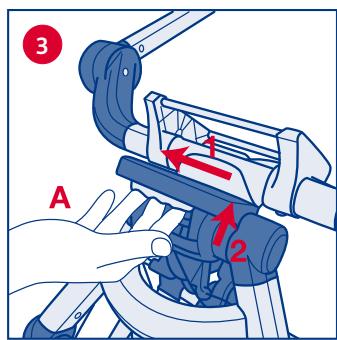

natural_image
Illustration of a hand using a bicycle lift to lift a wheel, with a red curved arrow indicating rotation (no text or symbols)
natural_image
Illustration of a hand adjusting a blue belt buckle with a red arrow indicating the adjustment (no text or symbols present)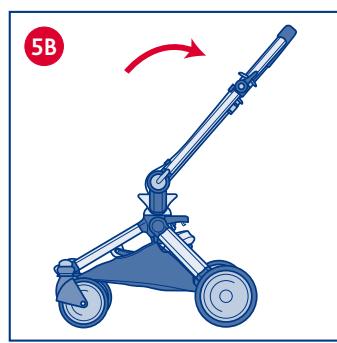
natural_image
Illustration of a blue wheeled cart with wheels and a red arrow indicating rotation (no text or symbols)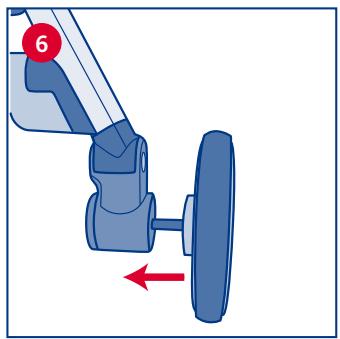
natural_image
Diagram of a blue industrial machine with a red directional arrow indicating motion (no text or symbols)
natural_image
Illustration of hands operating a car brake system with a wheel and gear (no text or symbols)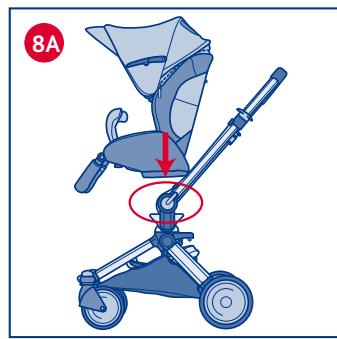
natural_image
Illustration of a baby stroller with a highlighted seat and arrow indicating rotation (no text or symbols)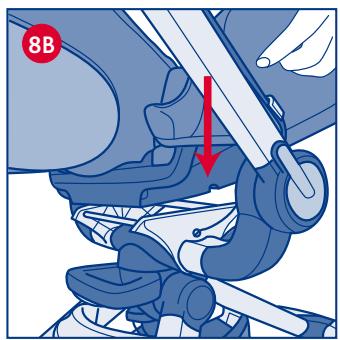
natural_image
Illustration of a car seatbelt with no text or symbols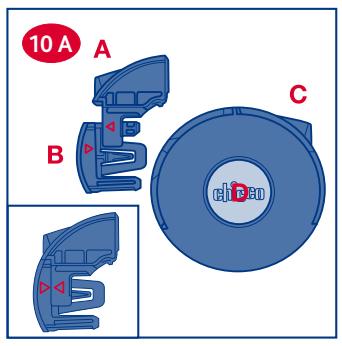
natural_image
Mechanical assembly diagram showing a blue clamp with red adjustment arrows (no text or symbols)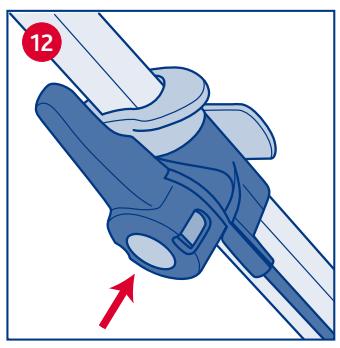
natural_image
Diagram of a blue mechanical clamp or connector with a red arrow indicating direction (no text or symbols)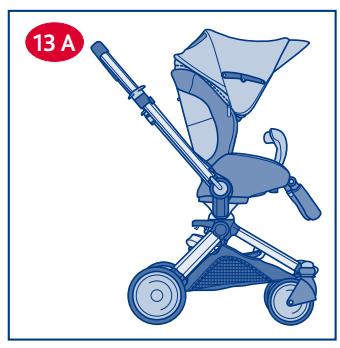
natural_image
Illustration of a baby stroller with a red circular badge labeled '13 A' (no text or symbols on the device itself)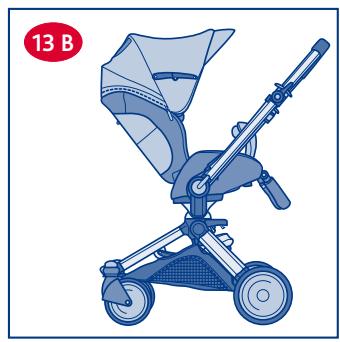
natural_image
Illustration of a baby stroller with a red circular badge labeled '13 B' (no text or symbols on the device itself)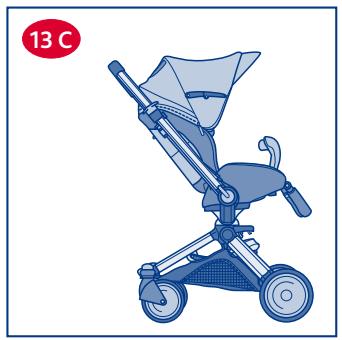
natural_image
Illustration of a baby stroller with a 13°C label (no text or symbols on the device itself)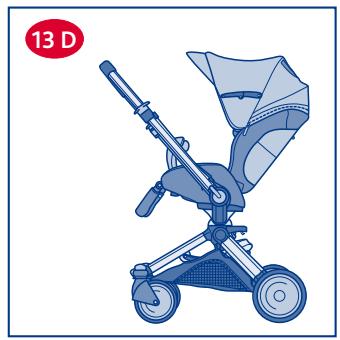
natural_image
Illustration of a baby stroller with a red circular badge labeled '13 D' (no text or symbols on the device itself)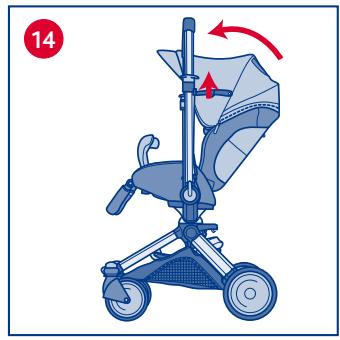
natural_image
Illustration of a baby stroller with a red arrow indicating rotation (no text or symbols)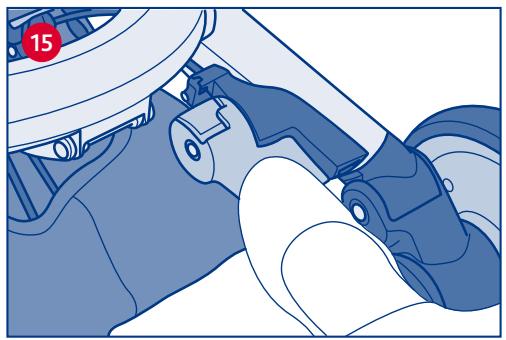
natural_image
Mechanical assembly diagram showing a car wheel and foot assembly (no text or symbols)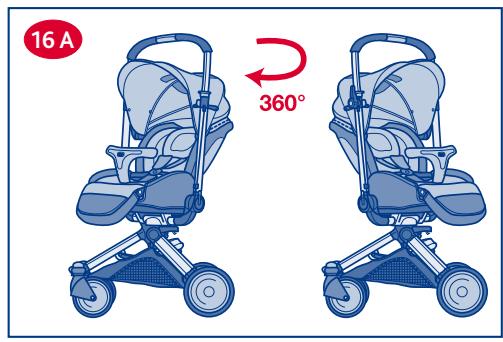
natural_image
Illustration of a baby stroller with a curved arrow indicating rotation (no text or symbols)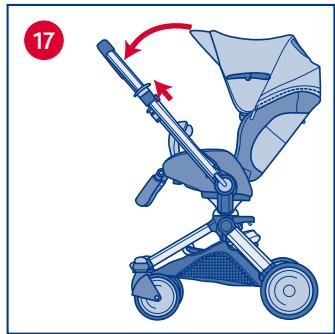
natural_image
Illustration of a baby stroller with a red arrow indicating motion (no text or symbols)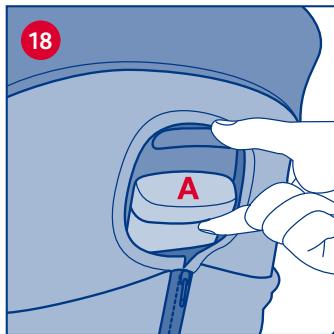
natural_image
Illustration of a baby stroller with a red circle highlighting the seat area (no text or symbols present)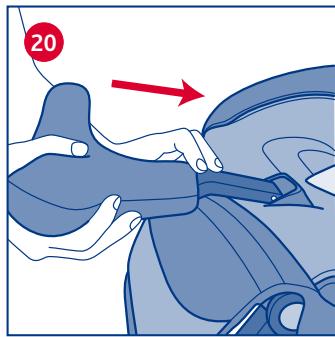
natural_image
Illustration of a person adjusting a seatbelt with a red arrow indicating motion (no text or symbols)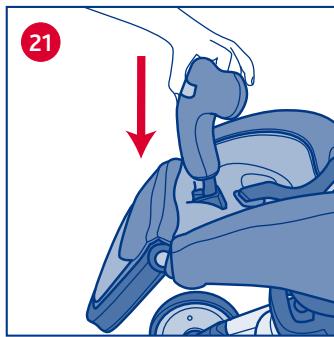
natural_image
Illustration of a hand adjusting a small car seatbelt with a red arrow indicating motion (no text or symbols)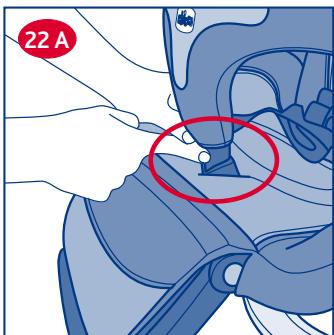
natural_image
Illustration of a hand holding a blue mechanical device with a red double-headed arrow indicating motion (no text or symbols)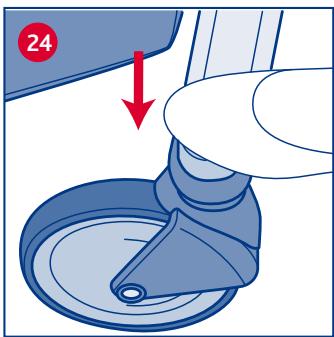
natural_image
Illustration of a mechanical component with a red arrow indicating direction, no text or symbols present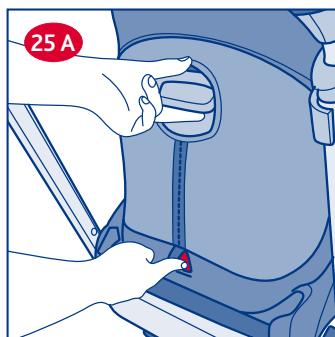
natural_image
Illustration of a robotic device with a hand adjusting its grip, showing no text or symbols.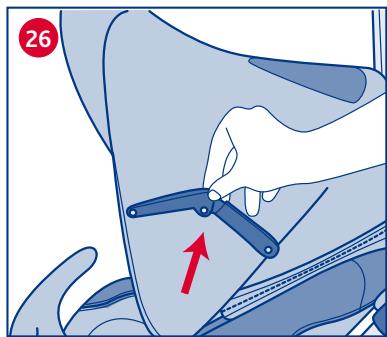
natural_image
Illustration of a baby stroller with a red arrow indicating motion (no text or symbols)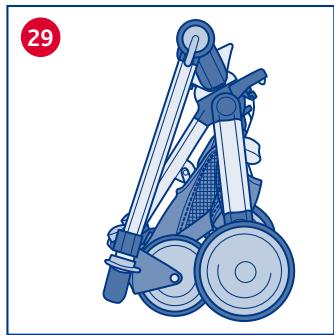
natural_image
Illustration of a mechanical device with wheels and a handle, no text or symbols present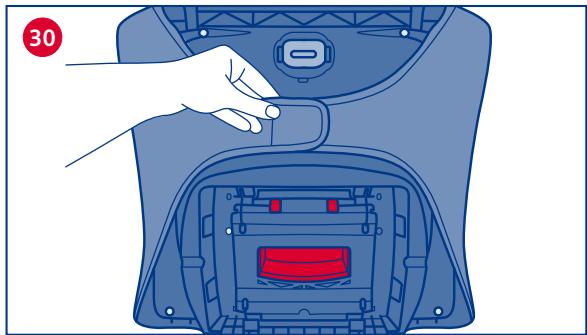
natural_image
Illustration of a hand pressing down on a blue backpack with internal compartments and a red cover (no text or symbols)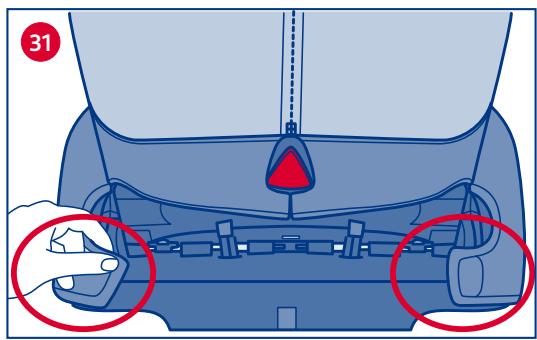
natural_image
Illustration of a hand adjusting a blue seatbelt, no text or symbols present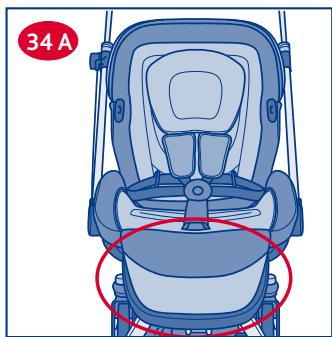
natural_image
Top-down diagram of a baby stroller seat with red circles highlighting the seat area (no text or symbols)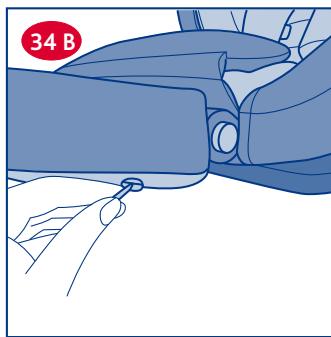
natural_image
Illustration of a car seatbelt being adjusted for a hand, with no text or symbols present.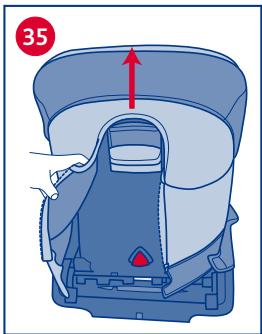
natural_image
Diagram of a car seat assembly with a red arrow indicating upward motion (no text or symbols)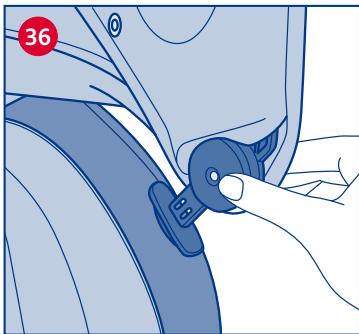
natural_image
Illustration of a hand adjusting a blue belt buckle (no text or symbols present)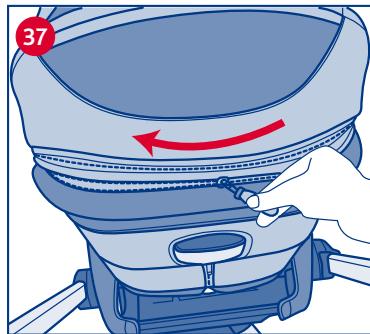
natural_image
Illustration of a hand inserting a zipper into a blue bag with a red arrow indicating motion (no text or symbols)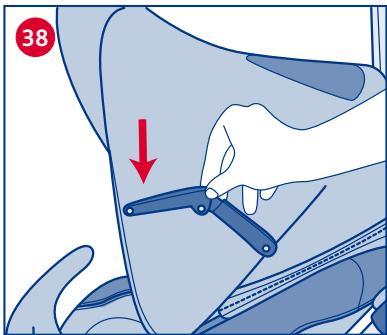
natural_image
Illustration of a hand adjusting a seatbelt inside a vehicle (no text or symbols visible)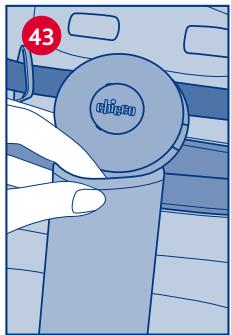
natural_image
Illustration of a hand holding a circular object labeled 'citizen' with a red circle marker showing number 43 (no text or symbols on the object itself)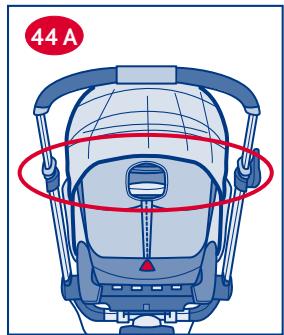
natural_image
Line drawing of a baby stroller with wheels and seat, no text or symbols present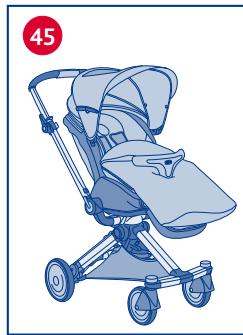
natural_image
Illustration of a baby stroller with a red circular badge showing number 45 (no text or symbols on the device itself)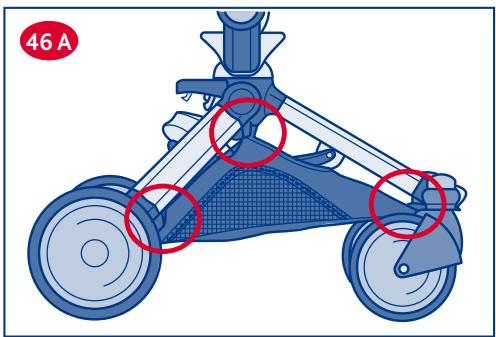
natural_image
Illustration of a hand using a tool to adjust or install a mechanical component (no text or symbols visible)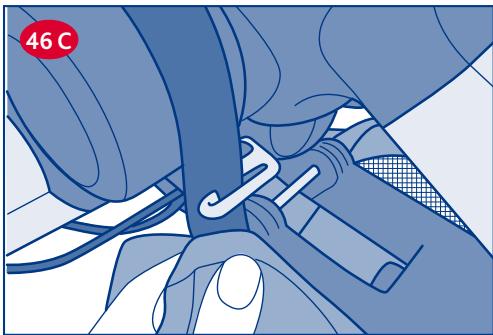
natural_image
Illustration of a hand adjusting a car seatbelt with a 46°C label (no text or symbols on the diagram itself)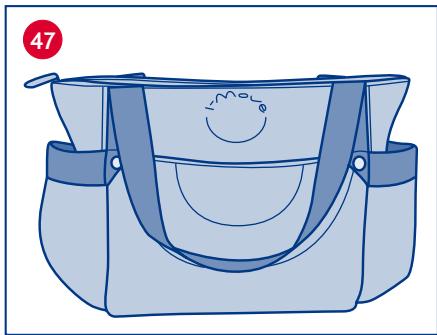
natural_image
Illustration of a light blue handbag with a smiley face design and straps, no text or symbols present.
AVVISO IMPORTANTE
IMPORTANTE: PRIMA DELL'USO LEGGE-RE ATTENTAMENTE QUESTO LIBRETTO D'ISTRUZIONI PER EVITARE PERICOLI NELL'UTILIZZO E CONSERVARLO PER OGNI FUTURO RIFERIMENTO. LA SICUREZZA DEL BAMBINO POTREBBE VENIR MENO SE NON SEGUI QUESTE ISTRUZIONI.
ATTENZIONE: PRIMA DELL'USO RIMUOVERE ED ELIMINARE EVENTUALI SACCHETTI DI PLASTICA E TUTTI GLI ELEMENTI FACENTI PARTE DELLA CONFEZIONE DEL PRODOTTO O COMUNQUE TENERLI LONTANI DALLA PORTATA DEI BAMBINI.
AVVERTENZE
REPOSE-JAMBES/REPOSE-PIEDS
ARTSANA Germany GmbH
Borsigstr. 1-3
63128 Dietzenbach
Telefon: 01 805 - 780 005
www.chicco.com
IMPORTANT: READ THESE INSTRUCTIONS CAREFULLY BEFORE USE AND KEEP
THEM FOR FUTURE REFERENCE.
YOUR CHILD'S SAFETY MAY BE AFFECTED IF YOU DO NOT FOLLOW THESE INSTRUCTIONS.
WARNING: BEFORE USE, REMOVE AND DISPOSE OF ALL PLASTIC BAGS AND PACKAGING MATERIALS AND KEEP THEM OUT OF REACH OF CHILDREN.
WARNINGS
- WARNING: A CHILD'S SAFETY IS YOUR RESPONSIBILITY.
- WARNING: children should be harnessed in at all times and should never be left unattended
- WARNING: keep children away from all moving parts whilst you adjust the stroller.
- WARNING: The child should be clear of moving parts while making adjustments.
- This vehicle requires regular maintenance by the user
• Overloading, incorrect folding and the use of non-approved accessories may damage or break this vehicle. - WARNING: It may be dangerous to leave your child unattended
- WARNING: before assembly, check that neither the product nor any of its components have been damaged during transportation; if this is the case, do not use the product and keep it out of the reach of children.
- This stroller is intended for use for children aged between 0 and 36 months, weighing up to a maximum of 15 kg.
- When used for children from 0 to 6 months of age, the backrest must be reclined as flat as possible.
- WARNING: Ensure that all locking devices are engaged before use. In particular, ensure that the Stroller is locked in the open position.
- Do not overload the basket with
weights of over 2 kg.
- Do not carry more than one child at a time inside the seat.
- WARNING: it may be unsafe to use replacement parts other than those supplied or approved by the manufacturer or distributor.
- WARNING: it may be unsafe to use accessories, e.g. child seats, bag hooks, rain covers etc. other than those supplied or approved by the manufacturer or distributor.
- WARNING: any load attached to the handle affects the stability of the pram / pushchair.
- WARNING: the use of the crotch strap and safety harness is necessary to guarantee the safety of your child. Always use the crotch strap in combination with the waist belt
- Ensure that the persons using the stroller know how to use it safely and how it works.
- WARNING: To avoid injury ensure that your child is kept away when unfolding and folding this product.
- Do not attempt to open or close the stroller with a child sitting in it. When adjusting the stroller, make sure that no moving parts come into contact with your child.
• Always apply the brakes whenever the stroller is stationary. - WARNING: never leave the stroller on a sloping surface with a child inside, even with the brakes applied.
- WARNING: Do not let your child play with this product.
- To avoid all risks of strangulation, never give children objects with cords or strings attached, or leave them within their reach.
- WARNING: never use the stroller on staircases or escalators: you could suddenly lose control of it. Always pay attention when going up and down steps or pavements.
- If the stroller is left exposed to direct sun light for a long time, allow it to cool down before placing your child in-
side. Prolonged exposure to direct sun light may cause the colour of the materials and fabric to fade.
- Do not use the product if any parts are broken, torn or missing.
- WARNING: Check that the pram body or seat unit attachment devices are correctly engaged before use
- WARNING: when it is not being used, the stroller should be kept out of children's reach.
- WARNING: This product is not suitable for running or skating
- Prevent the stroller from coming into contact with salt water. It may cause the formation of rust and corrosion.
- Do not use the stroller on the beach.
- WARNING: this product must only be used by an adult.
TIPS FOR CLEANING AND MAINTENANCE
This product requires periodic maintenance. The cleaning and maintenance operations must only be carried out by an adult.
CLEANING
The stroller has a removable lining (please refer to the "Removable lining" section). Please refer to the care label for instructions on cleaning the fabric parts. Please find below the washing symbols and relative meanings:

Hand wash in cold water

Do not bleach

Do not tumble dry

Do not iron

Do not dry clean
Use a soft cloth to clean the plastic parts on a regular basis. Always dry any metal parts that come into contact with water to prevent the formation of rust.
MAINTENANCE
Lubricate the moving parts, if necessary, with a dry silicon oil. Periodically check the condition of the wheels and keep them clean of dust, dirt and sand. Make sure all plastic parts that slide along the metal tubes are clean and free from dust, dirt and sand; this will avoid friction that may prevent the stroller from working properly. Keep the stroller in a dry place.
WARNING: when opening the stroller, make sure that your child and all other children are at a safe distance. Ensure that during these operations the moving parts of the stroller do not come into contact with your child.
- Raise the handlebar until it locks in place (diag. 1).
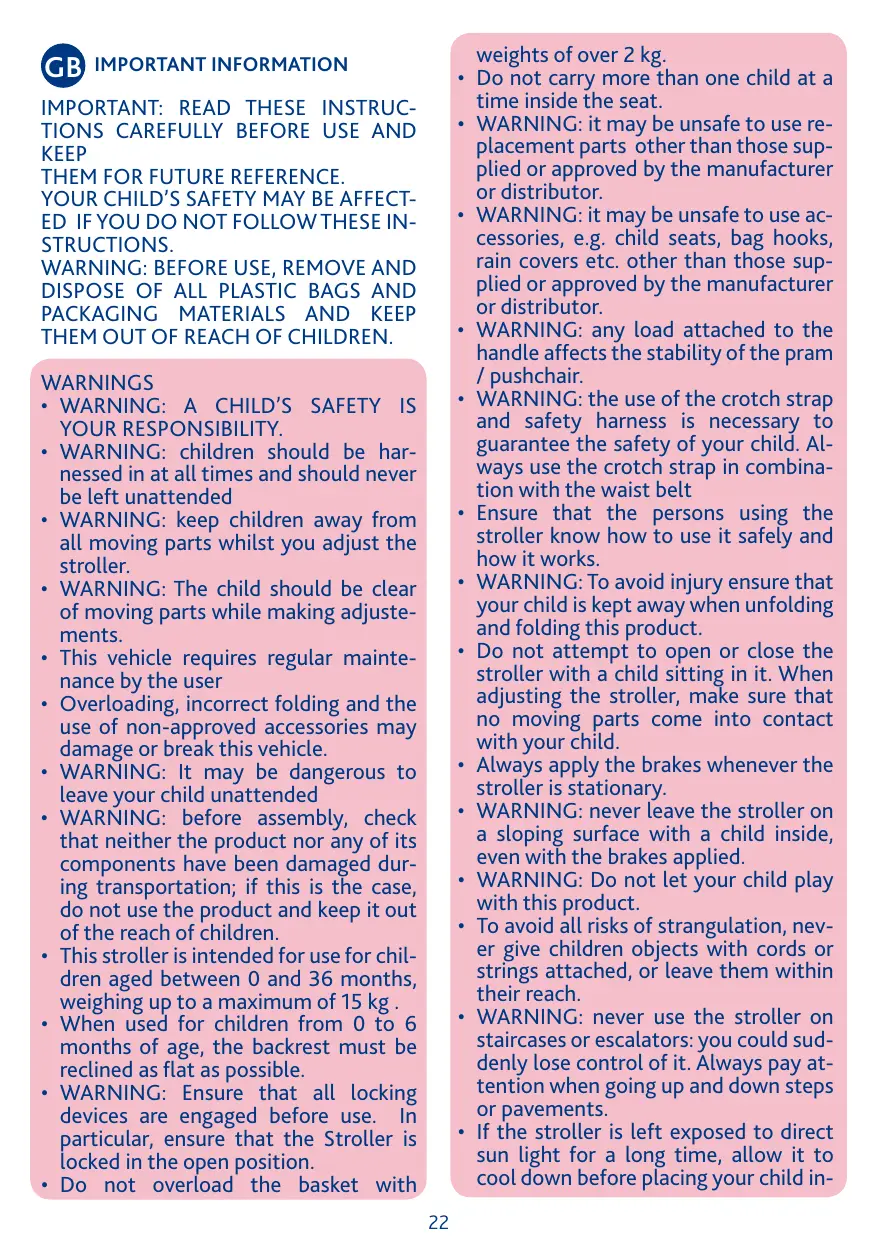
- Lift the frame until it reaches the position illustrated in Diagram 2.
- Press the open/close lever (A) following the instructions below: move it to the left (1) and then upwards (2) as seen in diagram 3.
- Push the rear leg outwards until it reaches the lock position (diagram 4).
WARNING: make sure the Stroller is locked in the open position. - Release the snap-clasps on the handle (diagram 5A) and move the handlebar to the position illustrated in diagram 5B.
FITTING AND REMOVING THE WHEELS
- Insert the wheel pin into the hole on the rear leg tube, as illustrated in diagram 6. Repeat the operation for both wheels.
- The rear wheels can be removed. Press the button in the centre of the wheel and slide it off the pin (diagram 7).
FITTING THE SEAT
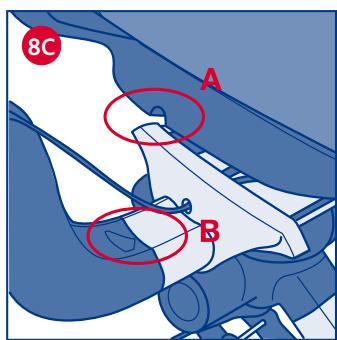
- To assemble the seat onto the stroller frame, grasp both sides of the seat with two hands and connect the base to the frame (diagrams 8A and 8B) so that the groove on the seat (A) is aligned with the arrows on the frame (B) (diagram 8C). Adjust the position of the seat until it clicks securely into place.
SAFETY HARNESS
The stroller comes with a five-point safety harness which consists in two shoulder straps, a lap belt and a crotch strap with a buckle.
WARNING: always use the shoulder strap when carrying children from 0 to 6 months of age.
-
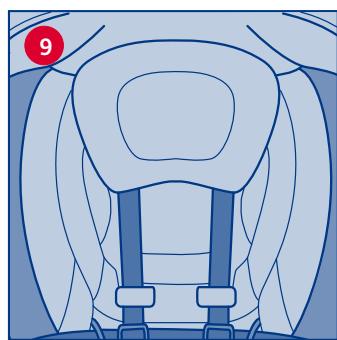
Thread the safety clasps through the fabric loops (diag. 9) and check that the shoulder straps are fitted at the right height for the child: if this is not the case, adjust the height as necessary.
-
Bring the upper harness strap clasp (A) in line with the triangle on the lap belt clasp (B) (Diagram 10) and then insert them both in the harness buckle (C). Slide the harness straps along the plastic rings until they are tight enough. Press the centre button (D) to release the safety harness straps.
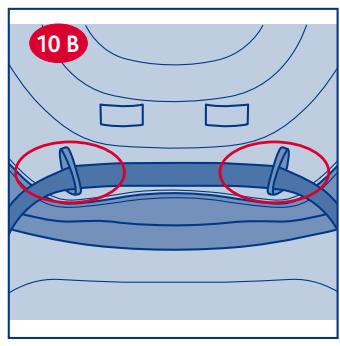
For extra safety, the stroller is fitted with D-rings which can be used to fit a separate safety harness, compliant with BS 6684 Standards. The rings are fitted internally on the right and left side of the stroller seat (diag. 10B).
WARNING: the safety harness must always be fastened to guarantee complete safety for your child.
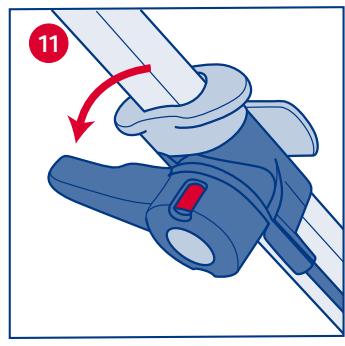
PARKING BRAKE
The parking brake control lever is fitted on the stroller handlebar,
-
To activate the brake, turn the lever counter clockwise until it locks in place, and the red brake ON indicator is visible. The braking device is now fully operational (Diagram 11).
-
To release the brakes, press the central button on the lever (diagram 12). The green brake OFF indicator will now be visible.
WARNING: Always apply the brakes whenever the stroller is stationary. Never leave the stroller on a sloping surface with a child inside, even with the parking brake ON.
USER MODES
- The stroller can be used in either parent-facing or front-facing mode.
The stroller can be switched from one user mode to another by:
- rotating the seat (diag. 13A front-facing, diag. 13B parent-facing)
- inverting the handlebar (diag. 13C front-facing, diag. 13D parent-facing)
ROTATING THE SEAT
WARNING: When performing the operations illustrated below, always place the stroller on a flat even surface and remove any weights attached to the handlebar to avoid compromising its stability.
To switch from parent-facing mode to front-facing mode, or vice-versa, apply the brakes and proceed as follows:
-
Release both snap-clasps on the handle simultaneously, and move the hand grip section upwards, as seen in diagram 14.
-
Use your foot to release the rotation lock pedal as seen in diagram 15.
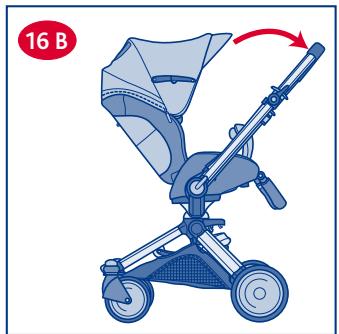
-
The seat can now be rotated in either direction (diag. 16A). Select the user mode (parent-facing or front-facing) and pull the handlebar back towards you (diagram 16B).
INVERTING THE HANDLEBAR
The user mode can also be switched by simply inverting the handlebar.
WARNING: remove all weights attached to the handlebar.
Apply the stroller brake and proceed as follows:
- Release both snap-clasps on the handle and move the hand grip section to the opposite side until it locks in place (diagram 17).
WARNING: when the stroller is used in this user mode, the swivel wheel option must be blocked (see "swivel wheels" paragraph)
WARNING: the stroller may become slightly less easy to manoeuvre when used in this mode.
RECLINING THE BACKREST
- Pull the button (A) on the stroller backrest to recline it to the position you need (diagram 18). Release the button and the backrest will click into the closest lock position. Simply push the backrest upwards to raise it again.
WARNING: these operations can become more difficult when the child is sat in the seat.
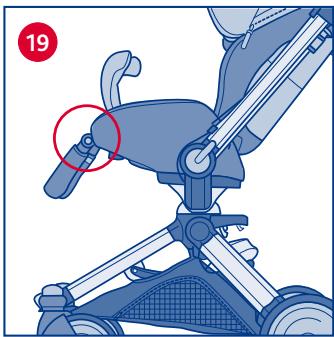
LEG-REST / FOOT-REST
The stroller is fitted with a practical adjustable leg-rest/foot-rest.
- To adjust the leg-rest/foot-rest, use the two buttons located on each side of the leg-rest, as indicated in diagram 19, until you find the right position. It is not necessary to press the buttons to raise the leg-rest/foot-rest again.
BUMPER BAR
-
To assemble the bumper bar, slide the side pins into the slots and push them all the way in (diagram 20).
-
Rotate the bumper bar to an upright position and press it downwards until you hear it click into place (diag. 21).
-
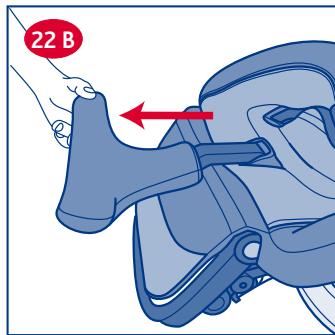
To remove the bumper bar, press the button indicated in diagram 22A and pull it upwards. Then pull the bumper bar into a horizontal position.
This position can be used to make it easier to place the baby inside the stroller.
To remove the bumper bar completely, pull it until it slides out of the slots on the seat (diag. 22B).
WARNING: Always restrain the child using the safety harness. The bumper bar is NOT a child restraint device.
WARNING: never use the bumper bar to lift the stroller up.
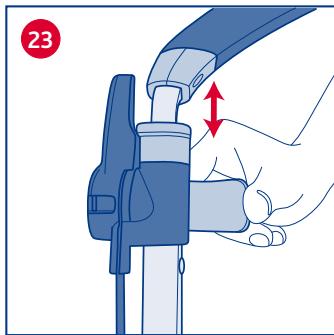
HAND GRIP
The hand grip can be adjusted in height.
- Release the adjuster levers on the sides of the hand grip, as seen in diagram 23, and adjust the handlebar to the desired height. Lock the adjuster levers in place.
SWIVEL WHEELS
The stroller has swivel/fixed front wheels. It is recommended to use the fixed wheels on particularly uneven ground. It is recommended to use the swivel wheels on normal road surfaces as it makes it easier to manoeuvre.
- To switch the front wheels to swivel mode, press the front button with your foot, as seen in diagram 24. To switch back to fixed mode, press the same button again with your foot. Whatever the current position of the wheel, it will lock in a straight position.
WARNING: Both wheels must be locked or unlocked at the same time.
WARNING: When using the stroller with the swivel wheels at the back, they must be locked in the fixed mode.
REMOVING THE SEAT
WARNING: when closing the stroller, make sure that your child and all other children are at a safe distance. Ensure that during these operations the moving parts of the stroller do not come into contact with your child.
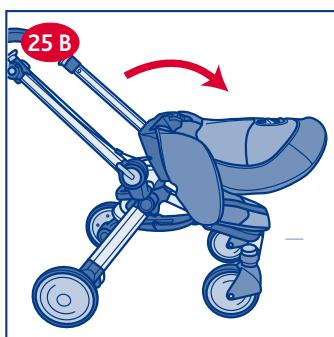
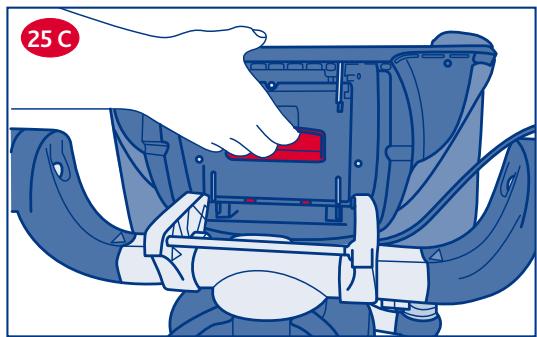
- To remove the seat, raise the backrest to an upright position. Use one hand to press the backrest adjuster button, and the other to press the triangular shaped orange button at the bottom of the backrest (Diag. 25A). Push the backrest forward towards the seat until the first set of fasteners are released. The seat can now be rotated all the way towards the front section of the stroller (Diag. 25B). Pull the orange handle located under the seat to remove it from the frame (Diag. 25C).
WARNING: when closing the stroller, make sure that your child and all other children are at a safe distance. Ensure that during these operations the moving parts of the stroller do not come into contact with your child.
Position the stroller in front-facing mode, as seen in diagram 13A.
-
Release the metal hinges as seen in diagram 26 and fold the hood; then follow the instructions provided in sections 25A and 25B.
-
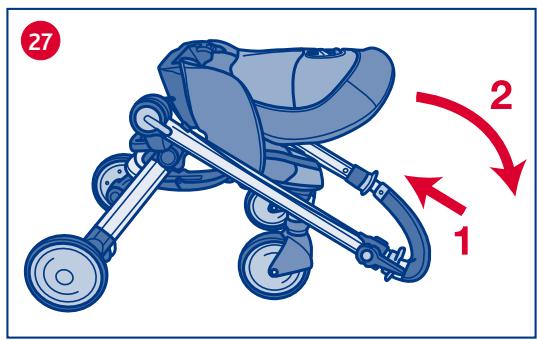
Shorten the handle making it more compact (1). Release both snap-clasps on the handle and turn the hand grip (2) to the position illustrated in diagram 27.
Press the open/close lever to fold the stroller, as illustrated in diagram 3.
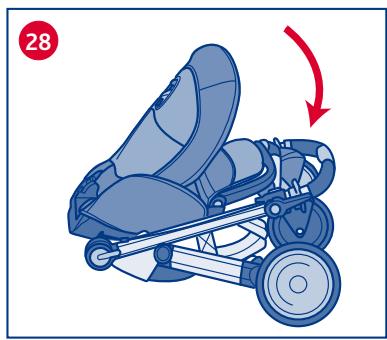
- Lift the handgrip up so the rear wheels approach the front wheels and lock in place (diag. 28).
Attention: we recommend closing the handlebar towards the front wheels to make it more compact when folded.
- To make the frame even more compact, you can also remove the seat from the frame by pressing the orange lever located under the seat (diag. 25C) as illustrated in diagram 29.
USING THE CHILD CAR SEAT AND CARRYCOT
The I-MOVE carrycot and the I-MOVE car seat can also be assembled on the CHICCO I-MOVE stroller frame. Please consult the relative instructions for information on how to fit and remove the carrycot or child seat.
WARNING: only the CHIČCO I-MOVE child car seat and carrycot can be fastened onto the I-MOVE stroller. Before using the stroller in combination with the carrycot or child car seat, always check that the hook-on system is correctly closed and locked in place. ONLY USE ACCESSORIES FITTED WITH THE RELATIVE I-MOVE HOOK-ON DEVICE.
REMOVABLE COVERS
- To remove the seat cover, open the velcro fastener under the seat, as illustrated in diagram 30.
- To remove the backrest cover, open the two velcro fasteners behind the seat, as illustrated in diagram 31.
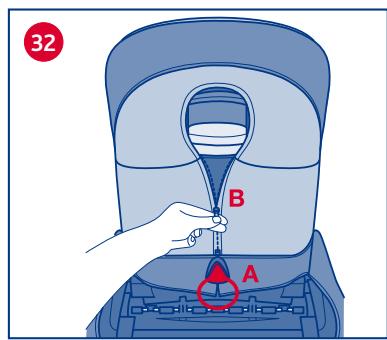
- To remove the main cover, open the velcro fastener (A) under the triangular orange button, and the zip (B) as illustrated in diagram 32.
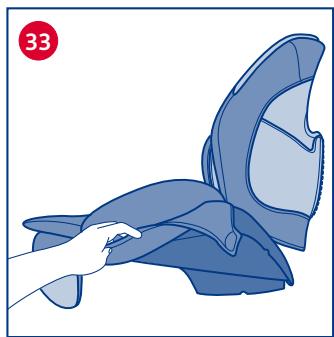
- Remove the side seat cover from the bodywork (diag. 33)
- Open the zip located under the foot-rest (diagrams 34A and 34B).
- Remove the cover from the stroller by pulling it over the backrest (diag. 35)
ACCESSORIES
WARNING: The accessories described below are not necessarily available on some versions of the product.
WARNING: Please read the instructions relative to the accessories fitted on the type of stroller you purchased carefully.
TRANSFORMABLE HOOD
A transformable hood can also be fitted on the stroller.
- The seat has two fixtures on the sides of the backrest which are used to fit the hood. To fit/remove the hood, slide the clip-on system into the fixtures, as illustrated in diagram 36.
- Close the zip on the back of the seat (Diag. 37).
WARNING: The hood must be fitted correctly on both sides of the stroller. Check that it is securely fastened. - To open the hood, press the front arch forwards and fasten it in place using the side hinges, as seen in diagram 38.
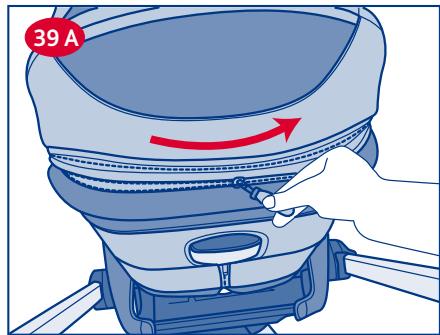
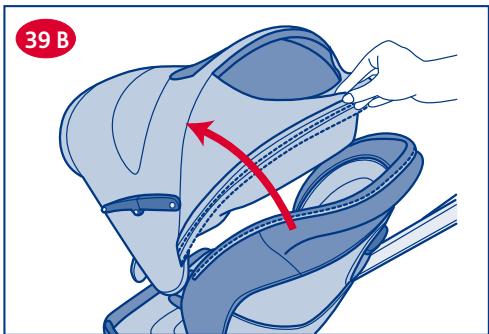
- To use it as a summer sun-hood, simply open the rear zip (diagram 39 A) and adjust the hood to the desired position (diag. 39B).
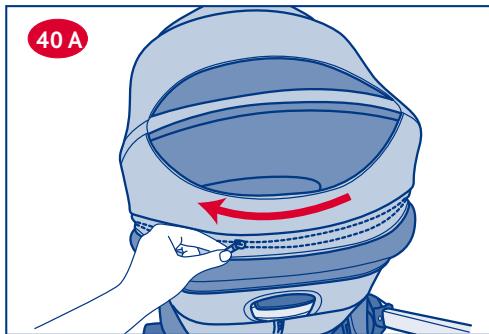
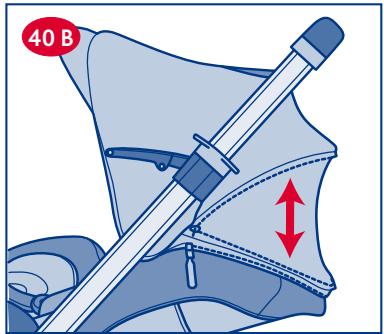
- When the backrest is full reclined, it is possible to open the zip on the back to expand the range of the hood and guarantee extra protection (diag. 40A and 40B).
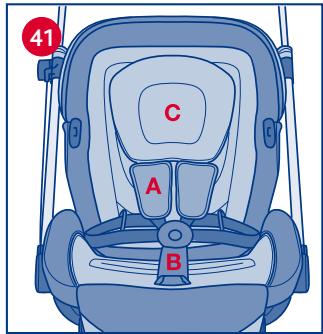
COMFORT KIT
The stroller can also be fitted with a Comfort Kit.
-
The Comfort Kit comes with 2 shoulder strap pads A, a crotch strap cover B and a cushion C (diagram 41).
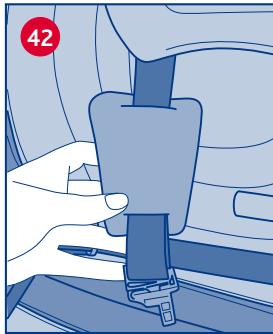
-
Slide the shoulder pads onto the straps as seen in diagram 42. The straps can be adjusted to suit the child's height.
-
Slide the crotch strap into the slot in the material as seen in diagram 43.
WARNING: the safety harness must always be fastened to guarantee complete safety for your child.
RAINCOVER
A raincover can also be fitted onto the stroller.
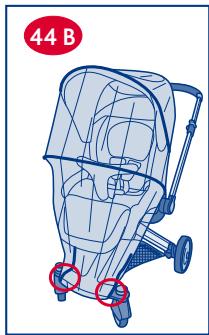
- Fit the raincover by fastening it to the hood using the elasticated section at the top (diag 44A) and fix in place attaching the Velcro fasteners to the ends of the front frame tubes, as illustrated in 44B. When you have finished using it, allow it to dry properly (if it is wet) before you fold it away.
WARNING: pay particular attention when using the rain-cover.
WARNING: the raincover cannot be used on a stroller which has no hood or sun-hood as it could suffocate the child. When the raincover is fitted on the stroller, never leave it exposed to direct sunlight with the child inside, as the temperature will rise considerably.
SLEEP SACK / LEG COVER
The Stroller can be fitted with a baby sleep sack which can also be used as a leg cover.
- Start by removing the bumper bar, then place the baby sleep sack on the seat. Slide the bumper bar through the slots on the baby sleep sack and fasten it to the seat (diag. 45).
The sleep sack has a zip at the back to divide it into a mattress and leg cover which can be used individually. The standard sleep sack user instructions are the same when used on the stroller.
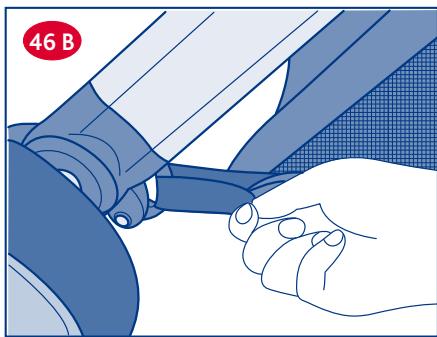
CARRY-ALL BASKET
The stroller can be fitted with a practical carry-all basket. 46. To assemble the basket on the stroller, attach the velcro fasteners, on the three ends of the basket, to the three slots on the stroller (diagrams 46A and 46B); then thread the 2 straps, found on the top part, around the tube and fasten in place as seen in diagrams 46A and 46C.
WARNING: Do not overload the basket with weights of more than 2kg. You must remove all contents from the basket before you close the stroller.
BAG
The stroller can also be fitted with a practical carry-all bag, which includes a changing mat.
- To make the bag even more practical, both the inside and outside have lots of pockets and compartments which can be used to store a number of different items in an orderly manner (diagram 47).
WARNING: do not overload the bag with weights of over 2 kg.
WARNING: exceeding this limit may compromise the stability of the stroller and cause it to topple over.
Important note: the images and instructions contained in this handbook refer to one version of the stroller; some components and functions described herein may vary according to the version of the stroller you have purchased.
FOR FURTHER INFORMATION
ARTSANA UK Ltd.
Prospect Close - Lowmoor Road
Industrial Estate - Kirby in Ashfield
Nottingham NG 17/7 LF - England U.K.
Tel. +44 1623 750870 (office hours)
HYPERLINK www.chicco.com
E
AVISO IMPORTANTE
IMPORTANTE: ANTES DE UTILIZAR LEER DETENIDAMENTE ESTE LIBRO DE INSTRUCCIONES PARA EVITAR PELIGROS DURANTE EL USO Y GUARDARLO PARA FUTURAS CONSULTAS.
PARA MAIS INFORMAÇÕES:
Artsana Portugal S.A.
Serviço Consumidor
Rua Humberto Madeira, 9
2730-097 Barcarena - Portugal
Telephone: 800-20-19-77
www.chicco.com
BELANGRIJK: LEES DEZE GEBRUIKSAANWIJZING AANDACHTIG DOOR, OM GEVAREN BIJ HET GEBRUIK TE VOORKOMEN. BEWAAR ZE VOOR LATERE RAADPLEGING.
DE VEILIGHEID VAN JE KIND KAN IN HET GEDRANG KOMEN ALS JE DEZE IN-STRUCTIES NIET OPVOLGT.
LET OP: VERWIJDER VOOR HET GEBRUIK EVENTUELE PLASTIC ZAKKEN EN ALLE ANDERE VERPAKKINGSONDERDELEN EN GOOI ZE WEG OF HOUD ZE IN IEDER GEVAL BUITEN HET BEREIK VAN KINDEREN.
WAARSCHUWINGEN
VOOR MEER INFORMATIE
Artsana Belgium N.V.
Klantenservice
Temselaan 5
Avvia il lettore dei QR con il tuo cellulare o con la webcam del tuo pc, inquadra il codice e scopri il video dimostrativo!
Activez le lecteur de code-barres ou flashcode de votre téléphone portable ou la webcam de votre ordinateur, scannez le code et découvrez la vidéo de démonstration !
D Starten Sie den QR-Code-Leser mit Ihrem Handy oder mit der Webcam Ihres PCs, erfassen Sie den Code mit der Kamera und entdecken Sie das Demo-Video!
¡Activa el reproductor QR con tu móvil o con la webcam de tu PC, encuadra el código y descubre el video demonstrativo!
GB Enable the QR player with your mobile phone or your OC webcam, frame the code and discover the demo!
P Activa o leitor de QR com o teu telemóvel ou com a webcam do teu pc, enquadra o código e descobre o vídeo de demonstração!
NL Start de QR speler met je mobiele telefoon of met de webcam van je pc, stel de code in en ontdek de demonstratieve video!
Starta läsaren för QR-koden med din telefon eller med webbkameran på din dator, zooma in koden och upptäck demo-videon!
CZ Spustte čtečku QR kódů vaším mobilním telefonem nebo web kamerou vašeho pc, načtěte kód a prohlédněte si předváděcí video!
PL Uruchom czytnik kodów QR bezpośrednio z telefonu komórkowego lub kamery internetowej Twojego komputera, odczytaj kod i obejrzyj film pokazowy!
Ενεργοποιήστε το QR κωδικό είτε μέσω του κινητού σας είτε μέσω της δικτυακής κάμερας του υπολογιστή σας, τοποθετήστε κατάλληλα τον κωδικό και ανακαλύψτε το βίντεο επίδειξης!
QR okuyucuyu, cep telefonunuz veya pc'nizin webcam'ı ile etkinleştiriniz, kodu çerçeveleyiniz ve tanıtım videosunu keşfediniz!
RUS Запустите дисковод QR с помощью своего мобильного телефона или вебкамеры ПК, наведите на код и посмотрите демонстрационным ролик!
TR Определи QR кода с помощта на твоя мобилен телефон или уеб камерата на компютъра и открий демо клипа!