USER MANUAL TRIO LIVING SMART, TRIO LIVING SMART GEOMETRIC CHICCO
natural_image
Illustration of a baby stroller with blue outline and white seat, no text or symbols present
natural_image
Illustration of a robotic arm with a red circular arrow indicating rotation (no text or symbols)
natural_image
Blue mechanical device with lever and handle, labeled '1B' in red circle (no text or symbols on device)
natural_image
Illustration of a robotic arm with red arrows indicating movement or force direction (no text or symbols)
natural_image
Illustration of a blue stroller with wheels and a person's leg, showing a red upward arrow indicating motion (no text or symbols)

natural_image
Illustration of a hand opening a car seat component (no text or symbols)
natural_image
Top-down view of a blue mechanical component with no visible text or symbols
natural_image
Illustration of a blue car seat with a red arrow indicating motion or direction (no text or symbols)
natural_image
Illustration of a blue car seat with two rings and straps, labeled '5D' in red circle (no text or symbols on the diagram itself)
natural_image
Illustration of hands adjusting a medical device (no text or symbols visible)
natural_image
Illustration of a person adjusting a seatbelt using a tool, with an inset showing the same seat (no text or symbols present)
natural_image
Illustration of hands installing or adjusting a mechanical component with clips (no text or symbols)
natural_image
Illustration of a hand adjusting a seatbelt inside a blue car seat (no text or symbols)

natural_image
Illustration of a car seatbelt buckle being adjusted, with a red arrow indicating the adjustment (no text or symbols present)
natural_image
Illustration of a hand adjusting a seatbelt with red arrows indicating movement (no text or symbols)
natural_image
Mechanical linkage diagram showing blue components and a red circular label '13 B' (no text or symbols on the diagram itself)
natural_image
Mechanical assembly diagram showing a frame structure with no visible text or symbols


natural_image
Mechanical linkage diagram showing blue components and a red circular label '15 B' (no text or symbols on the diagram itself)

natural_image
Diagram of a vehicle chassis frame with no visible text or symbols, featuring a red circular label indicating '15 C' (no readable text or symbols beyond the label)

natural_image
Illustration of a hand adjusting a mechanical component with a red upward arrow (no text or symbols)
natural_image
Illustration of a hand using a blue tool to lift a motorcycle, with a red arrow indicating motion (no text or symbols)
natural_image
Illustration of a hand adjusting a seatbelt device (no text or symbols visible)
natural_image
Illustration of a baby stroller with a red diagonal line and '22 A' label (no text or symbols on the diagram itself)
natural_image
Illustration of a blue stroller with a red circular badge labeled '22 B' (no text or symbols on the device itself)
natural_image
Mechanical assembly diagram showing a vehicle with wheels and a red arrow indicating motion direction (no text or symbols)
natural_image
Illustration of a blue mechanical component with a red directional arrow and number 25 (no text or symbols on the diagram itself)
natural_image
Illustration of a person adjusting a seatbelt using a tool (no text or symbols visible)

natural_image
Illustration of a blue bicycle steering wheel with attached suspension components (no text or symbols)
natural_image
Illustration of a blue mechanical device with gears and a lever, labeled '29 B' in red circle (no text or symbols on the device itself)
natural_image
Blue mechanical device with lever mechanism and red circular indicator showing number 30 (no text or symbols on the device itself)
natural_image
Blue and white illustration of a blue athletic device labeled 'chico' with a red circular badge showing '33 A' (no additional text or symbols)
natural_image
Illustration of a mechanical device with a red circle highlighting a component, labeled with number 34 (no text or symbols on the device itself)
natural_image
Illustration of a hand adjusting a seatbelt inside a car seat (no text or symbols)
natural_image
Illustration of a hand adjusting a seatbelt inside a car seat (no text or symbols)

natural_image
Illustration of a hand pouring liquid into a bottle inside a car (no text or symbols)
natural_image
Illustration of a person adjusting a seatbelt device (no text or symbols present)
natural_image
Illustration of a babystand seat with adjustable armrest and seat cover (no text or symbols)

natural_image
Illustration of a baby stroller with a hand holding the basket, no text or symbols present


natural_image
Anatomical illustration of an insect body with a red dot and dashed circle highlighting a specific region (no text or labels present)
natural_image
Illustration of a person wearing a ChiNext-branded shirt with a badge, no text or symbols present

natural_image
Illustration of a blue children's seat with two red circles highlighting specific areas (no text or symbols present)
natural_image
Illustration of a blue mechanical device with attached straps and a numbered label '49' (no text or symbols on the device itself)
natural_image
Illustration of a blue handbag with a strap and handle, no text or symbols present
natural_image
Illustration of a purple backpack with straps and handle, no text or symbols present

ISTRUZIONI D'USO
AVVISO IMPORTANTE
IMPORTANTE - TENETE QUESTE ISTRUZIONI PER RIFERIMENTI FUTURI
ATTENZIONE: PRIMA DELL'USO RIMUOVERE ED ELIMINARE EVENTUALI SACCHETTI DI PLASTICA E TUTTI GLI ELEMENTI FACENTI PARTE DELLA CONFEZIONE DEL PRODOTTO O COMUNQUE TENERLI LONTANI DALLA PORTATA DEI BAMBINI.
AVVERTENZE
UTILIZZO POLTRONCINA E SACCA
IMPORTANT – KEEP THESE INSTRUCTIONS FOR FUTURE REFERENCE
WARNING: BEFORE USE, REMOVE AND DISPOSE OF ALL PLASTIC BAGS AND PACKAGING MATERIALS AND KEEP THEM OUT OF REACH OF CHILDREN.
WARNINGS
- WARNING: Never leave your child unattended.
- WARNING: Ensure that all the locking devices are engaged before use
- WARNING: To avoid injury ensure that your child is kept away when unfolding and folding this product.
- WARNING: Do not let your child play with this product
- WARNING: Always use the restraint system.
- WARNING: This product is not suitable for running or skating.
- WARNING: Check that the pram body or seat unit or car seat attachment devices are correctly engaged before use
- The stroller is intended for use with children aged between 0 and 36 months, up to 15 kg of weighting
- It is recommended that the backrest should be used in its most reclined position for children from birth to 6 months of age.
- Only Car Seat CHICCO and/or Carrycot CHIC-Co with the CLIK CLAK fitting device can be attached to the stroller compatible.
- The parking device shall be engaged when placing and removing the children.
- Do not overload the storage basket. Maximum weight 5 kg.
- Any load attached to the handle and/or on the backrest and/or the sides of the vehicle will affect the stability of vehicle.
- Do not carry more than one child at a time
- Do not use accessories, replacement parts, or any component not supplied or approved by the manufacturer/distributor.
- For car seats used in conjunction with a chassis, this vehicle does not replace a cot or a bed. Should your child need to sleep, then it should be placed in a suitable pram body, cot or bed.
- WARNING: before assembly, check that the product and all of its components have not been damaged during transportation. Should any part be damaged do not use and keep out
of reach of children.
- WARNING: the product must be assembled by an adult.
- WARNING: the use of the crotch strap and safety harness is necessary to guarantee the safety of your child. Always use the safety harness together with the crotch strap.
- WARNING: Ensure that during these operations the moveable parts of the stroller do not come into contact with your child.
- WARNING: never leave the stroller on a sloped surface with a child onboard, even with the brakes applied.
- WARNING: when not in use, the stroller must be kept away from the reach of children.
- WARNING: This product must only be pushed by an adult.
- Ensure that the person using the stroller knows how to use it safely.
- Always apply the brakes whenever the stroller is stationary.
- To avoid the risk of chocking, keep objects fitted with strings or laces out of reach of children.
- Do not use the stroller on stairs or elevators: it could cause the loss of control of the stroller.
- Pay special attention when maneuvering the stroller up or down pavements or a step.
- If the stroller is left exposed to direct sun light for a long time, allow it to cool before placing your child in it. Prolonged exposure to direct sunlight may cause the fabric to fade.
- Do not use the product if some of its parts are broken, torn or missing.
- Prevent the stroller from coming into contact with salt water. It may cause the formation of rust.
- Do not use the stroller on the beach.
CLEANING AND MAINTENANCE
The cleaning and maintenance of this product must be carried out on a regular basis by the user. The cleaning and maintenance of the stroller must only be carried out by an adult.
CLEANING
The cover can be removed (please refer to the section "removable cover").
Please refer to the care labels for instructions on how to clean the fabric parts.
Below are the cleaning symbols and their meanings:

Wash by hand in cold water

Do not bleach

Do not tumble dry

Do not iron

Do not dry clean
Use a soft cloth to clean the plastic parts on a regular basis; do not use solvents or abrasive products. Always dry the metal parts to prevent the formation of rust if the stroller has come into contact with water.
MAINTENANCE
Lubricate the moving parts, if necessary, with dry silicon oil. Periodically check the condition of the wheels and keep them clean of dust and sand. Make sure all plastic parts that slide along the metal tubes are clean and free from dust, dirt and sand; this will avoid friction that may prevent the stroller from working properly. Keep the stroller in a dry place.
OPENING INSTRUCTIONS
WARNING: when opening the stroller, ensure that your child and all other children are at a safe distance. Ensure that during these operations the moving parts of the stroller do not come into contact with your child.
-
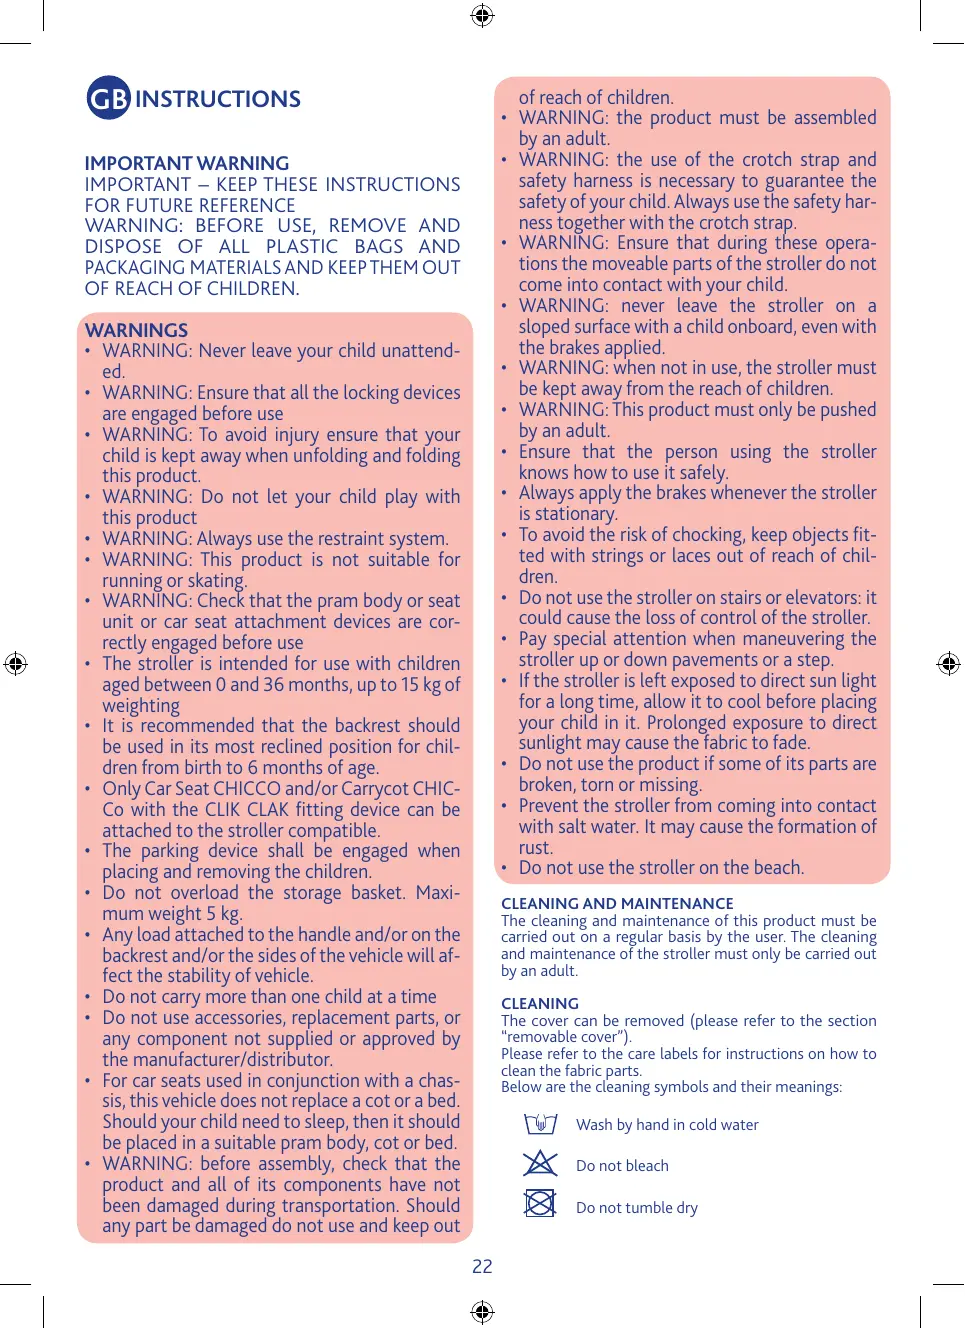
Before opening the stroller, press the side button (diagram 1A) to raise both handgrips into the right position. Make sure that the handgrips are locked in the UP position, as seen in diagram 1 B.
-
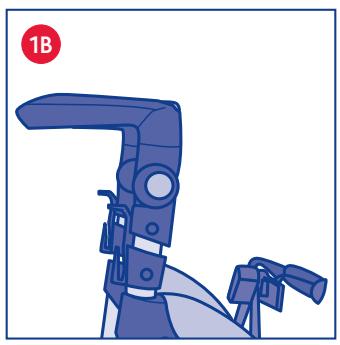
Pull both the small levers on the stroller handles at the same time; the stroller will start to open (diagram 2).
-
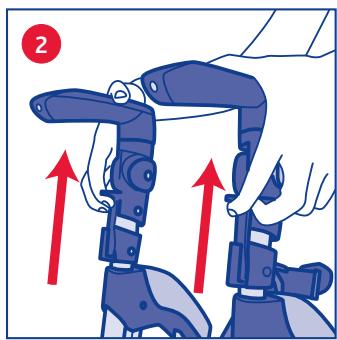
Raise the stroller to make it easier for it to open (diagram 3).
-
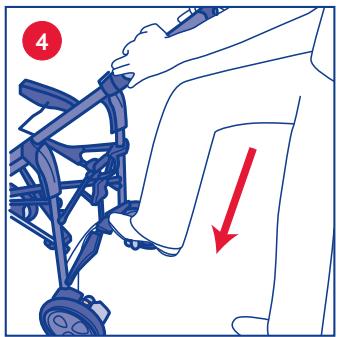
Press the cross bar downwards with your toe so it opens completely and locks the stroller in the open position (diagram 4)
WARNING: ensure that the stroller is locked in the open position, checking that the rear cross bar is locked in place.
FITTING/REMOVING THE LINING
For practical reasons, this operation should be performed with the seat removed from the stroller.
-
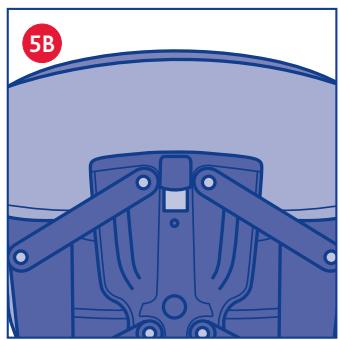
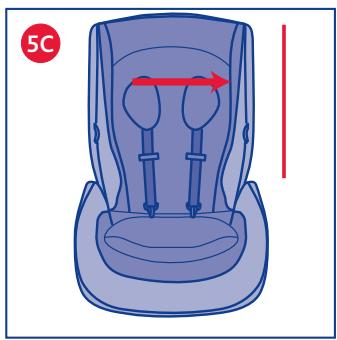
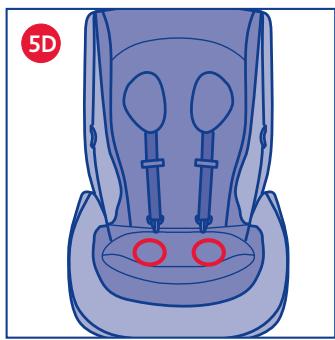
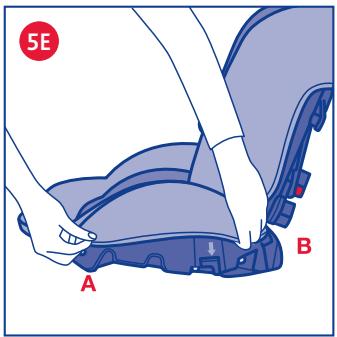
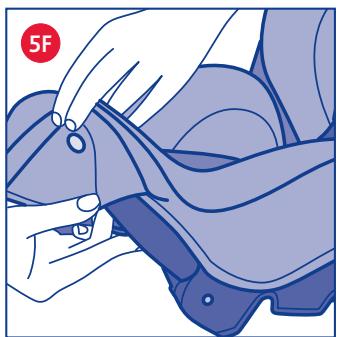
Start by fitting the top part of the fabric (diagram 5A) so that it fits neatly over the back, as seen in diagram 5B. Align the fabric with the plastic structure following the coloured tail (diagram 5 C). Fasten the seat to the base using the two buttons near the rings seen in diagram 5 D, then fasten the lower ends of the seat using the buttons (A) and the velcro fasteners (B) found on the side of the structure as indicated in diagram 5 E. Fit the leg rest supports into the fabric as seen in diagram 5 F.
-
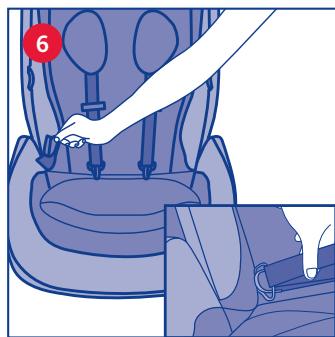
Slide the "D" rings through the slots (diagram 6)
-
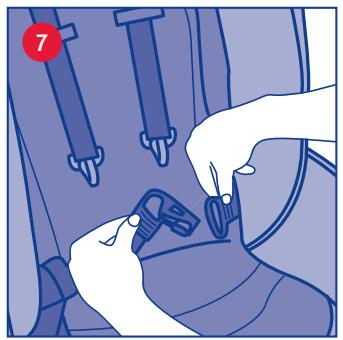
Thread the lap belt into the "D" rings as seen in diagram 7.
-
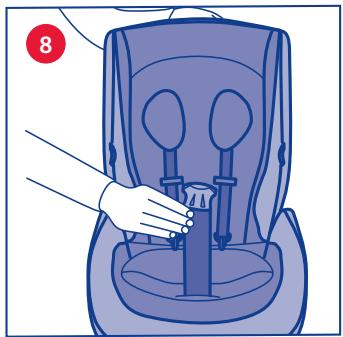
WARNING: the crotch strap is fastened to the seat support and held in place by the structure. The crotch strap must be threaded through the slot in the lining to ensure correct and safe use, as seen in diagram 8. Please refer to the "Safety harness" paragraph for information on how to use the harness correctly
-
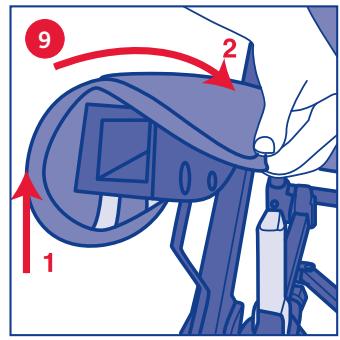
Fasten the two armrest covers in place by inserting the 3 tabs in the relative fixtures and then fastening the two metal buttons found inside the armrests (diag. 9).
SAFETY HARNESS
The stroller comes with a five-point safety harness that consists of two shoulder straps, a lap belt and a crotch strap with a buckle.
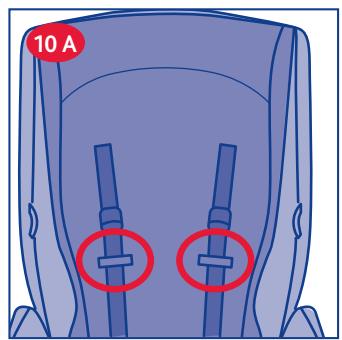
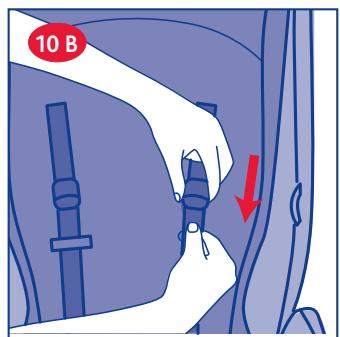
WARNING: For use with children from birth up to approximately 6 months of age, it is necessary to use the shoulder straps, sliding them first through the two adjustment holes. 10. Slide the safety clasps into the fabric slots (diagram 10A) and check that the shoulder straps are fitted at the right height for the child: if this is not the case, adjust the height (diagram 10).
-
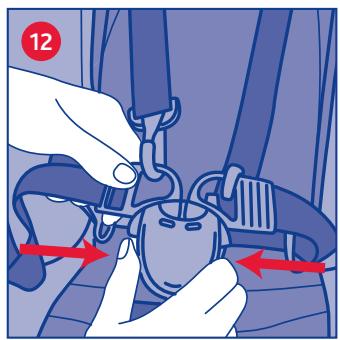
Place the child inside the seat, slot the 2 toothed ends into the buckle and adjust the width of the lap belt using the clasps (diagram 11).
-
To release the lap belt, press the two toothed ends together at the same time (diagram 12).
For extra safety, the stroller is fitted with D rings, which can be used to fit a separate safety harness, compliant with BS 6684 Standards. The rings are positioned inside the seat of the stroller on the left and right sides as shown in fig. 7. WARNING: the safety harness must always be fastened to guarantee complete safety for your child.
WARNING: To guarantee the safety of your child, always use both the crotch strap and the safety harness.
FITTING THE SEAT IN THE PARENT -FACING POSITION
WARNING: The bumper bar is not used when fitting the seat in this position.
-
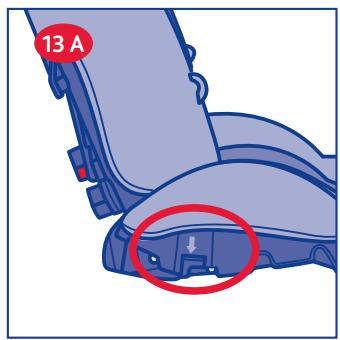
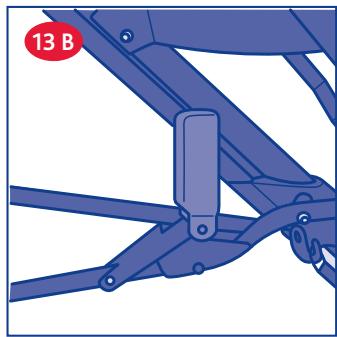
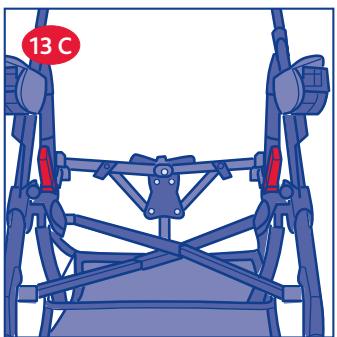
To fit the seat in the parent-facing position, open the seat and, using the orange arrows on the seat as reference (diagram 13 A) slide it onto the hooks (diagram 13 B and C) found on the stroller structure as seen in diagram 13 D.
-
Press the seat downwards until you hear it click and lock into place (fig 14).
WARNING: Check that the pram body or seat unit attachment devices are correctly engaged before use.
WARNING: After removal of the safety harness (e.g. for washing), ensure that the harness is reassembled correctly using the anchorage points. The harness must be re adjusted. To ensure that the harness is adjusted correctly, fitting your child and securely closed, pull firmly on the end of the harness (on the underside of the seat).
FITTING THE SEAT IN THE FRONT- FACING POSITION
-
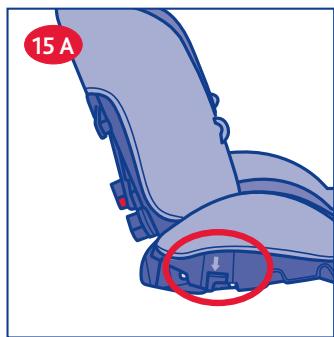
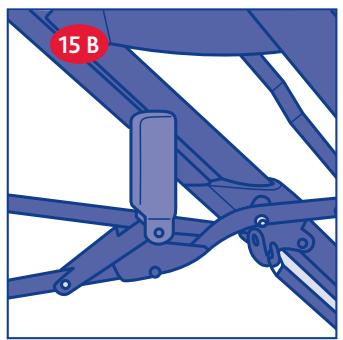
To fit the seat in the front-facing position, open the seat and, using the orange arrows on the seat as reference (diagram 15 A) slide it onto the hooks (diagram 15 B and C) found on the stroller structure as seen in diagram 15 D.
-
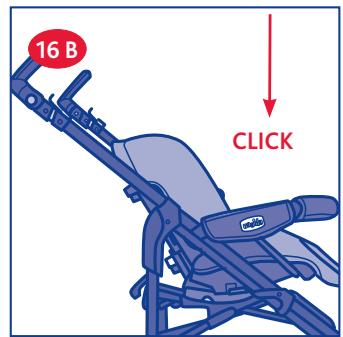
Press the seat downwards (fig 16A) until you hear it click and lock into place (fig 16B).
WARNING: Check that the pram body or seat unit attachment devices are correctly engaged before use.
REMOVING THE SEAT
It is not necessary to remove the stroller lining to remove the seat.
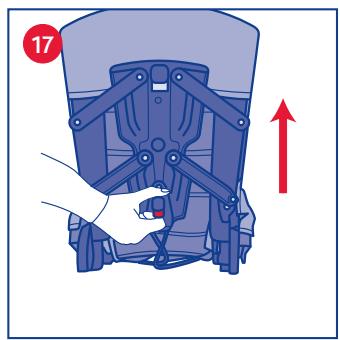
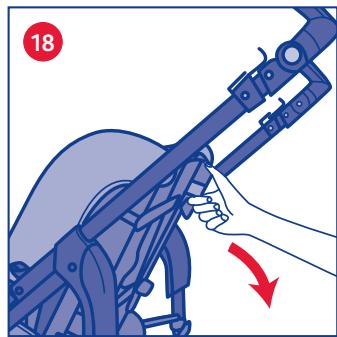
- Press the orange button on the back of the backrest and lift the seat upwards (diagram 17).
- Press the grey button on the stroller backrest to adjust the inclination until you find the position you need (diagram 18). Release the button and the backrest will click into the closest lock position. Simply push the backrest upwards to raise it.
WARNING: these operations can become more difficult when the child is sat in the seat.
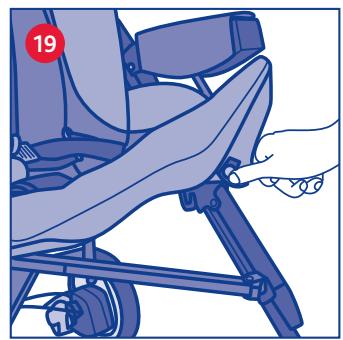
ADJUSTING THE LEG REST
- Press the two buttons on the inside of the leg rest side fixture (diagram 19) to adjust the leg rest to the required position.
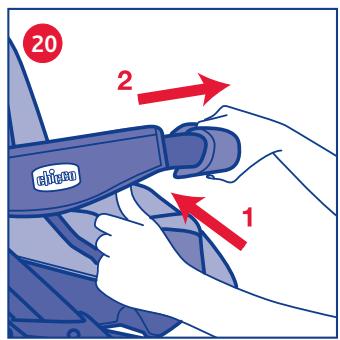
REMOVABLE BUMPER BAR
- To remove the bumper bar, press the two buttons found under the armrests (diagram 20) and pull the bar towards you. Open one side of the bumper bar only to seat the child in the stroller more easily.
WARNING: Always restrain the child using the safety harness. The bumper bar is NOT a child restraint device.
WARNING: Never use the bumper bar to lift the stroller up with the child sitting in it.
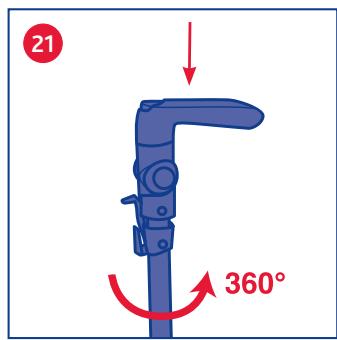
ERGONOMIC HANDGRIP
- Press the button on the handgrip to rotate the handgrip into the required position, according to the height and position most suited to the user (diagram 21).
The handgrip can be adjusted to 8 different positions.
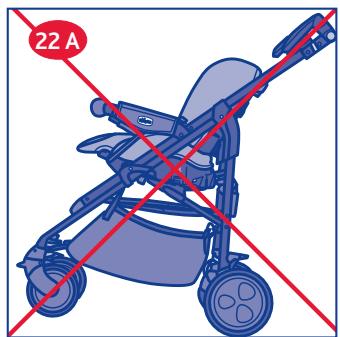
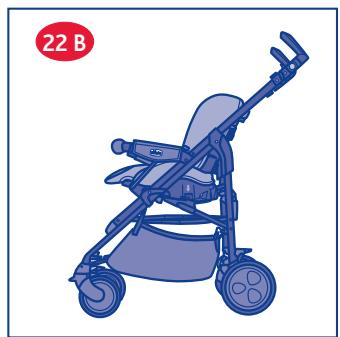
- WARNING: when using the stroller, the handgrips must not be in the DOWN position (diagram 22 A). Make sure that the handgrips are locked in the UP position, as seen in diagram 22 B.
PARKING BRAKE
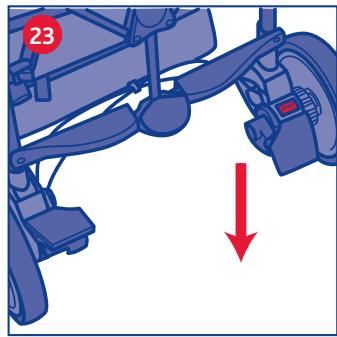
The parking brake is applied to both rear wheel at the same time. To make it easier to use the stroller, a special STOP & GO braking system has been installed, indicated by the coloured stickers on the rear brake lever.
-
To put on the brakes, press the right lever downwards (diagram 23). A red STOP sticker will appear and the opposite lever will move upwards.
-
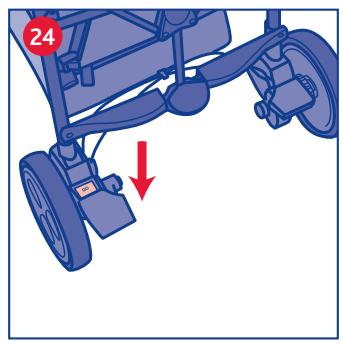
To release the brakes, press the left lever downwards (diagram 24). A green GO sticker will appear and the opposite lever will move upwards.
WARNING: Always apply the brakes whenever the stroller is stationary. Never leave the stroller on a sloping surface with a child inside, even with the parking brake ON.
WARNING: After applying the brake lever make sure that the brakes are properly applied on both of the rear wheel units.
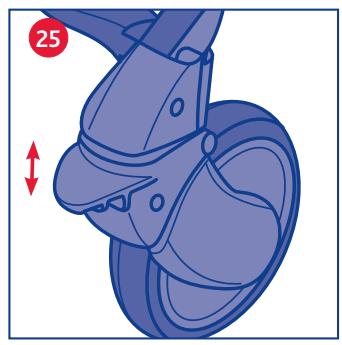
SWIVEL WHEELS
The stroller has swivel/fixed front wheels. It is recommended to use the fixed wheels on particularly uneven ground. It is recommended to use the swivel wheels on normal road surfaces as it makes it easier to handle.
- To switch the front wheels to swivel mode, press the front lever down with your front, as seen in diagram 25. To switch back to fixed mode, pull the lever up with your foot. Whatever the current position of the wheel, it will lock in a straight position.
WARNING: Both wheels must be blocked or released at the same time.
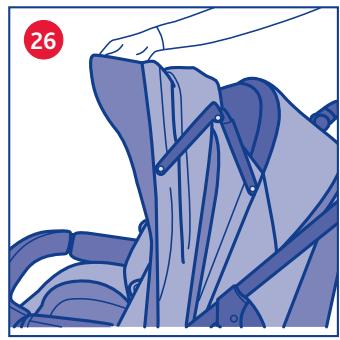
WARNING: when opening the stroller, ensure that your child and all other children are at a safe distance. Ensure that during these operations the moving parts of the stroller do not come into contact with your child. The stroller can be closed when in either parent-facing or front-facing mode. The instructions to follow are the same for both user modes. If you wish to reduce the space the closed structure takes up, it is recommended to close the structure with the seat fitted in the front-facing position.
-
Raise the side compasses and fold the hood (diagram 26).
-
Pull both the small levers on the handles; keep them raised whilst you use your toe to pull the rear cross frame upwards (diagram 27).
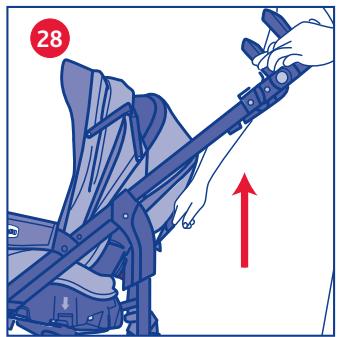
-
Grasp the closure handle and pull it upwards until the stroller locks into a closed position (diagram 28).
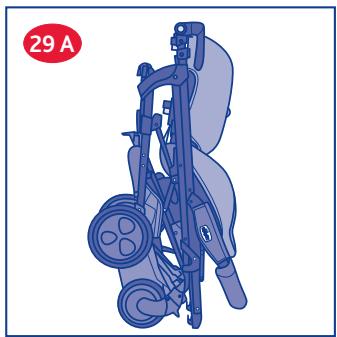
-
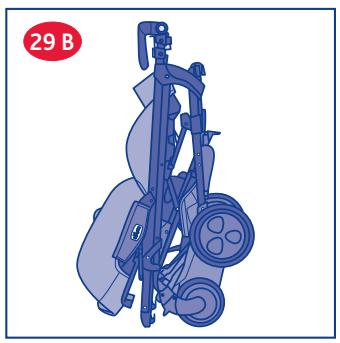
To decrease the space the closed stroller takes up, recline the backrest as flat as possible (diagram 29 A – front-facing diagram 29 B – parent-facing).
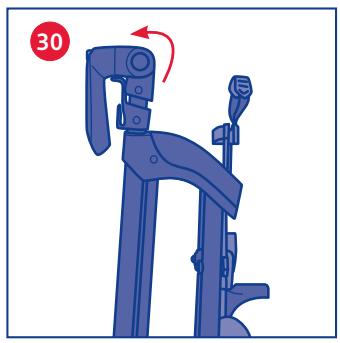
-
Now fold the handgrips forwards (diagram 30). When the stroller is closed and locked in place, it will stand up on its own
WARNING: You must always remove the joinable handle (if fitted) before closing the stroller.
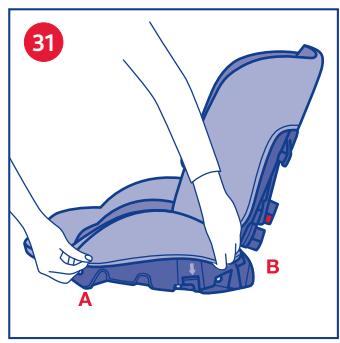
REMOVABLE COVERS
Open the stroller slightly with the safety harness unfastened:
-
Release press stud A and the velcro fastener B as indicated in diagram 31.
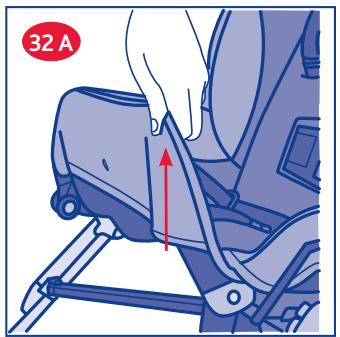
-
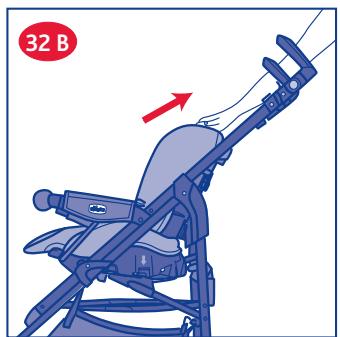
Raise the leg rest, release the buttons on the seat and slide the lining off, paying attention to the harness straps (diagram 32 A); remove the lining from the backrest by pulling it upwards after undoing the side Velcro fasteners (diagram 32 B).
USING THE CHILD CAR SEAT AND CARRYCOT
The CHICCO strollers which use the CLIK CLAK system on the armrests allow you to fasten the carrycot and/or child seat to the stroller frame without any need for additional fixtures.
Please consult the relative instructions for information on how to fit and remove the carrycot or child seat.
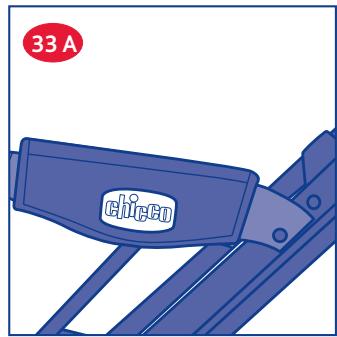
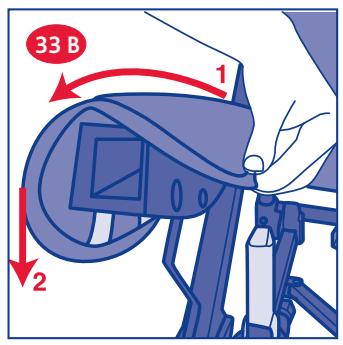
- Before fitting the child car seat or carry-coat, remove the armrest covers completely starting with the two metal buttons on the inside of the armrests and then sliding out the 3 tabs from their relative fixtures (diag. 33 A and B).
WARNING: only the CHICCO child seats and carycots which are fitted with the CLIK CLAK system can be fitted onto the stroller. Before using the stroller in combination with the carycot or child car seat, always check that the hook-on system is correctly closed and locked in place. ONLY USE ACCESSORIES FITTED WITH THE RELATIVE CLIK CLAK DEVICE.
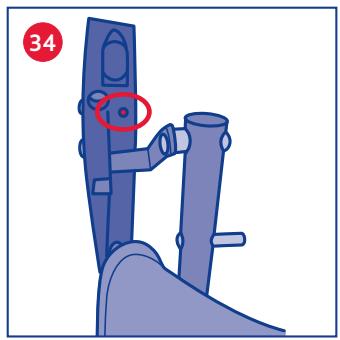
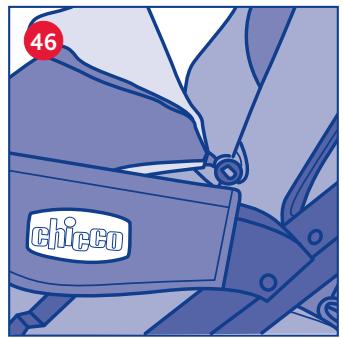
- WARNING: Incorrect fastening of the accessory to the stroller frame can cause the fastening system to malfunction, making it impossible to remove it. In this case you can manually release the accessory by using a screwdriver on the levers under the armrests which can be reached through the relative slot (diagram 34).
ACCESSORIES
WARNING: The accessories described below are not necessarily present on some versions of the product. Please read the instructions relative to the accessories fitted on the type of stroller you purchased carefully.
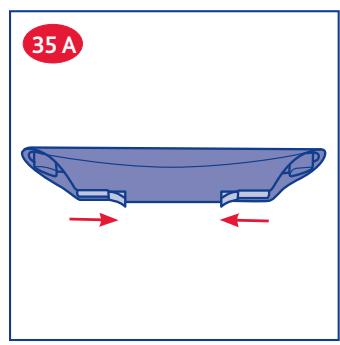
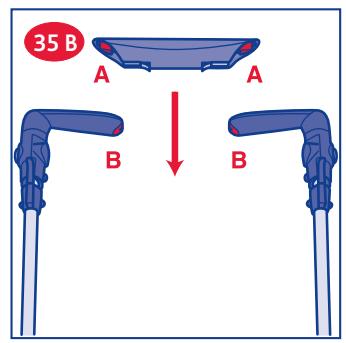
JOINABLE HANDLE
-
To fit the joinable handle, press the two central levers inwards at the same time (see diagram 35 A) and connect the hooks A and B into the relative holes (diagram 35 B), until you hear them click into place.
-
To remove the joinable handle, press the two central levers inwards at the same time (see diagram 36 A) and slide the handle upwards (diagram 36 B).
WARNING: before using the product in the "joined handle" mode, always check that it has been fitted correctly.
WARNING: You must always remove the joinable handle before closing the stroller.
WARNING: never use the joinable handle to lift the stroller up with the child sat in it.
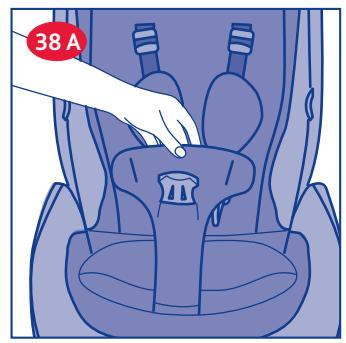
COMFORT KIT
The Comfort Kit comes with 2 shoulder strap pads and a wide abdominal strap. Use of the abdominal strap is highly
recommended when using the stroller in parent-facing mode, i.e. when the child is still rather small.
-
Slide the shoulder pads onto the straps as seen in diagram 37 G.
-
Slide the crotch strap into the relative opening (diagram 38 A) and the lap belt buckle into the side slots (diagram 38 B)
WARNING: use the clasps to adjust the width of the lap belt as necessary.
WARNING: the safety harness must always be fastened to guarantee complete safety for your child.
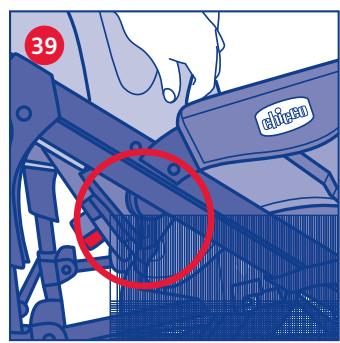
-
The seat has two fixtures on the sides of the seat base which can be used to fit the hood. To assemble the hood, insert the hook-on system into the fixtures, as seen in diagram 39. As the hood is connected to the seat, you don't need to turn it around when you switch between the front-facing and parent-facing modes.
-
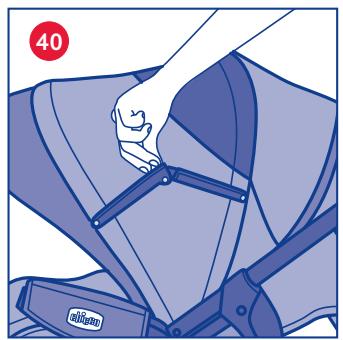
To open the hood, press the front arch forwards and fasten it in place using the side compasses as seen in diagram 40.
-
The hood has an extractible mesh feature to help protect your baby from excessive sunlight.
-
Open the side zips (diagram 42) to remove the rear flap and turn the hood into a summer sun-hood.
-
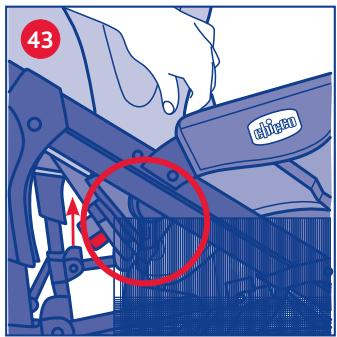
To remove the hood, take hold of it near the connector fixtures and simply pull it upwards, sliding the fasteners upwards (diagram 43).
WARNING: The hood must be fitted correctly on both sides of the stroller. Check that it is securely fastened.
FULL-COVER RAIN HOOD
A rain cover can also be fitted onto the stroller.
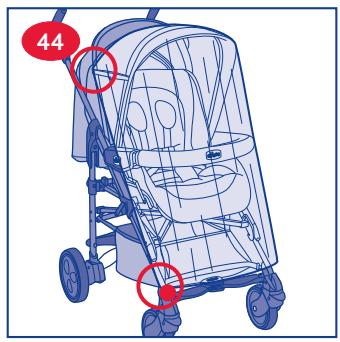
- Fasten the rain cover in place threading the buttons into the slots on the sides of the hood, as seen in diagram 44.
When you have finished using it, allow it to dry properly (if it is wet) before you fold it away. The rain cover can be used in either parent-facing or front-facing mode.
WARNING: Use only the raincover supplied or approved by the manufacturer.
WARNING: Do not use the rain cover if the stroller is not fitted with the hood or sun canopy to prevent the risk of suffocation.
To prevent the risk of overheating or suffocation, never leave the stroller under the sun with the rain cover fitted to it.
LEG COVER
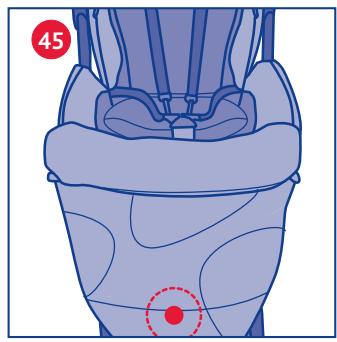
- To fit the leg cover, fasten the snap-button, found on the back of the leg cover, to the lower section of the seat leg rest (diag. 45).
The leg cover can be used in two different modes (section 46 and 47).
-
Thread the top part of the leg cover under the bumper bar and fasten in the highest position inserting the buttons into the slots on the side wings of the seat (diagram 44 B).
-
The leg cover can be folded back over the bumper bar and buttoned in place using the slots, as seen in diagram 47.
ITEM BASKET
The stroller comes with a practical item basket.
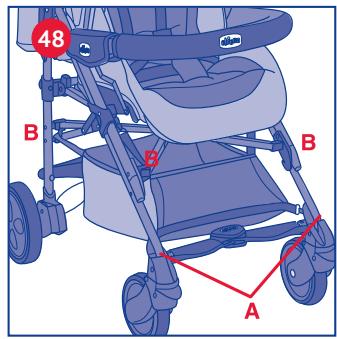
- To fit the basket onto the stroller, connect the clasps A on the basket to the two hooks on the front section of the stroller, and connect the 4 rings to the relative hooks B (diagram 48).
WARNING: Do not overload the basket with weights of over 5 kg. You must remove all contents from the basket before you close it.
BAG
Some versions of the stroller come with a practical carry-all bag, which includes a changing mat.
-
Fit the bag onto the stroller as seen in diagram 49.
-
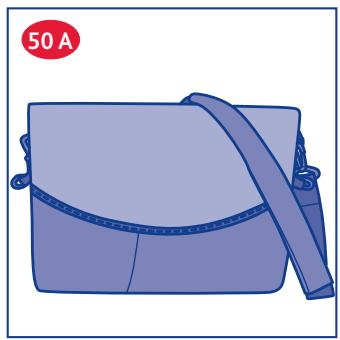
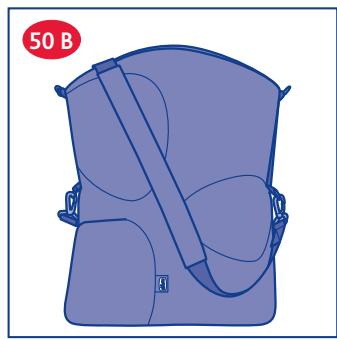
The bag can be used in two different ways. Option 1 (medium size): Clip the shoulder strap clasps to the rings on the sides, as seen in diagram 50A, and fold back the flap.
Option 2 (large size): Clip the shoulder strap clasps to the rings on the end, as seen in diagram 50B.
WARNING: do not overload the bag with weights of over 2 kg.
WARNING: exceeding the above indicated limit, with the bag attached to the handles, may compromise the stability of the stroller and cause it to topple over.
Important note: the images and instructions contained in this handbook refer to one version of the stroller; some components and functions described herein may vary according to the version of the stroller you have purchased.
FOR UK MARKET ONLY: COMPLY TO BS 7409 WARNING: A CHILD'S SAFETY IS YOUR RESPONSIBILITY.
Children should be harnessed in at all times and should never be left unattended. The child should be clear of moving parts while making adjustments. This vehicle requires regular maintenance by the user. Overloading, incorrect folding and the use of non-approved accessories may damage or break this vehicle.
WARNING: When used as a pram body, remember that:
- The depth of the pram body measured from the top of the mattress to the top of the side of the body at, or at any position within 300mm from, the harness attachment points, should not be reduced to less than 140mm when the mattress is in position;
- The matress purchased separately should conform to BS 1877 : Part 10.
- SAFETY HARNESS – For extra safety the stroller is fitted with “D” rings, which can be used to fit a separate safety harness, compliant with BS 6684 standards.
The rings are positioned inside the seat of the stroller on the left and right sides as shown in fig. 16.WARNING: when using this product in the car, use the lap belt assembled on the carrycot frame only.

INSTRUCCIONES DE USO
AVISO IMPORTANTE
ال Offensiveanned Technical Information
ARTSANA UK Ltd.
Prospect Close - Lowmoor Road Business Park Kirkby In Ashfield
Nottinghamshire - Ng17 7Lf
England U.K.
01623 750870 (office hours)
www.chicco.co.uk

ARTSANA SPAIN S.A.U.
C/Industria 10
Pol. Industrial Urtinsa
Apartado De Correos 212 - E
28923 Alcorcon (Madrid)-Spain
902 117 093
www.chicco.es

ARTSANA PORTUGAL S.A.
Rua Humberto Madeira, 9
2730-097 Queluz De Baixo Barcarena
Portugal
21 434 78 00
800 20 19 77
www.chicco.pt

ARTSANA BELGIUM N.V.
Temselaan 5 B-1853 Strombeek - Bever
Belgium
+32 23008240
www.chicco.be

ARTSANA TURKEY BEBEKVE SAGLIK URUNLER A.S.
Eski Uskudar Yolu, Erkut Sokak
Uner Plaza No. 4/1 Kat 12
Kozyatagi - Kadikoy
34710 Istanbul – Turkey
0214 444 2444
www.chicco.com

ARTSANA POLAND Sp.zo.o.
Aquarius, Ul. Połczyńska 31 A
01-377 Warszawa
+48 22 290 59 90
www.chicco.com

Dec V. Ruben Dario 1015
Colonia Lomas De Providencia 44647
Guadalajara, Jalisco-Mexico
01800 702 8983
www.chicco.com.mx

ARTSANA ARGENTINA S.A.
Uruguay 4501
Victoria Cp(1644)
San Fernando- Buenos Aires-Argentina
0810-888-2442
www.chicco.com.ar

ARTSANA INDIA PRIVATE LIMITED,
7Th Floor, Tower B, Paras Twin Towers,
Golf Course Road, Sector 54
Gurgaon - 122002
Haryana, India
(+91)(124)(4964500)
www.chicco.in

ARTSANA S.p.A.
22070 Grandate (CO) - Italy
Tel. (+39) 031 382 111
Fax (+39) 031 382 400
www.chicco.com
NOTE


NOTE