89063 - Drill Power Craft - Free user manual and instructions
Find the device manual for free 89063 Power Craft in PDF.


| Product Type | Corded Electric Drill |
| Brand | Power Craft |
| Model | 89063 |
| Power Source | AC 120V, 60Hz |
| Motor Power | 700 W |
| No-Load Speed | 0-3000 RPM, variable speed trigger |
| Chuck Type | Keyless, 1/2-inch (13 mm) |
| Drilling Capacity (Wood) | Up to 40 mm |
| Drilling Capacity (Steel) | Up to 13 mm |
| Drilling Capacity (Masonry) | Up to 16 mm |
| Torque Settings | 22+1 clutch settings for screwdriving |
| Forward/Reverse | Yes, with lock-on button |
| Auxiliary Handle | Side handle included for two-handed control |
| Depth Stop | Adjustable depth rod |
| Weight | 1.7 kg (3.7 lbs) |
| Dimensions (LxWxH) | 280 x 65 x 200 mm |
| Cord Length | 2.5 m |
| Protection Class | Class II (double insulated) |
| Included Accessories | Drill bit set (5 pcs), screwdriver bit set, carry case |
| Maintenance | Clean with dry cloth; check carbon brushes periodically |
| Safety Features | Lock-off switch, thermal overload protection |
| Repairability | Spare parts available (brushes, chuck, switch); user-serviceable |
| Warranty | 2 years limited manufacturer warranty |
Frequently Asked Questions - 89063 Power Craft
User questions about 89063 Power Craft
0 question about this device. Answer the ones you know or ask your own.
Ask a new question about this device
Download the instructions for your Drill in PDF format for free! Find your manual 89063 - Power Craft and take your electronic device back in hand. On this page are published all the documents necessary for the use of your device. 89063 by Power Craft.
USER MANUAL 89063 Power Craft
Instruction manual 23
DE
ERDBOHRER
natural_image
Industrial electric drill bit with red and black components, no visible text or symbols
natural_image
Camera aperture icon with green center and black blades (no text or symbols)POWER CRAFT®
GARDEN

Fremstillet i P.R.C.
6001 - Yongkang Shunyang Power Machinery Factory, Zhejiang EU-Importør:
HP Værktøj A/S
7080 Børkop
Danmark
Manufactured in P.R.C.
6001 - Yongkang Shunyang Power Machinery Factory, Zhejiang EU importer:
HP Værktøj A/S
7080 Børkop
Denmark
All rights reserved. The content of this user guide may not be reproduced in part or whole in any way, electronically or mechanically (e.g. photocopying or scanning), translated or stored in a database and retrieval system without the prior written consent of HP Værktøj A/S.

Produsert i P.R.C.
6001 - Yongkang Shunyang Power Machinery Factory, Zhejiang EU-importor
HP Værktøj A/S
7080 Børkop
Danmark
BRUGSANVISNING
BRUKSANVISNING
BRUKSANVISNING
KÄYTTÖOHJE
Turvallisuusohjeet
To get the most out of your new earth auger, please read these instructions and the attached safety instructions before use. Please also save the instructions in case you need to refer to them at a later date.
Technical specifications.
Stroke volume: 43 cm
3
Motor power output: 1,5 kW
Speed of the auger: 170 rpm
Fuel tank capacity: approx. 0.9 l
Fuel: Oil/petrol mixture 4 %
Gear oil: SAE 80-90
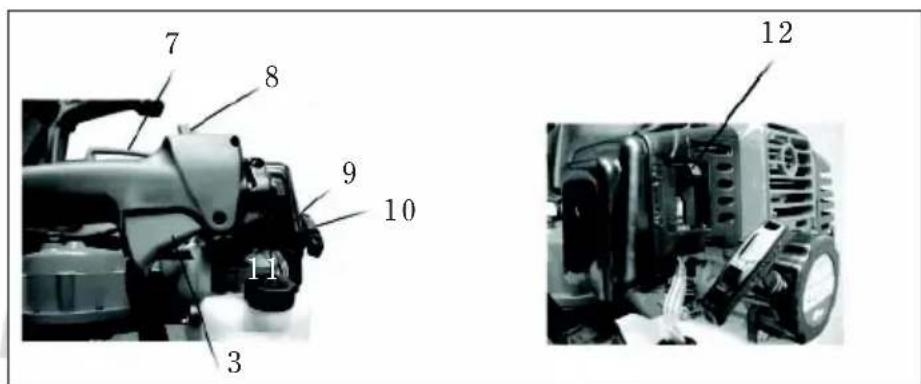
Main components
INSTRUCTION MANUAL
Special safety instructions
The motor uses lubricated petrol. Never use pure leaded petrol, diesel or other fuels.
The petrol must be a mixture of 1 part two-stroke oil to 25 parts unleaded 95-octane petrol.
Ensure the petrol and oil are well mixed before filling.
Mix and add the fuel in a well-ventilated area.
Fuel should be stored out of the reach of children in a clearly marked and approved container.
Remove any spilt fuel with a dry cloth after refuelling.
Smoking and the use of naked flame when refuelling or using the earth auger should be avoided.
Never refill with fuel when the motor is running.
Never refill with fuel in a closed room.
Do not overfill with fuel, as this can cause a fire hazard.
Check that the fuel cap is tightly closed, as fuel leaks can cause a fire hazard.
The motor parts become very hot when in use. Avoid touching and do not let the earth auger come into contact with any flammable materials (dry grass, dry leaves etc) whilst the motor is hot.
For outdoor use only. The exhaust gases contain carbon monoxide and hydrocarbons that are highly dangerous to humans and animals if inhaled.
Do not use the earth auger when it is raining or snowing.
Always use ear protectors, safety glasses, overalls and safety footwear when using the earth auger.
Never use the earth auger if the throttle and safety switch are not functioning correctly. Do not obstruct or in any other way deactivate the safety switch.
Never start the motor without the air filter in place or if the silencer is defective.
Always follow the motor maintenance instructions under "Cleaning and Maintenance".
Beware that the earth auger may vibrate violently or rebound if you hit a stone, roots or other hard material in the ground.
Make sure that you do not accidentally drill into electricity or telephone cables, sewage or drainage pipes, etc.
Assembly and preparation
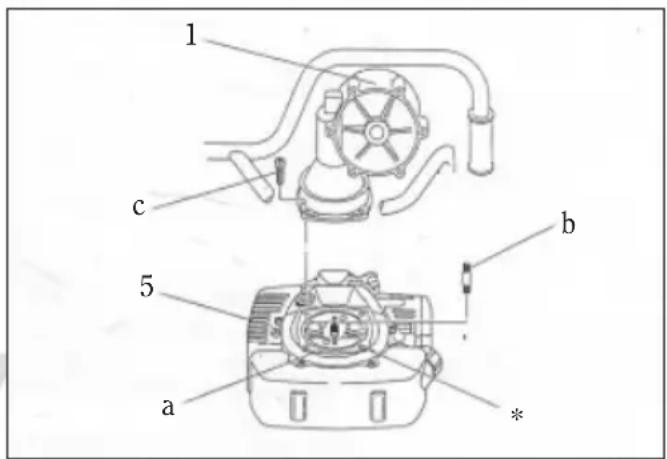
Assembling the motor and gearbox
Place the motor (5) on a clean, soft surface with the clutch plate (a) facing upwards.
Screw the stud (b) into position in the hole marked with (*) on the motor.
Position the gearbox (1) on the motor and screw the nut on the stud.
Screw the gearbox to the motor using the other three bolts (c), and tighten the bolts and nuts securely and evenly.
ENGLISH
INSTRUCTION MANUAL
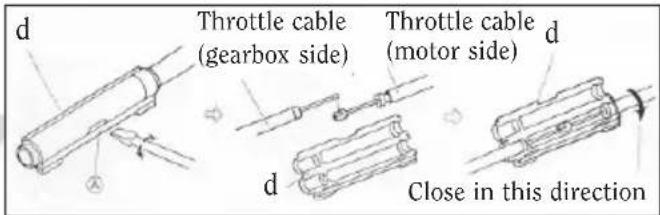
Connecting the throttle cable
Carefully open the connector (d) using a suitable screwdriver. Remove the connector from the cable.
Couple the wires in the two cables and replace the connector. Squeeze the connector until the top and bottom click together.
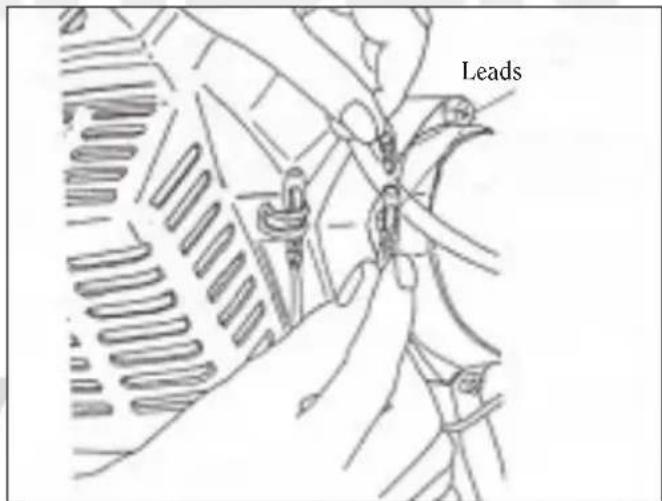
Connecting the leads
Push the contact plugs on the leads between the motor and gearbox together, paying attention to their colour codes.
Connecting the throttle cable
Connecting the leads
Connecting the auger and gearbox
Push the clamping band (e) on the auger upwards and pull the cotter pin (f) out of the hole.
Slot the auger shaft over the motor shaft, ensuring the holes in the shafts line up with one another.
Push the cotter pin through the holes and slide the clamping band into place.
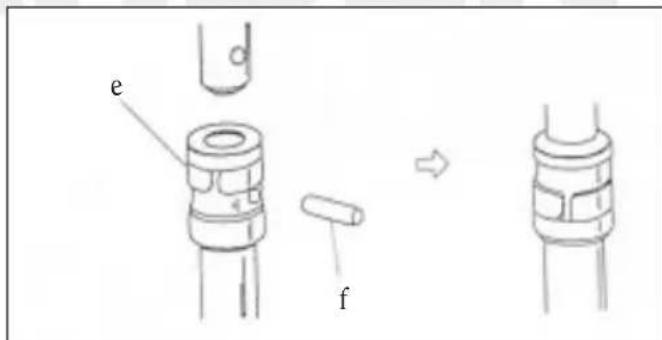
Assembling the auger and gearbox
INSTRUCTION MANUAL
Starting and stopping the motor
Cold motor start:
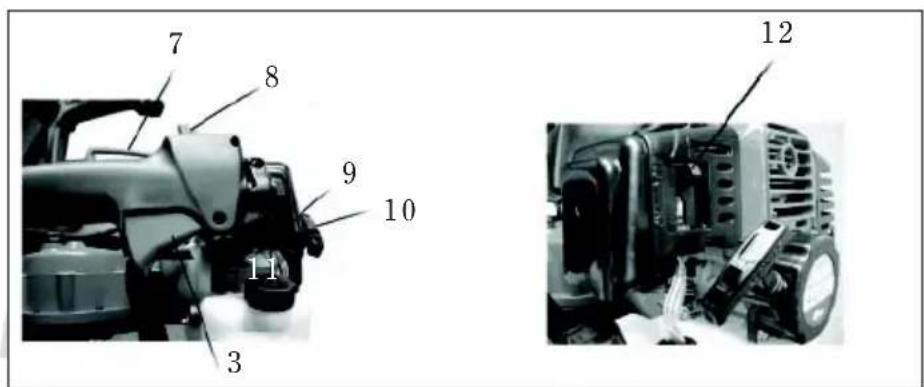
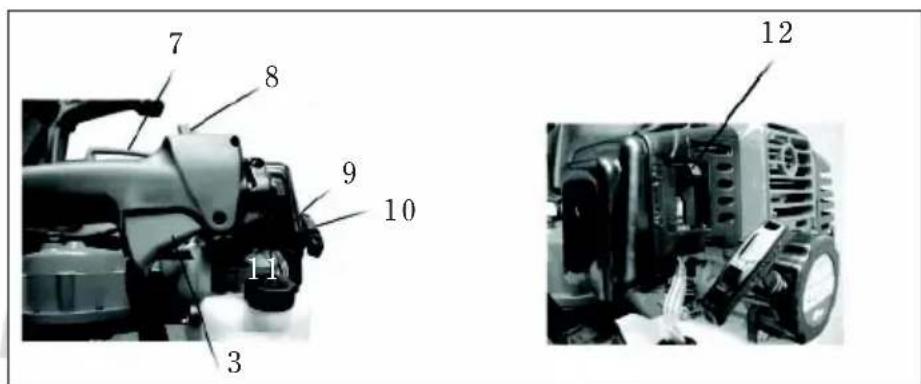
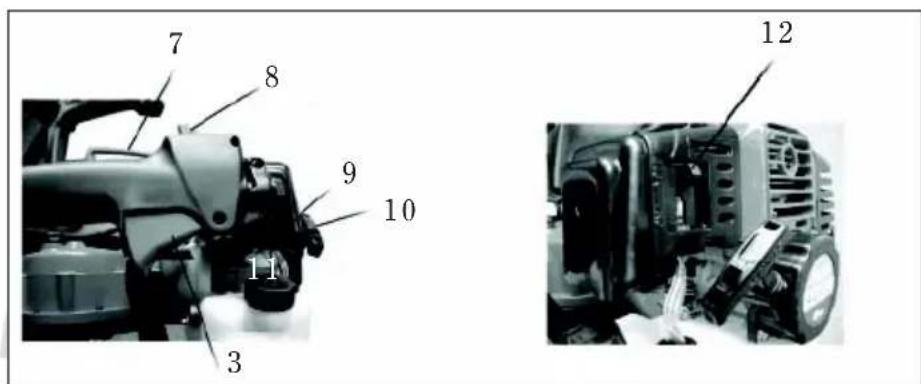
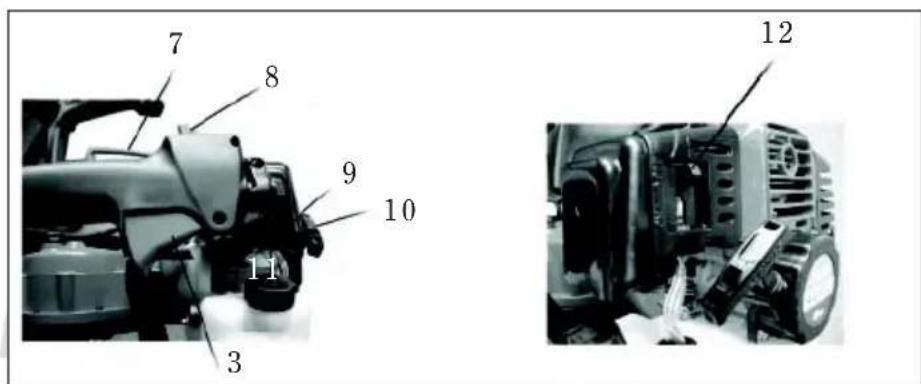
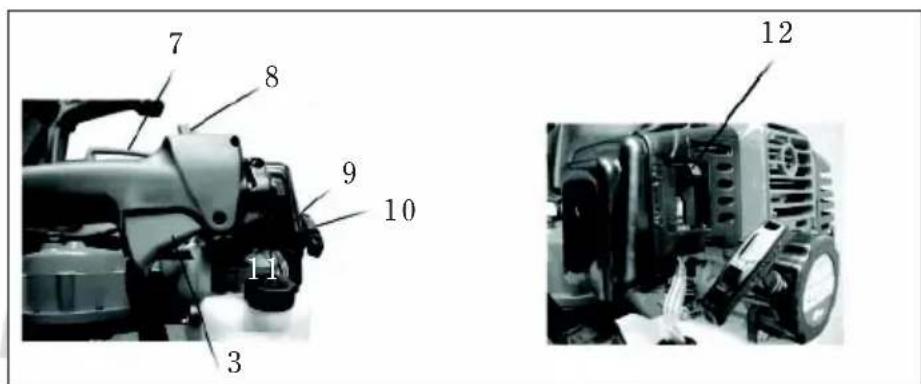
Set the starter switch (8) to the "RUN" position.
Push the choke (12) to the "OFF" position.
Squeeze the primer bulb 10 times to charge the carburettor with fuel.
Grip the handle (2) and press the throttle (3) and the safety switch (7) in.
Pull the starter handle (10) out about 10 cm until you feel resistance.
Pull the starter handle right out using sharp tugs until the motor starts.
Once the motor has been running for a few seconds, push the choke to the "ON" position.
Press the throttle (12) slightly and allow the motor to warm up at low revs slightly above idling. Push choke handle fully in.
Warm motor start
Warm motor start procedure is the same as for cold, except that you do not need to move the choke.
Stopping the motor
Release the throttle and allow the motor to idle for a couple of minutes.
Set the start button to OFF
Cleaning and Maintenance
Clean by wiping down exterior parts with a damp cloth. Ensure the ventilation slots are kept free of dust and dirt.
Cleaning the air filter
Remove the air filter by undoing the finger screw and removing the filter cover. Clean the filter cover and element using compressed air and replace. If the filter element cannot be cleaned properly, replace it.
Cleaning the spark plug
Remove the spark plug using a spark plug spanner.
Remove any deposits using a wire brush. Check that the spark gap is 0.6 to 0.7 mm and adjust if necessary.
Changing the gear oil
The gear oil must be changed after every 25 hours of operation.
The oil will flow most easily when it is warm.
Unscrew the drainage screw (g) from the gearbox and allow the oil to run out into a suitable container. Dispose of the used gear oil in accordance with local rules and regulations.
Position the earth auger vertically and unscrew the oil cover (h). Pour around 250 ml of fresh gear oil (SAE 80-90) into the gearbox through the oil filler nozzle until the oil reaches the bottom of the drainage hole.
Replace the drainage screw and the oil cover.
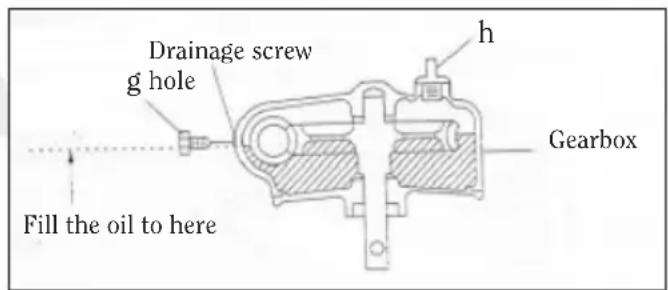
Changing the gear oil
INSTRUCTION MANUAL
Environmental information
HP Værktøj A/S endeavours to manufacture environmentally friendly electrical and electronic products; we also wish to contribute to the safe disposal of waste substances which may be environmentally hazardous.
A healthy environment is important for everyone, and we have therefore set ourselves the target of complying with the requirements in the EU's initiatives in this area, which means we guarantee the environmentally sound collection, treatment, recovery and disposal of electronic equipment which might otherwise harm the environment. This also means that our products do not contain any of the following chemicals and substances:
- Lead
- Mercury
- Cadmium
- Hexavalent chrome
- PBB (polybrominated biphenyls) (flame retardants)
- PBB (polybrominated diphenyl ethers) (flame retardants)
HP Værktøj A/S is proud to support the EU's environmental initiatives in order to play a part in a cleaner environment and hereby declares that our products comply with the RoHS Directive (2002/95/EC).

COMPLIANT™
GEBRAUCHSANWEISUNG
Einführung
GEBRAUCHSANWEISUNG
Sicherheitshinweise
CE mark placed: 2008
EC-DECLARATION OF CONFORMITY
Hereby, on our own responsibility declare that:
Is manufactured in compliance with the following:
98/37/EC: Safety of machinery with amendments.
06/95/EEC: Low Voltage Directive.
89/336/EEC: EMC- directive + (amendments 93/68/EEC)
STANDARDER, NORMER, NORMER, NORMIT, STANDARDS, NORMEN:
EN 61000-6-3:2001 - EN 61000-6-1:2001
- ERDBOHRER
- BRUGSANVISNING
- BRUKSANVISNING
- KÄYTTÖOHJE
- Turvallisuusohjeet
- Technical specifications.
- Main components
- INSTRUCTION MANUAL
- Special safety instructions
- Assembly and preparation
- ENGLISH
- Connecting the throttle cable
- Connecting the leads
- Connecting the auger and gearbox
- Starting and stopping the motor
- Cleaning and Maintenance
- Environmental information
- GEBRAUCHSANWEISUNG
- Einführung
- Sicherheitshinweise
Brand : Power Craft
Model : 89063
Category : Drill