
TVIP10005B - Surveillance Camera ABUS - Free user manual and instructions
Find the device manual for free TVIP10005B ABUS in PDF.


| Product Type | Surveillance Camera (IP) |
| Brand | ABUS |
| Model | TVIP10005B |
| Dimensions (mm) | 100 x 80 x 70 |
| Weight (g) | 350 |
| Power Supply | PoE (IEEE 802.3af) or 12V DC |
| Resolution | 1920 x 1080 (Full HD) |
| Frame Rate | 30 fps |
| Night Vision | Up to 30m with IR LEDs |
| Lens | Fixed 2.8mm, F2.0 |
| Field of View | Horizontal: 90°, Vertical: 50° |
| Video Compression | H.265/H.264 |
| Audio | Built-in microphone and speaker |
| Network Interface | 10/100 Base-T Ethernet (RJ45) |
| Storage | MicroSD card (up to 128GB), NAS |
| Weather Rating | IP66 (outdoor) |
| Motion Detection | Yes, with email alerts |
| Privacy Zone | Configurable |
| Operation Temperature | -20°C to 50°C |
| Maintenance | Clean lens gently with dry cloth, check cables periodically |
| Security | Password protection, HTTPS, 802.1X |
| Spare Parts & Repairability | Contact ABUS support for spare parts; device not user-serviceable |
Frequently Asked Questions - TVIP10005B ABUS
User questions about TVIP10005B ABUS
0 question about this device. Answer the ones you know or ask your own.
Ask a new question about this device
Download the instructions for your Surveillance Camera in PDF format for free! Find your manual TVIP10005B - ABUS and take your electronic device back in hand. On this page are published all the documents necessary for the use of your device. TVIP10005B by ABUS.
USER MANUAL TVIP10005B ABUS
TVIP10005B / TVIP10055B

natural_image
White wall-mounted electronic device with a black square button and 'ABUS' label (no readable text beyond branding)UK User manual
These user manual contains important information for installation and operation. This should be noted also when this product is passed on to a third party. Therefore look after these operating instructions for future reference!
A list of contents with the corresponding page numbers can be found in the index on page 6.
PL
natural_image
White wall-mounted electronic device with a black square button and 'ABUS' label (no readable text beyond branding)UK
User manual
Version 03/2013
CE
Dear Customer,
Thank you for purchasing this product.
This product meets the requirements of the applicable European and national guidelines. The corresponding declarations and documents can be obtained from the manufacturer.
To maintain this condition and to ensure risk-free operation, you as the user must observe these operation instructions!
Before initial start-up, read through the complete operating instructions observing operating and safety instructions.
All company and product names mentioned in this document are registered trademarks. All rights reserved.
If you have any questions, please contact your installer or your local dealer!
≥S,
|
Important safety instructions

The warranty will expire for damage due to non-compliance with these operating instructions. We shall not be liable for any consequential loss!

We do not accept liability for damage to property or personal injury caused by incorrect handling or non-compliance with the safety-instructions. In such cases the warrantywill expire.
Dear customer,
The following safety instructions are intended not only for the protection of your health, but also for the protection of the device. Please read through the following points carefully:
- There are no parts on the inside of the product which need to be serviced. Apart from this, the license (CE) and the guarantee/warranty will lapse if you open/take the product apart.
• The product will be damaged even it falls from a low height.
• This device can be used in inside only. - During the installation of the camera please take care that direct sunlight cannot fall onto the image sensor of the device. Please follow the installation instructions in the corresponding chapter of this user manual.
Avoid using the device under the following unfavorable ambient conditions:
• wetness or excessive air humidity
• extreme cold or heat
- direct sunlight
• dust or combustible gases, vapors or solvents
• strong vibration
• strong magnetic fields, such as those found in the vicinity of machinery or loudspeakers
- the camera should not positioned with opened iris towards the sun - this can lead to the destruction of the sensor.
• the camera may not be installed on unstable surfaces
General safety instructions:
- Do not leave packaging material lying around carelessly. Plastic/foil/bags and polystyrene parts etc. could become dangerous toys for children.
- For safety reasons don't give the camera into child hands due to them being able to swallow small parts.
- Please do not insert objects through the openings into the device.
- Use only accessories which are specified by the manufacturer. Please do not connect incompatible parts to the device.
- Please pay attention to the safety instructions and user manuals of the other connected devices.
- Check the device for damages before installation. If this should be the case please do not use it.
- Please adhere to the operational voltage limitations listed in the technical data. High voltage could destroy the device and pose a health hazard (electric shock).

During the installation into an existing video surveillance system make sure that all devices are disconnected from the low and supply voltage circuit.

If in doubt allow a professional electrician to mount, install and wire-up your device. Improper or make-do electrical connection to the mains does only represent at threat to you but also to other persons.
Wire-up the entire system making sure that the mains and low voltage circuit remain separated and cannot come into contact with each other in normal use or due to any malfunctioning.
Contents
- Usage in accordance with regulations ....7
- Scope of delivery 7
- Installation......8
3.1 Power supply 8
3.2 Installing the camera....8 - Camera description 8
4.1 Description of connectors ....8
4.2 Status LEDs....9
4.3 Restoring the factory settings....9
4.4 Putting into operation 10
4.5 Accessing the network camera for the first time....11
4.6 Accessing the network camera over a web browser....12
4.7 Installing the ActiveX plug-in ....12
4.8 Adjusting the security settings 12
4.9 Password prompt ....13 - User functions....14
5.1. Video control....15 - Camera settings (configuration) 17
6.1 System....18
6.2 Video 21
6.3 Audio....21
6.4 Network....22
6.5 Security......27 - Maintenance and cleaning 28
7.1 Function test 28
7.2 Cleaning....28 - Disposal....28
- Technical data....29
- GPL license information ....30
1. Usage in accordance with regulations

Use of this product for other than the described purpose may lead to damage to the product and other dangers. All other uses are not in accordance with regulations, and result in the invalidation of the product guaran tee and warranty. No liability can be accepted as a result. This also applies to any alterations or modifications made to the product.
Read the entire operating manual carefully before putting the product into operation. The operating manual contains important information on installation and operation.
2. Scope of delivery
| ABUS network camera TVIP10005B / TVIP10055B |  |
| Power supply u nit |  |
| Network cable (1 metre) | 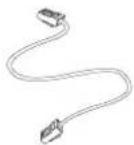 |
| Software CD (including operating manual) |  |
| Wall mount brac ket | 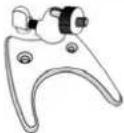 |
| Quick guide |  |
3. Installation
Make sure that all accessories and parts listed above are present in the scope of delivery. An Ethernet cable is required for camera operation. This Ethernet cable must meet UTP Category 5 (CAT 5) specifications and must not be longer than 100 metres.
3.1 Power supply
Before starting installation, ensure that the mains voltage and the rated voltage on the power supply unit are identical. The camera's supply voltage is 5 VDC. Please use the supplied power supply
3.2 Installing the camera
With the camera a mounting bracket is supplied. At the backside of the camera a socket is located. Using this socket the camera mounting bracket can be fixed at the camera. The mounting bracket can be fixed at the wall using the supplied pegs and screws.
4. Camera description
4.1 Description of connectors
| Front side Back side | |||
 |  | ||
| 1 Lens2 Microphone3 Status LED4 Network connector5 Power supply connector 5 VDC6 WPS Status LED (only TVIP10055B) | 7 WPS button (only TVIP10055B)8 Reset button9 Socket for camera bracket (1/4 inch thread)a Product sticker (with model number and MAC address) | ||
4.2 Status LEDs
| LED | Farbe | Bedeutung |
| Status LED Red continuously | on Start up procedure | (boot procedure)In case a network cable is attached to the camera, the camera will try to assign a valid IP address (using DHCP or using the configured fixed IP address).In case wireless network is configured, the camera tries to connect to access point using the configured wireless SSID/encryption. |
| Red flashing 1 / | second | Network connection is not available.LAN: network cable not connected or defect Wireless: configured wireless data is not accepted by the access point, or the access point is out of range. |
| Blue continuously on IP address was assigned successfully. (Note: it could be possible that the IP address will not match the target network. This can happen on manual setting of IP address. | ||
| WPS LED Flashing 1 / second WPS search started (pressing the WPS button for more than 10 seconds). The camera will try to exchange the wireless encryption settings with the WPS activated access point/Router. | ||
4.3 Restoring the factory settings
| Camera restart Press the reset button | for a short time. The camera will reboot. |
| Restoring the factory settings Press the reset button for more than 10 seconds. The settings of the camera will be reset to factory default.This is especially required after a firmware upgrade. | |
4.4 Putting into operation
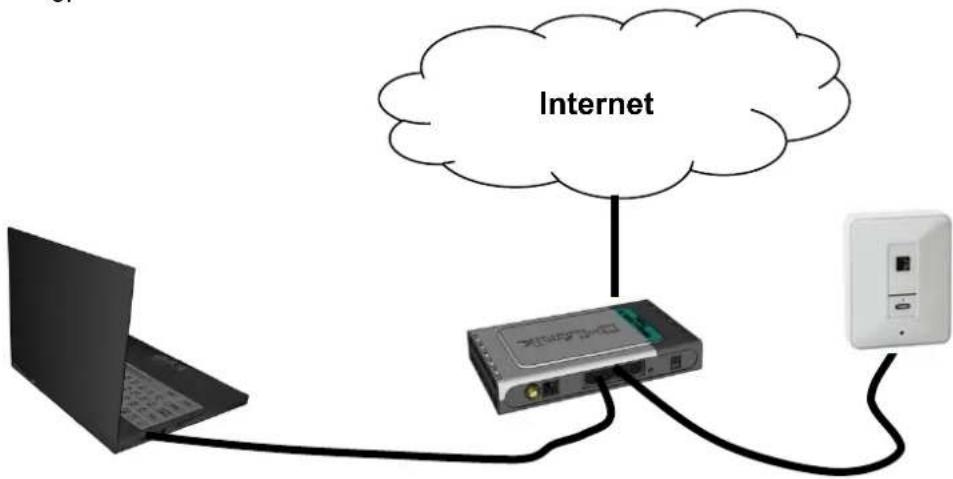
The network camera automatically detects whether a direct connection between the PC and camera should be made. A cross-over network cable is not required for this. You can use the supplied patch cable for direct connection when putting into operation for the first time.
Direct connection of the network camera to a PC / laptop
- Ensure that a CAT 5 network cable is used.
- Connect the cable to the Ethernet interface of the PC / laptop and the network camera.
- Connect the power supply to the network camera.
- Configure the network interface of your PC / laptop to the IP address 192.168.1.1 and the default gateway to 192.168.1.2.
- Go to point 4.6 to finish the initial set-up and establish the connection to the network camera.

natural_image
Laptop connected to a wall-mounted device (no text or symbols visible)① CAT 5 Ethernet cable
Connecting the network camera to a router / switch
- Ensure that a CAT 5 network cable is used.
- Connect the PC / laptop to the router / switch.
- Connect the network camera to the router / switch.
- Connect the power supply to the network camera.
- If a DHCP server is available in your network, set the network interface of your PC / laptop to "Obtain an IP address automatically".
- If no DHCP server is available, configure the network interface of your PC / laptop to 192.168.1.1 and the default gateway to 192.168.1.2.
- Go to point 4.6 to finish the initial set-up and establish the connection to the network camera.
8.
4.5 Accessing the network camera for the first time
The network camera is accessed for the first time using the IP Installer.
After the installation wizard is started, it searches for all connected ABUS IP network cameras and video servers in your network.
The program is found on the supplied CD-ROM. Install the program on your PC and then run it.
If a DHCP server is available in your network, the IP address is assigned automatically for both the PC / laptop and the network camera.
If no DHCP server is available, the network camera determines a free IP address from the 192.168.1.2–192.168.1.254 range independently. Your PC system must be located in the same IP segment in order to establish communications with the network camera.
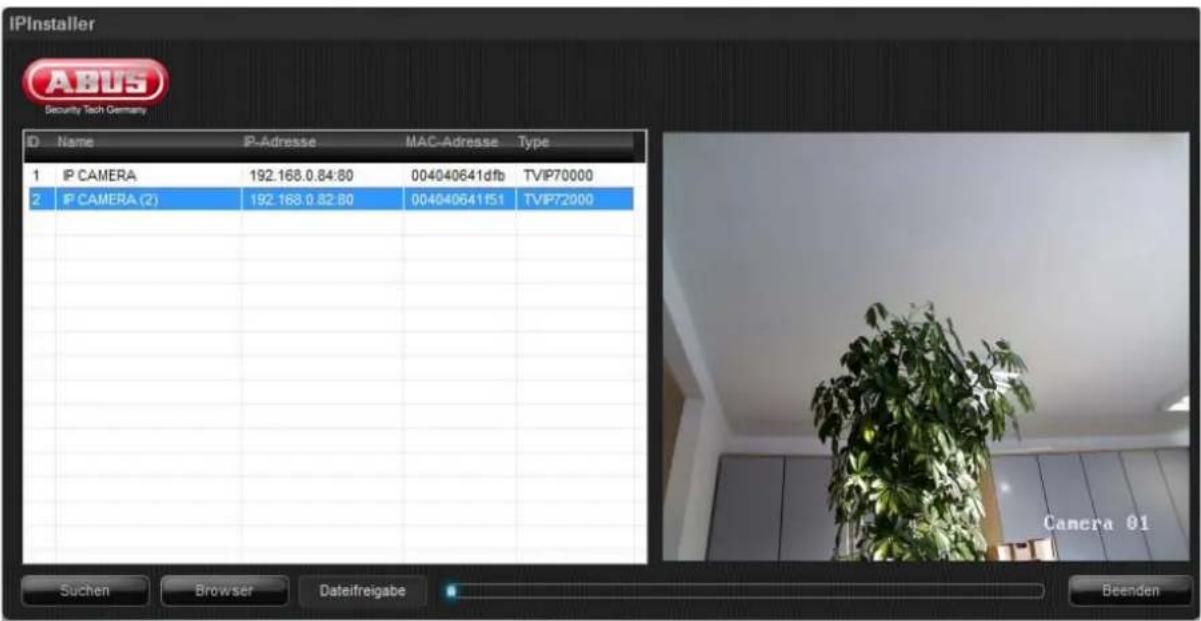

The standard setting for the network camera is "DHCP". If no DHCP server is in operation in your network, then we recommend setting the IP address manually to a fixed value following initial access to the network camera.
4.6 Accessing the network camera over a web browser
When you first access the network camera under Windows, the web browser queries the installation of an ActiveX plug-in for the network camera. This query depends on the Internet security settings of your PC. If the highest security level is set, the PC will refuse any installat on and any attempt at running it. This plug-in is used for displaying the video in the browser. To continue, click "Install" If the web browser prevents the installation, open the Internet security settings and reduce the security level or consult your IT or network administrator.
4.7 Installing the ActiveX plug-in
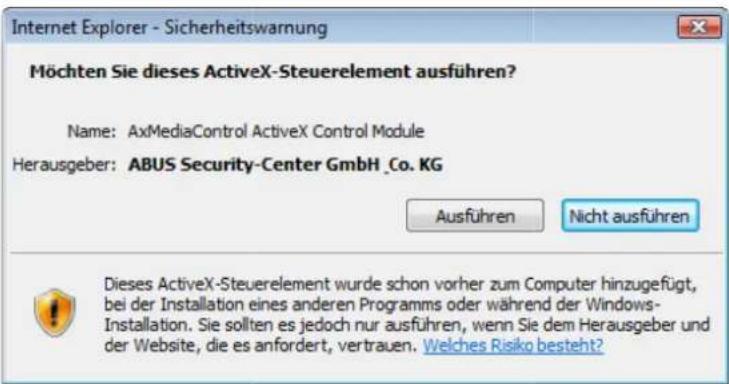
If Mozilla Firefox is used as the browser when accessing the camera, a n MJPEG stream is provided by the camera instead of the ActiveX plug-in.
4.8 Adjusting the security settings


Note: Your PC security settings may prevent a video stream. You can change the security settings to a lower level under "Tools / Internet: Options / Security". Make sure you enable ActiveX controls and downloads.
4.9 Password prompt
An administrator password is defined in the network camera as standard. However, the administrator should define a new password immediately for security reasons. After the new administrator password is stored, the network camera asks for the user name and password every time it is accessed.
The administrator account is set up in the factory as follows: user name "admin" and password "12345". Each time the network camera is accessed, the browser displays an authentication window and asks for the user name and password. If you can no longer access your personal settings in the administrator account, you can log in again with user name "admin" and password "12345" after resetting the network camera to the factory settings.
To enter a user name and password, proceed as follows:
Open Internet Explorer and enter the IP address of the camera (e.g. "http://192.168.1.14").
You are then prompted for authentication:

| Standard user name: | admin |
| Standard password: | 12345 |
-> You are now connected with the network camera and can see a video stream.
5. User functions
Open the main menu on the network camera. The interface is divided into the following main areas:

Live image display
You can access the full-screen view by double-clicking here (with Internet Explorer only).
Camera settings

Settings (configuration)
Used to configure the camera (administrator settings)
5.1. Video control

These functions are only available when using Internet Explorer.

Snapshot
The web browser displays a new window containing the snapshot. To save the snapshot, either left-click it and then click the floppy disk icon or right-click it and select "Save" from the context menu.

Full-screen view
Activate the full-screen view. The live image on the network camera is shown on the entire screen.
Start/stop live image display
The live stream can be stopped or ended. In both cases you can continue the live stream by pressing the play symbol.

Local recording
A recording on the local hard drive can be started or stopped. If you click the button, the Windows "Save as" dialog is called up.

Select a target directory on your hard drive. A directory and recording file are created automatically in the folder under the following name:
YYYYMMDD
YYYYMMDDHHmmss.avi
Y = Year
M = Month
D = Day
H = Hour
m = Minute
s = Second
Example:
C:\Recording\20091215\20091215143010.avi

The recorded data can be played back using an MP4-compatible video player (e.g. VLC Media Player). Alternatively, you can also watch the videos on Windows Media Player by installing a video codec in the IP Installer.

Digital zoom
Click the magnifying glass symbol to activate the digital zoom. The zoom factor can be changed on the scroll bar.

Setting the zoom factor
Change the zoom factor by moving the bar from left (low zoom) to right (high zoom).
6. Camera settings (configuration)
Only the administrator has access to the system configuration. The following sections explain each of the elements in the left-hand column. After you click a menu item on the left-hand side, a menu tree may be opened depending on the number of sub-items contained in the item. In this case, continue by clicking the sub-item.
Click "Home" to return to the main camera page.

Configuration
Home
Setting
System
▶ Camera

Welcome to Camera Settings Page
6.1 System
System Information Date Time Initialize
Information
Product information:
Product name: The product name indicates the functions included (e.g. WLAN).
Current version: Shows the current version of the installed firmware.
Image settings:
Brightness: Shows current brightness value
Contrast: Shows current contrast value
Saturation: Shows current saturation value
Sharpness: Shows current sharpness value
White balance: Selected option for white balance
Network:
LAN status: Current used IP address and HTTP port
Wireless status: Information about current wireless settings (only TVIP10055B)
Information
LED: Activate or deactivate the status LED at the front side of camera.
Hostname
Camera name: This is the description of the camera inside the network. As default the item number is configured.
Date/time
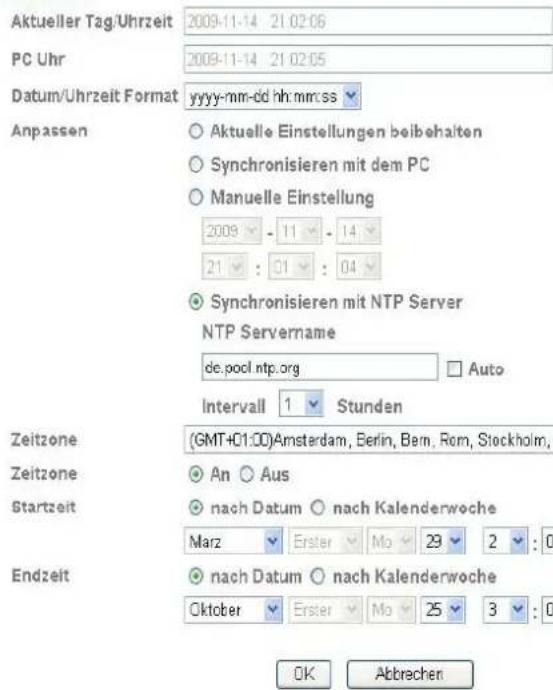
Current date/time: Shows the setting for the date/time currently stored in the camera.
PC clock: Shows the date/time on the PC from which you access the camera.
Date/time format: Select a format (YYYY-year, MM-month, DD-day, hh-our, mm-minute, ss-second).
Adjust:
Keep current settings: No changes to the settings
Synchronize with the PC: The date and time of the PC are taken over for the camera.
Manual setting: Manually set the time and date here.
Synchronize with the NTP server: Automatic updating of the date and time via a time server (Network Time Protocol)
NTP server name: Enter the domain name of the time server (e.g. de.pool.ntp.org)
Auto: When activated, the standard time server is used. Deactivate the "Auto" setting to enter the NTP server name manually.
Interval: Updating interval with the time server in hours
Time zone: Here you select the time zone in which the camera is located.
Daylight savings time: Enter the dates here for the switch from daylight savings time to standard time.

Accept the settings by pressing "Save" or cancel them by pressing "Cancel".
Initializing
Restart: If you press the Reset button once, the camera will restart.
Factory settings: Pressing this button causes the factory settings of the camera to be loaded. The selection must be confirmed.
Save settings: Here you can save a backup file of all camera settings.
Load settings: Settings saved to a backup file can be loaded here.
Update firmware: A more current version of the camera firmware can be loaded here. Information on updated firmware files can be found in the Software section at "http://www.abus.com".
Language
Upload language packet: You can set a different language here by uploading a language file. The following language is standard as default:
TVIP10005B -> German TVIP10055B -> German
The language files can be found on the supplied CD-ROM or inside the product area under www.abus.com.
6.2 Video
Video
Resolution: Please select between followings resolutions (Pixel): 640x480, 320x240, 160x120
Frame rate: Setting for frame rate in images per seconds.
Power frequency:
Using this value the camera can be adjusted regarding different power line frequencies. In germany this value is 50 Hz as standard.

Accept the settings by pressing "SAVE" or cancel them by pressing "Cancel".
6.3 Audio
Audio
Mikrofon
Microphon: Activates or deactivates the internal microphone.

The audio feature can be used only in conjunction with Internet Explorer.
6.4 Network
Netzwerk
MAC address: The hardware address of the camera is shown here.
Obtain IP address automatically:
The IP address, subnet mask, and address for the default gateway are obtained automatically from a DHCP server. An activated DHCP server must be present in the network in this case.
Use the following IP address:
Manual setting of the IP address, subnet mask, and standard router (gateway)
IP address: Manual setting of the IP address for the IP camera
Subnet mask: Manual setting of the subnet address for the IP camera
Standard router (gateway): Manual setting of the standard router for the IP camera
Use the following DNS server address:
If the DNS server address is not automatically assigned by a DHCP server, it can be manually assigned here.
Primary DNS server:
First server address with which the camera attempts to convert DNS names into IP addresses.
Secondary DNS server: Alternative server address with which the camera attempts to convert DNS names into IP addresses.
HTTP port number:
The standard port for HTTP transmission is 80. As an alternative, this port can be assigned a value in the range of 1025–65535. If several IP cameras are located in the same subnetwork, then each camera should have its own unique HTTP port.
MAC Adresse
00:18:FE:00:00:00
Standard Router (Gateway)

Accept the settings by pressing "SAVE" or cancel them by pressing "Cancel". If the network configuration is changed, then the camera must be restarted (System \ Initialize \ Restart).
DDNS
DynDNS or DDNS (dynamic domain name system entry) is a system that can update domain name entries in real time. The network camera is equipped with an integrated DynDNS client that updates the IP address independently via a DynDNS provider. If the network camera is located behind a router, we recommend using the DynDNS function of the router.
The following diagram offers an overview of accessing and updating the IP address using DynDNS.

flowchart
graph TD
    A["① 192.168.0.3"] --> B["LAN WAN"]
    B --> C["② 195.184.21.78"]
    B --> D["③ DynDNS access data"]
    B --> E["Internet"]
    E --> F["DynDNS.org Name Server"]
    F --> G["④ 195.184.21.78 → name.dyndns.org"]
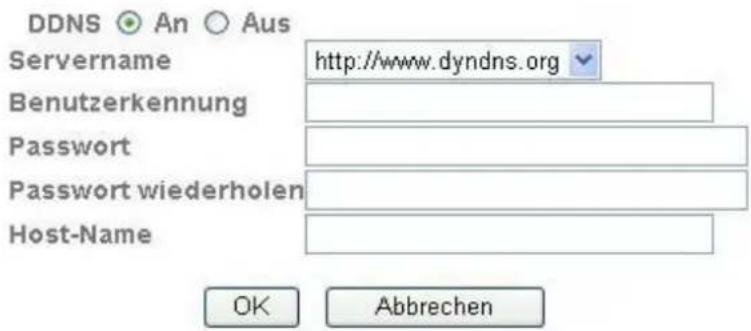
DDNS: Activates or deactivates the DDNS function.
Server name: Select a DDNS service provider. You must have registered access to this DDNS service provider (e.g. www.dyndns.org).
User ID: User ID of your DDNS account
Password: Password of your DDNS account
Repeat password: You need to confirm your password here.
Host name: Enter your registered domain name (host service) here (e.g. myIPcamera.dyndns.org).
Setting up a DDNS account
Set up a new account as follows under DynDNS.org:

Store your account information:

Note down your user data and enter this into the configuration of the network camera.
Accessing the network camera over DDNS
If the network camera is located behind a router, then access via DynDNS must be configured in the router. On the ABUS Security-Center homepage www.abus.com, you can find a description of DynDNS router configuration for common router models.
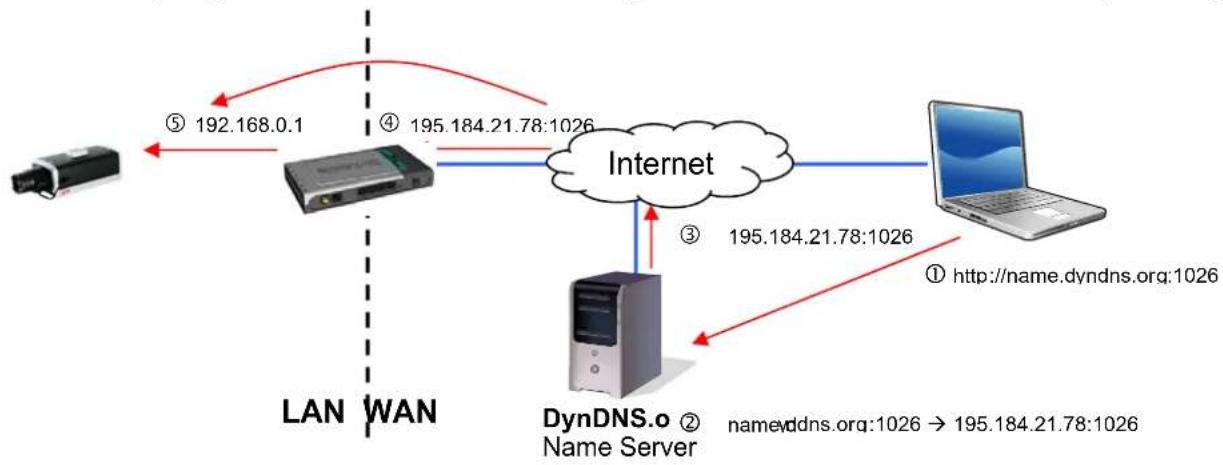
The following diagram offers an overview of accessing a network camera behind a router via DynDNS.org.
flowchart
graph TD
    A["Device"] -->|⑤ 192.168.0.1| B["Server"]
    B --> C["Internet"]
    C --> D["Laptop"]
    D -->|① http://name.dyndns.org:1026| E["DynDNS.o Name Server"]
    E -->|③ 195.184.21.78:1026| C
    C -->|④ 195.184.21.78:1026| B
    B -->|LAN WAN| A
    E -->|name vddns.org:1026 → 195.184.21.78:1026| C

Port forwarding of all relevant ports (at least RTSP + HTTP) must be set up in the router in order to use DynDNS access via the router.
Wireless (TVIP10055B only)
The camera features a WLAN network interface for wireless data transmission in an IP network. The network camera must be connected via a network cable for the initial configuration of all WLAN parameters.
WLAN: Enable or disable the WLAN interface.
MAC address: Shows the MAC address of the wireless interface.
IP address: The set IP address is displayed here. The address can be assigned automatically (DHCP) or manually (see below).
WLAN status display: The camera automatically searches the environment for WLAN access points (APs).
ESSID: Shows the name of the wireless network. If a connection to an access point has been established, this is indicated by the character "v" before the ESSID name.
Signal strength: Shows the signal quality in percent. To ensure a good connection, this value should not be below 60%.
Security: Indicates the way in which the network is protected (encryption type).
Wireless mode: Shows the WLAN standard that the access point (AP) supports.
Connect: When this button is pressed, the software attempts to connect to the selected access point. Additional data important for the connection must be configured in another window (it may be necessary to disable the pop-up blocker). The IP address is automatically determined.
Disconnect: The connection to the selected access point is disconnected.
Manual: Manual configuration of all data required for a wireless connection.
Update: When this button is pressed, the list of available access points is updated.
ESSID: The ESSID is the name of the access point.
Manual setting: Manual setting of the ESSID.
Mode: Select the WLAN connection mode here.
Infrastructure Ad-Hoc The network camera is connected to the network via an access point. In this mode, the network camera can communicate directly with another network adapter (network card). What is known as a peer-to-peer environment is set up.
Authentication: Here you can set the encryption mode for the wireless transmission.
Open No encryption selected.
Common key (WEP, Wired Equivalent Privacy) A 64- or 128-bit key is used for encryption (HEX or ASCII). For communication with other equipment, these keys must be the same on both devices.
WPA-PSK/WPA2-PSK (10/26 HEX characters or 5/13 ASCII characters according to bit length) (Wi-Fi Protected Access – Pre-Shared Keys) With this method, dynamic keys are used. TKIP (Temporal Key Integrity Protocol) or AES (Advanced Encryption Standard) can be selected as the encryption protocols. What is known as a passphrase (pre-shared key) must be assigned as the key. (64 HEX characters or 8 to 63 ASCII characters)
Encryption: Select the corresponding type of encryption here. Common key: WEP / disabled WPA-PSK / WPA2-PSK: TKIP or AES
Key length:
Network key:
With WEP only. Select the bit length for the key here.
With WEP only. Up to four keys can be assigned.
Obtain IP address automatically:
The IP address, subnet mask, and address for the default gateway are obtained automatically from a DHCP server. An activated DHCP server must be present in the network in this case.
Use the following IP address:
Manual setting of the IP address, subnet mask, and standard router (gateway)
Use the following DNS server address:
If the DNS server address is not automatically assigned by a DHCP server, it can be manually assigned here.
Primary DNS server:
First server address with which the camera attempts to convert DNS names into IP addresses.
Secondary DNS server: Alternative server address with which the camera attempts to convert DNS names into IP addresses.
WLAN
WLAN
Enable
MAC Address
8C:11:CB:02:4B:3B
IP Address
192.168.0.49
Status of wireless networks
ESSID
Signal Strength
Security
Radio Type
v PMV1
62
WPA(2)-PSK/TKIP, AES
11b/g
PMV2
44
WPA(2)-PSK/TKIP, AES
11b/g
Connect
Disconnect
Manual
Refresh

Accept the settings by pressing "SAVE" or cancel them by pressing "Cancel".
WPS (TVIP10055B only)
WPS (Wi-Fi Protected Setup) is a simple method for establishing a secure wireless network connection (WPA, WPA2). Consult the manual for your access point (e.g. router with WPS function) regarding the necessary steps for setting up the WPS function.
WPS: Enable the WPS function here if required.
MAC address: Shows the MAC address of the wireless interface.
IP address:
The set IP address is displayed here. The address can be assigned automatically (DHCP) or manually (see below).
Configure via: PBC:
Push Button Configuration – You set up a secure wireless connection by pressing the button on the access point or network camera.
PIN:
A secure wireless connection is set up in the network camera and access point through the assignment of a PIN. Press the “Generate new PIN” button to assign a new random PIN. This PIN must then be made known in the access point (WPS settings). Press “Start”. The network camera and access point are then automatically connected to each other via a secure connection.
Connect: A connection is established via WPS with the selected procedure (PBC or PIN).
Disconnect: The connection is disconnected.
Update: The list of available access points supporting WPS is updated.
6.5 Security
User
This menu item describes the user administration of the network camera. Up to 10 user accounts can be defined. The user accounts can each have one of three user types.
User list: Shows all configured users with the corresponding authorization levels.
Add: Add a user account.
Edit: Edit an existing user account. Before doing this, you need to select the required user account from the list.
Delete: Delete a user account.
| User types Permissions | |
| Administrator | Full access, including live views, configuration |
| Operator | Live view |
| Viewer | Live view |
The default access data for the main administrator is as follows:
User name: "admin"
Password: "12345"
User name: Here you assign the user name that needs to be entered for access to the camera.
Password: Here you assign the user name that needs to be entered for access to the camera.
Repeat entry: Here you assign the password that the corresponding user needs to enter for access to the camera.
User type: Select an individual user type for the user ID.
Anonymous setting: Activated Anonymous setting allows any user to see the main page including video stream. All settings pages are still password protected.

Accept the settings by pressing "SAVE" or cancel them by pressing "Cancel".
7. Maintenance and cleaning
7.1 Function test
Regularly check the technical safety of the product, e.g. check the housing for damage.
If safe operation is no longer possible, cease operating the product and safeguard it against accidental operation.
Safe operation is no longer possible under the following circumstances:
• The device shows visible damage.
• The device no longer works correctly.
• The device has been stored in adverse conditions for a long period of time.
• The device has been subjected to stress during transportation.

This product is maintenance-free for you. There are no components to service or anything inside the product to check. Never open it.
7.2 Cleaning
Clean the device with a clean, dry cloth. The cloth can be clampened with lukewarm water if it gets dirty.

Ensure that liquid does not penetrate the device, as this will cause damage. Do not use any chemical cleaning products, as they could damage the surface of the housing.
8. Disposal
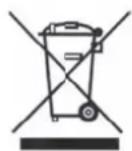
Devices displaying this symbol may not be disposed of as domestic waste. At the end of its service life, dispose of the product according to the applicable legal requirements. Please contact your dealer or dispose of the products at the local collection point for electronic waste.
- Technical data
| Item number TVIP10005B TVIP10055B | ||
| Image sensor 1/4" Progressive Scan CMOS Sensor | ||
| Camera type Farbkamera Farbkamera | ||
| Resolution 640x480, 320x240, 160x120 | ||
| Picture elements (total) 640x480 | ||
| Picture elements (effective) 640x480 | ||
| Lens f=1,7 mm | ||
| Horizontal viewing angle 67° | ||
| Digital zoom 10x | ||
| Image Compression MJPEG | ||
| Frame rate | MJPEG: 25 Images/s @ 640x480,MJPEG: 25 Images/s @ 320x240,MJPEG: 25 Images/s @ 160x120, | |
| Electronic-Shutter-Control | Auto | |
| White balance Yes | ||
| Gain control 0-9 dB | ||
| Backlight compensation | BLC | |
| Supported Browser | Mozilla Firefox, Apple Safari, Google Chrome or Internet Explorer 6.x and higher | |
| Supoorted Software | - | |
| Network connector | RJ-45 Ethernet 10/100 Base-T | |
| Network protocols | TCP/IP, DHCP, PPPoE, ARP, ICMP, DNS, NTP, UPnP, HTTP, TCP, UDP, ABUS Server | |
| Wireless | - | IEEE 802.11b/g/n |
| Access control | IP-address filter, username, password, 3 user levels | |
| Power supply | 5 V DC | |
| Current consumption | 260 mA | |
| Working temperature | 0°C ~ 35°C | |
| IP protection grade | IP34 | |
| Dimensions (WxHxD) | 63 x 77 x 32 mm | |
| Certifications | CE, RoHS, WEEE, REACH | |
10. GPL license information
Here we wish to inform you that the network surveillance cameras TVIP10005B and TVIP10055B contain Open Source Software, which is licensed exclusively under the GNU General Public License (GPL). To ensure that your use of the programs conforms with GPL, please refer to the GPL license conditions.
License text
The license text for the GNU General Public License can be viewed on the enclosed software CD.
Source code
The source code in use can be obtained from ABUS Security-Center upon request if you send an e-mail to license@abus-sc.com up to three years after purchase.
Executability of the overall system
The software packets (source code) do not enable you to set up a functional overall system. You also need a variety of software applications and the hardware developed for the network camera system.
natural_image
White wall-mounted electronic device with a black square button and 'ARBUS' logo, no visible text or symbols beyond the brand name.Instrukcja obsługi
Wersja 03/2013
CE
natural_image
Two devices connected by a black cable, one on a laptop and the other with a digital display (no text or symbols visible)① Kabel Ethernet Cat5


natural_image
White wall-mounted electronic device with a square display and 'AHUS' logo (no text or symbols on the device itself)natural_image
Two devices connected by a cable: a laptop and a wall-mounted device (no text or symbols visible)① Cat5-ethernetkabel


natural_image
White wall-mounted electronic device with a black square button and 'ABUS' label, no visible text or symbols beyond the logo.natural_image
Two devices connected by a cable, one black laptop and one white electronic device (no text or symbols visible)① Cable de Ethernet Cat5

W-LAN (solo TVIP10055B)
WPS (solo TVIP10055B)
Version 2, June 1991
Copyright (C) 1989, 1991 Free Software Foundation, Inc. 51 Franklin Street, Fifth Floor, Boston, MA 02110-1301 USA. Everyone is permitted to copy and distribute verbatim copies of this license document, but changing it is not allowed.
Preamble
The licenses for most software are designed to take away your freedom to share and change it. By contrast, the GNU General Public License is intended to guarantee your freedom to share and change free software--to make sure the software is free for all its users. This General Public License applies to most of the Free Software Foundation's software and to any other program whose authors commit to using it. (Some other Free Software Foundation software is covered by the GNU Lesser General Public License instead.) You can apply it to your programs, too.
When we speak of free software, we are referring to freedom, not price. Our General Public Licenses are designed to make sure that you have the freedom to distribute copies of free software (and charge for this service if you wish), that you receive source code or can get it if you want it, that you can change the software or use pieces of it in new free programs; and that you know you can do these things.
To protect your rights, we need to make restrictions that forbid anyone to deny you these rights or to ask you to surrender the rights. These restrictions translate to certain responsibilities for you if you distribute copies of the software, or if you modify it.
For example, if you distribute copies of such a program, whether gratis or for a fee, you must give the recipients all the rights that you have. You must make sure that they, too, receive or can get the source code. And you must show them these terms so they know their rights.
We protect your rights with two steps: (1) copyright the software, and (2) offer you this license which gives you legal permission to copy, distribute and/or modify the software.
Also, for each author's protection and ours, we want to make certain that everyone understands that there is no warranty for this free software. If the software is modified by someone else and passed on, we want its recipients to know that what they have is not the original, so that any problems introduced by others will not reflect on the original authors' reputations.
Finally, any free program is threatened constantly by software patents. We wish to avoid the danger that redistributors of a free program will individually obtain patent licenses, in effect making the program proprietary. To prevent this, we have made it clear that any patent must be licensed for everyone's free use or not licensed at all.
The precise terms and conditions for copying, distribution and modification follow.
GNU GENERAL PUBLIC LICENSE
TERMS AND CONDITIONS FOR COPYING, DISTRIBUTION AND MODIFICATION
- This License applies to any program or other work which contains a notice placed by the copyright holder saying it may be distributed under the terms of this General Public License. The "Program", below, refers to any such program or work, and a "work based on the Program" means either the Program or any derivative work under copyright law: that is to say, a work containing the Program or a portion of it, either verbatim or with modifications and/or translated into another language. (Hereinafter, translation is included without limitation in the term "modification".) Each licensee is addressed as "you".
Activities other than copying, distribution and modification are not covered by this License; they are outside its scope. The act of running the Program is not restricted, and the output from the Program is covered only if its contents constitute a work based on the Program (independent of having been made by running the Program). Whether that is true depends on what the Program does.
- You may copy and distribute verbatim copies of the Program's source code as you receive it, in any medium, provided that you conspicuously and appropriately publish on each copy an appropriate copyright notice and disclaimer of warranty; keep intact all the notices that refer to this License and to the absence of any warranty; and give any other recipients of the Program a copy of this License along with the Program.
You may charge a fee for the physical act of transferring a copy, and you may at your option offer warranty protection in exchange for a fee.
- You may modify your copy or copies of the Program or any portion of it, thus forming a work based on the Program, and copy and distribute such modifications or work under the terms of Section 1 above, provided that you also meet all of these conditions:
a) You must cause the modified files to carry prominent notices stating that you changed the files and the date of any change.
b) You must cause any work that you distribute or publish, that in whole or in part contains or is derived from the Program or any part thereof, to be licensed as a whole at no charge to all third parties under the terms of this License.
c) If the modified program normally reads commands interactively when run, you must cause it, when started running for such interactive use in the most ordinary way, to print or display an announcement including an appropriate copyright notice and a notice that there is no warranty (or else, saying that you provide a warranty) and that users may redistribute the program under these conditions, and telling the user how to view a copy of this License. (Exception: if the Program itself is interactive but does not normally print such an announcement, your work based on the Program is not required to print an announcement.)
These requirements apply to the modified work as a whole. If identifiable sections of that work are not derived from the Program, and can be reasonably considered independent and separate works in themselves, then this License, and its terms, do not apply to those sections when you distribute them as separate works. But when you distribute the same sections as part of a whole which is a work based on the Program, the distribution of the whole must be on the terms of this License, whose permissions for other licensees extend to the entire whole, and thus to each and every part regardless of who wrote it.
Thus, it is not the intent of this section to claim rights or contest your rights to work written entirely by you; rather, the intent is to exercise the right to control the distribution of derivative or collective works based on the Program.
In addition, mere aggregation of another work not based on the Program with the Program (or with a work based on the Program) on a volume of a storage or distribution medium does not bring the other work under the scope of this License.
- You may copy and distribute the Program (or a work based on it, under Section 2) in object code or executable form under the terms of Sections 1 and 2 above provided that you also do one of the following:
a) Accompany it with the complete corresponding machine-readable source code, which must be distributed under the terms of Sections 1 and 2 above on a medium customarily used for software interchange; or,
b) Accompany it with a written offer, valid for at least three years, to give any third party, for a charge no more than your cost of physically performing source distribution, a complete machine-readable copy of the corresponding source code, to be distributed under the terms of Sections 1 and 2 above on a medium customarily used for software interchange; or,
c) Accompany it with the information you received as to the offer to distribute corresponding source code. (This alternative is allowed only for noncommercial distribution and only if you received the program in object code or executable form with such an offer, in accord with Subsection b above.)
The source code for a work means the preferred form of the work for making modifications to it. For an executable work, complete source code means all the source code for all modules it contains, plus any associated interface definition files, plus the scripts used to control compilation and installation of the executable. However, as a special exception, the source code distributed need not include anything that is normally distributed (in either source or binary form) with the major components (compiler, kernel, and so on) of the operating system on which the executable runs, unless that component itself accompanies the executable.
If distribution of executable or object code is made by offering access to copy from a designated place, then offering equivalent access to copy the source code from the same place counts as distribution of the source code, even though third parties are not compelled to copy the source along with the object code.
- You may not copy, modify, sublicense, or distribute the Program except as expressly provided under this License. Any attempt otherwise to copy, modify, sublicense or distribute the Program is void, and will automatically terminate your rights under this License. However, parties who have received copies, or rights, from you under this License will not have their licenses terminated so long as such parties remain in full compliance.
- You are not required to accept this License, since you have not signed it. However, nothing else grants you permission to modify or distribute the Program or its derivative works. These actions are prohibited by law if you do not accept this License. Therefore, by modifying or distributing the Program (or any work based on the Program), you indicate your acceptance of this License to do so, and all its terms and conditions for copying, distributing or modifying the Program or works based on it.
-
Each time you redistribute the Program (or any work based on the Program), the recipient automatically receives a license from the original licensor to copy, distribute or modify the Program subject to these terms and conditions. You may not impose any further restrictions on the recipients' exercise of the rights granted herein. You are not responsible for enforcing compliance by third parties to this License.
-
If, as a consequence of a court judgment or allegation of patent infringement or for any other reason (not limited to patent issues), conditions are imposed on you (whether by court order, agreement or otherwise) that contradict the conditions of this License, they do not excuse you from the conditions of this License. If you cannot distribute so as to satisfy simultaneously your obligations under this License and any other pertinent obligations, then as a consequence you may not distribute the Program at all. For example, if a patent license would not permit royalty-free redistribution of the Program by all those who receive copies directly or indirectly through you, then the only way you could satisfy both it and this License would be to refrain entirely from distribution of the Program.
If any portion of this section is held invalid or unenforceable under any particular circumstance, the balance of the section is intended to apply and the section as a whole is intended to apply in other circumstances.
It is not the purpose of this section to induce you to infringe any patents or other property right claims or to contest validity of any such claims; this section has the sole purpose of protecting the integrity of the free software distribution system, which is implemented by public license practices. Many people have made generous contributions to the wide range of software distributed through that system in reliance on consistent application of that system; it is up to the author/donor to decide if he or she is willing to distribute software through any other system and a licensee cannot impose that choice.
This section is intended to make thoroughly clear what is believed to be a consequence of the rest of this License.
- If the distribution and/or use of the Program is restricted in certain countries either by patents or by copyrighted interfaces, the original copyright holder who places the Program under this License may add an explicit geographical distribution limitation excluding those countries, so that distribution is permitted only in or among countries not thus excluded. In such case, this License incorporates the limitation as if written in the body of this License.
- The Free Software Foundation may publish revised and/or new versions of the General Public License from time to time. Such new versions will be similar in spirit to the present version, but may differ in detail to address new problems or concerns.
Each version is given a distinguishing version number. If the Program specifies a version number of this License which applies to it and "any later version", you have the option of following the terms and conditions either of that version or of any later version published by the Free Software Foundation. If the Program does not specify a version number of this License, you may choose any version ever published by the Free Software Foundation.
- If you wish to incorporate parts of the Program into other free programs whose distribution conditions are different, write to the author to ask for permission. For software which is copyrighted by the Free Software Foundation, write to the Free Software Foundation; we sometimes make exceptions for this. Our decision will be guided by the two goals of preserving the free status of all derivatives of our free software and of promoting the sharing and reuse of software generally.
NO WARRANTY
- BECAUSE THE PROGRAM IS LICENSED FREE OF CHARGE, THERE IS NO WARRANTY OR THE PROGRAM, TO THE EXTENT PERMITTED BY APPLICABLE LAW. EXCEPT WHEN OTHERWISE STATED IN WRITING THE COPYRIGHT HOLDERS AND/OR OTHER PARTIES PROVIDE THE PROGRAM "AS IS" WITHOUT WARRANTY OF ANY KIND, EITHER EXPRESSED OR IMPLIED, INCLUDING, BUT NOT LIMITED TO, THE IMPLIED WARRANTIES OF MERCHANTABILITY AND FITNESS FOR A PARTICULAR PURPOSE. THE ENTIRE RISK AS TO THE QUALITY AND PERFORMANCE OF THE PROGRAM IS WITH YOU. SHOULD THE PROGRAM PROVE DEFECTIVE, YOU ASSUME THE COST OF ALL NECESSARY SERVICING, REPAIR OR CORRECTION.
- IN NO EVENT UNLESS REQUIRED BY APPLICABLE LAW OR AGREED TO IN WRITING WILL ANY COPYRIGHT HOLDER, OR ANY OTHER PARTY WHO MAY MODIFY AND/OR REDISTRIBUTE THE PROGRAM AS PERMITTED ABOVE, BE LIABLE TO YOU FOR DAMAGES, INCLUDING ANY GENERAL, SPECIAL, INCIDENTAL OR CONSEQUENTIAL DAMAGES ARISING OUT OF THE USE OR INABILITY TO USE THE PROGRAM (INCLUDING BUT NOT LIMITED TO LOSS OF DATA OR DATA BEING RENDERED INACCURATE OR LOSSES SUSTAINED BY YOU OR THIRD PARTIES OR A FAILURE OF THE PROGRAM TO OPERATE WITH ANY OTHER PROGRAMS), EVEN IF SUCH HOLDER OR OTHER PARTY HAS BEEN ADVISED OF THE POSSIBILITY OF SUCH DAMAGES.
END OF TERMS AND CONDITIONS
How to Apply These Terms to Your New Programs
If you develop a new program, and you want it to be of the greatest possible use to the public, the best way to achieve this is to make it free software which everyone can redistribute and change under these terms.
To do so, attach the following notices to the program. It is safest to attach them to the start of each source file to most effectively convey the exclusion of warranty; and each file should have at least the "copyright" line and a pointer to where the full notice is found.
This program is free software; you can redistribute it and/or modify it under the terms of the GNU General Public License as published by the Free Software Foundation; either version 2 of the License, or (at your option) any later version.
This program is distributed in the hope that it will be useful, but WITHOUT ANY WARRANTY; without even the implied warranty of MERCHANTABILITY or FITNESS FOR A PARTICULAR PURPOSE. See the GNU General Public License for more details.
You should have received a copy of the GNU General Public License along with this program; if not, write to the Free Software Foundation, Inc., 51 Franklin Street, Fifth Floor, Boston, MA 02110-1301 USA
Also add information on how to contact you by electronic and paper mail.
If the program is interactive, make it output a short notice like this when it starts in an interactive mode:
Gnomovision version 69, Copyright (C) year name of author
Gnomovision comes with ABSOLUTELY NO WARRANTY; for details type 'show w'.
This is free software, and you are welcome to redistribute it under certain conditions; type 'show c' for details.
The hypothetical commands `show w' and `show c' should show the appropriate parts of the General Public License. Of course, the commands you use may be called something other than `show w' and `show c'; they could even be mouse-clicks or menu items--whatever suits your program.
You should also get your employer (if you work as a programmer) or your school, if any, to sign a "copyright disclaimer" for the program, if necessary. Here is a sample; alter the names:
Yoyodyne, Inc., hereby disclaims all copyright interest in the program `Gnomovision' (which makes passes at compilers) written by James Hacker.
Ty Coon, President of Vice
This General Public License does not permit incorporating your program into proprietary programs. If your program is a subroutine library, you may consider it more useful to permit linking proprietary applications with the library. If this is what you want to do, use the GNU Lesser General Public License instead of this License.
UK Imprint
These operating instructions are published by ABUS Security-Center GmbH & Co.KG, Linker Kreuthweg 5, 86444 Affing, Germany. No reproduction (including translation) is permitted in whole or part e.g. photocopy, microfilming or storage in electronic data processing equipment, without the express written consent of the publisher.
The operating instructions reflect the current technical specifications at the time of print.
We reserve the right to change the technical or physical specifications.
PL Nota redakcyjna
© Copyright 03/2013 by ABUS Security-Center
- TVIP10005B / TVIP10055B
- PL
- Important safety instructions
- Dear customer,
- General safety instructions:
- Contents
- Usage in accordance with regulations
- Scope of delivery
- Installation
- Power supply
- Installing the camera
- Camera description
- Description of connectors
- Status LEDs
- Restoring the factory settings
- Putting into operation
- Direct connection of the network camera to a PC / laptop
- Connecting the network camera to a router / switch
- Accessing the network camera for the first time
- Accessing the network camera over a web browser
- Installing the ActiveX plug-in
- Adjusting the security settings
- Password prompt
- User functions
- Live image display
- Camera settings
- Video control
- Example:
- Camera settings (configuration)
- Configuration
- System
- Information
- Hostname
- Date/time
- Initializing
- Language
- Video
- Audio
- Network
- Netzwerk
- HTTP port number:
- DDNS
- Setting up a DDNS account
- Accessing the network camera over DDNS
- Wireless (TVIP10055B only)
- Obtain IP address automatically:
- Use the following IP address:
- Use the following DNS server address:
- Primary DNS server:
- WLAN
- WPS (TVIP10055B only)
- IP address:
- Configure via: PBC:
- Security
- User
- Maintenance and cleaning
- Function test
- Cleaning
- Disposal
- GPL license information
- W-LAN (solo TVIP10055B)
- WPS (solo TVIP10055B)
- NO WARRANTY
- UK Imprint
- PL Nota redakcyjna
Brand : ABUS
Model : TVIP10005B
Category : Surveillance Camera