
ATT-15C - Gramophone AKAI - Free user manual and instructions
Find the device manual for free ATT-15C AKAI in PDF.


| Product Type | Belt-drive turntable with cassette player, AM/FM radio, Bluetooth 5.3, USB/SD playback and recording |
| Brand | AKAI |
| Model | ATT-15C |
| Turntable Speeds | 33 1/3, 45, 78 RPM |
| Cartridge Type | Ceramic stereo cartridge with jewel stylus |
| Drive System | Belt drive |
| Built-in Speakers | Full range stereo speakers |
| Bluetooth Version | 5.3 |
| Bluetooth Range | 10 m |
| Bluetooth Frequency | 2.4 - 2.483 GHz |
| Bluetooth Emission Power | 1 mW |
| Radio Bands | AM, FM, FM-Stereo |
| Recording | Phono, Radio, Cassette, AUX IN recording to USB or SD card (MP3 128 kbps) |
| Playback Formats | MP3 (via USB/SD) |
| Inputs | Aux in (3.5mm) |
| Outputs | Earphone out (3.5mm) |
| Additional Ports | USB port, SD/MMC card slot |
| Cassette | Cassette tape player |
| Dust Cover | Removable semitransparent plastic dust cover |
| 45 RPM Adapter | Built-in |
| Power Supply | AC-DC adapter (included) |
| Cartridge Replacement | Replaceable with care (see manual for steps) |
| Stylus Replacement | Replaceable; recommended every 600 hours |
| Cleaning | Use dry cloth; avoid chemical solvents |
| Package Contents | Turntable, user manual, power adaptor, 45 RPM adaptor |
| Safety | Do not open cabinet; avoid moisture; unplug when not in use |
Frequently Asked Questions - ATT-15C AKAI
User questions about ATT-15C AKAI
0 question about this device. Answer the ones you know or ask your own.
Ask a new question about this device
Download the instructions for your Gramophone in PDF format for free! Find your manual ATT-15C - AKAI and take your electronic device back in hand. On this page are published all the documents necessary for the use of your device. ATT-15C by AKAI.
USER MANUAL ATT-15C AKAI
natural_image
Top-down view of a vintage gramophone with open lid and digital display (no visible text or symbols)USER MANUAL
AKAI
READ THIS INSTRUCTIONS CAREFULLY BEFORE USE AND STORE IN A SAFE PLACE FOR FUTURE REFERENCE
BEFORE USE
READ THIS BEFORE OPERATION
- Keep the instructions for future use.
- Choose the installation location of your unit carefully. Avoid placing it in direct sunlight or close to a source of heat. Also avoid locations subject to vibrations and excessive dust, heat, cold or moisture.
● Make sure has no liquid is spilled on device and device openings. - The ventilation holes should not be covered. Make sure there is enough space above and beside the amplifier/receiver (about 4 inches). Do not place a CD player or other equipment on top of the Turntable Player/Recorder/
- Do not open the cabinet as this might result in damage to the circuitry or electrical shock. If a foreign object gets into the set. Contact you dealer.
- Move device carefully, avoid shocks.
- When removing the power plug, never yank the cord.
- If the replacement of decision-making is required, please you send has an experienced or the device manufacturer technician.
● The sector cord should be unplugged a long period of use.
● For cleaning the device, please follow the recommendations of the notice. - Do not attempt to clean the unit with the chemical solvents as this might damage the finish. Use a clean, dry cloth.
● Device shall be repaired by a qualified person when:
a. the taken or the power cord is damaged,
b. objects have fallen a I ' interior camera or a liquid was reverses a I ' internal device,
c. device was exposes to the rain,
d. device does not work correctly without notable exterior change,
e. device fell and the subwoofer is broken. - The user shall not try to maintain device beyond that which is described in this information form. The guarantee would negate.
- Keep this manual in a safe place for future reference.
THE TURNTABLE FEATURES
- 3-speed turntable fit for 33 1/3, 45, 78 RPM
- Belt-drive turntable player
- Ceramic stereo cartridge with jewel stylus
- Built-in 45 rpm adapter
- USB and SD/MMC port for encoding & playing
- Aux in jack
- Earphone out jack
- Removable semitransparent plastic dust cover
- Full range stereo speakers
- Cassette tape player
- AM/ FM radio
- Bluetooth reception
- Bluetooth version: 5.3
AKAI
- Bluetooth connecting range: 10m
- Bluetooth frequency: 2.4 - 2.483GHz
- Bluetooth channel emission power: 1 mW
LOCATION OF CONTROLS

AKAI
- Transparent dust cover
- Folder selection
- Audio source
- Recording button
- Delete button
- Earphone jack (3.5mm)
- Power ON/OFF switch and volume control
- USB port
- Card slot for SD card
- LCD display
- Backward button
- Play/Pause button
- Stop button
- Forward button
- Aux in jack (3.5mm)-Line in
- Tuning knob
- Radio band switch (AM/ FM/ FM-Stereo)
- Function switch
- Adapter for 45 rpm
- Tone arm set
- Tone arm lift lever
- Auto stop ON/ OFF switch
- Speed switch (33.3, 45, 78rpm)
- Cartridge with stylus
- Turntable platter
- Cassette EJ/ FF button (Eject/ Fast forward)
- Cassette slot
- Speakers
- FM antenna
- DC IN jack
CAUTION:
Usage of controls or adjustments or performance of procedures other than those specified herein may result in hazardous radiation exposure.
This unit should not be adjusted or repaired by anyone except qualified service personnel.
CONNECTION
- Connect the AC-DC Adapter to your outlet and this unit.
- Rotate the power/volume control knob in a clockwise direction to turn on this unit.
AKAI
OPERATION INSTRUCTIONS
PHONO OPERATION
- Use the function switch to select PHONO mode.
- Set the speed selector to the appropriate position: 33, 45 or 78rpm according to the vinyl to be played.
- Set the auto-stop switch to ON position if you want the turntable to stop turning when it has reached the end of the record. If the switch is set to OFF position, the turntable will keep turning at the end of the record.

-
Place the record on the turntable (use the 45RPM adaptor, if required).
-
Unlock the arm clip and set the lift lever to the up position to raise the tonearm from the arm rest, then move the tonearm to the record slowly, as illustrated above. The platter will start rotating.
-
Move the tonearm lift lever to the down position, the tonearm will gently move onto the record and it will start to play.
-
To play a different track on the record, set the lift lever to the up position to raise the tonearm, move the raised tone arm to the start of the track and then move the lift lever to the down position, it will start to play a new track.
-
Adjust the volume, turn the volume knob to the right or left.
-
When you have finished playing records, lift the tonearm off the record and return it to the arm rest manually. Lock the tonearm clip to protect it from any accidental movement. Turn the volume knob in a counterclockwise direction to turn off the unit. Unplug it from the power supply if you are not going to use it for a while.
NOTE:
If your record player stops playing before the last track is finished, set the auto-stop switch to OFF. Your record will play to the end now, but you have to stop the turntable rotation manually. (Return the tonearm to its rest manually and the platter is still rotating, turn off the unit by the volume control knob.)
Phono Recording
- Set the function switch to PHONO mode and then insert a memory device (USB disk or SD card).
- Put your record onto the platter and get it ready for playback.
- Press the REC button when it's playing.
- This unit will start recording.
- To finish recording, press the STOP button.
- Your files will be stored in SD card by default if you insert both USB disk and SD card.
- Press and hold the REC button for 2 seconds during your recording, it can switch between USB disk and SD card.
- The file you recorded from Phono will start with "PH".
NOTE:
- The recording speed is 1:1. Recording will take as long as playing the record.
- The recording format is preset at MP3 bit rate 128kbps.
AKAI
- Adjust the Function switch to TAPE position.
- Insert a cassette tape into tape slot, with the exposed side facing right. The cassette will slide into the tape mechanism by pushing and start playing automatically. One end of the tape will remain visible when it's playing.
- Adjust volume control to your desired sound level.
- Depress the eject button completely in, the tape will be ejected from the slot.
- Press the eject button half way to fast forward of the tape you are listening.
- The tape will stop automatically when it comes to its end.
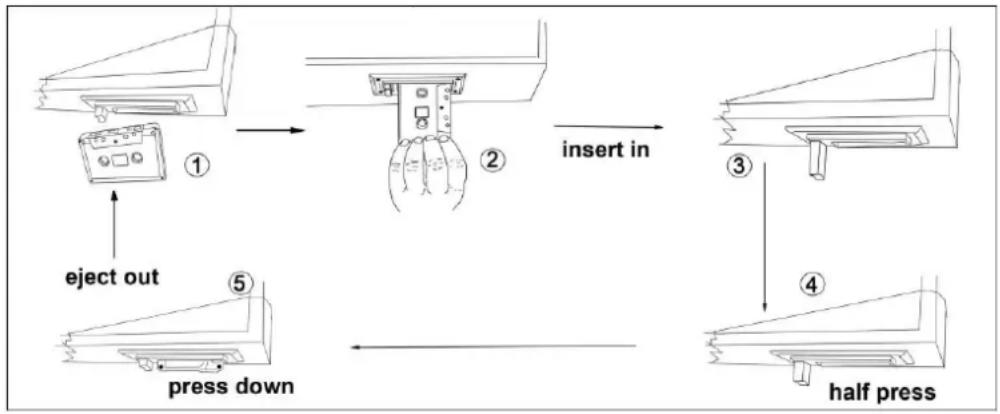
flowchart
graph TD
    A["①"] --> B["②"]
    B --> C["③"]
    C --> D["④"]
    D --> E["half press"]
    F["eject out"] --> A
    G["press down"] --> B
    H["insert in"] --> C
AUX IN OPERATION
- Adjust the Function switch to AUX position.
- Connect this unit with your audio device by an audio cable.
- Play the music on your audio device.
- Adjust volume control to your desired sound level.
- The external audio sourcing can be played by this jack.
Cassette Recording& AUX IN Recording
- Set the function switch to TAPE/ AUX mode and insert a memory device (USB disk or SD card).
- Insert a cassette into the slot and play, or play the external audio sourcing according to the steps above.
- Press the REC button when it's playing.
- This unit will start recording.
- To finish recording, press the STOP button.
- Your files will be stored in SD card by default if you insert both USB disk and SD card.
- Press and hold the REC button for 2 seconds during your recording, it can switch between USB disk and SD card.
- The file you recorded from AUX IN will start with "TAPE".
AKAI
USB/SD/BT PLAYING
PLAYING MUSIC FROM USB/SD DIRECTLY:
- Make sure the power is on, insert USB disk/ MP3 player into USB port and/or insert memory card into SD socket.
- Adjust function switch to USB/SD/BT position, press SOURCE button to choose music source between USB and SD if you insert both of them.
- The device supports for MP3 formats. Press PLAY/PAUSE button once to halt playing when it's playing, press it again to continue.
- Press PREV once to play the previous song, hold this button to speed up backward. Press NEXT once to play the next song, hold this button to speed up forward.
- Press FOLDER+ button, the unit will play the files in the folder you choose.
- Press STOP to end up the play.
- Adjust function switch to USB/SD/BT position, press SOURCE button to choose music source BT.
- Search the Bluetooth name "ATT-15C" and pair with it.
- You could play your music now.
NOTE:
The device does not support for transit music files between SD and USB.
LISTEN TO THE RADIO
- Use the function switch to select TUNER mode.
- Use the radio band switch to select the desired band (AM, FM or FM-Stereo).
- Press and hold the PLAY/PAUSE button for 2 seconds, this unit will search and store the radio stations automatically.
- Turn the tuning knob to tune into a radio station you desired if the signal is weak and can not be stored by auto-search.
-
Adjust the FM antenna or move the unit to a new place until the signal is strong enough.
-
Then repeat step 3, the radio station you desired will be found.
-
Adjust the volume knob to your desired volume level.
-
When you have finished listening to the radio, turn the volume knob in a counterclockwise direction to power off this unit. Unplug it from the power supply if you are not going to use it for a while.
FM and FM-stereo Band
FM: Use the radio band switch to select the FM. Stations/ programs are received in mono mode. Use this mode when stereo reception is weak.
FM-Stereo: Use the radio band switch to select FM-ST for receiving stereo station/ programs. Once a stereo signal is received, the STEREO icon will light up on the display.
NOTE:
- AM reception: The receiver has a built-in AM bar antenna. If reception is weak, slightly rotate or reposition the unit to improve AM reception.
- FM reception: The receiver has a built-in FM wire antenna hanging at the rear of the cabinet. For best reception, completely unravel and extend this wire.
AKAI
Radio Recording
- Set the function switch to TUNER mode and insert a memory device (USB disk or SD card).
- Press the REC button when it's playing.
- This unit will start recording.
- To finish recording, press the STOP button.
- Your files will be stored in SD card by default if you insert both USB disk and SD card.
- Press and hold the REC button for 2 seconds during your recording, it can switch between USB disk and SD card.
- The file you recorded from RADIO will start with "RAD".
- You cannot change the station during the recording.
DELETE FILES
- Just press the DELETE button when playing the recorded files.
NOTE:
This unit can delete the files recorded by itself only. Such as the files' name start with "PH" "RAD" "TAPE".
- The turntable can be connected with earphone by 3.5mm PHONES jack.
Turntable basic maintenance
Cartridge Replacement
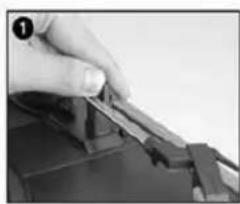
-Refer to the figures 1-8
natural_image
Close-up of a hand using a tool to adjust or install a mechanical component (no visible text or symbols)push the arm lock to release the tone-arm.

natural_image
Close-up of gloved hands holding a small electronic component (no visible text or symbols)take off cap of the cartridge to expose the needle out.

natural_image
Close-up of hands using pliers to work on a mechanical component (no visible text or symbols)separate the cartridge from the socket lightly.

natural_image
Close-up of hands holding a small object with a metallic clip, possibly part of a device or tool (no visible text or symbols)take off the audio-line from the cartridges completely.

natural_image
Close-up of hands using a small mechanical tool to adjust or install components (no visible text or symbols)
natural_image
Close-up of hands holding a small object with a curved handle, possibly part of a device or tool (no visible text or symbols)
natural_image
Close-up of hands using a tool to adjust or clamp a small component (no visible text or symbols)
natural_image
Close-up of hands assembling or repairing a mechanical component (no visible text or symbols)to fit a new one just in opposite deals. insert the audio-line accordingly, and install the cartridge to the socket lightly.
NOTE: Please exercise extreme care whilst performing this operation so as to avoid the tone arm and audio line wires from any damage.
Stylus Replacement
Removing the Stylus
- Gently pull down the front edge of the stylus.
- Pull stylus forward.
- Pull out and remove.
AKAI

natural_image
Diagram of a mechanical component with a red highlighted section and a downward arrow, no text or symbols present.
natural_image
Diagram of a mechanical tool with a red component and black directional arrow (no text or symbols)
natural_image
Diagram of a mechanical component with red and black directional arrows indicating movement (no text or symbols)Installing Stylus
-
Position the stylus with its tip facing down.
-
Line up the back of the stylus with the cartridge.
-
Insert the stylus with its front end at a downward angle and gently lift the front of the needle upward until it snaps into place.

natural_image
Technical illustration of a mechanical component with a red housing (no text or symbols)
natural_image
Technical illustration of a mechanical tool with a red handle (no text or symbols)
NOTE:
- Do not touch the stylus tip with your fingers. Avoid bumping the stylus on the turntable mat or a record's edge.
- Clean the stylus frequently with a soft brush with a back-to-front motion only.
- Clean your records to get rid of dust or grease with a record cleaning brush and record cleaning solution.
- Stylus should be replaced periodically (approximately every 600 hours)
- Do not use cleanser other that contains alcohol, benzene or any other harsh chemicals, which might damage the paint and finish of the turntable.
WHEN TRANSPORTING YOUR TURNTABLE PLAYER, DO NOT FORGET TO:
- Mount the protective cap on the stylus.
- Lock the tonearm clip onto the tonearm.
TIPS FOR BETTER PERFORMANCE
- When opening or closing the turntable cover, handle it gently, moving it either at the center or equally from both sides.
- Never apply harsh chemicals or solvents to any part of the turntable system.
- Always unplug it from the AC outlet and fasten the tone arm on the tone arm rest with the vinyl twist-tie before moving the turntable.
MAINTENANCE AND CARE
Caring for the player
- Apparatus shall not be exposed to dripping or splashing and no objects filled with liquids, such as vases, shall be placed on the apparatus.
● The maximum ambient temperature: 35irc C
● Electronic products of this kind should never be subjected to extreme temperatures or high humidity. For instance, this set should not be placed in bathing areas of around stoves and radiators.
AKAI
- If anything falls into the cabinet, unplug the unit and have it checked by qualified personnel before operating it any further.
Cleaning the unit
● To prevent fire or shock hazard, disconnect your unit from the AC power source when cleaning.
● The finish on your unit may be cleaned with a dust cloth and cared for as other furniture. Use caution when cleaning and wiping the plastic parts.
● A damp cloth may be used on the front panel.
Inclination
- Do not install the unit in a inclined position, It is designed to be operated in a horizontal position only.
Condensation
- If the unit is brought directly from a cold to a warm location, moisture may condense inside the player, and cause damage it. When you first install the unit, or when you move it from a cold to a warm location, wait for 30 minutes before operating the unit.
Disconnect power
- If you are not going to use the player for long time, be sure disconnect the player from the AC power source.
Disclaimer
Updates to Firmware and/or hardware components are made regularly. Therefore, some of the instruction, specifications and pictures in this documentation may differ slightly from your particular situation. All items described in this guide for illustration purposes only and may not apply to particular situation. No legal right or entitlements may be obtained from the description made in this manual.
Package Contents:
- 1 x turntable;
- 1 x user manual;
- 1 x power adaptor;
- 1 x 45 RPM adaptor
DISPOSAL OF ELECTRICAL AND ELECTRONIC EQUIPMENT
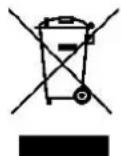
This symbol on the product or packaging means that the product should not be treated as household waste. Do not throw garbage at the end of its life, but take it to a collection center for recycling. in this way you will help to protect the environment and be able to prevent any negative consequences that it would have on the environment and human health.
To find your nearest collection center:
Contact local authorities
Access the website: www.mmediu.ro
Request additional information from the store where you purchased the product.
IMPORTER: SC INTERVISION TRADING-RO SRL
Street I.C Bratianu, no. 48-52, building A, floor. 5, room 504-505, Pitesti City, Arges County, Romania
Postal code: 110121
EU DECLARATION OF CONFORMITY

No INT302
We, INTERVISION TRADING RO SRL, default importer (manufacturer), with registered office in Mosoia Commune, Smeura Village, 8 Fagetului Alley, declare under sole responsibility that the following products:
Brand name: AKAI
Type: ATT-15C
Descriptions: TURNTABLE
Lot: 15C052XXXX
to which this declaration related is in conformity with the essential requirements of the following directives of the Council of the European Communities:
EUROPEAN COMMUNITY DIRECTIVE 2014/35/EU
EUROPEAN COMMUNITY DIRECTIVE 2014/53/EU
EUROPEAN COMMUNITY DIRECTIVE 125/2008 Amd 801/2013
EUROPEAN COMMUNITY DIRECTIVE 2011/65/EU Amd 2015/863/EU
The products are compliant with the following standards and safety regulations:N 62368-1:2014+A11:2017
EN 62479:2010
IEC 62321-3-1: 2013 ;
EN 300328 V2.2.2: (2019-07)
IEC 62321-5: 2013 ;
EN 301 489-1 V2.2.3: (2019-11)
IEC 62321-4:2013 + A1:2017 ;
EN 301 489-17 V3.2.4: (2020-09)
IEC 62321-6: 2015 ;
EN 55032:2015+A11:2020
IEC 62321-7-1: 2015 ;
EN 55035:2017+A11:2020
IEC 62321-7-2: 2017 ;
EN 50564:2011
IEC 62321-8: 2017
Certificate of conformity issued based on the Certificates CA22030459-E-000 ; CA22030451-S-000 ; TR22030459-E-002 ; TR22030451-S-000 ; TR22030459-E-000 ; TR22030459-E-001 TR22030467-S-000 and U01304220520613-1E of Guangdong Keyway Testing Technology Co., Ltd., No.7 of Zhangmutou District, Guanzhang Road, Zhangmutou town, Dongguan, Guangdong & Shen Zhen UONE Test Co., LTD., Unit 4B, Building B4, China Merchants Guangming Science Park, Tourist Road 3009, Guangming New District, ShenZhen, China.
Intervision Trading Ro SRL,
Signature:

Printed name and Position:
CIOBANU DORIN - GENERAL MANAGER
Date: 12 th of May, 2023
Place: Pitesti, Romania
AKAI
ATT-15C
PICK-UP CU RADIO ŞI CASETĂ

natural_image
Black-and-white photo of a vintage gramophone with open lid and digital display (no visible text or symbols)MANUALUL UTILIZATORULUI
ROMÂNĂ
AKAI
CITIȚI CU ATENȚIE ACESTE INSTRUCTIUNI ÎNAINTE DE UTILIZARE ȘI DEPOZITAȚI-LE ÎNTR-UN LOC SIGUR PENTRU REFERINȚE VIITOARE
ÎNAINTE DE UTILIZARE
CITIȚI ÎNAINTE DE OPERARE
natural_image
Hand holding a cable with a tool, no visible text or symbolsnatural_image
Close-up of a hand holding a small object, possibly a tool or component, with no visible text or symbols.natural_image
Close-up of hands holding a small electronic component (no visible text or symbols)natural_image
Close-up of hands using a tool to cut or sample material (no visible text or symbols)natural_image
Close-up of hands performing a sewing or sewing process on a dark fabric (no visible text or symbols)natural_image
Close-up of gloved hands assembling or adjusting a small mechanical component (no visible text or symbols)
natural_image
Close-up of hands using a tool to adjust or install a small mechanical component (no visible text or symbols)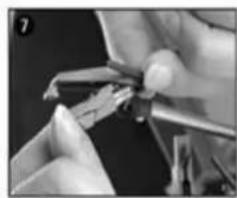
natural_image
Close-up of hands using a tool to adjust or install a mechanical component (no visible text or symbols)
natural_image
Close-up of hands assembling electronic components with a tool (no visible text or symbols)natural_image
Diagram of a mechanical component with a red highlighted section and a downward arrow, no text or symbols present.
natural_image
Diagram of a mechanical tool with a red component and black directional arrow (no text or symbols)
natural_image
Diagram of a mechanical component with red and black arrows indicating movement or force (no text or symbols)Instalarea Acului
natural_image
Technical illustration of a mechanical component with a red housing (no text or symbols)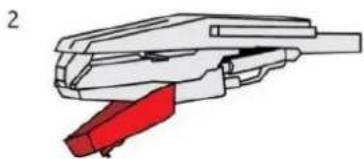
natural_image
Technical illustration of a mechanical clamp or connector with red clamps (no text or symbols)
NOTĂ:
SFATURI PENTRU O PERFORMANTĂ MAI BUNĂ
IEC 62321-7-2: 2017 ;
IEC 62321-8: 2017
Certificat de conformitate eliberat in baza certificatelor si rapoartelor de teste CA22030459-E-000; CA22030451-S-000; TR22030459-E-002; TR22030451-S-000; TR22030459-E-000; TR22030459-E-001; TR22030467-S-000 si U01304220520613-1E ale Guangdong Keyway Testing Technology Co., Ltd., No.7 ale Zhangmutou District, Guanzhang Road, Zhangmutou town, Dongguan, Guangdong si Shen Zhen UONE Test Co., LTD., Unit 4B, Building B4, China Merchants Guangming Science Park, Tourist Road 3009, Guangming New District, ShenZhen, China.
Intervision Trading Ro SRL,
Semnatura:

Numele si functia: CIOBANU DORIN - DIRECTOR
Data: 12 Mai, 2023
Locul: Pitesti, Romania
AKAI
ATT-15C
natural_image
Black TP-803 CD-ROM with open lid and digital display, no visible text or symbols on main bodyΟΔΗΓΙΕΣ ΧΡΗΣΗΣ
ΕΛΛΗΝΙΚΑ
AKAI
natural_image
Hand holding a cable with a tool, no visible text or symbols
natural_image
Four-panel sequence showing hands assembling electronic components with a tool, no visible text or symbolsto fit a new one just in opposite deals. insert the audio-line accordingly, and install the cartridge to the socket lightly.
NOTE: Please exercise extreme care whilst performing this operation so as to avoid the tone arm and audio line wires from any damage.
natural_image
Diagram of a mechanical component with a red highlighted section and a downward arrow, no text or symbols present.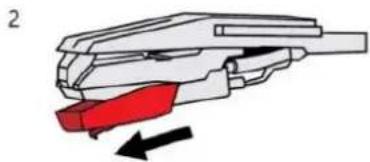
natural_image
Diagram of a mechanical tool with red and black components, no text or symbols present
natural_image
Diagram of a mechanical component with red and black arrows indicating movement or force (no text or symbols)Τοποθέτηση βελόνας
natural_image
Technical line drawing of a mechanical component with a red component (no text or symbols)
natural_image
Technical illustration of a mechanical clamp or connector component (no text or symbols visible)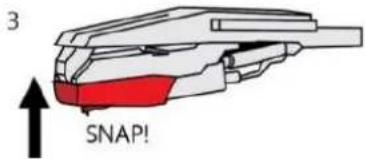
natural_image
Symbol of a waste bin with crossed lines indicating no waste, and a solid black rectangle below (no text or labels)natural_image
Top-down view of a vintage gramophone with open lid and digital display (no visible text or symbols)natural_image
Hand holding a cable with a tool, no visible text or symbolsnatural_image
Close-up of a hand holding a small electronic component, possibly a battery or circuit board (no visible text or symbols)natural_image
Close-up of gloved hands holding a small electronic component (no visible text or symbols)natural_image
Close-up of hands holding a small object, possibly a tool or device, with no visible text or symbols.natural_image
Close-up of hands performing a manual task with a tool on a workbench (no visible text or symbols)natural_image
Close-up of hands assembling or adjusting a mechanical component (no visible text or symbols)
natural_image
Close-up of hands using a tool to adjust a key (no visible text or symbols)
natural_image
Close-up of hands using a tool to cut or apply a small mechanical component (no visible text or symbols)
natural_image
Close-up of hands assembling electronic components with wires (no visible text or symbols)natural_image
Diagram of a mechanical component with a red highlighted section and a downward arrow, no text or symbols present.
natural_image
Diagram of a mechanical tool with a red component and black directional arrow (no text or symbols)
natural_image
Diagram of a mechanical component with red and black arrows indicating direction (no text or symbols)natural_image
Technical illustration of a mechanical component with a red highlighted section (no text or symbols)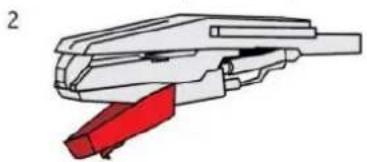
natural_image
Mechanical component diagram showing a red clamping tool inserted into a white housing (no text or symbols)
AKAI
ЗАБЕЛЕЖКА:
natural_image
Top-down view of a vintage gramophone with open lid and digital display (no visible text or symbols)HASZNÁLATI KÉZIKÖNYV
Magyar
AKAI
HASZNÁLAT ELÖTT FIGYELMESEN OLVASSA EL EZEKET A HASZNÁLATI UTASÍTÁSOKAT, ÉS TÁROLJA ÖKET BIZTONSÁGOS HELYEN A KÉSŐBBI HASZNÁLATRA.
HASZNÁLAT ELÖTT
OLVASSA EL MÜKÖDTETÉS ELÖTT
natural_image
Hand holding a cable with a tool, no visible text or symbolsAKAI
is behelyezi.
natural_image
Close-up of a hand holding a small mechanical component (no visible text or symbols)natural_image
Close-up of hands holding a small electronic component (no visible text or symbols)natural_image
Close-up of hands using pliers to cut a small object (no visible text or symbols)natural_image
Close-up of hands performing a sewing or sewing process on fabric (no visible text or symbols)natural_image
Close-up of hands assembling or adjusting a small mechanical component (no visible text or symbols)natural_image
Close-up of hands holding a small metal object with a looped handle (no visible text or symbols)
natural_image
Close-up of hands holding a small metal object with a looped handle (no visible text or symbols)
natural_image
Close-up of hands using a tool to cut or apply a small mechanical component (no visible text or symbols)
natural_image
Close-up of hands using a tool to cut or apply a small mechanical component (no visible text or symbols)
natural_image
Close-up of hands assembling or adjusting a mechanical component (no visible text or symbols)Tücsere
Tü eltávolítása
natural_image
Diagram of a mechanical component with a red highlighted section and a downward arrow, no text or symbols present.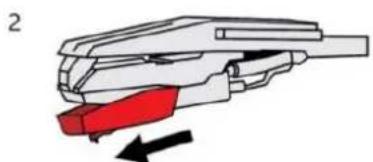
natural_image
Diagram of a mechanical tool with a red component and black directional arrow (no text or symbols)
natural_image
Diagram of a mechanical component with red and black arrows indicating direction (no text or symbols)Tü beszerelése
natural_image
Technical illustration of a mechanical component with a red clamped part (no text or symbols)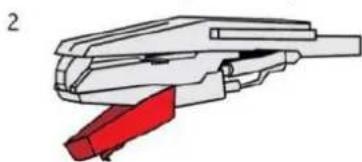
natural_image
Technical illustration of a mechanical tool or connector with a red handle (no text or symbols)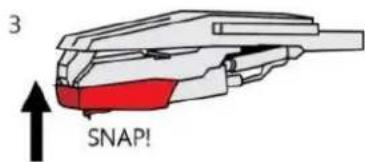
MEGJEGYZÉS:
natural_image
Top-down view of a vintage gramophone with open lid and digital display (no visible text or symbols)INSTRUKCJA OBSŁUGI
POLSKI
AKAI
PRZED UŻYCIEM NALEŻY DOKŁADNIE PRZECZYTAĆ NINIEJSZĄ INSTRUKCJĘ I PRZECHOWYWAĆ JĄ W BEZPIECZNYM MIEJSCU DO WYKORZYSTANIA W PRZYSZŁOŚCI.
PRZED UŻYTKOWANIEM
natural_image
Hand holding a cable with a tool, no visible text or symbolsUWAGA:
natural_image
Close-up of a hand holding a small electronic component (no visible text or symbols)natural_image
Close-up of hands using a tool to adjust or install a component (no visible text or symbols)natural_image
Close-up of hands holding a small object, possibly a tool or component, with no visible text or symbols.natural_image
Close-up of hands performing a sewing or sewing process on fabric (no visible text or symbols)natural_image
Close-up of hands assembling or adjusting a small electronic component (no visible text or symbols)natural_image
Close-up of hands holding a small metal object with a curved handle (no visible text or symbols)
natural_image
Close-up of hands using a tool to adjust a key on a surface (no visible text or symbols)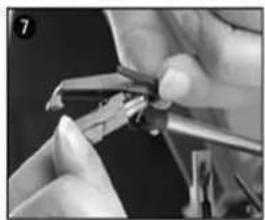
natural_image
Close-up of hands using a tool to adjust or install a small component (no visible text or symbols)
natural_image
Close-up of hands using a tool to adjust or install a small component (no visible text or symbols)
natural_image
Close-up of hands assembling or adjusting a small mechanical component (no visible text or symbols)
natural_image
Close-up of hands assembling or adjusting a small mechanical component (no visible text or symbols)natural_image
Diagram of a mechanical component with a red highlighted section and a downward arrow indicating force or direction (no text or symbols present)
natural_image
Diagram of a mechanical tool with red and black components, no text or symbols present
natural_image
Mechanical component diagram showing a red and black component with directional arrows (no text or symbols)Instalacja igły
natural_image
Technical illustration of a mechanical component with a red base and internal structure (no text or symbols)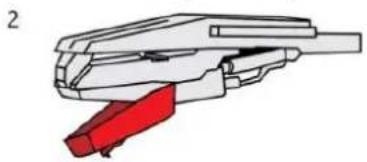
natural_image
Technical line drawing of a mechanical component with red clamped parts (no text or symbols)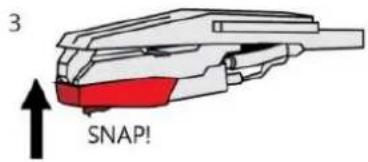
UWAGA:
natural_image
Black-and-white photo of a vintage gramophone with open lid and digital display (no visible text or symbols)NÁVOD K POUŽITÍ
ČESKÝ JAZYK
AKAI
PŘED POUŽITÍM SI PEČLIVĚ PŘEČTĚTE TENTO NÁVOD A ULOŽTE JEJ NA BEZPEČNÉM MÍSTĚ PRO BUDOUCÍ POUŽITÍ.
PŘED POUŽITÍM
PŘEČTĚTE SI PŘED POUŽITÍM
natural_image
Hand holding a cable with a tool, no visible text or symbolsnatural_image
Diagram of a mechanical component with a red highlighted section and a downward arrow, no text or symbols present.
natural_image
Diagram of a mechanical tool with red and black components, no text or symbols present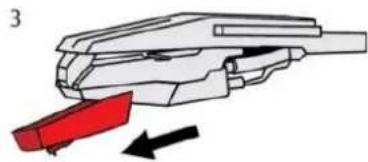
natural_image
Diagram of a mechanical tool or connector with red and black directional arrows indicating movement (no text or symbols)Instalace jehly
natural_image
Technical illustration of a mechanical component with a red base (no text or symbols)
natural_image
Technical illustration of a mechanical clamp or connector component (no text or symbols)
POZNÁMKA:
natural_image
Black-and-white photo of a vintage gramophone with open lid and digital display (no visible text or symbols)NÁVOD NA POUŽITIE
SLOVENSKY
AKAI
PRED POUŽITÍM SI POZORNE PREČÍTAJTE TIETO POKYNY A ULOŽTE ICH NA BEZPEČNÉ MIESTO PRE BUDÚCE POUŽITIE
PRED POUŽITÍM
PRED POUŽITÍM SI PREČÍTAJTE
natural_image
Hand holding a cable with a tool, no visible text or symbolsPOZNÁMKA:
natural_image
Diagram of a mechanical component with red highlighted section and downward arrow (no text or symbols)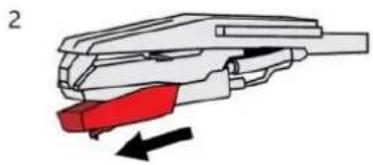
natural_image
Diagram of a mechanical tool with red and black components, no text or symbols present
natural_image
Diagram of a mechanical component with red and black arrows indicating movement or force (no text or symbols)Inštalácia ihly
natural_image
Technical illustration of a mechanical component with a red housing (no text or symbols)
natural_image
Illustration of a mechanical tool with a red handle and white body (no text or symbols)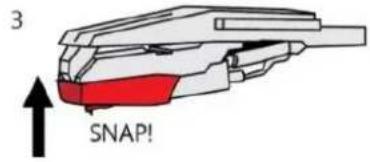
POZNÁMKA:

- AKAI
- READ THIS INSTRUCTIONS CAREFULLY BEFORE USE AND STORE IN A SAFE PLACE FOR FUTURE REFERENCE
- BEFORE USE
- READ THIS BEFORE OPERATION
- THE TURNTABLE FEATURES
- LOCATION OF CONTROLS
- CAUTION:
- CONNECTION
- OPERATION INSTRUCTIONS
- PHONO OPERATION
- NOTE:
- Phono Recording
- AUX IN OPERATION
- Cassette Recording& AUX IN Recording
- USB/SD/BT PLAYING
- PLAYING MUSIC FROM USB/SD DIRECTLY:
- LISTEN TO THE RADIO
- FM and FM-stereo Band
- Radio Recording
- DELETE FILES
- Turntable basic maintenance
- Cartridge Replacement
- Stylus Replacement
- Removing the Stylus
- Installing Stylus
- WHEN TRANSPORTING YOUR TURNTABLE PLAYER, DO NOT FORGET TO:
- TIPS FOR BETTER PERFORMANCE
- MAINTENANCE AND CARE
- Caring for the player
- Cleaning the unit
- Inclination
- Condensation
- Disconnect power
- Disclaimer
- Package Contents:
- DISPOSAL OF ELECTRICAL AND ELECTRONIC EQUIPMENT
- IMPORTER: SC INTERVISION TRADING-RO SRL
- EU DECLARATION OF CONFORMITY
- ATT-15C
- PICK-UP CU RADIO ŞI CASETĂ
- CITIȚI CU ATENȚIE ACESTE INSTRUCTIUNI ÎNAINTE DE UTILIZARE ȘI DEPOZITAȚI-LE ÎNTR-UN LOC SIGUR PENTRU REFERINȚE VIITOARE
- ÎNAINTE DE UTILIZARE
- CITIȚI ÎNAINTE DE OPERARE
- Instalarea Acului
- NOTĂ:
- SFATURI PENTRU O PERFORMANTĂ MAI BUNĂ
- Τοποθέτηση βελόνας
- ЗАБЕЛЕЖКА:
- HASZNÁLAT ELÖTT FIGYELMESEN OLVASSA EL EZEKET A HASZNÁLATI UTASÍTÁSOKAT, ÉS TÁROLJA ÖKET BIZTONSÁGOS HELYEN A KÉSŐBBI HASZNÁLATRA.
- HASZNÁLAT ELÖTT
- OLVASSA EL MÜKÖDTETÉS ELÖTT
- Tücsere
- Tü eltávolítása
- Tü beszerelése
- MEGJEGYZÉS:
- PRZED UŻYCIEM NALEŻY DOKŁADNIE PRZECZYTAĆ NINIEJSZĄ INSTRUKCJĘ I PRZECHOWYWAĆ JĄ W BEZPIECZNYM MIEJSCU DO WYKORZYSTANIA W PRZYSZŁOŚCI.
- PRZED UŻYTKOWANIEM
- UWAGA:
- Instalacja igły
- PŘED POUŽITÍM SI PEČLIVĚ PŘEČTĚTE TENTO NÁVOD A ULOŽTE JEJ NA BEZPEČNÉM MÍSTĚ PRO BUDOUCÍ POUŽITÍ.
- PŘED POUŽITÍM
- PŘEČTĚTE SI PŘED POUŽITÍM
- Instalace jehly
- POZNÁMKA:
- PRED POUŽITÍM SI POZORNE PREČÍTAJTE TIETO POKYNY A ULOŽTE ICH NA BEZPEČNÉ MIESTO PRE BUDÚCE POUŽITIE
- PRED POUŽITÍM
- Inštalácia ihly
Brand : AKAI
Model : ATT-15C
Category : Gramophone