
PILOT Q7 - Dash cam Niceboy - Free user manual and instructions
Find the device manual for free PILOT Q7 Niceboy in PDF.


| Product Type | Dashboard Camera (Dash Cam) |
| Brand | Niceboy |
| Model | PILOT Q7 |
| Dimensions (approx.) | 60 x 40 x 30 mm |
| Weight (approx.) | 60 g |
| Power Supply | USB 5V / 1A |
| Recording Resolution | Full HD 1080p |
| Field of View | 140° |
| Video Compression | H.264 |
| Main Functions | Loop recording, G-sensor, night vision, parking mode |
| Display | 2.0 inch TFT LCD |
| Storage | MicroSD card up to 32 GB (Class 10) |
| Battery | Built-in 200 mAh |
| Mounting | Suction cup and adhesive mount included |
| Connectivity | Mini USB port |
| Maintenance | Clean lens with soft cloth; format SD card periodically |
| Safety | Do not obstruct driver's view; mount securely; use only included accessories |
| Spare Parts & Repairability | Spare mount and USB cable available; contact Niceboy support for repair |
| Accessories Included | Car charger, USB cable, suction mount, adhesive mount, user manual |
Frequently Asked Questions - PILOT Q7 Niceboy
User questions about PILOT Q7 Niceboy
0 question about this device. Answer the ones you know or ask your own.
Ask a new question about this device
Download the instructions for your Dash cam in PDF format for free! Find your manual PILOT Q7 - Niceboy and take your electronic device back in hand. On this page are published all the documents necessary for the use of your device. PILOT Q7 by Niceboy.
USER MANUAL PILOT Q7 Niceboy
- Up button – in the menu, it is used to browse the menu.
- Menu/Switching modes)/Emergency recording – a short press in standby mode (the camera does not record video) is used to enter the video, photo, recording settings menu (depending on the selected mode) and a further press to the camera settings. A long press in standby mode is used to switch modes (Recording, Shooting, Playback). When recording a video, a short press turns on emergency recording (recorded videos are protected against deletion).
- Button down/turning off the microphone – in the menu, it is used to navigate through the menu. Long press in standby mode and during video recording turns off/on the camera microphone.
- OK/Turn off and on button - a short press in standby mode turns on video recording, a short press during video recording stops recording. A short press in the menu is used to confirm the selected item. A long press with the camera turned off turns the camera on. A long press in standby mode turns off the camera.
- USB-C - used to connect to the power supply.
- Entry for holder
- Entry for service purposes
- LEDs - the lower blue LED blinks during video recording, lights up in standby mode. The upper red LED indicates the connection to the
power supply (it lights up red when recording video and connected to the power supply.
-
SD slot – serves for inserting a memory card.
-
Loudspeaker
- Lens
- Reset button – used to reset the camera
CAMERA MENU LANGUAGE SETTINGS
Connect the camera without the memory card inserted to the power supply. The camera will start automatically, then press the Menu button twice briefly (2) and use the menu navigation button (3) to go to the „Language“ item, confirm with the OK button (4), here choose your preferred language and confirm with the OK button (4).
VIDEO SETUP
Playback: switches the camera to playback mode for recorded videos.
Video resolution: set the resolution of the recorded video.
Video loop: sets cyclical recording, i.e. time periods in which videos will be recorded. When the memory card is full, the oldest recordings (except videos taken in emergency recording) start to be overwritten.
WDR: turns on/off the function to improve the dynamic range (suitable for contrasting scenes or recording at night).
Exposure: exposure compensation setting.
Audio recording: turns on/off the camera microphone.
G-Sensor: setting the intensity of the G-Sensor. The G-Sensor detects shocks and automatically triggers emergency recording for recorded video. Timestamp: turns on/off the embedding of date and time information into the video.
PHOTO SETUP
Capture mode: set the mode for photos.
Photo resolution: set the photo resolution.
Exposure: exposure compensation setting.
Time stamp: allows you to insert date and time information into the captured photo.
CAMERA SETTINGS
Registration mark: allows you to set a registration mark or name to be inserted into the video.
Date/time: set the date and time.
Auto LCD: setting to turn off the display automatically.
Language: setting the language of the camera menu.
System sounds: enable/disable camera system sounds.
Volume: adjust the camera speaker volume
Frequency: frequency setting (50Hz for Europe, 60Hz for USA).
Format: erases all data on the memory card.
Factory reset: returns all settings to factory settings.
Version: camera firmware version information
SUCTION GLASS HOLDER
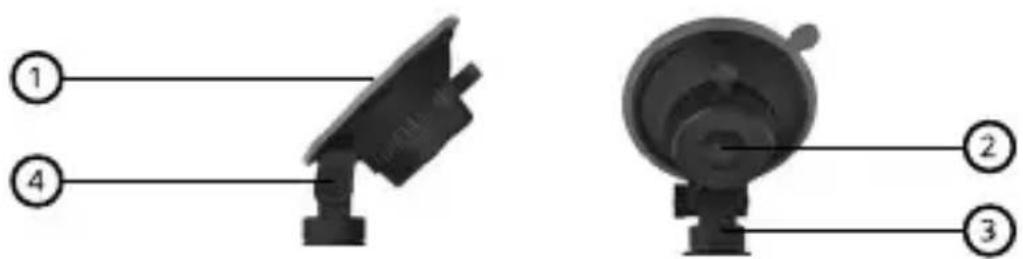
Press the suction part (1) of the holder against the glass and lock the holder using the rotating mechanism (clockwise direction). Turn the mechanism counterclockwise to remove the holder.
Attach the camera to the holder using the attachment (3) on the top of the camera. You can adjust the tilt of the camera using the screw (4). After setting the correct slope, do not forget to tighten the screw sufficiently.
Warning: place the suction camera holder only on the glass of the car, which has been properly cleaned (degreased) and is completely dry. The best bonding results are achieved at temperatures around 20^ .
MICROSD CARD
Choose a branded microSD card with fast video recording (type UHS-I U3 and faster) with a maximum capacity of 64 GB. Before using the card for the first time in the camera, it is necessary to format the card on a PC to the FAT32 file system (formatting the memory card will erase all data on the card). Insert the memory card into the camera with the PINs facing the camera display.
Recommendation: regularly format the memory card in the PC to avoid problems when recording video. If you use the camera daily, format the card at least once a month. More information about the use of the memory card and its formatting will be provided by the manufacturer of the selected memory card.
AUTOMATIC ON/OFF CAMERA
The moment the camera detects charging, it automatically turns on and starts recording (a memory card must be inserted). When the camera is disconnected from the power supply, it stops recording video and turns off.
CAMERA POWER SUPPLY
The camera can be connected to the power source using a car adapter (part of the sales package), or via a USB cable connected to a PC or an adapter for charging a mobile phone. A power bank can also be used.
Warning: the camera is not equipped with a battery, but with a supercapacitor, which is safer from the point of view of use in a car (it is not damaged due to temperature changes, it better tolerates both frost and high temperatures). For this reason, the camera can only be used when permanently connected to the power supply.
CONTENTS OF THE SALES PACKAGE
Car camera Niceboy PILOT Q7
Suction glass holder
Power cable
Manual
NICEBOY PILOT Q7 SPECIFICATIONS
Video resolution: 4K (interpolated), 2K, 1080p
Video format: MP4
Video codec: H.264
Display: 3" IPS
Lens: all-glass, 150°
Super capacitor: yes
Memory card: microSD, UHS-I U3, max. 64 GB, FAT32 format (the card is not included in the sales package)
Operating temperature: 0 °C to +50 °C
Charging adapter: output voltage 5V, input voltage 12-24V, output current 1A
Camera dimensions (W x H x D):
86.4 x 50 (123 with mount) x 35.6 mm
Camera weight: 77 g
Holder weight: 28 g
Note: The SW of the device can be continuously updated. The content of the manual, including the graphic representation (pictures), may differ from device to device depending on the device software and its updates. We reserve the right to make changes to the manual and individual device functions without prior notice.
Information on all frequency bands in which the radio equipment operates and intentionally transmits radio waves as well as the maximum radio frequency power transmitted in the frequency band in which the radio equipment is operated is included in the instructions and safety information.
The battery or accumulator that may be included with the product has a life of six months because it is a consumable item. Improper handling (prolonged charging, short circuit, breakage by another object, etc.) can lead to fires, overheating or battery leakage, for example
NICEBOY s.r.o. hereby declares that the type of radio equipment PILOT Q2 WIFI complies with Directives 2014/53 / EU, 2014/30 / EU, 2014/35 / EU, and 2011/65 / EU. The full content of EU Declaration of Conformity is available on the following websites:
https://niceboy.eu/en/declaration/pilot-q2-wifi
USER INFORMATION FOR DISPOSING ELECTRICAL AND ELECTRONIC DEVICES (HOME USE)

This symbol located on a product or in the product's original documentation means that the used electrical or electronic products may not be disposed together with the communal waste. In order to dispose of these products correctly, take them to a designated collection site, where they will be accepted for free. By disposing of a product in this way, you are helping to protect precious natural resources and helping to prevent any potential negative impacts on the environment and human health, which could be the result of incorrect waste disposal. You may receive more detailed information from your local authority or nearest collection site. According to national regulations, fines may also be given out to anyone who disposes of this type of waste incorrectly.
User information for disposing electrical and electronic devices. (Business and corporate use).
In order to correctly dispose of electrical and electronic devices for business and corporate use, refer to the product's manufacturer or importer. They will provide you with information regarding all disposal methods and, according to the date stated on the electrical or electronic device on the market, they will tell you who is responsible for financing the disposal of this electrical or electronic device. Information regarding disposal processes in other countries outside the EU. The symbol displayed above is only valid for countries within the European Union. For the correct disposal of electrical and electronic devices, request the relevant information from your local authorities or the device seller.

AZ ELADÓ CSOMAG TARTALMA
Autókamera Niceboy PILOT Q7
Szívós üvegtartó
Tápkábel
Kézikönyv
A NICEBOY PILOT Q7 MÜSZAKI ADATOK
- Gumb Gore – u izborniku služi za pregledavanje izbornika.
- Izbornik/Promjena načina)/Snimanje u hitnim slučajevima – kratkim pritiskom u stanju mirovanja (kamera ne snima video) ulazi se u izbornik postavki videa, fotografije, snimanja (ovisno o odabranom načinu) i daljnjim pritiskom do postavke kamere. Dugi pritisak u stanju pripravnosti koristi se za promjenu načina rada (Snimanje, Snimanje, Reprodukcija). Prilikom snimanja videa kratkim pritiskom uključuje se hitno snimanje (snimljeni video zapisi zaštićeni su od brisanja).
- Tipka dolje/isključivanje mikrofona – u izborniku se koristi za navigaciju kroz izbornik. Dugi pritisak u stanju pripravnosti i tijekom snimanja videa isključuje/uključuje mikrofon kamere.
- Tipka OK/Isključi i uključi - kratkim pritiskom u stanju pripravnosti uključuje se video snimanje, kratkim pritiskom tijekom video snimanja zaustavlja se snimanje. Kratkim pritiskom u izborniku potvrđuje se odabrana stavka. Dugi pritisak dok je kamera isključena uključuje kameru. Dugi pritisak u stanju pripravnosti isključuje kameru.
- USB-C - koristi se za spajanje na napajanje.
- Unos za nositelja
- Unos u službene svrhe
- LED diode - donja plava LED dioda treperi tijekom video snimanja,
https://niceboy.eu/ro/declaration/pilot-q2-wifi
INFORMATII PENTRU UTILIZATORI PRIVIND LICHIDAREA ECHIPAMENTELOR ELECTRICE ŞI ELECTRONICE (GOSPODĂRII)

INNEHÅLL I FÖRSÄLJNINGSPAKETET
Bilkamera Niceboy PILOT Q7
Sugglashållare
Kraftledning
Manuell
NICEBOY PILOT Q7 SPECIFIKATIONER
Nusle, 140 00, Czech Republic, ID: 294 16 876
Made in China.


- CAMERA MENU LANGUAGE SETTINGS
- VIDEO SETUP
- PHOTO SETUP
- CAMERA SETTINGS
- SUCTION GLASS HOLDER
- MICROSD CARD
- AUTOMATIC ON/OFF CAMERA
- CAMERA POWER SUPPLY
- CONTENTS OF THE SALES PACKAGE
- NICEBOY PILOT Q7 SPECIFICATIONS
- USER INFORMATION FOR DISPOSING ELECTRICAL AND ELECTRONIC DEVICES (HOME USE)
- AZ ELADÓ CSOMAG TARTALMA
- A NICEBOY PILOT Q7 MÜSZAKI ADATOK
- INFORMATII PENTRU UTILIZATORI PRIVIND LICHIDAREA ECHIPAMENTELOR ELECTRICE ŞI ELECTRONICE (GOSPODĂRII)
- INNEHÅLL I FÖRSÄLJNINGSPAKETET
- NICEBOY PILOT Q7 SPECIFIKATIONER
Brand : Niceboy
Model : PILOT Q7
Category : Dash cam