
58G950 - Batteries Graphite - Free user manual and instructions
Find the device manual for free 58G950 Graphite in PDF.


| Product Type | Petrol Chain Saw |
| Brand | Graphite |
| Model | 58G950 |
| Engine Displacement | 25.4 cm³ |
| Engine Power | 0.9 kW (1.2 HP) |
| Max Engine Speed | 10500 min⁻¹ |
| Idle Speed | 3000 min⁻¹ |
| Fuel Mixture Ratio | 25:1 (petrol:2-stroke oil) |
| Fuel Tank Capacity | 230 ml |
| Chain Oil Tank Capacity | 160 ml |
| Guide Bar Working Length | 250 mm |
| Guide Bar Overall Size | 12" (300 mm) |
| Chain Pitch | 3/8" (9.525 mm) |
| Chain Thickness | 0.050" (1.27 mm) |
| Chain Type | Oregon 3/8 0.050 |
| Weight (without guide bar and chain) | 3.2 kg |
| Dimensions (L x W x H, without guide bar) | 270 x 235 x 225 mm |
| Sound Pressure Level | 95 dB(A) (K=3 dB(A)) |
| Sound Power Level | 115 dB(A) (K=3 dB(A)) |
| Vibration Level | 0.5 m/s² (K=1.5 m/s²) |
| Safety Features | Chain brake, hand guard, anti-vibration, chain catcher |
| Included Accessories | Guide bar cover, guide bar, chain, plug key, carburettor screwdriver, shoulder strap, steel file, fuel-oil blend tank, hexagonal keys |
Frequently Asked Questions - 58G950 Graphite
User questions about 58G950 Graphite
0 question about this device. Answer the ones you know or ask your own.
Ask a new question about this device
Download the instructions for your Batteries in PDF format for free! Find your manual 58G950 - Graphite and take your electronic device back in hand. On this page are published all the documents necessary for the use of your device. 58G950 by Graphite.
USER MANUAL 58G950 Graphite
natural_image
Illustration of a hand using a tool to adjust or install a mechanical component (no text or symbols visible)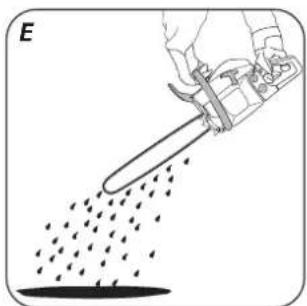
natural_image
Illustration of a hand pouring liquid from a container onto a surface, with no visible text or symbols.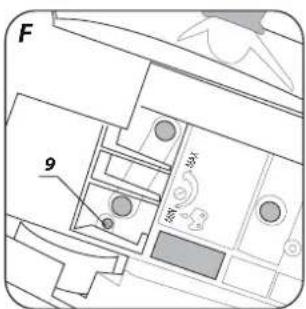
natural_image
Illustration of a wooden log being cut with a chainsaw (no text or symbols)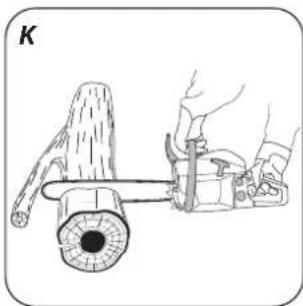
natural_image
Illustration of a hand using a tool to lift a tree trunk (no text or symbols)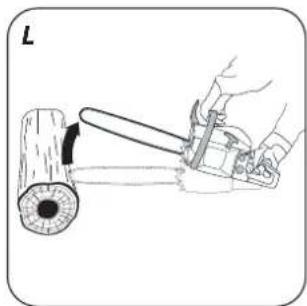
natural_image
Illustration of a hand using a tool to cut a wooden object with a curved arrow indicating motion (no text or symbols)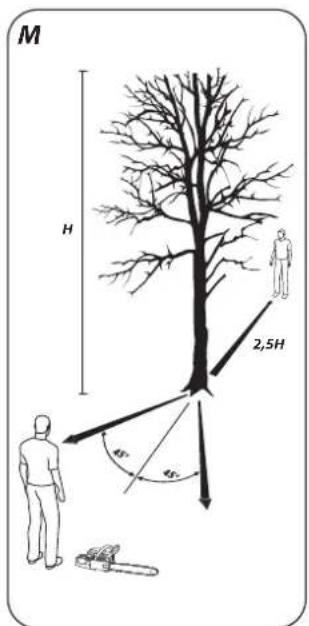
natural_image
Illustration of a hand using a tool to cut wood grain into a cylindrical opening (no text or symbols)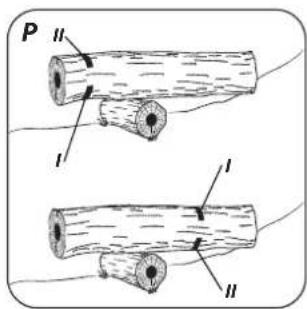
natural_image
Line drawing of a person wearing a backpack and holding a medical device (no text or symbols)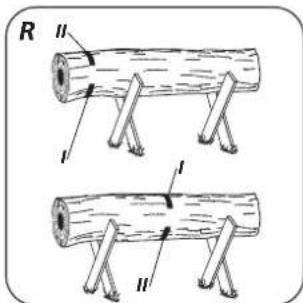

INSTRUKCJA ORYGINALNA (OBSŁUGI)
PILARKA ŁAŃCUCHOWA SPALINOWA
58G950
UWAGA: PRZED PRZYSTĄPIENIEM DO UŻYTKOWANIA PILARKI ŁAŃCUCHOWEJ SPALINOWEJ NALEŻY
UWAŻNIE PRZECZYTAĆ NINIEJSZĄ INSTRUKCJĘ I ZACHOWAĆ JĄ DO DALSZEGO WYKORZYSTANIA.
SZCZEGÓŁOWE PRZEPISY BEZPIECZEŃSTWA
BEZPIECZEŃSTWO UŻYTKOWANIA PILAREK ŁAŃCUCHOWYCH SPALINOWYCH
Ostrzeżenie!
/EC Declaration of Conformity/
/Gasoline chain saw/
/Benzin láncfűrész/
Model / Model. / Modell / 58G950
Numer seryjny / Serial number / Sorszám / 00001 ÷ 99999
/The above listed product is in conformity with the following UE Directives:/
/Machinery Directive 2006/42/EC/
/ 2006/42/EK Gépek /
/Noise Emission Directive 2000/14/EC Annex V; 2005/88/EC/
/guaranteed sound power level /
/and fulfils requirements of the following Standards:/
No. 1067 AV Technology Unit 2 Easter Court, Europa Boulevard, Warrington, Cheshire, WA5 7ZB
/Last two figures of CE marking year:/
/Name and address of the person who established in the Community and authorized to compile the technical file/
/GRUPA TOPEX Quality Agent /
e-mail graphite@gtxservic

TRANSLATION OF THE ORIGINAL INSTRUCTION MANUAL

PETROL CHAIN SAW
58G950
CAUTION: BEFORE USING THE PETROL CHAIN SAW READ THIS MANUAL CAREFULLY AND KEEP IT FOR FUTURE REFERENCE.
DETAILED SAFETY REGULATIONS
SAFE USE OF PETROL CHAIN SAW
Warning!
- Persons unfamiliar with instruction manual are not allowed to use chain saw.
- Use the chain saw for cutting wood only.
- Other use of the chain saw is the sole responsibility of the user who should bear in mind that it may be dangerous.
- The manufacturer is not responsible for losses and damages resulting from unintended use of the chain saw.
WORKPLACE
a) Keep your workplace tidy and ensure it is well lit. Untidiness and insufficient illumination contribute to accidents especially when chain saws are in use.
b) Keep children and bystanders away from the workplace. Distraction may cause loss of control over the tool.
PERSONAL SAFETY
a) Use safety equipment, such as work suit, protective glasses, protective shoes, protective helmet, earmuff protection and leather gloves. Using safety equipment in appropriate conditions reduces risk of body injury.
b) Do not overestimate your abilities. Stand firmly and keep your balance at all times. It enables better control over the saw in unpredicted situations.
c) Do not wear loose clothing or jewellery. Keep your hair, clothes and gloves away from moving parts. Loose clothing, jewellery or long hair may be caught by moving parts.
TRANSPORTATION AND STORING
a) When carrying the chain saw switch off the engine, put on the chain cover and switch on the chain brake. Carrying unsecured and operating chain saw may cause body injury.
b) Carrying the chain saw is possible only when holding its front handle. Other parts may not ensure appropriate grip and even cause injury.
c) Inspect your chain saw. Check alignment and fixing of moving parts, check against part cracks and all other factors that may affect operation of the saw. Repair the saw before use if it is found damaged. Many accidents are caused by improper maintenance of tool.
d) Cutting chain should be clean and sharp. Proper maintenance of sharp cutting edges of chain reduces the risk of jamming and makes operation easier.
POWER TOOL USE AND CARE
a) Check proper operation of the saw brake regularly. In emergency situation, non-operational brake may make chain disengagement impossible.
b) When work with the chain saw is completed, the tool must be cleaned carefully as well as used personal protective equipment, while the sensitive components must be maintained.
OPERATION
- Switch off the chain saw engine before releasing the chain brake.
- Be very careful at the end of a cut, because the saw having no support in processed material falls down due to its inertia, which may cause injuries.
- When working for a long time, the saw operator may experience formication and numbness in fingers and hands. Stop working in such case, because numbness reduces precision in saw use.
- It is forbidden to use open flame and smoke cigarettes.
- Fill the fuel tank of the saw with petrol and oil blend when the engine is off and cooled down, otherwise there is risk of spilling the blend and ignition from hot parts of the saw.
- Do not start the saw when leakage is found, it may cause fire.
- The saw heats considerably during operation. Be careful and do not touch hot parts of the saw with unprotected parts of your body.
- Only one person can operate the chain saw at a time. All other persons shall be away from working area of the chain saw. Especially children and animals should be away from working area.
- When starting the saw, its chain must not rest on the processed material or touch anything else.
- When working with the chain saw hold it with both hands by both handles. Keep firm body position.
- Children and juveniles cannot operate the chain saw. Allow access to the saw only to adults who know how to handle the tool. This instruction manual should be given with the chain saw.
- Stop working with the chain saw with first signs of fatigue.
- Before starting to cut set the chain brake lever in appropriate position (pull it to yourself). It is also hand guard.
- Move chain saw away from the material being cut only when the cutting chain is working.
- When cutting processed sawn wood or thin branches use support (sawing horse). Do not cut several boards at the same time (placed one on top of another), or material held by other person or held with foot.
- Long objects should be firmly fixed before cutting.
- In uneven, sloping terrain proceed with your work when facing upwards.
- When cutting through always use the bumper spike as a point of support. Hold the saw by the rear handle and guide with the front handle.
- In case the cut cannot be completed in one run, pull the saw a little back, put the bumper spike in another place and continue the cut lifting rear handle slightly.
- When cutting in horizontal plane, position yourself at an angle as close to 90° from cutting line as possible. Such operation requires concentration.
- When the chain is pinched when cutting with the tip of the bar, the saw may recoil towards operator. Because of this effect cut with the straight part of the chain whenever possible. Then, in case of pinching, the recoil effect changes direction away from the operator.
- Be very careful when cutting wood when there is the risk of splitting. Pieces of wood that are cut off can be flung in any direction (risk of body injury!).
- Only trained persons should cut tree branches! Uncontrolled fall of a tree branch constitutes a risk of body injury!
- Do not cut with tip of the guide bar (risk of recoil).
- Pay special attention to branches under strain. Do not cut branches, which hangs freely, from below.
- Always stand to the side of predicted fall line of the tree that is to be cut.
- During a tree fell there is a risk that branches of the tree, or trees in proximity, will break and fall. Be very careful, otherwise a body injury may occur.
- On a sloped terrain the operator should stay on upper part of the slope with respect to the tree being cut, never lower.
- Watch out for logs that may roll down towards you. Jump away!
- Operating saw tends to rotate when tip of the chain guide bar touches processed material. In such case the saw may get out of control and move towards the operator (risk of body injury!).
- The tree cuttings should be preceded with preparation of the work place consisting of the removal of lower interfering branches and clearing the area around the tree trunk.
- Do not work in strong wind, which may influence the predicted tree falling direction and cause its uncontrolled felling.
- Do not carry out cuttings in conditions of limited visibility, when it is foggy, rains or snows.
- Do not overreach and do not cut above your shoulder height, or when standing on a tree, ladder, scaffold, trunk, etc.
- A well-equipped first aid kit should be available near the work place.
To prevent saw recoil follow below instructions:
- Never start or guide a cut with the tip of the guide bar!
- Always start cutting with saw previously switched on!
- Ensure the cutting chain is sharp.
- Never cut more than one branch at a time. When cutting off, watch out for surrounding branches. When cutting a tree through, watch out for nearby tree trunks.
CAUTION! The design is assumed to be safe, protection measures and additional safety systems are used, nevertheless there is always a small risk of operational injuries.
EXPLANATION OF USED SYMBOLS

1

2
3
4
5

6
7
8
9
10

11

12
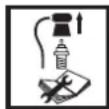
- Caution, use precaution measures
- Fire hazard
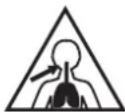
- Exhaust gas poisoning hazard
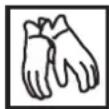
- Use protective gloves
- Switch off the engine and remove wire from the ignition plug before commencing any maintenance or repair
- Read instruction manual, observe warnings and safety conditions therein!
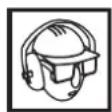
- Use head, eyes and ears protection
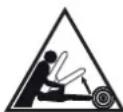
- Danger of recoil
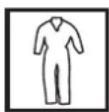
- Use protective clothes
- Use protective shoes
- Do not put your hands or legs close to cutting parts
CONSTRUCTION AND USE
Petrol chain saw is a hand-held tool. It is driven by an air cooled, two-stroke combustion engine. Tool of this type is designed for tasks in home garden. The saw can be used for cutting down trees, cutting branches, firewood, wood for fireplace and other tasks where cutting wood is necessary.

Use the device according to the manufacturer's instructions only.
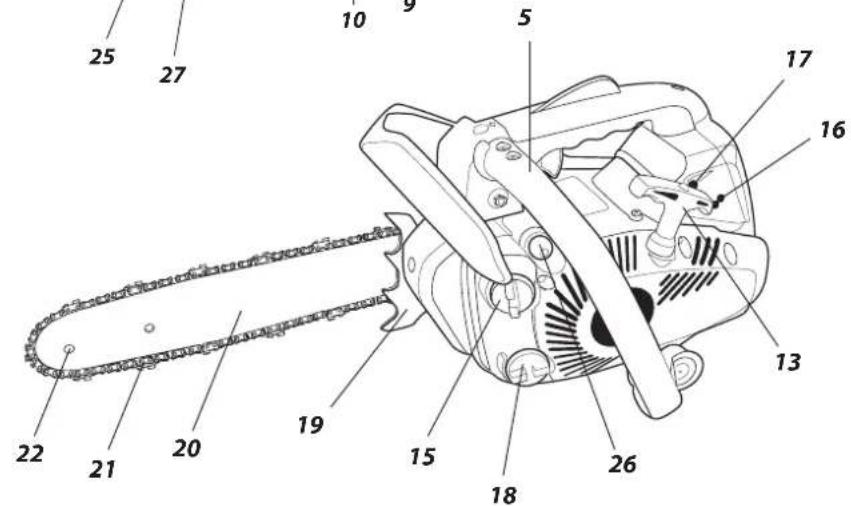
DESCRIPTION OF DRAWING PAGES
Below enumeration refers to the device elements depicted on the drawing pages of this manual.
- Throttle lever lock
- Choke cable
- Knob for air filter lid
- Air filter lid
- Front handle
- Brake lever
- Guide bar fixing nuts
- Chain tension adjustment screw
- Oil feed adjustment screw
- Casing
- Throttle lever
- Main handle
- Starter line
-
Ignition switch
-
Fuel filler plug
- Carburettor adjustment screws, L and H
- Low speed adjustment screw T
- Oil filler plug
- Bumper spike
- Guide bar
- Chain
- Guide bar chain wheel
- Shoulder strap
- Shoulder strap spring hook
- Shoulder strap holder
- Membrane pump
- Protection nut
* Differences may appear between the product and drawing
MEANING OF SYMBOLS

C AUATION

W ARNING

ASSEMBLY/SETTINGS

INFORMATION
EQUIPMENT AND ACCESSORIES
- Guide bar cover - 1 pce
- Guide bar - 1 pce
- Chain - 1 pce
- Key for ignition plugs - 1 pce
- Screwdriver for carburettor adjustment - 1 pce
- Shoulder strap - 1 pce
- Steel file - 1 pce
- Use petrol-oil blend tank - 1 pce
- Hexagonal key - 2 pcs
Prior to carrying the chain saw slide chain cover onto guide bar and chain. When carrying the chain saw, hold it by front handle. Do not carry the saw when holding main handle. If several cuttings are to be made, switch off the chain saw with the ignition switch between consecutive tasks.
INSTALLATION OF GUIDE BAR AND SAW CHAIN

Use pin and adjustment screw for adjustment of chain tension. It is very important that the bolt located on adjustment screw falls into hole in the guide bar during installation of the guide bar. You can move the bolt to the front and back by turning the adjustment screw. Those parts must be set appropriately prior to starting guide bar installation in the saw.

Guide bar and chain are supplied separately.
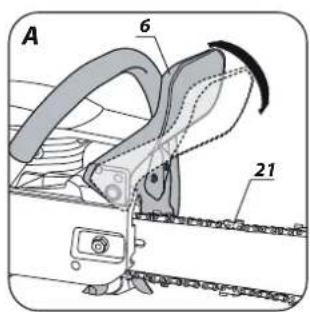
- Brake lever (6) must be in the upper (vertical) position (fig. A).
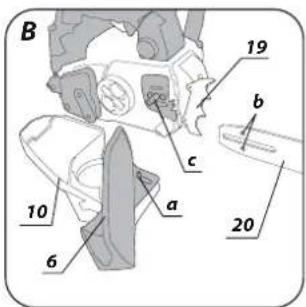
- Unscrew the guide bar fixing nuts (7) (27) and remove the casing (10).
- Put the chain (21) onto driving chain wheel located behind the clutch.
- Install the guide bar (20) (slide it behind the clutch) onto guiding screws (c) and push towards driving chain wheel (fig. B).
-
Put the chain (21) onto guide bar chain wheel (22) from below.
-
Move the guide bar (20) away from the driving chain wheel, so chain guiding links are placed in the guide bar groove.
- Ensure the pin (a) of the chain tension adjustment screw (8) is in the middle of the lower hole (b) of the guide bar (20), adjust when necessary (fig. B).
- Place the casing (10) in its place and fix by slightly tightening guide bar fixing nuts (7) (27).
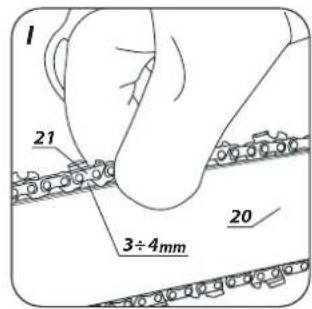
- Strain the chain appropriately using the chain tension adjustment screw (8). Chain tension is appropriate when the chain can be lifted by 3 to 4mm in the middle of the guide bar in horizontal position.
- Firmly tighten guide bar fixing screws (7) (27) while holding the guide bar tip.

Prior to guide bar and chain installation ensure that position of chain cutting blades is appropriate (correct position of the chain on the guide bar is shown on the tip of the guide bar). Always wear protective gloves during checks and installation of the chain to prevent cuts from sharp edges of the chain.

New chain requires start-up period, which lasts approximately 5 minutes. Chain lubrication is very important in this phase. Check chain tension after start-up period and readjust if necessary.
Check and adjust the chain tension frequently. Too loose chain can easily slide off the guide bar, quickly wear out or quickly wear out the guide bar.
FILLING SAW TANK WITH OIL

Oil tank in new chain saw is empty. Fill the tank with oil prior to first use.
• Unscrew oil filler plug (18).
- Pour in maximally 160 ml of oil (be careful to avoid contamination of oil during filling of the tank).
- Screw oil filler plug (18).

Do not use oil that has been already used or regenerated, as this may damage the oil pump. Use SAE 10W/30 oil for the whole year, or SAE 30W/40 in summer and SAE 20W/30 in winter.
FILLING THE FUEL TANK

When filling the fuel, follow these rules:
• engine must not work,
• you must not spill the fuel.

Accordingly to the below table, mix petrol (lead-free with octane number 95) with good quality engine oil for two stroke engines.
Table for 25 : 1 fuel blend
| Petrol (litres) 1 2 3 4 5 | |||||
| Oil for 2-stroke engines (ml) 40 80 120 160 200 |

- Pour appropriate amount of oil into a canister, and add exactly measured amount of petrol.
- Screw the cap and mix thoroughly.
• Unscrew fuel filler plug (15). - Pour in previously prepared fuel blend (max. 230 ml).
- Screw fuel filler plug (15).

Most problems with combustion engines result directly or indirectly from fuel used. You must not use oil designed for four-stroke engines to prepare fuel blend.
INSTALLATION AND ADJUSTMENT OF SHOULDER STRAP

Switch off the engine before installation and adjustment of the shoulder strap and shoulder strap holder.

Appropriate adjustment of the shoulder strap facilitates using the device.
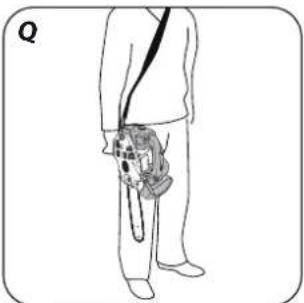
- Put the shoulder strap (23) over your head and shoulder (fig. Q).
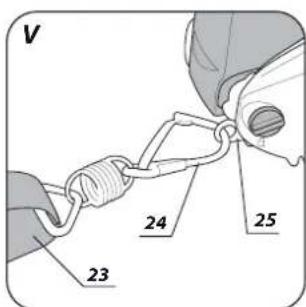
- Put the shoulder strap spring hook (24) (fig. V) in the shoulder strap holder (25).
- Use the shoulder strap fastener (23) (fig. Q) to adjust shoulder strap length to set the most comfortable working position.
Hold the chain saw with both hands during operation.
- Check level in the fuel tank and the oil tank.
- Ensure the brake lever (6) is in the switched on position (moved to the front).
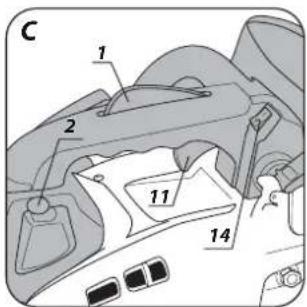
- When engine is cold, pull out choke cable (2).
- Set the ignition switch (14) to switched on position (fig. C).
- Place the saw on stable ground.
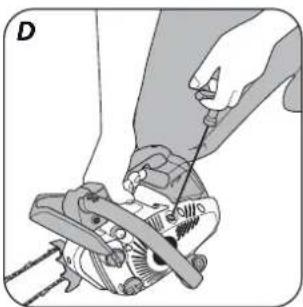
- While holding the saw pressed against ground, pull the starter line (13). First slowly so to hear the clutch gears, then pull it strongly (fig. D).
- After starting the saw, press the throttle lever lock (1) and throttle level (11) slightly (choke cable will move automatically to switched off position).
- Allow the engine to heat up with throttle lever (11) slightly pressed.
- Move the brake lever (6) to switched off position (to the back).
- Make a cut.
In case the engine does not start at the first try, pull out the choke cable (2) halfway and pull the starter line again.
After few failed attempts pump fuel with the membrane pump (26) and try again.

Do not start the engine while holding the saw in hands. During start up the chain saw must rest on ground and be held firmly. Ensure the chain is free to move without touching any object. Do not cut any material with choke cable pulled out.
STOPPING THE ENGINE

- Release the throttle lever (11) and allow the engine to run idle for a few minutes.
- Set the ignition switch (14) to STOP position.
CHECKING CHAIN LUBRICATION

Check lubrication of the chain and oil level in the tank before starting to work. Switch on the saw and hold it above ground. If you see enlarging oil marks, the chain lubrication works well (fig. E). If there are no oil marks or they are very small, use oil feed adjustment screw (9) to make appropriate adjustments. In case the adjustment brings no effects, clean oil outlet, upper hole of chain tension and oilway, or contact service.

Make adjustments when the saw is switched off, observe precaution measures and do not allow the guide bar to touch ground. Operate the tool safely and maintain at least 20 cm distance from ground.

Use oil feed adjustment screw (9) to set amount of supplied oil accordingly to respective operating conditions.
- MIN position – oil flow decreases.
- MAX position – oil flow increases (fig. F).
When cutting hard and dry wood and using whole length of the guide bar when making a cut, set the oil feed adjustment screw (9) to the MAX position.
You can reduce amount of oil supplied by turning oil feed adjustment screw (9) to MIN position, when cutting soft and damp wood, or when only part of the working length of the guide bar is used.
Depending on ambient temperature and amount of oil supplied, you can operate the chain saw for 15 to 40 minutes per one filling the oil tank (tank capacity is 160 ml).

Oil tank should be almost empty when the fuel tank is emptied. When filling the fuel remember about filling oil tank as well.
CHAIN LUBRICANTS

Durability of chain and guide bar depends heavily on quality of lubricant. Use only lubricants, which are designed for chain saws.

Never use regenerated or previously used oil for chain lubrication.
CHAIN GUIDE BAR

Guide bar (20) is exposed to heavy wear especially in tip and bottom part. To prevent side wear due to friction, it is recommended to turn over the guide bar every time the chain is sharpened. Clean the guide bar groove and oil holes on that occasion. Guide bar groove is rectangular. Check the groove against wear. Put rule to guiding strip and outer surface of a chain tooth. If you observe distance between, the groove is correct. Otherwise the guide bar is worn out and needs to be replaced.
CHAIN WHEEL

Driving chain wheel is subject to especially heavy wear. Replace the chain wheel when you observe clear signs of wear of wheel teeth. Worn chain wheel additionally reduces durability of chain. Chain wheel should be replaced by authorised service workshop.
ADJUSTMENT OF CARBURETTOR

Chain saw carburettor is factory set, however it may require precise adjustment when operating conditions change. Before starting to adjust the carburettor ensure new air filter and fuel filter are installed and tank is filled with appropriate fuel blend.

Adjust the carburettor with guide bar and chain installed.
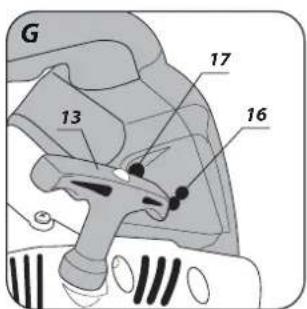
- Screw in both adjustment screws (L and H) (16) until stop (do not overtighten) (fig. G).
- First, unscrew two adjustment screws (16) as specified below:
-L screw: by 1^1 / 2±^1 / 4 of a turn -H screw: by 1^1 / 4±^1 / 4 of a turn
- Start up the engine and allow it to heat up while holding throttle lever (11) pressed in half.
- After the engine has been heated, release pressure on the throttle lever (11) and allow the engine to run slowly.
- Turn the screw (L) slowly clockwise until idle run achieves its maximum speed, then turn the screw counter-clockwise by 1/4 of a turn.
- Turn low speed adjustment screw (T) (17) counter-clockwise until the chain stops moving. When slow speed appears to be too low, turn the screw clockwise (fig. G).

Avoid touching the muffler. Hot muffler may cause severe burns.
CHAIN BRAKE

The saw features automatic brake, which stops the chain in case of recoil during chain saw operation. The brake engages automatically when force of inertia is applied to a weight located inside the brake casing. The chain brake can also be switched on manually, when the brake lever (6) is moved towards the guide bar (20). Switching the chain brake stops the chain movement in 0.12 sec.
BRAKING CHECK

Ensure the brake operates correctly before each use of the saw.
- Put operating saw on the ground and open the throttle fully for 1 – 2 seconds to allow the saw engine to operate at its maximum speed.
- Push the brake lever (6) forward. The chain should stop immediately.
- In case the chain stops slowly or does not stop at all, replace the brake band and clutch drum before using the chain saw again.
- To release the brake, pull the brake lever (6) towards the main handle (12) so you can hear sound typical of blockade snapping.

Ensure the chain brake operates correctly and the chain is sharp. It is very important for keeping potential recoil at a safe level.
CHECKING BRAKE ENGAGEMENT

During this check the saw engine should be switched off.
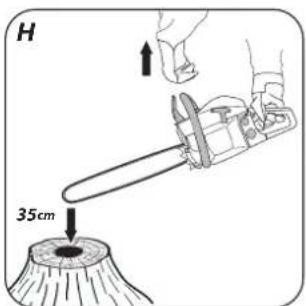
- Lift the saw while holding the front handle (5) and main handle (12) approximately 35 cm above wooden object.
- Let the front handle (5) go and allow the guide bar to tilt under its own weight and touch the wooden object (fig. H).
- At the contact with the wooden object, the chain brake should engage (brake lever (6) moves forward to the ON position).

Ensure the chain brake operates correctly before starting any task. In case the brake does not operate efficiently, adjust it or repair in authorized service site.

In case the engine operates at high speed with the chain brake switched on, the saw clutch will overheat. When the chain brake engages during operation of the engine, release the throttle lever immediately and keep engine speed at low level.
CHAIN TENSION ADJUSTMENT

Cutting chain tends to lengthen during operation due to higher temperature. Longer chain loosens and may slip off the guide bar.
- Loosen the guide bar fixing nuts (7).
- Ensure the chain (21) remains in the guiding groove of the guide bar (20).
- Use a screwdriver to turn the chain tension adjustment screw (8) clockwise, until the chain is strained appropriately (it should slightly hold the guide bar in horizontal position).
- Check the chain tension again (it should be possible to lift the chain by approximately 3 – 4 mm in the middle of the guide bar) (fig. I).
- Tighten firmly the guide bar fixing nuts (7).

Do not over-tension the chain. Adjustment of overly heated chain may lead to excessive tension when cooling down.
- Before starting any planned task, familiarize yourself with section describing safe rules for chain saw operation. It is recommended to gain experience by cutting waste wood pieces. It will also allow to find out the chain saw possibilities.
• Always observe safety regulations. - Use the chain saw only for cutting wood. Cutting other materials is forbidden.
- Intensity of vibrations and recoil change depending on the type of wood being cut.
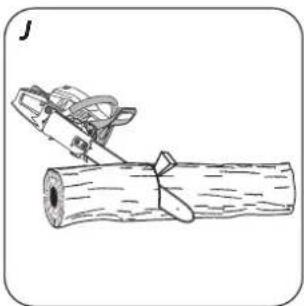
- Do not use the chain saw as a lever to lift, move or split objects. When the chain is pinched in wood, switch off the engine and drive wooden or plastic wedge into the processed piece to release the chain saw (fig. J). Start the tool again and commence cutting carefully.
- Do not fix the saw to a stationary work station.
- Attaching other devices, which are not allowed by the chain saw manufacturer, to the chain saw drive is forbidden.
- It is not necessary to apply big force to the chain saw when using the tool. Apply light pressure only while the engine operates with the throttle fully opened.

When the chain saw is pinched in kerf during cutting, do not remove it forcefully. It may cause loss of control over the chain saw, operator injury and/or damage to the chain saw.

Release the chain brake before starting to work.
- Press the throttle lever lock (1) and throttle lever (11) (wait until engine reaches its full speed before starting to cut).
- Keep maximum speed for the whole time.
- Allow the chain to cut wood. Press down the saw lightly (fig. K).
- Stop pressing the saw at the end of the cut to avoid loosing control over the tool.
- When the cutting has been finished release the throttle lever (11) and allow the engine to run idle.
- Switch off the engine before putting the chain saw away.

Keeping high speed of the engine when not cutting wood causes unnecessary losses and wear of parts.
PROTECTION AGAINST RECOIL

Recoil is movement of the guide bar of the chain saw up and/or back, which happens when the part of the chain on the guide bar tip encounters an obstacle.
- Ensure the processed material is firmly fixed.
- Use clamps to fix the material.
- Hold the chain saw with both hands when starting up and during operation.
- During recoil the chain saw cannot be controlled and the chain is loosened (fig. L).
- Incorrectly sharpened chain increases risk of recoil.
- Do not cut above level of your shoulders.

Avoid cutting with guide bar tip, it may cause sudden recoil – to the back and up. Always use complete safety equipment and appropriate working clothes when operating the chain saw.

Disassembly of protections, inappropriate operation, maintenance, improper guide bar or chain replacement may contribute to increase of risk of body injury in case of a recoil. Never modify the saw in any way. By using modified chain saw, the user looses all warranty rights. Warranty voids also when the chain saw is used inaccordingly to information contained in this manual.
CUTTING PIECES OF WOOD

When cutting wood follow guidelines for safety of work and do as follows:
- Ensure the wood piece cannot be moved.
- Use clamps to fix short pieces of material before cutting.
- Cut wood or wood-like materials only.
- Before cutting ensure the chain saw will not come into contact with stones or nails, as it could cause pulling the saw out and damage to the chain.
- Avoid situations when working saw might touch wired fence or ground.
- When cutting branches support the saw as much as possible and do not cut with the tip of the guide bar.
- Watch out for obstacles such as protruding stumps, roots, hollows and holes in the ground, as they may be cause of an accident.
FELLING A TREE

Define the tree fall line. Consider wind, lean of the tree, location of heavy branches, complexity of work after tree fall and other factors.
- When tidying area around the tree remember to ensure proper ground grip and escape path to use when the tree falls.
- Predict and tidy up two escape paths at angle, counting from the line opposite to expected line of the tree fall. There must be no obstacles on these paths (fig. M).
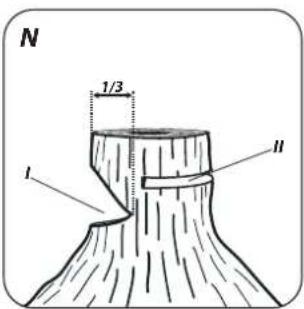
- Make a notch at the side of the fall, one third of the trunk diameter deep (fig. N).
- Make a felling cut at the side opposite to the previously made felling notch, and a little higher than lower surface of the notch.
- Insert wedges on time to avoid pinching of the saw chain.
- Fell the tree by driving a wedge rather than cutting through the whole trunk.

When felling trees observe all safety rules and do as follows:
- When the chain is pinched, switch off the chain saw and release the chain with a wedge. Wedge should be made of wood or plastic. Never use steel or cast iron wedge.
- Falling tree may pull other trees.
- Danger zone radius is 2.5 height of the falling tree (fig. M).
- If the operator is inexperienced or amateur it is recommended to have a training rather than gaining the experience without supervision.

Do not fell trees when:
- Conditions in danger zone cannot be determined due to fog, rain, snow or darkness.
- Line of tree felling cannot be determined due to wind or wind blows.
CUTTING THROUGH TRUNKS

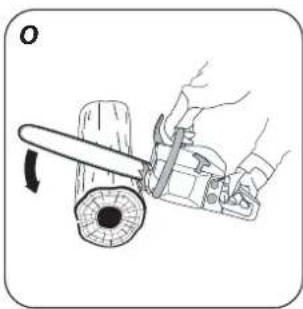
- Press the bumper spike (19) against the material and make a cut (fig. O).
- If the cutting cannot be finished even after the chain saw range is fully utilized, do as follows:
- Move the guide bar back from the cut material to a certain distance (with cutting chain still operating) and move the main handle (12) a little down, support the bumper spike (19) and finish the cut by lifting the main handle (12) a little.
- Always keep good feet and ground grip. Do not stand on the trunk.
- Watch out for possibility of the trunk rotation.
- Observe manual guidelines related to work safety to avoid the chain saw recoil.
- Always finish cutting at the side opposite to compressive stress to avoid pinching the chain in kerf.
- Before starting to work check the stress direction in the trunk that is to be cut, to avoid pinching chain of the saw.
- To eliminate stress, the first cut should be made at the tension side.
- When cutting a trunk that is lying on the ground, first make a cut deep 1/3 of the trunk diameter, then turn the trunk over and finish cutting at the opposite side.
- When cutting a trunk that is lying on the ground, do not allow to sink the cutting chain into the ground under the trunk. Negligence may cause immediate damage to the chain.
- When cutting trunk that is lying on the slope, the operator should always be at the slope side above the trunk.

CUTTING A TRUNK LIFTED ABOVE THE GROUND
In case the log is supported or placed on stable sawing horse, depending on the place of operation, make the cut 1/3 of the trunk diameter deep on the side under tension and finish cutting on the opposite side (fig. P and R).
TRIMMING / CUTTING BUSHES AND TREE BRANCHES

- Start cutting branches of a felled tree at its base and continue towards top of the tree. Do small branches with a single cut.
- First, check which way the branch bends. Then make a cut from the inside of the bend and finish cutting on the opposite side. Be careful, the branch being cut may spring back.
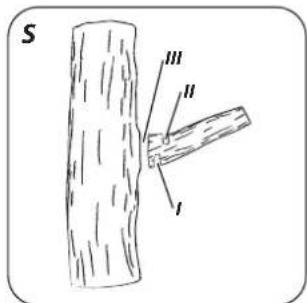
- When trimming tree branches, always cut downward to enable free fall of cut branch. However, sometimes undercutting the branch from the bottom may be helpful (fig. S).
- Be very careful when cutting a branch that may be under stress. Such branch may spring aside and hit the operator.

Do not cut branches when climbing up the tree. Do not stand on ladder, platforms, logs or positions that may cause loss of balance and control over the chain saw. Do not cut above level of your shoulders. Always hold the chain saw with both hands.
Ensure the engine is switched off and is cold before cleaning, checking or repairing the chain saw. Disconnect wire from the ignition plug to prevent accidental start up of the engine.
STORAGE

- Empty the fuel system before deciding to store the tool for more than one month.
- Drain fuel from the fuel tank, start the engine and allow it to use all remaining fuel and stop working.
- Use new fuel each season. Never use any cleaning agents on fuel tank, it may damage the engine.
- Pay special attention to keep the ventilation holes of the engine casing pervious.
- Clean plastic parts with mild detergent and a sponge.
- You can proceed with maintenance actions only described within this instruction manual. Any other action can be carried out only by authorized service.
- Do not make any changes in chain saw construction.
- When not in use, chain saw should be stored clean, on flat surface, in dry place and beyond reach of children.

When storing it is important to avoid deposition of rubber particles in basic parts of the fuel system, such as carburettor, fuel filter, fuel line and fuel tank. Fuels with alcohol additives (ethanol or methanol) may absorb moisture, and that during storing causes separation of fuel blend ingredients and formation of acids. Acidic petrol may damage the engine.
AIR FILTER

Dirty air filter reduces efficiency of combustion engine and causes increase of fuel consumption. Clean the air filter after each 5 hours of the saw operation.
- Clean the air filter lid (4) and its surroundings, so the dirt does not get into carburettor chamber after the lid is removed.
- Unscrew knob for air filter lid (3) and remove air filter lid (4).
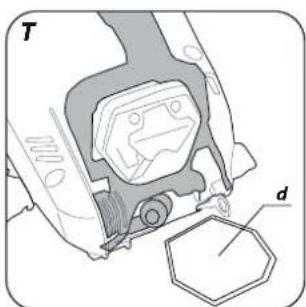
- Remove air filter (d) (fig. T).
- Use water with soap to clean the filter, wash with clean water and dry thoroughly.
- Install air filter. Ensure the grooves on the air filter rim match protrusions on the air filter lid (4).
- When installing the air filter lid (4) make sure to properly place ignition plug wire and access sleeves for carburettor adjustment screws.

Do not wash the air filter in petrol or any other flammable solvent to avoid fire hazard or appearance of dangerous vapours.
CYLINDER FINNING

Dust deposition on the cylinder finning may cause motor overheating. Check regularly and clean the cylinder finning when carrying out maintenance of the air filter.
GUIDE BAR AND CHAIN

Check condition of the guide bar and chain every 5 hours of the saw operation.
- Set the ignition switch (14) to off position.
- Loosen and unscrew the guide bar fixing nuts (7).
- Remove the casing (10) and disassemble guide bar (20) and chain (21).
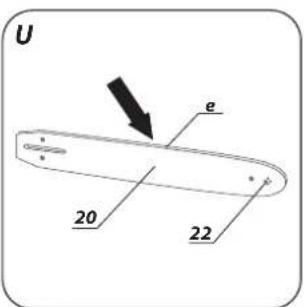
- Clean oil holes and groove (e) in the guide bar (20) (fig. U).
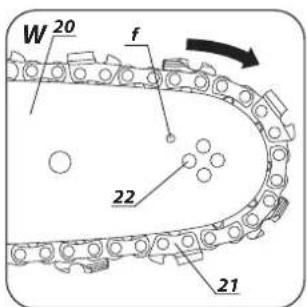
- Lubricate tip chain wheel of the guide bar (22) through the hole (f) located on the guide bar tip (fig. W).
- Check condition of the chain (21).
CHAIN SHARPENING

Pay attention to cutting tools. Cutting tools should be sharp and clean, it allows efficient and safe operation. Operating the saw with blunt chain causes quick wear of the chain, guide bar and driving chain wheel, and breaking the chain in the worst case. That is why it is important to sharpen the chain on time.
Chain sharpening is a complex operation. Sharpening the chain by yourself requires use of special tools and skills. It is recommended to entrust sharpening the chain to qualified persons.
FUEL FILTER

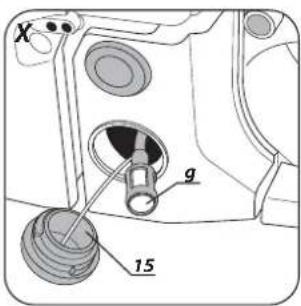
• Unscrew the fuel filler plug (15).
- Use wire hook to remove the fuel filter (through the fuel filler hole (fig. X).
- Disassemble the fuel filter and wash it in petrol or replace with a new one.
• Install the fuel filter in the tank.
- Tighten the fuel filler plug (15).

When the filter has been dismantled use the wire hook to hold up the end of the suction line. Be careful during fuel filter installation to prevent contamination from getting into the suction line.
OIL FILTER

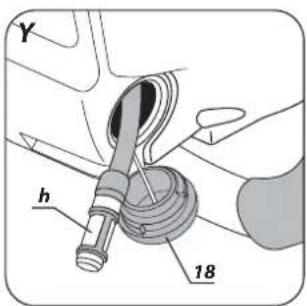
• Unscrew oil filler plug (18).
Use wire hook to remove the oil filter (h) through the oil filler hole (fig. Y).
- Wash the oil filter in petrol or replace with a new one.
- Remove dirt from the tank.
• Install the oil filter in the tank.
Tighten oil filler plug (18).

When putting the oil filter into the tank make sure it reaches front right corner.
IGNITION PLUG

To maintain reliable operation of the device, check condition of the ignition plug on a regular basis.
- Remove air filter lid (4).
- Remove wire (i) from the ignition plug.
- Put on plug key (included) and unscrew the ignition plug (fig. Z).
- Clean and adjust spacing between contacts (0.65 mm) (replace ignition plug when necessary).
OTHER INSTRUCTIONS
i Ensure there are no fuel leaks, loosened joints or damages of main parts, especially main handle joints and guide bar fixing. When you find any damage, make sure it is repaired before next use of the chain saw.
All faults should be repaired by service workshop authorized by the manufacturer.
TECHNICAL PARAMETERS
RATED PARAMETERS
| Petrol Chain Saw | |
| Parameter Value | |
| Engine displacement 25,4cm | 3 |
| Guide bar working length 250 mm | |
| Engine power 0,9 kW (1,2 KM) | |
| Max. Engine speed with cutting system (maximum) 10500 min | -1 |
| Idle rotational speed 3000 min | -1 |
| Average fuel consumption 0,95 l/h | |
| Fuel – petrol : oil for 2-stroke engines 25: 1 | |
| Fuel tank capacity 230 ml | |
| Chain oil tank capacity 160 ml | |
| Carburettor MC14A6-3 | |
| Ignition system | CDI |
| Ignition plug | L7T |
| Oil feed system | Automated pump with controller |
| Chain wheel (teeth x pitch) | 6T x 9,525 mm |
| Type of guide bar | With chain toothed wheel |
| Size of guide bar | GRAPHITE 12" (300 mm) |
| Type of chain | Oregon 3/8 0,050 |
| Chain pitch | 3/8" (9,525 mm) |
| Chain thickness | 0,050" (1,27 mm) |
| Dimensions (LxWxH) (w/o guide bar) | 270x235x225 mm |
| Weight (w/o guide bar and chain) | 3,2 kg |
| Year of production | 2016 |
NOISE LEVEL AND VIBRATION PARAMETERS
Sound pressure: Lp_A = 95 dB(A) K = 3 dB(A)
Sound power: Lw_A = 115 dB(A) K = 3 dB(A)
Vibration acceleration a_h=0,5 m/s^2 K=1,5 m/s^2
ENVIRONMENT PROTECTION
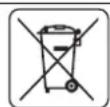
Do not dispose of combustion engine driven products with household wastes, they should be utilized in proper plants. Obtain information on waste utilization from your seller or local authorities. Worn out equipment contains substances active in natural environment. Unrecycled equipment constitutes a potential risk for environment and human health.
* Right to introduce changes is reserved.
"Grupa Topex Spółka z ograniczoną odpowiedzialnością" Spółka komandytowa with seat in Warsaw at ul. Pograniczna 2/4 (hereinafter Grupa Topex) informs, that all copyrights to this instruction (hereinafter Instruction), including, but not limited to, text, photographs, schemes, drawings and layout of the instruction, belong to Grupa Topex exclusively and are protected by laws accordingly to Copyright and Related Rights Act of 4 February 2004 (ustawa o prawie autorskim i prawach pokrewnych, Dz. U. 2006 No 90 item 631 with later amendments). Copying, processing, publishing, modifications for commercial purposes of the entire Instruction or its parts without written permission of Grupa Topex are strictly forbidden and may cause civil and legal liability.
PÍLENIE PŘOV STROMOV

GRAFISKÄS DALAS APRAKSTS
PALKIDE SAAGIMINE MAAPINNAL

DETALJNI PROPISI O SIGURNOSTI
SIGURNOST KOD KORIŠTENJA BENZINSKIH LANČANIH PILA
Upozorenje!
- Osobe koje nisu upoznale sadržaj dotičnih uputa ne smiju koristiti lančanu pilu.
- Lančanu pilu koristite isključivo za rezanje drveća.
- Korisnik snosi potpunu odgovornost za korištenje pile u druge svrhe imajući na umu da to može predstavljati opasnost.
- Proizvođač ne snosi odgovornost za štete prouzročene nepravilnim korištenjem lančane pile.
RADNO MJESTO
CANDELA DI ACCENSIONE

- INSTRUKCJA ORYGINALNA (OBSŁUGI)
- PILARKA ŁAŃCUCHOWA SPALINOWA
- 58G950
- SZCZEGÓŁOWE PRZEPISY BEZPIECZEŃSTWA
- BEZPIECZEŃSTWO UŻYTKOWANIA PILAREK ŁAŃCUCHOWYCH SPALINOWYCH
- Ostrzeżenie!
- TRANSLATION OF THE ORIGINAL INSTRUCTION MANUAL
- PETROL CHAIN SAW
- DETAILED SAFETY REGULATIONS
- SAFE USE OF PETROL CHAIN SAW
- Warning!
- WORKPLACE
- PERSONAL SAFETY
- TRANSPORTATION AND STORING
- POWER TOOL USE AND CARE
- OPERATION
- EXPLANATION OF USED SYMBOLS
- CONSTRUCTION AND USE
- DESCRIPTION OF DRAWING PAGES
- MEANING OF SYMBOLS
- EQUIPMENT AND ACCESSORIES
- INSTALLATION OF GUIDE BAR AND SAW CHAIN
- FILLING SAW TANK WITH OIL
- FILLING THE FUEL TANK
- INSTALLATION AND ADJUSTMENT OF SHOULDER STRAP
- Hold the chain saw with both hands during operation.
- STOPPING THE ENGINE
- CHECKING CHAIN LUBRICATION
- CHAIN LUBRICANTS
- CHAIN GUIDE BAR
- CHAIN WHEEL
- ADJUSTMENT OF CARBURETTOR
- Avoid touching the muffler. Hot muffler may cause severe burns.
- CHAIN BRAKE
- BRAKING CHECK
- Ensure the chain brake operates correctly and the chain is sharp. It is very important for keeping potential recoil at a safe level.
- CHECKING BRAKE ENGAGEMENT
- CHAIN TENSION ADJUSTMENT
- PROTECTION AGAINST RECOIL
- CUTTING PIECES OF WOOD
- FELLING A TREE
- CUTTING THROUGH TRUNKS
- CUTTING A TRUNK LIFTED ABOVE THE GROUND
- TRIMMING / CUTTING BUSHES AND TREE BRANCHES
- STORAGE
- AIR FILTER
- CYLINDER FINNING
- GUIDE BAR AND CHAIN
- CHAIN SHARPENING
- FUEL FILTER
- OIL FILTER
- IGNITION PLUG
- OTHER INSTRUCTIONS
- TECHNICAL PARAMETERS
- NOISE LEVEL AND VIBRATION PARAMETERS
- ENVIRONMENT PROTECTION
- PÍLENIE PŘOV STROMOV
- GRAFISKÄS DALAS APRAKSTS
- PALKIDE SAAGIMINE MAAPINNAL
- DETALJNI PROPISI O SIGURNOSTI
- SIGURNOST KOD KORIŠTENJA BENZINSKIH LANČANIH PILA
- Upozorenje!
- RADNO MJESTO
- CANDELA DI ACCENSIONE
Brand : Graphite
Model : 58G950
Category : Batteries