
J6015 - Receiver Emos - Free user manual and instructions
Find the device manual for free J6015 Emos in PDF.


| Product Type | Receiver |
| Model | J6015 |
| Brand | Emos |
| Power Supply | 230V AC, 50 Hz |
| Power Consumption | < 10 W |
| Frequency Range | FM: 87.5–108 MHz |
| Output Power | 2 x 20 W RMS |
| Impedance | 4–8 Ω |
| Dimensions (W x H x D) | 430 x 80 x 250 mm |
| Weight | 3.5 kg |
| Supported Audio Formats | MP3, WMA, WAV |
| Connectivity | USB, AUX, FM antenna |
| Remote Control | Included (2 x AAA batteries not included) |
| Display | LED digital display |
| Functions | Radio, play, pause, volume, source selection |
| Maintenance | Wipe with a soft, dry cloth. Do not use solvents. |
| Safety Warnings | Keep away from water and heat sources. Ventilate properly. |
| Spare Parts Availability | Contact Emos customer service for remote control, power cord. |
| Reparability | Not user-serviceable. Refer to qualified technician. |
| Operating Temperature | 0°C to 40°C |
| Storage Temperature | -10°C to 50°C |
Frequently Asked Questions - J6015 Emos
User questions about J6015 Emos
0 question about this device. Answer the ones you know or ask your own.
Ask a new question about this device
Download the instructions for your Receiver in PDF format for free! Find your manual J6015 - Emos and take your electronic device back in hand. On this page are published all the documents necessary for the use of your device. J6015 by Emos.
USER MANUAL J6015 Emos
6
7
8
GB | Digital Terrestrial Receiver

Do not dispose with domestic waste. Use special collection points for sorted waste. Contact local authorities for information about collection points. If the electronic devices would be disposed on landfill, dangerous substances may reach groundwater and subsequently food chain, where it could human health.
EMOS spol. s r.o. hereby declares that radio device type J6014, J6015 is in accordance with directive 2014/53/EU. The full wording of the EU declaration of conformity is available at http://www.emos.eu/download.
Package Contents
EM190-S/L
Universal remote
User manual
2× AAA batteries
External IR sensor
Device Description
Control Elements and Connectors
Front Panel (Fig.1)
Power - ON/OFF button
CH+/- - Channel switching button
Screen – information about current channel/clock
External IR sensor connector
Rear Panel (Fig. 2)
ANT IN - signal input
USB - port for connecting a data storage device
HD-OUT - HDMI video output
SCART – analogue video/audio output
12 V power supply input
Universal Remote (Fig. 3)
The EM190-S/L remote has 4 programmable buttons for TV control: TV Power, Vol+, Vol-, TV/AV. After programming these functions over from the original remote for the TV, you can control basic functions directly using the EM190-S/L remote. The learned codes will remain in the memory even after battery removal.
Button Programming
Long-pressing the SET button for 5 seconds switches the remote to learning mode (LED stops flashing and will remain lit).
While the LED is lit up, place the original remote and the EM190-S/L remote opposite each other at a distance of 3–5 cm.
Short-press and release the button you wish to programme on the EM190-S/L remote.
Press and hold a button on the original remote; once the LED on the EM190-S/L remote flashes twice and then again stays lit up, release the button.
Continue using the same method with the other buttons. After learning is finished, press the Set button once more; the LED swill turn off.
Description of Buttons on the Remote
1 - STANDBY: switch receiver on/off
2 - Next
3 - Fast forward
4 - Rewind
5 – Previous
6 - Play
7 – Pause: Pause playback
8 - STOP: Stop playback
9 - REC: Start recording
10 - USB: Access multimedia player menu
11 - SUB: Control subtitles on individual channels / files (depending on availability)
12 - TTX: Teletext
13 - AUDIO: Select audio track/ audio settings
14 – EPG: Electronic programme guide
15 – INFO: Display information about the current programme / show signal strength and quality
16 - Navigationbuttons: Navigation in the menu / Change channel / volume
17 - OK: Confirm selection
18 - MENU: Access the device's OSD menu
19 - Exit: Exit current menu
20 - V+/-: Change volume
21 - FAV: Show list of favourite channels
22 - MUTE: Mute audio
23 - CH+: Switch channel
24 - Number(0\~9): Numeric keypad for direct channel preset selection
25 - TV/RADIO:Switch between TV and RADIO channels
26 - RECALL: Quick selection of previous channel
Attention
In order to make full use of the USB port, the storage device connected to it must support USB 2.0. The required write speed of the USB device is 9.0 MB/s or faster in order to achieve error-free, stable recording and playback. Slower hard drives and flash drives may have issues with recording, resulting in image stuttering, or will not work at all. Only drives with a single partition and an NTFS or FAT32 file system will work correctly. If the drive uses a different file system, format the drive on a PC to the recommended file system before you connect it to the receiver. Heavily fragmented or overfilled memory devices may also not work correctly or smoothly. External HDDs must have their own power supply; the USB port built into the receiver is not able to supply sufficient voltage to power a portable USB HDD. Do not under any circumstances disconnect the USB device from the receiver during recording or playback. Doing so may damage the receiver or the flash drive and will also damage the data on the drive.
Installation and Assembly
Inserting Batteries into the Remote
Before turning the receiver on for the first time, place two AAA batteries into the remote in accordance with fig. 4.
Connecting the Receiver to the Signal Source
Connect the receiver to the signal source and other devices in accordance with fig. 5.
Putting the Receiver into Operation
When putting the receiver into operation for the first time or when resetting the receiver to factory settings, an installation guide will appear on the screen.
Based on your preferences, choose from the menu on fig. 6:
- Region
- OSD Menu Language
- Display Mode (factory preset is 720 p/50 Hz)
-
Aspect Mode
-
Antenna power (switch on only if you are using an active antenna powered directly from the receiver). Turning this feature on will reduce the sensitivity of the input tuner. It is therefore recommended to primarily use external power sources designed for powering antenna preamplifiers.
-
Confirm your selection with the OK button on the remote, after which the receiver will begin automatically searching and saving all available channels.
Features and OSD Menu Controls
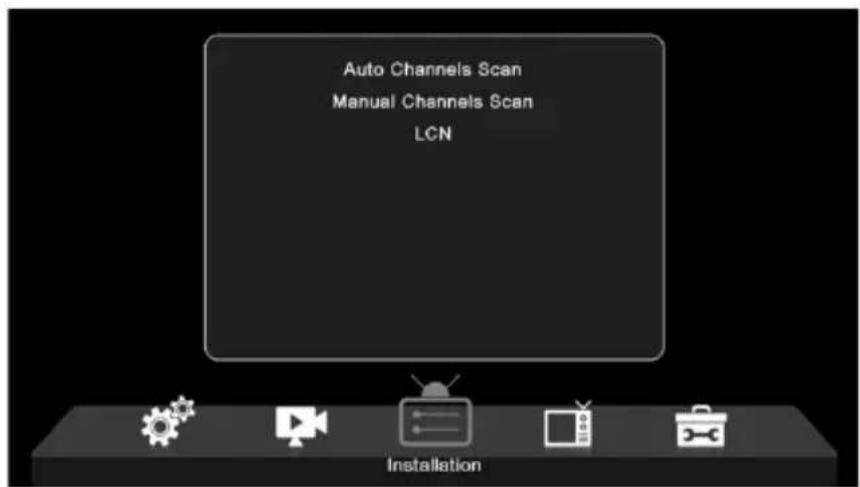
Installation (Fig. 7)
Auto Channels Scan
Automatic searching and storing of available TV channels.
a. Country – enter country of use
b. FTA only – limits search to free channels only
c. T2 signal only – limits search only to channels broadcast in DVB-T2
d. T2-Lite support
e. Search – starts tuning and saving channels after pressing OK
Manual Channels Scan
Manual search for TV channels. You can search channels by number or frequency. Once you have set your options, press Search to begin searching. Enter the parameters of the channel and start the search by pressing OK.
LCN (Logical Channel Numbering)
Choose whether you want to sort channels by their logical channel number. The default setting is "Off". This feature does not currently function in the Czech Republic.
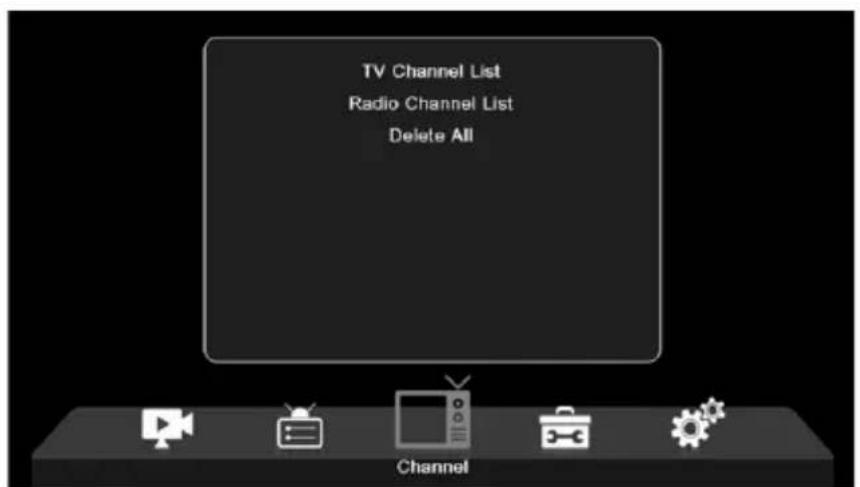
Channel Editing (Fig. 8)
TV Channel List
This option allows you to edit the list of channels by locking, deleting, skipping or moving channels and creating lists of favourite channels. If you wish to display a channel preview, select it using the up/down navigation buttons and press OK.
FAV
Favourite channels. Aside from the main channel list, you can also use several additional lists of favourite channels. There, you can sort channels by genre, language, etc. Choose a channel and press FAV on the remote. Then press OK. You will see the list of favourite channels.
Choose one of the lists and press OK. Then, press EXIT to confirm changes. The selected channel will be saved in this list (now marked by an icon). Use the right and left buttons on the remote to switch between channel lists. If you wish to remove a channel from a list of favourites channels, select the channel, press
the FAV button and then press OK. You will see the list of favourite channels. Press the OK button again. You can then exit the menu and confirm changes. The channel will be deleted from favourites.
Lock
Is used to lock channels with a PIN. Choose a channel and press the red button on the remote. Then, press OK and enter the default password of 0000. The channel will be marked with an icon. Press the EXIT button to confirm changes. The selected channel will be locked. If you wish to unlock the channel, select the channel, press the red button and enter the password by pressing OK.
Skip
Channels marked for skipping are not displayed in the channel list and are skipped when switching through channels. Select a channel and press the green button. Then press OK. The channel will be marked with an icon. Press the EXIT button to confirm changes. The selected channel will be skipped when switching through channels. To unblock the channel, select it again, press the green button and confirm with OK.
Move
Used for changing the order of channels. Select a channel and press the yellow button. Then press OK. The channel will be marked with an icon. Use the up and down buttons on the remote to choose a new position for the channel and press OK. The channel will be moved to this position. Note! If you wish to move channels to a different place, the LCN feature must be off.
Edit
Here, you can make advanced channel settings. Select a channel and press the blue button. New options will appear:
a. Sort
Press the red button on the remote. You can now sort channels by name (A-Z), name (Z-A), free/encrypted, lock.
b. Edit
Press the green button on the remote and then press OK. You can now change the channel name.
c. Delete
Press the blue button on the remote and then press OK. The channel will be marked with an icon. Press the EXIT button to confirm changes.
Radio Channel List
Access to a menu for editing the list of radio channels.
Delete All
Opens a warning window. If you choose Yes, all channels will be deleted.
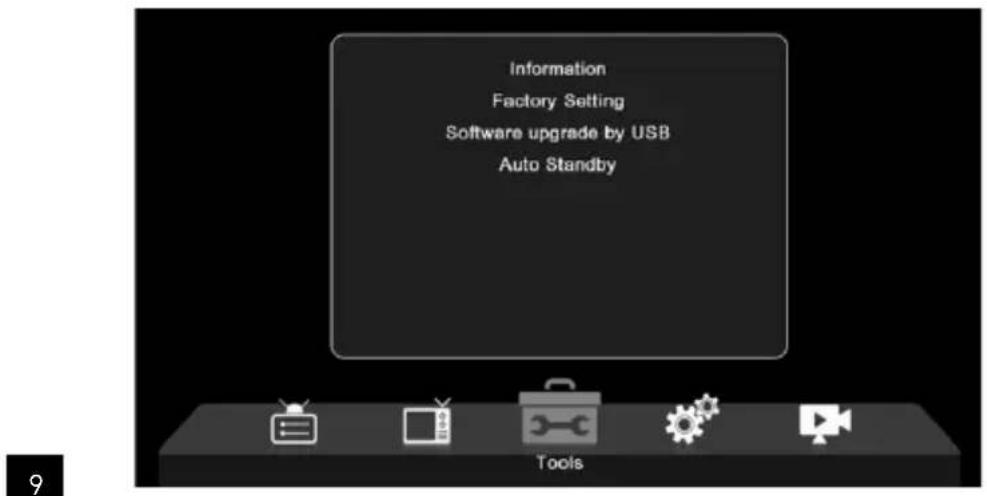
Tools (Fig. 9)
Information
Shows information about the model, video decoder and release date of installed firmware. When checking whether firmware is up-to-date, always take into account the release date of the update.
Factory Setting
If you choose to restore factory settings, channel lists and all receiver settings will be deleted.
Software Upgrade by USB
Leave the receiver connected to the TV but switch it to standby mode. Copy the latest firmware onto a USB drive (the file's extension will be. abs). Do not change the name of the firmware file or save it into subfolders. Plug the USB device into the receiver's USB port and press the Stand-by button on the remote. The TV screen will show a message: "USB drive connected". Go to MENU/Tools/Software Upgrade by USB and press OK. In the next window, choose upgrade mode: "AllCode". Choose the file with the firmware using the "Upgrade File" option. Select Start and press the OK button to begin the update. The process will complete within a few seconds and the receiver will automatically restart.
Once the upgrade is done, check the date of the new firmware by pressing: MENU/Tools/Information.
Note! If the upgrade process does not start, use a different USB drive with FAT32 file format.
Backing Up and Restoring Channels via USB
The list of tuned and sorted channels can be comfortably saved onto a USB device for later use, e.g. after restoring factory settings on the receiver. Go to MENU/Tools/Software Upgrade by USB and press OK. In the next window, choose upgrade mode: "Save Channels to USB". Select Start and press the OK button to save the file onto the USB device. To restore the list, select "Load Channels from USB" in the same menu and press the start button. After completing the update, the receiver will restart.
Auto Standby
Set when the receiver is to automatically switch to standby mode. You can choose from the following: 1 hour, 2 hours, 3 hours, 4 hours or 5 hours. The default value is 3 hours.
Clock
Activates/deactivates the clock on the front display in standby mode. The default setting is "On".
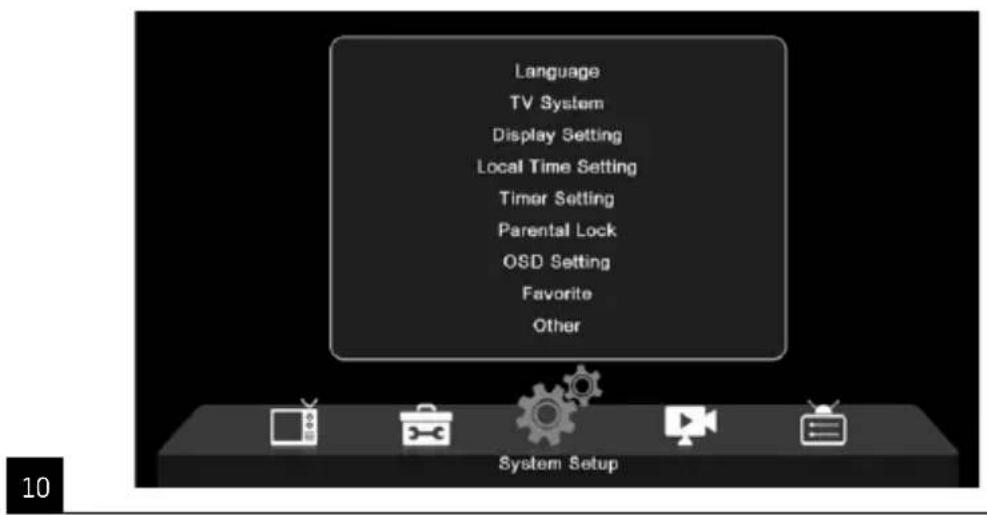
System Setup (Fig. 10)
Language
Select the language of the OSD menu, first and second audio track, subtitles and teletext.
TV System
Video Resolution
Set the resolution of the video output based on the connected device. If you are using HDMI output, the default setting is 720 p/50 Hz. If you are using SCART output, the default value is 576i. Not all TVs can display all resolutions.
Aspect Mode
Set the image aspect ratio depending on the connected TV. Available options are: Auto, 4: 3PS, 4: 3LB or 16:9. The default value is Auto.
Digital Audio Output
Available options: BS Out or LPCM Out. The default value is LPCM Out.
Panel Settings
Allows turning off the front display when using an external IR receiver.
Display Setting
Enables detailed image settings.
Brightness (default value is 50)
Contrast (default value is 50)
Saturation (default value is 50)
Hue (default value is 50)
Sharpness (default value is 5)
Local Time Settings
Region
Select the country where you are using the receiver. If your country is not in the list, select a different country from the same region.
GMT Usage
If you wish to use automatic time setting according to GMT, set the time to "By Region" (recommended). If you wish to set your time zone (time and date) manually, select "User Define" or "Off". The default setting is "By Region".
GMT Zone
Set the time zone (only if "GMT Usage" is set to "User Define").
Date
Set the date (only if "GMT Usage" is set to "Off").
Time
Set the time (only if "GMT Usage" is set to "Off").
Timer Setting
This function allows the user to manually set up recording or channel switching at a set time.
Note: The timer can also be set from the EPG menu (see the EPG section).
Timer Mode
Allows setting the timer to repeat: Once, Daily or Off.
Timer Service
Select the function of choice. If "Recording" is selected, the receiver switches to the set channel on the set day and time and will start recording the broadcast programme. If "Channel" is selected, the receiver switches to the set channel on the set day and time.
Wakeup Channel
Sets the channel on which the function is to be executed.
Wakeup Date
Sets the date for the function.
Start
Set the start time of the function
Duration
Set the duration of the function. After the function is complete, the receiver switches to the mode it was in before executing the function.
Parental Lock (Some firmware versions do not support this function)
Menu Lock
If activated, access to channel editing and search menu will be password protected. The default setting is Off.
Parental Lock
Uses broadcast flags to prevent children or adolescents from viewing restricted content. Enter the age restriction.
New Password
When changing from the default password to a different password.
Confirm Password
Confirm new password.
Note: The default password is 0000. The device also features a Master PIN, which is used in case you forget the password you have set. The Master PIN is 1006.
OSD Setting
OSD Timeout
Select the duration for displaying the information bar, from 1 to 10 seconds. The default value is 5.
OSD Transparency
Set the transparency of the OSD menu to "Off", or 10 % to 40 %. The default setting is "Off".
Favourites
To rename groups of favourite channels, select a group and press OK. You can now rename the favourites list.
Other
Antenna Power
If you are using an active antenna without a power adapter, set this feature to "On". If you are using a passive antenna, or an active antenna with a separate power adapter, set this feature to "Off". The default setting is "Off". Turning this feature on will reduce the sensitivity of the input tuner. It is therefore recommended to use external power sources designed for powering antenna preamplifiers.
Channel Play Type
Defines which channels the receiver will tune and display in the channel list. The default setting is All.
Beeper
You can use this feature when installing the antenna to determine signal strength. When this feature is active, double pressing the INFO button on the remote to display the signal strength and quality will also emit an audio signal to indicate signal strength. The default setting is Off.
AD Service
Audio description of events for the visually impaired. The default setting is Off.
Use AD as Default
If AD service is on, the audio track with AD will be chosen as default
AD Volume Offset
Is activated when AD service is on.
After Power Loss
Allows you to choose how the receiver should react upon sudden loss of power. The default value is "previous state".
Loopthrough in Standby
If active, the RF loop is pass-through even in standby mode.
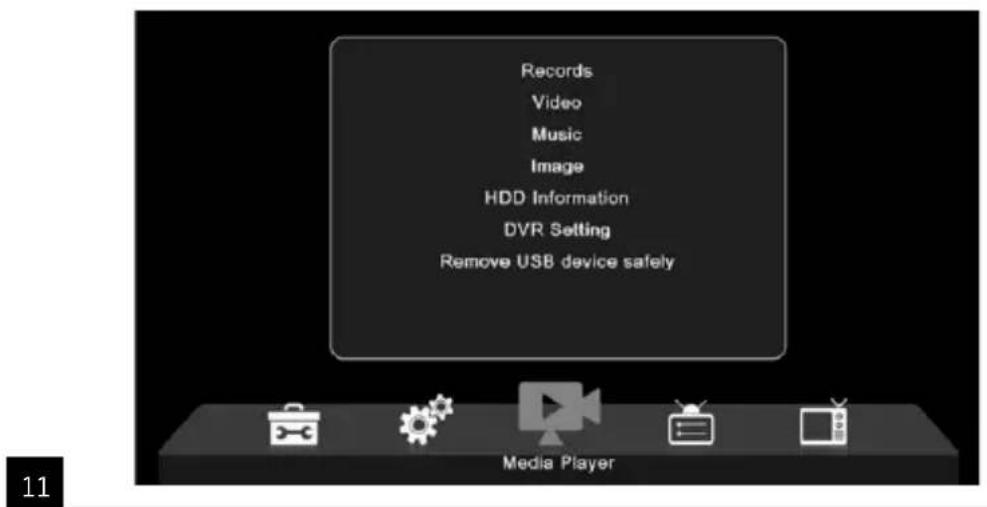
Media Player (Fig. 11)
Records
Player Mode Switch
Pressing the 1 button on the remote allows you to switch between Records, Music, Images and Video.
Sort
Pressing the 2 button on the remote sorts files by name, time, size and favourites. The "Sort" option is available in Music, Images and Video.
Repetition
Pressing the 3 button on the remote allows you to choose repetition options. This option is available in Music and Video.
Setup
Press 3 on the remote to set the duration for displaying images and set repeat options. This option is available in Images.
MultiView
Press 4 on the remote to preview images together on the screen in a grid. This option is available in Images.
Song List
Press the RED button on the remote. The image and video recording will be included in the song list. This option is available in Music and Video.
Favourites
Press the OK button to set favourite media files. This option is available in Images and Music.
FAV All
Shows the list of all favourite media. This option is available in Images and Music.
Edit
You can edit the name of the media by pressing the blue button.
Note: When watching a video with subtitles from a USB drive, you can set the colour and size of the subtitles, the colour of the background and the position of the subtitles on the screen. Pressing the green button on the remote shows subtitle settings.
Information about USB Storage
Shows information about the USB drive.
DVR Configuration
Timeshift
Allows constant recording of the current channel onto the USB device. If this feature is active, you can pause and rewind/fast forward the current broadcast. The default setting is "Off".
Skip
Available options are: 30 s, 1 min, 5 min, 10 min or 30 min. The default value is 30 seconds.
Timeshift to Record
If on, allows recording video with a time shift onto the USB device for later playback. The default setting is ON. This feature is active only if the Timeshift option is on.
Remove USB Device Safely
Select a connected USB device and safely remove it by pressing OK.
Timeshift
The timeshift function allows pausing the TV broadcast that is currently recording onto a USB device. Check that there is a USB device connected to the receiver. Go to the "DVR Configuration" menu and activate the Timeshift feature. Pressing the PAUSE button on the remote pauses the programme. Control the playback and navigate in the video using the buttons on the remote
Pressing the left or right buttons allows you to choose a starting point for the playback. Confirm with OK.
Pressing PAUSE pauses playback.
Press REV and FWD to rewind or fast forward. Press STOP to stop viewing the timeshifted footage and continue watching the live programme.
Immediate Recording
Check that there is a USB device connected to the receiver. While watching a programme, start recording by pressing the REC button on the remote (press REC 2× quickly to input recording duration). To stop recording, press STOP on the remote. An information window will appear to confirm you want to stop recording. Select [Yes] to stop recording or [No] to continue recording. Recordings are stored onto the USB drive and are available in Media Player/Records.
Note: To schedule recording, use the timer or EPG function.
EPG (Electronic Programme Guide)
EPG allows viewing additional information about the TV broadcast and scheduling recording timers for individual programmes. Press the EPG button on the remote to enter the electronic programme guide. Navigate in the menu using the directional buttons on the remote. Press the "Timer" button to view the DVR schedule.
Technical Specifications
Tuner input frequency: 177.5–858 MHz
Input impedance: 75 Ω
Input signal level: 256 QAM; R5/6 G1/128 <75.2 dBm; c/n <23.9db
AV output: Scart (CVBS)
S/PDIF Audio: Coaxial (optional)
HDMI: HDMI output
Operating temperature: +0 °C - 70 °C
Storage temperature: -40 °C - +65 °C
Mpeg Audio/ Video Decoder
Video: MPEG-2 (ISO/IEC 13818-2); MPEG-4 (ISO/IEC14496-2); H.264 (ISO/IEC14496-10); HEVC main profile@level 4.1 high tier
Profile Level MPEG-2 MP@HL; MPEG-4 ASP@L5 HD; H.264HP@L4.1; HEVC (max 10 bit) main profile @level 4.1; main 10 profile @level 4.1 high tier
Input data speed: Max. 60 Mb
Aspect ratio: 4:3, 16:9, letter box
Video resolution: 1920 × 1080i; 1280 × 720p; 720 × 576i
Audio decoder: MPEG-1 Layer I/II, MPEG-2 layer I/II; AAC, AAC+/HE-AAC/AC3, Dolby plus
Audio modes: Mono/Joint Stereo/Stereo
Sampling frequency: 32, 44.1 & 48 MHz
Power supply: AC 100–240 V, 50/60 Hz, or 12 V/1 A

DIGITAL·PLUS
Produced under licence from Dolby Laboratories. Dolby and the double D symbol are trademarks of Dolby Laboratories.

DVB and DVB logos are trademarks of DVB Project

HIGH-DEFINITION MULTIMEDIA INTERFACE
The terms HDMI and HDMI High-Definition Multimedia Interface, and the HDMI Logo are trademarks or registered trademarks of HDMI Licensing Administrator, Inc. in the United States and other countries.
Troubleshooting FAQ
If you discover any fault or malfunction, check whether it is listed below in the table of most common problems to find a quick solution. If you do not find the answer or have any other questions, contact the supplier's customer support line.
| Problem Possible Cause Solution | ||
| The red indicator does not light up when in standby mode. | Cable unpluggedBurned fuse in the device | Check that the power cable is plugged in. Check the fuse |
| Signal not found. | The antenna is not connected.Incorrect antenna settings. You are in a location without signal coverage. | Check the antenna's connection.Move the antenna. Contact a local specialist company. |
| No image or audio. | Scart/AV/HDMI not chosen in the input selection on your TV. | Switch to the correct input on your TV's remote. |
| "Encoded channel" appears on the screen. | The channel is encoded Choose a different channel. | |
| The remote does not work. | The receiver is off. The remote is not aimed directly onto the device. The front panel is obscured by an obstacle. Faulty batteries in the remote | Turn the receiver on. Aim the remote directly onto the front panel of the device. Remove the obstacle in front of the front panel. Change the batteries. |
| Cannot record onto a USB device. | The USB device has an incorrect file format. The USB device has a low write speed. | Format the USB device to NTFS, or FAT32 file system. Choose another high-quality USB device with a higher write speed. |
| The box stopped receiving channels after moving the device to a different room. | By extending the lead from the antenna, the signal quality has dropped below functional level. | Use a link amplifier to compensate for the signal loss in the cabling. Contact a local company for a precise antenna system layout. |
LCN (Logical Channel Numbering)
S/PDIF Audio: Coaxial (optional)
HDMI: HDMI output
LCN (Logical Channel Numbering)
S/PDIF Audio: Coaxial (optional)
HDMI: HDMI output
LCN (Logical Channel Numbering)
LCN (Logical Channel Numbering)
S/PDIF Avdio: Coaxial (optional)
HDMI: HDMI output
Delovna temperatura: +0 °C – 70 °C
LCN (Logical Channel Numbering)
S/PDIF Audio: Coaxial (optional)
HDMI: HDMI output
LCN (Logical Channel Numbering)
S/PDIF Aydio: Coaxial (optional)
HDMI: HDMI output
LCN (Logical Channel Numbering)
S/PDIF Audio: Coaxial (optional)
HDMI: HDMI output
Temperatura de functionare: +0 °C - 70 °C
Temperatura de depozitare: -40 °C - +65 °C
Mpeg Audio/ Decodor video
Video: MPEG-2 (ISO/IEC 13818-2); MPEG-4 (ISO/IEC14496-2); H.264 (ISO/IEC14496-10); HEVC main profile@level 4.1 high tier
Profile Level: MPEG-2 MP@HL; MPEG-4 ASP@L5 HD; H.264HP@L4.1; HEVC (max 10 bit) main profile @ level 4.1; main 10 profile @level 4.1 high tier
Delete All (Dzēst visu)
AD Volume Offset (AD skaluma nobide)
5 - Previous (Eelmine)
6 - Play (Esita)
7 – Pause (Paus): peatage taasesitus
8 - STOP (STOPP): katkestage taasesitus
9 - REC (SALVESTA): alustage salvestamist
10 - USB: avage multimeediumipleieri menüü
c. Delete (Eliminare)
Software Upgrade by USB (Aggiornamento software tramite USB)
New Password (Nuova password)
Confirm Password (Conferma password)

- GB | Digital Terrestrial Receiver
- Package Contents
- Device Description
- Control Elements and Connectors
- Front Panel (Fig.1)
- Rear Panel (Fig. 2)
- Universal Remote (Fig. 3)
- Button Programming
- Description of Buttons on the Remote
- Attention
- Installation and Assembly
- Inserting Batteries into the Remote
- Connecting the Receiver to the Signal Source
- Putting the Receiver into Operation
- Features and OSD Menu Controls
- Installation (Fig. 7)
- Auto Channels Scan
- Manual Channels Scan
- LCN (Logical Channel Numbering)
- Channel Editing (Fig. 8)
- TV Channel List
- FAV
- Lock
- Skip
- Move
- Edit
- a. Sort
- b. Edit
- c. Delete
- Radio Channel List
- Delete All
- Tools (Fig. 9)
- Information
- Factory Setting
- Software Upgrade by USB
- Backing Up and Restoring Channels via USB
- Auto Standby
- Clock
- System Setup (Fig. 10)
- Language
- TV System
- Video Resolution
- Aspect Mode
- Digital Audio Output
- Panel Settings
- Display Setting
- Local Time Settings
- Region
- GMT Usage
- GMT Zone
- Date
- Time
- Timer Setting
- Timer Mode
- Timer Service
- Wakeup Channel
- Wakeup Date
- Start
- Duration
- Parental Lock (Some firmware versions do not support this function)
- Menu Lock
- Parental Lock
- New Password
- Confirm Password
- OSD Setting
- OSD Timeout
- OSD Transparency
- Favourites
- Other
- Antenna Power
- Channel Play Type
- Beeper
- AD Service
- Use AD as Default
- AD Volume Offset
- After Power Loss
- Loopthrough in Standby
- Media Player (Fig. 11)
- Records
- Player Mode Switch
- Sort
- Repetition
- Setup
- MultiView
- Song List
- FAV All
- Information about USB Storage
- DVR Configuration
- Timeshift
- Timeshift to Record
- Remove USB Device Safely
- Immediate Recording
- EPG (Electronic Programme Guide)
- Technical Specifications
- Troubleshooting FAQ
- Delete All (Dzēst visu)
- c. Delete (Eliminare)
- Software Upgrade by USB (Aggiornamento software tramite USB)
- New Password (Nuova password)
- Confirm Password (Conferma password)
Brand : Emos
Model : J6015
Category : Receiver