
CK5000 - Multicooker Concept - Free user manual and instructions
Find the device manual for free CK5000 Concept in PDF.


| Type | Multicooker |
| Brand | Concept |
| Model | CK5000 |
| Capacity | 5 L |
| Power | 860 W |
| Voltage | 220-240 V, 50/60 Hz |
| Dimensions (LxWxH) | 30 x 30 x 28 cm |
| Weight | 3.5 kg |
| Material | Stainless steel, non-stick inner pot |
| Functions | Stew, soup, rice, steam, fry, bake, yogurt, slow cook, keep warm, timer |
| Controls | Digital display, touch buttons, programmable timer up to 24h |
| Safety | Overheat protection, automatic shut-off, locking lid, pressure release valve |
| Cleaning | Non-stick inner pot dishwasher safe; steam valve and lid washable with warm water |
| Accessories | Measuring cup, rice paddle, steam basket, recipe booklet |
| Spare parts available | Inner pot, sealing ring, steam valve, power cord |
| Repairability | Modular design; authorized service centers, spare parts orderable |
| Certifications | CE, RoHS |
Frequently Asked Questions - CK5000 Concept
User questions about CK5000 Concept
0 question about this device. Answer the ones you know or ask your own.
Ask a new question about this device
Download the instructions for your Multicooker in PDF format for free! Find your manual CK5000 - Concept and take your electronic device back in hand. On this page are published all the documents necessary for the use of your device. CK5000 by Concept.
USER MANUAL CK5000 Concept
CZ SK PL HU LV EN
concept
PODĚKOVÁNÍ
natural_image
Gray rectangular container with a black label showing the number 9 (no text or symbols on the container itself)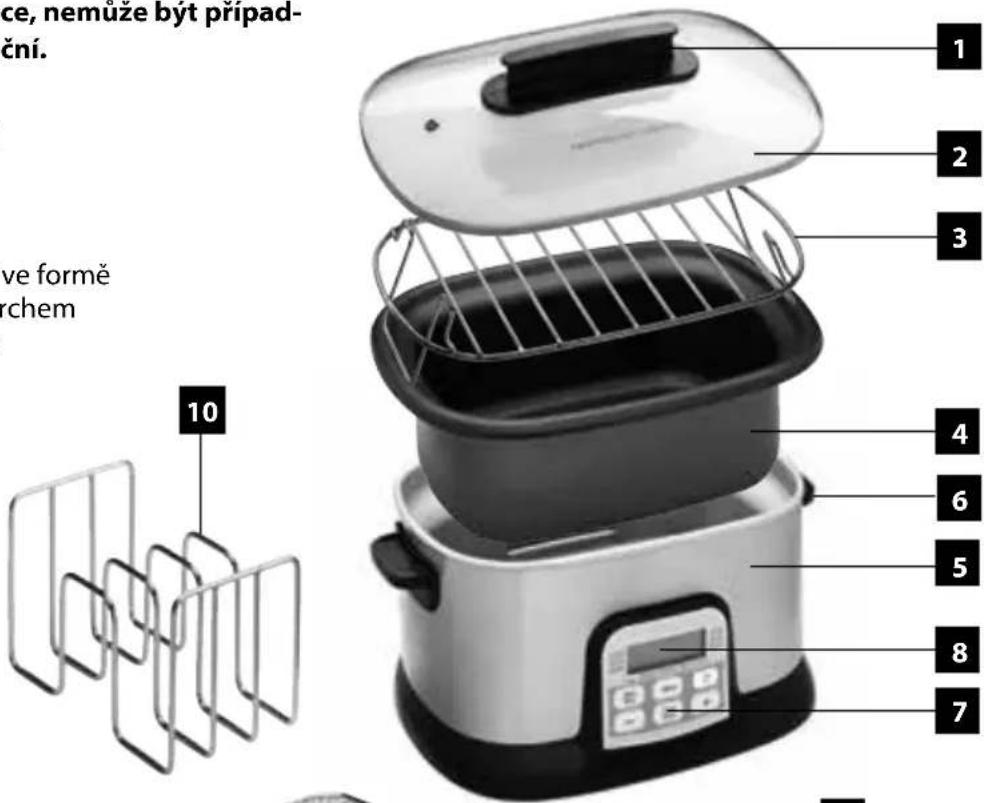
natural_image
3D wireframe model of a rectangular container with internal mesh structure (no text or symbols)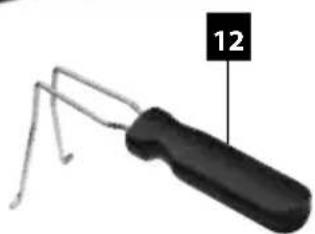
natural_image
Close-up of a black electrical fuse with metal wires, labeled with number 12 (no text or symbols on the object itself)POPIS PANELU
Recepty na www.my-concept.com
ČIŠTĚNÍ
natural_image
Symbol of a trash bin crossed with a diagonal line, no text or numbers presentnatural_image
Gray rectangular container with a black number 9 on top (no text or symbols on the container itself)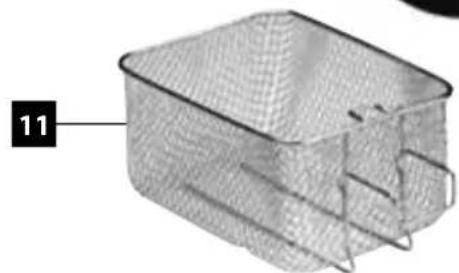
natural_image
3D wireframe model of a rectangular container with internal structure, labeled with number 11 (no text or symbols on the diagram itself)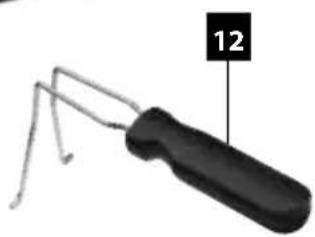
natural_image
Close-up of a black-handled soldering iron with metal clamps, labeled with number 12 (no text or symbols on the object itself)DISPLEJ
1 Vypínač ON/OFF
2 START/STOP tlačidlo
3 Tlačidlo MENU
4 LCD DISPLAY
5 TIMER/TEMP tlačidlo
6 Tačidla +/-
POZNÁMKA
Recepty na www.my-concept.com
ČISTENIE
natural_image
Symbol of a trash bin crossed with no text or labels, accompanied by a black rectangular bar at the bottom (no text or symbols present)natural_image
Gray rectangular container with a black label '9' pointing to its side (no other text or symbols)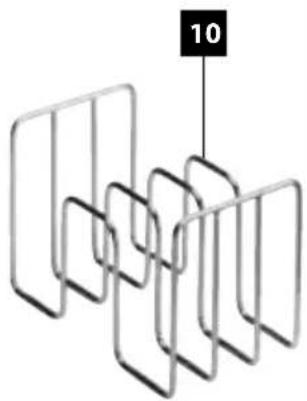
natural_image
Abstract diagram of interconnected rectangular frames with a label '10' pointing to the top-right corner (no text or symbols on frames)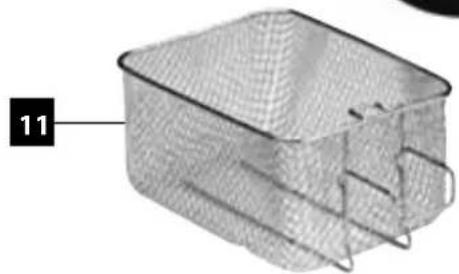
natural_image
3D wireframe model of a rectangular mesh structure with internal channels (no text or symbols)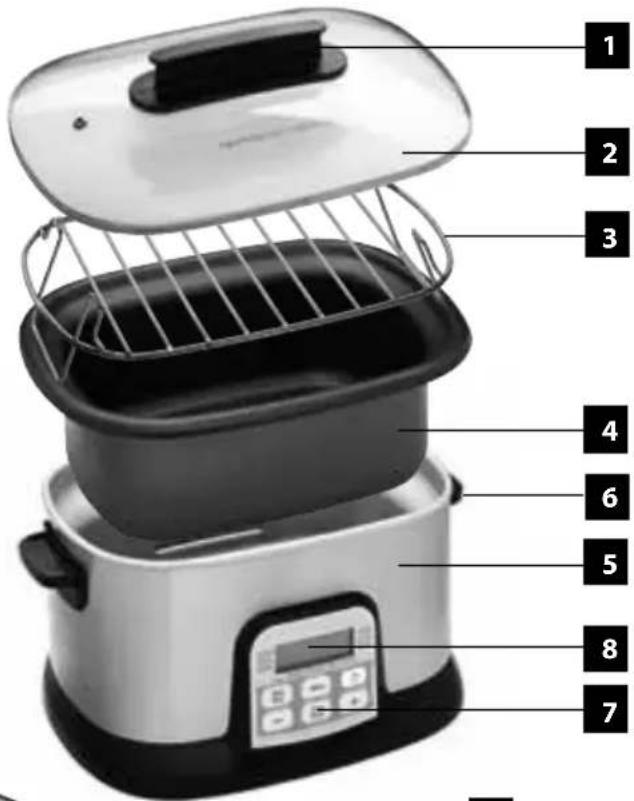
natural_image
Close-up of a black-handled soldering iron with metal clamps, labeled with number 12 (no text or symbols on the object itself)WYŚWIETLaCZ
natural_image
Symbol of a trash bin crossed with no text or numbers, representing waste sorting or disposal (no text present)natural_image
Gray rectangular container with a black number 9 on top (no text or symbols on the container itself)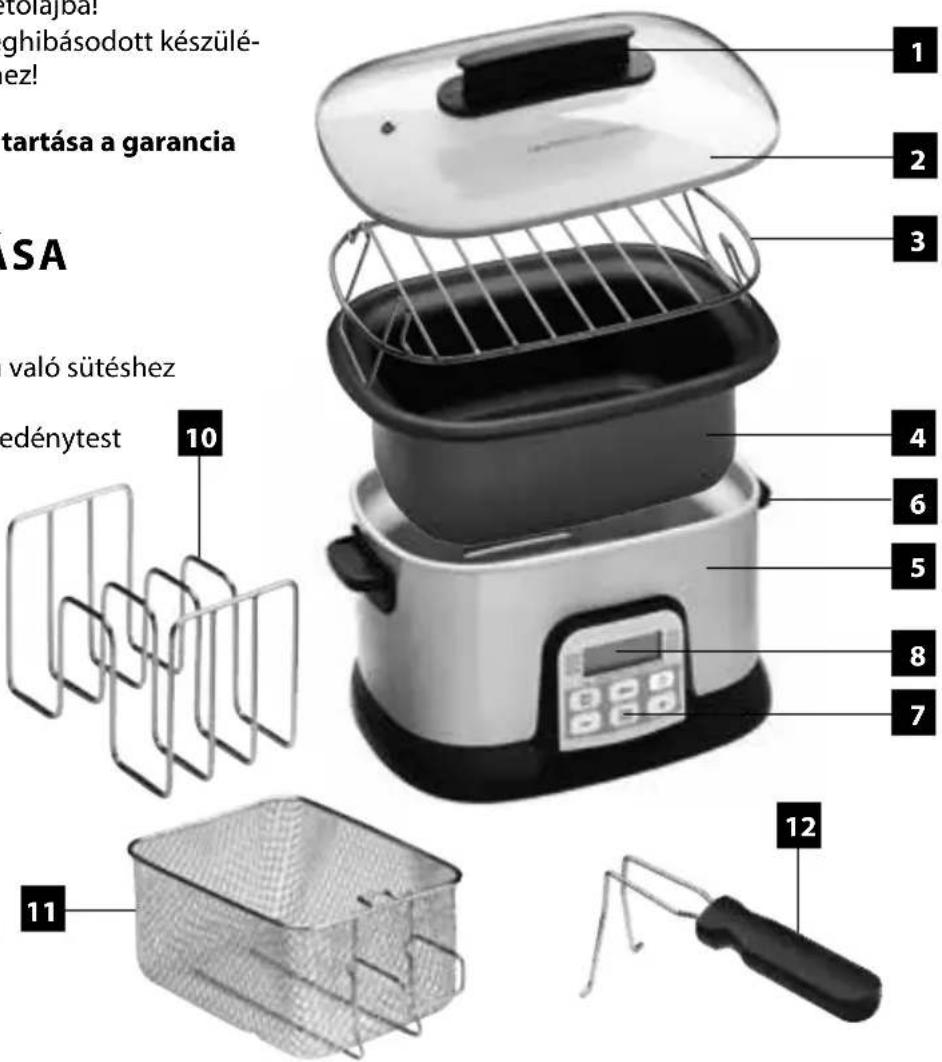
natural_image
Symbol of a trash bin crossed with a diagonal line, no text or numbers presentnatural_image
Gray rectangular container with a black label pointing to the top-left corner (no text or symbols on the container itself)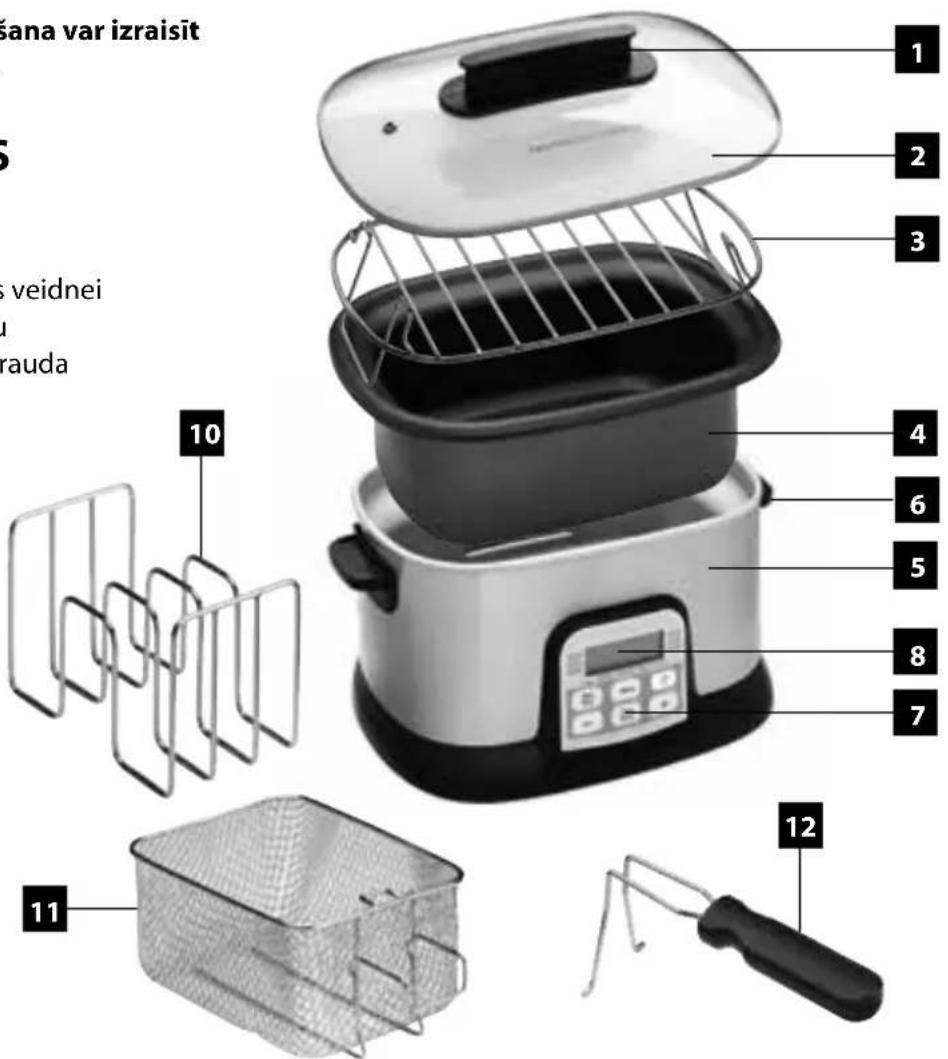
DISPLEJS
1 Slēdzis ON/OFF
2 Poga START/STOP
3 Poga MENU
4 LCD DISPLEJS
5 Poga TAIMERIS/TEMP
6 Pogas +/-
PIEZIME.
RECEPTES ww.my-concept.com
APKALPE
Thank you for purchasing a Concept product. We hope you will be satisfied with our product throughout its service life.
Please study the entire Operating Manual carefully before you start using the product. Keep the manual in a safe place for future reference. Make sure other people using the product are familiar with these instructions.
| Technical parameters | |
| Voltage 220–240 ~ 50 Hz | |
| Input 1500 W | |
| Capacity 6 l | |
IMPORTANT SAFETY INSTRUCTIONS
• Never use this appliance in another way than described in this operating manual.
- Remove all packaging and marketing materials from the appliance before you use it for the first time.
• Make sure the mains voltage corresponds to the values on the rating plate. Use grounded wall outlets only.
- Do not leave the unit unattended while it is turned on, or even only plugged into the wall outlet.
- The appliance is not designed for operation by an external time controller switch or by a separate system of remote control.
- Only place the appliance on a stable and heat-resistant surface detached from other heat sources.
• The temperature of accessible surfaces may rise while the appliance is in use.
- Do not cover the unit. There is a risk of overheating.
- Keep the minimum safe distance of at least 10 cm between the unit and flammable materials, such as furniture, curtains, lace, blankets, paper, clothing, and so on.
- Do not put anything on the unit while it is in operation.
- Before you fill the appliance with oil or fat and connect it to mains, make sure all the parts are completely dry and no water drops have remained in the heating bin. Never pour water into hot oil.
• Make sure not to overfill the basket, as hot oil or fat might boil over the edge of the bin.
• Never move a unit that is switched on or has hot contents in it.
- Do not touch the surface while it is hot. Use the handles and knobs.
- Keep the appliance clean; prevent foreign bodies from entering the openings. They might damage or short-circuit the appliance, or set it on fire.
• Unplug the appliance from the wall outlet when not in use.
- When disconnecting the appliance from the power outlet, never pull the power cord. Grasp the plug and disconnect it by pulling.
- Do not allow children or unskilled persons to handle the appliance; always use it out of the reach of these individuals.
- Persons with limited movement capacity, reduced sensory perception, insufficient mental capacity or those who are unaware of the proper handling should use the product only under the supervision of a responsible, aware person.
• Exercise utmost caution when using the unit while children are nearby.
• Never allow anyone to use the appliance as a toy.
• Make sure the power cord does not hang over the edge of the working area where children might reach it.
- Do not use the appliance out of doors and on wet surfaces as there is a risk of electric shock.
• Use only accessories recommended by the manufacturer.
- Never use the appliance with a damaged power cord or plug; contact an authorised service centre immediately to have the defective components repaired or replaced.
- Do not pull or move the product by grasping the power cord.
- Keep the appliance away from heat sources, such as radiators, ovens, etc. Do not expose the unit to direct sunlight or moisture.
• Do not touch the appliance with wet or damp hands. - Turn off the product and disconnect the plug from the mains outlet before installing accessories, performing maintenance, or in the event of failure.
• The appliance is intended for household use only; it is not designed for commercial application. - Do not immerse the power cord, the plug, or the appliance in water or other liquids.
• Always connect the power cord to the appliance first, then to the wall socket. - Check the appliance and power cord for damage regularly. Never turn the appliance on if damaged.
- Turn the unit off, unplug the power cord from the wall outlet, and let the unit cool down before cleaning and after use.
- After you finish work, set the temperature controller to minimum and disconnect the unit from the mains. Do not pour the oil from the heating bin until it has cooled down completely.
- Never pour cold water into the heating bin while it is hot.
- Never add water to hot oil.
- Do not attempt to repair the appliance. Contact an authorised service centre.
Failure to follow the manufacturer's instructions may lead to refusal of warranty repair.
PRODUCT DESCRIPTION
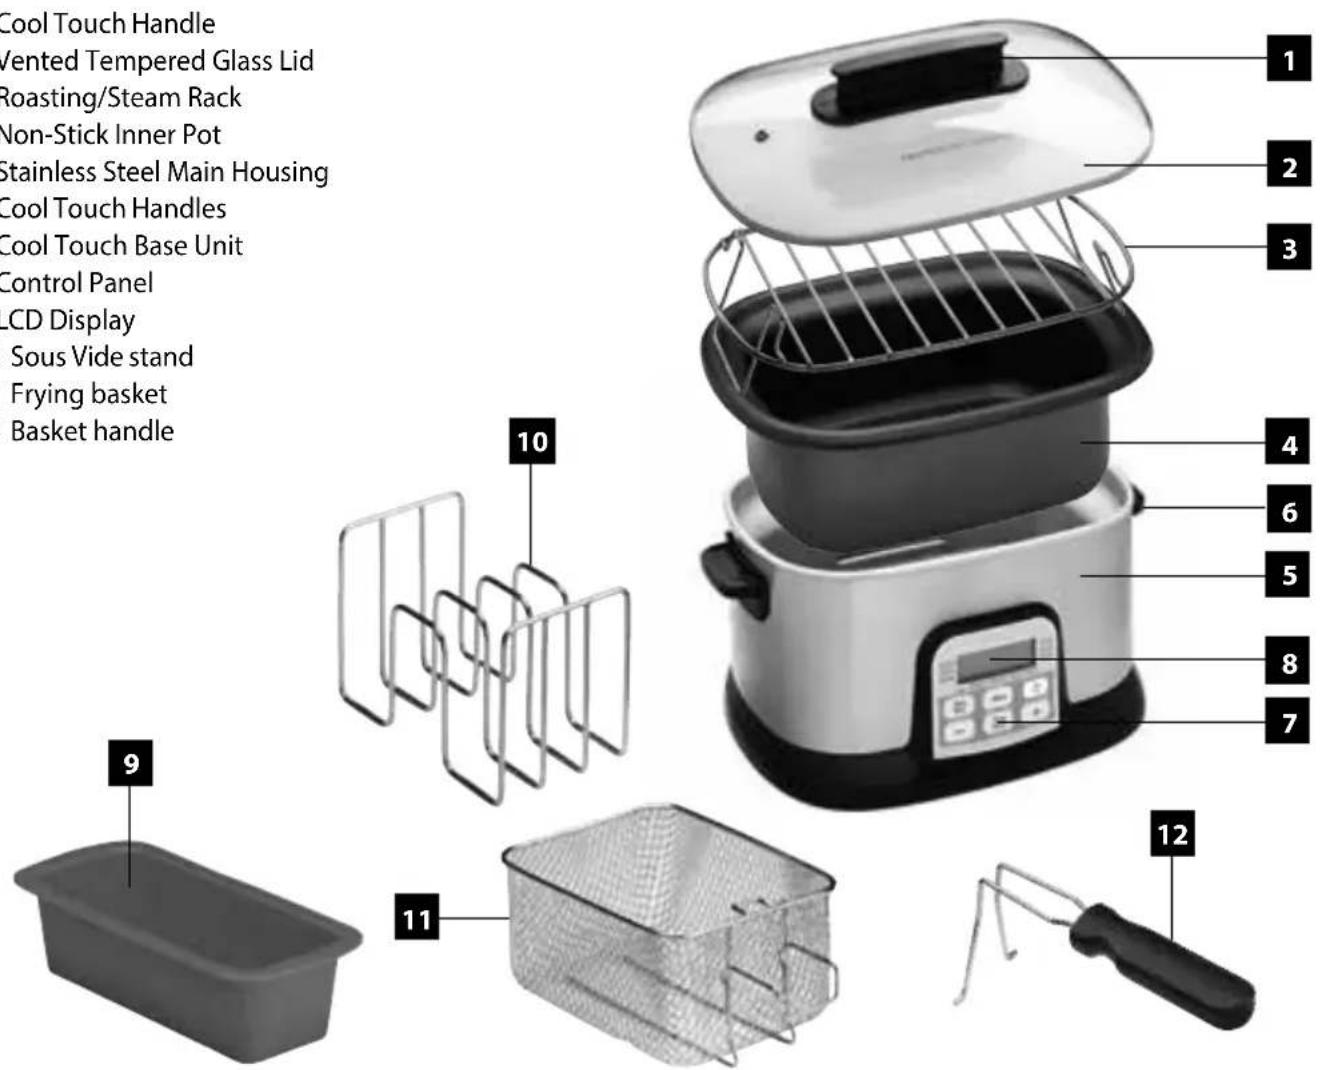
1 Cool Touch Handle
2 Vented Tempered Glass Lid
3 Roasting/Steam Rack
4 Non-Stick Inner Pot
5 Stainless Steel Main Housing
6 Cool Touch Handles
7 Cool Touch Base Unit
8 Control Panel
9 LCD Display
10 Sous Vide stand
11 Frying basket
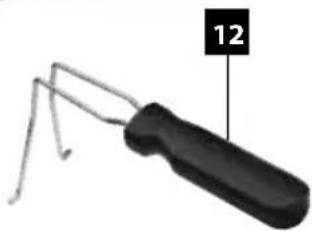
12 Basket handle
DISPLAY
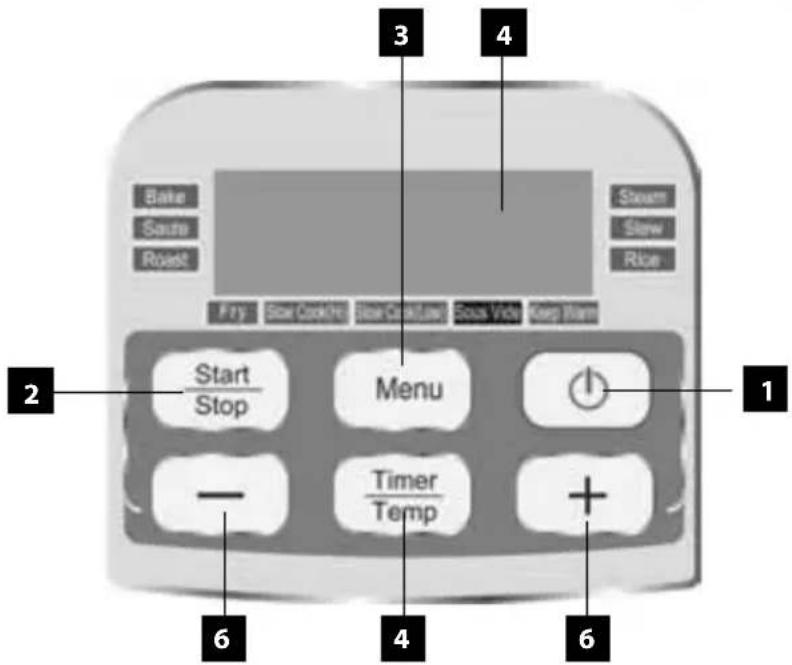
1 POWER BUTTON ON/OFF
2 START/STOP BUTTON
3 MENU BUTTON
4 LCD DISPLAY
5 TIMER/TEMP BUTTON
6 +/- BUTTON
NOTE
The Inner Pot consists of a nonstick surface. To avoid scratching the non-stick surface, please use wooden or plastic utensils.
FEATURES & FUNCTIONS:
Sauté: Using this mode with temperature settings between 190°C–220°C and timer settings between 5 minutes and 2 hours.
Steam: Program the multicooker to steam between 20–90 minutes.
Stew: Program the multicooker to cook soups and stews from 2 hrs up to 4 hrs.
Slow Cooker Settings: Select from 2 temperature settings of HIGH and LOW, and program the timer to slow cook from 4–12 hours.
Fry: Using this mode with temperature settings between 150°C–190°C and timer settings between 1 minutes and 30 minutes.
Bake: Select this mode to bake at temperatures between 110°C–140°C and program baking times from 30 minutes up to 4 hours.
Roast: Select this mode to roast at temperatures between 150°C–180°C and program roasting times from 30 minutes up to 4 hours.
Cook Rice: Like any standard rice cooker, this mode will automatically cook rice without any temperature or timer settings.
Sous vide: Using this mode with temperature settings between 45^ C– 95^ C and timer settings between 30 minutes and 72 hours.
Keep Warm: Keep food warm from 1 hour up to 4 hours in this cooker.
THE CONTROL PANEL
POWER BUTTON: Powers the Cooker On/Off.
START/STOP BUTTON: Starts or Cancels selected cooking function.
MENU BUTTON: Use this button to cycle through and select a cooking function - The arrow on the display will point to the selected function - Bake, Rice, Roast, Slow Cook (HI, LOW), Keep Warm, Steam, Stew, or Sauté.
LCD DISPLAY: The left side of the display shows the temperature. The right side of the display shows the programmed cook time.
TIMER/TEMP BUTTON: Use this button to toggle between adjusting Time and Temperature settings.
+/- BUTTON: Use these buttons to adjust the Time and/or Temperature settings.
PREPARING YOUR INFINITY COOKER FOR USE
- Before using your multicooker for the first time, carefully remove all the parts from the box and wash the inner pot, roasting rack, and the tempered glass lid with warm, soapy water. The cooking pot may also be washed in the top shelf of the dishwasher. The roasting rack is not dishwasher safe.
IMPORTANT: DO NOT IMMERSE THE MAIN HOUSING IN WATER. Wipe it clean with a damp cloth.
-
When ready to use, place the inner pot inside the main housing. Never use the multicooker without the cooking pot placed into the housing.
-
Plug the unit into an electrical outlet.
-
The LCD display will flash blue and beep once.
-
When ready to begin cooking, press the POWER button. The LCD display will illuminate blue and show 888°C 88:88.
NOTE: Long press TIME/TEMP switch °C to °F.
- Press the MENU button to move the indicator arrow on the LCD display to the Function that you desire.
NOTE
The initial 15 minutes of use may result in minimal smell and smoke. This is normal and harmless and comes from the protective substance applied to the heating elements during manufacturing
COOKING FUNCTION CHART
| Function | Default temperature | Default Time Cooking Time Range | Cooking temperature Range | |
| SLOW COOK (HI) N/A | 6:00 h | 4:00–12:00 h | N/A | |
| SLOW COOK (LOW) N/A | 8:00 h | 4:00–12:00 h | N/A | |
| KEEP WARM N/A | 2:00 h | 1:00–4:00 h | N/A | |
| STEAM N/A | 0:30 h | 0:20–1:30 h | N/A | |
| ROAST 180 °C | 1:00 h | 0:30–3:00 h | 150°C–180°C(+ 10°C) | |
| BAKE 150 °C | 2:00 h | 0:30–4:00 h | 150°C–190°C(+ 10°C) | |
| FRY 190 °C | 0:15 h | 0:01–0:30 h | 150°C–190°C(+ 10°C) | |
| SOUS VIDE 56 °C | 8:00 h | 0:30–72:00 h | 45°C–95°C(+ 1°C) | |
| SAUTE | 200 °C | 0:05 h | 0:05–2:00 h | 190°C–200°C(+ 10°C) |
| STEW | N/A | 2:00 h | 2:00–4:00 h | N/A |
| RICE | N/A | N/A | N/A | |
HOW TO SaUTÉ
- Place the inner pot inside the main housing.
- Place food inside the inner pot in an even layer for best results. Do not cover with Glass Lid.
- Plug the unit into an outlet and push the POWER button to turn "On."
- Press the MENU button until the flashing indicator arrow moves to the SAUTÉ position.
- Press the TIMER/TEMP button once and the default temp of "200°C" on the LCD display will flash. Press the + or - buttons to adjust to the desired temperature. Hold down for rapid increase/decrease.
-
Once the desired temperature is indicated on the LCD display, press the TIMER/TEMP button again and the default time of 00:05 min on the display will flash. Press the + or - buttons to adjust to the desired cook time. Hold down for rapid increase/decrease.
NOTE: The unit will countdown 10 sec and begin cooking if no other buttons are pressed.] -
Press the START/STOP button once to begin cooking.
-
Continuously mix/stir the contents of inner pot using a non-metallic utensil.
-
Once cooking is complete the unit will power off and beep 3 times.
HOW TO SLOW COOK (HIGH & LOW):
The 6 liters. capacity of the multicooker makes it the perfect size for cooking family meals or for large gatherings. In this mode, the unit will automatically switch to KEEP WARM once cooking is complete. Use the SAUTÉ function on 190°C–220°C.
- Place ingredients into the inner pot and place the pot into the base. Cover with Glass Lid.
- If you need to pre-cook prior to slow cooking, follow the instructions in this manual under SAUTÉ.
- Plug the unit into an outlet and press the POWER button.
- Press the MENU button until the flashing indicator arrow moves to the SLOW COOKER (HI) or (LOW) position depending on the recipe instructions.
- Press the TIMER/TEMP button once and the default time of 6:00 for HI or 8:00 for LOW on the display will flash. Press the + or - buttons to adjust in 30 min increments to the desired cook time.
- Follow the Cooking Function Chart on page 8 to reference the range of cooking times for the SLOW COOKER mode.
NOTE: The unit will countdown 10 sec and begin cooking if no other buttons are pressed.
-
Press the START/STOP button once to begin cooking. Do not open the lid repeatedly while cooking.
-
After cooking is complete, the unit will switch to Auto KEEP WARM for 2 hours (you will hear a 3 beep indicator). After the timer counts down the 2 hours the unit will shut off.
HOW TO COOK RICE:
- Place ingredients into the inner pot and place the pot into the base. Cover with Glass Lid.
- Plug the unit into an outlet and press the POWER button.
- Press the MENU button until the flashing indicator arrow moves to the RICE position.
- In RICE mode, neither the Time nor the Temperature can be manually adjusted.
NOTE: The unit will countdown 10 sec and begin cooking if no other buttons are pressed.] - Simply press the START/STOP button once to begin cooking.
- Once cooking is complete the unit will go to keep warm for 2 hours (you will hear a 3 beep indicator).
After the timer counts down the 2 hours the unit will power off.
HOW TO USE THE KEEP WaRM
The multicooker can also be used as a buffet server to keep food warm. Food can be kept warm from 1 hour up to 4 hours. This can be used for food previously cooked in the Multicooker or for food already prepared that you want kept warm.
- Place ingredients into the inner pot and place the pot into the base. Cover with Glass Lid.
- Plug the unit into an outlet and press the POWER button.
- Press the MENU button until the flashing indicator arrow moves to the KEEP WARM position.
- Press the TIMER/TEMP button once and the default time of 02:00 on the display will flash. Press the + or - buttons to adjust in 30 min increments to the desired KEEP WARM time.
- Follow the Cooking Function Chart on page 8 to reference the range of cooking times for the KEEP WARM mode. (Temperatures are not manually adjustable in KEEP WARM mode).
NOTE: The unit will countdown 10 sec and begin cooking if no other buttons are pressed.] - Press the START/STOP button once to begin keeping warm.
- Once the timer is up the unit will power off and beep 3 times.
HOW TO ROaST
Temperature settings from 150^ C– 180^ C are ideal for roasting meats and vegetables. The programmable timer can be set in 10 minute intervals up to 3 hours.
- Place food on the Roasting Rack and lower into the Inner Pot. Cover with Glass Lid.
- Plug the cord into an outlet and push the POWER button to turn "On."
- Press the MENU button until the flashing indicator arrow moves to the ROAST position.
- Press the TIMER/TEMP button once and the default temp of "350°F" on the LCD display will flash. Press the + or - buttons to adjust in 5°F increments to the desired temperature. Hold down for rapid increase/decrease.
- Once the desired temperature is indicated on the LCD display, press the TIMER/TEMP button again and the default time of "00:30" on the display will flash. Press the + or - buttons to adjust in 10 min increments to the desired cook time. Hold down for rapid increase/decrease.
- Follow the Cooking Function Chart on page 8 to reference the range of cooking times and temperatures for the ROAST mode.
NOTE: The unit will countdown 10 sec and begin cooking if no other buttons are pressed.
-
Press the START/STOP button once to begin cooking.
-
Once cooking is complete the unit will power off and beep 3 times.
HOW TO BaKE
Temperature settings from 150^ C– 190^ C allow for baking delicious pastries, desserts and other easy one pot meals. The programmable timer can be set in 10 minute intervals up to 4 hours.
- Place ingredients into the inner pot and place the pot into the base. Cover with Glass Lid.
- Plug the cord into an outlet and push the POWER button to turn "On."
- Press the MENU button until the flashing indicator arrow moves to the BAKE position.
- Press the TIMER/TEMP button once and the default temp of 150^ C on the LCD display will flash. Press the + or – buttons to adjust in 10^ C increments to the desired temperature. Hold down for rapid increase/decrease.
- Once the desired temperature is indicated on the LCD display, press the TIMER/TEMP button again and the default time of 01:00 on the display will flash. Press the + or - buttons to adjust in 10 min increments to the desired cook time. Hold down for rapid increase/decrease.
- Follow the Cooking Function Chart on page 8 to reference the range of cooking times and temperatures for the BAKE mode.
NOTE: The unit will countdown 10 sec and begin cooking if no other buttons are pressed.
-
Press the START/STOP button once to begin cooking.
-
Once cooking is complete the unit will power off and beep 3 times.
HOW TO STEaM
Steaming cooks food more gently than almost any other method. This means food retains its shape, color, and texture.
- Place food on the Steam Rack and lower into the Inner Pot.
- Add water to the bottom of the inner pot. Generally, 1–2 cups of water provides approximately 5–10 minutes of steam time.
- If additional water is required while cooking, carefully lift the lid away from you and add room temperature water. Water level should NOT exceed the steam rack or touch the food.
- Cover with Glass Lid.
- Plug the cord into an outlet and push the POWER button to turn "On."
- Press the MENU button until the flashing indicator arrow moves to the STEAM position.
- Press the TIMER/TEMP button once and the default time of 00:30 hrs on the display will flash. Press the + or - buttons to adjust in 10 min increments to the desired cook time. Hold down for rapid increase/decrease.
- Follow the Cooking Function Chart on page 8 to reference the range of cooking times for the STEAM mode.
NOTE: The unit will countdown 10 sec and begin cooking if no other buttons are pressed.
-
Press the START/STOP button once to begin cooking.
-
Once cooking is complete the unit will power off and beep 3 times.
-
When you are finished using the unit, make sure the POWER is "Off" and then unplug the unit and allow it to cool completely before handling. Use caution when placing hot meats on steam rack.
CaUTION
DO NOT add any liquids to the base of the main housing of the appliance.
HOW TO STEW
Stewing is a proces for the least tender cuts of meat. It is recommended to first sear the meat whole in the multicooker and then cut into chunks for stewing.
- Place ingredients into the inner pot and place the pot into the base. Cover with Glass Lid.
- If you need to pre-cook or brown foods prior to slow cooking, follow the instructions in this manual under SAUTÉ.
- Plug the unit into an outlet and press the POWER button.
- Press the MENU button until the flashing indicator arrow moves to the STEW position.
- Press the TIMER/TEMP button once and the default time of 2:00hrs on the display will flash. Press the + or - buttons to adjust in 10 min increments to the desired cook time.
- Follow the Cooking Function Chart on page 8 to reference the range of cooking times for the STEW mode.
NOTE: The unit will countdown 10 sec and begin cooking if no other buttons are pressed.
- Press the START/STOP button once to begin cooking.
NOTE: The cooking timer will not begin counting down until the cooker reaches a boil.
-
Once cooking is complete the unit will power off and beep 3 times.
-
When you are finished using the unit, make sure the POWER is "Off" and then unplug the unit and allow it to cool completely
HOW TO SOUS VIDE
Sous vide is a cooking method, which food is prepared in an airtight package (vacuum) in a water bath at a stable temperature. You can cook especially meat, fish, vegetables, but also fruits. The intention is to preserve the natural flavor, texture and juice quality food with uniform heating in the exact temperature controlled water bath.
- Place ingredients into the inner pot and place the pot into the base.
- If you need to pre-cook or brown foods prior to slow cooking, follow the instructions in this manual under SOUS VIDE.
- Plug the unit into an outlet and press the POWER button.
- Press the MENU button until the flashing indicator arrow moves to the STEW position.
- Press the TIMER/TEMP button once and the default time of 2:00hrs on the display will flash. Press the + or - buttons to adjust in 10 min increments to the desired cook time.
- Follow the Cooking Function Chart on page 8 to reference the range of cooking times for the STEW mode.
NOTE: The unit will countdown 10 sec and begin cooking if no other buttons are pressed.
-
Press the START/STOP button once to begin cooking.
-
Once cooking is complete the unit will power off and beep 3 times.
The vacuum is recommended to use vacuum brand Concept, more at www.my-concept.com.
HOW TO FRY
- Place ingredients into the inner pot and place the pot into the base. Pour into pot oil max. 2.5 liters.
- Plug the unit into an outlet and press the POWER button.
- Press the MENU button until the flashing indicator arrow moves to the FRY position
- Press the TIMER/TEMP button once and the default time of 0:15hrs on the display will flash. Press the + or - buttons to adjust in 1 min increments to the desired cook time.
NOTE: The unit will countdown 10 sec and begin cooking if no other buttons are pressed. - Press the START/STOP button once to begin cooking.
- After heating of the oil (try inserting one piece of food or a few crumbs of breadcrumbs: if around them begin to form bubbles you can start frying), insert the raw materials ready for frying in the frying basket into the container. Cover with a lid. During frying check the foods. When preparing pre-fried products, follow the instructions on food packaging of foods when preparing their own potato chips before placing them into the hot oil thoroughly.
- Once cooking is complete the unit will power off and beep 3 times.
After using of the multifunctional cooker, make sure that it is turned off. Before handling unplug it from outlet and leave it to cool.
IMPORTANT
Be careful when handling hot food.
NOTE: Leakage of a steam between the lid and the pot is caused by increased pressure in the pot after achieved the required temperature.
Recipes www.my-concept.com
CLEANING
Clean the appliance after every use to prevent the accumulation of grease, burnt-on food remnants, and unpleasant odours.
Do not immerse the power cord, plug, or base of the appliance in water or other liquid. Do not clean the lid and base in a dishwasher.
Prior to any cleaning, make sure the appliance has cooled down and is disconnected from the mains.
Never pour cold water into the bin while it is hot.
Wash the heating bin, lid, basket, grill in hot water with detergent.
Clean the base of the appliance with a wet cloth only. Do not use steel wool, abrasive agents or solvents to clean the appliance.
Allow all components to dry thoroughly prior to assembling the appliance.
MAINTENANCE
- Never pour cold water into the heating bin while it is hot.
- Do not use steel wool, abrasive agents or solvents to clean the appliance.
- Only use utensils that are made from wood or heat-resistant plastic.
• Never submerge the base in water or other liquids.
• Wipe it with a damp, clean cloth only.
• Never pour water into hot oil.
Any faults or defects caused by unsuitable or insufficient maintenance are not warranted.
REPAIR & MAINTENANCE
Any extensive maintenance or repair that requires access to the inner parts of the product must be performed by an expert service centre.
ENVIRONMENTAL PROTECTION
• Packaging materials and obsolete appliances should be recycled.
• The transport box may be disposed of as sorted waste.
• Polyethylene bags shall be handed over for recycling.
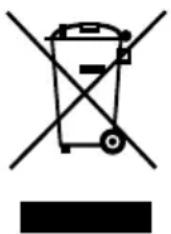
Appliance recycling at the end of its service life:
natural_image
Symbol of a trash bin crossed with no text or labels, accompanied by a black rectangular bar at the bottom (no text or symbols present)A symbol on the product or its packaging indicates that this product should not go into household waste. It must be taken to the collection point of an electric and electronic equipment recycling facility. By making sure this product is disposed of properly, you will help prevent the negative effects on the environment and human health that would otherwise result from inappropriate disposal of this product. You can learn more about recycling this product from your local authorities, a household waste disposal service or in the shop where you bought this product.
concept
The manufacturer (or importer) is responsible for ensuring the product complies with the requirements of applicable legal regulations as well as those of the relevant technical standards. Moreover, they are responsible for ensuring the product has the properties the manufacturer described in documents related to the goods or those reasonably expected by the customer with regard to the nature of the goods or based on advertising produced by the manufacturer, and further they are responsible for ensuring the product is fit for the purpose proposed by the manufacturer or that a product of the same type is normally used for.
The quality warranty term is 24 months from product takeover by the customer.
The warranty does not apply to wear and tear caused by regular use. The customer shall not be entitled to any warranty claims if, prior to taking the product over, they knew the product contained a defect or if the defect is attributable to the customer.
The warranty specifically does not apply:
- if the product installation, operation and service conditions stipulated in the product operating manual have not been adhered to,
- to malfunctions caused due to mechanical, heat or chemical damage, short circuit, over voltage or incorrect installation,
• to malfunctions caused by an inexpert third-party intervention,
• to malfunctions caused by natural disaster, - to malfunctions caused by insufficient or inappropriate maintenance in violation of the operating manual, including malfunctions caused by water and other sediments,
- to changes in colour of the heating surface or to scratching of the surface caused as a result of using the products in an unusual manner,
• to appearance and functional changes caused by exposure to sunlight, thermal radiation of water and other sediments, - if the service life of certain product parts expires, e.g. for accumulators, bulbs, etc.
The warranty does not apply to any products and services provided along with the product (gifts, promotional articles, etc.).
Filing a complaint
A complaint against a product defect must be fi led as soon as identifi ed, yet no later than before the end of the warranty term.
The customer must file a product complaint with the dealer from which they have purchased the product, or with any authorised service centre, a list of which is included in the product package, or available at www.my-concept.com.
While fi ling a product complaint, the product must be duly cleaned and securely packed so as to prevent any damage during its transport to an authorised service centre, where relevant, unless the product is delivered in person.
The customer must submit proof of having concluded a purchase contract for the product by producing the receipt.
While fi ling their complaint, the customer must indicate the noted defect and identify the preferred complaint application method.
Complaints processing
As long as the noted defect may be removed, the user has the right to have the defect duly removed free of charge on a timely basis.
Where such a procedure is not reasonable with regard to the nature of the defect, the user may require to be supplied a new defect-free product (replacement), or, where the defect applies to a part of the product only, replacement of the part concerned. However, if replacement of the product or any part thereof is not proportionate with regard to the nature of the defect, especially if the defect can be removed without undue delay, the customer has the right to have the defect removed free of charge.
If the noted defect is not removable, or if the customer becomes entitled to replacement of the product or a part thereof, yet the replacement is not possible, for example due to the product having been sold out, the customer has the right to return the product (withdrawal from the contract).
The customer shall have the right to a new product (replacement) or to replacement of a part of the product even if the defect can be removed, provided they cannot properly use the product due to repeated occurrence of the defect or due to a high number of such defects. In such a case, the customer also has the right to return the product (by withdrawing from the contract).
If the product is not returned (the customer does not withdraw from the contract), or if the customer does not apply the right to a new defect-free product (replacement), to replacement of a part thereof or to repair of the product, they may request a reasonable discount. The customer also has a right to a reasonable discount if a new defect-free product cannot be supplied to them, or if a product part cannot be replaced or the product repaired unless the situation is remedied within a reasonable time limit, or if remedying the situation would create major discomfort on the part of the customer.
The seller, authorised service centre or a staff member authorised by them must decide about each complaint immediately or within three business days in complicated cases. This term does not include a reasonable period of time, depending on the type of product concerned, required for the defect to be assessed by an expert. A complaint, including defect removal, must be dealt with without any undue delay, yet no later than within 30 calendar days of the complaint fi ling date, unless the seller and the customer agree on a later deadline.
On returning the product (withdrawing from the contract) the customer must return any accessories and documents supplied along with the product.
The customer does not have the right to keep the defective parts and components of the product replaced as part of a repair of the product.
This shall be without prejudice to any other rights the customer may have in relation to the purchase of the product.
Remark: Complaints against products damaged in transport are governed by the carrier's complaints procedure.
Manufacturer
Jindřich Valenta - ELKO Valenta
Vysokomýtská 1800, 565 01 Choceň
Czech Republic
tel.: +420 465 471 433
fax +420 465 473 304
Company ID No. 13216660
email: servis@my-concept.cz
www: www.my-concept.com
Product data
| Model: | |
| Production number: | |
| Date of purchase: Seal and signature of vendor: | |
concept
Jindřich Valenta – ELKO Valenta Czech Republic
Vysokomýtská 1800, 565 01 Choceň
Tel. +420 465 322 895, Fax: +420 465 473 304
www.my-concept.cz

ELKO Valenta – Slovakia, s.r.o.
Hurbanova 1563/23, 911 01 Trenčín
Tel.: +421 326 583 465, Fax: +421 326 583 466
www.my-concept.sk

Elko Valenta Polska Sp. Z. o. o.


- PODĚKOVÁNÍ
- POPIS PANELU
- ČIŠTĚNÍ
- DISPLEJ
- POZNÁMKA
- ČISTENIE
- WYŚWIETLaCZ
- DISPLEJS
- PIEZIME.
- APKALPE
- IMPORTANT SAFETY INSTRUCTIONS
- PRODUCT DESCRIPTION
- DISPLAY
- NOTE
- FEATURES & FUNCTIONS:
- THE CONTROL PANEL
- PREPARING YOUR INFINITY COOKER FOR USE
- HOW TO SaUTÉ
- HOW TO SLOW COOK (HIGH & LOW):
- HOW TO COOK RICE:
- HOW TO USE THE KEEP WaRM
- HOW TO ROaST
- HOW TO BaKE
- HOW TO STEaM
- CaUTION
- HOW TO STEW
- HOW TO SOUS VIDE
- HOW TO FRY
- IMPORTANT
- CLEANING
- MAINTENANCE
- REPAIR & MAINTENANCE
- ENVIRONMENTAL PROTECTION
- Appliance recycling at the end of its service life:
- concept
- Filing a complaint
- Complaints processing
- Manufacturer
- Jindřich Valenta – ELKO Valenta Czech Republic
- ELKO Valenta – Slovakia, s.r.o.
- Elko Valenta Polska Sp. Z. o. o.
Brand : Concept
Model : CK5000
Category : Multicooker