
VT-3602 BW - Mill Vitek - Free user manual and instructions
Find the device manual for free VT-3602 BW Vitek in PDF.


| Product type | Electric meat grinder |
| Model | VT-3602 BW |
| Brand | Vitek |
| Power supply | 220-240 V ~ 50/60 Hz |
| Rated power | 500 W |
| Max power | 2000 W |
| Continuous operation time | 5 minutes |
| Cooling time | 10-15 minutes between cycles |
| Overheat protection | Automatic thermal switch-off |
| Reverse function | Yes (REV button) |
| Low speed mode | Yes (SLOW button for soft foods) |
| Body material | Plastic |
| Blade material | Stainless steel |
| Cutting plates | 2: coarse (for raw meat, vegetables) and fine (for cooked meat, fish) |
| Attachments included | Sausage attachment, kebbe attachments (2), vegetable slicer (grating, potato cutting, slicing), juice extractor |
| Accessories storage | Built-in compartment in unit body |
| Cord storage | Compartment on bottom |
| Pusher | Included (2: for meat grinder head and vegetable slicer) |
| Food tray | Included |
| Juice extractor features | Adjustable pulp outlet control knob, mesh filter |
| Cleaning | Removable parts washable with warm water and mild detergent; body wipe with damp cloth |
| Safety features | Lock button for head removal, auto shut-off, use only supplied pusher |
| Unit dimensions (approx.) | 25 x 30 x 35 cm |
| Unit weight (approx.) | 4.5 kg |
| Warranty | 3 years (from dealer, with proof of purchase) |
Frequently Asked Questions - VT-3602 BW Vitek
User questions about VT-3602 BW Vitek
0 question about this device. Answer the ones you know or ask your own.
Ask a new question about this device
Download the instructions for your Mill in PDF format for free! Find your manual VT-3602 BW - Vitek and take your electronic device back in hand. On this page are published all the documents necessary for the use of your device. VT-3602 BW by Vitek.
USER MANUAL VT-3602 BW Vitek
ENGLISH
MEAT GRINDER
Meat grinder is intended for processing products and making homemade semi-finished products.
DESCRIPTION
- Pusher
- Food tray
- Meat grinder head body
- Meat grinder head setting place
- Meat grinder head lock button
- Unit body
- Carrying handle
- Attachment storage compartment lid
- Attachment storage compartment

-
Reverse button
-
Low speed button SLOW
-
On/off button
-
Screw
-
Crossed blade
-
Coarse cutting plate
-
Fine cutting plate
-
Meat grinder head nut
-
Sausage attachment
-
"Kebbe" attachment
-
"Kebbe" attachment
-
Cutting plate (15, 16) holder/cleaner
-
Meat grinder head setting place (4) cover
-
Vegetable slicer pusher
-
Vegetable slicer attachment body
-
Grating attachment
-
Potato cutting attachment
-
Slicing
-
Juice extractor attachment body
-
Plastic screw
-
Mesh filter holder
-
Unit body (28) lid
-
Pulp outlets control knob
PRECAUTIONS
Read this instruction manual carefully before using the unit and keep it for the whole operation period. Mishandling the unit can lead to its breakage and cause harm to the user or damage to his/her property.
To reduce the risk of fire, to prevent the electric shock and to avoid other injuries it is necessary to observe the following safety measures when using the electric meat grinder:
- Before using the unit for the first time, make sure that voltage in your mains corresponds to the operating voltage of the unit.
• Use only the attachments supplied. - To avoid risk of electric shock, NEVER IMMERSE the unit, the power cord and the power plug into water or any other liquids.
- Use a damp cloth to clean the meat grinder body and then wipe the unit body dry.
- Never leave the operating meat grinder unattended.
• Always switch the meat grinder off and unplug it before assembling, disassembling and cleaning.
- Place the unit on a flat steady surface away from heat sources, open flame, moisture and direct sunlight.
- Do not set the unit on a heated surface or next to it (for instance, near gas or electric stove, near heated oven or cooking surface).
- Handle the power cord with care, prevent it from multiple twisting and regularly straighten the power cord.
- Do not use the power cord for carrying the meat grinder.
- Do not let the cord hang from the edge of a table, and make sure it does not touch sharp furniture edges and hot surfaces.
- When unplugging the unit from the mains, pull the power plug but not the cord.
- Do not connect or disconnect the power cord from the mains and do not touch it with wet hands, this may cause electric shock.
- Do not allow children to touch the unit and the power cord during operation.
- Do not allow children to use the unit as a toy.
- This unit is not intended for usage by children under 8 years of age.
- Place the unit out of reach of children under 8 years of age during the operation and during the breaks between operation cycles.
- Children aged 8 and over as well as disabled persons can use this unit only under supervision of a person who is responsible for their safety, if they are given all the necessary and understandable instructions concerning the safe usage of the unit and information about danger that can be caused by its improper usage.
- For children safety reasons do not leave polyethylene bags, used as a packaging, unattended.
Attention! Do not allow children to play with polyethylene bags or packaging film. Danger of suffocation!
- Check the power cord and plug integrity periodically. Do not use the unit if the unit body, the power plug or the cord have damages.
- To avoid damages, transport the unit in original package only.
- Do not use the unit if the power cord or the plug is damaged, if the unit malfunctions, if it was dropped or damaged in any other way.
- Do not repair the unit by yourself. If you find any damages, unplug the unit and apply to an authorized service center.
ENGLISH
- Keep the unit out of reach of children.
«REV» (reverse) is used for removing obstructions which appear during processing of products.
Food tray provides convenient food layout during processing.
Two cutting plates with openings of different size are intended for different degrees of grinding.
Special accessories are used for sausages and «kebbe» making.
«Invisible» technology provides special compartment for accessories storage in the unit body.
«Disc Cleaner» technology allows using a special fixture for discs cleaning.
ATTENTION!
- Before grinding meat make sure that all bones and excess fat are removed.
- Do not push the products with any foreign objects or your fingers, use only the pushers (1) and (23) supplied with the unit.
- Never immerse the meat grinder body, the power plug or the power cord into water or other liquids.
- When using the «kebbe» attachments (19, 20), do not install the cutting plates (15, 16) and the crossed blade (14).
- Do not try to process food with hard fiber (for example, ginger or horseradish) in the meat grinder.
- To avoid obstructions do not apply excessive force while pushing meat with the pusher (1).
- If any hard piece of food stops the feeder screw or cutting blade rotation, immediately switch the unit off and use the screw reverse function «REV» (reverse) to remove the obstruction before starting again.
BEFORE USING THE MEAT GRINDER
After unit transportation or storage at low temperature, it is necessary to keep it for at least two hours at room temperature before switching on.
- Unpack the meat grinder and remove all package materials, wipe the unit body with a damp cloth and then wipe it dry.
- Wash all removable parts with warm water and neutral detergent, then rinse and dry thoroughly before assembling.
- Before using the unit for the first time, make sure that voltage in your mains corresponds to the operating voltage of the unit.
BASIC PRINCIPLES OF USING THE MEAT GRINDER
- The meat grinder is intended only for household processing of products and making homemade semi-finished products.
- Assemble the unit and place it on a flat dry surface.
- Make sure that ventilation openings on the body are not blocked.
- Insert the power plug into the socket, the button (12) « Illumination will light up.
- Place a suitable bowl under the meat grinder head (3).
- Make sure that the meat is fully defrosted, remove excess fat and all bones, and cut the meat into cubes or strips fitting the opening of the food tray (2).
- Switch the unit on by pressing the button (12) « ⏻ ».
- Slowly feed the meat pieces into the grinder head body (3) using the pusher (1).
- When operating, use only the pusher (1), supplied with the unit.
- Do not use any other objects to push products; do not push the meat with your hands.
- Do not apply excessive effort while pushing the meat or other foods.
- Obstructions can appear during grinding meat or other products, use the screw reverse mode «REV» (reverse) to remove the obstruction. To switch the screw reverse mode «REV» (reverse) on, switch the meat grinder off by pressing the
button (12) « ⏻», then press the button (10) « REV», the illumination of this button will light up, and then switch the unit on by pressing the button (12) « ».
- Do not run the appliance for more than 5 minutes continuously.
- After 5 minutes of continuous use, switch the meat grinder off and let it cool down during 10-15 minutes before further operation. After you finish operating, switch the meat grinder off, pressing
the button (12) « 🎨 Unplug the unit, and only after that you can disassemble it.
MEAT GRINDING
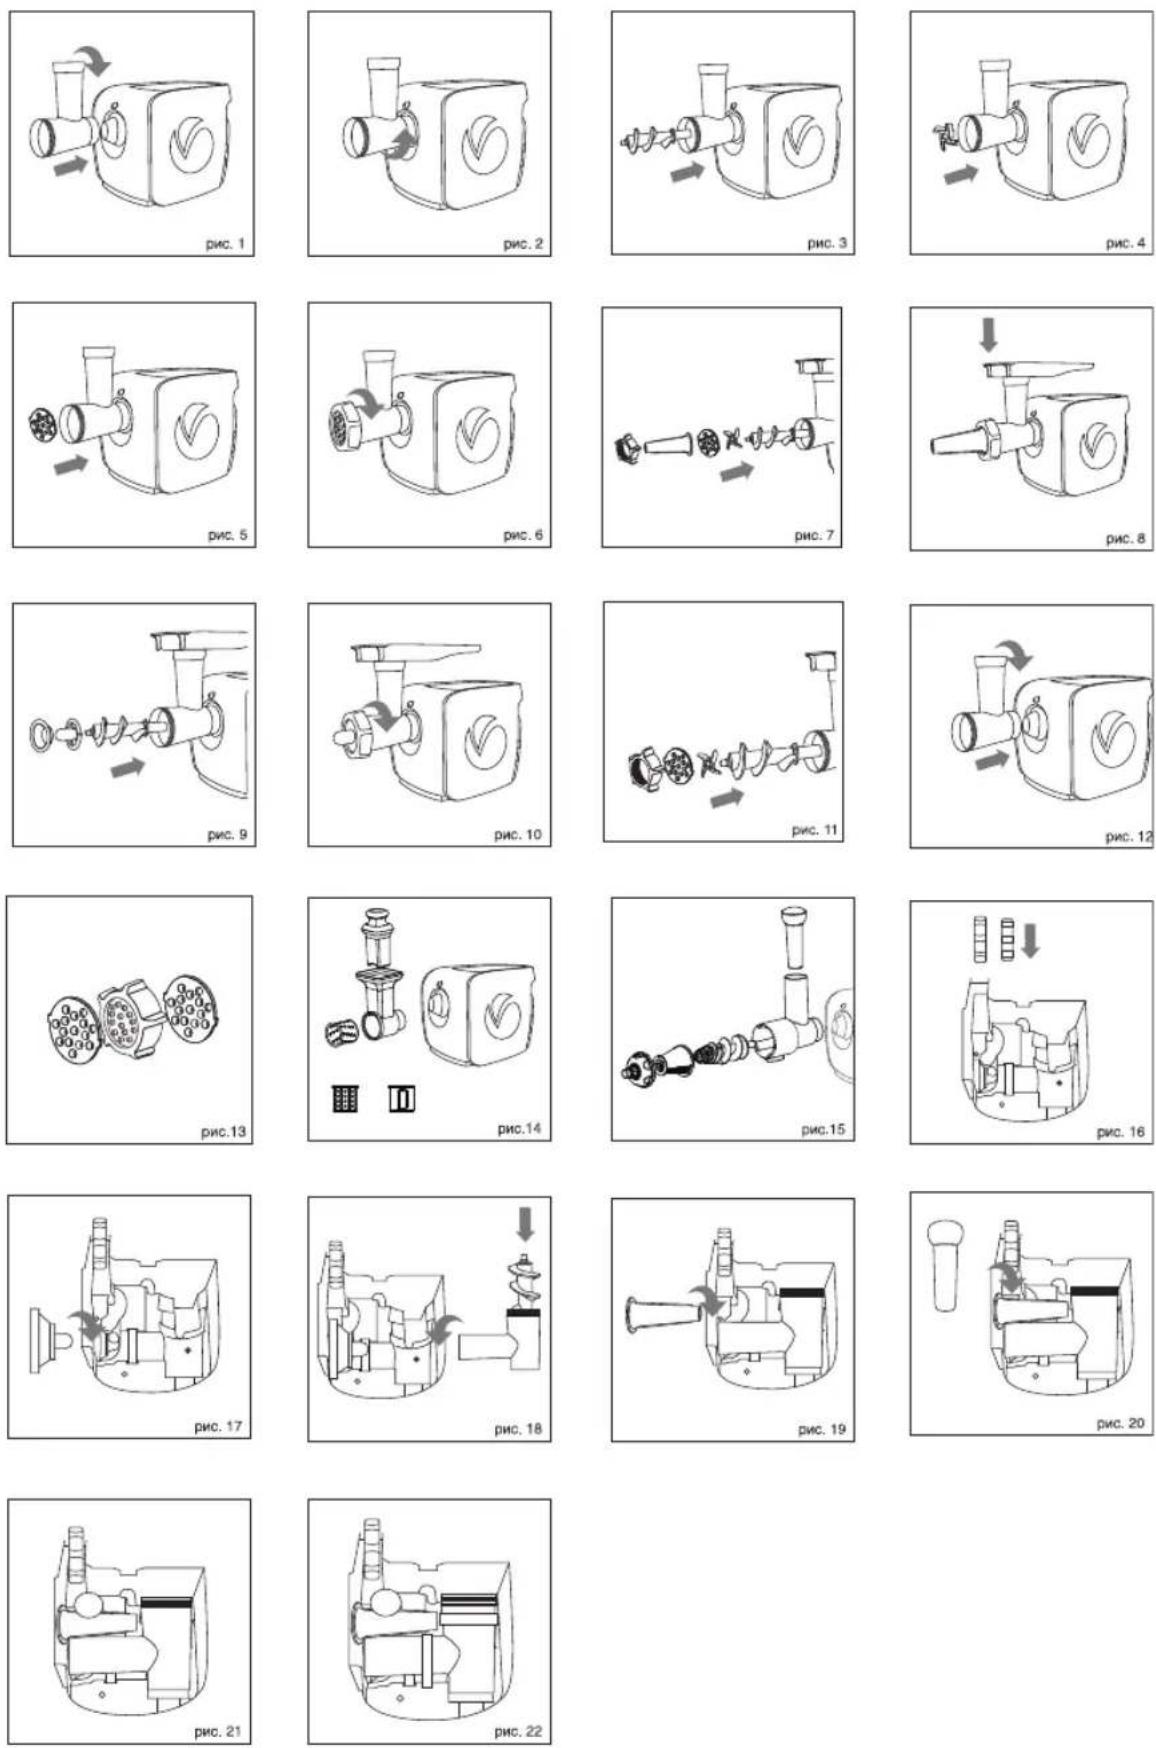
- Install the meat grinder head (3) to the setting place (4), and turn it counterclockwise until bumping (pic. 1, 2).
ENGLISH
- Install the screw (13) into the meat grinder head (3) body (pic. 3).
- Install the crossed blade (14) (pic. 4).
- Select one of the cutting plates (15 or 16) and set it above the blade, matching the ledges on the cutting plate with the grooves on the meat grinder head body (3), tighten the nut (17) (pic. 5, 6).
Attention!
- Face the blade cutting side to the cutting plate. If the blade is installed improperly, it will not grind the food products.
-
Coarse cutting plate (15) is for processing raw meat, vegetables, dried fruit, cheese, fish, etc.
– Fine cutting plate (16) is for processing raw and cooked meat, fish, etc. -
Place the food tray (2) on the meat grinder head body (3).
- Insert the power plug into the mains socket, the button (12) « Illumination will light up.
- Switch the meat grinder on, by pressing the button (12) «
- During the operation use only the pusher (1).
Note:
- For better meat processing slice it in cubes or stripes. Defrost frozen meat thoroughly.
- During the operation use only the pusher supplied with the unit; do not use any other objects, do not push meat with your fingers.
- After you finish operating, switch the unit off, pressing the button (12) « » unplug the meat grinder and only after that you can disassemble it.
- To remove the meat grinder head press the lock button (5), turn the meat grinder head (3) clockwise and remove it.
- To disassemble the meat grinder head, unscrew the nut (17) and take out the installed cutting plate (15 or 16), the crossed blade (14) and the screw (13) from the meat grinder head body.
AUTO SWITCH-OFF FUNCTION
- The meat grinder is equipped with auto switch-off function in case of motor unit overheating.
- In case of overheating of the motor, the automatic thermal switch will be on, and the meat grinder will be switched off.
- In this case remove the power plug from the mains socket immediately.
- Let the meat grinder cool down for approximately 50-60 minutes before switching it on again.
- Plug the meat grinder into the mains, switch it on, if the meat grinder can not be switched on, this may mean that it is otherwise damaged. In this case contact the authorized service center for meat grinder repair.
FILLING SAUSAGES
• Prepare minced meat.
- Install the meat grinder head (3) to the setting place (4), and turn it counterclockwise until bumping (pic. 1, 2).
- Insert the screw (13) into the meat grinder head body (3), set the crossed blade (14), take the cutting plate (16 for fine chopping) and set it above the blade, matching the ledges on the cutting plate with the grooves on the meat grinder head body (3), install the sausage attachment (18) and tighten the nut (17) (pic. 7).
• Install the food tray (2).
- Put the minced meat on the food tray (2).
- Use natural sausage casing, putting it preliminarily into a bowl with warm water for 10 minutes (pic. 8).
- Pull softened casing on the attachment (18) and tie a knot on the casing end.
- Insert the power plug into the mains socket, the button (12) « Illumination will light up.
- Switch the unit on by pressing the button (12) « ⏻ ».
- Use the pusher (1) to feed the minced meat, as the casing is filled up, slide it off the attachment (18) as necessary, and wet the casing if it becomes dry.
-
After you finish operating, switch the meat grinder off, pressing the button (12) « », unplug the unit and only after that you can disassemble the meat grinder.
-
To remove the meat grinder head press the lock button (5), turn the meat grinder head (3) clockwise and remove it.
- Unscrew the nut (17) and disassemble the meat grinder head.
USING "KEBBE" ATTACHMENTS
Kebbe is a traditional Middle East dish cooked of lamb meat, wheat flour and spices cut together for getting a base for hollow rolls. Rolls are filled and deep fried.
You can make different delicacies trying various fillings.
• Prepare the casing base.
- Install the meat grinder head (3) to the setting place (4), and turn it counterclockwise until bumping (pic. 1, 2).
ENGLISH
- Insert the screw (13) into the meat grinder head body (3), install "kebbe" attachments (19, 20) on the screw (13), make sure that the ledges on the attachment (20) match the grooves on the meat grinder head body (3) and tighten the nut (17) slightly. (pic. 9, 10).
• Install the food tray (2). - Put the prepared casing base on the food tray (2).
- Insert the power plug into the mains socket, the button (12) « Illumination will light up.
- Switch the unit on by pressing the button (12) « ⏻ ».
- Use the pusher (1) to supply the base for casing.
• Cut the rolls of the required length. - After you finish operating, switch the meat grinder off, pressing the button (12) « », unplug the unit and only after that you can disassemble the meat grinder.
- To remove the meat grinder head press the lock button (5), turn the meat grinder head (3) clockwise and remove it.
- Unscrew the nut (17) and disassemble the meat grinder head.
RECIPE (Filling)
| Lamb 100 g | |
| Olive oil 1 12 table spoon | |
| Onion (shred) 1 12 table spoon | |
| Spice | to taste |
| Salt | 14 tea spoon |
| Flour | 1 12 table spoon |
- Mince the lamb meat once or twice.
- Fry onion in oil till it gets gold color, and then add minced lamb meat, spice, salt and flour.
(Casing)
| Lean meat | 450g |
| Flour | 150-200 g |
| Spice | to taste |
| Nutmeg | 1 pc. |
| Ground chilly pepper | to taste |
| Pepper | to taste |
- Mince the meat twice or thrice, mince a nutmeg, and mix all the components.
- More meat and less flour in the casing provide better consistency and taste of the prepared dish.
- Fill the rolls, clamp at edges, and shape as you wish.
- Deep fry the rolls.
VEGETABLE SLICER
• Install the vegetable slicer body (24) to the meat grinder head setting place (4), and turn it counterclockwise until bumping.
• Install the grating attachment (25) or potato cutting attachment (26) or slicing attachment (27) into the vegetable slice body (24) till bumping (pic. 14).
- Insert the power plug into the mains socket, the button (12) « Lumination will light up.
- Switch the unit on by pressing the button (12) « ⏻ ».
- During the operation use only the pusher (23) supplied with the unit; do not use any other objects, never push vegetables with your fingers.
- Use low screw rotation speed for processing soft vegetables, for instance, tomatoes, to do this press the low speed button (11), the button (11) illumination will light up.
- After you finish operating, switch the meat grinder off, pressing the button (12) « », unplug the meat grinder and only after that you can disassemble it.
- To remove the vegetable slicer attachment (24) press the lock button (5), turn the attachment clockwise and remove it.
- Wash the vegetable slicer parts right after the use.
JUICE EXTRACTOR
Juice extractor attachment is intended for processing soft vegetables or fruits (especially for making tomato juice/squash or for processing «stone berries», for instance, red currant).
It is recommended to switch slow rotation speed «SLOW» on when using the juice extractor attachment, to do this press the button (11).
• Install the juice extractor attachment (28) body to the meat grinder head setting place (4), and turn it counterclockwise until bumping.
- Insert the plastic screw (29) into the juice extractor attachment (28) body.
• Install the mesh filter holder (30) into the juice extractor attachment (28) body so that the mesh filter is on the bottom (pic. 15).
- Cover the juice extractor attachment (28) with the lid (31), when installing the lid turn it to the mark "CLOSE" till bumping.
- Place the food tray (2) on the juice extractor attachment (28).
- Insert the power plug into the mains socket, the button (12) « Illumination will light up.
- Switch the low speed on by pressing the «SLOW» button (11), the button (11) will be illuminated.
ENGLISH
- During the operation use only the pusher (1) supplied with the unit; do not use any other objects to push vegetables, never push vegetables or fruit with your hands.
- Pulp outlets control knob (32) changes the gap between the screw (29) and the mesh filter holder (30); turning the knob (32) in the direction «MAX – MIN» find the perfect proportion of fruit and vegetable juice/squash and the amount of pulp outlets.
- If during the use of the juice extractor attachment the amount of juice/squash decreased, switch the meat grinder off, unplug it, dismantle the juice extractor and wash the mesh filter.
- After you finish operating, switch the meat grinder off, pressing the button (12) « », and unplug it.
- To remove the juice extractor attachment (28) press the lock button (5), turn the attachment clockwise and remove it.
- Dismantle the juice extractor attachment and wash all parts.
MEAT GRINDER CARE
- After you finish operating, switch the meat grinder off, pressing the button (12) «» unplug it and only after that you can disassemble it.
- Unscrew the nut (17) and remove the installed attachments (18, 19 or 20), the cutting plates (15 or 16) and the crossed blade (14) from the screw (13) (pic. 11).
- Press the lock button (5), turn the meat grinder head (3) clockwise and remove it (pic. 12).
- Remove the screw (13) from the meat grinder head (3).
- Remove the remains of the products from the screw (13).
- Wash all the used parts of the meat grinder with warm water and a neutral detergent, then rinse and dry thoroughly before assembling.
- Use the cutting plate holder (21) to remove the remaining meat from the cutting plate (15, 16) openings (pic. 13).
Dismantling the juice extractor attachment (28):
- Press the lock button (5), turn the juice extractor (28) clockwise and remove it.
- Turn the lid (31) to the mark «OPEN» and remove it.
- Remove the mesh filter (30) and the separator (29) from the attachment (28) body.
-
Wash all the details and dry them before assembling.
-
Cover the meat grinder head setting place (4) with the cover (22).
- Clean the meat grinder body (6) with a slightly damp cloth and then wipe dry.
- Do not use solvents or abrasives to clean the meat grinder body (6).
- Provide that no water gets inside the meat grinder body.
- Before you put the accessories away for storage, make sure that they are dry.
- For easy storage of the attachments, the storage compartment (9) is provided in the unit.
- Put the attachments into the compartment according to pictures 16-22. You may store the cutting plates (15 and 16) and the nut (17) in the pusher (21) body (pic. 13).
- Close the compartment with the lid (8).
- Put the power cord into special compartment on the meat grinder body bottom.
DELIVERY SET
Meat grinder with the attachments set inside - 1 pc. Food tray - 1 pc.
Vegetable slicer attachments set - 1 pc.
Juice extractor attachment - 1 pc.
Cover - 1 pc.
Instruction manual - 1 pc.
TECHNICAL SPECIFICATIONS
Power supply: 220-240 V \~ 50/60Hz
Rated power: 500 W
Maximal power: 2000 W
The manufacturer preserves the right to change design and specifications of the unit without a preliminary notification.
Unit operating life is 3 years
Guarantee
Details regarding guarantee conditions can be obtained from the dealer from whom the appliance was purchased. The bill of sale or receipt must be produced when making any claim under the terms of this guarantee.

This product conforms to the EMC-Requirements as laid down by the Council Directive 2004/108/EC and to the Low Voltage Regulation (2006/95/EC)
DEUTSCH
FLEISCHWOLF
MUHIM EHTIYOT CHORALARI
A production date of the item is indicated in the serial number on the technical data plate. A serial number is an eleven-unit number, with the first four figures indicating the production date. For example, serial number 0606xxxxxxx means that the item was manufactured in June (the sixth month) 2006.
DE


- ENGLISH
- MEAT GRINDER
- DESCRIPTION
- PRECAUTIONS
- ATTENTION!
- BEFORE USING THE MEAT GRINDER
- BASIC PRINCIPLES OF USING THE MEAT GRINDER
- MEAT GRINDING
- Note:
- AUTO SWITCH-OFF FUNCTION
- FILLING SAUSAGES
- USING "KEBBE" ATTACHMENTS
- VEGETABLE SLICER
- JUICE EXTRACTOR
- MEAT GRINDER CARE
- Dismantling the juice extractor attachment (28):
- DELIVERY SET
- TECHNICAL SPECIFICATIONS
- Unit operating life is 3 years
- Guarantee
- DEUTSCH
- FLEISCHWOLF
- MUHIM EHTIYOT CHORALARI
- DE
Brand : Vitek
Model : VT-3602 BW
Category : Mill