X820 - Digital Camera OLYMPUS - Free user manual and instructions
Find the device manual for free X820 OLYMPUS in PDF.
| Product type | Digital camera (shooting and display) |
| Brand | Olympus |
| Model | X820 |
| Effective pixels | 8,000,000 pixels |
| Image sensor | CCD 1/2.35", 8,500,000 total pixels |
| Lens | Olympus 6.3-18.9 mm, f3.1-f5.9 (35 mm equiv: 36-108 mm) |
| Optical zoom | 3x |
| LCD screen | 2.5", TFT color, 230,000 pixels |
| Shooting modes | Auto, P, Sport, Portrait, Landscape, Scene (15 modes), Guide |
| Flash modes | Auto, Red-eye reduction, Fill-in, Off |
| Self-timer | Approx. 12 seconds |
| Shutter speed | 4 to 1/2000 s |
| Normal shooting range | 0.6 m to ∞ (W), 1.0 m to ∞ (T) |
| Macro range | 0.1 m to ∞ (W), 0.6 m to ∞ (T); super macro: 0.05 m |
| Internal memory | Yes (built-in) |
| Storage media | xD-Picture Card (16 MB to 2 GB, H/M types and Standard) |
| Connectivity | USB, AV output (multi-connector) |
| Power supply | Lithium-ion battery LI-42B (3.7 V, 740 mAh) |
| Charger | LI-40C (100-240 V, 50/60 Hz) |
| Dimensions (W×H×D) | 91.8 × 55.7 × 19.1 mm (excluding protrusions) |
| Weight | 108 g (without battery or card) |
| Operating temperature | 0 °C to 40 °C |
| Operating humidity | 30% to 90% |
| Supplied software | Olympus Master 2 (CD-ROM) |
| Cleaning | Damp cloth, no solvents |
| Safety | Do not use near flammable gases; avoid flash near eyes |
Frequently Asked Questions - X820 OLYMPUS
User questions about X820 OLYMPUS
0 question about this device. Answer the ones you know or ask your own.
Ask a new question about this device
Download the instructions for your Digital Camera in PDF format for free! Find your manual X820 - OLYMPUS and take your electronic device back in hand. On this page are published all the documents necessary for the use of your device. X820 by OLYMPUS.
USER MANUAL X820 OLYMPUS
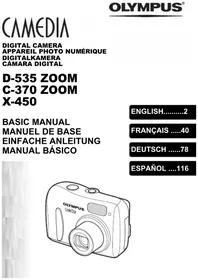
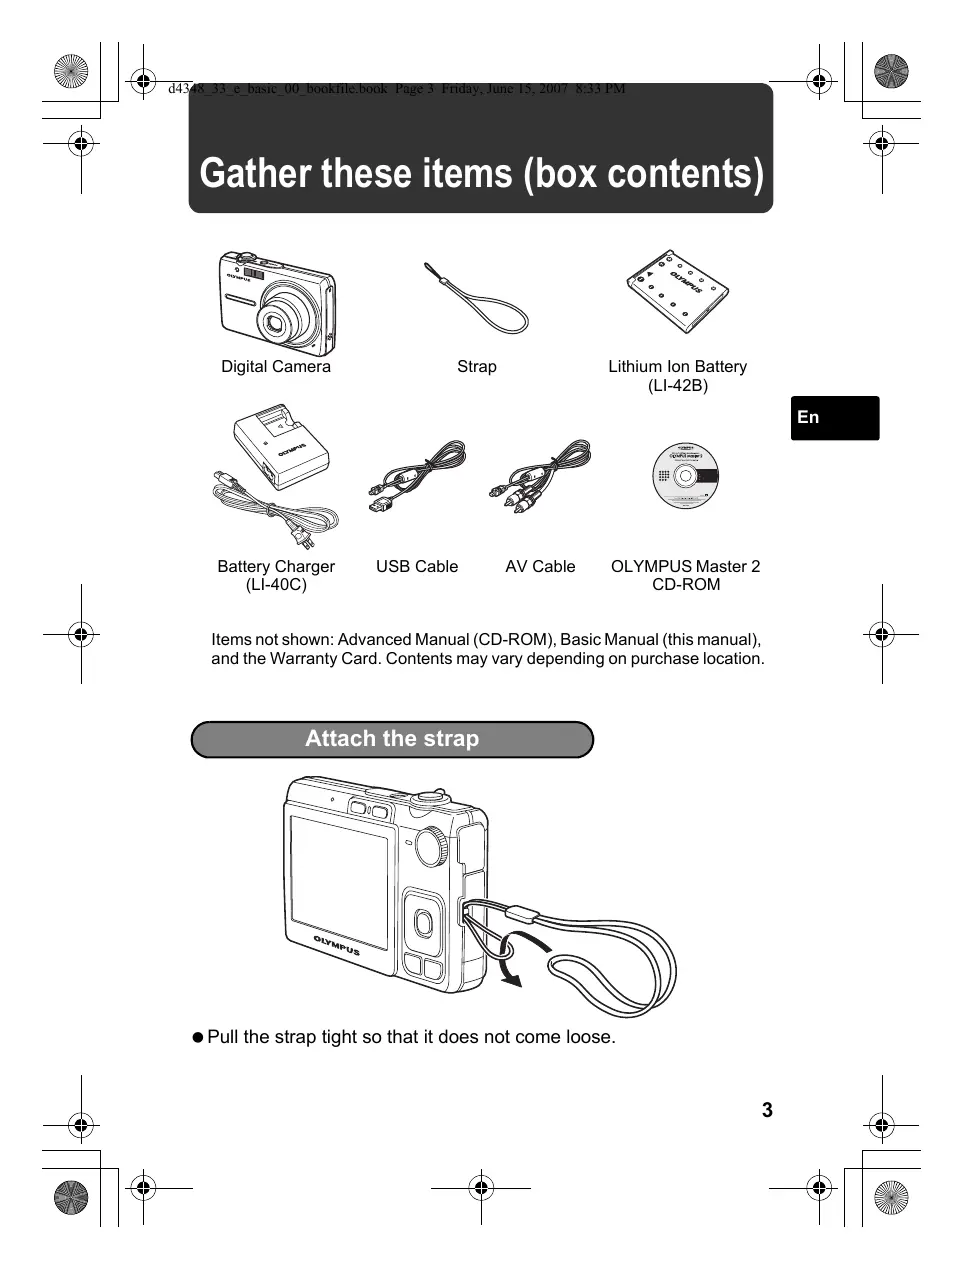
Gather these items (box contents) 3
Attach the strap 3
Prepare the camera 4
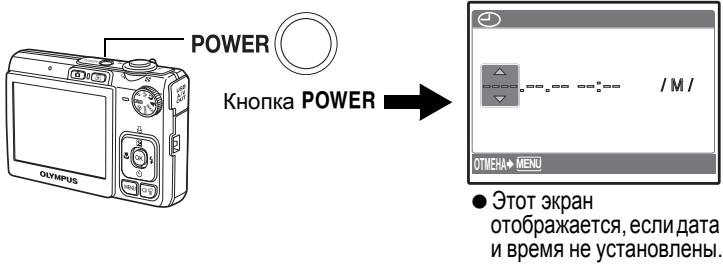
Turn the camera on. 6
Set the date and time 7
About the date and time setting screen 7
Set the language 9
Take a picture. 10
Review your pictures. 11
Erase pictures 11
Basic operation 12
Shooting Mode Buttons 12
Scene Modes 13
Macro Mode 13
Flash Modes 14
Self-Timer 14
Power Save Feature 14
15
Top Menu 15
Erase All Pictures 15
Connecting the camera 16
Playback on a TV 16
Direct Printing (PictBridge) 17
Transfer images 18
OLYMPUS Master software 20
Specifications 21
Safety Precautions. 23
- Before using your camera, read this manual carefully to ensure correct use.
- We recommend that you take test shots to get accustomed to your camera before taking important photographs.
- Please observe the safety precautions at the end of this manual.
- The images on the LCD screen and illustrations of the camera used in this manual may differ from the actual product.
Gather these items (box contents)
Digital Camera

Strap
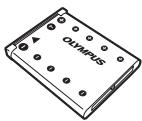
Lithium Ion Battery (LI-42B)

Battery Charger (LI-40C)
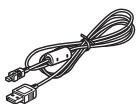
USB Cable
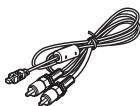
AV Cable

OLYMPUS Master 2 CD-ROM
Items not shown: Advanced Manual (CD-ROM), Basic Manual (this manual), and the Warranty Card. Contents may vary depending on purchase location.
Attach the strap
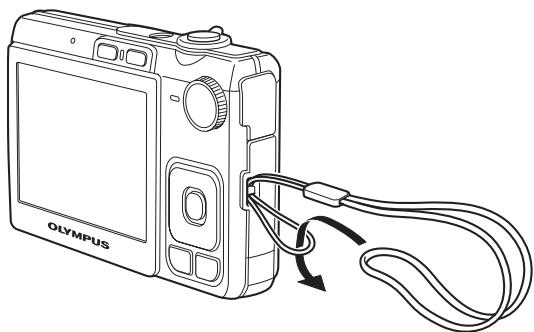
- Pull the strap tight so that it does not come loose.
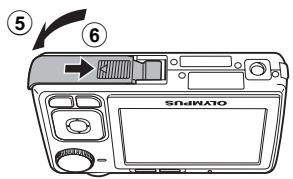
Prepare the camera
a. Charge the battery.
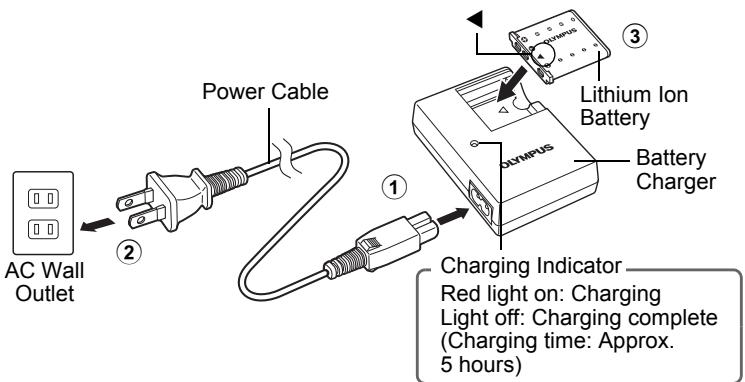
- Battery comes partially charged.
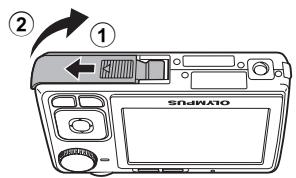
b. Insert the battery and an xD-Picture Card (optional).
- Insert the battery by putting in the marked side first, with the marks toward the battery lock knob. If you insert the battery incorrectly, you will not be able to remove it. Do not use force. Contact authorized distributors/ service centers. Damage to the battery exterior (scratches, etc.) may produce heat or an explosion.
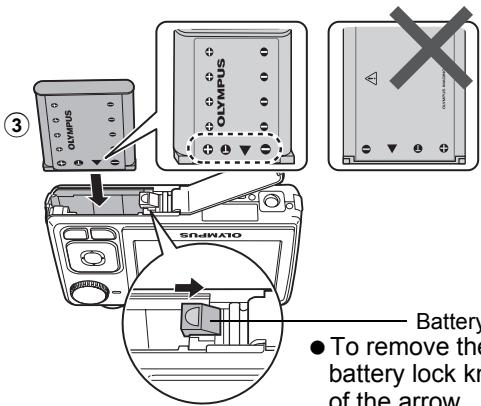
Battery lock knob
- To remove the battery, press the battery lock knob in the direction of the arrow.
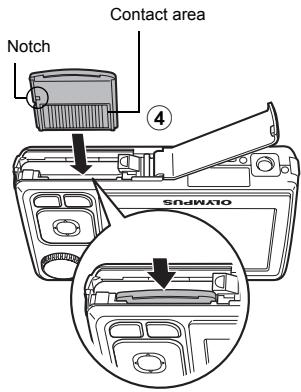
- Orient the card as shown, and insert the card straight in until it clicks into place.
- To remove the card, push the card all the way in, release slowly, grasp the card, then remove.
- With this camera, you can take pictures without inserting the optional xD-Picture Card™ (hereinafter referred to as "the card"). If you shoot pictures with this camera without using an xD-Picture Card, the pictures will be recorded in the internal memory. For details on the card, please refer to the Advanced Manual.
Turn the camera on
This explains how to turn on the camera in shooting mode.
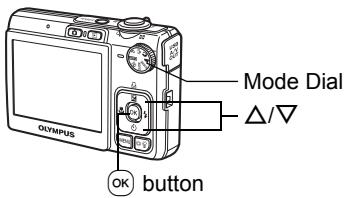
a. Set the mode dial to AUTO.

Still picture shooting modes
| AUTO | The camera determines the optimum settings for the shooting conditions automatically. |
| P | The camera automatically sets the optimum aperture value and shutter speed. |
| (◇◇) | This function reduces the blur incurred by a moving subject, or camera shake when taking pictures. |
| ○ | Suitable for taking pictures of people. |
| ▲ | Suitable for taking pictures of a landscape. |
| SCENE | Select from 15 available scene modes according to the shooting conditions. |
| GUIDE | Use the shooting guide displayed on the screen to shoot pictures according to the situation. |
b. Press the POWER button.
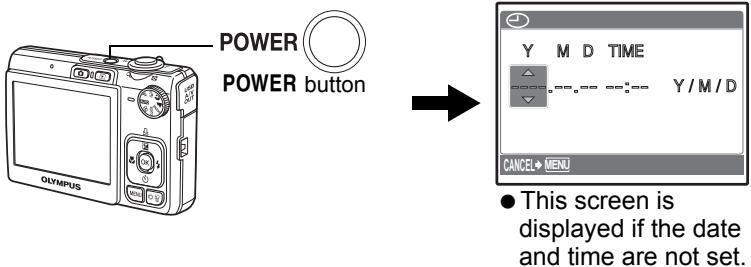
- To turn off the camera, press the POWER button once again.
Hint
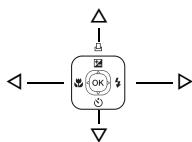
The directions of the arrow pad is indicated with in the supplied instruction manual.
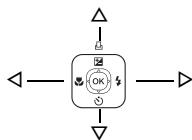
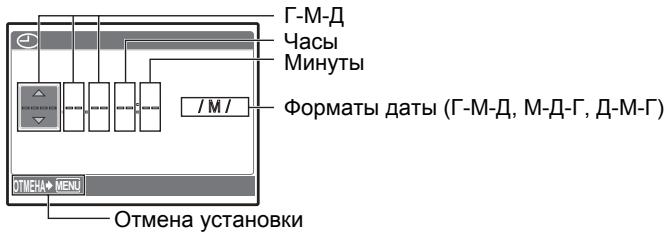
About the date and time setting screen
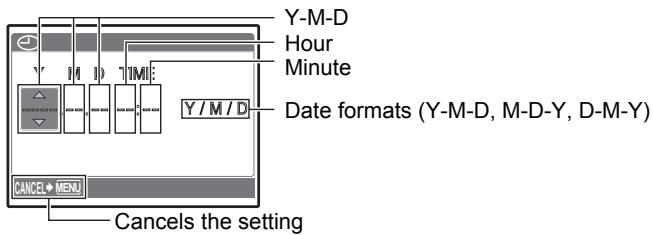
a. Press the 四 / and buttons to select [Y].
- The first two digits of the year are fixed.
![OLYMPUS X820 - a. Press the 四 / and buttons to select [Y]. - 1](/content/2024/12/84473/images/a41b5f3c609425254567fc8c7ba7b9c1d12780ab5ffd350f89ff7126b33af16a.jpg)
b. Press the button.
c. Press the Z / L and buttons to select [M].
![OLYMPUS X820 - c. Press the Z / L and buttons to select [M]. - 1](/content/2024/12/84473/images/da181f40c7d2f3f73a37d14cad2cf1ef32b90f31a82b410578561969dacf02db.jpg)
d. Press the button.
e. Press the / and buttons to select [D].
![OLYMPUS X820 - c. Press the Z / L and buttons to select [M]. - 2](/content/2024/12/84473/images/ada18090a803c58f7d6290cd8b85f374c313edf0829626591fd98686f91460cf.jpg)
f. Press the button.
g. Press the Z / Z and buttons to select the hours and minutes.
- The time is displayed in the 24-hour format.
![OLYMPUS X820 - c. Press the Z / L and buttons to select [M]. - 3](/content/2024/12/84473/images/88210b61620e3756a065c3aa24912152e06adb6d7d518e3d5caad3f68a58ecb5.jpg)
h. Press the button.
i. Press the / and buttons to select [Y/M/D].
![OLYMPUS X820 - c. Press the Z / L and buttons to select [M]. - 4](/content/2024/12/84473/images/2b18cf440a7ff769ac691f812d66aa387c7baa5fff0d48e21fd3ee5ef007bb1c.jpg)
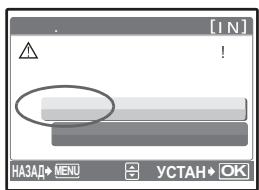
j. After all settings have been set, press OK.
- For a more accurate setting, press OK when the time signal hits 00 seconds.
![OLYMPUS X820 - c. Press the Z / L and buttons to select [M]. - 5](/content/2024/12/84473/images/d218b2d7fafff920cdd18e42a0157cc5b56a4597574b1d97f5d818362f437feb.jpg)
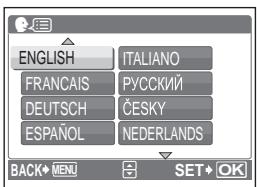
Set the language
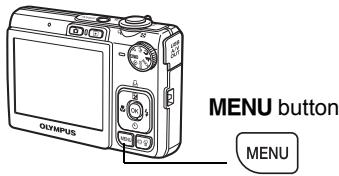
a. Press the MENU button to display the top menu.


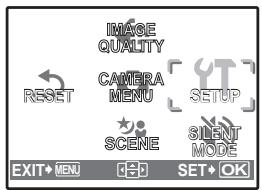
b. Press the button to select [SETUP], and press OK.
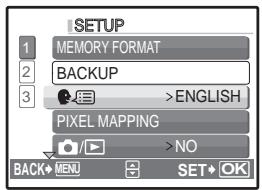
c. Press the / and buttons to select [O], and press OK.
d. Press the arrow pad (△∇◁▷) to select a language, and press OK.
- You can add other languages to your camera with the provided OLYMPUS Master software. Please refer to the Advanced Manual.
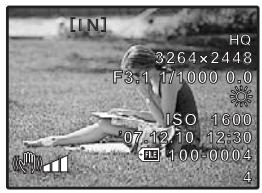
Take a picture
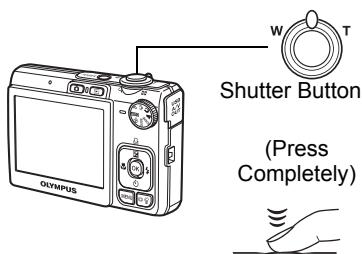
a. Hold the camera.

Horizontal grip
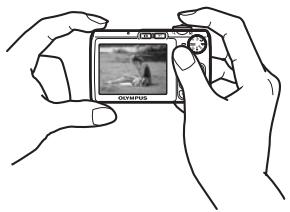
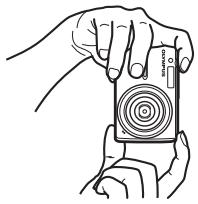
Vertical grip
b. Focus.
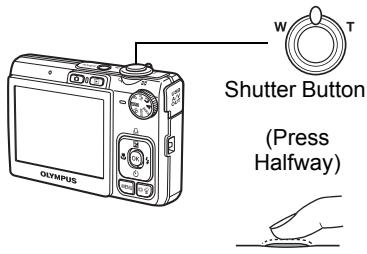
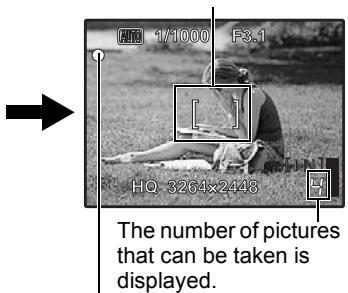
Place this mark over your subject.
When the focus and exposure are locked, the green lamp lights up, and the shutter speed and aperture value are displayed.
c.Shoot.

The card access lamp blinks.
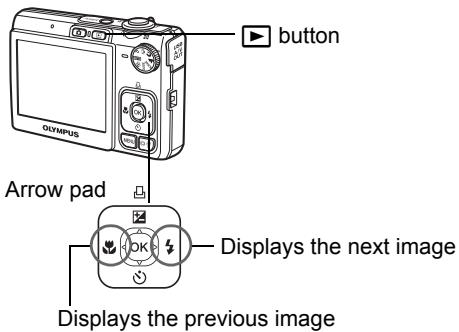
Review your pictures
a. Press the button.
Erase pictures
a. Press the and buttons to display the picture you want to erase.
b. Press the button.
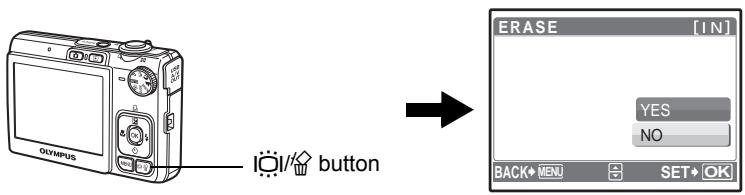
c. Press the / button, select [YES], and press OK.
Shooting Mode Buttons
While in shooting mode, use these buttons for quick access to some of the more commonly used features.
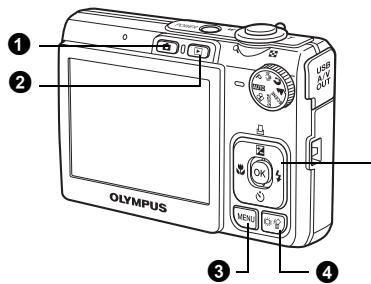
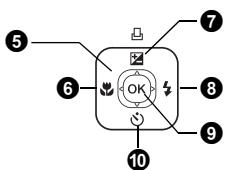
1 button (Shooting)
Selects the shooting mode.
2 button (Playback)
Selects the playback mode.
3 MENU button
Displays the top menu.
按钮(Backlight boost/Erase)
Press ICl in shooting mode. The monitor becomes brighter for 10 seconds.
Arrow pad ( < >)
Selects scenes, playback pictures and menu items.
6 button (Macro Mode)
Enables macro or super macro mode for taking close-up pictures.
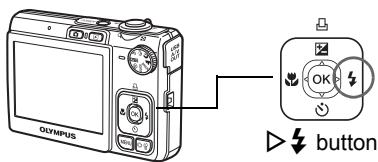
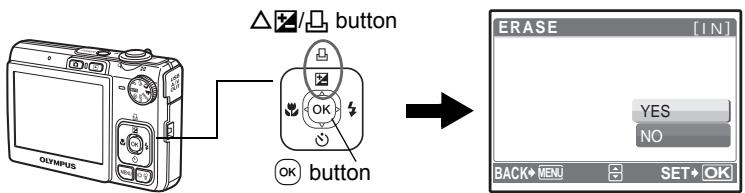
7 四 / button (Exposure Compensation/Print)
While in shooting mode, press this button to adjust the exposure compensation value, which affects picture brightness.
3 button (Flash Mode)
Selects from 4 flash modes - AUTO, (Red-eye reduction), (Fill-in flash), or (Flash off).
9 OK button (OK)
Confirms settings.
10 button (Self-timer)
Sets the self-timer to take the shot approximately 12 seconds after the shutter button is pressed.
Scene Modes
This function allows you to switch the SCENE (scene mode) according to the subject.
1 Set the mode dial to SCENE.

Press / to select the scene modes and press OK.
Shooting Scene Modes
- NIGHT+PORTRAIT
CANDLE - FIREWORKS
DOCUMENTS - UNDER WATER WIDE1
SPORT
SELF PORTRAIT
BEHIND GLASS
Auction
- UNDER WATER WIDE2
INDOOR
SUNSET
CUISINE
SMILE SHOT
- UNDER WATER MACRO
Macro Mode
This mode lets you take pictures as close as 10 cm (3.9 in.) to your subject. (at the widest angle)
Use this mode to take pictures as close as 5 cm (2.0 in.) to your subject. In mode, the position of the zoom lens is fixed.
Press the button repeatedly to select [ ] or [ ] and press 出
Flash Modes
Press the button repeatedly to select the flash mode and press OK.
Press the shutter button halfway.
- When the flash is set to fire, the mark lights.
3 Press the shutter button completely to take the picture.
| Icon | Flash Mode | Description |
| No indication | Auto flash | The flash fires automatically in low light or backlight conditions. |
| Red-eye reduction flash | The red-eye reduction flash mode significantly reduces this phenomenon by emitting pre-flashes before firing the regular flash. | |
| Fill-in flash | The flash fires regardless of the available light. | |
| Flash off | The flash does not fire. |
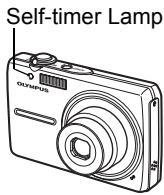
Self-Timer
Press the button to select [G] and press OK.
Press the shutter button fully to take the picture.
- The self-timer lamp lights for approximately 10 seconds after the shutter button is pressed, then starts blinking. After blinking for approximately 2 seconds, the picture is taken.
Power Save Feature
- To save the battery power, the camera automatically enters sleep mode and stops operating if not used for approximately 3 minutes. Operate the shutter button or zoom lever to reactivate the camera.
- If the camera is not operated for approximately 12 minutes after the camera enters sleep mode, it automatically retracts the lens and turns off. To resume operation, turn on the power again.
Top Menu
Press the MENU button to display the top menu on the monitor.
Use the arrow pad ( ) to select menu items.
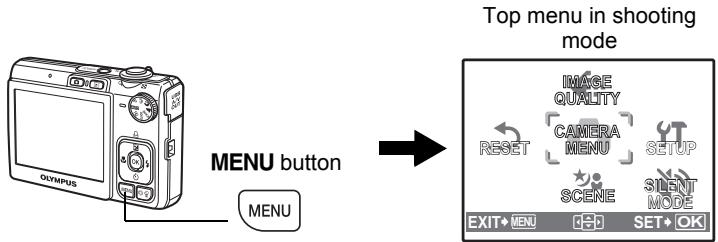
IMAGE QUALITY
Sets image quality and resolution.
CAMERA MENU
Adjusts various shooting settings.
RESET
Resetstof the factory default settings.
SCENE
Select a scene according to the subject and shooting condition.
SILENT MODE
Mutes the operation sounds, warning sounds, shutter sound, etc... during shooting and playback.
SETUP
Sets the date and time, language and other settings.
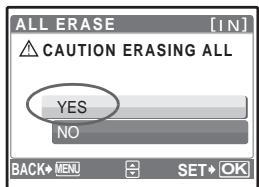
Erase All Pictures
Press the MENU button to display the top menu in playback mode.
2 Select [ERASE] [ALL ERASE], and press OK.
3 Select [YES], and press OK.
- All the pictures are erased.
Connecting the camera
Playback on a TV
Use the AV cable provided with the camera to playback recorded images on your TV. Both still pictures and movies can be played back.
1 Make sure that the TV and camera are turned off. Connect the multi-connector on the camera to the video input terminal on the TV using the AV cable.
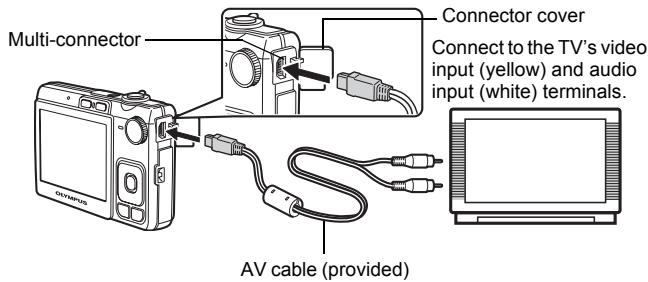
2 Turn the TV on and set it to the video input mode.
- For details on switching to video input, refer to your TV's instruction manual.
3 Turn the camera on and press the button to select the playback mode.
- The last picture taken is displayed on the TV. Use the arrow pad (△▽◇) to select the picture you want to display.
Direct Printing (PictBridge)
Using the provided USB cable, you may connect your camera directly to a PictBridge compatible printer to make prints. You can print a picture with simple operations.
1 In playback mode, display the picture you want to print out on the monitor.
Connect one end of the provided USB cable into the camera's multi-connector and the other end into the printer's USB connector.
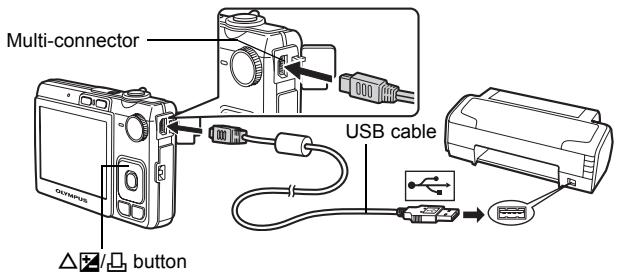
3 Press the 2 button.
- Printing starts.
- When you are finished, disconnect the USB cable from the camera with the picture selection screen displayed.

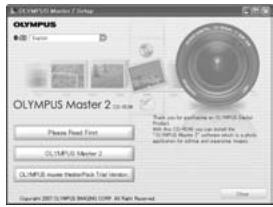
Transfer images
a. Install the software
Insert the OLYMPUS Master CD-ROM.
2 Windows: Click the "OLYMPUS Master 2" button.
Macintosh: Double-click the "Setup" icon.
3 Simply follow the on-screen instructions.
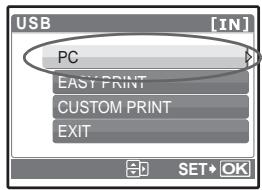
b. Connect the camera to the computer
Connect the camera and computer using the USB cable (provided).
The monitor will turn on automatically.
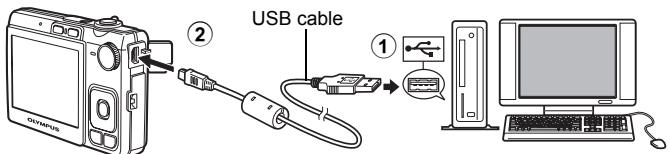
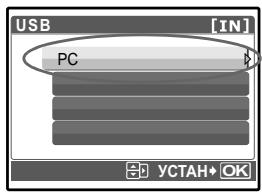
2 Select [PC] on the monitor, and press OK.
- Your PC will now recognize your camera as a removable storage drive.
c. Transfer images to the computer
With the camera now connected, open OLYMPUS Master.
Click "Transfer Images" on the browse window, and then click "From Camera".
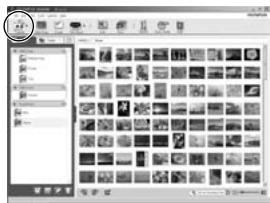
3 Simply follow the on-screen instructions.
Tips
- For more detailed information regarding camera setup and usage, please refer to the camera's "Advanced Manual" provided on CD-ROM.
- For additional assistance, refer to the "Help" file in the OLYMPUS Master software.
OLYMPUS Master software
OLYMPUS Master Software: Use this software to download pictures from the camera, view, organize, retouch, e-mail and print your digital pictures, movies and more!

System Requirements
| OS | Windows 2000 Professional/XP Home Edition/XP Professional/Vista or Mac OS X (v10.3 or later) |
| CPU | Pentium III 500 MHz/Power PC G3 500 MHz/Intel Core Solo/Duo 1.5 GHz, or later |
| RAM | 256 MB or more |
| Hard Disk | 500 MB or more free space |
| Connection | USB port/IEEE 1394 port |
| Monitor | 1024 × 768 pixels resolution or more with minimum 65,536 colors (Windows), 32,000 colors (Macintosh) |
| Other | Internet Explorer 6 or later (Windows), Safari 1.0 or later,QuickTime 6 or later (Macintosh) |
For the latest support information, visit the Olympus website (http://www.olympus.com/)

User Registration
Register your camera when you install OLYMPUS Master to activate your warranty, receive notifications for software and camera firmware updates, and more.
Camera
| Product type | : Digital camera (for shooting and displaying) |
| Recording system | |
| Still pictures | : Digital recording, JPEG (in accordance with Design rule for Camera File system (DCF)) |
| Applicable standards | : Exif 2.2, Digital Print Order Format (DPOF), PRINT Image Matching III, PictBridge |
| Sound with still pictures | : Wave format |
| Movie | : AVI Motion JPEG |
| Memory | : Internal memory |
| xD-Picture Card (16 MB - 2 GB) (Type H/M, Standard) | |
| Number of effective pixels | : 8,000,000 pixels |
| Image pickup device | : 1/2.35" CCD (primary color filter), 8,500,000 pixels (gross) |
| Lens | : Olympus lens 6.3 to 18.9 mm, f3.1 to 5.9 (equivalent to 36 to 108 mm on a 35 mm camera) |
| Photometric system | : Digital ESP metering |
| Shutter speed | : 4 to 1/2000 sec. |
| Shooting range | : 0.6 m (2.0 ft.) to ∞ (W), 1.0 m (3.2 ft) to ∞ (T) (normal) 0.1 m (0.3 ft.) to ∞ (W), 0.6 m (2.0 ft.) to ∞ (T) (macro mode) 0.05 m (0.2 ft.) (super macro mode) |
| Monitor | : 2.5" TFT color LCD display, 230,000 pixels |
| Outer connector | : USB connector, A/V OUT jack (multi-connector) |
| Automatic calendar system | : 2000 up to 2099 |
| Operating environment | |
| Temperature | : 0°C to 40°C (32°F to 104°F) (operation)/-20°C to 60°C (-4°F to 140°F) (storage) |
| Humidity | : 30% to 90% (operation)/10% to 90% (storage) |
| Power supply | : One Olympus lithium ion battery (LI-42B/LI-40B) |
| Dimensions | : 91.8 mm (W) × 55.7 mm (H) × 19.1 mm (D) (3.6 × 2.2 × 0.8 in.) (excluding protrusions) |
| Weight | : 108 g (3.8 oz) without battery and card |
Lithium ion battery (LI-42B)
| Product type | : Lithium ion rechargeable battery |
| Standard voltage | : DC 3.7 V |
| Standard capacity | : 740 mAh |
| Battery life | : Approx. 300 full charges (varies on usage) |
| Operating environment | |
| Temperature | : 0°C to 40°C (32°F to 104°F) (charging)/-10°C to 60°C (14°F to 140°F) (operation)/-20°C to 35°C (-4°F to 95°F) (storage) |
| Dimensions | : 31.5 × 39.5 × 6 mm (1.2 × 1.5 × 0.2 in.) |
| Weight | : Approx. 15 g (0.5 oz) |
Battery charger (LI-40C)
| Power requirements | : AC 100 to 240 V (50 to 60 Hz) |
| 3.2 VA (100 V) to 5.0 VA (240 V) | |
| Output | : DC 4.2 V, 200 mA |
| Charging time | : Approx. 5 hours |
| Operating environment | |
| Temperature | : 0°C to 40°C (32°F to 104°F) (operation)/-20°C to 60°C (-4°F to 140°F) (storage) |
| Dimensions | : 62 × 23 × 90 mm (2.4 × 0.9 × 3.5 in.) |
| Weight | : Approx. 65 g (2.3 oz) |
Design and specifications subject to change without notice.

CAUTION
RISK OF ELECTRIC SHOCK DO NOT OPEN

CAUTION: TO REDUCE THE RISK OF ELECTRICAL SHOCK, DO NOT REMOVE COVER (OR BACK). NO USER-SERVICEABLE PARTS INSIDE. REFER SERVICING TO QUALIFIED OLYMPUS SERVICE PERSONNEL.


DANGER
An exclamation mark enclosed in a triangle alerts you to important operating and maintenance instructions in the documentation provided with the product.

WARNING
If the product is used without observing the information given under this symbol, serious injury or death may result.

CAUTION
If the product is used without observing the information given under this symbol, injury or death may result.
If the product is used without observing the information given under this symbol, minor personal injury, damage to the equipment, or loss of valuable data may result.
WARNING!
TO AVOID THE RISK OF FIRE OR ELECTRICAL SHOCK, NEVER DISASSEMBLE, EXPOSE THIS PRODUCT TO WATER OR OPERATE IN A HIGH HUMIDITY ENVIRONMENT.
General Precautions
Read All Instructions - Before you use the product, read all operating instructions. Save all manuals and documentation for future reference.
Cleaning — Always unplug this product from the wall outlet before cleaning. Use only a damp cloth for cleaning. Never use any type of liquid or aerosol cleaner, or any type of organic solvent to clean this product.
Attaches — For your safety, and to avoid damaging the product, use only accessories recommended by Olympus.
Water and Moisture — For precautions on products with weatherproof designs, read the weatherproofing sections.
Location — To avoid damage to the product, mount the product securely on a stable tripod, stand, or bracket.
Power Source — Connect this product only to the power source described on the product label.
Foreign Objects — To avoid personal injury, never insert a metal object into the product.
Heat — Never use or store this product near any heat source such as a radiator, heat register, stove, or any type of equipment or appliance that generates heat, including stereo amplifiers.
WARNING
- Do not use the camera near flammable or explosive gases.
-
Do not use the flash and LED on people (infants, small children, etc.) at close range.
-
You must be at least 1 m (3 ft.) away from the faces of your subjects. Firing the flash too close to the subject's eyes could cause a momentary loss of vision.
-
Keep young children and infants away from the camera.
-
Always use and store the camera out of the reach of young children and infants to prevent the following dangerous situations which could cause serious injury:
-
Becoming entangled in the camera strap, causing strangulation.
- Accidentally swallowing the battery, cards or other small parts.
- Accidentally firing the flash into their own eyes or those of another child.
-
Accidentally being injured by the moving parts of the camera.
-
Do not look at the sun or strong lights with the camera.
- Do not use or store the camera in dusty or humid places.
- Do not cover the flash with a hand while firing.
CAUTION
-
Stop using the camera immediately if you notice any unusual odors, noise, or smoke around it.
-
Never remove the batteries with bare hands, which may cause a fire or burn your hands.
-
Never hold or operate the camera with wet hands.
-
Do not leave the camera in places where it may be subject to extremely high temperatures.
-
Doing so may cause parts to deteriorate and, in some circumstances, cause the camera to catch fire. Do not use the charger if it is covered (such as a blanket). This could cause overheating, resulting in fire.
-
Handle the camera with care to avoid getting a low-temperature burn.
-
When the camera contains metal parts, overheating can result in a low-temperature burn. Pay attention to the following:
-
When used for a long period, the camera will get hot. If you hold on to the camera in this state, a low-temperature burn may be caused.
-
In places subject to extremely cold temperatures, the temperature of the camera's body may be lower than the environmental temperature. If possible, wear gloves when handling the camera in cold temperatures.
-
Be careful with the strap.
-
Be careful with the strap when you carry the camera. It could easily catch on stray objects - and cause serious damage.
Follow these important guidelines to prevent batteries from leaking, overheating, burning, exploding, or causing electrical shocks or burns.

DANGER
- The camera uses a lithium ion battery specified by Olympus. Charge the battery with the specified charger. Do not use any other chargers.
- Never heat or incinerate batteries.
- Take precautions when carrying or storing batteries to prevent them from coming into contact with any metal objects such as jewelry, pins, fasteners, etc.
- Never store batteries where they will be exposed to direct sunlight, or subjected to high temperatures in a hot vehicle, near a heat source, etc.
- To prevent causing battery leaks or damaging their terminals, carefully follow all instructions regarding the use of batteries. Never attempt to disassemble a battery or modify it in any way, by soldering, etc.
- If battery fluid gets into your eyes, flush your eyes immediately with clear, cold running water and seek medical attention immediately.
- Always store batteries out of the reach of small children. If a child accidentally swallows a battery, seek medical attention immediately.

WARNING
- Keep batteries dry at all times.
- To prevent batteries from leaking, overheating, or causing a fire or explosion, use only batteries recommended for use with this product.
- Insert the battery carefully as described in the operating instructions.
- If rechargeable batteries have not been recharged within the specified time, stop charging them and do not use them.
- Do not use a battery if it is cracked or broken.
- If a battery leaks, becomes discolored or deformed, or becomes abnormal in any other way during operation, stop using the camera.
- If a battery leaks fluid onto your clothing or skin, remove the clothing and flush the affected area with clean, running cold water immediately. If the fluid burns your skin, seek medical attention immediately.
- Never subject batteries to strong shocks or continuous vibration.

CAUTION
- Before loading, always inspect the battery carefully for leaks, discoloration, warping, or any other abnormality.
- The battery may become hot during prolonged use. To avoid minor burns, do not remove it immediately after using the camera.
- Always unload the battery from the camera before storing the camera for a long period.
For customers in Europe

"CE" mark indicates that this product complies with the European requirements for safety, health, environment and customer protection. "CE" mark cameras are intended for sales in Europe.


This symbol [crossed-out wheeie bin WEEE Annex IV] indicates separate collection of waste electrical and electronic equipment in the EU countries. Please do not throw the equipment into the domestic refuse.
Please use the return and collection systems available in your country for the disposal of this product.
Use Only Dedicated Rechargeable Battery and Battery Charger
We strongly recommend that you use only the genuine Olympus dedicated rechargeable battery and battery charger with this camera.
Using a non-genuine rechargeable battery and/or battery charger may result in fire or personal injury due to leakage, heating, ignition or damage to the battery. Olympus does not assume any liability for accidents or damage that may result from the use of a battery and/or battery charger that are not genuine Olympus accessories.
Trademarks
- IBM is a registered trademark of International Business Machines Corporation.
- Microsoft and Windows are registered trademarks of Microsoft Corporation.
- Macintosh is a trademark of Apple Inc.
- xD-Picture Card™ is a trademark.
- All other company and product names are registered trademarks and/or trademarks of their respective owners.
- The standards for camera file systems referred to in this manual are the "Design Rule for Camera File System/DCF" standards stipulated by the Japan Electronics and Information Technology Industries Association (JEITA).
Provisions of warranty
- If this product proves to be defective, although it has been used properly (in accordance with the written Handling Care and Operating instructions supplied with it), during a period of two years from the date of purchase from an authorized Olympus distributor within the business area of Olympus Imaging Europa GmbH as stipulated on the website: http://www.olympus.com this product will be repaired, or at Olympus's option replaced, free of charge. To claim under this warranty the customer must take the product and this Warranty Certificate before the end of the two year warranty period to the dealer where the product was purchased or any other Olympus service station within the business area of Olympus Imaging Europa GmbH as stipulated on the website: http://www.olympus.com. During the one year period of the World Wide Warranty the customer may turn the product in at any Olympus service station. Please notice that not in all countries such Olympus service station exists.
- The customer shall transport the product to the dealer or Olympus authorized service station at his own risk and shall be responsible for any costs incurred in transporting the product.
- This warranty does not cover the following and the customer will be required to pay repair charge, even for defects occurring within the warranty period referred to above.
(a) Any defect that occurs due to mishandling (such as an operation performed that is not mentioned in the Handling Care or other sections of the instructions, etc.)
(b) Any defect that occurs due to repair, modification, cleaning, etc. performed by anyone other than Olympus or an Olympus authorized service station.
(c) Any defect or damage that occurs due to transport, a fall, shock, etc. after purchase of the product.
(d) Any defect or damage that occurs due to fire, earthquake, flood damage, thunderbolt, other natural disasters, environmental pollution and irregular voltage sources.
(e) Any defect that occurs due to careless or improper storage (such as keeping the product under conditions of high temperature and humidity, near insect repellents such as naphthalene or harmful drugs, etc.), improper maintenance, etc.
(f) Any defect that occurs due to exhausted batteries, etc.
(g) Any defect that occurs due to sand, mud, etc. entering the inside of the product casing.
(h) When this Warranty Certificate is not returned with the product.
(i) When any alterations whatsoever are made to the Warranty Certificate regarding the year, month and date of purchase, the customer's name, the dealer's name, and the serial number.
(j) When proof of purchase is not presented with this Warranty Certificate.
-
This Warranty applies to the product only; the Warranty does not apply to any other accessory equipment, such as the case, strap, lens cap and batteries.
-
Olympus's sole liability under this warranty shall be limited to repairing or replacing the product. Any liability for indirect or consequential loss or damage of any kind incurred or suffered by the customer due to a defect of the product, and in particular any loss or damage caused to any lenses, films, other equipment or accessories used with the product or for any loss resulting from a delay in repair or loss of data, is excluded. Compelling regulations by law remain unaffected by this.
Notes regarding warranty maintenance
-
This warranty will only be valid if the Warranty Certificate is duly completed by Olympus or an authorized dealer or other documents contain sufficient proof. Therefore, please make sure that your name, the name of the dealer, the serial number and the year, month and date of purchase are all completed or the original invoice or the sales receipt (indicating the dealer's name, the date of purchase and product type) is attached to this Warranty Certificate. Olympus reserves the right to refuse free-of-charge service if neither Warranty Certificate is completed nor the above document is attached or if the information contained in it is incomplete or illegible.
-
Since this Warranty Certificate will not be re-issued, keep it in a safe place.
- Please refer to the list on the website: http://www.olympus.com for the authorized international Olympus service network.
Disclaimer of Warranty
Olympus makes no representations or warranties, either expressed or implied, by or concerning any content of these written materials or software, and in no event shall be liable for any impelled warranty purchase are all completed or the original invoice or the sales receipt of merchantability or fitness for any particular purpose or for any consequential, incidental or indirect damages (including but not limited to damages for loss of business profits, business interruption and loss of business information) arising from the use of inability to use these written materials or software. Some states do not allow the exclusion or limitation of liability for consequential or incidental damages, so the above limitations may not apply to you.
Table des matieres
YdaJIeHHe BCex CHIMKOB 119
Iopknouenne foToKaMepbI 120
IprocmotpHa3kpaHeTeleBn3opa 120
Ppmaa (PictBridge) 121
Ipehenoc n3o6paXeHn 122
IporpaMMHoe oobcepeHne OLYMPUS Master 124
TexHHueckne xapaKTepeNCTNKn 125
MepblnpedoctopoKHOCTn. 127
- Перацльзовиме Камеры Виимателю почтite HaCTOUIe pyKOBODCTBO.
- Праздуем Делаь Вадные Фотографи, pekomeндуем Bam сдelaьпpoшные ChIMKIN,УTObl npBbIKHyTB K HOBО ФOTOKamepe.
CobnoaTe npabnla texhkn 6e3oNaChocTn, npBBeHHbIe B KOHc HactoJrero pyKOBoDCTBa. - N3o6paXeHnHa JK-dncJIeE n nnIOcTpaCm foTOkAmepbl, INoJIb3OBAHHbIe B pyKOBoDCTBe, MOrY T OTNIuATbcr dIra KOHKpeTHORO n3DeJIIn.
BbInbTe n3 Kopo6kn 3TN npEaMeTbI
LunpobarpoToKaMepe

PemeWok
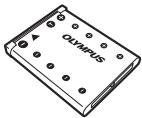
IOnHO-NTNeBbYaKKymyJrTOp(LI-42B)
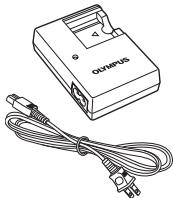
3apnHoe yctpoCTBO (LI-40C)

Ka6eIb USB
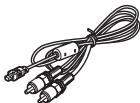
Ka6eJb AV

Kompt-IMC
OLYMPUS Master 2
Ha pncyHKax He noka3aHbI: POnHoe pyKOoDCTBO (KOMnakT-DnCK), OchOBHOe pyKOoDCTBO (HactOJIeepyKOoDCTBO) ngapHTmHaJ KApTa. KomnKeT NoCTABKn MOKeT pa3JIuHaTbcR B 3aBnCmOcTn OT MeCTa npno6peTeHn.
PpikpeiTe peMewoK
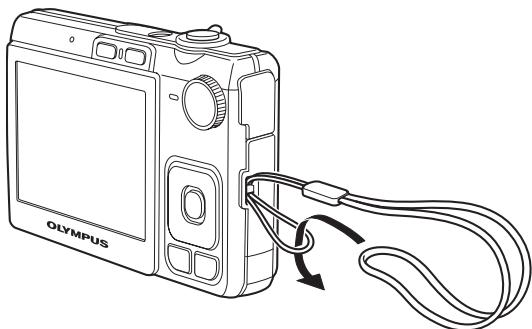
- Hadejxho 3aTnHTe peMeuOK, YTObI OH He COCKoJIb3Hyn C pyKn.
He npinarate Te cnny.
O6paTnTeCbK
OΦnIuaJIbHOMy
PnHnHnHnHarpeBaHaNn HnB3pIbAaKkMyJyToppa.
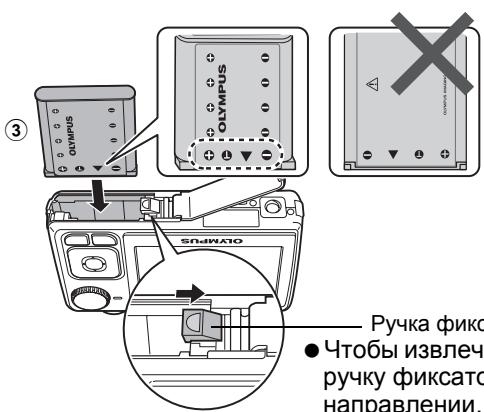
Pучkaфнкастораakymлгеторa
YuTo6bI n3BJIeHb aKKyMylJTop, HaxMMTe pyKU φnKcTaOpa aKKyMylJTopo B HappaBJIeHIn, yKa3aHHOM cTpeJIKOJ.
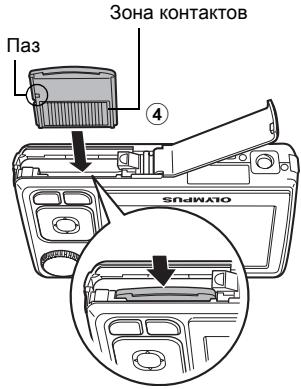
- CopneHTpyNe Te KapTy, KaK NOKa3aHO, IN BCTaBbTe ee npraMo BnpePeI Do 3aUeJIKNBaHnHa MeCTe.
UTo6bI n3BJIeYb KApTy, HaxMnTe Ha Hee Do yNopa, MeDJIeHHO BbICBO6OJNTe, 3aXBaTnTe KapTy, a 3aTEM N3BJIeKnTe.
C NOMOJIbIO 3ToI FOtOKaMEpbI MOXHO DeNaTb CHIMKIN, He BCTaBnJr IOnONHITeNbHyIO KapTy nAmrTxxD-Picture CardTM (daJeE "kapTa"). EcNn CnIMKn DeJaOTc8 Be3 nCNoIb3OBaHnRA KapTbIXD-Picture Card, CHIMKN 6yDyT 3aNNCbBaTc8 BO BHyTpEHHHIO nAmrTb. NOpPobHee o BCTabKe KapTb CMOTpInTe B POnHom pyKOBoDcTBO.
Включи-teфотokamepy
3decb obbrcnreTc, kak BkHouHTb foToKaMepy B pexmecbemkn.
a. YcTaHOBnTe DnCK peKmOB B NoJIOXeHne AUTO.
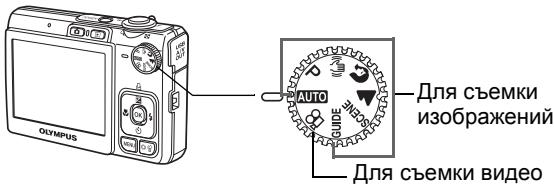
Pexnmbi potocbemkn
| AUTO | ΦOTOKamepa abTOMaTUeCKn onPeJeIeRrT ONTImaJIbHbIe HAcTPORIKNI NO ycNIOBnYM CbEKM.N |
| P | ΦOTOKamepa abTOMaTUeCKn yCTaHaBJIbAeT ONTImaJIbHbU bVIdepJXkU dIaΦpargMy. |
| (###) | 3Ta ΦyHKnIyMeHbIaIeT 3ΦΦeKT CMa3bIbAHIN I3ObpaKeHIn BcNeIcSTBVe dPoxKaHmO bSeKtA INI ΦOTOKamepbI BO BpeMg CbEKM.N |
| PekOMeHdUeTcI dIa CbEKM IIODeI. | |
| SCENE | PekOMeHdUeTcI dIa CbEKM NpiPoIbHbIX LaHdIaΦTob. |
| BbIbePiTe Odn I3 15 DoCTyHbIX pexIMOB cSeHbI B 3aBVCIMOCtN OT ycNIOBn CbEKM.N | |
| GUIDE | PyKOBoIcTBo IIO CbEMeK, OTObpaJxAeMOe Ha 3KpaHe, POMOKeT Bam DePaTb ChIMKn C uYeTOM CNTyaIzni N CHOKeTa. |
b. HaxmTe KhONky POWER.
YTo6bI BvIKNoHouNt bKaMepy, HaxMnTe KHOIpKy POWER eue pa3.
Cobet
B nocTabnemom pykoOoDCTbe no 3Kcnnyataunn HnnpaBneHn KnaBnW Kypcopa yka3aHbI △
O6 3kpaHe HactpoKn DaTbI N BpeMeHN
a. HaxmTe KhoNkI /, n V, yTo6bl Bbl6paTb [I].
-Первье ДБЕЦфрbl roДа He n3MeHЯOTcR.
![OLYMPUS X820 - a. HaxmTe KhoNkI /, n V, yTo6bl Bbl6paTb [I]. - 1](/content/2024/12/84473/images/c9fc6d7b48cf0921e589430e3bf4ec257be30955864d5d0c7f29598512f962d6.jpg)
b. HaxmTe KhoNky

c. HaxmTe KhONKn / n V, yTO6bl Bbl6paTb [M].
![OLYMPUS X820 - c. HaxmTe KhONKn / n V, yTO6bl Bbl6paTb [M]. - 1](/content/2024/12/84473/images/dba520c26f226f5374200fbe00d6876f16be42a6bebc2b9e2077f0837c85a0c4.jpg)
d. HaxmTe KhoNky
e. HaxmTe KhoNKn 四 / n V, yTo6bI Bbl6paTb [d].
![OLYMPUS X820 - c. HaxmTe KhONKn / n V, yTO6bl Bbl6paTb [M]. - 2](/content/2024/12/84473/images/3c5b4f350e2e80af5a9e2f51422dae3785c2b9c17e77966192bdaa3c74a563d9.jpg)
f. HaxMMTe KhoNky
g. Haxmnte KhoNkn /n V, yTo6bI BblpaTb Yacbl MNHyTbI.
Bpemr oTo6paKaetcB 24-ycaobom fopmate.
![OLYMPUS X820 - c. HaxmTe KhONKn / n V, yTO6bl Bbl6paTb [M]. - 3](/content/2024/12/84473/images/a23d1c0aa21e11564846aa8f952dec0bb49daeb5947e85e31608b4b5e081423a.jpg)
h. HaxMMTe KhoNky
i. HaxMnte KHONKn △/□ n ∇, yTo6bI BbI6paTb [Γ/M/D].
![OLYMPUS X820 - c. HaxmTe KhONKn / n V, yTO6bl Bbl6paTb [M]. - 4](/content/2024/12/84473/images/9e532bc5f65c5fafa4758ad94467d32355a9c9974309c1ea8e03a4f417b78eea.jpg)
3 Khonka (Pexm BCbIiKu)
Bb6op oJHoro n3 4 pexMIOB BCblIckn - AUTO, (PiOaBneHne 3ΦΦeKtKaPacbHix rna3), (PpHNyDntelbA aBCblIka) nn (OTKJIUcHHe BcblIckn).
KhONka OK (OK)
YdaJIeHHe BCex CHIMKOB
1 HaekmTe KhoNky MENUДЯ OTo6paKeHnBepxHero MeHIO B pexKIme npocMToPa.
BbIbepuTe [YDAJIeHHe] [YDAJI.BCE] n HaxMnTe OK.
BbIbepeNTe [A] nHaKMnTe OK. Bce cHIMK6yDyT ydaJeHbl.
2 BbIbepuTe Ha MOHHTope [PC] H haxMnTe OK.
KoMnHbTepeOnpeDeneTΦOTOKaMepyKaK CbeMHbI NcCK.
CTaHdapThoe 3,7BnoctoHHoroToka
HanpJKeHne
CTaHapTHa emKoCTb : 740 mAu
Cpok cnykboa kkyMylToppo : Okono 300 noIhbx 3apAIOK (3abncIT OT npImeHnna)
YcIOBn3KcIpyataUN
XpaHEnn
Tempepatya : oT 0^ do 40^ (3apka)/
BbIXoD 4,2BnoctOraHHoroToKa,200MA
PpOdoJXnTeJIbHOCTb : PpN6IIN3nTeJIbHO 5 yaco
3apRdK
YcIOBnIaTUN
XpaHEnn
Tempeatypa : oT 0^ do 40^ (3Kcnnyataza/
OT-20°C Do 60°C (xpaenne)
Pa3Mepbl : 62× 23× 90 MM
Macca :Pnp6n3nteIbHo 65r
KoHCTpykUInuTexHnueckneXapaKTepnCTnKMOyTbIbN3MeHeBb6e3 npedBaupntelbHorO yBeDOMJIeHn.

OCTOPOXHO
OTACHOCTB: NIPAKHENY
3NEIPTPKCECOMK TOMOK, HE OTPBCBAH

OCTOPXNO: BO 13E6KJAHWEI NPOAEKHJEI 9JIETKPIHNECKIM TOKOM HE CHIMAIPE KFBkUKN (IV) ADJHIOO PAHEB). BHTNPU TOOTOKAMEF HET TEJANTER, HNYKDAIOUIXXCA B VAUEIM OC6YJHKBIAHUM. BO DEPTE TEXHAECOE 06CJYKBIAHIME BbCOKOCKBtIHΦMILOPBAOHOMCYCEPBCHOMYIEPTEOCHAUY OLYMPS.


ONACHO
BocnDIOHNTbIyIhN 3A,3KIOHOHN B TPEOHTbIKH,063HOaETB aCpOBDIOHTbIKHOONQOKMHTAAIN BAKHBHe NcHtPcYKNO NO KcHNPATAUINx yXOdy.

OCTOPOXHO
HbeNoIhNEHHepe kpeMeHauaui, 063haeHbHx 3Tm CMMBOJOM, npn HcNfB.38aBHAnD hAHOrIOEIAHMO NpMIEBVCNT K cepE3bH TBPAMM I mCpeTbHMOHYCXOJD.

TIPEJUYIPEXKDEHME
dAHHOrO h3deJIy MoKET npIbEcTn K TpaBmAM nJN CMePTeHOMy HCxOy.
HBeIIOHNHENEpeKOMHeaDau,063OHeHEnBHX 3TM CMMBOLOM, npi HcNOJbOBAHNHO daHHO I3dEIMoKOpNt PnBHeCTn KTPaBMAM N3KOk CTENEH T JXeKCTN, NOBpExDeHHIO o6OpDyOBAHIN INI NTope CEHbIX daHbIX.
ONACHO!
BOI3EKAHHE BO3FOPAHIN IINI NOPAXEHNIA 3NEKTPMNECKMN TOKOM, HN B KOEM CNTYUAE HE PA3BMPAIRE N3DEINE, HE NOBSEPRAIE N3DEINE BO3DEJECTBMIO BO3JI IN HE 9KCIPIYATPNYITE ETO INI BICOKOI BAAHXOCTN OKPYKAIOLE CPEDI.
Osshne MEPbI npedocTopoxHoctn
IpouHTaTe Bce NnCTpyKunm —pepe nCNoJIb3OBAHMe m3deJIN pyKOBOdCTBaN DOKYMHeTAUIO DnA DaJIbHeIeO IcNOJIb3OBAHn.
OuHCTKaIpeed OuyHCTKoI Ob3aTeBnHOOTcoEINHnIe NTdEIne OTJeKTPocTeIN. IIOYOHCTKMOXHO NcIOb3OBaTb TOnBKO BnAXHyIOTKaHb. HeNb3a NcIOb3OBaTb DIA OUYCHKm KJNDKe INa a3pO30NbHbIE OMHUaIOUne CpeDCTBa, aTakke JIOb6e opraHueCckne paactBOPHTeIN.
AkceccyapbI -B cIeJX IINH O630NaChOCTn I BO N36ExaHne NOBpeKdEHHaN 3DeJIINn IcNoJIb3yIte TOnbKO Te akceccyapbI, KOtOpble peKOMeHNDoBaHbl fIpMOn Olympus.
Boda n Blara - Mepbl npedoctoopoxHocTn DJIy Bnafo3aunTHbIX N3deJIN ONICAHbI B pa3delaX 03aunTe OT BlaRi.
Pa3meHne-HaJexHo yctahabnBaIte H3deJIne Ha 1tATNB,CTOky nIb6peKeT,UTo6bI u36ekaT nobpeXdEHHN3deJIIN.
NCTOCHNI NITAHNAI -IOKNUOaHTe DaHHoe N3dJIne TOJbKO K TeM NCTOCHIKAM NITAHNAI, KOTOPbIE YKa3aHbI Ha N3dJIIN.
IocToPOHHne npEdMeTbI -Bo n36eXaHne TpaBM 3aPpeUeHO BCTabJIaTB Bn3dJIne MeTaJIInuYeCKne npEdMeTbI.
Tenno—HeIb3a IcNoIb3ObaTb INI XpaHnTb DaHnOe I3dEne PraDM C TaKIMN NCTOUYHKAMN TENPa KAK OTOnIteNbIhBe 6BaTapeN, TEnIOBbe 3acOnHKn, Neu IJIbOoe ObopyoDaBaHne INIyCtpoiCTBa, BbldeJeIooJee TeNIIo, B.T.Y. yCINITeN CTpeocicTeM.

OCTOPOXHO
HeJIb3Я NOJIb3OBAtBcSa FOToKaMepoR pAOM C TROPUChIMN HJI B3pbIBOONaCHbIMn Ra3aMn.
He nCnoJb3yIte BCnblkky n LED npn CbeMke IIOdei (MnaJeHcE B, MaJIeHbKnx DeTei n T.D.) c 6bn3KOro pacCTOraHHia.
- Пи сьемke CO BCblshkoш PACNoIarate foTOkamepy He 6JIne 1 M OT ueNoBcecknx liu. Cpa6aTbBAHne BCblshkn prdOM c rna3amN ueNoBeKa MoXet npVBectN K BpeMeHHoI NTepe 3peHnI.
He daBaIte foToKamepy deTm mMaJeHcAm.
Bcerda nCnOJIb3yIte I xpaHInTe foTOKaMepy BHe npedeJIOB IOcraeMoCTI DЯ MaJIeHbKIN DeTe N MnaJeHcEe BO n36ExaHne CLeNyUoXn CITyaU, B KOTOpbIX OHI MOrT NOnyUHTb CpeBcE3HbIe TpaBMbl:
- Pe6eHOK MOKeT 3aNyTaTbC8 B peMeUke FOToKoMepbI, YTO pINBeTe K ydyuSeHnIO.
- Pe6eHOK MOKET CnyaHIO nporIOTnTb aKKyMylrTOp, KapTbI namrTn NJI npyrne MeJkne Detaln.
- Pe6eHok MOKeT OcJIeNITb BCNbIiKo Ce6a IJIn Dpyrnx DeTei.
- Pe6eHok MOKeT NOnyUHTb TpaBMy OT DnBxUxxCa DeTaNei FOToKamepbl.
He cmoTpnte Ha coJIHcE nJIn yapKne JAmNbI, IcNoJIb3yA foToKaMepy.
HeJIb3x xpaHnTb foTOkAmepy B nbIbHbIX nII INBnaXhblX nOMEueHnX.
He hakpbBaIte pyKoB BCbIuKy BO BpeM ee cpaTaBHaHna.

PNEyPPEKDEHNE
HemeIeHHo npeKpaTHe uCNoJIb3OBAHne foTOkAmepbl npnIOaBJeHHn Heo6bIyHoro 3anaxa, UyMa nn Dbima.
-
He tvora'te akkymnyTop roIbIMn pykamN - Bby moxete o6xeycsra.
He depknte foToKamepy BnaXhbIMn pyKaMn.
He octabnIte fotoKamepy B MecTx, rKe OHa MoKet NOBeprHyTbCBy BO3DeiCTBnIO OueHb BBICOKNX TEMpepaTyp. -
3TO MOKET npINBECTN K yxUdSeHnIO xapaKTepNCtNK ee 3JeMeHTOB, a, B He KToTOPbIX CnyaJX, QOTOKAMEpa MOKET 3arOpETbcr. He HApKpbIaJIte (HanPIMeP, OeJAmO) 3apRdHoe yCTPOIcTB O BvPem INCOnIb30BaHnI. 3TO MOKET npINBECTN K nepeIpeByu n NOKApY.
Bo n36exaHne Hn3KoTeMnepaTyphblx OXorOB, o6paauTecb c foToKaMePoO octOpoxHo.
-
PockoIbky foToKamepa coOpEKPIT MeTaNIIueckne DeTALIN, ee nepepeB MoXeT npInBeCTN K Hn3KOTemNepaTyPbIM OXOrAM. PpIMMITE BO BHNMaHHe CLeDyUOe:
-
PnnpoDOnKInTeHbHom nCIOJIb3OBAHmФOTOKaMepa HarpeBaetc.ДержаФOTOKaMepy B 3TOM COCTOAHM,MOXHO NOJUYHTb HN3KOTemNepaTyphbl OXKOr.
- Пикайн demургдддддддддддддддддддддддддддддддддддддддддддддддддддддддддддддддддддддддддддддддддддддддддддддддддддд徳 МOTKET OXnAITbC Do TmepaTpyI HnKe OKypaIooIe. Пин demургсd d d d d d d d d d d d d d d d d d d d d d d d d d d d d d d d d d d d d d d d d d d d d d d d d d d d d d d d d d d d d d d d d d d d d d d d d d d d d d d d d d d d d d d d d d d d d d d d d d d d d
CJIeIte 3a peMeUKOM.
C.SeIeNt3apeMeLlKOM,HaKOTOpOMBUCNTΦOTOKAmepa. OHMOXETJIeKO 3aueHnTb3a4PNIuHbIe BbICTyNAIOUne PpeDMTeb I CTaTb PnPHHOI CepE3HOITpABMbI.
Mepblpeoctopoxhocn npn nCnoJIb3OBAHm ankkymyIaTopa
Bo n36exaHne npoteckn, neperpeBa, Bo3ropaHna IIN B3pbIba aKkymyIaTopa, npaoKeHHa 3JeKtpnueCKM TOKOM IIN npuHHeHHa OXOROB npre eoNCnoB3OBAHH, cNeDyTe HnKeYka3aHHbIM BaXhblm IHCTpyKUmaR.

ONACHO
B 308 foTOKAMpe nCIOJIb3yETcH IOHHO-JIITNeBbI aKKMyJrTOp fnpMbI Olympus. 3apKaJTe aKKMyJrTOp C NOMOJIbY yka3aHHOro 3apdHoro yCTpoiCTBa. HeJIb3raNcONJIb3OBaTB dpyrHe 3apdHbIe yCTpoiCTBa.
- Henb3a HarpeBaTb aKKyMylrTopb IIN 6pOcaTb IN B OROHb.
-Пи ИСЮЛБЗOBАнИ ИП XРАЕНИ AKKUMYЛТОВ СLEДNTE,ЧTOБы OHI He KACANCSbMeTAPINUeCKNX ПпEDМETOB TINа КБЕМРьХИУКРASHEHIN,БулавOK,3aCTeXeK IN T.I.
- Henb3x xpaHnTb akkymyIaTObpb I MecTx, rIe OHN MOrTy NIOBepraTbCBAO3JeCTBnIO npRbMIX COINHeHbIx JUYe, BbICOKNX TEMpePaTb PABTomO6bnJX, pRdOM C NCTOCHKAMN TENNa I T.I.
Bo n36bexaHne npoteckn akkyMnyIaTOPOB uNIN NOBpeXeHn Ix BbIOBO,CKpyuJe3HO cNeDuYTe NHCTpyKUmN IO kCkPnYatauNn akkyMnyIaTOPOB.He nbTaitecb pa36bnpaTb akkyMnyIaTOpbl NIN DOpabTaBtBAtbIX C NOMOUsbNo naKn IN T.I.
- EcniKnDkocb n3 akkymyIaTopa nonana B rna3a, HemeIeHNO npOMoTe rna3a YncTo, XOJIOHOI npOTouHNO BOIo N cpoHNo 6paTITecb K bpaHy.
XpaHnTe aKKymyIaTOpbI BHe npeJeIOB DocraeMoCTn MaJIeHbKnx DeTei. Ecnnpe6eHOK cIpyaHNO pOgrIOTn aKKymyIaTOp, cpoUHO oBpaTntecb K bpaCy.

OCTOPOXHO
-ПоctогнhoДержnteakKуМЛТОрblcCyHIMN.
- Boизбекане потуки,перрева,БоЗгораняи ИлиВь�Ba,ИСПОЛьзуITEToьКO
akkymnyTOp,peKOMeHДOBaHbIДЯИСПОЛьЗOBaHЯСДанHBIMИЗDEJIINEM.
BCTabIyIe akKymyIaTOp octopoxH0, kak OnncaHo B INHCTpyKzIu nIO 3KcNlyaTaIu.
- Ecni akkyMnyIopbI He 3apjkaIoTcB TeueHne yka3aHHoro BpeMeH, npeKpaTIte 3apJdKy, H He IcNoJIb3yIte IX.
- He nCloNoJIb3yIte aKKyMylJTop, eCIn OH TpeChyI nn CLOMaH.
- EcINI BO BVPEMRAICNIOJIb3OBAHNA AKKUMyJITOP IPOTEK, NOTepraI HOpMaJIbHyO OKpacky, DeΦopMnIPOBaICR NII INPNO6peI dpyrHe aHOpMaJIbHbIe OC06EHHOCTN, PpekPaTInE NCIOJIb3OBAtB φOTOKaMEpy.
- Ecπi Jxικοκθb, BbiteKuaIa I3 aKKyMyJtApO, nonaHa OeXdy nII Koxy, HemeIeHNO ChIMITE 3aqr3HeHHyOeXdy nI pOMoIte NopaxeHbI yUactOK uCTO, XoJIoHNo npToUHO BOIO. Ecπi OT xικοKTn Ha Koxe octanc oXoR, cpoHNo o6paTntecb K BpaCy.
- He noDBeprainTe akKymyIaTOpbI BO3dEiCTBnO yIapOB IIN IpoDoJnxITeJIbHO Bn6paIIM.

PNEpyPPEXDEHNE
-Пелед установков akkyмларopa BHIMATEьн OCMOTРTE erо на Налочпор teчek,ИЗмehен� Okpackи,Дeфорmaци ИпдугхаHopmaJIbHbIX пизнakOB.
Bo Bpem npoJOnKInTeJIbHOrO nCnIb3OBaHnA aKKyMylrTop MoKeT HarpeTcR. Bo n36eXaHHe OxorOB He BbIHMaIte erO n3ΦOTOKaMebpI cpa3y Je.
-Перед Дпinteльныхханенem Фотokамерь обязатelho n3BnKeNTe n3 Hee aKKyMЛЯТOP.
ПользователмВЕрone

3нak“CE"уka3bIbaeT,чTO 3OT npOdyKT COOTBeTCTByET EBponeiCKM Tpe6oBaHnI M no 6e3ONaChOCTn,oxpaHe 3dOpOBbY,3K0JIOnUYeCKOJ 6e3ONaChOCTn n 6e3ONaChOCTn nolb3OBaTeJI.ФOTOkAmepbl co 3HaKOM“CE" npedna3NaueHbI dI pynpaJxN B Ebpone.

3TOT cMMBON [nepeepkHyta MycOpna ypha WEEHa KaKonecax, npInIOxHHe IV] 603Naaet pa3dJIbHbI C6op 3JeKTPnuecknx I 3NeKTPOHHbIX OTOXoOB B Pocnn.
IpoKanyiSta, He BbIbpaBcIbAitne N3dEnnBa 6bITOBoM MyCOPONpBOoD. IcNoJIb3yIte CNTeMbI BO3BpATA n C6Opa (ecnTakOBbIe IMeIOTC) dIpy yTNIJ3aUIN OTXODOB BblIeYka3aHHbIX TINOB.
IcnoJIb3yIte ToJIbKO cneunalHbIy aKKymJITop I 3apJdHOe yCTpOHTBO
Mbl HactoTeIbHO peKOMeHdyem IcNIOb3ObaTb TOnbKO oprInHaJIbHbI aKKMyJITOp n 3apraHoe yctpoCTBO Olympus c daHNo foTOkAmepoN.
IcnoIb3ObaHnne HeOpinHaJIbHOrO aKKyMylraTopa n/nn 3apJdHOro yCTpoiCTBa MoKET npBecTeN KOnxpay IInn NOnyuEHnIO TpABm NO pPruHHeYteuK, HArpeBa, BO3rOpAHnI INn NOpeXeJeHnAaKMyIaTopa. Olympus He HeceT HnKaKo OTBeTCTBeHHocTn 3a HeCacThBle CnyaH INn NOpeXeJeHnK, KOToPbE MOrYT B03HKnHyTb B pe3yJbTaTe NCNoIb3OBAHnAaKkyMylraTopa n/Inn 3apJdHOro yCTpoiCTBa, KOToPbE He RaJIyOTcOpITnHaJIbHbIMN akCeccyapamn Olympus.
Toprobie MapK
- IBMЯльета зaperисторованно Торгов Марков International Business Machines Corporation.
- Microsoft Windows KBJIOCT3apeRnCTpnpOBaHHbIMN TopROBbIMN MapKaMn Microsoft Corporation.
- Macintosh yBnAeTcT toproBoI MapKoI Apple Inc.
- xD-Picture Card™ Альперета Торовский Марков.
- OctaIbHbIe Ha3BaHnI KOMnAHH I nIPOyKTOB YBJIYOTc TOPROBbIMI MapKaMn I/IIIN 3apeNCTpnpOBaHHbIMI TOPROBbIMI MapKaMn COOTBeTCTByIOx IN BJaJeNbUeB.
B NaCTOJIeI INHCTpyKcIIN PpINrAITbI CTAHdApTbI PaJIOBbIX CnCTEm foToKamep "Design Rule for Camera File System/DCF", yCTaHOBJIeHHbIe Japan Electronics and Information Technology Industries Association (JEITA).
YcnoBra rapaHTn
-
EcnB INIeINbENOBHApKByBaTeC HEnCnPaBHOCTB T BHeTHeM DByEETOT DaTbI NOKyNk, PnY CLOBIM, YTO OHO IcNOIb3OaBOIcB KopkeTHO (B COOTBCTBIM C neAHTbIM pyKyoBOdCTBOM IN dpyTmIM YkaaAHmIM NO 3KcIpyaTu, pInpnaeMaBIMK INeHIO), BoIIO KyNtNeoY BAtOPBoAHORO DcTn6bToTOpA Olympus HA terPoppTropu DeTeIbHOCTOn Olympus Imaging Europa GmbH corNacho INfOpMaun, NyblNKyEmoH N aCaJIte http://www.olympus.com, OHO bDetaT no peSeHIO Olympus 6CeNtAnHO TOpeMOHTnPoBAHO NmI ZAMHeNO. JIa NpOvNeHcyUgny No daHINr rapaHTNn BlaDeneu DOJIoHN PeBbRbITN IaNEme N dAnhblrpaHTNIbCepTNFikat DmNepy, y KOTOPOr IOIeNMe 6blIO KyIeNo, INI B IJIooB cEpBNCbI CEHTP Olympus Ha TepprTOPI mDeTEbHOCTOn Olympus Imaging Europe GmbH corNaHO hOpMaPouMn, NyblNKyEmoH N aCaJIte http://www.olympus.com Do OKOHuaHry DByXNetHErO rapaHTNIHO cPoka. B TceHneC spOka DeCTBIA MOnETH NcONHETN BcEMPHoR papHTN BlaDeneU mIEe npABo PpeBbRbITN IaNEme N IJIooB cEpBNCbI CEHTP Olympus. ObpaTnte BHMAHHe, YTO cEPBNCbI He CEHTPbOLy OPOsT OIKbPTbI He BO cEe CTpaHax.
-
TpAchnopTPOBky u3dEINb A CEBNCHy CEHTR INK NcHepy OYUMP BnAeNEu OCUyecTeBnREt CAMOCTORTBHo, Hecce Bc 3TmH pACxODbI y nPCKn.
- B nepeHCNEHbIX NHXe CNYAa HDAHn RApaTHN He DeIeCTBY, nBnaLEeJIOn OANBaIBeT peMOHT 3a CBW cHT, dAxe eCNH pEOMHT IPOBEDeH NOCTHECHYN YkA3AHHO RbUIE RapaHTNIHO rCPOKA.
(a) HenncpabHOCTb 3-3a HnepabNBOHOro hOncNoB3OBAHHa (HannpMeR, dEeCTbHa, yomNHYOTORY B ykaAahAAIO NO kCcnPnyatauON aDpyrns pazdienax pykoBOOCTBa T. n.).
(B) HenciPraBbOCTb B p3yIeTBApe MOnH, MoDfNkauM, UChTmK dpyRtBcTBA, npO3BeENbHx C n3dEEMe Kem-Jn6o, kPoMe Olympus u ABOTIOBbAusbC eepBCINbXu cUENTPOb Olympus.
(c) HenncpaBnOCTb IINN NOBpExdHeNe BCNECTBne TpaHcnpoTnpOBKn, naDeHnA, ydaP a N. d. noce npNo6pBeTeNIA u3NdEYn.
(D) HennpBnABHOCTbI IVNOBPExDNHEc BCNEBCTDn NOxapca, 3EMNPTERCEHNH, HABONHEHNH, yparAHNA INyTRHX CTXINHbIXbECTDnT, AqrPHRENQ OKXPAKOUeS cpebl in nepePADAN BAPRHEKNB B ETEKTOPCEN.
(e) HenncpaBHOCTb B peshyIbTaTe He6peXHOrO IIN HnepaBInbHOrO XpaHeHnra (HAnpIMep, B yCObOBx IN BICOKOM TeMpePAtypo IIN BnAekHoCTN, BOIN3 peENPEHIOB HaceKOBMy, TAKIX KAK NaTaNHH, OANCbHx PnpapAOB IN T. n.), HnepaBInbHOrO YxoDA IN T. d.
(f) HencpabHoctb B pe3yltate HcToeHn 3apya 3JeMeHTOB nITaHn.
(g) HenncnpabHoctb n3-3a nonaHaHb BOBHytpb Kopnyca n3dJIyne necka, rpr3n n T. n.
(h) OTCyTCTBnE daHOro rapaHTnHOrO cepTnФkata npn ppebYBaHeHH n3JeNna IJpeMOHTa.
(i) BHeCENHe M3MeHEnB R aBaHTNtHbB CEPTnФKAT OTOHcTeHbRO rOgA, MeCtua NnIaDtbl KOKyTN, IMeHN bNaDeFbUca, HaBaHaN DiNEpa IuN cepDNHOrO HOpema.
TcTCTBnO kDyMHTa, nTbEPRXdaoUe foKt NOKyni, npN ppeBbENHn daHHoro rapAHTHNORo cePTNDKATA.
4.Даннага rapantna pacnpocraetaCerTToIbkoHa cAmo IaIedine; rapaHTHe Na paeopocratapeTcHa aKceccyapbI, HApHIMeP, YeXON, PemEshOk, 3aAHTHyPo KblxBuObSeKtBHa and NEmeHTb NITAHnA.
5. O63aTeIbCTBa Olympus no DaHHOI rapaHTmOr gPAMnHBAOTcR NCKIOHTeINbHO pEMOHOM n 3aMeHOH N3dEINr.NckIOHaeTc KAKAR-NJ0BETCTBEHOCHTb 3a pRMBsN INKOCBEHNbYbBTKn I NOBPEKDeHNr, NoNECHeHBe BnAbeIDem 13-3a HEICNPABHOCTN uN3dEHNr, B aCTHOCTN, 3a y6bIbTKn I NOBPEKDeHMe KAKX-NJbOo OBekTHOB, FOtONEHOK INpyTORO oBOpyDobAHnI aKCECCyApOB, INCPOb3yeMbX C n3dEINmE, a TAOKe YbBTKn I NOBPEKDeHNr 13-3a ZadepKKn peMOTHThbX paObTn UYteRn KaKoi-NJbO hNΦopMaUIn. DaHHbI pyHKT He oPAMnHBAe nNOLOKHeH NdeCTBYuOeero zakoHOdaTEbCTBa.
PpimMeaHnno nCNoJb3ObaHnIO rapaHTmN
1.Даннaja rapан'tя DeiIeBtIbHaToIbKO b CNYae KORpeKTHOrO 3anOpHeHnra rapaHTmHOrO ceTpNФkata Olympus nI aBtopnOzBaHbIM dInepoM, INI b Cnyae HaHnHnApyrJxDokymeTob, cOdEpxaXH DoCTaOHTHbIe DaHbIe. B rapaHTmHOM cepTnФkate DOnKHO bItb Yka3aHo BAue IMR, HaBaHne IDaNepa, ceprihNbHomeP, rOD, MeCru N data NOKynIK. B pOTNBHM cNoyae K Hemy doJIoJen HpnIpaTaBc oprInnHaL Cheta-fakTybI INI TObApHOrO yeka (c Yka3aHnEM HaBaHnI DaNepa, daIb TOKynIK N tna IaNEnDy). Olympus mEe I npBa OTKa3aTb B 6BeCNlATHom cepRbICHOM 06CnyXbAHnI, eCNI raapaHTmHbI cepTnФkAT HeBepHO 3anOpHeN, K Hemy He npIpaIaraeTc ONIO IH bYkeYaKa3HHx DOKymeTOB INI eCNI npedctabHeHHaN HnFpOmauRA JRAJIeTcN HenoIIHO INI hEOCTOBEPHO.
European Technical Customer Support:
Please visit our homepage http://www.olympus-europa.com
or call our TOLL FREE NUMBER*: 00800 - 67 10 83 00
for Austria, Belgium, Denmark, Finland, France, Germany, Italy, Luxemburg, Netherlands, Norway, Portugal, Spain, Sweden, Switzerland, United Kingdom
- Please note some (mobile) phone services providers do not permit access or request an additional prefix to +800 numbers.
For all European Countries not listed and in case that you can't get connected
to the above mentioned number, please make use of the following
CHARGED NUMBERS: +49 180 5 - 67 10 83 or +49 40 - 237 73 4899
Our Technical Customer Support is available from 9 am to 6 pm MET (Monday to Friday)
Authorized Distributors
Austria: Olympus Austria GmbH
Shuttleworthstr. 25, A-1210 Wien
Tel: (01)-291 01-0
Belgium: Olympus Belgium N.V.
Luxemburg: Boomsesteenweg 77
2630 Aartselaar Tel: +32 3 870 58 00
Canary Is.: K.R.H.K. MAYA S.A.
Edificio Tirsons, EI Cebadal
Calle Arequipa, 8
35008 Las Palmas de Gran Canaria
Tel: (34) 928 30 41 00
K.R.H.K. MAYA S.A.
France: Olympus France Centre Technique
Spain: OLYMPUS ESPANA S.A.
Caidos de la Division Azul, 12
28016-Madrid Tel: +34 902 444 104
United Kingdom: Olympus Service Department
/Fire P.O.Box 222
Southall, Middlesex, UB2 4SH
Tel: (0207) 2530513
www.olympus.co.uk
Algeria: Eurl KADD
Le Telemly Alger, 146 Bd Krim.
Belkacem, Alger
Tel: 00 213 21 74 60 00
Egypt: Optoscient M.Nagui & Co
- 26th July St., Cairo
Tel: +20 2391 4883
Kenya: Jacky's Kenya I
box 459777, 5th floor
Laxcon house, Nairobi
Tel: 254 20 3747222
Morocco: Latco
183-187 Bd Ziraoui, Casablanca
Tel: +212 22 206245/46
South Africa: JEL Distribution South Africa (Pty) Ltd
Limbro Office Park 14 Voyager Street,
Linbro Office Park, Marlboro, Sandton
Johannesburg
Tel: +27 11 372 4000
Fax: +27 11 608 3039
E-mail: henfre.nel@jelcorp.com
www.olympus.co.za