
VT-1455 BK - Blender Vitek - Free user manual and instructions
Find the device manual for free VT-1455 BK Vitek in PDF.


| Product Type | Hand Blender Set |
| Model | VT-1455 BK |
| Brand | Vitek |
| Power Supply | 220-240 V ~ 50/60 Hz |
| Maximum Power Consumption | 950 W |
| Speed Control | Variable (knob) + Turbo mode |
| Continuous Operation Time (Blender/Whisk/Grating/Slicing) | 1 minute max |
| Continuous Operation Time (Chopper Knives) | 30 seconds max |
| Minimum Break Between Cycles | 3 minutes |
| Attachments Included | Blender, whisk, 2 chopping knives, grating disc, slicing disc, disc holder |
| Bowls Included | Measuring cup (0.5 L approx.), chopper bowl (1 L approx.), large bowl (1.5 L approx.) |
| Additional Accessories | 2 geared lids, pusher, protective cover, whisk gear |
| Cleaning Method (Motor Unit) | Wipe with damp cloth; do not immerse |
| Cleaning Method (Attachments and Bowls) | Wash in warm water with mild detergent; not dishwasher safe |
| Storage | Dry, cool place, out of reach of children |
| Cord Management | Do not wind cord around motor unit |
| Safety Features | Release buttons, sharp blade warnings, RCD recommended |
| Intended Use | Chopping, mixing, beating, grating, slicing |
Frequently Asked Questions - VT-1455 BK Vitek
User questions about VT-1455 BK Vitek
0 question about this device. Answer the ones you know or ask your own.
Ask a new question about this device
Download the instructions for your Blender in PDF format for free! Find your manual VT-1455 BK - Vitek and take your electronic device back in hand. On this page are published all the documents necessary for the use of your device. VT-1455 BK by Vitek.
USER MANUAL VT-1455 BK Vitek
flowchart
graph TD
    A["Hand mixer with whisk"] --> B["Brusher with brush"]
    B --> C["Arrow to brush in panel 2"]
    D["Brusher with brush"] --> E["Arrow to brush in panel 3"]
    E --> F["Arrow to brush in panel 4"]
    style A fill:#f9f,stroke:#333
    style D fill:#f9f,stroke:#333
    style B fill:#ccf,stroke:#333
    style E fill:#ccf,stroke:#333
    style F fill:#ccf,stroke:#333
ENGLISH
HAND BLENDER SET
Blender set is intended for chopping products, mixing or beating them.
DESCRIPTION
- Attachment rotation speed control knob with operation indicator
- ON button
- Turbo mode button «T»
- Motor unit
- Release buttons
- Blender attachment
- Whisk gear
- Whisk for beating/mixing of liquid products
- Measuring cup
- Chopper geared lid
- Chopping knife
- Chopper bowl
- Pusher
- Bowl (18) geared lid
- Feeding chute
- Chopping knife with protective cover
- Geared lid (14) release button
- Bowl
- Grating attachment
- Slicing attachment
- Grating/slicing disc holder
Attention!
For additional protection it is reasonable to install a residual current device (RCD) with nominal operation current not exceeding 30 mA. To install RCD contact a specialist.
SAFETY MEASURES
Before using the unit, read these instructions carefully. Keep these instructions for future reference.
Use the unit according to its intended purpose only, as it is stated in this user manual. Mishandling the unit can lead to its breakage and cause harm to the user or damage to his/her property.
Before connecting the unit to the mains, make sure that your home mains voltage corresponds to the voltage specified on unit body.
- The blender set allows quick and effective operation, but continuous operation time should not exceed 1 minute while using blender attachment, whisk, slicing attachment and grating attachment and 30 seconds while using chopping knives. Make at least a 3-minute break between operation cycles.
- Do not switch the unit on without food. Before using the blender attachment, cool down hot products, temperature of products should not exceed 70°C.
- Do not place the measuring cup and bowls into a microwave oven.
• Do not use the unit outdoors. - Do not use the accessories not belonging to the supplied set.
-
Before using the unit for the first time wash all the removable parts that will contact products thoroughly.
-
Before using the unit, make sure that all parts are installed properly.
• Use the unit on a flat stable surface. - Products should be put into the bowls before switching the unit on.
- Do not overfill the chopper bowl with products and watch the level of poured liquids.
- The cutting blades of chopping knives, blender attachment and slicing attachment are very sharp and dangerous. Handle these attachments very carefully!
- If rotation of the chopping knives and attachments is hindered, unplug the unit and carefully remove products that prevent blade rotation.
- Remove products and pour out liquids from the chopper bowls only after complete stop of the knives.
- Do not touch the rotating parts of the unit. Keep hair or clothes edges away from the blender blades rotating zone.
• Never leave the operating unit unattended.
• Always unplug the unit before cleaning, the unit should be unplugged also when you do not use it. - Do not use the unit near hot surfaces (such as gas or electric stove, oven).
- Provide that the power cord does not touch sharp edges and hot surfaces.
• Do not pull the power cord and do not twist it. - Do not touch the motor unit body, the power cord and plug with wet hands.
• Do not use the unit if the power cord is damaged. - Do not try to repair the unit by yourself. If there are any damages of the unit, apply to an authorized service center.
- To avoid risk of electric shock or fire, do not immerse the unit into water or any other liquids.
• If the unit was dropped into water:
— do not touch the water;
— unplug the unit immediately, only after that you may take the unit out of water;
— apply to an authorized service center for testing and repairing the blender.
• Do not allow children to use the unit as a toy.
- Close supervision is necessary when children or disabled persons are near the operating unit.
- This unit is not intended for usage by children or disabled persons unless they are given all the necessary and understandable instructions by a person who is responsible for their safety on safety measures and information about danger that can be caused by improper usage of the unit.
- For children safety reasons do not leave polyethylene bags, used as a packaging, unattended.
- Attention! Do not allow children to play with polyethylene bags or packaging film. Danger of suffocation!
- Keep the unit out of reach of children.
• Do not switch the unit on without food inside.
After unit transportation or storage at low temperature it is necessary to keep it for at least two hours at room temperature before switching on.
- Unpack the blender set and remove any stickers that can prevent unit operation.
- Check the unit for damages; do not use it in case of damages.
Before using the unit wash the blender attachment (6), whisk (8), measuring cup (9), bowls (12 and 18), chopping knives (11 and 16), grating attachment (19), slicing attachment (20), disc holder (21) and pusher (13) with warm water and a neutral detergent, then rinse and dry them. - Wipe the motor unit (4), whisk gear (7) and geared lids (10 and 14) with a soft slightly damp cloth, then wipe them dry.
- Before switching the unit on make sure that your home mains voltage corresponds to unit operating voltage.
Attention!
- Do not immerse the motor unit (4), the whisk gear (7), the geared lids (10 and 14), the power cord and plug into water or any other liquids.
- Do not put the attachments and bowls in a dish-washing machine.
Selection of attachment rotation speed
- To select the attachment rotation speed press and hold the button (2) and rotate the speed control knob (1).
- To increase the attachment rotation speed turn the knob (1) clockwise, and to reduce the attachment rotation speed turn the knob (1) counterclockwise.
- For operation at the maximal rotation speed, press and hold the turbo mode "T" button (3).
Continuous operation time
The blender set allows quick and effective operation, but continuous operation time should not exceed 1 minute while using blender attachment (6), whisk (8), grating attachment (19) and slicing attachment (20) and 30 seconds while using chopping knives (11,16). Make at least a three-minute break between operation cycles.
USING THE BLENDER ATTACHMENT (6) (pic. 1).
The blender attachment (6) is used for chopping products, mixing or beating various ingredients.
WARNING: Before assembling the blender make sure that the power plug is not inserted into the socket.
- Attach the blender attachment (6) to the motor unit (4) till the release buttons (5) click.
— Insert the plug into the mains socket. The blender is ready for operation. - Immerse the blender attachment (6) into the bowl with products, that you want to chop or mix; you can use the measuring cup (9) for it.
- Press and hold the on button (2), select the required rotation speed of the blender attachment chopping knife by turning the speed control knob (1) or press and hold the turbo mode (3) "T" button.
Notes:
— Products should be put into the bowl before switching the unit on.
Before you start to chop/mix, we recommend to peel fruit and vegetables, remove inedible parts, such as stones, and cut fruit or vegetables into approximately 2x2 cm cubes.
- While using the blender attachment (6), hold the unit vertically, try not to diverge from the vertical plane (pic. 1).
- After you finish using the unit, take the power plug out of the socket and detach the blender attachment (6) by pressing the release buttons (5).
Attention!
- Do not remove the blender attachment (6) during blender operation.
- In order not to damage the blades, do not process too hard products such as cereals, rice, coffee, ice, frozen foods.
- Continuous operation time should not exceed 1 minute with subsequent 3 minutes break at least.
USING THE WHISK (8) (pic. 2).
Use the whisk (8) only to make cream, biscuit dough or mixing ready desserts.
WARNING: Before assembling the blender make sure that the power plug is not inserted into the socket.
— Insert the whisk (8) into the gear (7).
- Attach the gear (7) to the motor unit (4) till the release buttons (5) click.
— Insert the plug into the mains socket.
— Put the whisk (8) into the bowl with products.
- Press and hold the ON button (2), select the required whisk rotation speed by turning the speed control (1) or press and hold the turbo mode "T" button (3).
- After you finish using the unit, take the plug out of the socket, detach the whisks (8) from the gear (7), and detach the gear (7) from the motor unit (4) by pressing the buttons (5).
Attention!
— Do not use the whisk (8) to make tight dough.
- Products should be put into the bowl before switching the unit on.
- Continuous operation time should not exceed 1 minute with subsequent 3 minutes break at least.
USING THE CHOPPER (pic. 3).
The chopper is used to chop small amount of meat, hard cheese, onion, herbs, garlic, carrots, walnuts, almonds or fruits.
Attention! Do not use the chopper to chop very hard products, such as nutmegs, ice, coffee beans or cereals.
Before you start chopping:
- Cut meat, cheese, onion, garlic, carrots into approximately equal slices.
ENGLISH
- Remove stems of herbs, peel the nuts.
- Remove bones, veins and cartilage from meat.
Note: To achieve the best results refer to the table below.
Attention:
The blades of chopping knife (11) are very sharp! Always hold the knife only by the upper plastic end.
— Set the chopping knife (11) on the axis in the chopper bowl (12) by holding the plastic end.
- Put the foodstuffs meant for processing into the bowl (12).
- Match the ledges on the geared lid (10) with the grooves of the bowl (12) and turn the geared lid (10) clockwise until bumping.
- Insert the motor unit (4) into the geared lid (10) till the release buttons click.
- Holding the ON button (2), select the required chopping knife rotation speed by turning the speed control knob (1) or press and hold the turbo mode "T" button (3).
— Hold the motor unit (4) with one hand and hold the bowl (12) with the other hand during operation.
— Unplug the unit after you finish using it.
- To remove the motor unit (4), press the release buttons (5) and remove the motor unit (4) by pulling it upwards.
— Remove the geared lid (10) rotating it counterclockwise.
- Carefully detach the chopping knife (11) from the bowl taking it by the plastic end.
- Take the chopped products out of the chopper bowl (12).
— Right after the end of operation clean, wash and dry all the parts used during the products processing.
Attention!
- Strictly follow the described sequence of operations.
- Continuous operation time of the chopper should not exceed 30 seconds with subsequent 3 minutes break at least.
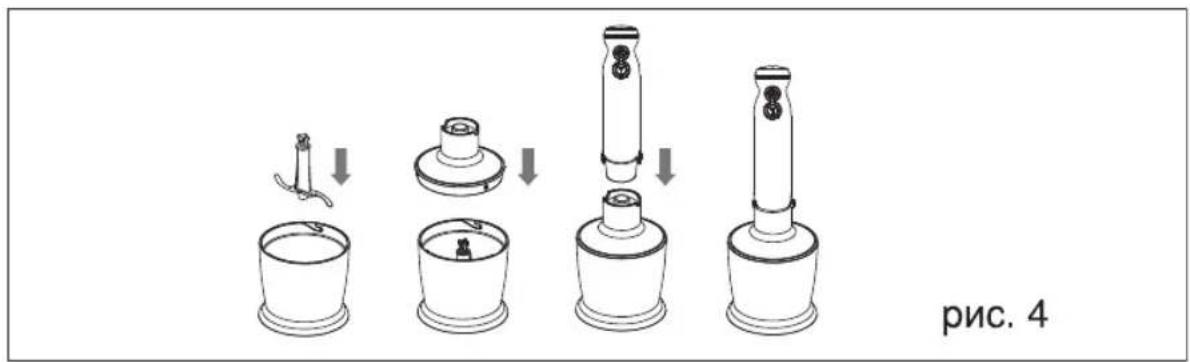
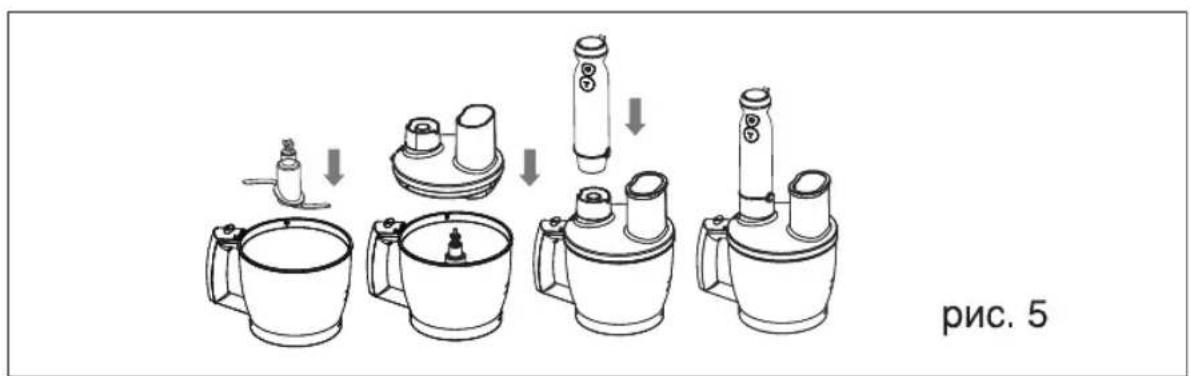
USING THE BOWL (18) (pic. 4 and pic. 5).
Grating attachment (19) and the slicing attachment (20) are intended for processing vegetables or fruits. The chopping knife (16) is used to chop meat, hard cheese, onion, herbs, garlic, carrots, walnuts, almonds or fruits. Attention!
Do not use the chopping knife (16) to chop very hard products, such as nutmegs, ice, coffee beans or cereals.
- Set the grating attachment (19) and the slicing attachment (20) into the grating/slicing disc holder (21) and provide that the attachment is fixed. Click of the attachment clamp shows that the attachments are set properly.
— Set the disc holder (21) on the axis of the bowl (18).
Note: If you use the chopping knife (16), do not forget to remove the protective cover before placing it into the bowl.
- Set the geared lid (14) on the bowl (18) so that the mark is opposite the release button (17). Turn the geared lid (14) clockwise until bumping.
— Place the motor unit (4) on the geared lid (14), click of the release buttons shows that the adjustment is done properly. - Press and hold the ON button (2), select the required attachment rotation speed by turning the speed control knob (1) or press and hold the turbo mode "T" button (3).
- Using the grating attachment (19) or the slicing attachment (20), put the food products meant for processing into the feeding chute (15) and press them gently with the pusher (13).
Attention!
During the operation use only the pusher (13) supplied with the unit; do not use any other objects for pushing, do not push the products with your hands.
- Using the chopping knife (16), put food products into the bowl (18) before switching the unit on.
— Unplug the unit after you finish using it. - To remove the motor unit (4), press the release buttons (5) and remove the motor unit (4) by pulling it upwards.
- To remove the motor unit (14), press the release button (17) and turn the geared unit (14) counterclockwise.
— Carefully take the chopping knife (16) or the disc holder (21) out of the bowl.
Attention! Be careful when removing the chopping knife (16) out of the bowl (18) and hold the chopping knife (16) only at the plastic tip.
— Take the chopped products out of the chopper bowl (18).
— To remove the attachments (19 or 20) from the disc holder (21), press the attachment clamp upwards and take the attachment off.
Be very careful: The cutting blades of the slicing attachment (20) are very sharp!
— Right after the end of operation clean, wash and dry all the parts used during the products processing.
Attention!
- Strictly follow the described sequence of operations.
- Continuous operation time with attachments (19, 20) should not exceed 1 minute, and continuous operation time with chopping knife (16) should not exceed 30 seconds. Make at least a 3-minute breaks between operation cycles.
CLEANING
ATTENTION!
The blades of the blender attachment (6), chopping knives (11, 16) and slicing attachment (20) are very sharp and dangerous. Handle these attachments very carefully!
— Unplug the unit before cleaning.
— Detach all the attachments.
ENGLISH
Food products, attachments used and approximate time of products processing
| Product type Weight | Attachment type | Operation time | |
| Meat (without fat streaks) | 250 g | Chopping knife (16) | 15 sec. |
| Herbs | 50 g | Chopping knife (11) | 10 sec. |
| Almond, nuts | 150 g | Chopping knife (11 or 16) | 15 sec. |
| Hard cheese | 100 g | Chopping knife (11) | 10 sec. |
| Onion | 200 g | Chopping knife (11 or 16) | 10 sec. |
| Fruit | 200 g | Chopping knife (11) | 10 sec. |
| Carrots | 200 g | Chopping knife (16)Grating attachment (19) or slicing attachment (20) | 15 sec. |
| Raw potatoes | 400 g | Slicing attachment (20) | 10 sec. |
| Cucumbers | 800 g | Slicing attachment (20) | 10 sec. |
| Eggs | 4 pc. | Whisk (8) | 15 sec. |
- Use a slightly damp cloth to clean the motor unit (4) and the gears (7, 10, 14), then wipe them dry.
— After processing of salty or sour products it is necessary to rinse the used attachments with water.
- While possessing products with strong dyeing properties (for instance, carrot or beetroot) the attachments and bowls can get colored, wipe the attachments and the bowls with a cloth, dampened in vegetable oil; after that wash the attachments and bowls in warm water with a neutral detergent, rinse and dry them.
- Wash the attachments (6, 8, 11, 16, 19, 20), disc holder (21), measuring cup (9), bowls (12, 18) and pusher (13) in warm water with a neutral detergent, then rinse and dry them.
— Put the chopping knife (11) into the bowl (12), and cover the knife (16) with a plastic protective cover.
DO NOT IMMERSE THE MOTOR UNIT (4) AND THE GEARS (7, 10, 14) INTO ANY LIQUIDS, DO NOT WASH THEM UNDER WATER JET OR IN A DISH-WASHING MACHINE.
STORAGE
— Clean the unit before taking it away for storage.
— Do not wind the power cord around the motor unit.
- Keep the blender set away from children in a dry cool place.
Cooking examples
Mayonnaise
Use the blender attachment (6) to make mayonnaise.
Ingredients:
200-250 ml vegetable oil
1 egg (yolk and white)
1 tablespoon of lemon juice or vinegar
Salt and pepper to your taste
Put all the ingredients into the measuring cup (9) according to the order mentioned above. Immerse the blender attachment (6) until it reaches the bottom of the cup. Switch the blender on at the maximal rotation
speed by pressing and holding the turbo mode "T" button (3), and wait till vegetable oil becomes an emulsion. Then, without switching the unit off, move the blender attachment (6) upwards and downwards slowly, until you get mayonnaise of the desired consistency.
DELIVERY SET
Motor unit - 1 pc.
Blender attachment - 1pc.
Whisk gear - 1pc.
Whisk - 1 pc.
Measuring cup - 1pc.
Chopper bowl - 2 pc.
Chopping knife - 2 pc.
Large knife protective cover - 1pc.
Attachment holder - 1 pc.
Grating attachment - 1 pc.
Slicing attachment - 1 pc.
Geared lid - 2 pc.
Pusher - 1 pc.
Instruction manual - 1 pc.
TECHNICAL SPECIFICATIONS
Power supply: 220-240 V \~ 50/60 Hz
Maximal power consumption: 950 W
The manufacturer preserves the right to change the specifications of the unit without a preliminary notification.
Unit operating life is 3 years
Guarantee
Details regarding guarantee conditions can be obtained from the dealer from whom the appliance was purchased. The bill of sale or receipt must be produced when making any claim under the terms of this guarantee.

This product conforms to the EMC-Requirements as laid down by the Council Directive 2004/108/EC and to the Low Voltage Regulation (2006/95/EC)
DEUTSCH
STABMIXER-SET
A production date of the item is indicated in the serial number on the technical data plate. A serial number is an eleven-unit number, with the first four figures indicating the production date. For example, serial number 0606xxxxxxx means that the item was manufactured in June (the sixth month) 2006.
DE
- ENGLISH
- HAND BLENDER SET
- DESCRIPTION
- Attention!
- SAFETY MEASURES
- Selection of attachment rotation speed
- Continuous operation time
- USING THE BLENDER ATTACHMENT (6) (pic. 1).
- Notes:
- USING THE CHOPPER (pic. 3).
- Before you start chopping:
- Attention:
- The blades of chopping knife (11) are very sharp! Always hold the knife only by the upper plastic end.
- USING THE BOWL (18) (pic. 4 and pic. 5).
- Do not use the chopping knife (16) to chop very hard products, such as nutmegs, ice, coffee beans or cereals.
- During the operation use only the pusher (13) supplied with the unit; do not use any other objects for pushing, do not push the products with your hands.
- Attention! Be careful when removing the chopping knife (16) out of the bowl (18) and hold the chopping knife (16) only at the plastic tip.
- Be very careful: The cutting blades of the slicing attachment (20) are very sharp!
- CLEANING
- The blades of the blender attachment (6), chopping knives (11, 16) and slicing attachment (20) are very sharp and dangerous. Handle these attachments very carefully!
- DO NOT IMMERSE THE MOTOR UNIT (4) AND THE GEARS (7, 10, 14) INTO ANY LIQUIDS, DO NOT WASH THEM UNDER WATER JET OR IN A DISH-WASHING MACHINE.
- STORAGE
- Cooking examples
- Mayonnaise
- DELIVERY SET
- TECHNICAL SPECIFICATIONS
- Unit operating life is 3 years
- Guarantee
- DEUTSCH
- STABMIXER-SET
- DE
Brand : Vitek
Model : VT-1455 BK
Category : Blender