ZMM3501B - Meat Grinder Zelmer - Free user manual and instructions
Find the device manual for free ZMM3501B Zelmer in PDF.

| Brand | Zelmer |
| Model | ZMM3501B |
| Product Type | Electric Meat Grinder (Meat Mincer) |
| Functions | Mincing, Sausage Stuffing, Shredding (grating, slicing, pureeing), Juice Extraction (tomato) |
| Minced Meat Capacity | 8.5 kg in 10 minutes (beef) |
| Continuous Operation Time | Up to 10 minutes, then cool down before restart |
| Cutting Plates Included | Fine, medium, coarse (3 discs) |
| Accessories Included | Food pusher, tray, shredder discs (grating, slicing, pureeing), juice extractor set, sausage stuffing tube, kebbe attachment |
| Safety Features | Mechanical overload protection (breakaway coupling); safety lock for disassembly |
| Housing Material | Plastic (motor housing) |
| Metal Parts | Stainless steel cutting blade, cutting plates, feed screw |
| Dishwasher Safe Parts | Plastic parts only; metal parts must be hand washed |
| Cleaning | Disassemble, clean immediately after use; do not immerse motor in water; use brush for sharp parts; water temperature max 60°C |
| Warranty | 2 years (B&B TRENDS S.L.) |
| Intended Use | Domestic only; not for commercial or industrial use |
| Maximum Altitude | 2000 m above sea level |
| Compliance | EU Directive 2012/19/EU (WEEE) |
Frequently Asked Questions - ZMM3501B Zelmer
User questions about ZMM3501B Zelmer
0 question about this device. Answer the ones you know or ask your own.
Ask a new question about this device
Download the instructions for your Meat Grinder in PDF format for free! Find your manual ZMM3501B - Zelmer and take your electronic device back in hand. On this page are published all the documents necessary for the use of your device. ZMM3501B by Zelmer.
USER MANUAL ZMM3501B Zelmer
natural_image
White zelmer electrician tool with stainless steel handle and meshing (no visible text or symbols)EN USER MANUAL Meat mincer
DE BENUTZERHANDBUCH Fleischwolf
CZ NÁVOD K POUŽITÍ Mlynek na maso
RODZAJE MASZYNEK DO MIELENIA MIĘSA MARKI ZELMER
WE WOULD LIKE TO THANK YOU FOR CHOOSING ZELMER. WE WISH THE PRODUCT PERFORMS TO YOUR SATISFACTION AND PLEASURE.
TYPES OF ZELMER MEAT MINCERS
Below, you can see an assortment of equipment anticipated for meat mincers, which the user manual refers to
| MODEL MIN | CING CHAMBER | DOUBLE SIDE KNIFE | SMALL HOLE DISC | MEDIUM HOLE DISC | BIG HOLE DISCI | SAUSAGE STUFFER | SHREDDER JUICE EX-TRACTOR |
| ZMM3501B | 5+-+++- | -- | |||||
| ZMM3502B | 5+-+++big - | ||||||
| ZMM3503B | 5+-+++small + |
DESCRIPTION
- Food pusher
- Hopper plate
- Head
- Feed screw
- Cutting blade
- Cutting plate (fine)
- Fixing ring
- Cutting plate (coarse)
- Cutting plate (medium)
- Kebbe
- Sausage attachment
- Locking knob
- Motor housing
- ON/Off switch
Shredder
- Grating drum
- Slicing drum
- Pureeing drum
- Body
- Pusher
Juice extractor accessory
- Juicer screw
- Juicer chamber
- Filter
- Juicer tray
- Juicer anti splash protector
- Juicer regulator screw
SAFETY INSTRUCTIONS
If the supply cord is damaged it must be replaced by the manufacturer, its service agent or similarly qualified persons in order to avoid a hazard.
Respect the operating times of the accessories indicated
in their specific sections of the manual.
Proceed according to maintenance and cleaning section of this manual for cleaning. Warning: potential injury from misuse!
Care shall be taken when handling the sharp cutting knives and during cleaning.
Always disconnect the appliance from the supply if it is left unattended and before assembling, disassembling or cleaning.
Switch off the appliance and disconnect from supply before changing accessories or approaching parts that move in use.
This appliance shall not be used by children. Keep the appliance and its cord out of reach of children.
Appliances can be used by persons with reduced physical, sensory or mental capabilities or lack of experience and knowledge if they have been given supervision or instruction concerning use of the appliance in a safe way and if they understand the hazards involved. Children shall not play with the appliance.
The device is intended for domestic use only. It is not intended for use in applications such as:
- employee kitchens in stores, offices and other work environments
- farms
- by customers in hotels, motels and other environments residential
- bed and breakfast environments
This appliance is intended for use at a maximum altitude of 2000m above sea level.
IMPORTANT WARNINGS
This appliance is designed for home use and should never be used for commercial or industrial use under any circumstances. Any incorrect use or improper handling of the product shall render the warranty null and void.
Prior to plugging in the product, check that your mains voltage is the same as the one indicated on the product label.
The mains connection cable must not be tangled or wrapped around the product during use.
Do not use the device, or connect and disconnect to the supply mains with the hands and/or feet wet.
Do not pull on the connection cord in order to unplug it or use it as a handle Unplug the product immediately from the mains in the event of any breakdown or damage and contact
an official technical support service. In order to prevent any risk of danger, do not open the device. Only qualified technical personnel from the brand's Official technical support service may carry out repairs or procedures on the device. This appliance is designed for home use and should never be used for commercial or industrial use under any circumstances. Any incorrect use or improper handling of the product shall the warranty null and void.
Prior to plugging in the product, check that your mains is the same as the one indicated on the product label.
Check the filter every time before squeezing. Do not use the juicer any more in case of any cracks or damage, and get in touch with the nearest dealer and manufacturer.
B&B Trends S.L. disclaims all liability for damages that may occur to people, animals or objects, for the non-observance of these warnings.
INSTRUCTIONS FOR USE
Meat Grinder
The continuous operation should not exceed 10 minutes; suspend the operation in the event of exceeding 10 minutes and restart the machine after cooling down.
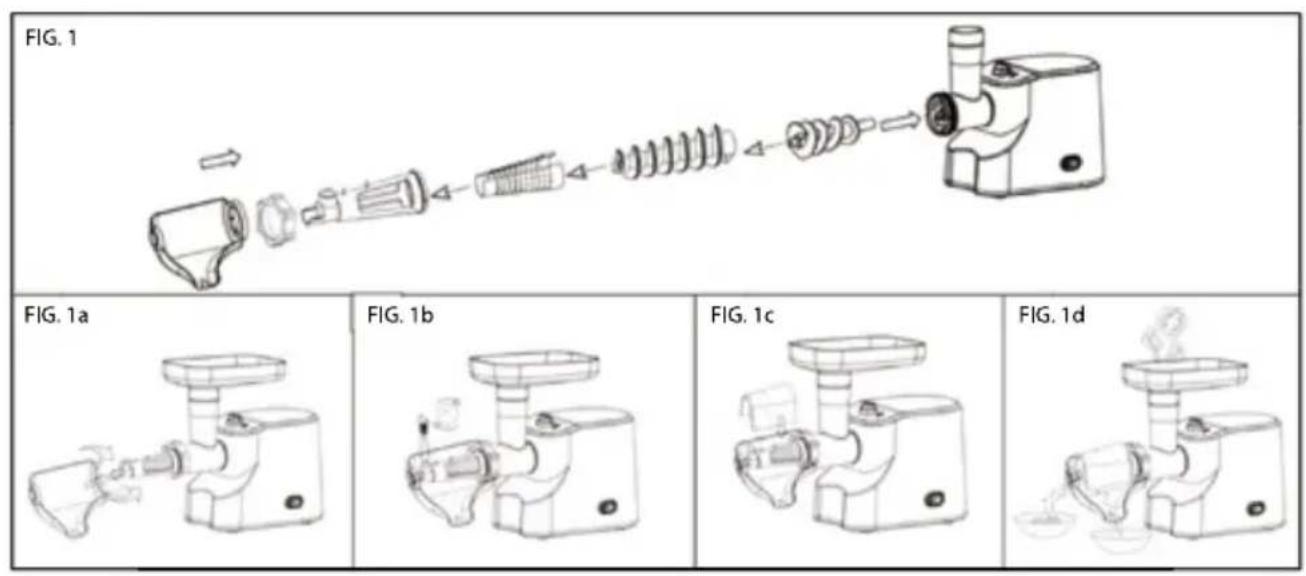
Preparing the meat mincer to work and the actuation of the appliance
Place the drive unit close to the power network socket, on a firm surface so as not to cover the ventilation holes within the casing.
Before the first use of the meat mincer, wash the equipment elements.
Assemble the appropriate equipment and join it with the drive unit.
Plug in the unit.
Turn the meat mincer on with the main switch
Operating the mincing set
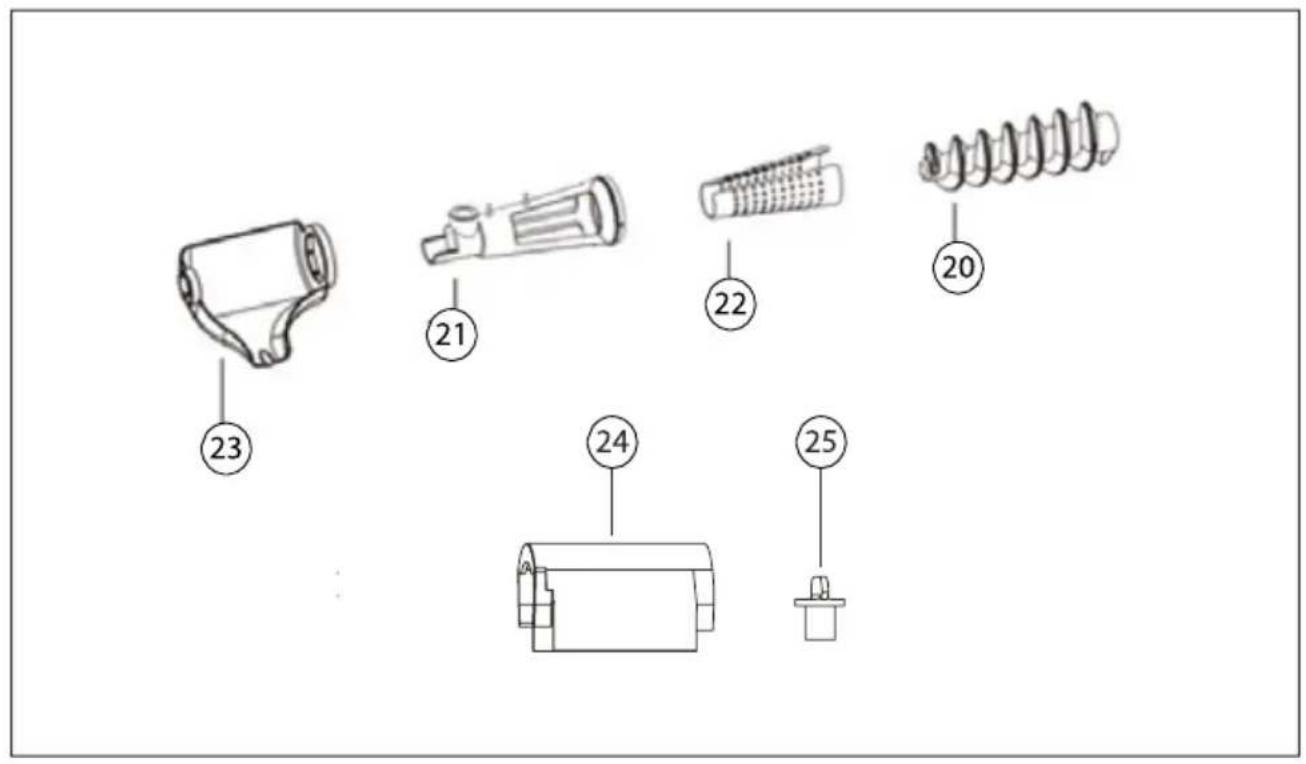
Insert the following parts into the mincer body :
Insert the scroll with the coupling facing inside. Fit the knife onto the pin of the scroll. Make sure the blade is outward (failure will be caused for incorrect placement)
Place the disc over the knife so that the protrusion in the mincer body will fit into the groove in the circumference of the disc.
Tightly fit all the elements of the mincer unit.
Fit the assembled mincer unit onto the drive unit and turn it until you hear a click of the lock. It means that the body has been properly installed.
Place the tray on the mincer chamber
NB: Use only the pusher to push products.
Operating the sausage stuffer
Insert the following parts into the mincer body: Insert the scroll with the coupling facing inside. Fit the insert onto the pin of the scroll.
Fit the sausage stuffing tube.
Tightly fit all the elements with the threaded ring. Fit the assembled mincer unit onto the drive unit and turn it until you hear a click of the lock.
Place the tray on the mincer body.
Soak the casing for about 10 minutes before fitting. Fit the wet casing on the sausage filler nozzle.
NB: Make sure not to block the ventilation openings on the nozzle.
NB2: The meant cannot be “too thin”. A large liquid content may cause its leakage to the inside of the mincer.
Shredder
The shredder is equipped with 2 or 3 discs. The first, for grating into chips (cheese, carrots, celery, roast beetroot, etc.). The second disc (slicing disc) is used for grating vegetables (potatoes, onions, cucumbers, etc.). The third cutting disc (drum disc) is used for mashing vegetables (potatoes, beetroot, etc.) and fruit.
Operating the shredder
Assemble the chamber of the shredder just as like mincing chamber.
Place the required cutting rolls on feeding tube, make sure the bottom of cutting rolls is tightly compacted to the salad tube.
Cut large products into smaller elements, which you can easily put into the mincing chamber.
Do not mash soft fruits containing stones.
When the work is finished pull the power cord out from the network supply \socket.
Remove the food remaining in the shredder chamber or on the grater with a wooden spoon.
NB: blades of the disc do not require any regeneration.
Operating the juice extractor
Please follow the picture on the way to the tomatoes accessories installed.
Insert the following parts into the mincer body:
Insert the scroll with the coupling facing inside. Fit the insert onto the pin of the scroll.
Fit the juicer screw and juicer chamber
Tightly fit all the elements with the threaded ring
Fit the assembled mincer unit onto the drive unit and turn it until you hear a click of the lock.
Place the juicer anti splash protector
Chop in tomatoes firstly. Turn on the power switch and make sure the equipment moves all right before put.
Use food pusher. Use the juicer regulator screw to regulate the release of pulp.
Mechanical safety device for the motor
The meat mincer is equipped with mechanical protection, which secures the motor against any damage – teeth of the coupling break, when the meat mincer is overloaded (f. ex. when bones have entered into the mincing chamber).
The broken coupling should be replaced with a new one:
- unscrew the coupling from the feed screw,
- remove the broken coupling
- put on the new coupling and screw it.
After the work has been finished
Turn off the unit and unplug it.
Remove the pusher and remove the food tray off the mincing chamber or the shredder chamber.
Press the safety lock and turn the mincing set or the grating chamber into right and take it off.
Take apart all the elements of the mincing set, the chamber with the sausage stuffer or the shredder.
MAINTENANCE AND CLEANING
Before cleaning, always turn off the appliance and unplug it from the power supply.
Do not immerse the appliance and power cord in water or other liquids or wash them in the dishwasher.
Prompt: it is suggested that clean the appliance immediately after use, which is easy for cleaning.
In the event of disassembling the appliance, rotate the appliance on the opposite direction of installation direction.
When disassembling all mincing chamber or body of shredder, press on the lock button 1 with one hand and screw off the mincing chamber or body of shredder with the other hand as the direction of the arrow shown in the right picture.
Please be careful for the disassembly of the appliance, so as not to scratch your fingers.
Do not use abrasives, scrubbers, acetone and alcohol to clean juicer.
Since some parts are relatively sharp, clean them with a brush, so as not to scratch fingers;
Neither immerse the motor in water, nor rinse it under the water tap. Water temperature for cleaning should not exceed 60^ C.
Only plastic parts are suitable for dishwashing machine.
It is forbidden to wash metal accessories in the dishwasher, as the aggressive cleaning agents used in these devices may discolour the metal parts and damage them.
Those parts should be rinsed under running water and dried immediately.
Table of recipes
The continuous operation should not exceed 10 minutes; suspend the operation in the event of exceeding 10 minutes and restart the machine after cooling down.
| ACCESSORY LOAD QUANTITY | NTITY TIME OF OPERATION | ||
| Mincer function Beef 8,5kg | 10 minutes | ||
| Tomato juicer Tomato 0,3kg | 1 minute | ||
| Shredder Soaked carrots | 0,5 kg | 1 minute |
PRODUCT DISPOSAL

This product complies with European Directive 2012/19/EU on electrical and electronic devices, known as WEEE (Waste Electrical and Electronic Equipment), provides the legal framework applicable in the European Union for the disposal and reuse of waste electronic and electrical devices. Do not dispose of this product in the bin, instead going to the electrical and electronic waste collection centre closest to your home.
ELIMINAREA PRODUSULUI

B&B TRENDS, S.L. guarantees compliance of this product for the use for which it is intended for a period of two years. In the case of breakdown during the term of this warranty, users are entitled to repair or else the replacement of the product at no charge if the former is unavailable, unless one of these options proves impossible to fulfill or is disproportionate. In this case, you can then opt for a reduction in price or cancellation of the sale, which must be dealt with directly with the sales vendor. This also covers replacement of spare parts provided that the product has been used according to the recommendations specified in this manual for both cases, and has not been tampered with by any third party that is not authorised by B&B TRENDS, S.L. The warranty will not cover any parts subject to wear and tear. This warranty does not affect your rights as a consumer in accordance with the provisions in Directive 1999/44/EC for member states of the European Union.
USE OF WARRANTY
Customers must contact a B&B TRENDS, S.L. authorised Technical Service for repair of the product. Since any tampering of the same by anyone not authorised by B&B TRENDS, S.L., or the careless or improper use of the same shall render this warranty null and void. The warranty must be fully completed and delivered along with the receipt or delivery docket for the effective exercise of rights under this warranty.
This warranty should be retained by the user as well as the invoice, receipt or the delivery docket to facilitate the exercise of these rights. For technical service and after-sales care outside the Polish territory, please submit your query to the point of sale where you purchased the item or check for further aftersales information at www.zelmer.com