
VN-6500PC - Voice recorder OLYMPUS - Free user manual and instructions
Find the device manual for free VN-6500PC OLYMPUS in PDF.
| Product Type | Digital voice recorder |
| Brand | OLYMPUS |
| Model | VN-6500PC |
| Dimensions | 102 x 37 x 18.8 mm |
| Weight | 64.8 g (with batteries) |
| Power supply | 2 AAA batteries (LR03) or 2 Ni-MH rechargeable batteries (optional) |
| Alkaline battery life | Approx. 37 hours |
| Internal storage capacity | 512 MB |
| Maximum recording time | Up to 221 h 30 min in LP mode |
| Recording modes | HQ, SP, LP |
| Microphone | Electret condenser microphone (mono) |
| Speaker | Round dynamic 23 mm, max output 250 mW |
| Microphone jack | 3.5 mm mono jack (impedance 2 kΩ) |
| Earphone jack | 3.5 mm mono jack (impedance 8 Ω) |
| Folders | 5 folders, up to 200 files per folder |
| Special functions | VCVA, LowCut filter, fast/slow playback, segment repeat |
| PC connectivity | USB (removable disk) |
| System compatibility | Windows 2000/XP/Vista, Mac OS X 10.2.8-10.5 |
| Audio format | WMA |
| Supplied accessories | User manual, advanced manual stored in memory |
| Optional accessories | Microphones (ME52, ME15), earphones (E20), telephone pickup (TP7), strap (ST26), charger (BU-400) |
| Care and cleaning | Soft dry cloth, no solvents |
| Safety | Follow warnings, do not disassemble, avoid shocks and humidity |
Frequently Asked Questions - VN-6500PC OLYMPUS
User questions about VN-6500PC OLYMPUS
0 question about this device. Answer the ones you know or ask your own.
Ask a new question about this device
Download the instructions for your Voice recorder in PDF format for free! Find your manual VN-6500PC - OLYMPUS and take your electronic device back in hand. On this page are published all the documents necessary for the use of your device. VN-6500PC by OLYMPUS.
USER MANUAL VN-6500PC OLYMPUS
Thank you for purchasing an Olympus Digital Voice Recorder. Please read these instructions for information about using the product correctly and safely. Keep the instructions handy for future reference. To ensure successful recordings, we recommend that you test the record function and volume before use.
Blaopadram BIV, Chea 3aKnVHtme PUNUbO HIOKoH OH AmyUPL. MoNA, pnpOTETe TEEIN HNCTPKYUMI 3a HINOPMUAOMI OTHHOO pBNHITNO EbeONACHO hNtON3BAHne AH npDyKTCA. CbXpAHReiTe INHCTPKUIMITE Ha DcTbHNO MRCTO 3a BdEeuin pCTABKs. Aa daPpAWe IcYCNHUI ZATMN, pnpOpHApBAAe Da TcBETTA NcHNBaCATA yFNkHNZ aYNeR daPpYntHyptobae.
Dekujeme vam, je 2ste si koupil digitili dinfaktom Olympus. Plied pvimn pouzit hem protosto risjcie prezote pomerovnado, uzmoi'ma vam to pouzivat protosto bezpecn' a spravneh. Noad peclveiuchovojte pro dalii pouzit. Plied pvimn pouzit hovacn' a spravneh. Noad peclveiuchovojte uozne fukrice protoastn a nastavit hlasstot, zasbjitek tak dokonolnu kahravsk.
| 3 | 1 2 3 4 |
| Time & Date | 15m15s 14m15s |
| 108 12:00AM | 15m15s 14m15s 23 ⑤ |
| 1 108 12:00AM | Remain 22h52m46s ⑥ |
| 7:25'08 330'PM | 6 |
| 15m15s 14m15s | 15m15s 14m25s ① ② |
| 8 |
| 1 |
| 2 |
| 3 |
| 4 |
| 5 |
| 6 |
| 7 |
| 8 |
| 9 |
| Remote |
| PC |
| PC |

Introduction
This manual is a basic version. Please refer to the complete advanced manual either from the stored data in the [OL_manual] folder of the recorder or download the data from the OLYMPUS website.
- The contents of this document may be changed in the future without advanced notice. Contact our Customer Support Center for the latest information relating to product names and model numbers.
- The utmost care has been taken to ensure the integrity of the contents of this document. In the unlikely event that a questionable item, error, or omission is found, please contact our Customer Support Center.
- Any liability for passive damages or damage of any kind occurred due to data loss incurred by a defect of the product, repair performed by the third party other than Olympus or an Olympus authorized service station, or any other reason is excluded.
Trademarks and registered trademarks:
Microsoft, Windows and Windows Media are registered trademarks of Microsoft Corporation.
- Macintosh is the trademark of Apple Inc.
Safe and Proper Usage
Before using your new recorder, read this manual carefully to ensure that you know how to operate it safely and correctly. Keep this manual in an easily accessible location for future reference.
The warning symbols indicate important safety related information. To protect yourself and others from personal injury or damage to property, it is essential that you always read the warnings and information provided.
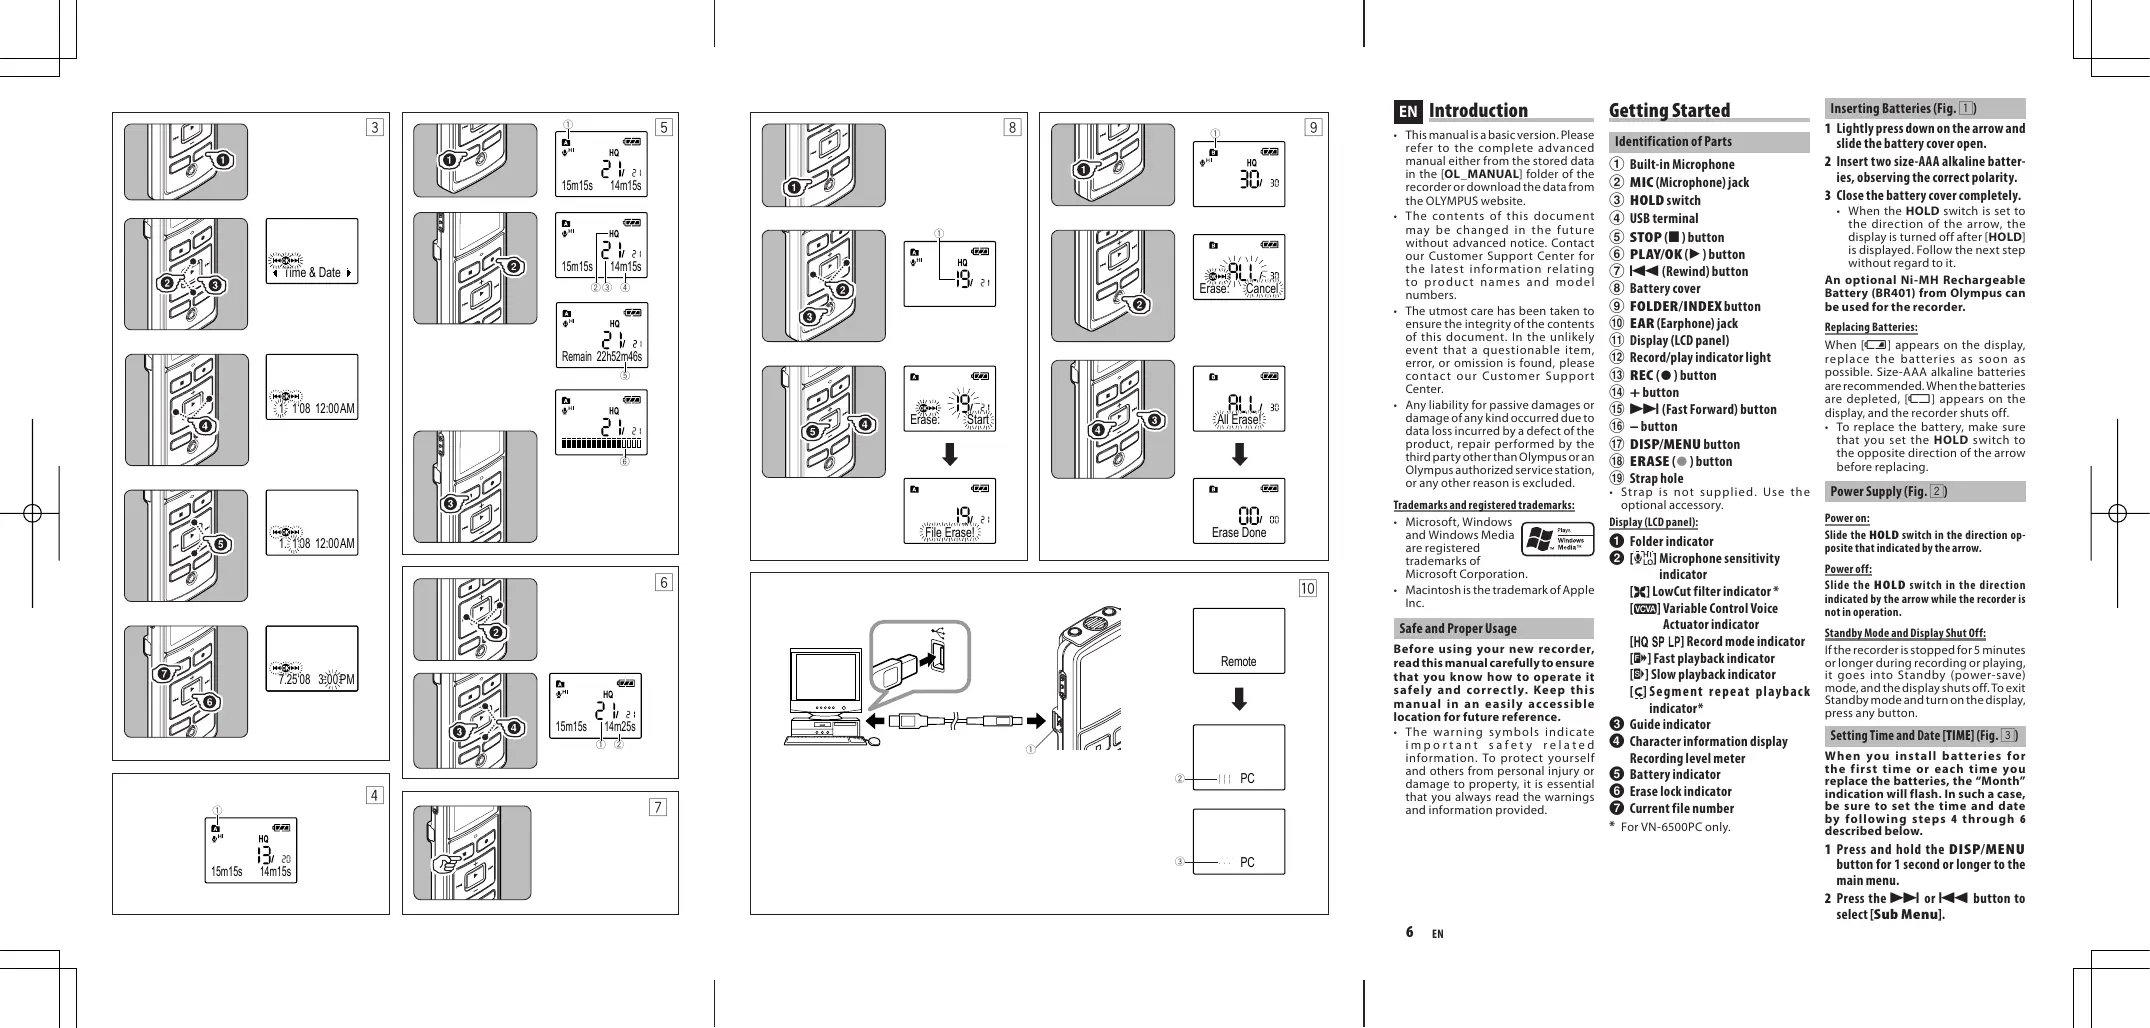
Getting Started
Identification of Parts
① Built-in Microphone
MIC(Microphone)jack
③ HOLD switch
④ USB terminal
⑤ STOP(■)button
⑥ PLAY/OK(▶)button
⑦ I←(Rewind) button
8 Battery cover
9 FOLDER/INDEX button
⑩ EAR(Earphone)jack
11 Display (LCD panel)
12 Record/play indicator light
13 REC () button
(14) + button
(15)▶▶I (Fast Forward) button
(16) - button
DISP/MENU button
ERASE () button
(19)Straphole
- Strap is not supplied. Use the optional accessory.
Display (LCD panel):
1 Folderindicator
[9] Microphone sensitivity indicator
[LowCut filter indicator*
[COVA] Variable Control Voice Actuator indicator
[HQ SP LP] Record mode indicator
[Fast playback indicator]
[ ] Slow playback indicator
[C]Segment repeat playback indicator*
3 Guide indicator
Character information display
Recording level meter
5 Battery indicator
Erase lock indicator
7 Current file number
* For VN-6500PC only.
Inserting Batteries (Fig. 1)
1 Lightly press down on the arrow and slide the battery cover open.
2 Insert two size-AAA alkaline batteries, observing the correct polarity.
3 Close the battery cover completely.
- When the HOLD switch is set to the direction of the arrow, the display is turned off after [HOLD] is displayed. Follow the next step without regard to it.
An optional Ni-MH Rechargeable Battery (BR401) from Olympus can be used for the recorder.
Replacing Batteries:
When [ ] appears on the display, replace the batteries as soon as possible. Size-AAA alkaline batteries are recommended. When the batteries are depleted, [ ] appears on the display, and the recorder shuts off.
To replace the battery, make sure that you set the HOLD switch to the opposite direction of the arrow before replacing.
Power Supply (Fig. 2)
Power on:
Slide the HOLD switch in the direction opposite that indicated by the arrow.
Poweroff:
Slide the HOLD switch in the direction indicated by the arrow while the recorder is not in operation.
Standby Mode and Display Shut Off:
If the recorder is stopped for 5 minutes or longer during recording or playing, it goes into Standby (power-saving) mode, and the display shuts off. To exit Standby mode and turn on the display, press any button.
Setting Time and Date [TIME] (Fig. 3)
When you install batteries for the first time or each time you replace the batteries, the "Month" indication will flash. In such a case, be sure to set the time and date by following steps 4 through 6 described below.
1 Press and hold the DISP/MENU button for 1 second or longer to the main menu.
2 Press the or button to select [Sub Menu].
3 Press the PLAY/OK (▶) button.
[Time & Date] appears on the display, and [ ] flashes.
4 Press the or I button to select the item to set.
- Select the item from "Month", "Day", "Year", "Hour" and "Minute" with a flashing point.
5 Press the + or - button to set.
Follow the same steps by pressing the or button to elect the next item, and press the + or - button to set.
6 Press the PLAY/OK () button to complete the setup screen.
The clock will start from the set date and time.
- Press the PLAY/OK (▶) button according to the time signal.
7 Press the STOP (■) button to close the menu mode.
Notes on the Folders (Fig.14)
The recorder provides five folders, [A], [B], [C], [D] and [E]. To change the folder selection, press the FOLDER/INDEX button while the recorder is stopped. Up to a total of 200 files can be recorded in each folder.
1 Current folder
Recording (Fig. 5)
1 Press the FOLDER/INDEX button to select the desired folder.
2 Press the REC () button to start recording.
- The record/play indicator light turns red, and recording starts.
3 Press the STOP (■) button to stop recording.
- New recordings are saved as the last file in the folder.
① Current folder
② Current recording mode
③ Current file number
④ Recording time
⑤ Remaining recording time
⑥ Recording level meter
Playback (Fig. 6)
1 Press the FOLDER/INDEX button to select the desired folder.
2 Press the or I button to select the file to playback.
3 Press the PLAY/OK (▶) button to start playback.
- The record/play indicator light turns green, and the elapsed playing time is indicated on the display.
4 Press the + or - button to select the proper sound volume.
- The display shows the volume level. You can choose between [00] to [30].
① Current file number
② Playing time
To Stop: (Fig. 7)
Press the STOP (■) button.
- The recorder stops in the middle of the file being played.
Erase
Erasing One File at a Time (Fig. 8)
1 Press the FOLDER/INDEX button to select folder.
2. Press the or button to select the file to be erased.
① File to be erased
3 Press the ERASE () button.
4 Press the button to select [Start].
5 Press the PLAY/OK(▶) button.
Erase All Files from a Folder (Fig. 9)
1 Press the FOLDER/INDEX button to select the folder to be erased.
① Folder to be erased
2 Press the ERASE (●) button twice.
3 Press the button to select [Start].
4 Press the PLAY/OK (▶) button.
Notes:
An erased file cannot be restored.
- The file set to erase lock will not be erased.
- Completion of erasing may take several seconds. Do not attempt to remove, replace battery or attempt any other functions on the voice recorder during this period because data may be corrupted.
Other Functions
Connecting to Your PC (Fig. 10)
Apart from using this unit as a recorder, you can use it as an external memory for your computer, as a storage device.
- The audio files recorded by this recorder can be played back on your computer using Windows Media Player. You can also transfer the WMA files downloaded with Windows Media Player to your recorder and enjoy them (excluding files with copyright protection).
1 Connect the recorder's USB terminal to a PC USB port or USB hub.
- Once [Remote] is displayed, you can save or read the data.
2 Transfer the audio files to your computer.
- Connect the recorder to your computer and launch Explorer.
- The recorder will be recognized as a removable disk.
Each of the five folders is named as DSS_FLDA, B, C, D and E. The audio files are saved in these folders. - All the audio files recorded by this recorder will be in WMA format.
i.e.:
VN-6500PC: VN 650001.WMA
VN-5500PC: VN 550001.WMA
VN-3500PC: VN_350001.WMA
- If you are using Windows 2000, Windows Media Player must be installed on the PC.
3 Click on the task bar located at the lower-right corner of the screen. Click [Safely Remove Hardware].
① USB terminal
② Sending the date
③ Receiving the data
Using the recorder on your PC
| Windows | Operating System: Microsoft Windows 2000/XP/Vista (Standard Installation) |
| Compatible PC's: Windows PC's equipped with more than one free USB port | |
| Macintosh | Operating System: Mac OS X 10.2.8 ~ 10.5 (Standard Installation) |
| Compatible PC's: Apple Macintosh series equipped with more than one free USB port |
The support service will not cover if your PC has been updated from Windows 95 or 98 to Windows 2000/ XP/Vista. Any failure on a self-modified PC will not be covered under the operational warranty.
Notes:
- NEVER disconnect the USB while the record/play indicator light is flashing in red. If you do so, the data may be destroyed.
Refer to the user's manual for your PC regarding the USB port or USB hub on your PC. - As the noise may cause adverse effects on electronics devices nearby the recorder, unplug the earphone when you connect the recorder to a PC.
General Precautions
Read this manual carefully to ensure that you know how to operate it safely and correctly. Keep this manual in an easily accessible location for future reference.
The warning symbols indicate important safety related information. To protect yourself and others from personal injury or damage to property, it is essential that you always read the warnings and information provided.
Warning regarding data loss:
- Recorded content in memory may be destroyed or erased by operating mistakes, unit malfunction, or during repair work.
- For important recorded content, we recommend you to write it down some where or make a back-up by downloading to a PC.
- Any liability for passive damages or damage of any kind occurred due to data loss incurred by a defect of the product, repair performed by the third party other than Olympus or an Olympus authorized service station, or any other reasons is excluded from Olympus's liability.
For safe and correct Usage
- Use your earphones only after sufficiently reducing the volume of the earphones, otherwise hearing impairment and/or hearing disorders may occur.
- Do not use your telephone at a high volume for an extended period of time as hearing impairment and/or hearing disorders may occur.
- Be sure to stop the recorder before replacing the batteries. Unloading the batteries while the recorder is in use may corrupt the file.
- Do not leave the recorder in hot, humid locations such as inside a closed automobile under direct sunlight or on the beach in the summer.
- Do not store the recorder in places exposed to excessive moisture or dust.
- Do not use organic solvents such as alcohol and lacquer thinner to clean the unit.
- Do not place the recorder on top of or near electric appliances such as TVs or refrigerators.
- Avoid sand or dirt. These can cause irreparable damage.
- Avoid strong vibrations or shocks.
- Do not disassemble, repair or modify the unit yourself.
- Do not operate the unit while operating a vehicle (such as a bicycle, motorcycle, or go-cart).
- Keep the unit out of the reach of children.
Batteries
Warning:
- Batteries should never be exposed to flame, heated, short-circuited or disassembled.
- Do not attempt to recharge alkaline, lithium or any other non-rechargeable batteries.
- Never use any battery with a torn or cracked outer cover.
- Keep batteries out of the reach of children.
If you notice anything unusual when using this product such as abnormal noise, heat, smoke, or a burning odor:
① removethebatteriesimmediately while being careful not to burn yourself, and;
2 call your dealer or local Olympus representative for servicing.
Specifications
Recording medium:
Built-in flash memory
Overall frequency:
VN-6500PC, VN-5500PC:
HQ mode: 200 to 13,000Hz
SP mode: 200 to 7,000Hz
LP mode: 200 to 3,000Hz
VN-3500PC:
HQ mode: 200 to 13,000Hz
SP mode: 200 to 7,000Hz
LP mode: 200 to 3,000Hz
Recording time:
VN-6500PC, VN-5500PC: 512 MB
HQ mode:Approx. 35 hours 20 minutes
SP mode: Approx. 69 hours 35 minutes
LP mode: Approx. 221 hours 30 minutes
VN-3500PC:128 MB
HQ mode:Approx. 8 hours 40 minutes
SP mode: Approx. 17 hours 10 minutes
LP mode: Approx. 54 hours 40 minutes
The above-noted recording times indicate times after deletion of the manual data stored in the recorder.
- The manual data can be deleted by connecting to a computer and deleting or by formatting the recorder. For details, please
see " Formatting the Recorder [Format]"
- Before deleting the data, please make a backup file of the PDF data of the manual.
Microphone:
Electret Condenser Microphone (monaural)
Speaker:
Built-in 23 mm round dynamic speaker
Maximum power:
250mW
Maximun headphone output: ≤ 150mV (according to EN 50332-2)
Wide band characteristic headphone output:
75mV≤ (according to EN 50332-2)
Earphone jack (monaural):
3.5 ~mm diameter, impedance 8
Microphone jack (monaural): 3.5 mm diameter,impedance 2k
Power supply:
Two AAA (LRO3) batteries or Two NiMH rechargeable batteries
Continuous battery:
Alkaline batteries:
Approx. 37 hours
Ni-MH rechargeable batteries:
Approx. 25 hours
Dimensions:
102 (L) x 37 (W) x 18.8 (T) mm
Weight: 64.8g (including battery)
- Battery life is measured by Olympus. It varies greatly according to the type of batteries used and the conditions of use.
- Your recorded contents are for your personal use or pleasure only. It is prohibited to record copyrighted material without permission of the copyright holders according to copyright law.
- Specifications and design are subject to change without notice for improvement of performance.
Accessories (Optional)
Ni-MH Rechargeable Battery
Charger: BU-400 (Europe only)
Ni-MH Rechargeable Battery: BR401
Connecting cord (Earphone jack
Microphone jack): KA333
Noise-Cancellation microphone: ME52
Electret condenser microphone: ME15
Dual monaural araphone: E20
Telephone pickup: TP7
Neck Strap:ST26

"CE" mark indicates that this product complies with the European requirements for safety, health, environment and customer protection.

This symbol [crossed-out wheeled bin WEEE Annex IV] indicates separate collection of waste electrical and electronic equipment in the EU countries.
Please do not throw the equipment into the domestic refuse. Please use the return and collection systems available in your country for the disposal of this product.
Applicable Product: VN-6500PC, VN-5500PC, VN-3500PC

This symbol [crossed-out wheeled bin Directive 2006/66/EC Annex II] indicates separate collection of waste batteries in the EU countries. Please do not
throw the batteries into the domestic refuse. Please use the return and collection systems available in your country for the disposal of the waste batteries.
BG
BbVeHne
Taan HnCTpyKun3a 3e KcnPOnataaun e 6a0B BapmaHt. MoJ, BnXte nblHa t HnCTpyKun3a 3e KcnPOnataaun B CbXpaHeta t NnOPompaNbnPaK [OL MANUAL] Ha 3aHnCBAuToO yCTpoIcTBo HnCBaLte HnOPOMaUnTa oYbe CTpaHauT hA OLYMUP.
CbbsjxhetaTo hTo3nOkyMeHm Moje da bSeJe npomEneHo B 6bdue63e npedBapntenHO npedynpeJxdHe. Cbpsketee c HauHua UcHtbp 3a ocbnyXbae Ha KImEnHTte, 3a da nolpyUte AKTuHaN HnOpMaau OTHOCHO mEmHata Ha npDyKTte HnHomePate Ha moDenITE.
PONOJEHN Ca MAKCIMANH YCINNA 3a OCNYRPAHBA Ha NUOCTTA Ha CbDbpKHAHTO Ha TOI DOKYMENT. PnMANKO BEPOTHOTO OTKPRVAHE Ha cMbHNTENHe NYKT, rpewka IINI nponycK, MOnJa dce BpKteCe HsuaII LeHTb 3a ObCNYKBAHe HA KNIENTHTe.
U3KIOHcE BCAK OTOBOPOHCTa naCnBHmIeTIu NIOBPODAOTBCAKBO ECECTBO, bblkaaCeHa 3a 3gyaHa naDannHb p3eyntlNaTHeAeKFTBnOyTA, nonpabKa, mBpBuHsEoTHPtoTneIuie,paznHooTOnOlympusnnOptniHApOnOlympuscebpN, nIN BCAKBAKn Dpyr npnuHIn.
TbproBcNMapKnpeHCTpnpaHnTbproBcNMapKn
- Microsoft, Windows
- Windows Media
- canpertiparhi

Plays Windows Media
TbproBcKmKaMpKnHa KopnpaunMaTra Microsoft.
Macintosh e Tbprobcka Mapka Ha Apple Inc.
Be3oNaHn npabHnHa ynoTpe6a
Ppndn 3a 3anOpoheta da n3non3bate BaawetohoobzanaBauocyOtpcIbTO, npOcpeTe BHNMaTeHNo T03 npArHyN, 3a da ce yBeptne, ye 3HaeteKaK daPabotte6EzaohOnn npablnHoCnpdykTa.CbxpaHbaTne T03 npArBuHK Ha neCHO doctbHNO mTo 3a 6bDeea cnpBaA.
PpeynpedtenHnne CmBbOnI dabat BaNn HINOpOmaTc OTHOCHO 6BezonachocTt. 3a da npedn3a9e ce6 Ch n npdytn niua ot hniuecko hapanbae Hn NOBpeD bBypX nuJece TBO, oet cbseCTBEHO 3HaueHen BInHar n Da hetete npdeypekdennHainHnFOpMaHTA, KORTo Bn ce npedoctBaR.
Kak da 3anoptyhe
HdENTnphiupaneHa qactnte
① BrpaedENMkpofoh
② MIC(Mukpooh)6yKca
③ HOLD npeBknIouBaay
④ USB TepMnHaI
⑤ 6yToH STOP(■)
⑥ 6yToH PLAY/OK(▶)
⑦ 1 (PnpeBpTaHeHa3aD)6yTOH
⑧ Kanakha rhe3doto 3a 6aTepeyra
⑨ 6yToH FOLDER/INDEX
⑩ EAR (Cnywannka) 6yka
11 Ekpan (LCD naHEn)
12 HnHnKaTOpHa CBNTIHa npu3aInc/ Bb3npoN3BExkDaHe
⑬ 6yToHREC(●)
⑭ 6yToH +
15▶l(Bb30npBbptHaenpanpe) 6bytoH
16 6yToH-
⑰ 6yToH DISP/MENU
⑱ 6yToH ERASE(●)
19 OTbOp 3a KaMka 3a HoceHe
Kamika 3a Hocene He e HauHna.
U3noI3BaTe akcecoapnte B
OOnuJ.
Ekpan(LCD nahen):
1 HndkaTop nanka
2 [H] HNIMKATOP 3a YBCTBNTENHOCTTa HA MHKPOFOHa
[X]Инданахетафиrtbp LowCut
[VOA]HnIaKOpT aperynpEymna rnaocb AKTbMBoT
[HQ SP LP] HnHnKatop3apekzmHa 3aNNC
[图]HnDnKaToP3a6b3poBb3pOn0B8KeDaJIa
[9]InHikatokat 3aBaHNOBb3nP0n3B6EJaDa
[CI HnIrkuaKoTpa3Ba3bnPOnB6EaDkAe HA cerMeTnHpaO NObTOpeHne
3 INHnKaTOp pbKoBOdCTBO
Ekpam3aHnHOpMaunz3aCMBONITE mHepeBaHNBOTaHa3Nc
5 HndkaTop 6aTepeia
HNDKATOP3a3akIOVBAHe HAHTPBAAHETO
7 HmepHa Tekyu ai
- Camo 3a VN-6500PC.
IocTabaHHeHa6aTePnTe (Mrg.1)
1 HatncheTne Kekb Bbpyx Cptenkata nNb3Hete Kanaka Ha 6aTepeyta, 3a Da cToBpN.
2 Cnoxkete Dbe ankanhns 6bateHHn pa3mep AAA, kaTo cneHte 3a npabunnnnt noNCHc.
3aTaBopete HanbHNO KaNaka ha6aTePnHa.
Korato npebknoybatenl HOLD nactpoeh no nocoka ha ctpenkata,ekpahtc eNknknoya cnede kato h Hero ce nokaxe [HOLD].PnpemhefofopmaIHO np3 cndbaaatac tbnka.
IpezakjaMneite 6aTeepnNi-MH (BR401)(no n36op)Ot Olympus Morat da 6bdatnON3BaHN B ZanHCbaUOTOyCTPOITCBTO.
CmhaHa 6aTepuInte:
Korato [C] ce noBn haE kpaHa, cmeHete bate pntne KONKOtoe bB3MOXHO NO-CKopo.IIpenOpYBaTce aAnkanhBatepncPcAzmepAA.A. Korato batepnte ca nTozouHen, ha Ekapa ce noBnBa[B] n 3anpcBaOTO yucptnoCTBO eNkIOyBA.
3a da 3aemctite 6abeptina, Ybepece tCe HCTA CnPTNIN PnBcKIObVAHOBL DNOcOKA, pONBUNOONKHa hCTpeNKATA, pNEpDA nI3BpUHTE CMNHATA.
Enktpo3axpaHbAne (Mn.2)
BkIIOUbaHe:
Плз�пete npeвкlnoуан HOLO nocoka,npotHbONOJOKHa Na t3n, nocoyeha OTcpenkata.
N3KIIIOUBAHe:
ПлзerteNetpeBknMчaHaHOLDno nocoka, noocuyaetaOt cTpeKnKaTa,doKaTo3anCbauTo yctpoIcTBoE bNokoi.
Pexm Standby n3KIOUbahe Ha ekpana:
Ako3aninBcauOtoyCtpoynCTBOeepcnHPO 3a5nIO nOBeY MInyTNo Bpeme HA 3aNNI NIN Bz3pnON3BeKJdAne, ce KKnOuBa peKIM Standby (EhePrcntcNaB) n EkapBaTbeNkNoBu.3a Da n3ne3HeTe O pekim Standby n3a Da BknOHTe EkpAna, HNTchepe PnON3BoENb6TyOn.
HaTpoiBaHae HaacobToB VpeMe Hatata [Time & Date] (Mn. 3)
Korato noctabte 6atepnn 3a nbpnn tnnb CBeKn TKT, Korato cmene 6atepnnte, nndknataopT Meceu qie cebTa. Btakb cnayu yabepe ce, ye cte hacptponnu caca
nata, cneBaaKN cneHnTe CtbKn ot 4 do 6, onncan no-dony.
1 Hatnche Tc b3 a3bpbxHae 6ytoha DISP/MENU 3a 1 cekyuHa nnn noBeye,3a da OTnDe He rnaBHO meHo.
2 Hatnche6bytoh▶InniI<,3a daH36epete [Sub Menu].
3 HaTnCHete 6yToH PLAY/OK ()
[Time & Date] ce noBBA ha ekpaHa cNBtA [<0>
4 Hatmchete 6ytoh I nnI,3a da m36epete 06ekTa3aHaCTpOBAhe.
I36befepere o6eKta ot,Meceu" "Deh",TojnaH",HacMnHyTa Cmrfua Kypcop.
5 HaTmChete 6yToHa + Hn - 3a hactPouka.
- PIIEMNHETeIpe3cBzIeTbCTNk, Kato HATKNTAE 6yTOH IINN 1, 3a da n36bepe cneBauaqoi 06EKT, HnATNCHETe 6yTOHa + INN - 3a NaCTPouKa.
6 Hatnchete 6byoN PLAY/OK (▶), 3a Ja 6doBpHNTe HAcTpoKNtHa ekpaHa.
奈 GaohnKbHNTIcTCTaPTnAOT 3adaeHATA TAC.
- Hattinchete 6byton PLAY/OK (▶) cbfNacho BVPembeira Cunhan.
7 Hattchene 6bytoHa STOP (■),3a da 3aTbOpHe peKIma 3a MeHIO.
3a6eJeknOTHoCHO nankTe (Φm.4)
3a da npomehnite n36opa ha naoka, hatachete 6bytona FOLDER/INDEX dokato 3anaicbaotoo yctpoihtcbo He pa60tin. Bb BCRAA naoka morgat da ce 3anaishat he noboee ot 200 thaiia.
① Hactoana nanka
3auncbane (Mn.5)
1 Hatachete6ytoHa FOLDER/INDEX, 3a da n36epeTe JenaHata nanka.
2 HuaHcTe6yOHTRREC(●), 3a da cTnpatpate 3anncbaHeto.
Индатуговп. 37аци/Вьзрочьдспсвота CBETBA Вчетбен Историясambetо.
3HaTnChete6yToHSTOP(■),3a da cnpe3aanncbaheto.
Hònu 3ánnci cè cbxphānbaT kato nocchéén qian b nankata.
① Tekuza nanka
② TeKuyp eJxHm Ha 3aHc
③ Tekyü Hoomep Ha φaɪnla
④ BpemeHa3aInc
⑤ OcTaBaAio BpeMe 3a 3aIINC
⑥ ΜιΜερBaHηνΒΟΤΟΗ 3aΠις
Bb3npoun3Bexkdahe (Our. 6)
1 Natichete 6yToHa FOLDER/INDEX, 3a da 6epeTe jenahanata nanka.
2 Hatmchene 6ytoh InnI ,3a da n36epete faeta 3aBb3npoun3BeKJaDa.
3 Hattichete 6yTOH PLAY/OK (3)a 3 CTAPTNHa Hb3nPOnHBEeKaHetao.
- INHnKaTOpBt 3a 3aNc/ Bb3Pon13BeJdAHe CBeTBa B3eHO H3MnHAnO ToBpeMe CeNoRBAHaEKpHa.
4 Natichneche 60ytha + mHn -, 3a da n3epeet noxdxhaeta cna ha 3Bvya.
Ekpahtnokaa3bHbBOtOHaCnata na 3yaKa. MokeTe da n36bnpatemekdy [00] do [30].
① TekuHomepHaΦaII
② Bpeme 3a BB3npoN3BexKaHe
3a da cnpete: (Mn. 7)
HaTmchete 6yToHa STOP (■).
3auncauoto yctpoiCTBO cnnpa no cpeaTa Ha Bb3npoN3BekDaHnFaain.
N3tpnBaHe
M3tpmbane no eunH φaHnHaBeHNbK (Φur. 8)
1 Hatachete6byToHaFOLDER/INDEX, 3a da n36epTe npka.
2 Hanche6byoH HnniA<3a 136epe foHa,koToNCKate da n3PHTe.
①ФаилзинТрунове
3 HATNCHEte 6yToHa ERASE (
4 Hattchete 6ytoh ▲,3a da n3epe[Start].
5 Hatnchete 6ytoh PLAY/OK ()
NtprnBaHe Ha BcMnKn faiNoBe ot napanka (Φnr.9)
1 Hattchete 6ytoha FOLDER/INDEX, 3a da n36pepe nankata, korto nckate da n3TPNTE.
①Панka 3a m3tpnBaHc
2 Hatnche 6ytoHa ERASE () Dba pTbN.
3 Hattchete 6ytoHa▶I, 3a da n36epete[Start].
4 HATNCHE6yToHa PLAY/OK(>).
3a6eJekn:
Ntprnt faHn He moke da 6bde Bb3ctaHOBeH.
-Фай,КOTоE a3KIOUHcpeuI STNpBaHNe,нмАдбObdeIbTnPT.
3aBpBwHbEt Na H3tPbnBaHTo MoKe da OTheme HAKONKo CekyHn. He ce OnntBaanTe dMaXatae, 3aMeCTBaTe 6aTePnIa rNn da npabine HeuO duRy Ho nLaCobOTo 3aINCBaIo yCTpoiCTBo npe3 TOBA BpEme, 3aOtO moKeTe da YHNUQOXHe INFOPMaUa.
ApyrNΦyHKznn
- HNKOKA He n3BaXdaYte USB
yctpoTcBTO,doKATOHNHdkatoptb3aNNC/8b3pONBBeJdAeCBTeN B cepEno. Ako npanBaHTe, HnΦopmaunra To Moze Da bDe yHnUOKOHeA.
Hanabepe7cnpabka hcapbvnika ha nortpe6nentela 3a Bauman KOMNItbp bBb Bp3ka c USB npota ha KOMNItbpBaN.
TbkyuMbT MoKeJa HMa HeNbaOnpInrTeH eEeKbBpxy EneKtPOHNHeApAnaHT B6mIOCT Do 3aNcBaUOTo yCtPoIcTBO, hNkIoTeCHyUwKnAaOTnTHeOTO, KORA CbP3Be3 AnCeBaUOTo yCtPoIcTBOC KMONIOTpB.
06u npednaHmepkn
PpoyeTeTo3nHapbHnK BHmAtenHo,3a da ce yBepnte,ye Bne 3haete KAK da pabOtne C hero Be6oanOnNKoPeKTHo.CxbpaHraBaIte To3n HapbHnK Ha necho DoctbHNO mTc03a 3bdeua cnpBaKa.
IpeynpndteHnHne CmBONI daBaB BaxHa INHOpmaun OTHocHO 63oNaChocTtA.3a da npnda3nfe Ce6u Hpyr nuHa ot FnueNcKo HaparBaHne u NOBpeDa BbyxmyeCTBO, eOT cbseCTBHe 3NuHHe BnHar n Da yeTeTe npdynpexJeHHnra INHOpmaunTa, koTo Bu ce npdeOctBa.
PepdnypexpdeHne OTHOCHO 3ary6a Ha daHHn:
3mnaCahOTo BlAMETaCbIbPxAHae MoJc da 6bJe yHnOxoHeN IIN N3PTNO npAoi rpeKn npri yOnptBe4ata, HEm3npabHOCT Ha yctPoIHCTBOTo, INI NO Bpeme HA nonpaBa.
3a BaKasho 3aIcapHo CbIbPdKaHae Hne Bn IpenOpnbVabe Da ro 3aIiWseTeHkBdeHnDa npabVeIpeBPO konMe Kato rO cBaNITE ha KOMIObTa pCa.
OT OTROBOPHCTTA Holympus e n3KIIOHeHa BCJAKBA OTBOPOHCT 3a nacmbnI qTeI nnIOBpeIOn DBCJAKBO ECTcBb, B3HKnHAnI I Be3yIITnat Ha3YgBa H daHNH, pNInHHeAOT DeEKeTb H npDyKtA, nonPabkA, M3bBpSeHa OT TpTe O nipe, p3aunHoOT OmpLynnnOToOpN3iuparCepbn3Ha Olympus, nncBCKakBn DpynnpuynnH.
3a 6e3onacha n npabunha ynotpe6a
N3npo3BaIte BauHTe CnuJAnKnCMO cIeN Kato HamaJIteOce3aTeHNO CInaTHa NTbYka NmB nptOBEN Cyuay MoKeTe Da cnPnUHNTe YBpeXdAhe Na CnuXaN/nn CyuXOBO paTOrcTB0.
He n3n03BaTeBaunTe CnywannKn npn BnCoka cnna Ha 3Byka 3a npOdbJnxTHeNO BpeMe 3auoTO ToBA MoKe Da Do BoBeDe DO yBpeJaHcNaXyNn/nnnCnyxOBO paatpOCTBO.
Ybepete Ce, ye Cte cnpenn 3a nncBa oto yctpoinCTBO npedn da n3BaJnte batepnite. N8aBaxdAneto h6atepniteDokato 3aNcBaaOTo yctpoInCTBO pa0tni, moke da nobpei faia#.
He octabrae 3auncbauo yctpoictBOHa ropeu, Bnaekn Mecta, KaTO hAnpImepB bTpe B3atBopeh AToMObUn, n3NOKeHO Ha npka CbHueBa CBETNHa HnHa nnJaXa npE3 JIANTO.
He CxbpaanHbAte 3aIINCbauToO yCtpoCTBOHaMe, INIOJKeHN Ha npekOpemhaBnA rna Inpax.
H Me3no3Ba7e opraHHnHN pa3TbOPENTNI KATO JAKOXOJENH I naKOB p3aPdENTNI 3a NOUcTBaNE HaYCTPOINCTBO.T
He noctabayte 3a nncbaoToy UcpoICTBO Bbpxu HnB 6nMoCTOdo eNeKtpueckn yepeni KaTo TeneBu30np HnXnaDInHnHi.
I36B8aBte 3aneBcAto Hn Bb3pOImBaEeJdAHeTo B 6bn30ct do MoBunHnTepeoHn nn DpyrB 6BezHnHvUCTbN Ta Kto TE MoTat dApnVHnHTnePepenHn n Wym.AkO JOnOBnTe Wym, npEmecTe ce HaDpyro MAnTo nn NpEmecTe 3aNNCbAooTo UcTPOCTBO daneyOT kTaNbA uCPTbA.
N368RaBae NpBk INn MPbCOTNA. Te Moarat dapeu3nBknKat HenoPraBMn 5eTu.
ИЗбгаве симп Вибрацим Ии уаду.
He paarno6bawite, he nonpaBwite n He moDnOu npaTe camy uctpoCTBOTo.
- He n3n0an3Baive yctpOHTbTO, DOKATOynpabBnBaTe npEbo3HO cpeCTBO (kato HapnpMeP BenoCAned, MOTOuKInet mNlDcTcA cnoptHa KOniNka).
CxbpaHbRAaTEyCTPOIeCTBOToDAneuOT Deua.
Батугия
BhimaHne
- Пин ИкakBN 六OBTeNTcBA
нслагаite Дугч с actn,OCBEN
OCHOBHATA,В OTdEnHNeTTO
3aБatePepnA.ТobmaМожde Na
npuHnH npotuahe Na BatePepnTa,
NpeRpaBaNoxapKInn ekCknoNsia.
BatepiniheNe6bnaHOKORA da 6bDatm3nagHaNHOfBn,3aqrPBAhe, KbCo CbeDinHeHne,NiMa Da 6bDat parrNo6bAHn.
He npabate oponi 3a npezekaJHAn hAJKANH,NTIMEBN HIN BCRAKAKNBpyrH en pezapeKaem6baterpn. - Hkora He n3n03BtKe KaKbATO n da bno 6aTeprnc c pa3kbcaHa mnyhkyaka bTuHna o6bivka.
CxbpaHbBaTe 6aTepeNte daJeT O deua.
Ako npin3n0n3BaHeTo h npOyKta 3a6eBekne He nto HeoBnuaHno, Kato Hapnempe HeecTeBhen UyM, 3aqrbaHae, Npuek Nm MnpuNc Hn3rOpANo:
①OTCTPahete 6atepntte He3a6abHO,Kato BHMaBaTe da He Ce 3rOpTe N;
②ceo6aTeHaBaWnIuNbPnHn Ha pernoHaHHn npedCTabWteHn HaOlympus3a06cnyXbaHe Ha KInENTH.
CneuΦkaaun
3anncbaaocpeDCTBO:
Brrpaedha nnaa namet
067a yectota:
VN-6500PC, VN-5500PC:
PexnHQ:200do13.000Hz
PexkIM SQ:200do7.000Hz
Pexmm LP: 200 do 3.000 Hz
VN-3500PC:
PexnHQ:200do13.000Hz
Pekim SQ: 200 do 7.000 Hz
Pexm LP: 200 do 3.000 Hz
Bpeme 3a 3anu:
VN-6500PC, VN-5500PC: 512 MB
PekmHQ:Prn6n3n10He3504aue n 20 Mnytyn
PekmSP:ПИБИNTENHO69аca n35MHNYTIN
Pekm LP: Pn6n3nEnTeNBO 102a c a 30 MNHYtN
VN-3500PC:128MB
PekmHQ:Pi6n3HtENHO8aca 40MNHTYN
Pekhmi SP: Pn6bIINTeHNO 17 caca n 10 MInHTyN
Pekhmi LP: Pnib6n3uTetno 5H4 uca n 40 MMHyTu
「Tepenocooyeho BpeMe 3a 3aHNC HnDInKnPaBpeMTo CneI n3TpMbAeHapyHOCbXpaHeneHATA hHOPMaunB 3aHNCBaJIOU yctPouCTBO.
Информая OT Habpунка можд Бдп Итрпа чрз СбрБЗВА ККМ ComKOTbР ИТрване ИПОФМатрахе Ha 3ANCBSAOTO yCTpoICTBO. 3a NOBUE NOДРбHOCHT, MOnA, BnKTe ,OΦmPIMpaHa He 3ANCBSAOTO yCTpoICTBO [Format] (Фоват).
- PteidnJaMa3TPrWTeHEnHOpMaunIra, MoJN, hanpaBete pesheBHO KONHe HA InHPOMpAunIra B PDF Ot hAPyNHika.
MnKpOΦoH:
EneKtopoHmKpOfoHOn KOHeH3aTOp (MOHOFOHUeH)
Bucokoroboputei:
Bradehou 23 mmKpBtbldAmHmUeH BVCOKOROBOPHTI
MaKcImaHaMoUHocT:
250mW
MakcmaHaMoUoHCTNaCnyuAaKnTe: ≤ 150mV (cnpeednupeKtBaEN S0332-2)
Bkyca3a cnyuAnK (MOHOFOHnHu) 03,5 MMJAMaeTbP, mIpeNaHEC8O
Bkyca3a MMKPOOHo (MOHOHouHEN) 0,3 MM DuaTbP, mMnEDA H2 K9
Enektpo3axpaHbaHe:
ДовAEA(LRO3)БатериMuнд�Ni-MHпөрөдэхаамбтөрүns
NoctoHa 6aTepey:
Aikann6atepnn:
Pn6n3nteHNo 37aca
NiMH-NiPHEpAaHJaAsn ce 6abeTpimN PnHiINbIeTHeNo 25 qaca
Pa3mepn:
102 (L) MM × 37 (W) MM × 18,8 (T) MM (6E3 n3BkNAHNTe cAHTn)
Terno:64,8 rp. (BkIouHTeNHO 6aTepeRnTa)
JINBOTbHa 6aTePnTa e n3MepeH oT Olympus. Tom Bapna cnpmo BnuHa HnON3BaHnte 6aTePn H yCNoBnTaHa yOnTp6a.
Baweto 3auncaho Cbdupxhajne e cama 3a bau wna Hynotpe6a nn yboonctbne.3a6paheo Ea da 3aancbeate matepnan c ABtOPcko npabo 6e3 paeehenne O
npnteKatenHe Toba npabo cnopei 3aKoHa 3a abTOPCKOTO npabo.
Cneuaqunuune mnaaHnt ca o6ekt na pommaHa 6e3 npdynpejKeJHMe 3a noDobpeHme Ha nIaBnHeHneto.
Akkcecoapu (Onzua)
3apexdaio yctpoictbo 3a Ni-MH 3pezapea4aemc 6aTeepn: BU- 400 (cama 3a Ebpona)
ПразарждаemaNi-MHбатери: BR401
Cbpr3Ba7a BpBb (Bykca 3a cnyuakn Bykca 3a mKPOΦOH: KA333
MnkofoHa 3oOCTpaHbaHe ha yma:ME52
ENeTKPOHmMKPOFOHON KOHNHe3aOT:ME15
[Time & Date] (Obr. 3)
Piprvninstalaci po kazd'yemene bateri bude blikat udaj,Month".V takovem pripadé nastavceças datum provedenim kroku 4 az 6, kterjssopansy nice.
1 Stisknutim a pridrzejim tlačitka DISP/MENU po dobu alesoń 1 sekundy prjedete do hlavnabidyk.
2 Stisknutim tlačitka▶Inebol▼ zvolte połozku [Sub Menu].
3 Stisknete tlacitko PLAY/OK ()
- Na displeji se zobrazi nastaveni [Time & Date]; bude blikat znak [<
>].
Rezim SP: pribl. 69 h 35 min
Rezim LP: prbl. 221 h 30 min
VN-3500PC:128MB
Rezim HQ: prbl. 8 h 40 min
Rezim SP: pribl. 17 h 10 min
Rezim LP: pribl. 54 h 40 min
Uvedené doby nahravani
predstavuji hodnoty po
odstaneni datpíručkyulożnych
vdktafonu.
Data prirukcy Ize odstranit pripojenim k poicita vymazanizne nebo formatovanim diktafonu. Podrobnosti naleznete v casti, Formotavani diktafonu [Format].
Pf. odstranenim dat vyvtore zaloznki kopi soubor PDF pifrucky.
Mikrofon:
Elektretovy kondenzatörov mikrofon (monofonni)
Reproduktor:
[X] Indikator for LowCut-filter*
[COVA] Indicator for Variable Control Voice Actuator
[HQ SP LP] Indikator for optagetilstand
[B»] Indikator for hurtig gengivelse
[B] Indikator for langsom gengivelse
[C]Indikator for gentagelse af segment*
3 Indikator for kontroleponente
Informationsvisning af tegn Maler for optageniveau
5 Indikator for batteri
6 Indikator for sletteläs
7 Aktuelt filnummer
- Gælder kun VN-6500PC.
Kohaldatv toode: VN-6500PC, VN-5500PC, VN-3500P

See sensombill[abrikiprutsatud ratastpelprigjak, direktivi 2006/66/EU II lisa] tātishab kasutatad patairede eraldi kogumist ELinikides. Palun Ārgi visake patairesid olmeprugihulka. Kasutatid
patareide körvaldamiseks kasutage palun tei rige olemasevoid tagastusja kogumissuteeme.
ES
Introduccion
Microsoft Corporation.
Built-in flash memory
Fréquence générale
VN-6500PC, VN-5500PC:
Piles rechargeable Ni-MH: BR401
Cordon de raccordement (prise
NataoTe to koumi STOP (■).
O katayaapeac staupata 0t evdiameo tou apxieiou ou avanapayetai.
Atypn
Diaypaip apxieou tn φopá (Eik.8)
1 PntjoteokoumiFOLDER/INDEX yia va eaeEe 4aeklo.
2 Pntjote To koumui liyava emiEeTe to apexio yia diaypapn.
① Apxεio yiaδiaypaφn
3 Flatnote to koumi ERASE ( ).
4 NatnoTe to koumi I yia va emleEe [Start].
5 Platnote to koumni PLAY/OK ()
Diaypaip oawtwv apxiw ano eva pake lo (Eik.9)
1 Natjoteokoumi FOLDER/INDEX yia va eieEeTe to qakeLo yia diaypaq.
① Φακελος γιδιαγραφή
2IaioTe duo opec to koupi erASE (
3 Natjotre to koupi ni yia va enuXeTe [Start].
4 Platjote to koumi PLAY/OK(>).
Σημειώεις:
EV eivai duvato vaavktneva apexio nuo xeia diayapaei.
Ta apexia sto omaia exei puoiotei Kleiouwa diayapaqnch devi ayapaovatni.
HoklpaonTc diayapnc,muopei va diapkeaTe aetepoAenTA. Mny enieipnoeTa va apiaepeTe n avtikataoTe Tn amatapa Ka any enieipnoeKaiaaAan Aetoupyia otov kataypaea auto to diotina, kaohmcpupe ia Kataotpapouv ta deojeva.
AlambdaeIeIoupyieC
SvduoTovuolooyiOaC(Eik.10)
EKTOCAnTOxHONAutNCVvADAc
OwOuOeUNCxyoynPAnOnc,UMOpTeIE
vaTNOXPOIOMIoNaeOTcEwEETepIK
nuHyIaYIOuONyOAtIOAC,OaNlaBn
OWOuOeUNAnOHTKeUONc.
Mnpoite va eKTEAoeTe avanapaywIy tuw apieWu hou nou nyoxpaipnKav ano autov tokaypaae oToT unoloyoiTn oac xnpaioiowvTac to Windows Media Player. Mnpoite eniocva uetapepeTa apeia WMA ToMu taqapotwate Me to Windows Media Player oToV kataypaea ka va taakouete (EcTO cO anapeiamu npoataa neuaepiu kduikaiawtau).
1 Suvbéσe tov akpóδεkτη USB tov kataypaΦaσε μiaθuapusbnσ USB
hub yia uOIoYoiTn.
MoliceuapoviatreinevEci[Remote], npoe iTe va anoNkeoTe n va avaywOeTe ta 6edouva.
2 Metapeper ta apxieia nov otov unolatoiac.
- UUVDEATEV KATAYPAEa OTV
- UUVOJOTnAc kAI EKTEAEteTov
Explorer.
O katayapaac 30 aaavywpioteiwcagaiopouevocdeltaoc.
Ka3e evac ano touc nEvte qakeouc exei ovoautei wc DSS FLDA,B,C,Dkai.Ta apceia houaoBnkeuovtae autouc Touq kakeouc.
Olaataayiaianyououyypapovtai ano autov tok atayapaeθeivai oe omuq WMA.
a
VN-6500PC: VN_650001.WMA
VN-5500PC: VN_550001.WMA
VN-3500PC: VN_350001.WMA
EavXnOaIooiaTe Windows 2000, to WntWindows Media Player npEeia vyaKyKaTaTaBc otov H/Y.
3 Kavte klik otyn emioy [ ] otnyapun epyaiownou Bioketai otyn katw deia ywvia ntc obovnc. Kavte klik enyimoy [Aospaaick katapynon oukeuwu Aikou].
① Akpoδékτης USB
② AnoToaI wv 8e0Evw
③ AynnTwvδεδoμεvωv
XpnoTou kataypaqeaotov H/Yoac
(Móvo yia tyn Eupwnn)
Enavaopotcjeevnunatapia Ni-MH: BR401
Nn] n no Directive o n [2006/66/EC Annex II 17
y
1197
(nin) Electret nni n
:
n"230hnnnnynn
n nn
250 mW
TIN 09
≤150mV
(EN50332-2-0xnnn)
:(1)nTINy
Ω8nnm3.5n
:(11n)11n7n7u
kΩ 2 nOy, mm 3.5 Φ
:nnn np90x
nnu AAA (LR03) nhiio nu
MHNiHIO
:wnn vin vihio
n 37 n
niyy 25:niyy Ni-MH nihi
D'Tnn
n"n 102 (x) x 37 (y) x 18.8 (v)
(niu7x7)
:7wn
(n7n 64.8
T-ynnnnion nyn .
Olympus
wnynnnnny
y
()D
BU-400:ni-MH (T
BR401:Ni-MHn
山 山 (20 kA333:(1
ME52:
ME15:0111111
E20:nh9n n"
TP7: 10000000000000000000000000000000000000000000000000000000000000000000000000
1
y
y
n nn nnnnnnnnnnnnnnnnnnnnnnnnnnnnnnnnnnnnnnnnnnnnnnnnnnnnnnnnnnnnnnnnnnnnnnnnnnnnnnnnnnnnnnnnnnnnnnnnnnnnnnnnnnnnnnnnnnnnnnnnnnnnnnnnnnnnnnnnnnn
yniyninnyin 2007Olympus
#
:n
n99 79 17T
:
:VN-6500PC, VN-5500PC
13,000 Hz 200 :HQ
7,000 Hz 200:SQxn
3,000 Hz 200:LPxn
:VN-3500PC
13,000 Hz 200 :HQ
7,000 Hz 200:SQxn
3,000 Hz 200:LPxn
:nuhpnnt
VN-6500PC, VN-5500PC: 512 MB
20n 35:HQ
35 69:SP
30n221:LP
VN-3500PC:128MB
N NNNNNNNNNNNNNNNNNNNNNNNNNNNNNNNNNNNNNNNNNNNNNNNNNNNNNNNNNNNNNNNNNNNNNNNNNNNNNNNNNNNNNNNNNNNNNNNNNNNNNNNNNNNNNNNNNNNNN
y
unnnnniynxN9"0wn
| Microsoft Windows 2000/XP/Vista (nh) | Windows |
| Windows | Macintosh |
| Windows NT | Apple Macintosh |
| USB port | |
| Mac OS X 10.2.8 ~ (ngh) | 10.5 |
| macintosh |
98 90 Windows 95-NT 1000 Windows 2000/XP/Vista-7
:nnyn
USB-n nnnn nn nnnnnnnnnnnnnnnnnnnnnnnnnnnnnnnnnnnnnnnnnnnnnnnnnnnnnnnnnnnnnnnnnnnnnnnnnnnnnnnnnnnnnnnnnnnnnnnnnnnnnnnnnnnnnnnnnnnnnnnnnnnnnnnnnnnnn
HOLD HONAN ANOHNANONNANONNNNNNNNNNNNNNNNNNNNNNNNNNNNNNNNNNNNNNNNNNNNNNNNNNNNNNNNNNNNNNNNNNNNNNNNNNNNNNNNNNNNN
n nn n (BR401) niin Ni-MH .Olympus n
nHion nna
Voice Actuator jinn [w] Variable Control
nno n nn [HQ SP LP]
nynynnn [n]
nynnn [9]
nntinynnuinn [C]
*yuv
nnn 3
1
nunnnnn
zhjinn 5
nnn nn jinn 6
innnn nn 19on 7
VN-6500PC
1 Display (LCD panel)
(in base a EN 50332-2)
Jack auricolari (mono):
diametro 3,5mm ,impedenza 8
Vienafailadzeshana Fig.8
1 Lai izveletos mapi, nospiedet pogu FOLDER/INDEX.
2 Lai zéveletos falu, kasjädžës, nosiediptogpu▶l vail
① Fails, kas jadzës
3 Nospiediet pogu ERASE (●).
4 Lai izveletos [Start], nospiediet pogu I.
5 Nospiediet pogu PLAY/OK(>)
Visu failu dzësana no mapes (Fig. 9)
1 Lai izveletos mapi, kas jadzes, nospiediet pogu FOLDER/INDEX.
① Mape, kas jadzeš
2 Divas reizes nospiediet pogu ERASE (●).
3 Lai izveletos [Start], nospiediet pogu▶I.
4 Nospiediet pogu PLAY/OK (▶).
Piezimes:
Dzestu failu atjaunot nav iespejams.
- Blokëts fails netiek dzësts.
Dzësanas process var iznemt vairkas sekundes. Sajä laika nemeginiet iznemt baterjias, nomainitāts, vai sajä laika dikkofona veikt CITAs fungkcijs, zo pretëjā gadijumva var tikt bojati dati.
Citas funkcijas
Pievienošana datoram (Fig.10)
Papildus tam, ka izmantojat so ierici k diktofun, varat to izmantot k datora arejas atmas glabasanas ierici.
Audio failus, kas ierakstiti ar so diktofonu, var atskanot datora, izmantojot Windows Media Player. Varat ari ar Windows Media Player lejupiädetos WMA failus pauruit uz diktofonu un klausities tos (iznemot failus, kurus aizsarga autortiesibu likums).
1 Pievienojiet diktofona USB kabel datora USB portam vai USB ligzdia.
- Kad parādās [Remote], varat saglabṭa vī nolṣṭi datus.
2 Audio failu parsutisana uz datoru.
- Viepienojiet diktofonu datorum am palaidiert Windows Explorer.
- Diktofons tiks atpazits kā nonemems disks.
Katra no piecām mapēm ir nodevēṭa sādī: DSS_FLDA, B, C, D un E. Audio faili tiek saglabāti šajās mapēs.
Visio audi falli, kas ierakstiti ar 50 diktofunoi, bus WMA formata.
t.i.:
VN-6500PC: VN 650001.WMA
VN-5500PC: VN-550001.WMA
VN-3500PC: VN_350001.WMA
Ja lietojat operetajstemu Windows 2000, datora jabut instaletakai programmai Windows Media Player.
3 Uzdevumjosla, kas atrodas ekrana apaksejā labaj sturi, noklikskinetujz [Noklikskinet [Drosa aparaturas nonemsana].
① USB pieslegvieta
② Datu nosutisana
③ Datu sanemśana
Diktofona lietosana, piesledzot to datoram
Windows
Operetajstema:
Display (LCD-schem):
1 Mapindication
[CH] Indicate microfoongevoeligheid [K] Indicate LowCut filter*
[VCVA] VCVA-indicatie (Variable Control Voice Actuator)
[HQ SP LP] Indicatie opnamemodus
[Time & Date] (afb.3)
Opmerkingen over demappen (afb. 4)
Microsoft Corporation.
![OLYMPUS VN-6500PC - [Time & Date] (afb.3) - 1](/content/2019/11/84080/images/fa8e5345322d62142f4b17c845ebd17a6a538756aad068426110720a926da3f6.jpg)
Notas sobre as pastas (Fig. 4)
3 Nolnoctb1o 3aokpoye KpbIshky ANEMETOB PIIAHNA.
Kornda nepeknjouateh HOLD yctahonbenn B hnapabhenn, nokaaHHOM cTpenkO, dnCnneB bblKTHoNTc noote Oo6paxenH ahdnn [HOLD]. BbnoHnnte cnDyoumsh wa, he oobpaan ha hep BHNMAYa.
BДИКTOΦOHe MOKHO NcNoIb3OBaTb nepe3apJxAeMbIe3NEMENTbIInITaHnIa Ni-MH (BR401) npOn3BoDCTBa komahmO Olympus.
3aMeHa 3JIeMeHToB nHTaHnA:
Nocne OTo6paJHcHn CmBbONa [4] Ha DCnPee KAKMQHO 6bCTpee 3aMeHNTe NEmeHTb NtAHnA. PekomeHyETcNcNoB3oBaTb 9eOnyHBe NEmeHTb NtAHnA TnA AAA. Nocne NcEupHaNn 3apJa NEmeTOB NtAHnA Ha DCnPee OTo6pa3HTCmCBN0 [4] ,Nocne YeroDkTkoOHbKlNOHTCn
- Pered 3ameHoi 3neMeHtA nHTaHnH y6dIITcB, cyoNEpKIOuHateNb HOLD cDINHytBCTOPHO, npOTBONIOJNOxHyI npArpaBENIOU CTpeNk.
NCTOChNK PHTaHnA (mR. 2)
BkLIOUeHHe nITaHnA:
cBdbHbTe nepeKnIOuHTeL HOLD b HanpaBLeHH, npOTbONoJXHOM ykaah3NMy TcpeKN.
BbikloueHn nntaHn:
cDmbHne tpeKnoHauTehn HOLDb HapnabEnHH, ykaaHnnom cTePknK, korga pabota dNktofoHa npeKpaenaH.
Pexm oKuHaHn N BbIKIoueHne Iucnpe:
Ecni npkepaTntb pa60Ty dNkTOfoHOB TceHHeNE 5MmHTyN6OeeBOBpEM3aHcINn mUH BOCIPON3ABeHEnO, OHpeXoDNB pEKMH OxKdHAnH (EKOHOHN HNeprn)
(B COOTBETCTBUN C EN 50332-2)
PazbemДЯнHayuHnKOB(MOHOFOHUcckN):
[NOA] Indikator for rostaktivering (Variable Control Voice Actuator)
Maximal effect: 250 mW
Maximal uteffekt for hörlar:
≤150mV
(i enlightemed EN 50332-2)
Hörlursuttag (mono):
3,5 mm diameter, impedans 8
Mikrofonuttag (mono):
3,5 ~mm diameter, impedans 2 k
Strömforssörjning:
v3A AAA-batterin (LRO3) or v3a uppladdingsbara-NH-matterin
Oavbruten batteritid:
- Len pre model VN-6500PC.
Vlozenie batéri (Fig. 1)
Zlakhac zatacta ne sikpu a vysunte kryt bateri.
2 Vlozte dve baterie ve'kesti AAA, pričom dodržte spravnu polaritu.
Ydktofohi Mokhna BkopocntObyBaTn DaqatKOBni HikeN-metanoIprudnHn aKymyIaTOp (BR401) Bnpo6HnTuTb. Olympus.
3aMiHa eneMeHtB XnBneHHA:
JKIOH Da NcIeINB iDIObOpaKaETCbCnMBON [C4],JKHaiNBIuIe 3aMHTiB enEMEHNI KJbENHeHH. PekOMENDBAOH BKNOPCITOBYBatn PnykHI enEMEHNI KJbENHeHH TNYI AAA. JKIOZapRd enEMEBTIB JKBbENHeHH BNuepNaHO, H Da NcIIeINB iDIObOpaKaETCbCnMBON [C4],aNkTOfOH BmIMKaKtCBsC.
- Nepu hix zamiHOBaTI enemEHNIbENHH, nepeKoHaTecn, IIO nepemikau HOLD nepemiiHcHny npotunLeXhOMy HanpMky Do cTPIKN.
Джеренин (φiR.[2])
YbIMKHeHnJXnBLeHn:
Nocythebe nepemeknACHOLD y hampamky, npotnehckomy DO Bk3a3horo CTpknIOK.
BumKHeHHxKbIeHHa:
Nocyhnye nepemikha HOLD y hanyamky, BKA3AHOM cyptiKIOK.
Pexm oukyBaHHra Ta BmKHeHHa dncnpe:
Jaioi nd aac 3aunycbHnna 6ao BiDtBOpenha 3yynHnntn DkTKofoHn Ha 5a60 bilue XbMLINH, BIn nepeIe y pekm oicykBaHN (3peKepEnHH eepri), aDCNneB IMBKKHeTbc. LIOb MItn 3 pekimmy oikyBaHNr Ta yBIMKHytn dncnne, HataNCHitb 6yb-ky KONKnY.
Bctanoblenha yacy ta datn [Time &Date](phi.3)
Pid qac npworo BCTabnHna enemtib XmbnHera Ta KoxHoro pa3y nid qac ix 3amHH6nnMaThme Inukiau (Month).Y taxomy pasi oob8A3KOBO CTaBHOIb Daty Ta qac, BVOKHAVBI KPOK 4-6, JAK CE onmCAHO NHXe.
1 Hatnchitb Ta ytpmmyte KhoNky DISP/MENU npotrarom 1 cekyndu A6o doBwe, 0o6 ybiTn B rOJOBHe MeHo.
2 Hatnichb.honky>la6o1<,0o6Bn6pTaN [Sub Menu].
3 HatnchItb KhoNky PLAY/OK ()
Ha dinnei biO6pa3uTbc8 [Time&Date],a[1<0X]nouhe 6bnmata.
4 HatnckAte KONKy ▶a60 1, qo6 Bn6paTH3aueHHa, JAE notpibHO BCTAHOBHTN.
Bn6ePi3 3aHcHEnI JIyNHTKtB 'Month', 日 ^ , 年 ^ , Hour ^ Ta 念 Minute, KONI BOHI 6JbnMoAotb.
① Po3'EM USB
②HaCnHnHaHnX
③ OTPmMaHHaHnX
BukopnstHaNkToΦoHa i3ΠK
PekmSP: pnp61.17 royni 10 XBNHIN
PezkM LP: pny61.54 royni i 40 xBNHn
333aHHe H Buie TpBAniBCT 3aNcYBaHHoN0Haay cac, knnDocTynnnc nCnBdAneHHaDNHX noC6Hnka, uO 36epiraotbCBA nDKtOfoHi
- Dani noci6Hnka MoKHa BnDAIHNi, NdkIOHbMnDkTOOHoDOKOMTI oTepa a6b I BoOPmATyBabWu HOr. IaO tOpMaHnHa DOkNAdHoiO IHOPMaJIi iIN. po3dIn 《OPomatByhnni DkTOFOHa[Format].
-П配电Hньдагпдаг,сбгогьрзерськоюлдадихипociciHнka,akm36epiraeTbcaуформatiPDF.
MikpoΦoH:
eNEKPTEHNOKOHDeHCATOPHNI MikoPOHO (MOHOOHCHNI)
Dnhamik:
Bsyobanh enekTropanhamiHn nnDiamHK diametropom 23 mm
MakcmaIbHa notyXhHtB:
250 MBT
MaKcMmaJIbHaBbIaXIIdHaNoTsyHJtcb HabyuHnKi:
≤150MB
(biDnOBiDNo do EN 50332-2)
POM'3EBAHUHMA (MOHOFOHCHN)IaMIDet P0 3,MM, NOBHN opin Og 5MT
POMKIMKOPOHMAOHOOHVNHn? DAMETPO3.5MMOBHNIOINOP2KMO
JxepenoXnBHeHHa:
Да велемпхиьменч.TNY AAA (LR03) a6do bvi hikelbmetanorigpondhi akymyntopn
TpuBaniCTbpo60THBID enemertieHJXNBENHAA:
Лужki ENEMETI XUJIENHRA: npri6N.37 rodni
Hikeneb-metanoripndi akymyntopnp: np6bn.2074n
Ra6apuTu:
102 (J) MNN 37 (LU) MM 18,8 (F) MM (6e3bctyni)
Bara:
64,8r (BkIIOUHO 3eIeMeHTamn JKNBHeHNA
- Yacpo6oTbIeNEMeTIbXbUHeHnB BMIPHN KOMPAnHcIe Olympus. Ce 3aueHnM oMe cytTEbO 3MINOBATNC 3aENHO BID TnYI BYKOpNCTOByBaHIn XeMeHtIB XbUHeHn Ta yMOB bKOpNCCTAHN.
3aHncaHnBMCTnpH3aHcHnI Hnne IbnbAChORo BVKOpNCtAHnTa 3aDobOenHn. BIdnoBIDHO do 3aKOHy npo ABTOCBk npaba 3ab60pHecBc Ta3ncyBnat Matepiian, 3aXuHeni ABTOCBmKn pPAB, 6e3O3bONy BlaNCHKB ABTOCBkNpAB.
Techihi xiapaektpcnctnka Ta dian3nn Moxytb 6ytn 3mIheh 6ez nonepedkennya nknokpaaenha po60tin pnpctpno.
Akkecsyapn (He BxOjaTb do KOMPNeKtTy)
3apnnpn pncptpi nna HikeneBmetanoirpndnix akyumnytospB:BU-400 (niuee Ira kpaai Ebpouni)
Hikeb-Metanoripnndn ankyumyantop: BR401
3^ dhybahnHn HUypo3EM habyhnuKa Po3'EM mikofohaKA333
Mikpofoh on 3yucnennm yumy: ME52
Enkptehn kondncatopnn mikofoh: ME15
Повдийн монофочни <|im_start|>assistant Навшник: E20
TeleohnnMikpooh:TP7
Hawin Hn pemineb:ST26

3HaK

Ley CMMON [nepekpclenen KoMn Ka koniuaatax WEEE
Annex IV] no37aueh oekpemn 361p cmttt I ane eKTPuHORI n eKETPOHORO
obanhaannu b kpaiahn Bponenbckoro cooyo.
He Binknaidte O6naDHHaP aozim 3 xathIM CTiMMI, IytnYni3auii bUorBO BnOby KOpNCTUYTeCEaOCTYNHMIu yBawii KpAHIcNTeMAMNIbTOBPHO BnKOpCtAHNA T36oby CMITTR. BnIp6, kAn 3actoCobyc: VN-6500PC,VN-5500PC,VN-3500PC

LeyCNMBON
[nepekcelemnokoih Na konlatax Directive 2006/66/EC,doatok II] no3naehae heo6xdictb OKpemoro 360py BVKOPCTAHNX ENEMTEI
JXWBENHRA B KHPAAx CBPoneNcBKORO COO3y. He BVKDAIte ENEMHTX JXWBENHRA pAO3OM i XATMIH CMITTAM,ДЯ YTVTIJIaZIi BIXOKIPCTAHN IX EMENTIB XWBENHRA KOPCITYTECA CNTMAMA NOBTOPHORA BIXOKIPCTAHNA I 360py CMITTT,DOCTYINMMU y Baaii KPIAIH.
OLYMPUS UK LTD
Vision House 19 Colonial Way Watford Herts WD24 4JL
Phone (switchboard): +44 (0) 1923 831000
http://www.olympus.com
REP. OFFICE OLYMPUS C&S
blvd. Bulgaria 88, entr. 2, fl. 1, ap. 3, 1404 Sofia, Bulgaria
Tel./Fax: +359 2 854 84 14, http://www.olympus.bg
OLYMPUS C&S, SPOL. S.R.O.
OLYMPUS HUNGARY KFT.
1382 Budapest 62, Pf.838, Tel.: +36 1 250 9377
POLYPHOTO S.P.A.
Via C. Pavese 11/13 20090 Opera/Milano,
Tel.: (02) - 530021
OLYMPUS LITHUANIA UAB
Seskines 55A, Vilnius, LT - 07159 Lithuania
Tel.: +370 5 233 00 21
OLYMPUS LATVIA SIA
Vienibas gatte 87 b, LV-1004 Riga,
Talr.: +371 762 33 34
OLYMPUS NEDERLAND B.V.
Industrieweg 44, 2382 NW Zoeterwoude
Tel.: 0031 (0)71-5821888, http://www.olympus.nl
OLYMPUS BELGIUM N.V.
Boomsesteenweg 77,2630 Aartselaar
Tel: (03) 870 58 00
OLYMPUS NORGE A/S
OLYMPUS POLSKA SP. Z O.O.
MGT EDUCATIONAL S.R.L
Bd. Ficusului nr. 40, scara B, et. 2, Sector 1,
013975 Bucuresti,
Tel.: 021-2328894, Fax: 021-2328899, http://www.mgt.ro
OLYMPUS D.O.O.
Dorda Stanojevicca 12, 11070 Beograd
Tel.: 011 2222-914, http://www.olympus.co.yu
OJIMNYC CEPBNC FACNJNTP YUC
r. MockBa, KoxeBHHueckn np-3d 4, ctp.2
TeN.: +7 495 540 70 71
OLYMPUS SVERIGE AB
Pyramidvagen 5, 169 56 Solna, Sweden
Tel.: +46 8 7353400, Fax: +46 8 7353410
OLYMPUS SLOVENIJA D.O.O.
Baznikova 2, SI-1000 Ljubljana.
TEL: +386 (1) 236 33 20
OLYMPUS SK SPOL. S R.O.
(Premises/Goods delivery) Wendenstrasse 14-18, 20097 Hamburg, Germany. Tel. +49 (0)40-237730
(Letters) Postfach 10 49 08. 20034 Hamburg, Germany.
http://www.olympus-europa.com
OLYMPUS UK LTD.
Vision House 19 Colonial Way Watford Herts WD24 4JL. Tel. +44 (0)1923 831000
http://www.olympus.co.uk


- Introduction
- Trademarks and registered trademarks:
- Safe and Proper Usage
- Getting Started
- Identification of Parts
- Display (LCD panel):
- Inserting Batteries (Fig. 1)
- Replacing Batteries:
- Power Supply (Fig. 2)
- Power on:
- Poweroff:
- Standby Mode and Display Shut Off:
- Setting Time and Date [TIME] (Fig. 3)
- Press the PLAY/OK (▶) button.
- Press the or I button to select the item to set.
- Press the + or - button to set.
- Press the PLAY/OK () button to complete the setup screen.
- Press the STOP (■) button to close the menu mode.
- Notes on the Folders (Fig.14)
- Recording (Fig. 5)
- Press the FOLDER/INDEX button to select the desired folder.
- Press the REC () button to start recording.
- Press the STOP (■) button to stop recording.
- Playback (Fig. 6)
- Press the + or - button to select the proper sound volume.
- To Stop: (Fig. 7)
- Press the STOP (■) button.
- Erase
- Erasing One File at a Time (Fig. 8)
- Erase All Files from a Folder (Fig. 9)
- Notes:
- Other Functions
- Connecting to Your PC (Fig. 10)
- Connect the recorder's USB terminal to a PC USB port or USB hub.
- Transfer the audio files to your computer.
- Click on the task bar located at the lower-right corner of the screen. Click [Safely Remove Hardware].
- General Precautions
- Warning regarding data loss:
- For safe and correct Usage
- Batteries
- Warning:
- Specifications
- Microphone:
- Speaker:
- Maximum power:
- Wide band characteristic headphone output:
- Earphone jack (monaural):
- Power supply:
- Continuous battery:
- Dimensions:
- Accessories (Optional)
- BG
- BbVeHne
- TbproBcNMapKnpeHCTpnpaHnTbproBcNMapKn
- Be3oNaHn npabHnHa ynoTpe6a
- Kak da 3anoptyhe
- HdENTnphiupaneHa qactnte
- Ekpan(LCD nahen):
- IocTabaHHeHa6aTePnTe (Mrg.1)
- CmhaHa 6aTepuInte:
- Enktpo3axpaHbAne (Mn.2)
- BkIIOUbaHe:
- N3KIIIOUBAHe:
- Pexm Standby n3KIOUbahe Ha ekpana:
- HaTpoiBaHae HaacobToB VpeMe Hatata [Time & Date] (Mn. 3)
- 3a6eJeknOTHoCHO nankTe (Φm.4)
- 3auncbane (Mn.5)
- Bb3npoun3Bexkdahe (Our. 6)
- N3tpnBaHe
- M3tpmbane no eunH φaHnHaBeHNbK (Φur. 8)
- NtprnBaHe Ha BcMnKn faiNoBe ot napanka (Φnr.9)
- ApyrNΦyHKznn
- 06u npednaHmepkn
- PepdnypexpdeHne OTHOCHO 3ary6a Ha daHHn:
- 3a 6e3onacha n npabunha ynotpe6a
- Батугия
- BhimaHne
- CneuΦkaaun
- 3anncbaaocpeDCTBO:
- 067a yectota:
- VN-3500PC:
- Bpeme 3a 3anu:
- VN-6500PC, VN-5500PC: 512 MB
- VN-3500PC:128MB
- MnKpOΦoH:
- Bucokoroboputei:
- MaKcImaHaMoUHocT:
- Enektpo3axpaHbaHe:
- NoctoHa 6aTepey:
- Pa3mepn:
- Akkcecoapu (Onzua)
- 3apexdaio yctpoictbo 3a Ni-MH 3pezapea4aemc 6aTeepn: BU- 400 (cama 3a Ebpona)
- ПразарждаemaNi-MHбатери: BR401
- Cbpr3Ba7a BpBb (Bykca 3a cnyuakn ↔ Bykca 3a mKPOΦOH: KA333
- MnkofoHa 3oOCTpaHbaHe ha yma:ME52
- ENeTKPOHmMKPOFOHON KOHNHe3aOT:ME15
- [Time & Date] (Obr. 3)
- Stisknete tlacitko PLAY/OK ()
- Mikrofon:
- Reproduktor:
- ES
- Introduccion
- Atypn
- Σημειώεις:
- AlambdaeIeIoupyieC
- SvduoTovuolooyiOaC(Eik.10)
- hub yia uOIoYoiTn.
- Metapeper ta apxieia nov otov unolatoiac.
- Kavte klik otyn emioy [ ] otnyapun epyaiownou Bioketai otyn katw deia ywvia ntc obovnc. Kavte klik enyimoy [Aospaaick katapynon oukeuwu Aikou].
- Enavaopotcjeevnunatapia Ni-MH: BR401
- #
- unnnnniynxN9"0wn
- Jack auricolari (mono):
- Vienafailadzeshana Fig.8
- Visu failu dzësana no mapes (Fig. 9)
- Piezimes:
- Citas funkcijas
- Pievienošana datoram (Fig.10)
- Diktofona lietosana, piesledzot to datoram
- Windows
- Operetajstema:
- Display (LCD-schem):
- [Time & Date] (afb.3)
- Notas sobre as pastas (Fig. 4)
- 3aMeHa 3JIeMeHToB nHTaHnA:
- NCTOChNK PHTaHnA (mR. 2)
- PazbemДЯнHayuHnKOB(MOHOFOHUcckN):
- Maximal uteffekt for hörlar:
- Hörlursuttag (mono):
- Mikrofonuttag (mono):
- Strömforssörjning:
- Oavbruten batteritid:
- Vlozenie batéri (Fig. 1)
- 3aMiHa eneMeHtB XnBneHHA:
- Джеренин (φiR.[2])
- YbIMKHeHnJXnBLeHn:
- BumKHeHHxKbIeHHa:
- Pexm oukyBaHHra Ta BmKHeHHa dncnpe:
- Bctanoblenha yacy ta datn [Time &Date](phi.3)
- MikpoΦoH:
- Dnhamik:
- MakcmaIbHa notyXhHtB:
- MaKcMmaJIbHaBbIaXIIdHaNoTsyHJtcb HabyuHnKi:
- POM'3EBAHUHMA (MOHOFOHCHN)IaMIDet P0 3,MM, NOBHN opin Og 5MT
- POMKIMKOPOHMAOHOOHVNHn? DAMETPO3.5MMOBHNIOINOP2KMO
- JxepenoXnBHeHHa:
- TpuBaniCTbpo60THBID enemertieHJXNBENHAA:
- Ra6apuTu:
- Bara:
- Akkecsyapn (He BxOjaTb do KOMPNeKtTy)
- Hikeb-Metanoripnndn ankyumyantop: BR401
- OLYMPUS UK LTD
- OFFICE OLYMPUS C&S
- OLYMPUS C&S, SPOL. S.R.O.
- OLYMPUS HUNGARY KFT.
- POLYPHOTO S.P.A.
- OLYMPUS LITHUANIA UAB
- OLYMPUS LATVIA SIA
- OLYMPUS NEDERLAND B.V.
- OLYMPUS BELGIUM N.V.
- OLYMPUS NORGE A/S
- OLYMPUS POLSKA SP. Z O.O.
- MGT EDUCATIONAL S.R.L
- OLYMPUS D.O.O.
- OJIMNYC CEPBNC FACNJNTP YUC
- OLYMPUS SVERIGE AB
- OLYMPUS SLOVENIJA D.O.O.
- OLYMPUS SK SPOL. S R.O.
Brand : OLYMPUS
Model : VN-6500PC
Category : Voice recorder