
CD-726DAB - Radio Clas Ohlson - Free user manual and instructions
Find the device manual for free CD-726DAB Clas Ohlson in PDF.


| Product Type | CD Player with DAB Radio |
| Brand | Clas Ohlson |
| Model | CD-726DAB |
| Article Numbers | 38-6607, 38-6608 |
| Dimensions (W x H x D) | 25 x 13.5 x 21.5 cm |
| Mains Voltage | 230 V AC, 50 Hz |
| Battery Requirement | 6 x C/LR14 (sold separately) |
| DAB+ Frequency Range | 174–240 MHz |
| FM Frequency Range | 87.5–108 MHz |
| AUX Input | 3.5 mm stereo jack |
| Presets | Up to 10 each for DAB and FM |
| CD Playback | Audio CDs, up to 20 programmable tracks |
| Display | LCD |
| Antenna | Telescopic aerial for FM |
| Speaker | Built-in |
| Safety Classification | Class 1 Laser Product |
| Recommended Cleaning | Soft, dry cloth |
| Automatic Standby | After long period of inactivity |
| Usage | Indoor use only |
Frequently Asked Questions - CD-726DAB Clas Ohlson
User questions about CD-726DAB Clas Ohlson
0 question about this device. Answer the ones you know or ask your own.
Ask a new question about this device
Download the instructions for your Radio in PDF format for free! Find your manual CD-726DAB - Clas Ohlson and take your electronic device back in hand. On this page are published all the documents necessary for the use of your device. CD-726DAB by Clas Ohlson.
USER MANUAL CD-726DAB Clas Ohlson
CD Player with DAB Radio
natural_image
Line drawing of a portable electronic device with front panels and buttons (no text or symbols)Art.no
38-6607
38-6608
Model
CD-726DAB
CD-726DAB
Ver. 20140910
CD Player with DAB Radio
Art.no 38-6607 Model CD-726DAB
38-6608
CD-726DAB
Please read the entire instruction manual before using the product and then save it for future reference. We reserve the right for any errors in text or images and any necessary changes made to technical data. If you have any questions concerning technical problems please contact our Customer Services.
Contents
- Safety 4
1.1 Safety symbols....4
-
Description ....5
-
230 V Mains operation ....6
-
Battery operation....6
-
Operating instructions....6
5.1 Placement....6
5.2 Switching on the CD player with DAB radio for the first time 6
5.3 Switching the radio on and off and selecting the function....6
- DAB Radio ....7
6.1 Listening to DAB radio....7
6.2 Activate "Full Scanning" manually for automatic DAB station search ....7
6.3 Manual DAB station search ....7
6.4 Saving a found DAB radio station as a preset 8
6.5 Browsing the saved DAB radio stations (in DAB mode)....8
6.6 Removing unwanted DAB stations (Pruning)....8
6.7 DAB station information....8
- FM radio....9
7.1 Activating FM mode 9
7.2 Automatic search for FM stations 9
7.3 Manual search for FM stations 9
7.4 Saving a found FM radio station as a preset 9
7.5 Browsing the saved FM radio stations (in FM mode)....9
7.6 FM station information....9
- CD player ....10
8.1 CD playback....10
8.2 Skip function....10
8.3 Programmed playing of CD tracks 10
8.4 Repeat a track on a CD....10
-
AUX mode (external audio source)....11
-
Setting the time and date....11
-
Resetting the radio to factory settings....11
-
Care and maintenance....11
-
Troubleshooting....12
-
Disposal 12
-
Specifications....12
1. Safety
- The product should not be taken apart or modified. Certain non-shielded components inside the casing of the CD player/radio carry dangerous current. Contact with these can lead to fire or electric shock.
- The product is intended for indoor use only.
- Never subject the CD player to high or low temperatures, dust, heavy vibration, impacts, humidity or moisture.
- Do not place the product where it could fall into water or other liquids. Do not place any objects containing liquid on the product, e.g. flower vases or drinks.
- Do not cover the CD player. Adequate ventilation with a distance of at least 10 cm between ventilation holes and the surrounding area is necessary to prevent the CD player from becoming too warm.
- Disconnect the CD player from the power supply by unplugging it from the wall socket.
- Protect your hearing. Listening on high volume for prolonged periods can lead to permanent hearing loss.
- Repairs and service should only be performed by qualified tradesmen, and only with original spare parts.
- The CD player must not be dismantled or modified in any way.
- The CD player must not be used close to medical equipment such as in intensive care units. Neither should it be used in close proximity to someone with an implanted pacemaker, cardioverter-defibrillator or similar.
1.1 Safety symbols
Note the following safety symbols:
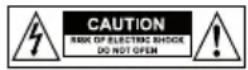
Warning: Do not open the housing. The casing contains hazardous unshielded live components which if touched could start a fire or give you an electric shock.
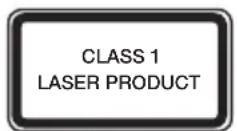
CLASS 1 LASER PRODUCT
Warning: Do not open the housing. The product contains invisible laser beams which can cause eye damage. Do not look directly into the laser beam or look directly at it using an optical instrument.
2. Description
Package contents:
CD player with DAB radio, mains lead and instruction manual.
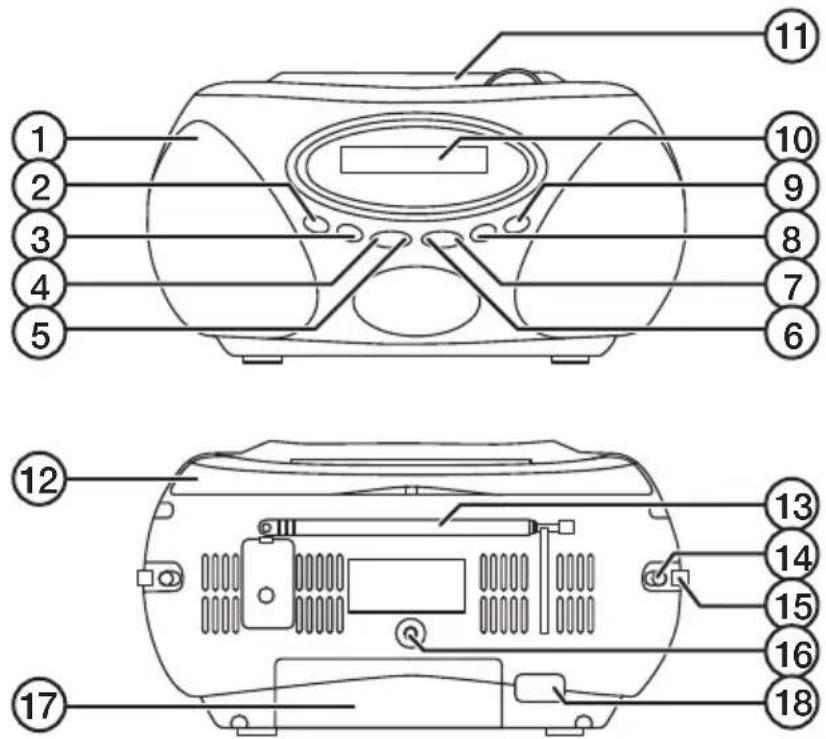
- Speaker
- [MODE, DAB+/FM] Select certain functions for the CD player, select DAB or FM radio
- [PRESET/PROG] Save stations as presets
- [MENU] Press in the button on the left to display the menu
- [SELECT] Press in the button on the right to confirm
- [SKIP/TUNE< ] Press in the button on the left to change to a lower frequency or submenu
- [SKIP/TUNE>] Press in the button on the right to change to a higher frequency or submenu
- [STOP/INFO] Stop CD playback or display information about the radio station
-
[PLAY/PAUSE FULL SCAN] Start playback/pause playback or start a station search in DAB mode (Full Scan)
-
LCD display
-
CD tray
-
Handle
-
Telescopic aerial for FM radio
-
[OFF/AUX/CD/DAB+/FM] Function selector
-
OFF
- AUX (for listening to an external audio source such as a telephone, MP3 player)
- CD
-
DAB+/FM (for listening to the radio (DAB+ or FM))
-
VOLUME Volume control
- AUX IN line-in for external audio source (3.5 mm)
- Battery compartment
- AC socket for mains lead
3. 230 V Mains operation
Plug the power lead into the AC socket (18) and into an electrical socket.
- Do not touch the mains lead with wet hands.
- Disconnect the power lead if the CD player is not be used for an extended period.
- Do not pull on the mains lead when unplugging the CD player, grip the plug and pull it out of the socket.
4. Battery operation
-
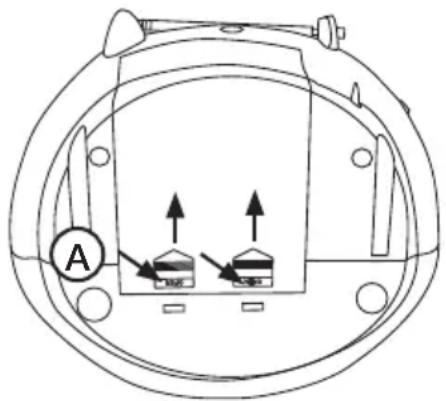
Open the battery compartment (17) by pressing it down at the arrows (where "OPEN" is written). Press and slide the battery cover outwards in the direction of the arrows.
-
Insert 6 × C/LR14 batteries (sold separately) observing the polarity markings in the battery compartment.
5. Operating instructions
5.1 Placement
The CD player should be placed on a flat surface indoors where it is not in direct sunlight or close to a heat source, and not in a humid atmosphere such as in a bathroom.
5.2 Switching on the CD player with DAB radio for the first time
- Make sure that the function selector is set to OFF.
- Completely extend the telescopic aerial and lift it up. It is important that optimum reception is achieved the first time the radio is used and scans for DAB and FM stations.
- Connect the mains lead to the AC socket (18).
- Connect the plug to a wall socket.
- Set the function selector (14) to the DAB+/FM position to turn the radio on. "Welcome to Digital Radio" will appear on the display.
- The radio will automatically begin searching for DAB stations. "Autotune Full Scan" will appear on the display and an event indicator will show that searching is in progress and how many stations have been found. When the scan has finished, the radio will start playing the first station found. If no DAB stations are found "No DAB Station" will appear on the display.
- All the DAB stations found will be saved in the memory, next time the radio is switch on it will not need to perform an automatic scan. However, a manual station search can be made by pressing [PLAY/PAUSE FULL SCAN] (9) whilst in DAB mode.
5.3 Switching the radio on and off and selecting the function
The function selector [ OFF/AUX/CD/DAB+/FM ] (14) switches the radio on/off. The function selector has four positions:
- OFF
- AUX (for listening to an external audio source such as a telephone, MP3 player)
• CD - DAB+/FM (for listening to radio, DAB starts first (press [ MODE, DAB+/FM ] (2) if you wish to change to FM (or from FM to DAB))
6. DAB Radio
DAB – Digital Audio Broadcasting
DAB radio is not the same as analogue radio. In DAB mode, the signals from several broadcasters are combined and sent on the same frequency. These groups of signals are called Multiplexes and Ensembles. Each time a group has been found, its name appears at the bottom of the display.
DAB mode - secondary services
Sometimes, a “>” symbol can be seen after the name of a station. This indicates that the station has a secondary service. This secondary service could be in the form of a sports commentary for example.
Automatic standby (after long period of inactivity)
The CD player automatically switches to standby mode after a long period of inactivity. This occurs when the CD player is in stop mode for a long time or if the DAB radio receives no signal.
To re-activate the CD player, first switch the function selector to OFF and then switch it back to the desired function, CD or DAB+/FM.
6.1 Listening to DAB radio
Activate DAB mode
- Set the function selector to DAB+/FM. "Welcome to Digital Radio" will appear on the display.
- When the radio is turned on for the first time it automatically enters DAB mode and performs an autoscan. During the scanning process, the words "Full Scanning" and the number of stations found will appear on the display.
- When the scan is complete, the radio starts playing the station with the lowest frequency.
- If no DAB stations are found "No DAB Station" will appear on the display.
6.2 Activate "Full Scanning" manually for automatic DAB station search
- Set the function selector to DAB+/FM. "Welcome to Digital Radio" will appear on the display.
- Press [ PLAY/PAUSE FULL SCAN ] (9) (in DAB mode) to start a "Full Scan" search.
- "Searching" is shown on the display whilst the search is in progress. Note: The search can take 1 or 2 minutes.
- When stations are found they are saved automatically. To listen to the saved stations, press [SKIP/TUNE<] or [SKIP/TUNE>] to select a station. Press [SELECT] to confirm.
6.3 Manual DAB station search
- Press [MENU] (4) to display the menu.
- Press [SKIP/TUNE<] (6) or [SKIP/TUNE>] (7) and select Manual Tune. Press [SELECT] to confirm.
- Press [SKIP/TUNE<] or [SKIP/TUNE>] to browse the DAB channels (5A to 13F).
- Press [SELECT] to confirm your choice of channel. The chosen multiplex will then be shown on the display.
6.4 Saving a found DAB radio station as a preset
The radio can save up to 10 different DAB radio stations as presets. DAB presets are not saved over FM presets. Save a DAB radio station as follows (In DAB mode):
- Tune the radio into the desired station.
- Push and hold [ PRESET/PROG ] (2) for 2 seconds. The preset station and "P#" (where # is the preset station number) will appear on the display.
- Press [SKIP/TUNE<] or [SKIP/TUNE>] to select which preset number the station is to have (1–10).
- Press [SELECT] to confirm.
Note: If a previously saved station already occupies the chosen preset slot it will be replaced by the new one.
6.5 Browsing the saved DAB radio stations (in DAB mode)
- Press [ PRESET/PROG ] (3) to show the preset station and its preset number (P#).
- Press [ SKIP/TUNE< ] or [ SKIP/TUNE> ] to select a station.
- Press [ SELECT ] to confirm.
Note: The radio might become silent for a moment whilst the stations are changing.
6.6 Removing unwanted DAB stations (Pruning)
- In DAB mode, press [MENU] (4).
- Press [ SKIP/TUNE< ] or [ SKIP/TUNE> ] to select PRUNE.
- Press [ SELECT ] to confirm.
- "PRUNE" will appear on the display, press [SKIP/TUNE<] or [SKIP/TUNE>] and select NO to quit or YES to remove the station in question.
- Press [MENU] (4) to exit and return to normal DAB mode.
6.7 DAB station information
By pressing [ STOP/INFO ] (8) repeatedly, you can display the following information:
- Frequency – The frequency is displayed as for example “11C 220.352MHz”.
- Audio Bite Rate – The display shows the radio mode (DAB) and the digital audio bit rate of the current reception.
- Scrolling text – Text from the DAB station you are listening to. The information can for example include facts about the music being played.
- Programme Type: shows which type of programme you are listening to, "Rock", "Pop", "News" etc. If there is no information, the text "Programme Type" is displayed.
- Ensemble: This is a group of radio stations sent on the same frequency. There are both national and local multiplexes. The local ones contain stations specific for your area.
- Signal Strength: The signal strength is displayed graphically by means of a slide bar. The stronger the signal, the longer the bar.
• Date: shows the current date.
• Time: shows the current time.
7. FM radio
Completely extend the telescopic aerial and lift it up. This is important in order to get the best reception when the radio is scanning for FM stations.
Once the radio is switched on, it will start playing the same programme it was set to when it was last switched off.
7.1 Activating FM mode
- Set the function selector to DAB+/FM. "Welcome to Digital Radio" will appear on the display (the radio always starts in DAB mode).
- Press [MODE DAB+/FM] (2) to select FM.
- Set the desired volume using VOLUME (15).
7.2 Automatic search for FM stations
- Press [PLAY/PAUSE FULL SCAN] (9) or hold in [SKIP/TUNE<] or [SKIP/TUNE>] for about 1 second to start an automatic search for the next available FM station.
- The search stops when a station with a strong signal reception has been found.
Note: Stations with weak signal reception must be tuned in manually.
7.3 Manual search for FM stations
Press [ SKIP/TUNE< ] (6) or [ SKIP/TUNE> ] (7) to browse the frequency range.
7.4 Saving a found FM radio station as a preset
The radio can save up to 10 different FM radio stations as presets. FM presets are not saved over DAB presets.
FM radio stations are saved as follows:
- Tune the radio into the desired station.
- Push and hold [ PRESET/PROG ] (3) for 2 seconds. The preset station and "P#" (where # is the preset station number) will appear on the display.
-
Press [SKIP/TUNE<] (6) or [SKIP/TUNE>] (7) to select which preset number the station is to have (1–10). If there is already a station saved on preset 1, its name and frequency will be displayed, if no station has previously been saved as preset 1, "Empty" will appear on the display.
-
Press [SELECT] to confirm.
-
"Preset # stored" will appear in the display once the station is saved.
Note: If a previously saved station already occupies the chosen preset slot it will be replaced by the new one.
7.5 Browsing the saved FM radio stations (in FM mode)
- Press [ PRESET/PROG ] (3), the current station and its preset number (#) will be displayed.
- Press [ SKIP/TUNE< ] (6) or [ SKIP/TUNE> ] (7) to select one of the preset stations (1–10).
- Press [SELECT] to confirm that you want to listen to that station.
7.6 FM station information
By pressing [ STOP/INFO ] (8) repeatedly, you can display the following information:
- Audio Type: shows whether the signal is mono or stereo.
-
Scrolling text: Text from the FM station you are listening to. The information can for example include facts about the music being played.
-
Programme Type: shows which type of programme you are listening to, "Rock", "Pop", "News" etc. If there is no information, the text "Programme Type" is displayed.
- Signal Strength: The signal strength is displayed graphically by means of a slide bar. The stronger the signal, the longer the bar.
- Date: shows the current date.
- Time: shows the current time.
- Frequency: displays the frequency of the current station.
8. CD player
8.1 CD playback
- Set the function selector [ OFF/AUX/CD/DAB+/FM ] (14) to CD.
- Open the CD door by carefully lifting it.
- Place a CD onto the spindle in the middle of the CD compartment.
- Shut the door by carefully pushing it down.
- The CD player will start reading the disc and display the total number of tracks.
- Press [ PLAY/PAUSE FULL SCAN ] (9) to start playing the CD.
- Press [PLAY/PAUSE FULL SCAN] (9) again if you wish to pause the playback. Press the same button again to resume playback.
- Press [ STOP/INFO ] (8) to stop playback or set the function selector [ OFF/AUX/CD/DAB+/FM ] (14) to a different position than CD to stop the playback.
8.2 Skip function
- Press [ SKIP/TUNE> ] (7) once to skip to the next track.
- Press [ SKIP/TUNE< ] (6) once to return to the beginning of the current track.
- Press [ SKIP/TUNE< ] (6) repeatedly to skip back to previous tracks.
8.3 Programmed playing of CD tracks
A total of 20 tracks can be programmed.
- Press [ STOP/INFO ] (8). Press [ PRESET/PROG ]. "PROG" will begin flashing on the display.
- Press [ SKIP/TUNE< ] (6) or [ SKIP/TUNE> ] (7) to select which track is to be saved.
- Press [PRESET/PROG] to store the desired track into the play list memory. "PROG02" appears on the display.
- Repeat steps 2–3 to add more tracks to the play list.
- Press [PLAY/PAUSE FULL SCAN] once you have finished programming your tracks onto your play list. The tracks on the CD will now be played in the order programmed on your play list.
- Press [ STOP/INFO ] (8) to stop playback.
- To clear the programmed play list, either press [ STOP/INFO ] (8) twice, open the CD door, set the function selector to a different position or switch the CD player off.
8.4 Repeat a track on a CD
- During playing of a CD, press [MODE, DAB+/FM] (2) once to repeat the track that is playing. "REP 1" is shown on the display.
- Press [MODE, DAB+/FM] a second time to repeat all the tracks on the CD. "REP ALL" is shown on the display.
- Press [MODE, DAB+/FM] (2) a third time to begin playing the tracks in random order. "RAND" is shown on the display.
- Press [MODE, DAB+/FM] (2) a fourth time to exit the repeat playback mode. No text is shown on the display when the repeat function is shut off.
9. AUX mode (external audio source)
- Set the function selector [ OFF/AUX/CD/DAB+/FM ] (14) to AUX.
- Connect an external audio source to AUX IN (16) using a suitable cable with a 3.5 mm stereo plug.
- Playback is controlled from the external audio source. Adjust the volume on both the external audio device and the radio to achieve the best sound quality.
- Set the function selector [ OFF/AUX/CD/DAB+/FM ] (14) in a different position than AUX to stop listening to the external audio source.
10. Setting the time and date
- While in DAB or FM mode: Press [MENU] (4) to display the menu.
- Press [SKIP/TUNE<] (6) or [SKIP/TUNE>] (7) and Set Time/Date. Press [SELECT] to confirm.
- "Set 12/24 hour" will appear on the display. Press [SELECT].
- Select 12- or 24-hour clock ("Set 12 hour" or "Set 24 hour") using [SKIP/TUNE<] or [SKIP/TUNE>]. Press [SELECT] to confirm.
- Press [SKIP/TUNE<] or [SKIP/TUNE>] to select Set Time/Date and then press [SELECT].
- "Set time 00:00" is displayed (hours flashing), adjust to the correct time using [SKIP/TUNE<] or [SKIP/TUNE>]. Press [SELECT] to confirm. The minutes will now be flashing, set them in the same way as the hours. Press [SELECT] to confirm.
- "Set Date" will flash, set the date the same way as you set the time. Press [SELECT] to confirm. "Time saved" will appear on the display when the time and date have been set.
Note: All the time and date settings must be made before the settings are saved automatically. - Select the date format by pressing [SKIP/TUNE<] (6) or [SKIP/TUNE>] (7) select Set Time/Date and then Set date format. Press [SELECT] to confirm. Choose either DD-MM-YYYY or MM-DD-YYYY by pressing [SKIP/TUNE<] or [SKIP/TUNE>]. Press [SELECT] to confirm.
11. Resetting the radio to factory settings
- In DAB+/FM mode, hold in [MODE DAB+/FM] until "Press ENTER key to reset" is displayed.
- Press [ SELECT ] (5) to start the reset process. "Press ENTER key OK" is displayed.
- Once the unit has reset, the radio starts playing in DAB mode and performs an "Auto scan".
Note: All preset stations will also be lost if the radio is reset, as explained below.
13. Care and maintenance
Clean the product using a soft, dry cloth. Never use solvents or abrasive cleaning agents.
14. Troubleshooting
Poor radio reception
- Extend the aerial completely.
- Move the radio. Remember to scan for stations again after moving.
- Check that the radio is not close to any sources of interference such as microwaves, fluorescent lights, etc.
No sound
- Check the volume setting.
- Check that the power switch is not set to OFF and that the mains lead is connected correctly.
- Try changing to another station.
The controls are not working
- Check that the power switch is not set to OFF and that the mains lead is connected correctly.
- Turn the unit off, unplug the mains lead, wait about 1 minute. Plug the mains lead back in.
- Reset the radio to its factory settings, see Resetting the radio to factory settings.
15. Disposal
This product should be disposed of in accordance with local regulations. If you are unsure how to proceed, contact your local council.
16. Specifications
Mains voltage 230 V AC, 50 Hz
Frequency range DAB+/DAB 174–240 MHz
FM 87.5–108 MHz
AUX socket 3.5 mm
Battery type 6 × C/LR14 (sold separately)
Size 25 × 13.5 × 21.5 cm
natural_image
Technical diagram of a mechanical component with two internal components and directional arrows, labeled A (no text or symbols beyond labels)5. Användning
5.1 Placering
DAB – Digital Audio Broadcasting
DAB - Digital Audio Broadcasting
natural_image
Technical diagram of a mechanical component with two internal components and directional arrows, labeled A (no text or symbols beyond labels)5.1 Aufstellung
DAB – Digital Audio Broadcasting
Postal 10 – 13 Market Place
Kingston Upon Thames
Surrey
KT1 1JZ
Deutschland
- CD Player with DAB Radio
- Contents
- Safety
- Safety symbols
- CLASS 1 LASER PRODUCT
- Description
- 230 V Mains operation
- Battery operation
- Operating instructions
- Placement
- Switching on the CD player with DAB radio for the first time
- Switching the radio on and off and selecting the function
- DAB Radio
- DAB – Digital Audio Broadcasting
- DAB mode - secondary services
- Automatic standby (after long period of inactivity)
- Listening to DAB radio
- Activate DAB mode
- Activate "Full Scanning" manually for automatic DAB station search
- Manual DAB station search
- Saving a found DAB radio station as a preset
- Browsing the saved DAB radio stations (in DAB mode)
- Removing unwanted DAB stations (Pruning)
- DAB station information
- FM radio
- Activating FM mode
- Automatic search for FM stations
- Manual search for FM stations
- Saving a found FM radio station as a preset
- Browsing the saved FM radio stations (in FM mode)
- FM station information
- CD player
- CD playback
- Skip function
- Programmed playing of CD tracks
- Repeat a track on a CD
- AUX mode (external audio source)
- Setting the time and date
- Resetting the radio to factory settings
- Care and maintenance
- Troubleshooting
- Poor radio reception
- No sound
- The controls are not working
- Disposal
- Specifications
- Användning
- Placering
- DAB - Digital Audio Broadcasting
- Aufstellung
- Deutschland
Brand : Clas Ohlson
Model : CD-726DAB
Category : Radio