
CR-A108I - Radio Clas Ohlson - Free user manual and instructions
Find the device manual for free CR-A108I Clas Ohlson in PDF.


| Brand | Clas Ohlson |
| Model | CR-A108I |
| Product Type | Portable Radio |
| Frequency Range | FM 87.5-108 MHz, AM 530-1710 kHz |
| Power Source | AC 230V 50Hz or 4 x AA batteries (not included) |
| Dimensions (W x H x D) | 200 x 120 x 80 mm |
| Weight | 0.5 kg |
| Speaker | Built-in 2-inch dynamic speaker |
| Audio Output | 3.5 mm headphone jack |
| Tuning | Analog rotary dial with frequency indicator |
| Controls | Volume knob, tuning knob, on/off switch |
| Antenna | FM telescopic antenna, AM built-in ferrite bar |
| Power Consumption | 5 W (AC mode) |
| Battery Life | Approx. 20 hours with alkaline AA batteries |
| Display | Analog frequency scale |
| Additional Features | Carry handle, earphone socket, AC power cord |
| Safety Warnings | Do not expose to water or moisture; use only specified power source |
| Cleaning Instructions | Wipe with a soft, dry cloth; do not use liquid cleaners |
| Spare Parts Availability | Batteries and AC adapter are standard; other parts contact Clas Ohlson |
| Repairability | Not user-serviceable; contact authorized service center |
Frequently Asked Questions - CR-A108I Clas Ohlson
User questions about CR-A108I Clas Ohlson
0 question about this device. Answer the ones you know or ask your own.
Ask a new question about this device
Download the instructions for your Radio in PDF format for free! Find your manual CR-A108I - Clas Ohlson and take your electronic device back in hand. On this page are published all the documents necessary for the use of your device. CR-A108I by Clas Ohlson.
USER MANUAL CR-A108I Clas Ohlson
Clock Radio with iPod Dock
Klockradio med iPod-dockning Klokkeradio med iPod-dokking Kelloradio iPod-telakalla

Art.no. Model
18-8149 CR-A108I-UK
38-3796 CR-A108I
Ver. 201005
Clock Radio with iPod Dock
Art.no: 38-3796 Model: CR-A108I
18-8149 CR-A108I-UK
Please read the entire instruction manual before using the product and save it for future reference. We reserve the right for any errors in text or images and any necessary changes made to technical data. If you have any questions regarding technical problems please contact Customer Services.
Contents
Safety
Product description
Buttons and functions
Getting started
Use
Care and maintenance
Disposal
Specifications
Safety
- Do not open the casing! Certain components inside the casing are exposed and carry dangerous electrical current. Contact with these can give electric shock.
- The product should only be repaired by qualified service technicians.
- The product should not be taken apart or modified.
- The product is designed for indoor use only.
- Never expose the device to high temperatures, blows, dampness or moisture.
- Do not place the product where there is a risk of it falling into water or other liquid. Do not place containers with liquid on the product e.g. flower vases, coffee cups, fizzy drink bottles.
- Do not place the device in damp, dusty environments or where there are heavy vibrations.
- Shut off the stand-by function during night time or when you travel away.
Buttons and functions
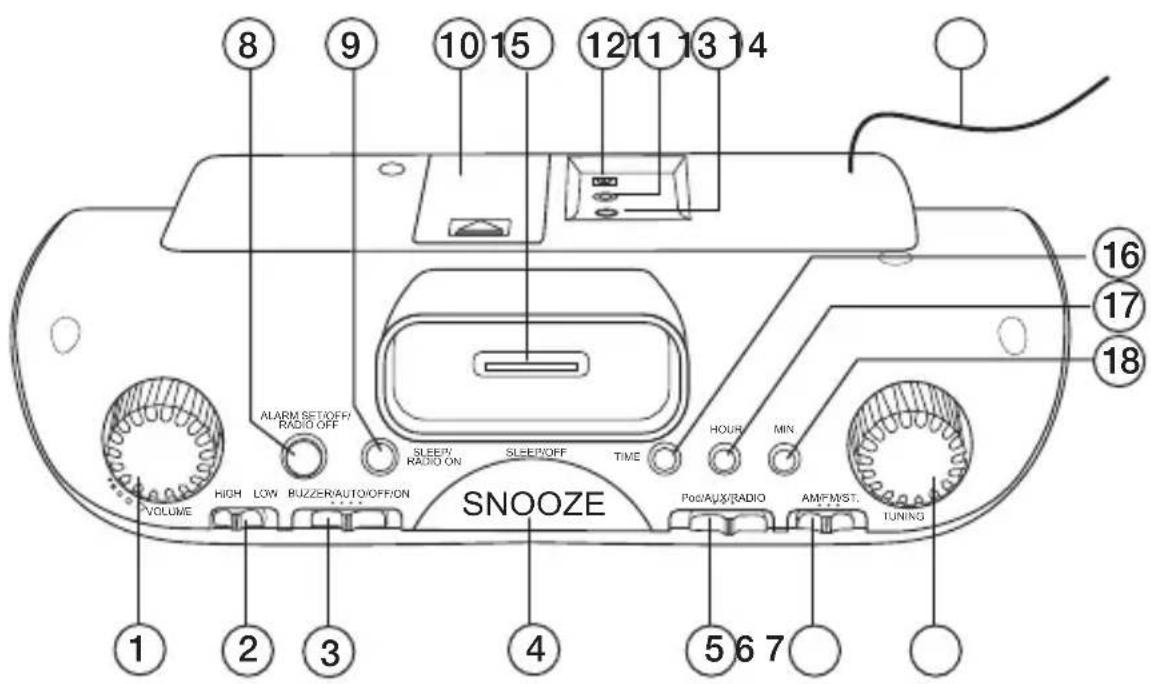
- VOLUME – Volume control
- Backlight – Choice of HIGH (bright light) or LOW (weak light)
- BUZZER/AUTO/OFF/ON – Power/function switch
- SLEEP OFF/SNOOZE – Repeated wake-up alarm
- iPod/AUX/RADIO – Select audio source (iPod, external music player or radio)
- AM/FM/ST.
- Radio band selector
- TUNING
– Frequency adjusting knob
- ALARM SET/OFF/RADIO OFF
- Setting button for alarm/alarm signal activation button
- SLEEP/RADIO ON – Sleep timer/radio activation button
- Backup battery compartment (9 V)
- iPod dock
- Mains adaptor socket
- 3.5 mm headphone jack
- AUX IN – External audio source input jack
- FM aerial
- TIME – Time set button
- HOUR – Sets the hours
- MIN – Sets the minutes
Front

- Alarm indicator - Lit = Alarm activated, Off = Alarm deactivated
- AM/PM indicator - Lit = PM, Off = AM
- Clock
- Frequency indicator
Getting started
Connecting the power supply
- Connect the mains adaptor to the socket (12) on the back of the device.
- Plug the other end of the mains lead into a wall socket.
- Make sure that the wall socket you are using is accessible so that it is easy to disconnect the device from the mains when it is not in use.
Inserting the backup battery
The backup battery prevents the clock from losing all its settings in the event of a power cut. Without a backup battery the clock will reset to zero every time the device is unplugged.
- Open the battery cover on the back of the device.
- Insert a 9V battery (not included) according to the markings inside the battery compartment and then replace the cover.
- Remove the batteries if the product is not to be used for a long time. Batteries left in the clock for long periods can begin to leak and damage the device or property.
Setting the time
The first time the mains lead is connected, "0:00" will flash on the display. The display will stop flashing as soon as you begin setting the time.
- Press and hold in TIME whilst simultaneously pressing repeatedly on HOUR to set the hours.
- Press and hold in TIME whilst simultaneously pressing repeatedly on MINUTE to set the minutes.
Listening to music (radio, iPod or external audio sources via the aux-in)
- Set the function switch (3) to the ON position.
- Select an audio source using the iPod/AUX/RADIO switch (5).
- Adjust the volume using VOLUME (1).
Listening to the radio
- Set the function switch (3) to the ON position.
- Set the iPod/AUX/RADIO switch (5) to "RADIO".
- Set the radio band selector to the desired frequency range; AM, FM or FM stereo.
- Tune into the desired station using the tuning knob and adjust the volume using the volume control.
- Set the function switch (3) to OFF to turn the radio off.
FM: Fully unravel the wire aerial and position it until you receive the best reception.
AM: The stereo is equipped with a built-in aerial. Therefore, the wire aerial is not necessary. Direct the aerial by positioning the entire stereo.
Listening to an iPod
If you have an iPod, you can connect it to the clock radio to listen to your iPod music. Your iPod is charged all the time it is connected to the dock.
This device supports the following iPod models:
iPod classic
iPod touch (1st and 2nd generation)
iPod nano (1st to 4th generation)
iPod (5th generation)
- Seat the iPod in the docking station. Use a docking adaptor if necessary. When the iPod is connected correctly a symbol will appear on the display of your iPod.
- Select iPod using the iPod/AUX/RADIO switch (5).
- Set the function switch (3) to the ON position.
- Adjust the volume using VOLUME (1).
- The iPod function buttons (start/stop, next track, etc) can be used as normal.
Listening to external audio sources via the AUX IN
If you have an external audio source such as a CD player or MP3 player with a 3.5 mm headphone jack, you can connect it to the clock radio to play the music stored on the external device. In order to do this, you will need an audio lead with a 3.5 mm plug on both ends (sold separately).
- Connect the external audio source to the auxiliary line in jack on the clock radio "AUX IN" (14).
- Select AUX IN using the iPod/AUX/RADIO switch (5).
- Set the function switch (3) to the ON position.
- Set the volume on the external device to about 80% and adjust the clock radio volume using VOLUME (1).
- Use the function buttons on the external audio source (start/stop, next track, etc) as normal.
Alarm
Setting the alarm time
-
Press and hold in ALARM whilst simultaneously pressing repeatedly on HOUR to set the hours.
-
Press and hold in ALARM whilst simultaneously pressing repeatedly on MINUTE to set the minutes.
Check the alarm time setting
Press and hold in the ALARM button to check what time the alarm is set to.
Turning the alarm on/off
- To turn the alarm on, set the function switch (3) to BUZZER or AUTO (music).
- To turn off the alarm, turn the function switch (3) to the OFF position.
Wake up to the sound of the buzzer
- Set the function switch to the BUZZER position. The alarm indicator will light up to show that the alarm is activated.
- The alarm will sound at the set alarm time.
- Press the SNOOZE button to activate the repeated wake-up alarm function. The alarm will stop but will sound again after 9 minutes.
- Turn off the alarm by pressing ALARM. The alarm will be turned off but is still activated and will come on again at the same time the next day.
- Set the function switch to OFF if you do not wish the alarm to come on the next day. The alarm indicator will go off.
Wake up to the sound of the radio/music
- First, set the function switch to ON to set the desired radio station and volume. Then set the function switch to the AUTO position. The alarm indicator will light up.
- Set the alarm time according to the instructions above.
- When the alarm time occurs, the radio will start playing at the set station and volume.
- Press the SNOOZE button to activate the repeated wake-up alarm function. The alarm will stop but will sound again after 9 minutes.
- Turn off the radio by pressing ALARM. The radio will be turned off but the alarm is still activated and the radio will come on again at the same time the next day.
- Set the function switch to OFF if you do not wish the radio to come on and wake you the next day. The alarm indicator will go off.
You can also connect an iPod or other external audio source and wake up to music from that device. However, it must be turned on all the time if it is to sound at the set alarm time, so this is not recommended. Select an audio source using the iPod/AUX/RADIO switch (5).
Sleep function (automatic shut off)
The stereo can be set to shut off automatically after a certain time.
- First, set the function switch (3) to "ON" to set the desired radio station and volume. Then set the function switch to the BUZZER, AUTO or OFF position.
- Select an audio source using the iPod/AUX/RADIO switch (5).
- Press SLEEP once. When the button is held in, "0:59" will appear on the display.
- The automatic shut off time can be increased by holding in the SLEEP button whilst simultaneously pressing the HOUR button. The display will now show "1:59".
- The automatic shut off time can be decreased by holding in the SLEEP button whilst simultaneously pressing the MINUTE button. Release the buttons when the desired shut off time appears on the display.
- Press SNOOZE once again to turn the radio off before the set time has elapsed.
Care and maintenance
• Always unplug the product from the wall socket before cleaning.
- Clean with a soft, lightly moistened cloth. Never use strong solvents or cleaning agents.
- Remove the batteries if the product is not to be used for a long time. Batteries left in the clock for long periods can begin to leak and damage the device or property.
Disposal
Follow local ordinances when disposing of this product. If you are unsure of how to dispose of this product, please contact your local authority.
Specifications
AC/DC adaptor 9 V AC, 50 Hz
iPod charging 5 V/500 mA
Speakers 2 x 2 W
Battery (backup) 1 x 9 V/6LR61 (not included)
For consumer contact, please visit
www.clasohlson.co.uk and click on
customer service.
Internet www.clasohlson.co.uk



- CLOCK RADIO WITH IPOD DOCK
- CONTENTS
- SAFETY
- BUTTONS AND FUNCTIONS
- FRONT
- GETTING STARTED
- CONNECTING THE POWER SUPPLY
- INSERTING THE BACKUP BATTERY
- SETTING THE TIME
- LISTENING TO MUSIC (RADIO, IPOD OR EXTERNAL AUDIO SOURCES VIA THE AUX-IN)
- LISTENING TO THE RADIO
- LISTENING TO AN IPOD
- THIS DEVICE SUPPORTS THE FOLLOWING IPOD MODELS
- LISTENING TO EXTERNAL AUDIO SOURCES VIA THE AUX IN
- ALARM
- SETTING THE ALARM TIME
- CHECK THE ALARM TIME SETTING
- TURNING THE ALARM ON/OFF
- WAKE UP TO THE SOUND OF THE BUZZER
- WAKE UP TO THE SOUND OF THE RADIO/MUSIC
- SLEEP FUNCTION (AUTOMATIC SHUT OFF)
- CARE AND MAINTENANCE
- DISPOSAL
- SPECIFICATIONS
Brand : Clas Ohlson
Model : CR-A108I
Category : Radio