
PLL-K200 - Radio Clas Ohlson - Free user manual and instructions
Find the device manual for free PLL-K200 Clas Ohlson in PDF.


| Type | Portable Digital PLL Radio |
| Brand | Clas Ohlson |
| Model | PLL-K200 |
| Frequency Range FM | 87.5 - 108 MHz |
| Frequency Range AM | 530 - 1710 kHz |
| Display | LCD with backlight |
| Speaker | Built-in 3-inch, 8 ohm |
| Headphone Jack | 3.5 mm stereo |
| Antenna | Telescopic rod for FM, built-in ferrite for AM |
| Power Source | 2 x AA batteries (not included) or AC adapter (5V DC, not included) |
| Battery Life | Approximately 30 hours (alkaline) |
| Preset Stations | 20 (10 FM, 10 AM) |
| Additional Functions | Auto scan, manual tuning, sleep timer, clock with alarm |
| Dimensions (W x H x D) | 150 x 80 x 30 mm (5.9 x 3.1 x 1.2 in) |
| Weight (without batteries) | 210 g (7.4 oz) |
| Material | Plastic cabinet |
| Color | Black |
| Cleaning | Wipe with a dry, soft cloth. Do not use liquids or solvents. |
| Safety | Keep away from water and high temperatures. Do not disassemble. |
| Spare Parts / Repairability | Contact Clas Ohlson customer service for parts and repair options. |
Frequently Asked Questions - PLL-K200 Clas Ohlson
User questions about PLL-K200 Clas Ohlson
0 question about this device. Answer the ones you know or ask your own.
Ask a new question about this device
Download the instructions for your Radio in PDF format for free! Find your manual PLL-K200 - Clas Ohlson and take your electronic device back in hand. On this page are published all the documents necessary for the use of your device. PLL-K200 by Clas Ohlson.
USER MANUAL PLL-K200 Clas Ohlson
Kitchen clock radio with automatic search
natural_image
Line drawing of a car air conditioner front panel with control buttons and dials (no text or symbols)Model/Modell/Malli: PLL-K200 Model/Modell/Malli: PLL-K200-UK
Kitchen clock radio with automatic search Art.no. 38-2354/18-8000, model PLL-K200/PLL-K200-UK
Please read the entire instruction manual before using and save it for future reference. We apologise for any text or photo errors and any changes of technical data. If you have any questions concerning technical problems please contact our Customer Service Department (see address on reverse.)
Table of contents
Safety 3
Buttons and functions 4
Getting started 5
Use 7
Care and maintenance 9
Disposal 9
Specifications 9
Safety
- Never open frame! Dangerous live voltage on certain exposed components inside! Risk of electric shock on contact!
- Do not place the product where it could fall into water or some other liquid. Never place the product near objects that could cause water or another liquid to spill onto the product, e.g., a flower vase or a soft drink bottle.
- Make sure the ventilation openings are not obstructed so air can freely circulate.
- Use only cords intended or recommended for the appliance.
Buttons and functions

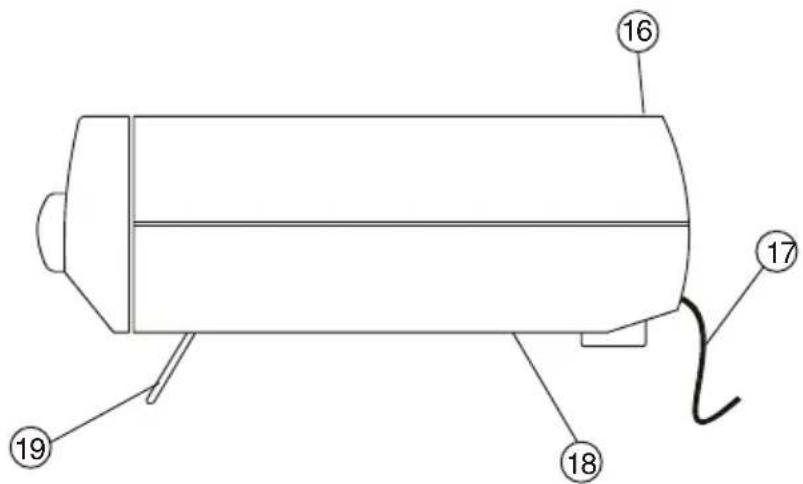
- Function switch (ON/OFF/AUTO)
- Button lock
- Alarm/Memory 1/6
- Store button 2/7
- Store button 3/8
- Store button 4/9
- Memory button 5/10
- Set time/Memory+5
- Set alarm
- Show countdown time/store in memory
- Sleep
- Frequency selector up/set hours
- Frequency selector down/Set minutes
- Volume control
- Timer off/on (Countdown)
- Battery slot
- Antenna wire
- Speakers
- Table stand
- LCD display
Getting started
Mounting under kitchen cupboard
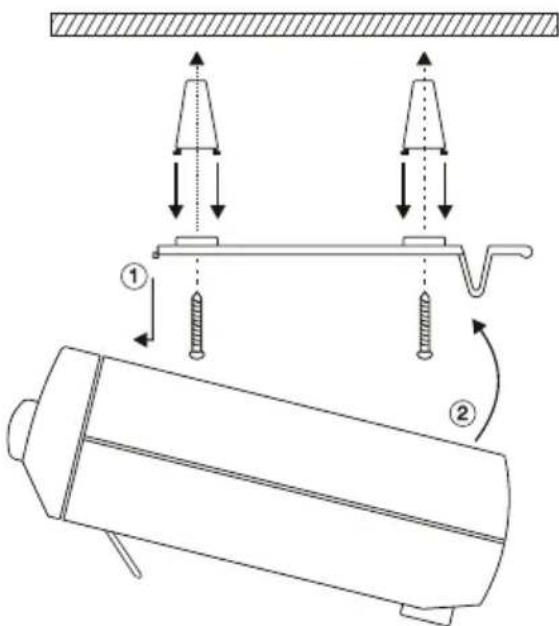
By using the mounting plate you can install the appliance under a kitchen cupboard, for example. The mounting plate is attached with quick-fittings to the top of the appliance.
Mounting with distance rings
Mounting without distance rings
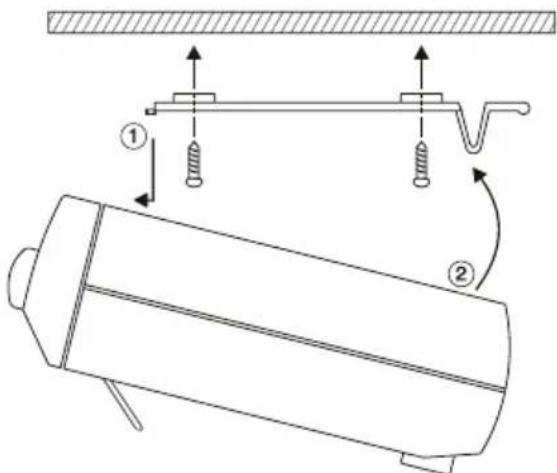
- Free the mounting plate from the appliance by pressing in the two lock clips and at the same time lift off the plate.
- Attach the mounting plate as in the diagram but without the distance rings (included). Use the longer screws if distance rings are used.
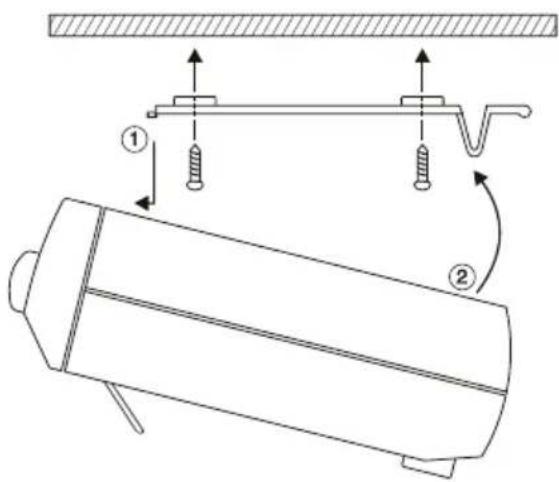
- To Attach the appliance to the mounting plate first attach the hooks (1) and then incline the appliance upward until the two clip locks (2) are firmly locked in place.
- To remove the appliance simply reverses this sequence.
Place, x-ring on table
Fold out the two foot supports if the appliance is to be placed on a flat surface.
Use on table

natural_image
Simple line drawing of a cylindrical object resting on a surface, no text or symbols presentBattery reserve
The clock radio has a battery reserve function: 2 pcs. 1.5 V-batteries (not included) must be installed so that the time settings are not lost if there is a power failure.
Inserting the batteries:
- Remove the battery cover on the back of the appliance by shoving it straight back.
- Lift out battery cassette and insert 2x LR3/AAA-batteries. Be sure to position the batteries correctly by following the polarity markings at the bottom of the battery cassette.
- Replace the battery cassette and battery cover.
- Connect cord to wall socket.
NOTE! Always remove the batteries if the appliance is not going to be used for long periods.
Use
Set time
- Set the function switch (1) to "OFF" position.
- Press and hold in the Set time button (8) for 2 seconds. The time begins to blink on the display.
- Press one or more times on the Set hours button (12) to set the hour. If you go past the desired, you must go round again through zero.
- Press one or more times on the Set minutes button (13) to set the minute.
- Press Set time (8) again to confirm. The time appears (not blinking) on the display. If no button is pressed for 8 seconds the clock returns to the normal position.
Listening to the radio
- Set function switch (1) to "ON". The current band frequency appears for 10 seconds.
- Adjust sound volume with the volume control (14).
- Press one or more times on the frequency selectors (12 & 13) to search manually for a radio channel
- Press and hold down either of the frequency selectors (12 & 13) to automatically seek a radio channel. Release button as soon as the search starts.
- Set the function switch (1) to "OFF" position to switch off the radio.
Storing the radio channels in the memory
-
Switch on radio and tune in the desired radio channel as instructed in section "Listening to the radio".
-
Press once Store in memory (10). "M" indication begins to blink on the display.
-
Press any of the Store buttons (3 to 8) to save in the storage space 1-5. To save in the storage spaces 6-10 first press Memory +5 button (8) and then on any of the storage buttons. If no button is pressed for 8 seconds the clock returns to its normal position.
Listening to stored channels
- Switch on radio.
- Press any of the store buttons (3 to 8) to select channels 1 to 5.
- First press button Memory +5 and then on any of the store buttons to select channels 6-10.
Using the alarm
Set alarm time
- Set the function switch (1) to "OFF"
- Press the Set alarm button (9) once.
- Press once or more the Set hour button (12) to set the hour ahead
- If you press too long, you will have to go around again.
-
Press once or more the Set minutes button (13) to set the Minute ahead.
-
Press Set alarm (9) again to confirm. The time is shown in the display. If no button is pressed for 8 seconds the clock returns to its normal position.
Activating the alarm
- Set the function switch (1) to "AUTO". The display shows the type of alarm: Symbol
Alarm Wake to alarm signal
Radio Wake to chosen radio channel (see section
"Listening to the radio")
No symbol Alarm is shut off
Shutting off the alarm
When the alarm sounds press repeatedly on Alarm (3) until no alarm symbol appears in the display. To switch off the alarm entirely, set the function switch (1) to the "OFF" position.
Repeated waking (snooze)
When the alarm signal sounds press any of the store buttons (3 to 8) to shut off the alarm temporarily and activate snooze. The alarm signal on the display begins to blink when the function is activated. The alarm signal will now sound again after 10 minutes.
To switch off the alarm completely set the function switch (1) to the "OFF" position.
Sleep timer (automatically switches off radio)
- Tune in the desired radio channel (see section "Listening to the radio").
- Set function switch to "AUTO" or "OFF" position
- Press one or more times on Sleep (11) button. The go-to-sleep time appears on the display. The time jumps 10 minutes each time you press. The maximum time is 90 minutes.
- Switch off radio by setting the function (1) to "OFF" or "AUTO" position.
Timer (countdown)
- Set Countdown switch (15) in position. The timer symbol appears on the display and the countdown setting is shown.
- Press Countdown time (10) to show and set the countdown time.
- Press one or more times on the Set hours button (12) to set the hour. If you go too far you must go all the way round again through zero.
- Press one or several times on the Set minutes button (13) to set the minute. After 8 seconds the display returns to the current time.
- You can show the time remaining at any time by pressing the Show countdown time button (10).
- When the countdown reaches zero an alarm signal sounds.
- Switch off by setting the Countdown switch (15) to "OFF" position.
Button lock
Set the switch (2) to "position" to activate the button lock. All buttons except volume control will now be locked. Return the switch to "OFF" position to activate the button lock.
Care and maintenance
Wipe dry with a soft slightly moist cloth. Use no solvents or strong cleansers.
Disposal
If or when you should decide to discard the product please follow local regulations. If you are unsure what to do, contact your local authorities
Specifications
Voltage 230 V AC, 50 Hz
Battery type (backup) 2 x LR3/AAA-batteries (not included)
Radio frequency range FM 88 – 108 MHz
Köksklockradio med automatisk sökning Art.nr 38-2354/18-8000, modell PLL-K200/PLL-K200-UK

Montering utan distansringar
natural_image
Simple line drawing of a cylindrical object resting on a surface, no text or symbols presentBatterireserv

natural_image
Simple line drawing of a cylindrical object resting on a surface with a hatched base (no text or symbols)Batterireserve
Klokkeradioen har en reservefunksjon med batterier. 2 stk. 1,5 V-batterier (medfølger ikke) må installeres for å påse at dine tidsinnstillinger ikke går tapt ved strømavbrudd.
Sett i batteriene

natural_image
Simple line drawing of a cylindrical object resting on a horizontal surface (no text or symbols)Paristovarmennus
For consumer contact, please visit
www.clasohlson.co.uk and click on
customer service.
INTERNET www.clasohlson.co.uk



- Kitchen clock radio with automatic search
- Kitchen clock radio with automatic search Art.no. 38-2354/18-8000, model PLL-K200/PLL-K200-UK
- Table of contents
- Safety
- Buttons and functions
- Getting started
- Mounting under kitchen cupboard
- Mounting with distance rings
- Mounting without distance rings
- Place, x-ring on table
- Use on table
- Battery reserve
- Inserting the batteries:
- Use
- Set time
- Listening to the radio
- Storing the radio channels in the memory
- Listening to stored channels
- Using the alarm
- Set alarm time
- Activating the alarm
- Shutting off the alarm
- Repeated waking (snooze)
- Sleep timer (automatically switches off radio)
- Timer (countdown)
- Button lock
- Care and maintenance
- Disposal
- Specifications
- Köksklockradio med automatisk sökning Art.nr 38-2354/18-8000, modell PLL-K200/PLL-K200-UK
- Montering utan distansringar
- Batterireserv
- Batterireserve
- Sett i batteriene
- Paristovarmennus
Brand : Clas Ohlson
Model : PLL-K200
Category : Radio