
IAN 290911 - Fitness Equipment CRIVIT - Free user manual and instructions
Find the device manual for free IAN 290911 CRIVIT in PDF.

| Brand | Crivit |
| Model | IAN 290911 |
| Product Type | Wall-mounted pull-up bar |
| Usage | Domestic, indoor only |
| Safety Standard | EN ISO 20957-1:2013, class H |
| Maximum user weight | 110 kg |
| Dimensions (assembled) | 112 x 39 x 35 cm |
| Main materials | Tubular steel |
| Delivery contents | Mounting frame (1), tubes A/B/C, tubular handles (2), brackets (4), screws, washers (18), nuts (6), stop rods (2), clamping key (2), instruction manual |
| Main functions | Pull-up exercises, hanging pull-ups, hanging knee raises, pelvic tilts |
| Fixation type | Wall-mounted (screws not included) |
| Wall requirements | Solid concrete, minimum load capacity 300 kg |
| Required training space | Min. 2 x 2 m, clear area of 0.6 m around |
| Recommended age | From 14 years |
| Simultaneous users | One only |
| Cleaning | Damp cloth, without abrasive products, dry thoroughly |
| Storage | Clean and dry, at room temperature, away from extremes |
| Warranty | 3 years (purchase date on receipt) |
| Wear parts | Stop rods, nuts, screws (check regularly) |
| Repairability | Use only original spare parts |
Frequently Asked Questions - IAN 290911 CRIVIT
User questions about IAN 290911 CRIVIT
0 question about this device. Answer the ones you know or ask your own.
Ask a new question about this device
Download the instructions for your Fitness Equipment in PDF format for free! Find your manual IAN 290911 - CRIVIT and take your electronic device back in hand. On this page are published all the documents necessary for the use of your device. IAN 290911 by CRIVIT.
USER MANUAL IAN 290911 CRIVIT
KLIMMZUGSTANGE / PULL-UP BAR / BARRE DE TRACTION
DE AT CH
KLIMMZUGSTANGE
Operation and Safety Notes
NL BE
PULL UP BAR
GB / IE Operation and Safety Notes Page 13
natural_image
Technical line drawing of a mechanical lever system with no visible text or symbols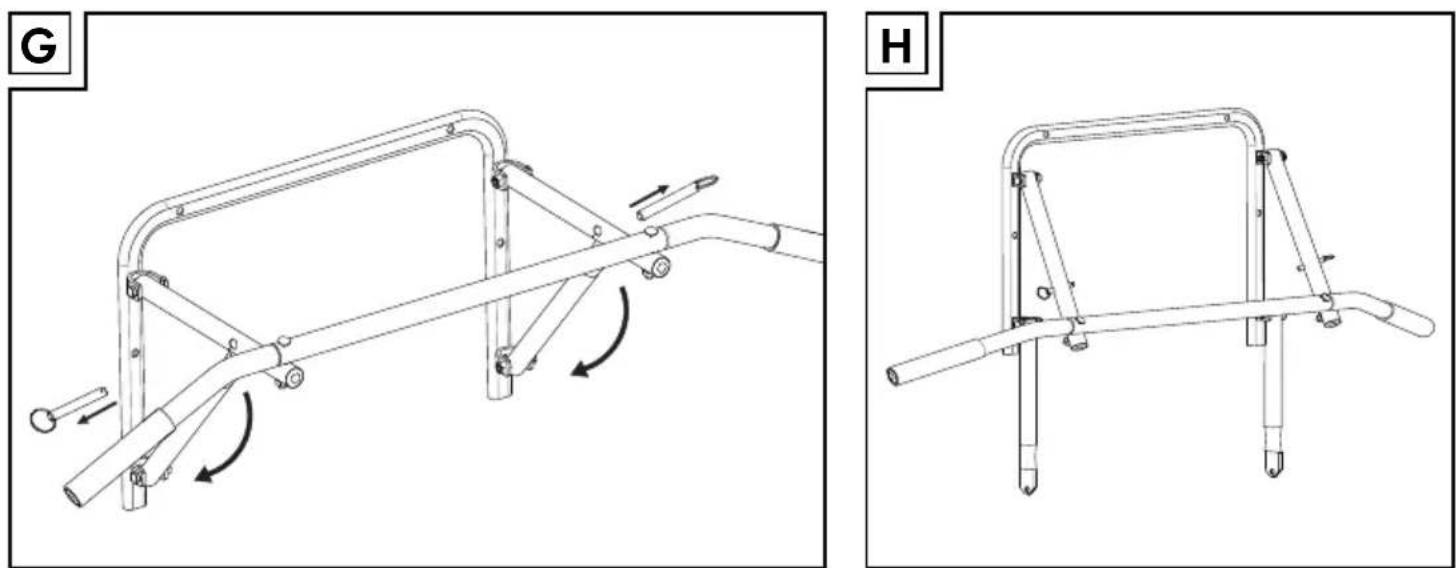
natural_image
Technical line drawings of a mechanical device with directional arrows indicating motion (no text or symbols)Intended use....Page 14
Part description and scope of delivery....Page 14
Technical data......Page 14
Safety Notices......Page 14
Safety guidelines for mounting on wall Page 15
Before use....Page 16
Assembly Page 16
After use......Page 16
General training notes......Page 16
Warming up....Page 17
Exercises Page 17
Stretching Page 18
Cleaning and storage Page 19
Disposal Page 19
Warranty Page 19
Pull-up bar
- Introduction

We congratulate you on the purchase of your new product. You have chosen a high quality product. Familiarise yourself with the product before using it for the first time. In addition, please carefully refer to the operating instructions and the safety advice below. Only use the product as instructed and only for the indicated field of application. Keep these instructions in a safe place. If you pass the product on to anyone else, please ensure that you also pass on all the documentation with it.
Intended use
The product is intended to be a piece of training equipment for use in private households. It is not approved for installation and use in therapeutic or professional gyms. Suitable only for an adult and those aged over 14. Any use of the product other than that described above or any alteration to the product is not allowed and can lead to injuries and /or damage to the product. The manufacturer does not assume any liability for damage arising from improper use. The product is not designed for commercial use. Indoor use only.
● Part description and scope of delivery
Immediately after unpacking the contents, check them for completeness and that the product and all parts of it are in perfect condition. On no account should you assemble the product if the scope of delivery is incomplete.
1 mounting frame x1
2 | tube A x1
3 handle tube x2
4 tube B x2
5 tube C x2
6 holder on mounting frame x4
7 bolt D x4
8 washer x18
9 bolt E x2
10 locking pin x2
11 nut x6
12 wrench x2
instructions for use x1
- Technical data
Dimension: 112 × 39 × 35 ~cm
$$ (W \times H \times D) $$
Weight: 5440g (12,0lbs)
Max User Weight: 110 kg
Domestic use only - Class: H
The product was tested in accordance to
EN ISO 20957-1:2013 class H.

Safety Notices
PLEASE CAREFULLY READ ALL THE INFORMATION BEFORE USING THE PRODUCT. KEEP THE INSTRUCTIONS FOR USE.
DANG RONING!
LIFE AND DANGER OF ACCIDENTS FOR INFANTS AND
CHILDREN! Never leave children alone and unsupervised with the packaging material.
Danger of suffocation. Always keep children away from the product.
■ This product is not a toy!
This product should only be used by persons that are familiar with the safety instructions.
- Check the product for stability by pulling and shaking it before every use.
This product is not suitable for the attachment of dynamic parts, e. g. swings.
Do not perform any exercises that require you to hang with your head towards the ground.
Do not swing!
If possible only use this product on floors with shock-absorbing properties such as carpet in
order to minimize the risk of injury in case of falling down.
- Keep the instructions in the vicinity of the training apparatus. This could be useful for reading up on the main exercises.
⚠CAUTION! Do not leave children alone and unsupervised! The product is not a climbing frame or toy!
⚠CAUTION! RISK OF INJURY! Make sure that all parts are undamaged and correctly assembled.
- Check that the product is correctly mounted and ensure all screwed joints are tight. Prior to every use, check carefully for any possible damage or loose connections. Loose connections must be tightened immediately. On no account should you use the product if there is any damage.
- Improper assembly may result in injury. Damaged parts could adversely affect safety and function.
■ Damage to your health cannot be excluded if the product is used improperly.
⚠CAUTION! RISK OF INJURY! Never undertake any changes or adjects to the product while exercising.
Children or persons who lack the knowledge or experience to use the product or whose physical, sensory or intellectual capacities are limited must never be allowed to use the product without supervision or instruction by a person responsible for their safety. Children must never be allowed to play with the product.
Before beginning training, have your doctor carry out a general medical check-up and clarify any possible heart, circulatory or orthopaedic problems.
- Do not use the product if you suffer from illnesses, cramps, nausea or chest pains.
■ Do not use the product during pregnancy.
- Wrong and excessive training can endanger your health. If you feel any pain while exercising, you should stop immediately and consult a doctor.
CAUTION! Never overload the product. This could result in injuries and / or damage to property. This
product should only be used by one person while exercising. The maximum user weight is 110 kg (242.5 lbs).
- Do not use the product in areas that can be freely accessed by anyone at any time.
ATTENTION! Components most susceptible to wear, e. g. the locking pins, nuts and bolts.
■ Only use product in proper working condition!
- Store the product inaccessible when it is not used.
- Any of the adjustment products that could interfere with the user's movement should not be left projecting.
WARNING!
For one user only
The safety level of the equipment can be maintained only if it is examined regularly for damage and wear, e. g. the connection points.
■ To replace defective components immediately and/or keep the equipment out of use until repair. Only use original replacement parts
Training space:
When training, make sure there is enough space between you and any objects or other people in order to avoid injury. The area chosen should measure at least 2 x 2 m and should be well ventilated. The subsurface must be level and even. Check that it is has a secure footing.
A free area of not less than 0.6 m shall remain around the training area in the directions from which the equipment is accessed (see fig. A.).

Safety guidelines for mounting on wall
This product is solely intended for fixture to a solid concrete wall and make sure it has sufficient load bearing capacity for wall mounting with a minimum load of 300 kg.
Do not fasten to breeze blocks, plaster, wood, plywood or similar materials.

■ Wall fastening screws are deliberately not supplied because the type needed depending on the material to which fasten the product. Consult a speciality retailer to ask if your fastening system is suited to your material. Sufficient expertise is required for mounting this product on the wall.
After being mounted on wall, the handles of the curved grab bar must be at an approx. 90° angle to the wall.
■ Wall assembly only by a specialist and thoroughly checked for stability when completed.
Do not assemble on wall near stairs.
Note: Make sure that the suspension product is installed correctly and check for wear at regular intervals.
- Before use
Note: Remove all packaging materials from the product.
- Assembly
☐ Assemble the devise in line with fig. B–E. ☐ You may need a second person to help you. ☐ Attach the two tubes 8 to the lower and the two tubes C 5 to the upper holders on mounting frame 6 and fasten them with the bolt D 7, washers 8 and nut 11 (fig. B).
Note: Use four washers 8 on each holder on mounting frame 6; one each at the both outer sides and one each at the both inner sides of the holder.
Mount the tube B to the tube C 5 and fasten the locking pin 10 (fig. C).
☐ Assemble the handle tube onto both sides of tube A 2 (fig. D).
☐ Attach the assembled handle tube on the both tubes C 5 and fasten them with the bolt E 9, washers 8 and nut 11 (fig. E).
☐ Make sure the locking pins are in place.
☐ Make sure to follow the Safety guidelines for mounting on wall.
You will need the following tools (not included) for wall mounting:
- 4 Wall fastening screws,
- 4 anchor plugs,
- 1 pencil,
- 1 drill,
- 1 screw driver,
- 1 cable-wire detector.
☐ Use a cable-wire detector before drilling to avoid damage to wiring inside the wall.
☐ Hold the mounting frame up to the wall in a suitable location and mark the 4 mounting holes with a pencil. Drill mounting holes as marked and insert anchor plugs into holes to be flush with surface.
☐ Attach the mounting frame to wall using the 4 wall fastening screws as shown on fig. F.
After use
☐ Follow the steps with fig. G-H to pull out the locking pins and load down the handle bar.
☐ Put the locking pins back in the tube and avoid losing it.
☐ CAUTION! When the locking pins are pulled out, the mounting frame parts can be fall down automatically and hit the user. When pulling out the locking pins 10, it is important to hold the mounting frame parts in order to avoid injury.
● General training notes
The following instructions are only a sample of possible exercises. Please refer to the respective literature for information about other exercises.
☐ Warm up before beginning the exercises.
Do not train if you feel ill or unwell.
☐ When starting training, get instruction on the correct execution of the exercises from an experienced physiotherapist if possible.
☐ Only exercise as long as you feel well and/or you are able to carry out the exercises correctly.
☐ Wear comfortable sports clothing and trainers.
☐ Determine the frequency and intensity of the exercises yourself. Start slowly 2 to 3 times a week for 10 minutes at a time, and increase the frequency and the exercise intensity gradually. The more frequently and regularly you carry out the exercises, the fitter and better you will feel.
⚠️CAUTION! Avoid training too intensely!
When you first begin training, 2–3 minutes are sufficient per exercise. If you train every day the duration can be increased to 5–10 minutes after approximately one week. The maximum training time should, however, not exceed 1 hour.
Take sufficient breaks between exercises and drink sufficient fluids.
⚠CAUTION! Cease exercising immediately if you experience discomfort or feel unwell and consult your doctor.
● Warming up
Take sufficient time before each training session to warm up. The following includes descriptions of some simple exercises for this purpose. Repeat these exercises 2 to 3 times each.
Neck muscles
Turn your head slowly to the left and to the right. Repeat this movement 4–5 times.
☐ Circle your head slowly, first in one direction and then in the other.
Arms and shoulders
☐ Clasp your hands behind your back and pull them carefully upwards. If you bend your upper body forwards at the same time all the muscles are warmed up optimally.
☐ Circle both your shoulders forwards at the same time and then change direction after one minute.
☐ Pull your shoulders up to your ears and let your shoulders fall again.
☐ Circle your right and left arms alternately forwards and then after one minute backwards.
IMPORTANT: Don't forget to continue breathing steadily throughout!
Warming up leg muscles
Stand on one leg and lift the other leg with your knee bent until it is approximately 20 cm from the floor.
☐ First circle the lifted foot in one direction and then change direction after several seconds.
☐ Then change legs and repeat the exercise.
☐ Lift your legs in turn and take several steps in place. Make sure that you lift your legs only as far as you are able to maintain good balance.
- Exercises
Some of many exercises are described in the following.
Pull Ups (Fig. I)
Grasp the equipment, as shown, in grip at the bar ends.
☐ Tense your gluteal, leg and abdominal muscles.
☐ Slowly pull the upper part of your body upwards and your shoulders blades toward the spine. Leave the shoulders lowered and maintain the tension in the abdominal muscles.
☐ Your arms are bent and tense, so that you will be able to see just over the middle bar of the equipment.
☐ Remain in this position for a moment and then return to the starting position.
☐ Repeat the exercise for 3 sets, each set for 10–15 times. Rest sufficiently between exercises.
IMPORTANT: Go through this motion slowly and maintain the body tension throughout.
Hanging Knee Tuck Ups (Fig. J)
Grasp the equipment, as shown, in grip at the bar ends.
☐ Tense your gluteal, leg and abdominal muscles.
☐ Bend your knees and pull your legs, which are slightly bent and close together, toward your chest.
☐ Lower your legs again until your thighs form a right angle with your upper body.
☐ Pull your legs toward your chest once more with a single, steady motion. Make sure that your arms remain tense at all times in their raised position while you are varying the position of your legs.
- Keeping your arms straight and try not to swing back and forth.
☐ Repeat the exercise for 3 sets, each set for 10–15 times. Rest sufficiently between exercises.
IMPORTANT: This exercise focuses on the abdominal muscles throughout the exercise. Do not relax your legs and go through the exercise slowly.
Hanging Knee Side by Side (Fig. K)
Grasp the equipment, as shown, in grip at the bar ends.
☐ Tense your gluteal, leg and abdominal muscles.
☐ Bend your knees and pull your legs, raise your knees toward your chest, bending your hips and knees and twist to left.
☐ Lower your legs return to the starting position.
☐ Bend your knees and pull your legs, raise your knees toward your chest, bending your hips and knees and twist to right.
☐ Lower your legs then return to the starting position.
- Keeping your arms straight and try not to swing back and forth.
☐ Repeat the exercise for 3 sets, each set for 10–15 times. Rest sufficiently between exercises.
IMPORTANT: This exercise focuses on the external oblique muscles throughout the exercise. Do not relax your legs and go through the exercise slowly.
Abdominal and Hip Flexors (Fig. L)
Grasp the equipment, as shown, in grip at the bar ends.
☐ Tense your gluteal, leg and abdominal muscles.
Keeping your arms straight and hold the tension of the abdominal muscles. Your head forms an extension of the spinal column and the neck must not be overextended.
☐ Raise your stretched legs as high as possible. Stretch the tips of your toes and try to keep your thighs at a right angle with your upper body.
☐ Remain in this position for a moment and then return to the starting position.
☐ Repeat the exercise for 3 sets, each set for 10–15 times. Rest sufficiently between exercises.
IMPORTANT: This exercise strengthens the abdominal and hip muscles. Maintain the body tension and don't make a hollow back
- Stretching
Take sufficient time after each training session to stretch. The following illustrates some simple exercises for this purpose. You should carry out the relevant exercises 3 times on each side for 30-40 seconds.
Neck muscles
Stand in a relaxed position. Pull your head gently to one side with one hand, first to the left and then to the right. This exercise stretches the sides of your neck.
Arms and shoulders
Stand up straight with your knees slightly bent.
☐ Bend your right arm behind your head until your right hand is between your shoulder blades.
☐ Hold your right elbow with your left hand and pull it backwards.
☐ Change sides and repeat the exercise.
Leg muscles
Stand up straight and lift one foot off the ground.
☐ Slowly circle your foot, first in one direction and then in the other.
☐ Change feet after a while.
IMPORTANT: Please ensure that your thighs stay parallel next to one another.
☐ Push your hips forward and keep your upper body upright.
- Cleaning and storage
■ Never use abrasive or caustic cleaners. Doing so would damage the product.
☐ Clean the product with a damp cloth and without cleaning agent. Then dry it well.
□ Always store the dry and clean product in at roomtemperature. Please protect this equipment from extreme temperatures, sun and humidity. Improper storage and use of the equipment may lead to premature wear and tear and potential brittleness and cracks in the construction and this may result in injuries.
- Disposal
The packaging is made entirely of recyclable materials, which you may dispose of at local recycling facilities.
Contact your local refuse disposal authority for more details of how to dispose of your worn-out product.
- Warranty
The product has been manufactured to strict quality guidelines and meticulously examined before delivery. In the event of product defects you have legal rights against the retailer of this product. Your legal rights are not limited in any way by our warranty detailed below.
The warranty for this product is 3 years from the date of purchase. Should this product show any fault in materials or manufacture within 3 years from the date of purchase, we will repair or replace it - at our choice - free of charge to you.
The warranty period begins on the date of purchase. Please keep the original sales receipt in a safe location. This document is required as your proof of purchase. This warranty becomes void if the product has been damaged, or used or maintained improperly.
The warranty applies to defects in material or manufacture. This warranty does not cover product parts subject to normal wear, thus possibly considered consumables (e.g. batteries) or for damage to fragile parts, e.g. switches, rechargeable batteries or glass parts.
Introduction......Page 21
Utilisation conforme....Page 21
$$ (I \times H \times P) $$
Poids : 5440 g (12,0 lbs)
$$ (b \times h \times d) $$
⚠ WAARSCHUWING! LEVENSGEVAAR EN KANS OP ONGEVALLEN VOOR KLEU-
Peso: 5440g (12,0lbs)
$$ (L \times A \times P) $$
Peso: 5440g (12,0lbs)