
SNS 45 A2 - Manucure / Pédicure SILVERCREST - Free user manual and instructions
Find the device manual for free SNS 45 A2 SILVERCREST in PDF.

| Product Type | Manicure/Pedicure Set |
| Brand | SilverCrest |
| Model | SNS 45 A2 |
| Intended Use | Nail grooming: cutting, filing, polishing, cuticle care |
| Power Source | 2 x AA batteries (not included) |
| Motor Speed | 2 speed settings (approx. 2000-5000 RPM) |
| Number of Attachments | 6 pieces: sanding bands, polishing stone, cuticle pusher, etc. |
| Dimensions (L x W x H) | 18 x 4 x 4 cm |
| Weight | 200 g (without batteries) |
| Color | White/Black |
| Battery Life | Approx. 2 hours of continuous use |
| Safety Features | Auto shut-off after 15 minutes of inactivity, low noise operation (<50 dB) |
| Cleaning & Maintenance | Clean attachments with brush; wipe device with a damp cloth; do not immerse |
| Storage | Comes with a storage case |
| Included Accessories | 6 attachments, storage case, cleaning brush, manual |
| Replacement Parts | Sanding bands available separately (size: standard) |
| Warranty | 2 years |
| Manufacturer | SilverCrest (Lidl) |
| Certifications | CE, RoHS |
Frequently Asked Questions - SNS 45 A2 SILVERCREST
User questions about SNS 45 A2 SILVERCREST
0 question about this device. Answer the ones you know or ask your own.
Ask a new question about this device
Download the instructions for your Manucure / Pédicure in PDF format for free! Find your manual SNS 45 A2 - SILVERCREST and take your electronic device back in hand. On this page are published all the documents necessary for the use of your device. SNS 45 A2 by SILVERCREST.
USER MANUAL SNS 45 A2 SILVERCREST
Operating instructions
IAN 90252
5 ☆
ES
Before reading, unfold the page containing the illustrations and familiarise yourself with all functions of the device.
DE AT CH
GB / MT Operating instructions Page 91
natural_image
Diagram of a mechanical assembly showing a cylindrical component being inserted into a cylindrical housing, with a labeled part (20) pointing to the component.ADVERTENCIA
natural_image
Illustration of a hand holding a pen or stylus, with no visible text or symbolsADVERTENCIA
natural_image
Line drawing of a closed book with a bandage, no text or symbols presentnatural_image
Line drawing of a hand holding a finger with fingers, no text or symbols presentES
CONSEJO
Cuidado
natural_image
Technical line drawing of a mechanical component with no visible text or symbolsES
natural_image
Line drawing of a medical device with internal tubing and connectors (no text or symbols)KOMPERNASS HANDELS GMBH
BURGSTRASSE 21
44867 BOCHUM
GERMANY
www.kompernass.com
Indice
flowchart
graph TD
    A["Top-Down Arrow"] --> B["Right Arrow"]
    C["Top-Down Arrow"] --> D["Right Arrow"]
natural_image
Diagram of a mechanical assembly showing a cylindrical component being inserted into a cylindrical housing, with a labeled part '20' pointing to the cylinder (no text or symbols beyond label)AVVERTENZA
natural_image
Line drawing of a hand holding a finger with a small object attached (no text or symbols)AVVERTENZA
natural_image
Illustration of a hand holding a pen and writing on a lined index finger (no text or symbols present)♦ Limarle con la lima sabbiata 17.
AVVERTENZA
natural_image
Illustration of a hand holding a finger with a finger pointing to the index finger (no text or symbols present)AVVERTENZA
natural_image
Line drawing of a closed book with a hand holding the cover (no text or symbols)natural_image
Line drawing of a hand holding a finger, with fingers gently positioned (no text or symbols)SUGGERIMENTO
natural_image
Technical line drawing of a mechanical component with no visible text or symbolsnatural_image
Line drawing of a device with coiled heating elements and a heat sink (no text or symbols)KOMPERNASS HANDELS GMBH
BURGSTRASSE 21
44867 BOCHUM
GERMANY
www.kompernass.com
Índice
Introdução.....62
natural_image
Simple line drawing of a cylindrical object with a droplet inserted, connected to a cylindrical container (no text or symbols)INDICAÇÃO
natural_image
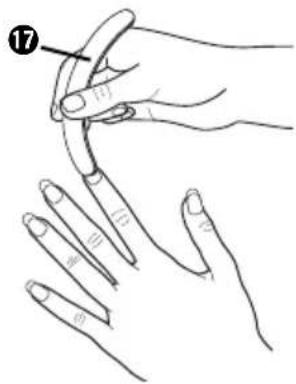
Illustration of a hand holding a finger with a numbered label (17), no text or symbols presentINDICAÇÃO
natural_image
Line drawing of a closed book with a hand holding the cover (no text or symbols)natural_image
Line drawing of a hand holding two fingers, no text or symbols presentSUGESTÃO
Cuidados
natural_image
Technical line drawing of a mechanical component with no visible text or symbolsnatural_image
Line drawing of a medical device with internal tubing and connectors (no text or symbols)KOMPERNASS HANDELS GMBH
BURGSTRASSE 21
44867 BOCHUM
GERMANY
www.kompernass.com
Table of Contents
Introduction .....92
Copyright....92
Limitation of Liability .....92
Intended Use 92
Warning Notices 93
Safety instructions .....94
Appliance and
Accessories ..... 100
Setting up and connecting to the power supply ..... 101
Safety instructions....101
Items supplied and
initial inspection....101
Unpacking....102
Disposal of packaging .....102
Requirements for the
installation location .....102
Electrical connection .....103
Handling and operation .... 104
Switching On and Off .....104
Functions....104
Utilisation 105
Selecting artificial nails .....105
Attaching artificial nails .....106
Matching a nail set .....109
Application of the UV-Gel .....109
Hardening of the UV-Gel .....110
Topping up....112
French nails....113
Removal of artificial nails .....113
Care....114
Cleaning 114
Safety instructions .....114
Cleaning the appliance .....114
Cleaning accessories .....115
Exchanging the
UV Lamps 115
Troubleshooting ..... 116
Safety instructions .....116
Malfunction causes
and remedies .....117
Storage/Disposal ..... 118
Storage....118
Disposing of the appliance .....118
Appendix 118
Notes on the EC Declaration
of Conformity .....118
Technical data 119
Warranty....119
Service....120
Importer....120
Introduction
Congratulations on the purchase of your new appliance.
You have clearly decided in favour of a quality product. These operating instructions are a part of this product. They contain important information in regard to safety, use and disposal. Before using the product, familiarise yourself with all of these operating and safety instructions. Use the product only as described and only for the specified areas of application. In addition, pass these documents on, together with the product, to any future owner.
GB MT
Copyright
This documentation is copyright protected.
Any copying or reproduction, including as extracts, as well as the reproduction of images, also in an altered state, is only permitted with the written authorisation of the manufacturer.
Limitation of Liability
All technical information, data and information for connection and operation, contained in these operating instructions correspond to the latest at the time of printing and, to the best of our knowledge, take into account our previous experience and know-how. No claims can be derived from the details, illustrations and descriptions in these instructions. The manufacturer assumes no responsibility for damage caused by failure to observe the instructions, improper use, inappropriate repairs, making unauthorized changes or for using unapproved replacement parts.
Intended Use
This appliance is intended only for the application and fi xating of artifi cial fi nger nails for manicure purposes in indoor areas and is only for domestic use. This ap- pliance is not intended for any other use or for uses beyond those mentioned here.
WARNING
Risks from unintended use!
Risks can be engendered by the appliance if it is used for unintended purposes and/or other types of use.
▶ Use the appliance exclusively for intended purposes.
▶ Observe the procedures described in these operating instructions.
Claims of any kind resulting from damage caused by improper use, incompetent repairs, unauthorized modifications or the use of non-approved spare parts will not be acknowledged.
The operator alone bears liability.
Warning Notices
In the existing operation instructions the following warnings are used:

DANGER
A warning at this risk level indicates a threateningly dangerous situation.
If the dangerous situation is not avoided it could lead to death or serious physical injuries.
▶ Observe the directives in this warning notice to avoid the risk of deaths or serious physical injuries.

WARNING
A warning at this risk level indicates a possibly dangerous situation.
If the dangerous situation is not avoided, this could lead to personal injury.
▶ Follow the instructions in this warning to avoid personal injuries.
IMPORTANT
A warning at this risk level signifies possible property damage.
If the situation is not avoided it can lead to property damage.
The directives in this warning are there to avoid property damage.
NOTICE
▶ A notice signifies additional information that assists in the handling of the appliance.
Safety instructions
This appliance complies with the statutory safety regulations. Incorrect usage can, however, lead to personal and property damage.
A repair to the appliance during the warranty period may only be carried out by a customer service firm authorised by the manufacturer, otherwise no additional warranty claims can be considered for subsequent damages.

DANGER
Potentially fatal risk of electrical shocks!
Upon contact with live wires or live components there is a potentially fatal risk!
Pay heed to the following safety information to avoid a potentially fatal risk from electrical power:
▶ To avoid potential risks, if the appliance power cable is damaged, it must be replaced by the manufacturer, its Customer Service or by a qualified technician.
▶ Do not install the appliance in the bathroom.
▶ Connect the appliance exclusively to a correctly fused mains power socket.
▶ Do not touch the appliance and the plug with wet hands.
▶ NEVER place the appliance in water.
▶ Do NOT open the housing of the appliance (except when changing the UV lamps). If live connections are touched and/or the electrical or mechanical construction is altered, there will be an increased risk of electric shock.

WARNING
Risk of injury from ultraviolet light (UV-Light)!
Looking directly into the UV light from the UV lamps in this appliance can cause eye injuries and diminish the power of your vision!
▶ NEVER look directly into the ultraviolet light from the UV lamps.
▶ If the UV lamps are not in use, switch them off.
▶ Non-users, and especially children, may not be present during the operation of the appliance.
WARNING - RISK OF INJURY
▶ Before use check the appliance for visible external damage. Do not put into operation an appliance that is damaged or has been dropped.
This appliance is not intended for use by individuals with restricted physical, physiological or intellectual abilities or deficiencies in experience and/or knowledge unless they are supervised by a person responsible for their safety or receive from this person instruction in how the appliance is to be used.
▶ Children should be supervised to ensure that they do not play with the appliance.
▶ Never look directly into the UV lamps. It could cause injury to the eyes!
▶ Always keep the appliance and all accessories out of the reach of children.
▶ Pay heed to the instructions given on the containers of all substances used.
▶ Repairs should only be carried out by authorised specialist companies or by the Customer Service Department. Incorrect repairs can result in significant risks for the user. In addition, warranty claims become void.
▶ Defective components may only be replaced with original replacement parts. Only by using these replacement parts can it be guaranteed that they comply with the safety requirements.
WARNING
Risks of damage to health from solvent-containing substances and vapours!
The inhalation of solvent-containing substances and vapours can damage your health!
▶ Do not breathe in the vapours from solvent-containing substances (e.g. acetone).
▶ Ensure there is adequate ventilation when interacting with solvent-containing substances.
▶ Pay heed to the instructions on the containers of the solvent-containing substances.
WARNING
Risks of health damage from chemical substances!
The improper handling of chemical substances can lead to serious health damage!
▶ If swallowed, IMMEDIATELY seek medical attention!
▶ In cases of allergic reactions, consult a doctor immediately!
▶ In the event of contact with the eyes or mucous membranes, contact a doctor immediately!
INFORMATION ON HANDLING CHEMICAL SUBSTANCES
The chemical substances supplied with this product include the nail glue, the finishing solution, the UV gel and the French gel.
▶ Open the pots and jars containing the chemical substances carefully.
▶ Handle the chemical substances cautiously and with care.
The chemical substances are irritating to the eyes and skin.
The chemical substances can cause skin irritations (sensitisation of the skin).
▶ Wear protective gloves and protective clothing when handling chemical substances.
▶ Ensure that there is sufficient ventilation when you are working with the chemical substances. If there is insufficient ventilation, wear breathing apparatus.
▶ Never use the UV gel or the French gel on damaged or unhealthy nails, or for repairing damaged nails.
ATTENTION - PROPERTY DAMAGE
▶ Protect the appliance from moisture and the penetration of liquids.
NEVER immerse the appliance in water or place the appliance in the close vicinity of water and DO NOT place objects filled with liquids (e.g. vases) onto the appliance.
▶ Do not place any objects on the appliance.
▶ Do not operate the appliance close to open flames (e.g. candles).
▶ Avoid direct solar radiation.
▶ Always pull the plug itself out of the mains power socket, do not pull it with the power cable.
In the case of a malfunction occurring or a thunderstorm, disconnect the plug from the mains power socket.
WARNING - RISK OF INJURY!
UV appliances may not be used by:
▶ People who suffer from skin cancer or are predisposed to it,
▶ People, who are taking light-sensitivity enhancing drugs,
▶ People under 18 years of age,
▶ People with a tendency towards freckles,
▶ People with a naturally red hair colour,
▶ People with unusual skin discolourations,
▶ People with more than 16 moles (with a minimum diameter of 2 mm) on their body,
▶ People with atypical moles (atypical moles are asymmetrical moles with a diameter of more than 5 mm and different pigmentation plus irregular border areas; if in doubt, consult your doctor),
▶ People who are suffering from sunburn,
▶ People who do not tan in the sun without skin burns,
▶ People who quickly suffer from skin burns in direct sunlight,
▶ People who have frequently suffered from a severe sunburn during their childhood,
▶ People who suffer from skin cancer or are suffering from this disease or are susceptible to skin cancer,
▶ People with a first-degree relative who is suffering or has already suffered from a melanoma (skin cancer),
▶ People who, due to a light sensitivity ailment, are in physicianly or medical treatment,
▶ People who absolutely cannot tan at all, or who cannot tan without getting sunburned, when they are exposed to the sun,
▶ People who are easily sunburned when they are exposed to the sun,
▶ during pregnancy.
The irradiation should not exceed the minimal erythema dose (MED). If erythema (skin redness) occurs several hours after irradiation there should be no further applications made. In this case, the next irradiation should not take place before one week after the date of the skin redness.
If unexpected side effects such as itching occur within 48 hours after the first application of the UV appliance, you should consult a doctor before receiving further UV irradiation.
■ Recommended exposure timetable:
- Do not carry out more than 5 treatments per day. This could lead to skin irritation.
- Do not exceed the recommended number of 400 treatments per year.
■ The appliance may not be used if the timer is not working properly.
■ Use only lamps of the specified type. The use of a UV lamp from another manufacturer or of a different type will lead to the revocation of the warranty.
■ UV radiation from the sun or from UV appliances can cause both skin and eye damage, which may be irreversible. These biological effects depend on the quality and quantity of the radiation and on the skin and eye sensitivity of the individual person.
The skin can suffer from sunburn after excessive exposure to radiation. Too frequent UV radiation from the sun or UV appliances can lead to premature skin aging and cause an increased risk of skin cancer. This risk increases with increasingly cumulative UV exposures. UV radiation at a young age increases the subsequent risk of skin cancer.
■ UV radiation can lead to injuries to the eyes and skin, such as premature skin aging and even skin cancer. Read these operating instructions carefully. Some medications or cosmetics increase the sensitivity to UV radiation.
The unprotected eye can suffer superficial inflamation and, in some cases, excessive exposure may cause damage to the retina. Frequently repeated exposures can lead to cataracts.
In the event of individually identified sensitivity or allergic reactions to UV radiation, you should first seek medical advice before beginning the irradiation.
■ Certain ailments or the side effects of certain drugs may be exacerbated by UV irradiation. If in doubt, consult your doctor.
There should be a period of at least 48 hours between the first two exposures.
■ Avoid sunbathing and use of the appliance on the same day. This could lead to skin irritation.
■ Pay heed to the instructions on the irradiation time, time intervals for the irradiation and the distance to be from the lamp. If you do not, it could lead to skin irritation.
- Consult your doctor if persistent tumours or ulcers form, or changes in moles come about or sores develop.
■ Protect sensitive skin areas, such as scars, tattoos and the genitals, from irradiation.
■ Do not carry out more than 5 treatments per day. This could lead to skin irritation.
■ Do not exceed the recommended number of 400 treatments per year.
■ Remove cosmetics and sun care products before using the appliance. If you do not, it could lead to skin irritation.
NOTICE
▶ If in any doubt, consult your doctor about the possible applications before using the appliance.
Appliance and Accessories
NOTICE
▶ See in addition the illustrations on the fold-out side.
Figure A:
① UV appliance with 4 built-in UV lamps
② ON/OFF switch
③ Operating indicator "POWER"/Standby
4 Operating indicator "240 seconds"
⑤ Time preselect button "240 seconds"
⑥ Operating indicator "150 seconds"
⑦ Time preselect button "150 seconds"
⑧ Operating indicator "90 seconds"
⑨ Time preselect button "90 seconds"
10 Start button
Figure B:
⑪ Nail clippers (for clipping the nail-tips)
⑫ Cuticle pusher (to push back the cuticle)
⑬ Brush (for applying the UV Gel)
14 Sanding block (for smoothing of unevenness)
⑮ Spot swirl (for applying French gel or decorative elements)
16 Cellulose pads (for applying the fi nishing solution or for correction)
⑰ Sandpaper fi le (for fi ling nails)
18 Nail tips (artifi cial fi ngernails)
19 Finishing solution (for fi nal treatment and for cleaning brushes)
20 Nail glue (to glue the "GLUE" nail tips on)
②1 UV gel (for topping up nails)
22 French gel (for modelling "French nails")
Setting up and connecting to the power supply
Safety instructions
WARNING
During the commissioning of the appliance personal injury and property damage could occur!
Observe the following safety information to avoid these risks:
▶ Packaging material should not be used as a play thing. There is a risk of suffocation.
To avoid damage to people and property, pay heed to the requirements for the installation site and the electrical connection of the appliance.
Items supplied and initial inspection
The appliance is supplied with the following components as standard:
• UV appliance with 4 UV lamps and mains power cable
- Sand sheet fi le
- Sanding block
- Nail Tips
- Cuticle pusher
- Brush
- Spot swirl
- Nail clippers
• 1 pot French gel ("French gel")
• 2 pots of UV gel ("UV Gel")
• Finishing solution ("Finishing")
• 2 bottles of nail glue ("Glue")
• 100 cellulose pads (cellulose tissues)
- Storage case
- Operating instructions
NOTICE
▶ Check the contents to ensure everything has been provided, and for signs of visible damage.
▶ If the contents are incomplete, or have been damaged due to defective packaging or transportation, contact the Service Hotline (see chapter Service).
Unpacking
Remove all parts of the appliance and these operating instructions from the box.
◆ Remove all packing material.
Disposal of packaging
The packaging protects the appliance against transport damage. The packaging materials are selected from the point of view of their environmental friendliness and disposal technology and are therefore recyclable.
The recirculation of packaging into the material circuit saves on raw material and reduces generated waste. Dispose of packaging material that is no longer needed according to the regionally established regulations.
NOTICE
▶ If possible preserve the appliance's original packaging during the warranty period so that, in the event of a warranty claim, you can package the appliance properly for its return.
Requirements for the installation location
For the safe and trouble-free operation of the appliance the following requirements must be met at the installation location:
■ Place the appliance on a dry, fl at and fi rm surface.
■ Do not place the appliance in a damp environment and not in an area at risk from spraywater.
■ Do not place the appliance adjacent to a radiator or a raiation heater.
■ The mains power socket must be easily accessible, so that the plug can be easily removed in an emergency.
Electrical connection

DANGER
Potentially fatal risk of electrical shocks!
Upon contact with live wires or live components there is a potentially fatal risk!
Pay heed to the following safety information to avoid risks from electrical power:
▶ Do not operate the appliance if the plug or the power cable are damaged.
▶ Connect the appliance exclusively to a correctly fused mains power socket.
▶ Do not touch the appliance and the plug with wet hands.
▶ Avoid water contact with the appliance.
▶ DO NOT open the housing of this appliance. If live connections are touched and/or the electrical or mechanical construction is altered, there will be an increased risk of electric shock.
Before you connect the appliance, compare the connection data (voltage and frequency) on the typeplate of the appliance with that for the intended power source. his data must match, in order to avoid any damage to the appliance.
- Ensure that the power cable of the appliance is not damaged and that it is not laid over hot surfaces and/or sharp edges.
◆ Ensure that the power cable is not over-taut or kinked.
Do not let the power cable hang over edges (trip wire effect).
◆ Insert the plug into the mains power socket.
Handling and operation
In this chapter you receive important information for the handling and operation of the appliance.
NOTICE
▶ See also the chapter Appliance and Accessories.
Switching On and Off
Switch the UV appliance ① on by pressing the ON/OFF switch ② to the position "I". The operating indicator ③ lights up and the appliance is ready for use.
Switch the UV appliance ① off by pressing the ON/OFF switch ② to the position "0". The operating indicator ③ extinguishes.
Functions
Three different treatment times can be set on the appliance:
■ 90 seconds (Button ⑨)
■ 150 seconds (Button ⑦)
■ 240 seconds (Button 5)
Switch the UV lamps on by pressing the Start button ⑩.
Select the desired treatment time and then press the appropriate time preselect button ⑨, ⑦ or ⑤.
NOTICE
The UV lamps switch off automatically after the lapse of the preset time.
Press the time preselect button ⑨, ⑦ or ⑤ and the Start button ⑩ once again as described above for any further treatments.
Utilisation
CAUTION
Risk of property damage from glue and UV gel.
Nail glue 20, UV gel 21 and French gel 22 are very difficult to remove from furniture surfaces, clothes and carpets.
▶ Cover your work area with paper or with a hand towel prior to use.
NOTE
Place the UV appliance ① on a covered, stable surface.
▶ Never place the nail glue 20, the French gel 22 or the UV gel 21 in the vicinity of the UV appliance 1.
▶ Never expose the nail glue 20, the Ench gel 22 or the UV gel 21 to direct sunshine.
Selecting artificial nails
NOTICE
For the first applications it may be helpful to be assisted by an experienced person.
Before the application, remove all jewelry on the hands.
▶ Clean and dry your hands before the application. We recommend that the hands are washed about 15 - 20 minutes before the application, so that there will be no residual moisture on the nails.
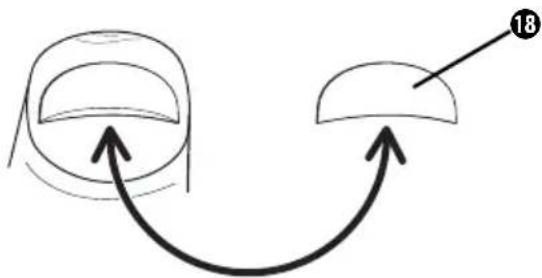
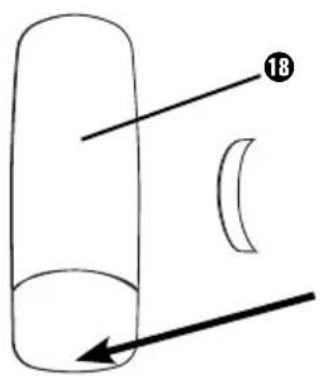
Select a nail tip 18 whose curvature corresponds as closely as possible to the natural curve of your nail.
flowchart
graph TD
    A["Top Left Node"] --> B["Bottom Right Node"]
    B --> C["Arrow 18"]
    style A fill:#f9f,stroke:#333
    style B fill:#f9f,stroke:#333
    style C fill:#ccf,stroke:#333
Select a nail tip 18 which closes exactly at the edge of your natural nail and whereby the sides are parallel to your natural nail.
If necessary, file the ends of the nail tips 18 with the sandpaper file 17, so that the end point (arrow) covers about one third of your natural nail.
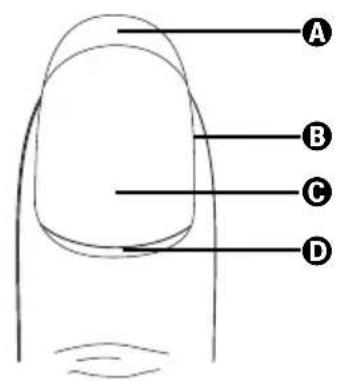
A Free edge
B Nail bed
© Nail plate
D Cuticle
NOTICE
If you use a too small nail tip 18, it can break off more easily. Therefore, select a larger nail tip 18 and then file the sides into the desired form.
◆ Repeat the described process until all of your nails have the desired length and shape.
Attaching artificial nails
NOTICE
▶ Take note that nails absorb moisture from contact with water. The nails, however, must be completely dry before the application.
Before the application, refrain from using any hand creams or the like, because, to make possible the optimal adhesion of the nail tips ⑬ the nail surfaces must be completely free from greases.
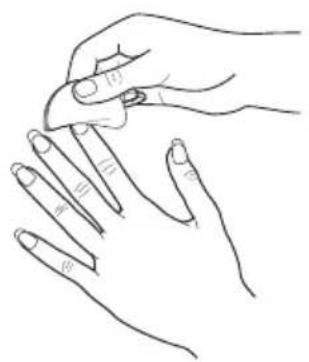
♦ Push the cuticle Ⓓ back with the cuticle pusher 12 and then remove the transparent skin from the nail plate C of your finger.
Now treat the nail surface with the sanding block 14 until the fingernail is no longer shiny.
Remove the dust from filing with a paper cloth or cellulose pad 16.
Rub the nails with the finishing solution 19 so that the last remnants of dust and grease are removed.
NOTICE
▶ Under no circumstance should you now touch the nail surfaces with your fingers, if you do, they will become greasy again and this will prevent a good bonding!
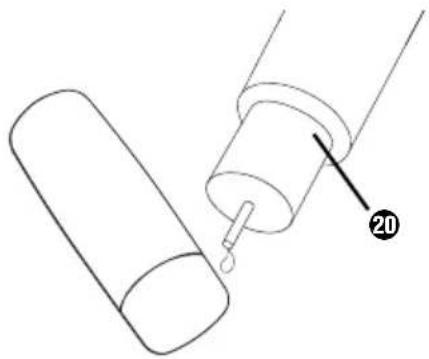
Apply a small drop of nail glue 20 to the lower part of the nail tip 18 and distribute it with the aid of the nail glue bottle 20 on the lower surface. Hold the nail tip 18 down so that the nail glue 20 cannot run onto the upper part of the nail tip 18.
natural_image
Simple line drawing of a cylindrical object with a droplet inserted, connected to a cylindrical container (no text or symbols)NOTICE
Before the first use you must puncture the bottle of nail glue 20 with a pointed object, such as a needle. If, at a later date, the bottle of nail glue 20 has become blocked, it can again be opened for use with a needle.
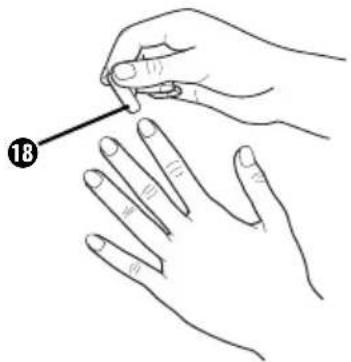
Now place the nail tip 18 at an angle on the natural nail, so that the predetermined edge of the nail tip 13 lies on the edge of the natural nail.
Now tilt the nail tip 18 with gentle pressure onto the natural nail, so that potential air bubbles are squeezed out.
NOTICE
▶ Wipe away excess nail glue 20 with a cellulose pad 16, a cotton bud or a paper towel.
Hold the nail tip ⑱ firmly for 10-12 seconds and, at the same time, press it down with sufficient pressure onto the natural nail. Ensure that no air bubbles are formed and that the tip is glued on perfectly straight.
NOTICE
There may no longer be a gap under the nail, so that dirt cannot penetrate.
▶ Ensure that no air bubbles or white spots form under the nail tip 18. In this case, take the nail tip 18 off immediately and lay it back on again.
When you have glued all of the nail tips ⑱ on, trim them to the desired length with the nail clippers ⑪. Press the nail clippers ⑪ together in one squeeze. If you press too slowly, it may happen that the nail tips ⑬ splitter.

natural_image
Line drawing of two hands performing a medical procedure with a tool (no text or symbols)◆ File them into shape with the sand sheet file ⑰.
NOTICE
▶ File very carefully, because the nail tips 18 are held only with a nail glue 20.
▶ If you are not used to long nails, cut them back a little in order to avoid knocks and the falling off of the nail tips 18.
Matching a nail set
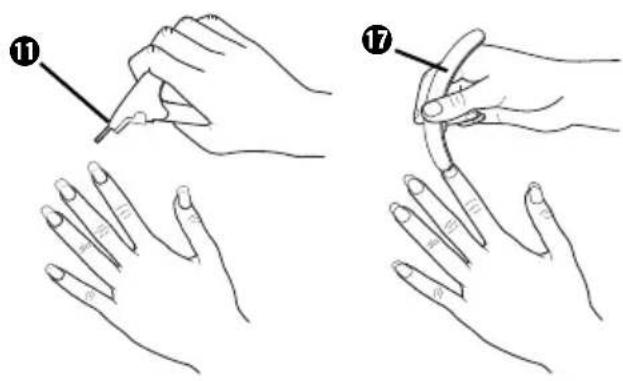
- Carefully file the transitions from the nail tips 18 to the natural nails with the Sandpaper file 17 until they conform to the contour of the natural nail. File only the nail tips 18! Do not damage your natural nail.
- Carefully file the sides of the nail with the Sandpaper file ⑰ until it is straight and does not exhibit a "wing".
◆ Repeat this step for each individual nail.
natural_image
Illustration of a hand holding a finger with a numbered label (17), no text or symbols presentRemove the dust from filing with a paper cloth or cellulose pad 16.
Application of the UV-Gel
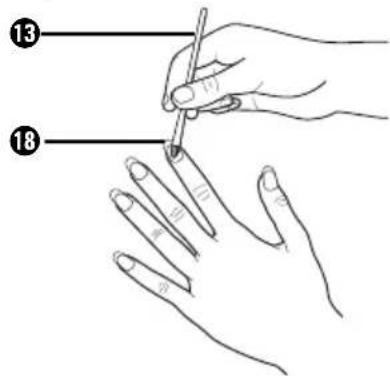
Using the brush 13, take a small amount of UV Gel 21 and then wipe the excess on one side of the brush 13 off on the edge the UV Gel pot.
Apply a thin coating of UV-Gel 21 onto the complete nail. Apply a little more UV Gel 21 to the lower part of the nail, as hereby is how the off set between the natural and the artificial nail is created. Furthermore, the transition from natural to artificial nails is especially sensitive to pressure and knocks, thus more UV Gel 21 must be applied here.
INFORMATION
When you are doing the application do not press too heavily on the brush 13, since the brush 13 could otherwise cause streaking.
▶ Model the first layer of the UV Gel ②1 very carefully, as this determines the future shape of the nail. Model the best possible natural nail shape.
- Maintain a distance of about 1 mm from the cuticle during the application.
NOTICE
▶ Should any UV Gel 21 inadvertently come onto the cuticle or the nail bed, remove it before the hardening, for example, with a cotton wool swab.
◆ Repeat the above process for all nails.
NOTICE
▶ Ensure that the nail is covered evenly with UV Gel 21.
Hardening of the UV-Gel
NOTICE
▶ See also the chapter Handling and operation
Switch the UV appliance ① on with the ON/OFF switch ②.
◆ Press the Start button 10; the UV Lamps will be switched on.
Now select the desired treatment time and then press the appropriate time preselect button ⑨, ⑦ or ⑤. For the first hardening we recommend the time setting of 240 seconds.
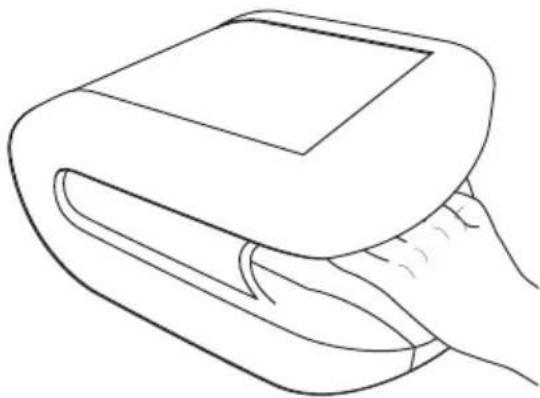
Hold your hand with the nails upward for the duration of the set treatment time in the opening of the UV appliance ①.
Treat the thumbnail separately because, when you hold your hand in the UV unit, the UV light only shines on the side of it.
Repeat the application of the UV gel 21 and the hardening in the UV appliance 1 as described above once more.
NOTICE
▶ After the expiry of the preselected treatment time the UV lamps are switched off automatically
The Start button ⑩ and a time preselect button (⑨, ⑦ or ⑤) must be activated again for each new treatment.
natural_image
Line drawing of a closed book with a bandage, no text or symbols present♦ Examine each nail, after the application and hardening of all coatings, for unevenness, small scratches or ridges.
If you discover unevenness, apply a further thin layer of UV gel ② and hard-en the nail with the setting of 150 seconds or 90 seconds (depending on the amount of applied UV gel ②).
Even after the last hardening of the Gel layer, the nails may feel a feel sticky ("sweat-layer" or polymerization layer).
Moisten a cellulose pad ⑯ with finishing solution ⑲ and then wipe this over the nail.
natural_image
Line drawing of a hand holding two fingers, no text or symbols presentTIP
If you want to apply ornaments or small rhinestones to the nail, use the sharp side of the Spot swirl ⑮ to place them in the non-hardened most recent layer of the UV gel ②1. Then harden the UV gel ②1. Apply an additional, very thin layer of UV gel ②1 over the nail and then harden it to ensure that the ornaments are held firmly in place. This gives the ornaments better protection.
Topping up
NOTICE
- Because the natural nail grows, over time the attachment of the nail tip can raise itself. For this reason the gap between the cuticle and the nail attachment must be topped up from time to time. - A topping up is required about every 2 - 3 weeks.
Using the sandpaper file 17, file around the attachments of the hardened gel.
Use the sanding block 14 until the nail is no longer shiny.
When done, reapply UV gel 21 and harden it again.
NOTICE
In this regard, see the previous chapters Application of the UV-Gel and Hardening of the UV-Gel
French nails
"French nails" means decorating the fingernails with a white tip.
◆ Model the nail as described in the chapter entitled "Application" until you have applied the first layer of UV gel ② and hardened it.
Use the round application side of the Spot swirl 15 to apply French gel 22 to the nail tip. Always take up new French gel 22 with the point and model the white nail tip with light circular movements.
◆ Proceed with the other nails in the same way.
Now harden the nail using a setting of 150 seconds.
Then apply an additional layer of UV gel 21. Apply a little less UV gel 21 to the white part of the nails than to the rest. This makes the transition to the white tip disappear.
Now harden the nail using a setting of 150 seconds. After the last hardening of the gel layer, the nails may feel a little sticky ("sweat layer" or polymerization layer).
Moisten a cellulose pad 16 with finishing solution 19 and then wipe this over the nail.
Removal of artificial nails
IMPORTANT
Risk of damaging the natural nail surface!
A forcible breaking-off of the nail tips 18 can cause damage to the natural nail surfaces!
▶ Do not break the nail tips 18 off the natural nails.
Remove the nail tips 18 only in accordance with the following description.
First trim the nails all the way back with the nail clippers ⑪.
Then file the nail tips ⑱ off with the sandpaper file ⑰.
TIP
▶ After this, apply a little nail oil or use a rich hand cream for hands and nails in order to care for your natural nails.
Care
■ Regularly file the attachments and nail edges.
■ Polish the nails once a week.
■ When applying nail varnish, use both a lower layer and an upper layer.
■ Do not use an acetone-based nail polish remover for removing nail polish, because this would loosen and damage the artificial nails.
■ Wear rubber gloves when using detergents or bleaching agents.
■ Wear a pair of rubber gloves for all work/activities that may damage the nails.
Cleaning
Safety instructions

DANGER
Potentially fatal risk of electrical shocks!
▶ Disconnect the plug from the mains power socket before you start cleaning the appliance.
IMPORTANT
Damage to the appliance!
▶ To avoid irreparable damage, ensure that no moisture can penetrate inside the UV appliance ① when you are cleaning it.
Cleaning the appliance
Clean the surfaces of the UV appliance ① only with a soft and dry cloth.
Cleaning accessories
NOTE
▶ Clean the brush 13 and the Spot swirl 15 immediately after every use.
▶ Always close all bottles and tubs after use.
- Keep the brush 13 and the Spot swirl 15 in the finishing solution 19 and then wipe them both off with a paper towel.
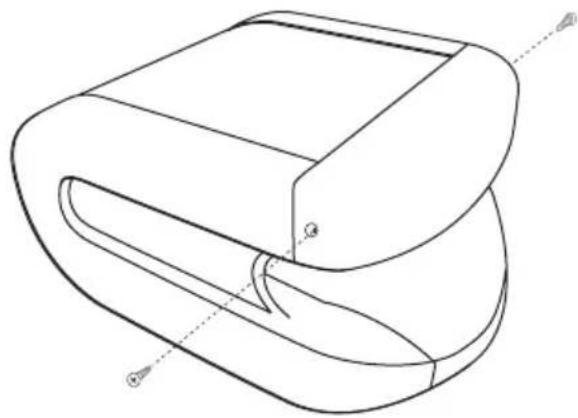
Exchanging the UV Lamps

DANGER
Potentially fatal risk of electrical shocks!
▶ Disconnect the plug from the mains power socket before you start with the exchange of the UV lamps!
NOTICE
The UV lamps may ONLY be replaced with lamps of the same type. The specifications for the precise lamp type are given in the chapter "Technical Data".
Unscrew the two screws on the sides of the appliance with a cross-head screwdriver.
natural_image
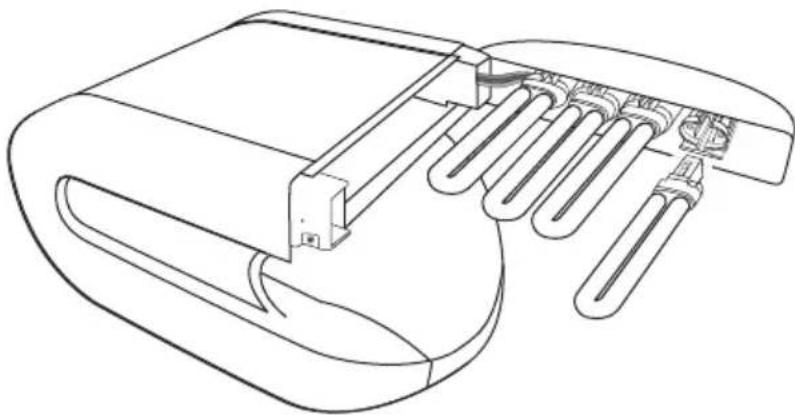
Technical line drawing of a mechanical component with no visible text or symbolsPull the front appliance cover with the ultraviolet lamps carefully from the appliance, thereby paying heed to the cable connection on the side.
◆ Carefully pull the defective UV lamp out of its socket.
natural_image
Line drawing of a device with multiple U-shaped connectors and a curved housing (no text or symbols)◆ Insert the new UV lamp into the socket.
- Slide the appliance cover with the UV lamps back onto the appliance, thereby ensuring that the cable connection on the side does not get snagged or trapped.
♦ Rattach the appliance cover with the two side screws.
Troubleshooting
In this chapter you will receive important information for malfunction localization and remedies. Observe the instructions in order to avoid risks and damage.
Safety instructions
WARNING
Observe the following safety information to avoid risks and property damage:
▶ Repairs to electronic appliances may only be carried out by specialists who have been trained by the manufacturer. Considerable risk to the consumer and damage to the appliance can occur as a result of incompetent repairs.
Malfunction causes and remedies
The following table will help with localizing and remedying minor malfunctions:
| Defect Possible cause Solution | ||
| Appliance does not switch on. | The plug is not connected. | Insert the plug into the mains power socket. |
| Mains power socket does not supply any voltage. | Check the fuses. | |
| UV gel 21 does not harden suffi ciently. | The selected treatment time too short. | Select a longer treatment time. |
| One or more UV lamps are defective. | Replace any defective UV lamps (see chapter entitled “Exchanging UV lamps”) | |
| Too much UV gel 21 applied. | Apply less UV gel 21. | |
| The nails were not directly under the UV lamps. | Hold the hand correctly in the UV appliance 1. | |
| After hardening, a "sweat layer" remains on the nails. | Occurrence of a "sweat-layer" caused by polymerization. | Remove the "sweat layer" with the fi nishing solution 19. |
| The artifi cial nails are soft/loosened. | Loosening of the artifi cial nails by products with a high acetone concentration. | Apply no products with a high acetone concentration. |
| The artifi cial fi ngernails show unevenness. | Pressure on the brush 13 too high when applying the UV gel 21. | Do not press too hard on the brush 13 when you are applying the UV gel 21. |
| UV gel 21 unevenly applied. | Apply a further and thinner layer of UV gel 21 and then harden it. | |
| A UV lamp does not glow. | UV lamp defect. Replace the defective UV lamp. | |
NOTICE
▶ If you cannot solve the problem with the aforementioned solutions, please contact Customer Services.
Storage/Disposal
Storage
IMPORTANT
Health risks from solvent-containing substances!
Solvent-containing substances and their vapours can damage your health!
▶ Carefully close all containers holding the accompanying substances.
▶ Store the accompanying substances out of the reach of children.
- Should you decide not use the appliance for an extended period, disconnect it from the mains power supply and store it in a clean and dry location away from direct sunlight and out of the reach of children.
- Store all substances in a clean, dry and cool location away from direct sunlight and out of the reach of children.
Disposing of the appliance
UNDER NO CIRCUMSTANCES should you throw the appliance or the substances into normal household waste. This product is subject to the provisions of the European Directive 2012/19/EU.
Dispose of the appliance and the substances via an approved waste disposal company or your communal waste disposal centre. The chemical substances are subject to special waste treatment. Observe the currently applicable regulations. In case of doubt, please contact your waste disposal centre.
Appendix
Notes on the EC Declaration of Conformity
This appliance complies with all the essential requirements and other relevant provisions of ...
-the European directive on electromagnetic compatibility 2004/108/EC,
-the Low Voltage Directive 2006/95/EC,
-and the RoHS Directive 2011/65/EU.
The full original Declaration of Conformity is available from the importer.
CE
Technical data
| Model SNS 45 A3 | ||
| Operating voltage 220 - 240 V | ~ / 50 Hz | |
| Power consumption 45 W | ||
| Operating temperature +5 - +45 °C | ||
| Humidity (no condensation) 5 - 90 % | ||
| Dimensions (W x H x D): 23,1 x 29,6 x 14,3 cm | ||
| Weight approx. 1300 g | ||
| Number of UV Lamps 4 | ||
| UV Lamp Type UV-9W 365 nm, 9 W | ||
| UV-type of the appliance UV-A Lamp type 3 | ||
| Automatic switch-off times | after 90, 150 and 240 seconds | |
Warranty
The warranty for this appliance is for 3 years from the date of purchase. The appliance has been manufactured with care and meticulously examined before delivery.
Please retain your receipt as proof of purchase. In the case of a warranty claim, please make contact by telephone with our Customer Service Department. Only in this way can a post-free despatch for your goods be assured.
NOTICE
The warranty covers only claims for material and manufacturing defects, but not for transport damage, wearing parts or for damage to fragile components, e.g. buttons or batteries.
This product is for domestic use only and is not intended for commercial use. The warranty is void in the case of abusive and improper handling, use of force and internal tampering not carried out by our authorised service branch.
Your statutory rights are not restricted in any way by this warranty. The warranty period is not extended by repairs made under the warranty. This applies also to replaced and repaired parts.
Damages and defects extant at the time of purchase must be reported immediately after unpacking, resp. no later than two days after the date of purchase.
Repairs made after the lapse of the warranty period are subject to charge.
Service
GB Service Great Britain
Tel.: 0871 5000 720 (£ 0.10/Min.)
E-Mail: kompernass@lidl.co.uk
IAN 90252
MT Service Malta
Tel.: 80062230
E-Mail: kompernass@lidl.com.mt
IAN 90252
Hotline availability: Monday to Friday 08:00 - 20:00 (CET)
Importer
KOMPERNASS HANDELS GMBH
BURGSTRASSE 21
44867 BOCHUM
GERMANY
www.kompernass.com
Inhaltsverzeichnis
Einführung 122
Urheberrecht....122
natural_image
Diagram of a mechanical assembly showing a cylindrical component inserted into a cylindrical housing, with a labeled part (20) pointing to the insertion point.HINWEIS
natural_image
Illustration of a hand holding a finger with a numbered label (17), no text or symbols presentHINWEIS
natural_image
Line drawing of a closed book with a bandage, no text or symbols presentnatural_image
Line drawing of a hand holding two fingers, no text or symbols presentTIPP
natural_image
Technical line drawing of a mechanical component with no visible text or symbolsnatural_image
Line drawing of a device with multiple U-shaped connectors and a curved housing (no text or symbols)KOMPERNASS HANDELS GMBH
BURGSTRASSE 21
44867 BOCHUM
GERMANY
www.kompernass.com
KOMPERNASS HANDELS GMBH
BURGSTRASSE 21
44867 BOCHUM
DEUTSCHLAND / GERMANY
www.kompernass.com


- ES
- DE AT CH
- ADVERTENCIA
- CONSEJO
- Cuidado
- Indice
- AVVERTENZA
- SUGGERIMENTO
- Índice
- Introdução.....62
- INDICAÇÃO
- SUGESTÃO
- Cuidados
- Table of Contents
- Introduction .....92
- Safety instructions .....94
- Appliance and
- Accessories ..... 100
- Setting up and connecting to the power supply ..... 101
- Handling and operation .... 104
- Utilisation 105
- Cleaning 114
- Exchanging the
- UV Lamps 115
- Troubleshooting ..... 116
- Storage/Disposal ..... 118
- Appendix 118
- Introduction
- Copyright
- Limitation of Liability
- Intended Use
- WARNING
- Risks from unintended use!
- Warning Notices
- DANGER
- A warning at this risk level indicates a threateningly dangerous situation.
- A warning at this risk level indicates a possibly dangerous situation.
- IMPORTANT
- A warning at this risk level signifies possible property damage.
- NOTICE
- Safety instructions
- Potentially fatal risk of electrical shocks!
- Upon contact with live wires or live components there is a potentially fatal risk!
- Risk of injury from ultraviolet light (UV-Light)!
- WARNING - RISK OF INJURY
- Risks of damage to health from solvent-containing substances and vapours!
- Risks of health damage from chemical substances!
- INFORMATION ON HANDLING CHEMICAL SUBSTANCES
- ATTENTION - PROPERTY DAMAGE
- WARNING - RISK OF INJURY!
- UV appliances may not be used by:
- Appliance and Accessories
- Figure A:
- Figure B:
- Setting up and connecting to the power supply
- During the commissioning of the appliance personal injury and property damage could occur!
- Items supplied and initial inspection
- Unpacking
- Disposal of packaging
- Requirements for the installation location
- Electrical connection
- Handling and operation
- Switching On and Off
- Functions
- Utilisation
- CAUTION
- Risk of property damage from glue and UV gel.
- NOTE
- Selecting artificial nails
- Attaching artificial nails
- Matching a nail set
- Application of the UV-Gel
- INFORMATION
- Hardening of the UV-Gel
- TIP
- Topping up
- French nails
- Removal of artificial nails
- Risk of damaging the natural nail surface!
- Care
- Cleaning
- Damage to the appliance!
- Cleaning the appliance
- Cleaning accessories
- Exchanging the UV Lamps
- Troubleshooting
- Malfunction causes and remedies
- Storage/Disposal
- Storage
- Health risks from solvent-containing substances!
- Disposing of the appliance
- UNDER NO CIRCUMSTANCES should you throw the appliance or the substances into normal household waste. This product is subject to the provisions of the European Directive 2012/19/EU.
- Appendix
- Notes on the EC Declaration of Conformity
- Technical data
- Warranty
- Service
- Importer
- Inhaltsverzeichnis
- Einführung 122
- HINWEIS
- TIPP
Brand : SILVERCREST
Model : SNS 45 A2
Category : Manucure / Pédicure