
PDBNP 14 A1 - Stapler PARKSIDE - Free user manual and instructions
Find the device manual for free PDBNP 14 A1 PARKSIDE in PDF.


| Product type | Cordless electric stapler |
| Brand | Parkside |
| Model | PDBNP 14 A1 |
| Power supply | 14 V lithium-ion battery (not included) |
| Magazine capacity | Approx. 100 staples |
| Compatible staples | Type 53 (6-14 mm) or similar |
| Dimensions (L x W x H) | Approx. 24 x 5 x 22 cm |
| Weight | Approx. 1.2 kg (without battery) |
| Main functions | Stapling, nailing into wood, cardboard, fabric |
| Safety | Safety lock, two-hand trigger |
| Maintenance and cleaning | Clean the magazine regularly, lubricate moving parts |
| Spare parts and repairability | Available through Parkside customer service |
| Noise level | Approx. 85 dB(A) |
| Vibrations | < 2.5 m/s² |
| Storage temperature | -20 °C to 40 °C |
Frequently Asked Questions - PDBNP 14 A1 PARKSIDE
User questions about PDBNP 14 A1 PARKSIDE
0 question about this device. Answer the ones you know or ask your own.
Ask a new question about this device
Download the instructions for your Stapler in PDF format for free! Find your manual PDBNP 14 A1 - PARKSIDE and take your electronic device back in hand. On this page are published all the documents necessary for the use of your device. PDBNP 14 A1 by PARKSIDE.
USER MANUAL PDBNP 14 A1 PARKSIDE
AIR BLIND RIVET GUN PDBNP 14 A1
GB IE NI
AIR BLIND RIVET GUN
Translation of the original instructions
NL BE
PERSLUCHT-BLINDNIETPISTOOL
Before reading, unfold the page containing the illustrations and familiarise yourself with all functions of the device.
FR BE
GB / IE/NI Translation of the original instructions Page 1
B
Contents
Introduction....2
Intended use....2
Operating components (fig. A) 2
Accessories (Fig. B) 2
Package contents 2
Technical data 2
General safety instructions for compressed air tools .... 3
Hazards caused by flying parts 3
Hazards during operation 4
Hazards caused by dust and vapours 4
Risks due to repetitive movements.... 5
Hazards caused by accessories....5
Hazards in the workplace 5
Risks due to noise....5
Risks due to vibrations 5
Additional safety instructions for pneumatic machines....6
Before use....6
Lubrication 6
Refilling oil 7
Connecting to a compressed air source....7
Use....7
Maintenance and cleaning....8
Changing the gripper jaws....8
Troubleshooting 10
Disposal....11
Kompernass Handels GmbH warranty 11
Service 12
Importer 12
Translation of the original Conformity Declaration....13
AIR BLIND RIVET GUN PDBNP 14 A1
Introduction
Congratulations on the purchase of your new appliance. You have chosen a high-quality product. The operating instructions are part of this product. They contain important information about safety, usage and disposal. Before using the product, please familiarise yourself with all operating and safety instructions. Use the product only as described and for the range of applications specified. Please also pass these operating instructions on to any future owner.
Intended use
The pneumatic pop rivet gun is used to join suitable materials with a rivet joint. Any other usage or modification of the appliance is deemed to be improper and carries a significant risk of accidents. The manufacturer accepts no responsibility for damage(s) resulting from improper usage. This tool is intended for domestic use only.
Symbols on the compressed air tool:
 | Read the operating instructions before use. | |
 | Wear a dust mask. | |
 | Always wear eye protection when using or maintaining the rivet gun. | |
 | Always wear hearing protection. | |
 | Oil regularly. | |
Operating components (fig. A)
(For illustrations see fold-out pages)
① Mouthpiece (4.8 mm pre-fitted)
② Front connector
③ Hexagonal socket on the front connector
4 Trigger
⑤ Lubricant opening
6 Connecting nipple
7 Handle
8 Thread for the pin collector
Accessories (Fig. B)
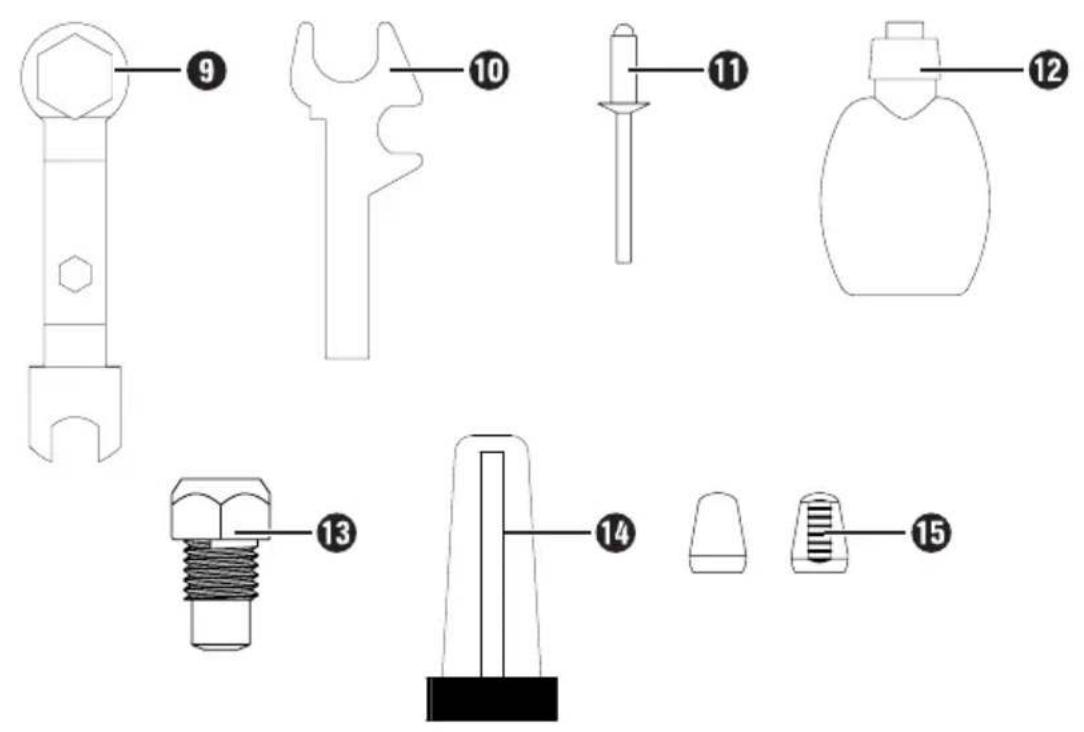
9 Assembly spanner 10 | 15 | 24 mm
10 Assembly spanner 14 | 19 mm
⑪ 4 × 20 rivets (2.4 - 3.2 - 4.0 - 4.8 mm)
12 Oil container
13 3 spare mouthpieces (2.4 - 3.2 - 4.0 mm)
14 Pin collector with attachment ring
15 2 × spare gripper jaws
Package contents
1 air blind rivet gun
4 mouthpieces (2.4 - 3.2 - 4.0 - 4.8 mm)
2 assembly spanners
1 connecting nipple (pre-fitted)
20 rivets each (2.4 - 3.2 - 4.0 - 4.8 mm)
1 oil container
1 pin collector
2 gripper jaws
1 carrying case
1 set of operating instructions
Technical data
Working pressure: max. 6.3 bar
Air consumption: 127 l/min (average)
Stroke length: 14 mm
Traction: min. 7,050 N
Compressed air supply: 1/4"
Noise emission value:
Noise measurement determined in accordance with ISO 15744.
The rated noise level of the tool is typically:
Sound pressure level: L _pA = 76.1 dB (A)
Uncertainty: K_pA = 3 dB
Sound power level: L _WA = 87.1 dB (A)
Uncertainty: K _WA= 3 dB
Wear hearing protection!
Total vibration value:
Vibration values determined in accordance with ISO 28927-6 and EN 12096:
Vibration emission value a_h ≤ 0.85 m/s^2
Uncertainty K_h=0.59 m/s^2
NOTE
The noise emission levels and vibration values specified in these instructions have been measured in accordance with the corresponding standardised measuring procedure and can be used to make equipment comparisons. The noise emission levels and vibration values vary depending on the use of the compressed air tool and may be higher than the values specified in these instructions in some cases. It is easy to underestimate the noise emission levels and vibration values if the compressed air tool is used regularly in this manner.

General safety instructions for compressed air tools
WARNING!
For multiple hazards: Please ensure that you have read and understood the safety instructions before adjusting, operating, repairing, maintaining or replacing any accessories on the rivet gun and before working in the vicinity of the machine. Failure to do this can result in serious bodily injury.
■ The rivet gun should only be adjusted, set or used by adequately qualified and trained operators.
This rivet gun may not be modified. Modifications can reduce the effectiveness of the safety measures and increase the risks for the operator.
- Do not lose the safety instructions – give them to the operator.
■ Never use a damaged rivet gun.
The appliance must be inspected regularly to ensure that it is labelled with the required rated values and markings given in this manual. The user must contact the manufacturer to obtain replacement labels if necessary.
Hazards caused by flying parts
If a workpiece or accessory breaks, parts can be flung out at high speeds.
■ Always wear impact-resistant eye protection when operating the rivet gun or exchanging accessories on the appliance. The degree of necessary protection must be evaluated separately for each individual task.
■ Wear a safety helmet if working above head height. In this case, the risks for others should also be assessed.
Hazards during operation
- When using the machine, the operator's hands can be subject to hazards such as cuts, grazing and heat. Wear suitable gloves to protect your hands.
■ The operator and maintenance personnel must be physically capable of handling the size, mass and power of the machine. - Hold the machine correctly: be ready to counteract any normal or sudden movements – keep both hands ready.
■ Ensure that your body is balanced and that you have stable footing.
■ Use only the lubricants recommended by the manufacturer. - Suitable safety goggles must be worn; wearing of protective gloves and safety clothing is recommended.
■ Never use the machine without a rivet.
■ Only operate the machine if the additional machine tool is properly attached to the machine with a suitable locking mechanism.
There is a risk of electrostatic discharge if the machine is used on plastic and other non-conductive materials.
Hazards caused by dust and vapours
The dust and vapours produced by using the rivet gun can be hazardous to health (e.g. cause cancer, birth defects, asthma and/or dermatitis); it is essential to carry out a risk assessment in respect of these risks and to implement corresponding regulatory mechanisms.
■ The risk assessment should include all dust caused by the use of the machine and the existing dust that may be kicked up at the same time.
The rivet gun is to be operated and maintained in accordance with the recommendations contained in this manual to keep the release of dust and vapours to a minimum.
■ The exhaust air should be routed so that the raising of dust in already dusty environments is kept to a minimum.
If dusts or vapours are created, the main priority must be to control these at the site of their release.
All inserts or accessories of the machine intended for collecting,
extracting or suppressing airborne dust or vapours or should be used and serviced in accordance with the manufacturer's instructions.
Consumables/machine tools should be selected, maintained and replaced in accordance with the recommendations in this guide in order to avoid unnecessary intensification of dust or vapour production.
■ Use breathing equipment as per the instructions provided by your employer or as required by health and safety regulations.
Risks due to repetitive movements
When using a rivet gun, the operator should adopt a comfortable posture whilst ensuring a secure hold and avoiding awkward postures or positions in which it is difficult to maintain balance. The operator should change positions during the course of long-lasting tasks. This can be helpful in the prevention of discomfort and fatigue.
■ Users of non-rotary, percussive tools may experience unpleasant sensations in their hands, arms, shoulders, neck area or other body parts while working with the tools.
If the operator notices symptoms such as persistent or recurring illness, discomfort, throbbing, pain, tingling, burning or stiffness, these indications should not be ignored. In this case, the operator should consult a suitably qualified physician.
Hazards caused by accessories
■ Before replacing the mouthpiece or emptying the pin collector, disconnect the rivet gun from the compressed air supply.
Hazards in the workplace
■ Slipping, tripping up and falling are the main causes of injuries in the workplace. Take care not to trip over the air hose.
This pop rivet gun is not suitable for use in explosive environments and is not insulated against contact with power sources.
- Do not operate the appliance in the vicinity of electric mains, gas pipelines, etc. which could pose a hazard if damaged by the machine.
Risks due to noise
Excessive noise levels in conjunction with insufficient hearing protection may lead to permanent hearing damage, hearing loss and other problems, such as tinnitus (ringing, buzzing, whistling or humming in your ears). It is essential that a risk assessment is carried out with respect to these risks and that appropriate regulatory mechanisms are implemented.
■ Suitable regulatory mechanisms include measures such as the use of insulation materials to avoid ringing noise occurring on the workpieces.
■ Use ear protection equipment as per the instructions provided by your employer or as required by health and safety regulations.
The rivet gun is to be operated and maintained in accordance with the recommendations contained in this manual to reduce any unnecessary increase of the noise levels.
■ Consumables should be selected, maintained and replaced in accordance with the recommendations in this guide in order to avoid unnecessary increase of the noise levels.
Risks due to vibrations
■ Vibrations can damage the nerves and cause malfunctions to the blood circulation in the hands and arms.
■ When working in a cold environment, wear warm clothing and keep your hands warm and dry.
If you notice numbness, tingling or pain in your fingers or hands or notice that the skin of your fingers or hands has become pale, stop working with the rivet gun, inform your employer and consult a doctor.
■ The rivet gun is to be operated and maintained in accordance with the recommendations contained in this manual to reduce any unnecessary increase of the vibrations.
- Do not use your free hand to hold the machine tool, as this will increase the impact of the vibrations.
- Hold the machine securely but not too firmly while maintaining the necessary hand-reaction force, as the vibration risk generally increases the harder the machine is held.
■ To prevent injury, all worn, broken or bent parts of the locking mechanism must be replaced immediately.
Additional safety instructions for pneumatic machines
■ Compressed air can cause serious injury.
- Ensure that the air supply is switched off, the hose is not under pressure, that the air supply has been shut off and that the machine is disconnected from the air supply when not in use, and also before exchanging accessories or carrying out repairs.
—Never aim the airflow towards yourself or any other person.
-Cold air must be directed away from the hands.
■ Thrashing hoses can cause serious injury. Therefore, always check that the hoses and their fixings are not damaged or have not come loose.
If universal rotary joints (claw couplings) are used, locking pins must be used to provide protection; Whipchek® air hose restraints must be used to provide protection in case of a failure of the connection of the hose to the machine.
- Do not use quick-lock couplings at the inlet. Only use threaded hose connectors made of tempered steel (or a material with similar shock resistance).
■ Ensure that the maximum permissible pressure stated on the machine is not exceeded.
■ Never carry pneumatic machines by the hose.
Before use
NOTE
The rivet gun may only be operated on cleaned, oil-atomised compressed air and may not exceed the maximum operating pressure of 6.3 bar at the appliance. The compressor must be fitted with a pressure reducer to regulate the working pressure.
▶ Note that the maximum working pressure may not be exceeded. An excessive working pressure does not mean increased output; it merely increases the air consumption and accelerates appliance wear. Always comply with the technical information.
Lubrication
NOTE
▶ Regular lubrication is particularly important to avoid friction and corrosion damage. We recommend using a suitable special oil for compressed air tools (e.g. Liqui Moly compressor oil).
—Lubrication with mist oiler
A mist oiler (not supplied) continuously and optimally lubricates the appliance as a preparation stage after the pressure reducer. A mist oiler gives off fine drops of oil into the air flow and thus guarantees regular lubrication.
- Manual lubrication
If you do not have a mist oiler, lubricate the tool before every use or any longer work sessions. To do this, drip 3-5 drops of special oil for compressed air appliances into the lubricant opening ⑤.
Refilling oil
To ensure that the rivet gun remains operational for as long as possible, make sure that there is sufficient pneumatic oil in the appliance.
You have the following options:
◆ Attach a maintenance unit with an oiler to the compressor.
◆ Install a fitted oiler into the compressed air line or the compressor.
- Manually add 3–5 drops of pneumatic oil from the supplied oil container 12 into the connecting nipple 6 after every 15 minutes of operation.
When opening the oil container ^12 for the first time, remove the cap nut from the container. Use a pair of long-nosed pliers or a similar implement to remove the internal pipette.
♦ Turn it 180°, replace it and screw it back in place with the cap nut.
Use a needle or similar tool to poke a small hole into the tip of the pipette to release oil.
Connecting to a compressed air source
NOTE
▶ Before connecting the compressed air source,
-the correct working pressure (3-6 bar) must be fully reached
-ensure that the trigger ^4 is not pulled
◆ Pull the supply hose connector over the quick-release fastener on the connecting nipple ⑥ until it clicks into place.
NOTE
The compressed air source must be equipped with a pressure reducer to ensure that you can regulate the air pressure.
Use
The appliance is ready for use as soon as the pneumatic air flow has been established.
♦ Screw the pin collector 14 onto the thread for the pin collector 8 at the back of the machine.
◆ Determine the suitable rivet size on the basis of the workpieces used.
Use a suitable tool to drill a hole into the workpieces in the spot where the rivet ⑪ will be located. Make sure the diameter of the hole corresponds to the determined rivet size.
!
CAUTION!
- Suitable safety precautions must be taken depending on the size and nature of the workpieces. Use suitable clamping devices to prevent the workpieces from slipping.
In the event of an interruption to the air supply, release the trigger 4 immediately.
▶ Before switching on the machine, make sure the machine tool is firmly placed on the surface to be processed.
Check if the diameter of the attached mouth-piece ① matches the mandrel diameter of the determined rivet size.
If it does not, unscrew the front connector using the assembly spanner ⑨, if necessary.
!
CAUTION!
▶ Ensure that the appliance is disconnected from the compressed air source before you fit or remove the front connector ②.
If necessary, unscrew the mouthpiece ① from the front connector ② sing the assembly spanner ⑨. Afterwards, screw the correct spare mouthpiece ⑬ into the front connector ② and tighten it.
To attach the front connecto②, press it onto the thread (you will feel minor resistance) and tighten it by hand.
♦ Tighten the front connecto② using the assembly spanner⑨.
◆ Reconnect the appliance to the compressed air supply.
◆ Place the rivet body in the drill hole.
◆ Slide the appliance over the river until the mandrel is fully inserted into the mouthpiece 1.
♦ Pull the trigger ^4 . The mandrel is pulled into the device, detached from the rivet body and the rivet joint is established permanently. The mandrel falls into the pin collector ^14 If necessary, repeat the process until the mandrel has been fully separated from the rivet body.
♦ Proceed in the same way with the other rivets ⑪.
◆ Empty the pin collector ^14 regularly.
When you have finished working, disconnect the appliance from the compressed air source.
Maintenance and cleaning

nect the appliance from the compressed air supply.

CAUTION!
Before maintenance, clean off any hazardous substances that may (due to working processes) have accumulated on the appliance. Avoid all skin contact with these substances. If the skin comes into contact with hazardous dusts, this can lead to severe dermatitis.
The dust and vapours produced by using the appliance can be hazardous to health (e.g. cause cancer, birth defects, asthma and/or dermatitis); it is essential to carry out a risk assessment in respect of these risks and to implement corresponding regulatory mechanisms.
NOTE
To ensure correct functioning and long-term durability of the rivet gun, pay attention to the following points:
■ Sufficient and continuously intact oil lubrication is highly important for optimum functioning.
■ Use only the genuine replacement parts recommended by the manufacturer, otherwise you could put users at danger. In doubt, contact the Service Centre.
■ Use only accessories and supplies of the sizes and types recommended by the manufacturer of the rivet gun.
■ Only clean the appliance with a soft, dry cloth or with compressed air.
■ Never use sharp or scratchy cleaning agents under any circumstances.
Changing the gripper jaws
Friction can wear out the gripper jaws 15 if this happens, replace the worn gripper jaws 15 with the supplied spare gripper jaws 15 as follows.
◆ Unscrew the front connector ^2 using the assembly spanner ^9
if necessary. This gives you access to the following parts:
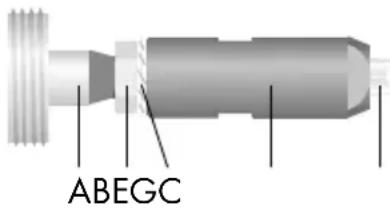
A Appliance shaft
B Lock nut
C Lock washer
E Two-piece metal cone
G Gripper jaws
- Unscrew the two-piece metal cone (E) holding the gripper jaws (G) from the shaft (A), using the two assembly spanners ⑨ and ⑩ necessary.
Using both assembly spanners, 9 and 10 unscrew the front piece of the metal cone from the back piece (E2, E1). This gives you access to the following parts:
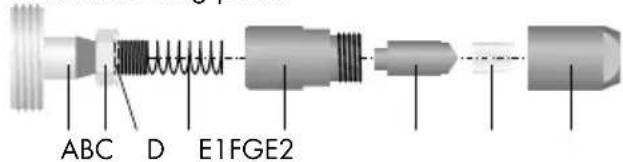
A Appliance shaft
B Lock nut
C Lock washer
D Spring
E1 Back piece of the metal cone
F Expanding mandrel
G Gripper jaws
E2 Front piece of the metal cone
Remove the expanding mandrel (F) and the worn gripper jaws (G) from the front piece of the metal cone (E2).
Place the new gripper jaws (G) into the front piece of the metal cone (E2) such that the narrow ends protrude from its opening.
NOTE
Both gripper jaws (G) must protrude from the opening flush with each other. We recommend that you hold the front piece of the metal cone (E2) vertically, with the gripper jaws (G) pointing downward.
Insert the expanding mandrel (F) such that its tips are inside the notch formed by the rear ends of the gripper jaws (G).
Using both assembly spanners, and 10, screw the front and back piece of the metal cone (E2, E1) together.
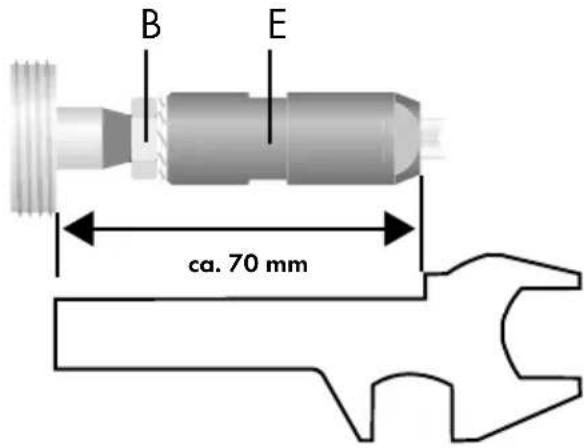
♦ Screw the metal cone (E) back onto the appliance shaft (A) and tighten it using the assembly spanner ⑨. Use the assembly spanner ⑩ to lock the lock nut (B).
After installing the metal cone (E), check the distance between the thread and metal cone (E). It should be approximately 70 mm. You can use the assembly spanner 10 as a measuring aid. If necessary, adapt the measurement by adjusting the lock nut (B).
To attach the front connecto②, press it onto the thread (you will feel minor resistance) and tighten it by hand.
♦ Tighten the front connector ^2 using the assembly spanner ^9 .
Troubleshooting
| Fault Possible cause | Remedy | |
| Riveting power too low, some air escapes from the outlet. | Moving parts jammed due to dirt. | Check the pressure supply filter for contamination. |
| Pressure supply too low. | Check the pressure supply filter for contamination. | |
| Lubricate the tool as described in the instructions. | ||
| If necessary, repeat the steps outlined above. | ||
| Appliance does not work; compressed air escapes completely through the outlet. | Moving parts are jammed due to material build-up. | Lubricate the tool as described in the instructions. |
Disposal

packaging consists of environmentally friendly material.
It can be disposed of in the local recycling containers.
Do not dispose of the appliance in the normal domestic waste!
Your local community or municipal authorities can provide information on how to dispose of the worn-out appliance.

Dispose of the packaging in an environmentally friendly manner.
Note the labelling on the packaging and separate the packaging material components for disposal if necessary.
The packaging material is labelled with abbreviations (a) and numbers (b) with the following meanings:
1-7: Plastics,
20-22: Paper and cardboard,
80-98: Composites

Your local community or municipal authorities can provide information on how to dispose of the worn-out product.
This appliance has a 3-year warranty valid from the date of purchase. If this product has any faults, you, the buyer, have certain statutory rights. Your statutory rights are not restricted in any way by the warranty described below.
Warranty conditions
The validity period of the warranty starts from the date of purchase. Please keep your original receipt in a safe place. This document will be required as proof of purchase.
If any material or production fault occurs within three years of the date of purchase of the product, we will either repair or replace the product for you at our discretion. This warranty service is dependent on you presenting the defective appliance and the proof of purchase (receipt) and a short written description of the fault and its time of occurrence.
If the defect is covered by the warranty, your product will either be repaired or replaced by us. The repair or replacement of a product does not signify the beginning of a new warranty period.
Warranty period and statutory claims for defects
The warranty period is not prolonged by repairs effected under the warranty. This also applies to replaced and repaired components. Any damage and defects present at the time of purchase must be reported immediately after unpacking. Repairs carried out after expiry of the warranty period shall be subject to a fee.
Scope of the warranty
This appliance has been manufactured in accordance with strict quality guidelines and inspected meticulously prior to delivery.
The warranty covers material faults or production faults. The warranty does not extend to product parts subject to normal wear and tear or fragile parts such as switches, batteries, baking moulds or parts made of glass.
The warranty does not apply if the product has been damaged, improperly used or improperly maintained. The directions in the operating instructions for the product regarding proper use of the product are to be strictly followed. Uses and actions that are discouraged in the operating instructions or which are warned against must be avoided.
This product is intended solely for private use and not for commercial purposes. The warranty shall be deemed void in cases of misuse or improper handling, use of force and modifications / repairs which have not been carried out by one of our authorised Service centres.
Warranty claim procedure
To ensure quick processing of your case, please observe the following instructions:
■ Please have the till receipt and the item number (e.g. IAN 298637) available as proof of purchase.
- You will find the item number on the type plate, an engraving on the front page of the instructions (bottom left), or as a sticker on the rear or bottom of the appliance.
If functional or other defects occur, please contact the service department listed either by telephone or by e-mail.
- You can return a defective product to us free of charge to the service address that will be provided to you. Ensure that you enclose the proof of purchase (till receipt) and information about what the defect is and when it occurred.
NOTE
For Parkside and Florabest tools, please send us only the defective item without the accessories (e.g. battery, storage case, assembly tools, etc.).

You can download these instructions along with many other manuals, product videos and software on www.lidl-service.com.
Service
GB Service Great Britain
Tel.: 0871 5000 720 (£ 0.10/Min.)
E-Mail: kompernass@lidl.co.uk
IE Service Ireland
Tel.: 1890 930 034
(0,08 EUR/Min., (peak))
(0,06 EUR/Min., (off peak))
E-Mail: kompernass@lidl.ie
IAN 298637
Importer
Please note that the following address is not the service address. Please use the service address provided in the operating instructions.
KOMPERNASS HANDELS GMBH
BURGSTRASSE 21
DE-44867 BOCHUM
GERMANY
www.kompernass.com
Translation of the original Conformity Declaration
We, KOMPERNASS HANDELS GMBH, documents officer: Mr Semi Uguzlu, BURGSTR. 21, DE - 44867 BOCHUM, GERMANY, hereby declare that this product complies with the following standards, normative documents and EC directives:
Machinery Directive
(2006/42/EC)
Applied harmonised standards:
EN ISO 11148-10: 2011
Type designation of machine:
AIR BLIND RIVET GUN PDBNP 14 A1
Year of manufacture: 02 - 2018
Serial number: IAN 298637
Bochum, 06/02/2018
CE
Semi Uguzlu
- Quality Manager -
We reserve the right to make technical changes in the context of further product development.
Table des matières
Introduction....16
KOMPERNASS HANDELS GMBH
BURGSTRASSE 21
DE-44867 BOCHUM
ALLEMAGNE
www.kompernass.com
Directive relative aux machines (2006/42/CE)
WAARSCHUWING! LETSELGEVAAR!
KOMPERNASS HANDELS GMBH
BURGSTRASSE 21
DE-44867 BOCHUM
DUITSLAND
www.kompernass.com
KOMPERNASS HANDELS GMBH
BURGSTRASSE 21
DE-44867 BOCHUM
DEUTSCHLAND
www.kompernass.com
KOMPERNASS HANDELS GMBH
BURGSTRASSE 21
DE-44867 BOCHUM
GERMANY
www.kompernass.com
Last Information Update
Version des informations · Stand van de informatie

- AIR BLIND RIVET GUN PDBNP 14 A1
- AIR BLIND RIVET GUN
- PERSLUCHT-BLINDNIETPISTOOL
- FR BE
- Contents
- Introduction....2
- General safety instructions for compressed air tools .... 3
- Before use....6
- Use....7
- Maintenance and cleaning....8
- Troubleshooting 10
- Disposal....11
- Kompernass Handels GmbH warranty 11
- Translation of the original Conformity Declaration....13
- Introduction
- Intended use
- Operating components (fig. A)
- Accessories (Fig. B)
- Package contents
- Technical data
- Noise emission value:
- Wear hearing protection!
- Total vibration value:
- NOTE
- General safety instructions for compressed air tools
- WARNING!
- Hazards caused by flying parts
- Hazards during operation
- Hazards caused by dust and vapours
- Risks due to repetitive movements
- Hazards caused by accessories
- Hazards in the workplace
- Risks due to noise
- Risks due to vibrations
- Additional safety instructions for pneumatic machines
- Before use
- Lubrication
- Refilling oil
- You have the following options:
- Connecting to a compressed air source
- Use
- !
- CAUTION!
- Maintenance and cleaning
- Changing the gripper jaws
- Disposal
- Do not dispose of the appliance in the normal domestic waste!
- Warranty conditions
- Warranty period and statutory claims for defects
- Scope of the warranty
- Warranty claim procedure
- Service
- Importer
- Translation of the original Conformity Declaration
- CE
- Table des matières
- Introduction....16
- WAARSCHUWING! LETSELGEVAAR!
- KOMPERNASS HANDELS GMBH
Brand : PARKSIDE
Model : PDBNP 14 A1
Category : Stapler