
PDT 40 D3 - Stapler PARKSIDE - Free user manual and instructions
Find the device manual for free PDT 40 D3 PARKSIDE in PDF.


| Product type | Pneumatic stapler |
| Brand | Parkside |
| Model | PDT 40 D3 |
| Dimensions (W x H x D) | 241 x 235 x 59 mm |
| Weight | approx. 1270 g |
| Power supply | Compressed air (max pressure 8 bar) |
| Recommended working pressure | 4 to 7 bar |
| Magazine capacity | 100 staples or nails |
| Fastener types | Nails: 15, 25, 40, 50 mm; Staples: 16, 25, 40 mm |
| Staple width | 5.7 mm |
| Recommended hose diameter | 9 mm |
| Air consumption per fastening | approx. 0.09 L |
| Sound pressure level (LpA) | 114.6 dB(A) |
| Sound power level (LwA) | 125.6 dB(A) |
| Vibrations (total value) | 15 m/s² (uncertainty K = 1.5 m/s²) |
| Safety device | Anti-trigger safety |
| Lubrication | Special compressed air oil (manual or via lubricator) |
| Delivery content | Stapler, 1000 nails, 1000 staples, protective goggles, oil container, transport case, instruction manual |
| Warranty | 3 years (conditions according to manual) |
| Intended use | Private use, assembly and repair work |
| Cleaning | Soft cloth; do not use solvents |
| Regular maintenance | Check screws, lubricate after approx. 5000 fastenings |
| Additional accessories | Pressure regulator, hose ∅ 9 mm (not included) |
Frequently Asked Questions - PDT 40 D3 PARKSIDE
User questions about PDT 40 D3 PARKSIDE
0 question about this device. Answer the ones you know or ask your own.
Ask a new question about this device
Download the instructions for your Stapler in PDF format for free! Find your manual PDT 40 D3 - PARKSIDE and take your electronic device back in hand. On this page are published all the documents necessary for the use of your device. PDT 40 D3 by PARKSIDE.
USER MANUAL PDT 40 D3 PARKSIDE
natural_image
Black industrial Nitrator with attached fastener (no visible text or symbols)PNEUMATIC STAPLER PDT 40 D3
GB IE NI
PNEUMATIC STAPLER
Translation of the original instructions
FR BE
AGRAFEUSE PNEUMATIQUE
Before reading, unfold the page containing the illustrations and familiarise yourself with all functions of the device.
DK
GB / IE/NI Translation of the original instructions Page 1
natural_image
Assorted safety components including a spray bottle, safety goggles, and stacked metal sheets (no text or symbols visible)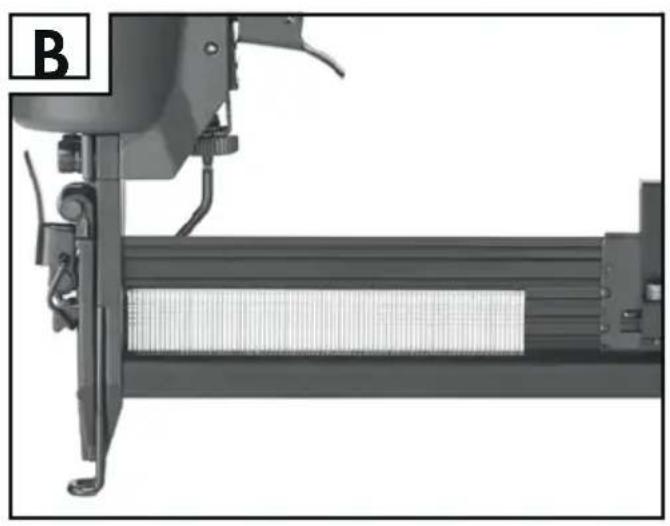
natural_image
Mechanical assembly diagram showing a lever mechanism with a textured rectangular component and attached components (no text or symbols visible)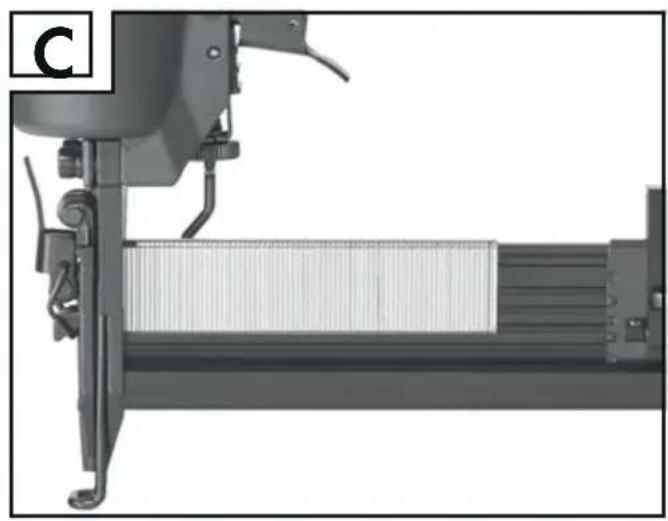
natural_image
Mechanical assembly diagram showing a conveyor belt system with a cylindrical component (no text or symbols visible)Contents
Introduction....2
Intended use 2
Features 2
Package contents 2
Technical data 3
Staple gun safety 4
Work safety 4
Supplementary safety instructions for compressed air staplers 4
Original accessories/auxiliary equipment 5
Before use....6
Connecting the compressed air supply 6
Filling the magazine 6
Operation 6
Removing jammed staples 7
Maintenance and cleaning 7
Maintenance by the user 8
Cleaning 8
Disposal 8
Kompernass Handels GmbH warranty 9
Service....10
Importer 10
Translation of the original Conformity Declaration 10
PNEUMATIC STAPLER PDT 40 D3
Introduction
Congratulations on the purchase of your new appliance. You have chosen a high-quality product. The operating instructions are part of this product. They contain important information about safety, usage and disposal. Before using the product, please familiarise yourself with all operating and safety instructions. Use the product only as described and for the range of applications specified. Please also pass these operating instructions on to any future owner.
Intended use
This appliance is designed for assembly and repair work. Any other usage or modification of the appliance is deemed to be improper and carries a significant risk of accidents. The manufacturer accepts no responsibility for damage(s) resulting from improper usage. This appliance is intended for domestic use only.
Not for commercial use.
Explanation of the symbols used:
 | Read the operating instructions before use. |
 | Before using the device for the first time, read the original operating instructions and safety instructions. |
 | Wear protective goggles! |
 | Wear hearing protection! |
 | Do not use the appliance when working on scaffolding or ladders. |
 | Trigger lock! |

Warning! Risk of cutting injuries!
Features
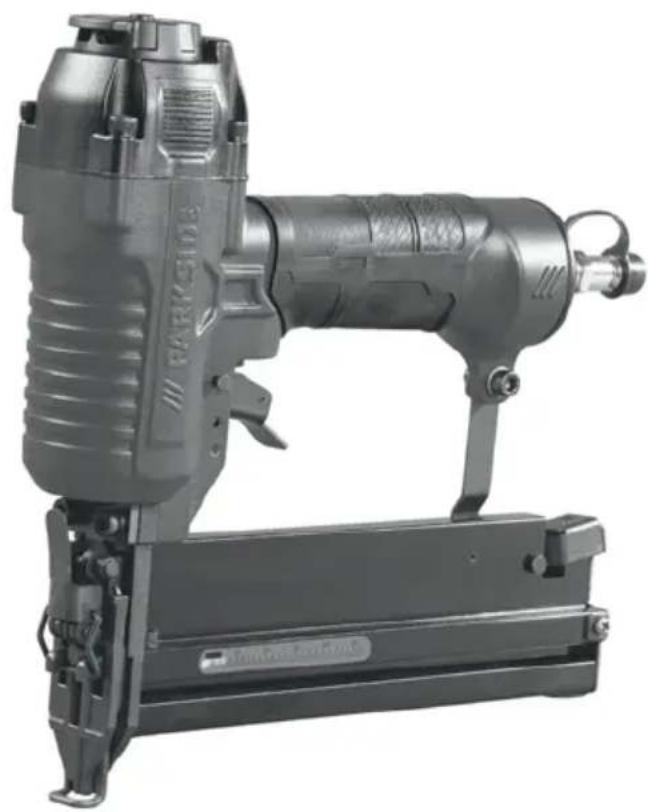
① Exhaust cover (rotatable)
2 Trigger
3 Handle
4 Threaded connector nipple 6.35 mm (1/4")
5 Magazine lever
6 Magazine
⑦ Fill level indicator
8 Knurled screw
9 Trigger lock
10 Opening
11 Face plate
12 Quick-release lever: face plate
Package contents
1 pneumatic stapler PDT 40 D3
1 carton of nails, 1000 pcs.
1 carton of staples, 1000 pcs.
1 pair of safety goggles
1 oil container with compressed air special oil
1 carrying case
1 set of operating instructions
Technical data
Dimensions: 241 × 235 × 59 ~mm
$$ (W \times D \times H) $$
Weight
(without fasteners): approx. 1270 g
Maximum permissible
pressure: 8.3
Recommended
pressure range: 4 to 7 bar
Air consumption per
Nailing process: approx. 0.091
per nailing action
Recommended
lubricant: compressed air special oil
Loading capacity: 100 pcs.
Nail lengths: 15, 25, 40, 50 mm
Staple lengths: 16, 25, 40 mm
Staple width: 5.7 mm
Recommended
hose diameter: ∅ 9 mm
Compressed
air quality: filtered, atomised oil and
condensate free
Noise and vibration data:
Measurement values determined in accordance with EN 12549:1999, EN ISO 4871. The A-rated sound pressure level of the appliance is typically:
Sound pressure level: L_ A = 114.6 dB(A)
Uncertainty: K_pA = 3 dB(A)
bound power level: L _WA = 125.6 dB(A)
Uncertainty: K_WA = 3 dB(A)
These values are appliance-specific indicators and do not reflect the noise development at the place of usage. The noise development at the place of usage depends, for instance, on the working environment, the workpiece, the workpiece rest, the number of nailing processes. If required, carry out corresponding noise reduction measures relative to the workpiece construction and workplace conditions; e.g. placing the workpiece on a noise-dampening underlay, reducing the vibration of the workpiece by clamping or covering, setting the correct working pressure. In special cases, personal protective equipment should be worn.
Wear hearing protection!
Vibration emission value:
Total vibration value calculated according to ISO 8662-11:1999:
$$ \mathrm{a} _ {\mathrm{h}, \mathrm{W}} = 1 5 \mathrm{m} / \mathrm{s} ^ {2} $$
Uncertainty K = 1.5 m/s²
Mechanical impacts (vibration)
The vibration parameter for the staple gun has been calculated according to ISO 8662-11:1999
- hand-held motor-driven machines - measurement of mechanical vibrations on the handle - staple guns (see technical specifications). The value is an appliance-specific indicator and does not represent the effect on the hand-arm system while using the appliance. The effect on the hand-arm system when using the appliance depends on factors such as the gripping force, the applied pressure, the working direction, the set air pressure, the workpiece, the workpiece rest.

Staple gun safety

WARNING!
▶ Read all safety warnings and all instructions. Failure to follow the warnings and instructions may result in electric shock, fire and/or serious injury.
Save all warnings and instructions for future reference.
■ Before starting work, check the correct functioning of the safety and triggering mechanisms as well as firm seating of all screws and bolts.
■ Do not carry out any unauthorised modifications to the staple gun.
■ Do not disassemble or block any parts of the staple gun, such as the trigger lock.
- Do not carry out any "emergency repairs" with unsuitable materials.
- Maintain the staple gun regularly and properly according to the manufacturer's guidelines.
■ Avoid any weakening of or damage to the appliance, e.g. through
-impacts or engraving,
-modifications not authorised by the manufacturer,
-working along stencils made of hard metals, e.g. steel,
-dropping onto or sliding across the floor,
- using it as a hammer,
-all types of violence.
■ Fasten the staple gun firmly on supports, e.g. on a workbench.
The mounts used must be designed so that they protect the staple gun from damage, twisting or slipping.
Work safety
■ Never aim an operationally ready staple gun directly at yourself or others.
■ While working, hold the staple gun so that your head and body cannot be injured by a possible kickback caused by a fault in the energy supply or hard objects in the workpiece.
■ Never trigger the staple gun into the air. This will prevent risks caused by flying nails or staples and excessive strain on the appliance.
■ Before transport, disconnect the staple gun from the compressed air source, especially if you are using ladders or working in an unusual position.
In the workplace, carry the appliance only by the handle and not with your finger on the trigger.
■ Pay attention to the working conditions. Nails/staples can break through thin workpieces or slide off and injure people when working on the corners or edges of workpieces.
■ Use suitable protection equipment to protect yourself, e.g. hearing and eye protection. Wearing protective equipment such as a dust mask, non-skid safety shoes, hard hat, or hearing protection used for appropriate conditions will reduce personal injuries depending on the type and use of the appliance.
Supplementary safety instructions for compressed air staplers

WARNING! RISK OF INJURY!
▶ Never exceed the maximum permissible operating pressure of 8 bar.
Use a pressure reducer to adjust the working pressure.
▶ Never use oxygen or other flammable gases as an energy source.
- Keep work area clean and well lit.
Cluttered or dark areas invite accidents.
- Keep children and bystanders away while operating the staple gun. Distractions can cause you to lose control.
■ Stay alert, watch what you are doing and use common sense when operating the staple gun. Do not use a staple gun while you are tired or under the influence of drugs, alcohol or medication.
A moment of inattention while operating the staple gun may result in serious personal injury.
■ Do not overreach. Keep proper footing and balance at all times. This enables better control of the staple gun in unexpected situations.
■ Disconnect the appliance from the compressed air source before starting any repairs or maintenance work and before transportation.
RISK OF INJURY!
Do not use the appliance when working on scaffolding or ladders.
■ Never use hydrogen, oxygen, carbon dioxide or other gas in cylinders as an energy source for this tool, as this could lead to an explosion and thereby cause serious injuries.
RISK OF INJURY!
Do not operate the appliance if the trigger lock ⑨ is damaged. Failure to do this can lead to serious injury.
■ When undoing the hose coupling, hold the hose firmly in your hand to prevent injuries caused by a thrashing hose.
■ Always use a 14 " threaded nipple and quick release for the compressed air connection.
■ Never place your hands in the vicinity of the opening 10 if the appliance is ready for use. Failure to do this can lead to serious injury.
■ Ensure there is no damage.
Check the appliance for any possible defects before use. If the appliance exhibits any faults, it should not be used under any circumstances.
■ Do not use any sharp or pointed objects.
Never insert any sharp and/or metallic objects into the appliance.
The compressed air driven staple gun may only be connected to lines, in which it is ensured that the maximum permissible pressure cannot be exceeded by more than 10%, e.g. by means of a pressure control valve built into the compressed air line (pressure reducing valve) with a downstream or built-in pressure relief valve.
■ When using a compressed air driven staple gun, make sure that the maximum pressure is not exceeded.
■ The compressed air driven staple gun may only be operated at the required pressure for the respective operation to avoid unnecessarily high noise levels, increased wear and consequent errors.

WARNING! RISK OF FIRE AND EXPLOSION!
▶ Never operate the compressed air driven staple gun with oxygen or combustible gases under pressure.
Original accessories/auxiliary equipment
■ Use only the additional equipment and accessories specified in the operating instructions. Using fastenings or accessory tools other than those recommended in the operating instructions can lead to a risk of injury.
■ Have your compressed air tool serviced by a qualified repair person using only original replacement parts. This ensures that the safety of the compressed air tool is maintained.
Before use
NOTE
▶ Put on the supplied protective goggles before each use. Remove the protective film from the goggle lenses before first use.
Connecting the compressed air supply
NOTE
In order to achieve the full power available from your compressed air tool, always use compressed air hoses with an internal diameter of at least 9 mm. A lower internal diameter can considerably reduce the power.
The appliance may be operated only with cleaned, atomised-oil air and must not exceed the maximum working pressure of 8 bar on the appliance. The compressor must be fitted with a pressure reducer to regulate the working pressure.

CAUTION!
▶ Do not use a compressed air line that contains any condensate.
The tool must be sufficiently supplied with pneumatic oil to ensure long service life. This can take place as follows:
-Use oiled compressed air by fitting a mist lubricator.
- Without a mist lubricator: Add oil manually via the threaded nipple 4 every day. Approx. 1–2 drops of pneumatic oil for every 15 operating minutes during continuous use.
▶ If the tool has been out of operation for several days, add around 5 drops of pneumatic oil manually via the threaded nipple 4.
Connect the appliance to a suitable compressed air source.
1.) For this purpose, press the quick-release connection of the compressed air hose (not included) onto the 14 " threaded nipple of the compressed air stapler.
The connection locks automatically.
2.) Now connect the other end of the compressed air hose to the (filter) pressure reducer on the compressor.
Filling the magazine
◆ Press the magazine level 5 and pull back the magazine cover until it stops.
Place the appropriate fastener material (nails, see fig. B or staples, see fig. C) in the magazine
- The staples must be placed on the bar of the magazine 6
◆ Slide the magazine cover forwards until it clicks into place.
Operation
◆ Load the magazine of the compressed air stapler, as described in the section "Filling the magazine".
- Set the correct working pressure using the pressure reducing valve (not supplied).
NOTE
■ Make sure that you do not exceed the maximum working pressure of 8 bar on the appliance. An excessive working pressure does not mean increased output; it merely increases the compressed air consumption and accelerates appliance wear.
♦ Switch on the compressor.
Run the compressor once until the maximum tank pressure has been reached and then switch off the appliance.
◆ Place the appliance on the workpiece and pull the trigger ②.
NOTE

The compressed air stapler is equipped with a trigger lock 9.
The fastener material does not leave
the appliance until the opening 16f the compressed air stapler is pressed against the workpiece and the trigger 2s pressed.
- Check whether the fastener is properly driven in according to requirements.
- If the fastener protrudes, increase the air pressure in steps of 0.5 bar.
- If the fastener is too deep, reduce the air pressure in steps of 0.5 bar.
■ Alternatively, you can speed up the work, by holding in the trigger ②.
◆ Apply the compressed air stapler to the workpiece.
◆ Press the appliance onto the workpiece till the opening 10 is touching it. The fastener material leaves the appliance.
As long as you pull the trigger ^2 a piece of fastener material leaves appliance each time the opening touches the workpiece.
Alternatively, you can keep the opening of the appliance permanently pressed onto the workpiece.
◆ Each time you pull the trigger ^2 a fastener leaves the appliance.
NOTE
■ Fine adjustment is also possible with the knurled screw 8.
♦ Turn the knurled screw down to sink the fastener deeper into the workpiece.
- Turn the knurled screw up to sink the fastener less deeply into the workpiece.
♦ Turn the exhaust cove ^1 to direct the escaping air in the desired direction.
◆ Disconnect the appliance from the compressor after completing your work.
Removing jammed staples
If a staple/nail gets stuck in the magazine shaft, immediately remove the compressed air supply line.
◆ Open the magazine ^6 as described in the section "Filling the magazine".
Open the face plate by pulling the face plate quick release lever in the direction of the trigger lock
◆ Remove the food.
◆ Close the face plate ^1 by pulling the face plate quick release lever in the direction of the exhaust panel 1
◆ Close the magazine of the compressed air stapler, as described in the section "Filling the magazine".
Maintenance and cleaning

NING! RISK OF INJURY! Disconnect the appliance from the compressed air supply.

WARNING!
▶ Have the power tool repaired by the Service Centre or a qualified technician and only using genuine replacement parts. This will ensure that the safety of the appliance is maintained.

CAUTION!
▶ Any service or repair work over and above that described in this section may only be carried out by specialists.
- Maintain the compressor tool regularly to ensure safe operation.
◆ Check bolted connections for a tight fit, retighten if necessary.
We recommend fitting a pressure reducer with a water separator and an oiler in front of the compressed air tool.
If there is increased oil or air discharge, check the compressed air tool and have it serviced if necessary.
Maintenance by the user
Lubrication with the mist oiler:
NOTE
A mist oiler continuously and optimally lubricates the compressed air stapler as a preparation stage after the pressure reducer. A mist oiler adds fine drops of oil to air flowing through the appliance and therefore guarantees regular lubrication.
Install the mist oiler after the (filter) pressure reducer. To do this, insert the plug nipple of the mist oiler into the quick-release coupling of the (filter) pressure reducer.
Then connect the compressed air appliance to the quick-release coupling provided for this purpose.
Manual lubrication
NOTE
If you do not have a mist oiler, you must manually lubricate after the consumption of approximately 5000 fasteners.
Apply 1-2 drops of compressed air special oil into the threaded nipple 4 of the compressed air stapler.
Then pull the trigger ^2 a few times.

CAUTION!
▶ Do not use too much oil, as the oil could be ejected along with the fastener material through the opening 10 and could possibly damage the workpiece.
Cleaning
■ Do not use any sharp objects for cleaning the appliance. Do not allow any liquids to get into the appliance. This can damage the appliance.
■ Clean the appliance regularly, preferably immediately after completion of the work.
- Clean the housing with a dry cloth - do NOT use petrol, solvents or cleaners that can attack the plastic.
- Put the compressed air stapler in the supplied carrying case after each use to protect it from contamination.
Disposal

The packaging consists of environmentally friendly material. It can be disposed of in the local recycling containers.
Do not dispose of the appliance in the normal domestic waste!
Your local community or municipal authorities can provide information on how to dispose of the worn-out appliance.
This appliance has a 3-year warranty valid from the date of purchase. If this product has any faults, you, the buyer, have certain statutory rights. Your statutory rights are not restricted in any way by the warranty described below.
Warranty conditions
The validity period of the warranty starts from the date of purchase. Please keep your original receipt in a safe place. This document will be required as proof of purchase.
If any material or production fault occurs within three years of the date of purchase of the product, we will either repair or replace the product for you at our discretion. This warranty service is dependent on you presenting the defective appliance and the proof of purchase (receipt) and a short written description of the fault and its time of occurrence.
If the defect is covered by the warranty, your product will either be repaired or replaced by us. The repair or replacement of a product does not signify the beginning of a new warranty period.
Warranty period and statutory claims for defects
The warranty period is not prolonged by repairs effected under the warranty. This also applies to replaced and repaired components. Any damage and defects present at the time of purchase must be reported immediately after unpacking. Repairs carried out after expiry of the warranty period shall be subject to a fee.
Scope of the warranty
This appliance has been manufactured in accordance with strict quality guidelines and inspected meticulously prior to delivery.
The warranty covers material faults or production faults. The warranty does not extend to product parts subject to normal wear and tear or fragile parts such as switches, batteries, baking moulds or parts made of glass.
The warranty does not apply if the product has been damaged, improperly used or improperly maintained. The directions in the operating instructions for the product regarding proper use of the product are to be strictly followed. Uses and actions that are discouraged in the operating instructions or which are warned against must be avoided.
This product is intended solely for private use and not for commercial purposes. The warranty shall be deemed void in cases of misuse or improper handling, use of force and modifications/repairs which have not been carried out by one of our authorised Service centres.
Warranty claim procedure
To ensure quick processing of your case, please observe the following instructions:
■ Please have the till receipt and the item number (e.g. IAN 12345) available as proof of purchase.
■ You will find the item number on the type plate, an engraving on the front page of the instructions (bottom left), or as a sticker on the rear or bottom of the appliance.
If functional or other defects occur, please contact the service department listed either by telephone or by e-mail.
■ You can return a defective product to us free of charge to the service address that will be provided to you. Ensure that you enclose the proof of purchase (till receipt) and information about what the defect is and when it occurred.

You can download these instructions along with many other manuals, product videos and software on www.lidl-service.com.
Service
GB Service Great Britain
Tel.: 0871 5000 720 (£ 0.10/Min.)
E-Mail: kompernass@lidl.co.uk
IE Service Ireland
Tel.: 1890 930 034
(0,08 EUR/Min., (peak))
(0,06 EUR/Min., (off peak))
E-Mail: kompernass@lidl.ie
IAN 285202
Importer
Please note that the following address is not the service address. Please use the service address provided in the operating instructions.
KOMPERNASS HANDELS GMBH
BURGSTRASSE 21
DE-44867 BOCHUM
GERMANY
www.kompernass.com
Translation of the original Conformity Declaration
We, KOMPERNASS HANDELS GMBH, document officer: Mr Semi Uguzlu, BURGSTR. 21, DE - 44867 BOCHUM, GERMANY, hereby declare that this product complies with the following standards, normative documents and EC directives:
Machinery Directive (2006/42/EC)
Applicable harmonised standards:
EN 792-13: 2000+A1
Type designation of machine:
Pneumatic stapler PDT 40 D3
Year of manufacture: 05 - 2017
Serial number: IAN 285202
Bochum, 17/05/2017
CE
Semi Uguzlu
- Quality Manager -
We reserve the right to make technical changes in the context of further product development.
Indholdsfortegnelse
Indledning 12
Anvendelsesområde 12
Udstyr 12
Pakkens indhold 12
Tekniske data 13
KOMPERNASS HANDELS GMBH
BURGSTRASSE 21
DE-44867 BOCHUM
TYSKLAND
www.kompernass.com
KOMPERNASS HANDELS GMBH
BURGSTRASSE 21
DE-44867 BOCHUM
ALLEMAGNE
www.kompernass.com
Directive relative aux machines (2006/42/CE)
Spijkerlengtes: 15, 25, 40, 50 mm
Nietlengtes: 16, 25, 40 mm
Nietbreedte: 5,7 mm
Aanbevolen
slangdiameter: ∅ 9 mm
⚠ WAARSCHUWING! LETSELGEVAAR!
KOMPERNASS HANDELS GMBH
BURGSTRASSE 21
DE-44867 BOCHUM
DUITSLAND
www.kompernass.com
KOMPERNASS HANDELS GMBH
BURGSTRASSE 21
DE-44867 BOCHUM
DEUTSCHLAND
www.kompernass.com
KOMPERNASS HANDELS GMBH
BURGSTRASSE 21
DE-44867 BOCHUM
GERMANY
www.kompernass.com
Last Information Update · Tilstand af information · Version des informations
Stand van de informatie · Stand der Informationen:
05 / 2017 · Ident.-No.: PDT40D3-052017-1

- PNEUMATIC STAPLER PDT 40 D3
- PNEUMATIC STAPLER
- AGRAFEUSE PNEUMATIQUE
- DK
- Contents
- Introduction....2
- Staple gun safety 4
- Before use....6
- Operation 6
- Maintenance and cleaning 7
- Disposal 8
- Kompernass Handels GmbH warranty 9
- Importer 10
- Translation of the original Conformity Declaration 10
- Introduction
- Intended use
- Features
- Package contents
- Technical data
- Noise and vibration data:
- Wear hearing protection!
- Vibration emission value:
- Mechanical impacts (vibration)
- Staple gun safety
- WARNING!
- Save all warnings and instructions for future reference.
- Work safety
- Supplementary safety instructions for compressed air staplers
- WARNING! RISK OF INJURY!
- WARNING! RISK OF FIRE AND EXPLOSION!
- Original accessories/auxiliary equipment
- Before use
- NOTE
- Connecting the compressed air supply
- CAUTION!
- Filling the magazine
- Operation
- Removing jammed staples
- Maintenance and cleaning
- Maintenance by the user
- Manual lubrication
- Cleaning
- Disposal
- Warranty conditions
- Warranty period and statutory claims for defects
- Scope of the warranty
- Warranty claim procedure
- Service
- Importer
- Translation of the original Conformity Declaration
- Indholdsfortegnelse
- Indledning 12
- ⚠ WAARSCHUWING! LETSELGEVAAR!
Brand : PARKSIDE
Model : PDT 40 D3
Category : Stapler