
PDBS 6.2 A1 - Scissors PARKSIDE - Free user manual and instructions
Find the device manual for free PDBS 6.2 A1 PARKSIDE in PDF.

| Product Type | Cordless Electric Scissors |
| Model | PDBS 6.2 A1 |
| Brand | Parkside |
| Voltage | 6.2 V |
| Battery Type | Lithium-ion (built-in) |
| Battery Capacity | 1.5 Ah |
| Charging Time | Approx. 3-5 hours |
| Blade Material | Stainless Steel |
| Cutting Capacity (Paper) | Up to 10 sheets |
| Cutting Capacity (Fabric) | Up to 3 layers |
| No-Load Speed | 5000 rpm |
| Blade Length | 60 mm |
| Weight | 0.4 kg |
| Dimensions (L x W x H) | 200 x 70 x 40 mm |
| Safety Lock | Yes (trigger lock) |
| Overload Protection | Yes |
| Blade Guard | Included |
| Cleaning | Wipe with dry cloth; no water |
| Replacement Blade | Available separately (Parkside spare part) |
| Battery Charge Indicator | LED indicator on charger |
| Warranty | 3 years |
Frequently Asked Questions - PDBS 6.2 A1 PARKSIDE
User questions about PDBS 6.2 A1 PARKSIDE
0 question about this device. Answer the ones you know or ask your own.
Ask a new question about this device
Download the instructions for your Scissors in PDF format for free! Find your manual PDBS 6.2 A1 - PARKSIDE and take your electronic device back in hand. On this page are published all the documents necessary for the use of your device. PDBS 6.2 A1 by PARKSIDE.
USER MANUAL PDBS 6.2 A1 PARKSIDE
PNEUMATIC METAL SHEARS PDBS 6.2 A1
GB
PNEUMATIC METAL SHEARS
Operation and Safety Notes
Translation of the original instructions
SI
ŠKARJE ZA PLOČEVINO NA STISNJEN ZRAK
DRUCKLUFT-BLECHSCHERE
Before reading, unfold both pages containing illustrations and familiarise yourself with all functions of the device.
HU
GB Operation and Safety Notes Page 5
natural_image
Close-up of a hand using a crimping tool to adjust a mechanical component (no visible text or symbols)Introduction......Page 6
Intended use....Page 6
Features Page 6
Technical Data Page 6
General safety rules....Page 7
Projectile hazards....Page 9
Operating hazards Page 9
Repetitive motions hazards....Page 9
Accessory hazards....Page 9
Workplace hazards......Page 10
Dust and fume hazards......Page 10
Noise hazards......Page 10
Vibration hazards....Page 10
Additional safety instructions for pneumatic power tools......Page 11
General safety instructions for compressed air metal shears....Page 11
Before use......Page 11
Installation Page 11
Start-up Page 11
Connecting the compressed air tool....Page 11
Cutting Page 12
After initial use ......Page 12
Spare parts / replacing consumables......Page 12
Cleaning and storage Page 12
Lubricating the cutting shears....Page 13
Storing the cutting shears....Page 13
Information about warranty and service processing......Page 13
Warranty terms Page 13
Extent of warranty....Page 13
Processing of warranty claims....Page 13
Environmental instructions and disposal information......Page 14
Declaration of Conformity Page 14
| The following pictograms are used in these operating instructions / on the equipment: | |||
 | Please read the operating instructions! |  | Never use hydrogen, oxygen, carbon dioxide or other bottled gases as an energy source. |
 | Note |  | Wear ear protection, dust mask, safety glasses and protective gloves. |
 | Observe the warning and safety instructions! |  | Compressed air hose |
 | Caution! Explosion hazard! |  | Dispose of packaging and device in an environmentally-friendly way! |
| Oil daily | |||
Pneumatic metal shears PDBS 6.2 A1
- Introduction
Congratulations!
You have chosen high-quality device by our company. Familiarise yourself
with the product before using it for the first time. In addition, please carefully refer to the operating instructions and the safety advice below. Initial operation of this tool must be performed by trained personnel.
KEEP OUT OF THE REACH OF CHILDREN!
Intended use
The metal shears are an air-powered tool for handyman use. It is designed to cut sheet metal. The user should wear safety goggles and gloves to protect himself from accidental contact with potentially sharp edges. Keep these instructions in a safe place. When passing this product on to others, please also include all the documents. Any use other than the intended is prohibited and potentially dangerous. Damages resulting from noncompliance or misuse are not covered by the warranty and are not included in the manufacturer's liability. This device has been designed
for household use and may not be used for commercial or industrial purposes.
Features

Check that all the items are present and that the product is in perfect condition immediately after unpacking. Never use
the product if it is defective.
1 Plug nipple for compressed air connection
2 Trigger
3 Knife
- Technical Data
Max. working pressure: 6.2 bar cuts aluminium sheets up to 2.4 mm cuts sheet metal up to 1.1 mm Weight: 1220 g
Noise and vibration

ATTENTION! Always wear hearing protection!
Noise parameter per EN15744:2008
Noise level L_pA : 90.6 dB(A)
Sound power level L_WA : 101.6 dB(A)
L_pC,peak = 110.9 dB(A)
Uncertainty K = 3 dB
Vibration parameters per EN 12096, ISO 28927-7
Hand-arm vibration level: 0.55 m/s ^2
Uncertainty K: 1.5 m/s ^2

General safety rules
Note: When used in the following text, the terms "compressed air unit" or "device" refer to the compressed air unit specified in these instructions for use.
WARNING! Basic safety measures must be followed when using compressed air devices to eliminate the risk of fire, electric shock and personal injury. Be sure to read and follow the notices within these operating instructions prior to using the equipment and store them in a safe location. The manufacturer assumes no liability for damages or personal injury resulting from failure to follow these operating instructions.
Persons (including children) who lack the knowledge or experience to use the tool or whose physical, sensory or intellectual capacities are limited must never be allowed to use the tool without supervision or instruction by a person responsible for their safety.
■ Prevent children from playing with the device.
WARNING! RISK OF INJURY! Before
performing maintenance tasks, disconnect the compressed air supply.

EXPLOSION HAZARD! Never
use petrol or other flammable liquids to clean the air tool! Sparks could
ignite residual vapours inside the compressed air unit resulting in the compressed air unit exploding. Do not use the device in explosive environments with flammable liquids, gasses or dust. Never work on materials which are or could potentially be highly flammable or explosive.
Only use the equipment in areas of application for which it was designed!
Do not overburden the device.
Never use hydrogen, oxygen, carbon dioxide or other bottled gasses to power this tool as doing so may result in an explosion and thus may cause severe injuries.
- Maintain and clean the device regularly as instructed (see Chapter „Cleaning and storage“).
Check the device for damage before startup. Always make sure that the device is in perfect condition each time before use.
■ Always be attentive! Unexpected movement of the device may cause hazards.
Avoid placing your body in an unnatural position. Keep proper footing and balance at all times. By doing this you will be in a better position to control the compressed air unit in unforeseen circumstances.
Do not use any device if its switch is defective. A device that can no longer be switched on and off is dangerous and must be repaired.
Store the device out of the reach of children when it is not in use. Do not let anyone use the device if he or she is not familiar with it or has not read the instructions and advice. Compressed air units are dangerous when they are used by inexperienced people.
Maintain the device carefully. Check that moving device parts are working properly and move freely. Check for any parts that are broken or damaged enough to detrimentally affect the functioning of the device. Have damaged parts repaired before using the device. Many accidents have their origins in poorly maintained devices.
Switch the device off if you do not use it anymore.
ays wear personal protective equipment and safety glasses. Wearing personal protective equipment such as dust mask, non-slip safety shoes, safety helmet or ear protectors, depending on the type of air tool and its application, reduces the risk of injuries.
Check the connections and supply lines. All maintenance devices, couplings and hoses must be equipped to meet the pressure and air amounts specified in the device specific values. Pressure that is too low influences the functioning of the device; pressure that is too high can cause damage to property and personal injury.
A WAREFUG! WHEN PUT-
- Protect hoses from kinks, constrictions, solvents and sharp edges. Keep hoses away from heat, oil and rotating parts.
■ Make sure that the hose clamps are always tightly fastened. If the hose clamps are not tightly fastened or are damaged, the air could escape uncontrollably. - eplace damaged hoses immediately. A damaged supply line may result in the air hose flapping about and may result in injuries.
If the power cable of the appliance is damaged, it has to be replaced by the manufacturer or its service department or a similarly qualified person in order to avoid hazards.
Do not use the device when tired or under the influence of drugs, alcohol or medications. One moment of carelessness when using the device may result in serious injuries.
Do not directly inhale the exhaust air. Keep eyes away from exhaust air. Exhaust air from the air tool may contain water, oil, metal particles or contaminants from inside the compressor. This may damage your health.
TING THE TOOL DOWN! Always put down the device so it does not come into contact with the trigger. This could potentially result in accidental activation of the device, which again could result in hazards.
Only use suitable accessories. These may be purchased from the manufacturer. Using non-OEM accessories may result in hazards.
Only use filtered and regulated compressed air. Dust, caustic vapours and/or moisture may damage the motor of the compressed air tool.
The hose must be designed for pressures of at least 8.6 bar or 125 PSI, but at least 150 % of the maximum pressure generated in the system.
The tool and supply line must be equipped with a hose coupling to completely release pressure when disconnecting the coupling hose.
DANGER! Avoid contact with live lines. This device is not insulated against electric shock.
WARNING! RISK OF INJURY! High working pressures can give rise to recoil forces
that under certain conditions can result in danger from continuous loading.
If you are inexperienced in the use of this type of device, you should seek training to learn how to handle it safely.
■ WDANGER! OF STAB
WOUNDS! Do not treat an injection as a simple cut. A high pressure jet may inject toxins into the body and cause serious injuries. If the spray is injected into the skin, seek medical help immediately.
Do not modify this device in any way without the manufacturer's approval.
■ Only use the device with the specified pressure (max. 6.2 bar).
■ Disconnect the compressed air unit from the air supply after each use and when not in use.
Do not use the compressed air device if it leaks or is in need of repair.
■ Never connect the compressed air device to an air hose with pressure exceeding 6.2 bar.
- Keep your working area clean and well lit. Untidy or poorly lit working areas can result in accidents. Doing so will allow you better control of the device, particularly under unforeseen circumstances.
WARNING! Any have the device re-
paired by qualified specialist personnel using OEM spare parts. This will maintain the safety of the device.
- Keep children and other persons away from the device during use. Distractions can cause you to lose control of the device.
Wear suitable clothing. Do not wear loose clothing or jewellery. Keep your hair, clothing and gloves clear of moving parts. Loose clothing, jewellery or long hair can become trapped in moving parts.
Put down trigger and device in the event of unexpected compressor failure.
If possible, use a condensate trap or drain the hoses and pipes of condensate (water) regularly before and during the use compressed air units.
ATTENTION! An undersized compressed air system may minimise the efficiency of your device.
For multiple hazards, read and understand the safety instructions before installing, operating,
repairing, maintaining, changing accessories on, or working near the nibbler or shear. Failure to do so can result in serious bodily injury.
■ Only qualified and trained operators should install, adjust or use the nibbler or shear.
Do not modify this nibbler or shear. Modifications can reduce the effectiveness of safety measures and increase the risks to the operator.
Do not discard the safety instructions; give them to the operator.
Do not use the nibbler or shear if it has been damaged.
Tools shall be inspected periodically to verify that the ratings and markings required by this part of ISO 11148 are legibly marked on the tool. If necessary, the user must contact the manufacturer for replacement labels.
- Projectile hazards
■ Disconnect the nibbler or shear from the energy source when changing inserted tool or accessories.
Be aware that failure of the workpiece or accessories, or even of the inserted tool itself can generate high-velocity projectiles.
Always wear impact-resistant eye protection during operation of the tool. The grade of protection required should be assessed for each use.
■ Ensure that the workpiece is securely fixed.
■ Ensure that metal cuttings are directed so as not to cause a hazard.
Operating hazards
Use of nibblers and shears can expose the operator's hands to hazards including cuts, abrasions and heat:
- avoid contact with the cutter whenever the nibbler or shear is connected to the power supply; - cutting with nibblers and shears creates sharp edges.
■ Wear relevant protective equipment such as gloves.
Operators and maintenance personnel shall be physically able to handle the bulk, weight and power of the tool.
- Hold the tool correctly; be ready to counteract normal or sudden movements and have both hands available.
Maintain a balanced body position and secure footing.
Release the start-and-stop device in the case of an interruption of the energy supply.
Use only lubricants recommended by the manufacturer.
Avoid direct contact with the inserted tool during and after use as it can become hot.
Sharp tools should always be used.
Avoid unsuitable postures as it is likely for these positions not to allow counteracting of normal or unexpected movement of the tool.
Unexpected tool movement or breakage of cutters can cause injuries.
Warnings shall be given against the risk of explosion or fire due to the material being processed.
Repetitive motions hazards
When using a nibbler or shear to perform work-related activities, the operator can experience discomfort in the hands, arms, shoulders, neck or other parts of the body.
While using a nibbler or shear, the operator should adopt a comfortable posture whilst maintaining secure footing and avoiding awkward or off-balance postures. The operator should change posture during extended tasks; this can help avoid discomfort and fatigue.
If the operator experiences symptoms such as persistent or recurring discomfort, pain, throbbing, aching, tingling, numbness, burning sensations or stiffness, these warning signs should not be ignored. The operator should consult a qualified health professional.
Accessory hazards
Disconnect the nibbler or shear from the energy supply before fitting or changing the inserted tool or accessory.
Use only sizes and types of accessories and consumables that are recommended by the
General safety rules
manufacturer of nibblers or shears; do not use other types or sizes of accessories or consumables.
■ Cutters can become hot during use; do not touch.
Do not use cracked or deformed accessories or inserted tools.
- Workplace hazards
Slips, trips and falls are major causes of workplace injury. Be aware of slippery surfaces caused by use of the tool and also of trip hazards caused by the air line or hydraulic hose.
Proceed with care in unfamiliar surroundings. There can be hidden hazards, such as electricity or other utility lines.
The nibbler or shear is not intended for use in potentially explosive atmospheres and is not insulated against contact with electric power.
■ Ensure that there are no electrical cables, gas pipes, etc., which can cause a hazard if damaged by use of the tool.
Dust and fume hazards
Dust and fumes generated when using nibblers and shears can cause ill health (for example cancer, birth defects, asthma and / or dermatitis); risk assessment and implementation of appropriate controls for these hazards are essential.
Risk assessment should include dust created by the use of the tool and the potential for disturbing existing dust.
Operate and maintain the nibbler or shear as recommended in these instructions, to minimize dust or fume emissions.
■ Direct the exhaust so as to minimize disturbance of dust in a dust-filled environment.
Where dust or fumes are created, the priority shall be to control them at the point of emission.
All integral features or accessories for the collection, extraction or suppression of airborne dust and fumes should be correctly used and maintained in accordance with the manufacturer's instructions.
Select, maintain and replace the consumable / inserted tool as recommended in the instruction handbook to prevent an unnecessary increase in dust or fumes.
■ Use respiratory protection.
Noise hazards
Exposure to high noise levels can cause permanent, disabling hearing loss and other problems, such as tinnitus (ringing, buzzing, whistling or humming in the ears). Therefore, risk assessment and implementation of appropriate controls for these hazards are essential.
Appropriate controls to reduce the risk may include actions such as damping materials to prevent workpieces from "ringing".
■ Use hearing protection.
Operate and maintain the nibbler or shear as recommended in the instruction handbook, to prevent an unnecessary increase in the noise level.
Select, maintain and replace the consumable / inserted tool as recommended in the instruction handbook, to prevent an unnecessary increase in noise.
If the nibbler or shear has a silencer, always ensure it is in place and in good working order when the nibbler or shear is being operated.
Vibration hazards
■ Exposure to vibration can cause disabling damage to the nerves and blood supply of the hands and arms.
■ Wear warm clothing when working in cold conditions and keep your hands warm and dry.
If you experience numbness, tingling, pain or whitening of the skin in your fingers or hands, stop using the nibbler or shear, tell your employer and consult a physician.
Operate and maintain the nibbler or shear as recommended in this instruction handbook, to prevent an unnecessary increase in vibration.
- Hold the tool with a light but safe grip, taking account of the required hand reaction forces,
because the risk from vibration is generally greater when the grip force is higher.
Additional safety instructions for pneumatic power tools
Air under pressure can cause severe injury:
- always shut off air supply, drain hose of air pressure and disconnect tool from air supply when not in use, before changing accessories or when making repairs;
- never direct air at yourself or anyone else.
■ Whipping hoses can cause severe injury. Always check for damaged or loose hoses and fittings.
- Cold air shall be directed away from hands.
Whenever universal twist couplings (claw couplings) are used, lock pins shall be installed and whipcheck safety cables shall be used to safeguard against possible hose-to-tool or hose-to-hose connection failure.
Do not exceed the maximum air pressure stated on the tool.
■ Never carry an air tool by the hose.

General safety instructions for compressed air metal shears
■ Always wear safety gloves.
Be careful whilst working with the shears. Edges created on the work piece can cause cuts.
If possible, already run the shears at full speed when applying them. Otherwise sudden, jerky movement could result if the shears catch when starting up at the front, resulting in backlash.
- Before use
Installation
The device itself is fully functional at delivery. You will need to install a coupler before using the device itself (please note the data specified under technical details for accuracy of fit/size).
Wrap the coupler with Teflon tape (not included) before screwing it into the compressed air unit. Wrap the tape as tightly as possible around the thread. This will minimise the likelihood of air leaking and optimise the work process.
Now screw the coupling into the compressed air equipment.
Tighten the coupler into the compressed air unit with a size 14 spanner using moderate force (see Fig. A).
Adjusting the compressed air supply and connections
☐ Only use filtered, lubricated and regulated compressed air.
□ Apply the connection method on the compressed air unit shown in Fig. B. This will increase the effectiveness and life of the tool.
Set your compressor to the device's operating pressure specified under Technical Data. Please note, on average the pressure for 10 m of hose will decrease by about 0.5 bar.
WARNING! Excessive pressure is dangerous! Never exceed the specified pressure!
☐ Add a few drops of oil for compressed air tools or SAE 10–20 motor oil to the compressed air connection of the compressed air unit. Using other oil (esp. viscous) will result in malfunctions, damage or even total loss of the device.
- Start-up
- Connecting the compressed air tool
☐ Verify the work piece is properly secured.
☐ Connect the compressed air by pushing on the coupler of the hose with some force (see Fig. C).
☐ Verify the air hose is properly seated (see Fig. D). A loose hose whipping about out of control presents a major hazard. The coupler must be tightly seated for the same reason. Also check this.
Cutting
□ Activate the trigger to start using the shears.
Move the metal shears toward the item you wish to work on. If possible, already run the shears at full speed when applying them.
Note: The shears may take up to 8 seconds to be fully ready for use and reach full force. During this time you should wait before applying the shears to ensure better cutting results and treat the device with care.
Note: Do not apply too much pressure whilst cutting. Do not overburden the shears. In addition to possible unclean cutting results, this could also cause metal slivers to chip off and fly about.
Note: Metal slivers flying about can be very dangerous!
Note: If the compressed air supply is temporarily cut off due to power failure or temporary compressor failure, immediately release the trigger 2. If you now wish to continue working, you must first remove the metal shears all the way out of the work piece. You can then continue working.
- When using the device always be aware of the following items:
The shears must always operate at full speed. This means, the compressor must always supply sufficient pressure and air volume.
- Work slow. Slowly guide the shears along the work piece and work without applying excessive pressure.
- Move the shears smoothly.
- Do not tilt the shears.
☐ Please tighten the screws of the cutter head regularly and replace worn or damaged cutting edges if necessary (see Fig. E).
☐ Use the corresponding Allen key when doing this.
☐ Check the cutter head after 2 minutes of continuous operation to ensure it is securely seated.
- After initial use
Once the task has been finished the equipment must be disconnect from the compressed air supply.
This first requires the pressure to be completely released from the lines.
Switch off the compressor.
☐ To release potentially remainders of compressed air, briefly activate the trigger 2 of the device.
□ Pull back the lock.
Take off the coupler.
- Spare parts/replacing consumables
- When replacing items, always be sure the compressed air supply is disconnected!
Note: The shear head does not necessarily have to be removed all the way. After loosening the screws you can remove the parts of the cutter blades to replace the defective part.
☐ Use a fitting hex wrench to loosen the screws on the underside of the shear head (see Fig. E). Remove the blades and replace the defective part.
☐ During assembly be sure the blades are correctly aligned.
☐ First insert the lower blade.
Then insert the centre piece.
☐ Then insert the marked ring. This is merely a spacer between the upper and lower blade.
Now insert the upper blade and secure the shear head with the screws.
Note: please note, the notches on the blades must face the inside.
- Cleaning and storage
To ensure a long life and trouble-free operation, it's important to observe the following instructions.
□ Always disconnect the tool from the compressed air source before cleaning it.
□ Clean your tool with a soft, dry cloth or lightly blow it out with compressed air. Never use caustic cleaners.
Cleaning and storage/Information about warranty and service processing
- Lubricating the cutting shears
Turn the tool over so the compressed air connection is facing up, and add a few drops of oil for compressed air tools or SAE 10-20 motor oil to the compressed air connection of the compressed air unit.
□ Activate the trigger to allow the oil to distribute better.
☐ Hold a rag or absorbent paper towel in front of the air discharge opening and operate the device in idle for a few seconds.
ATTENTION! Remove the compressed air connection before performing maintenance!
WARNING! Excess oil will be blown out. Keep persons or objects away from the discharge.
- Storing the cutting shears
Store the compressed air tool in dry rooms, protected from the effects of weather.
☐ Ensure moisture does not enter the compressed air unit.
● Information about warranty and service processing
Creative Marketing Consulting GmbH warranty
Dear customer,
the warranty for this device is 3 years from the date of purchase. In the event of product defects, you have legal rights against the retailer of this product. Your statutory rights are not limited in any way by our warranty detailed below.
Warranty terms
The warranty period begins on the date of purchase. Please retain the original receipt safely. This document is required as your proof of purchase.
Should this device show any fault in materials or manufacture within three years from date of purchase, it will be repaired or replaced – at our choice – by us free of charge. This warranty is conditional on the defective device and the proof of purchase (receipt) being presented within the three year warranty period, and that there is a brief written description of the nature of the defect and of the date it arose. If the defect is covered by our warranty, we will return the repaired device or replacement thereof. A repair or exchange of the device does not extend a new warranty period.
- Extent of warranty
The appliance has been manufactured to strict quality guidelines and meticulously examined before delivery.
The warranty applies to faults in material or manufacture. This warranty does not apply to product parts subject to normal wear and tear and which can therefore be considered as wear items, or to damage to fragile parts, e.g. switches, storage batteries or glass parts.
This warranty becomes void if the device has been damaged or improperly used or maintained. All instructions provided in the operating instructions must be followed strictly to constitute proper use of the product. Purposes and practices which the operating instructions warn of or advise against must be avoided without fail.
This product is intended for private, non-commercial use only. Any incorrect or improper use of the device, use of force and changes not performed by our authorized service branch will void the warranty.
- Processing of warranty claims
Please follow the instructions below to ensure quick processing of your claim:
When inquiring about your product please have your receipt and product number (e.g. IAN) ready as your proof of purchase.
... / Environmental instructions and disposal information / Declaration of Conformity
The product number can be found on the type plate, an engraving, the cover page of your instructions (bottom left) or the decal at the back or bottom. In the event of malfunctions or other defects, please first contact the service department below by phone or e-mail.
A product recorded as defective, along with the proof of purchase (sales receipt) and a description of the defect and when it occurred, can then be returned free of charge to you to the service address provided.

Note:
Visit www.lidl-service.com to download this and many other manuals, product videos and software.
How to contact us:
GB
Name: C. M. C. GmbH
Website:www.cmc-creative.de
E-mail:service.gb@cmc-creative.de
Phone:0-808-189-0652(standard
German landline rates apply)
Fax: 0-808-189-0652
Registered office: Germany
IAN 275681
Please note that the following address is not a service address.
Please first contact the service point named above.
Address:
C. M. C. GmbH
Katharina-Loth-Str. 15
66386 St. Ingbert, Germany
●Environmentalinstructions and disposal information
Don't waste, recycle!

Device, accessories and packaging should be recycled in an environmentally friendly manner.
Do not dispose of the air tool with your household waste, or throw into fire or water. If possible, non-operational equipment should be recycled. Contact your local retailer for information.
● Declaration of Conformity CE
We,
C. M. C. GmbH
Responsible for documentation: Daniel Havener
Katharina-Loth-Str. 15
66386 St. Ingbert
declare in our sole responsibility that the product
Pneumatic metal shears
Item number: 1942
Year of manufacture: 2016 / 34
IAN: 275681
Model: PARKSIDE PNEUMATIC METAL
SHEARS PDBS 6.2 A1
meets the basic safety requirements of European Directives
Machinery Directive
EC Directive 2006/42/EC
and its amendments.
The conformity assessment is based on the following harmonised standards:
EN ISO 11148-11:2011
Ime: C.M.C. Creative Marketing &
Consulting GmbH
Servis in informacije
Media-Impeks d.o.o
Spletna stran: www.cmc-creative.de
E-pošta: service.si@cmc-creative.de
Telefon: 00386 2 796 3511
(normalna tarifa nem. tel. omrežja)
Sedež: Nemčija
IAN 275681
Upoštevajte, da spodnji naslov ni naslov servisa. Najprej se obrnite na zgoraj navedeno servisno službo.
Naslov:
C. M. C. GmbH
Katharina-Loth-Str. 15
66386 St. Ingbert
Nemčija
koljevarstveni napotki in navodila za odlaganje / ES izjava o skladnosti Napotki za garancij
- Okoljevarstveni napotki in navodila za odlaganje
Recikliranje surovin namesto odlaganja smeti!

$$ L _ {p C, \text { peak }} = 1 1 0, 9 \mathrm{dB(A)} $$
Odchýlka K = 3 dB.
Vibračné parametre podl'a EN 12096,
ISO 28927-7
Hladina vibrácií ruka-rameno: 0,55 m/s ^2
$$ L _ {p C, \text { peak }} = 1 1 0, 9 \mathrm{dB(A)} $$
EXPLOSIONSGEFAHR! Verwen-

service.at@cmc-creative.de
Telefon: +49 (0) 6894 9989751
natural_image
Close-up of a hand holding a black mechanical component with a metallic connector, showing a left-hand rule to shift the component (no text or symbols visible)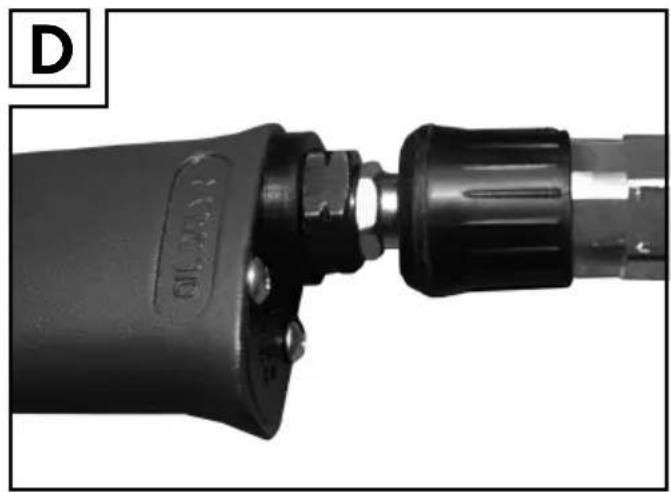
natural_image
Close-up of a black cylindrical tool with a flanged handle and metallic shaft, labeled 'D' in the corner (no readable text or symbols on the tool itself)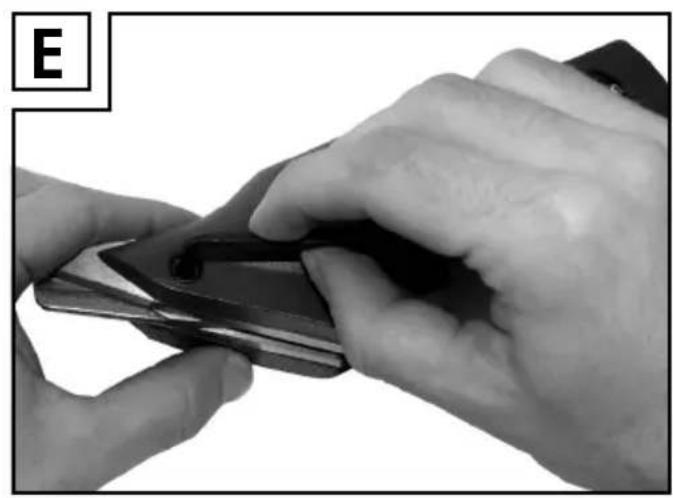
natural_image
Close-up of hands holding a small electronic device with a black clip, no visible text or symbols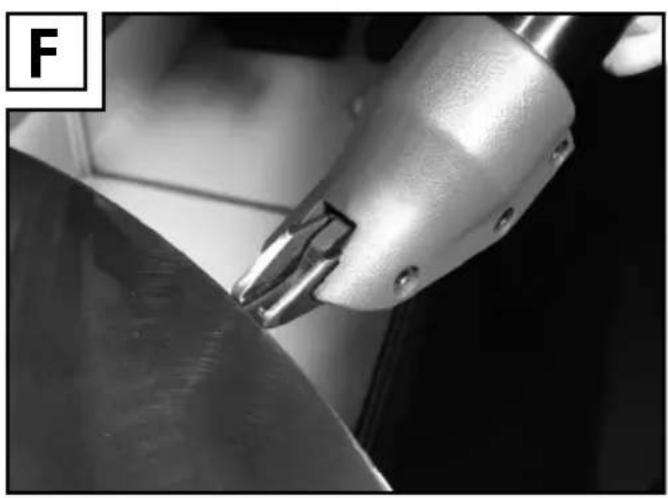
natural_image
Close-up of a precision tool interacting with a metallic mechanical component (no visible text or symbols)C. M. C. GmbH
Katharina-Loth-Str.15
66386 St. Ingbert
Germany