
Harstad - Oven Eurom - Free user manual and instructions
Find the device manual for free Harstad Eurom in PDF.


| Brand | Eurom |
| Model | Harstad |
| Product type | Wall-mounted electric fireplace |
| Dimensions (W x H x D) | 90 x 57 x 11 cm |
| Weight | 15 kg |
| Power supply | 220-240 V ~ 50 Hz |
| Maximum power | 2000 W |
| Adjustable powers | 0 W (flames only), 1000 W, 2000 W |
| Lighting | Integrated LED bulb for flame effect |
| Remote control | Yes, with AAA 1.5 V batteries (not included) |
| Thermostat | Adjustable from 15 to 30 °C (default 20 °C) |
| Timer | Weekly programming up to 10 settings |
| Protection | Overheat safety device |
| Installation | Wall mounting, minimum height under unit: 30 cm, recommended 60 cm |
| Safety distances | At least 1 m from flammable materials, 20 cm from side walls, 100 cm from ceiling |
| Minimum ambient temperature | Room of at least 20 m³ |
| Maintenance | Clean the exterior with a soft cloth; the glass with a soft cloth without abrasive products |
| Remote control batteries | 2 x AAA 1.5 V (not included) |
Frequently Asked Questions - Harstad Eurom
User questions about Harstad Eurom
0 question about this device. Answer the ones you know or ask your own.
Ask a new question about this device
Download the instructions for your Oven in PDF format for free! Find your manual Harstad - Eurom and take your electronic device back in hand. On this page are published all the documents necessary for the use of your device. Harstad by Eurom.
USER MANUAL Harstad Eurom
natural_image
Interior view of a dimly lit gas stove burner with visible flames and wood paneling (no text or symbols)Harstad
Art.nr. 36.342.5
Art.nr 36.343.2 (Swiss plug)
EN This symbol on your device means: do not cover!
Maximum capacity Watt 2000
Settings 0–1000-2000W
Bulb LED
Dimensions cm 11 x 90 x 57
Weight kg 15
Batteries remote control 2 x AAA 1,5V (not provided)
General safety instructions
- Read this instruction booklet carefully and fully before use.
- Before use, check your new fireplace (including cable and plug) for any visible damage. Never use a damaged fireplace but take it back to the supplier for a replacement.
- This fireplace may only be used once it has been hung. Do not use until it has been installed as per instructions!
- This fireplace is exclusively intended for normal, household usage. Only use for providing additional heating in your home.
- This fireplace is not suitable for use in wet or damp spaces such as bathrooms, wash rooms etc. Do not place in the direct vicinity of a tap, water source or similar and ensure that it cannot fall into water and that water cannot enter the device. If the cable falls into water make sure you
remove the plug from the socket! Do not use a fireplace that is wet inside but take it to be repaired. Never immerse the fireplace, cable or plug in water or any other fluid and never touch the fireplace with wet hands.
-
The connection voltage and frequency, as given on the device, must correspond to that of the socket to be used. The electrical installation must be protected via an earth leakage circuit breaker (max. 30 mAmp.). Never place the fireplace nearby, under or facing a socket or in the vicinity of an open fire or heat source.
-
Extend the electric cable fully before inserting plug into socket and ensure that it does not come into contact with the fireplace or get hot. Do not place the cable under carpet, cover with mats or similar and do not place in areas that are walked on frequently. Ensure that it cannot be stepped on and that no furniture is placed on top of it. Do not bend the cable around sharp corners and do not roll up too tightly after use.
-
The use of an extension cable is not advised as this can lead to overheating and fire. If the use of an extension cable is unavoidable, make sure that it is not damaged and that it is an approved extension cable with a minimum diameter of 3 × 1.5 mm^2 . Always fully extend the cable in order to prevent overheating! To avoid fuses being blown, do not use any other equipment on the same socket or electrical group as the one used for the fireplace.
-
Do not use the fireplace outdoors or in areas that are smaller than 20 m^3 .
-
A fireplace contains hot and/or glowing and sparking components. Do not, therefore, use where fuels, paint, flammable fluids and/or gases are stored.
-
Do not use the fireplace nearby or facing furniture, animals, curtains, paper, clothing, bedding or other flammable materials. Keep at least 1 metre from the fireplace!
-
Never cover the fireplace! Inlet and outlet openings should never be blocked as this may pose a fire risk. Never use the fireplace to dry clothing or place anything on it. Air around the fireplace must be able to circulate freely. Never install it too close to walls or large objects and never under a shelf, cupboard or similar.
-
Prevent foreign objects entering ventilation or outlet openings on the fireplace. This may cause electric shock, fire or damage.
-
Never leave a working fireplace unattended but switch off and then remove the plug from the socket. Always remove the plug from the socket if the fireplace is not in use! Remove plug by pulling on the plug itself; never pull on the cord!
-
Always switch the fireplace off, remove plug from socket and let the fireplace cool down before you:
-
clean the fireplace
- carry out maintenance on the fireplace
-
touch or move the fireplace
-
The fireplace gets hot during use. In order to avoid burns, never touch the hot surfaces with bare hands!
-
This heater can also be controlled with a timer or an app as well as manually. However you operate it, always ensure that all safety regulations have been observed!
-
Close supervision is necessary if the product is used near children or incapacitated persons. Children of less than 3 years should be kept away unless continuously supervised. Children aged from 3 years and less than 8 years shall only switch on/off the appliance provided that it has been placed or installed in its intended normal operating position and they have been given supervision or instruction concerning use of the appliance in a safe way and understand the hazards involved. Children aged from 3 years and less than 8 years shall not plug in, regulate and clean the appliance or perform user maintenance.
This appliance is not suitable to be operated by children or persons who have physical, sensory and/or mental limitations, or by persons who have no knowledge of, or experience with, this appliance. This appliance can be used by children aged from 8 years and above and persons with reduced physical, sensory or mental capabilities or lack of experience and knowledge if they have been given supervision or instruction concerning use of the appliance in a safe way and understand the hazards involved. Children shall not play with the appliance. Cleaning and user maintenance shall not be made by children without supervision.
-
Keep the fireplace clean. Dust, dirt and/or deposits in the fireplace often lead to overheating. Ensure that this type of build-up is regularly removed. Do not use aggressive products or metal scourers for cleaning the device as this will damage the housing and parts of the metal may find their way into the electrical parts and lead to short circuiting.
-
Do not lift the fireplace using the glass plate.
-
Do not turn on the appliance if you have discovered damage to the appliance itself, the cord or the plug, if the appliance is malfunctioning, if it has been dropped or if there are any other signs of a defect. Return the complete product to the vendor or to a certified electrician for inspection and/or repair. Always ask for the original parts. Do not use attachments and/or accessories that have not been recommended or supplied by the manufacturer. The appliance (incl. cord and plug) may only be opened and/or repaired by properly authorised and qualified persons. Repairs that have not been carried out correctly may pose a risk!
-
Only use the fireplace for its intended purpose and as stipulated in this instruction booklet.
Failing to adhere to instructions 21 & 22 could lead to damage, fire and/or personal injury. This will invalidate the guarantee and the supplier, importer and/or manufacturer will take no responsibility for the consequences!
Description
The HARSTAD comprises an atmospheric fireplace (containing a heating element and ventilator which blows warm air out of the top of the fireplace), wall supports, a remote control and this instruction booklet.
The atmospheric fireplace is covered with a wooden edge and glass plate at the front. There is a metal cabinet behind this which contains the atmospheric elements at the front, air grilles at the sides and, on top, the grille which is used to blow out warm air and the operating panel. The hanging bracket is located at the back and the technical aspects are housed internally.
The wall supports must be attached to the wall so that the fireplace can be hung on them. Screws, plugs, a spacer bracket and self-tapping screws are supplied.
With the remote control you can operate all functions of the stove.
Please keep the instruction booklet somewhere safe for reference or for providing with the device if it is sold on.
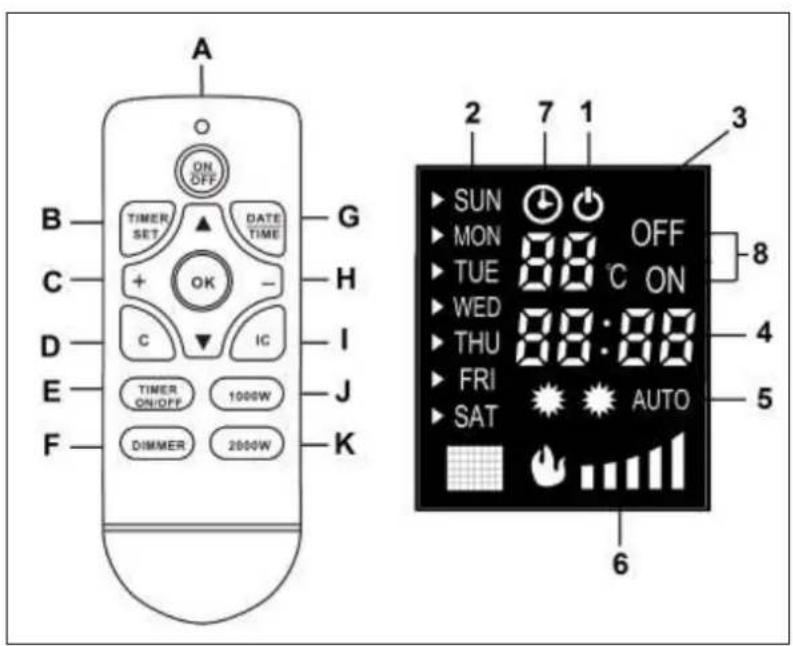
Remote control:
A. ON/OFF button
B. Button for setting the time
C. + button
D. Erasing the time setting
E. Timer on/off button
F. Dimmer button
G. DAY and TIME button
H. - button
I. Automatic output selection
J. 1000W button
K. 2000W button
Display:
- Stand-by light
- Lamps of 1000W - 2000W - auto
- Day indicator 6. Dimmer setting
- Temperature and thermostat setting 7. Operating timer light
- Time indicator and timer setting 8. Timer ON & OFF setting
Location and Connection
- Remove all packaging material and keep out of reach of children. After removing packaging, check the appliance for damage or other signs that could indicate a fault/defect/malfunction. In case of doubt, do not use the appliance, but contact your vendor for inspection or replacement.
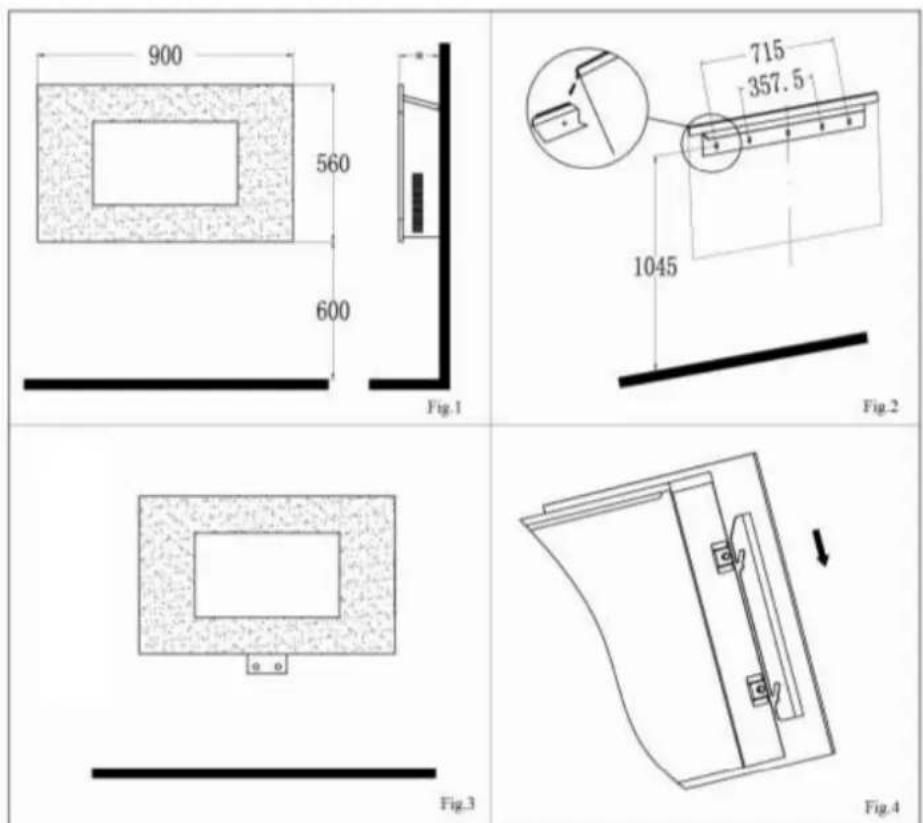
- Do not use the fireplace before it has been completely installed according to the instructions and you have read the instruction booklet fully!
- This device was designed to be permanently hung on a wall. Ensure the wall is sturdy, completely vertical, is not sensitive to vibration and is not flammable. Make sure it is not made of synthetic material and or covered with flammable material. Be aware of pipes that may be contained within the walls when drilling holes.
- Choose a suitable location for the fireplace, at least one metre from all obstructions, walls and flammable materials (see safety instructions) and in the vicinity of a 16 Amp (at least) fused, earthed electrical socket (protected by a 30 mA earth leakage circuit breaker). This socket must be located to the right of the fireplace.
- There must be at least 30 cm distance between the base of the fireplace and the ground, however, you are advised to place the fireplace at a height of 60 cm. for the best sight. There must be at least 20 cm distance between the fireplace and the side walls, at least 100 cm. between the fireplace and the ceiling. Do not hang the device directly under or in front of an electrical socket (see diagram 1).
- The wall supports must be attached horizontally (use a spirit level!) to the wall. Determine the location of the wall supports (take the above into account), mark the location of the screws and drill 5 holes at the marked places using a 6 ~mm
drill. Put the plugs into the holes and then screw the wall supports to the wall. Be aware of pipes that may be contained within the walls when drilling holes!
- Attach the securing-bracket with both self-tapping screws underneath the fireplace in the holes provided. The flat side of the bracket must be placed against the underside of the fireplace; the other must rest against the wall so that the wall piece sticks out under the fireplace (diagram 3). This bracket will be hidden from sight once the glass screen has been installed.
- Now hang the fireplace carefully on the central wall support with the hanging bracket (see diagram 2). The bracket should not stick out from the support! The electrical cable comes out at the right hand, lower side of the fireplace and must be placed out of range of the heat.
- Now mark the location at which the securing-bracket must be screwed to the wall. Remove the fireplace from the wall, drill both holes and insert a plug. Hang the fireplace on the bracket and screw the securing bracket to the wall.
- Hang the glass plate (two people are needed for this job!) with the four hooks over the four knobs on the sides of the fireplace and check that all four hooks are correctly attached (see diagram 4). Secure the glass plate by tightening the screw that goes through the bracket (which sits on the glass plate).
• Installation is now complete.
Note: ensure that the weight of the fireplace hangs on the wall supports and not on the little securing bracket!
OPERATING
- Check that the details on the data plate correspond to those of the electrical supply which you wish to use for the fireplace. Do not use the same connection for any other equipment.
• Install two AAA-1,5V batteries in the remote control. - Check whether the main switch is set to OFF (O is pushed in)
- Now insert the plug into the grounded socket.
- Push the main switch to ON (I is pushed in). The stove is now on stand-by and the light is switched on at the ⏻
- You can now further operate the fireplace with the remote control or with the buttons on the fireplace itself.
Push-button operation
If you don't use the remote control, you can press the relevant buttons on the control panel, manually set it to 3 positions; the corresponding lights will turn on.
- I/O : flame effect only
- I/O + 1000W : flame display and heating at 1000W
- I/O + 2000W : flame display and heating at 2000 Watt (all the lights are turned on).
By pressing the I/O button longer, you initiate the dimmer function; the light intensity will increase or decrease with every tweet. Release the button when you have achieved the desired intensity
Attention! The thermostat cannot be set manually, only with the remote control. The thermostat is standard set to 20^ C.
Remote control:
- Press on the ON/OFF button to switch on the stove.
- Now set the desired temperature. The temperature & timer setting will usually show the ambient temperature. By pressing on the + or - button, you see the set temperature flashing for a short time and by pressing the + or - buttons, you can adjust the temperature (from 15 to 30°C). After a few seconds, the display switches back to the ambient temperature and the newly desired temperature is set. The temperature is standard set to 20°C.
- Now you can start operating the stove by pressing the button to 1000W (half output) or 2000W (full output). When the set temperature is above the ambient temperature, the stove will start to heat (1000W, 2000W). The corresponding lights on the display are turned on (1000W-1 star, 2000W-2 stars). If you press the IC button, the stove will automatically choose the most suitable output. The corresponding lights on the display are turned on (IC-AUTO).
- The thermostat will switch off the stove as soon as the stove reaches the desired temperature and it will switch it on again if the ambient temperature drops.
- By pressing the ‘dimmer’ button (there are 5 positions), you can intensity or decrease the flame effect of the stove.
- You switch off the stove by pressing the ON/OFF button. The temperature level that you set will remain. However, if you switch on the stove once again, you will have to reset the output.
- If you want to switch off the stove for a longer period, then also set the main switch on O (OFF). The set temperature will now be erased. Finally remove the plug from the socket.
TIMER
The stove has a built-in weekly timer, which allows you to set a weekly schedule for switching on and off. You must first set the date and time; if you don't do that, then the stove assumes that it is scheduled for Sunday at 00.00!
- Press the ON/OFF button to switch on the stove.
- Press on the DAY/TIME button; the day indicator will light up. Select the arrows and V for the current day and confirm this by pressing the DAY/TIME button again (Sunday, Monday, etc.)
- The hour indication will now flash. By pressing on the + and - buttons, you select the current hour. Reconfirm by pressing on the DAY/TIME button.
- The minutes indicator will now flash. By pressing on the + and - buttons, you select the precise time. Confirm by pressing on the DAY/TIME button.
• Day and time are now set.
To set the weekly timer, take the following steps:
- Ensure that the stove is switched on with the ON/OFF button.
- Press on the TIMER SET button. The indication 01 on the display starts to flash, indicating that you have selected the first timer setting (you can select
10 timer settings). Confirm this by pressing once again on the TIMER SET button.
- The day indicator will now flash (SUN). Choose the days when the stove must operate (e.g., from Monday to Friday) by pressing + next to the days you have selected and pressing - next to the days that you don't want to select. Use to arrows to move to the next day. Press again on the TIMER SET button to choose the days and confirm.
- The hours indication will now flash and you will see ON on the display. By selecting the + and - buttons, you choose the hours when you want the stove to operate. Confirm by pressing the TIMER SET button.
- The minutes indicator will now flash. By pressing the + and - buttons, you select the time period (in intervals of 10 minutes) for the stove to operate. Confirm by pressing on the DAY/TIME button. The starting time is now set.
- The hour indicator is flashing again to order for you to set at which time the operation must end. OFF appears on the display. Select the time in the same way you selected the operating time and confirm by using the TIMER SET button.
- Now the temperature setting starts to flash. Using the + or - buttons, select the desired temperature and confirm by using the TIMER SET button.
- You initial timer setting is now set.
- To generate a second setting, press once again on the TIMER SET button. While 01 is flashing, press on the + button: 02 will appear. Confirm this using the TIMER SET button and subsequently set new days, hours and minutes as described above.
- You can generate maximum 10 time settings. Prevent the setting from containing any conflicting or overlapping orders.
To operate the stove according to the timer settings, do the following:
- Switch on the stove using the ON/OFF button.
- Press the 1000W or 2000W button to set the desired output. If the desired temperature is above the ambient temperature, the stove will begin to heat (1000W, 2000W). The corresponding light will light up on the display (1000W-1 star, 2000W-2 stars).
If you press the IC button (automatic choice of output), the stove possible will start to heat the room 20 minutes before the set time. After 20 minutes the stove will automatically choose the most suitable output. The corresponding light will light up on the display (IC-AUTO).
- By pressing the 'dimmer' button (there are 5 positions), you can intensity or decrease the flame effect of the stove.
- Now activate the timer by pressing on the TIMER ON/OFF button. The operating-timer light will light up and the timer set 01 will flash. If you press OK now, then the heater will completely process all the settings once until Sunday evening 24:00. If you want to repeat the set weekly schedule, press once again on the TIMER ON/OFF button. A symbol ][ will appear on the display. If you now press OK, the timer setting will be repeated weekly.
- If you don't select a time setting, then the stove will automatically select setting 01 after flashing approx. 14 times and the heater will completely process all the settings once until Sunday evening 24:00.
Attention! All timer settings (maximum 10 per week) will be processed completely one by one. Therefore, make sure that they do not contradict each other!
- If you wish, you can also readjust the thermostat, output and dimmer while the timer is working.
- You stop the operation of the timer by pressing on the TIMER ON/OFF button. The stove will act as if there are no current timer settings and will simply operate according to the thermostat and output settings. By pressing the TIMER ON/OFF button again, you reactivate the timer setting.
- To erase the timer setting, press on the TIMER SET button. 01 will start flashing on the display. Using the + and - buttons, look for the setting number that you want to erase and subsequently press on the C button (erasing the timer setting). The timer setting will disappear immediately.
ATTENTION! If you want the stove to operate according to a timer programme, it will not only have to remain on stand-by, but also switched on (using the ON/OFF button). If this is not necessary, always switch off the stove using the ON/OFF button, switch off the main switch and remove the plug from the socket.
ATTENTION! Day and time are deleted if the electricity is cut off. This happens not only when the plug is pulled out of the socket, but also if the main switch is set to O (OFF). The timer settings however are stored. When the electricity is restored and the timer settings are entered, then you need to reset the day and hour settings immediately; otherwise the time will begin at 0.00!
If you do not enter any orders for approx. 15 seconds, the display will turn off.
Pressing any random button will reactivate the display.
Switching off
If you are not using the stove, you must switch it off using the main switch (you press O) and remove the plug from the socket. Doing this will erases all the settings, also day and time. Only the timer settings are stored.
Safety feature
The Harstad atmospheric fireplace is equipped with an overheating protection. In case of internal overheating, the overheating safeguard will switch the heater off. This may occur if the heater cannot give off enough heat or if it cannot draw in enough fresh air. As mentioned above, this is generally caused by (partially) covering the heater, obstructing the air intake and/or outlet grills or installing the heater too close to a wall or something similar.
If this happens, turn the fireplace off by switching the main switch to O and remove the plug from the socket. Leave the fireplace to cool down for at least 15 minutes and remove the cause of overheating. You can then switch the fireplace back on.
If the device overheats again or you cannot ascertain the reason for this, take the fireplace to your service point to be checked/ repaired.
Important! For safety reasons the fire will not automatically restart after overheating.
Check whether conditions are safe before switching it on! So never switch on the heater by means of a timer and never connect it to a power supply that regularly switches on and off.
Cleaning and maintenance
Always remove the plug from the socket and let the fireplace cool down before cleaning or touching.
The Harstad atmospheric fireplace does not need much maintenance. Always keep the in- and outlet openings clean and dust-free. Use a soft cloth or a soft brush to clean the outside of the metal case. The glass plate can also be cleaned with a soft cloth. Do not use abrasive cleaning fluids or special glass cleaners!
If the device malfunctions, immediately remove the plug from the socket and take to a service point. Do not carry out repairs yourself and always ask for original parts to be used.
If the fireplace is to be stored after the winter period, clean it, pack it in original packaging if possible and store in a cool, dry and clean place. Make sure the fireplace is kept upright.
Problems and solutions
If the fireplace will not work check the electrical supply. Is the socket working properly? Has the fuse blown?
If the fireplace stops working suddenly, it may mean that the overheating safeguard has been triggered (see under ‘Safeguards’).
In the event of other defects, immediately switch the fireplace off, remove the plug from the socket and consult a supplier or recognised electrician. Never carry out repairs yourself as this invalidates the guarantee and may be dangerous!
Français
Données techniques
Type
Harstad
Tension Volts/Hz 220-240 / 50
Puissance max. Watts 2000
natural_image
Simple line drawing of a rectangular frame with a small square at the top and a horizontal line below, labeled Fig.3 (no text or symbols on the diagram itself)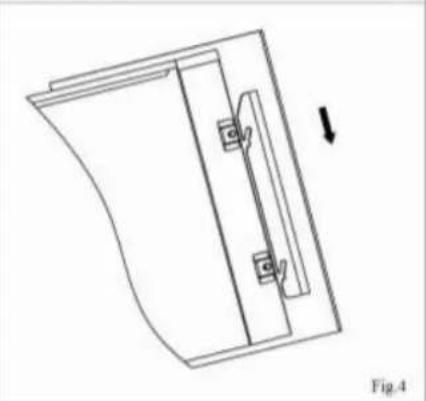
natural_image
Technical line drawing of a mechanical component with arrows indicating direction (no text or symbols)| Item | Symbol | Value | Unit | Item Harstad | Unit | |
| Heat output | Type of heat input, for electric storage local space heaters only (select one) | |||||
| Nominal heat output | P_nom | 2.0 | KW | manual heat charge control, with integrated thermostat | Not applicable | |
| Minimum heat output (indicative) | P_min | 1.0 | KW | manual heat charge control with room and/or outdoor temperature feedback | Not applicable | |
| Maximum continuous heat output | P_max,c | 2.0 | KW | electronic heat charge control with room and/or outdoor temperature feedback | Not applicable | |
| Auxiliary electricity consumption | fan assisted heat output | Not applicable | ||||
| At nominal heat output | el_max | 0.014 | KW | Type of heat output/room temperature control (select one) | ||
| At minimum heat output | el_min | 0.014 | KW | single stage heat output and no room temperature control | [no] | |
| In standby mode | el_SB | 0.48 | W | Two or more manual stages, no room temperature control | [no] | |
| with mechanic thermostat room temperature control | [no] | |||||
| with electronic room temperature control | [no] | |||||
| electronic room temperature control plus day timer | [no] | |||||
| electronic room temperature control plus week timer | [yes] | |||||
| Other control options (multiple selections possible) | ||||||
| room temperature control, with presence detection | [no] | |||||
| room temperature control, with open window detection | [no] | |||||
| with distance control option | [no] | |||||
| with adaptive start control | [yes] | |||||
| with working time limitation | [no] | |||||
| with black bulb sensor | [no] | |||||
| Contact details | EUROM-KOKOSSTRAAT 20-8281JC-GENEMUIDEN-NETHERLANDS | |||||


- Harstad
- General safety instructions
- Description
- Remote control:
- Display:
- Location and Connection
- Note: ensure that the weight of the fireplace hangs on the wall supports and not on the little securing bracket!
- OPERATING
- Push-button operation
- TIMER
- Switching off
- Safety feature
- Cleaning and maintenance
- Problems and solutions
- Français
- Données techniques
Brand : Eurom
Model : Harstad
Category : Oven