
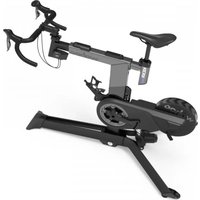
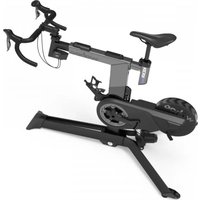
Kickr Smart Bike Trainer - Exercise bike Wahoo - Free user manual and instructions
Find the device manual for free Kickr Smart Bike Trainer Wahoo in PDF.


| Product Type | Smart bike trainer |
| Brand | Wahoo |
| Model | Kickr Smart Bike Trainer |
| Power Supply | AC adapter included (mains) |
| Connectivity | Bluetooth, ANT+, compatible with iOS 8+, Android 4.3+, Mac (ANT+ or BLE dongle), PC (ANT+ or BLE) |
| Training Modes | Manual resistance (0-100%), target power (ERG), route simulation (SIM) |
| Key Features | Power measurement, resistance control, fitness app compatibility, spin-down calibration |
| Bike Compatibility | Quick release 130/135 mm, thru axle 12x142/12x148 mm (adapters included) |
| Weight | Approximately 21 kg (not exactly specified) |
| Dimensions (folded/unfolded) | Not specified; approximate dimensions: 60 x 50 x 40 cm (estimated) |
| Material | Metal, plastic |
| Noise Level | Quiet (smart trainer type) |
| Maintenance and Cleaning | Clean with a dry cloth; perform a spin-down calibration every two weeks via the Wahoo Fitness app |
| Safety Instructions | Do not touch moving parts; the KICKR may become hot; use on a stable, flat surface; securely attach the bike before use; keep children and pets away |
| Spare Parts and Repairability | Keep packaging for transport; contact Wahoo Support or an authorized dealer for parts |
| Box Contents | KICKR, power adapter, quick release, disc brake caliper spacer, 1.8mm spacer, adapters A, B, C, D |
| Warranty | Not specified (typically 2 years) |
| General Information | Manufactured by Wahoo Fitness; support available by phone and website; Wahoo Fitness app recommended |
Frequently Asked Questions - Kickr Smart Bike Trainer Wahoo
User questions about Kickr Smart Bike Trainer Wahoo
0 question about this device. Answer the ones you know or ask your own.
Ask a new question about this device
Download the instructions for your Exercise bike in PDF format for free! Find your manual Kickr Smart Bike Trainer - Wahoo and take your electronic device back in hand. On this page are published all the documents necessary for the use of your device. Kickr Smart Bike Trainer by Wahoo.
USER MANUAL Kickr Smart Bike Trainer Wahoo
natural_image
Exterior view of a black and white Wahoo KICKR exercise machine (no signage or text on the device itself)KICKR Quick Start Guide
natural_image
Mechanical assembly diagram showing a clamp and bracket assembly (no text or symbols)See full instructions for complete setup.

natural_image
Technical line drawing of a mechanical device with a meshed circular component and mounting base (no text or symbols)
natural_image
Technical line drawing of a mechanical device with rotating arms and a central mesh component (no text or symbols)
natural_image
Diagram of a mechanical component with rotational arrow indicating rotation (no text or symbols)


natural_image
Mechanical assembly diagrams showing two configurations of a device with rotating components and internal structure (no text or symbols)OR

flowchart
graph LR
    A["Adapter C"] --> B["Optical Structure"]
    B --> C["Adapter D"]
    B --> D["12x142mm Configuration (Adapter D)"]
    B --> E["12x148mm Configuration (Adapter D)"]

natural_image
Mechanical assembly diagram showing two stages of a mechanical linkage mechanism, with no visible text or symbols.Thank you for purchasing the Wahoo KICKR!
LEARN MORE:
For instructional videos, compatible apps, FAQs, or to submit a support request please visit: www.wahoofitness.com/support
PLEASE CONTACT US WITH
QUESTIONS OR CONCERNS AT:
Wahoo Fitness
90 W. Wieuca Rd NE
Suite 110
Atlanta, GA 30342 United States
TELEPHONE:
United States: 1-877-978-1112
Germany: +49-30-568-373827
United Kingdom: +44-800-808-5773
Phone Hours: Monday - Friday
10am-7pm Eastern Time Zone
UNPACKING
(1) KICKR
(2) AC Power Adapter
(3) Quick Release Skewer
(4) Disc Brake Caliper Spacer
(5) 1.8mm Spacer
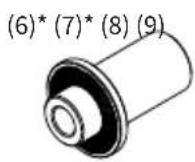
(6) Adapter A – For 130mm and 135mm Quick Release
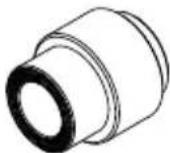
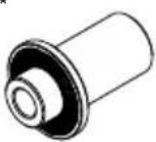
(7) Adapter B - Reversible hub spacer for 130mm and 135mm Quick Release
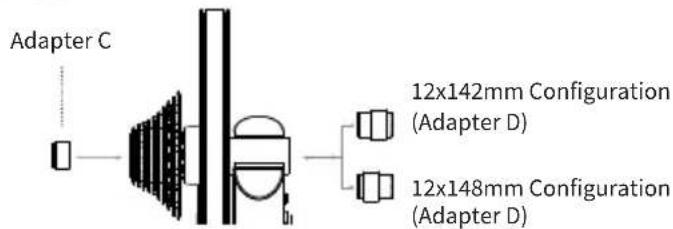
(8) Adapter C - For 12x142 and 12x148 Thru Axle
(9) Adapter D - Reversible hub spacer for 12x142 and 12x148 Thru Axle

- Before beginning or modifying any exercise program please consult your physician.
- Do not put hands or objects near moving parts of the KICKR.
- The KICKR may become hot to the touch when used for extended periods of time.
- Do not attempt to dismount the bicycle while the flywheel is in motion.
-
Keep children and pets away from the KICKR while in use.
-
Only use the KICKR on a stable, level surface with properly adjusted leveling feet.
- Use caution when standing while riding on the KICKR.
- Keep the KICKR away from water.
- Only use the power adapter that comes with the KICKR.
- Check to make sure the bicycle is properly secured to the KICKR before every ride.
KICKR SETUP
Place your KICKR on a stable, level surface and open the legs by (1) pressing down on the blue leg-lock tabs and (2) pivoting the legs outward until they snap in place. (NOTE: Ensure the leg-lock tabs have popped back up and secured the legs in an open position.)
(3) Use the included AC power adapter to connect the trainer to a standard wall outlet.

Download the Wahoo Fitness app for free from the Apple App Store or from the Android Google Play Store.
Follow the in app setup guide to complete your profile and to pair sensors.
To stabilize the trainer, adjust the two leveling feet (4) by twisting them left or right until the trainer is level and (5) lock them into place by tightening the blue locknuts against the KICKR leg frame. (NOTE: Check that your trainer is stable before every ride; if needed re-adjust the leveling feet.)
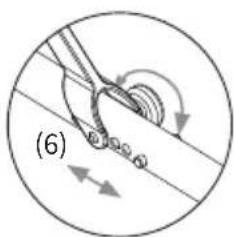
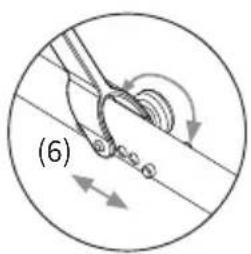
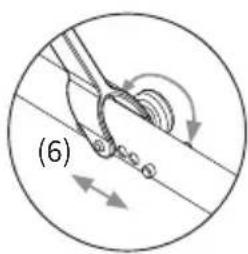
Adjust the height of the trainer to fit your specific wheel size by (6) relocating the height adjustment knob on the center leg to the appropriate setting. If you are unsure of your wheel size, check the tire sidewall or consult your local bike shop.

natural_image
Mechanical assembly diagram showing two configurations of a device with rotating components and directional arrows (no text or symbols)
natural_image
Mechanical assembly diagram showing a robotic arm interacting with a bracket (no text or symbols visible)

natural_image
Diagram of a rope knot with directional arrows indicating motion (no text or symbols)FOR 130MM OR 135MM QUICK RELEASE
Adapters Needed: A and B
KICKR comes pre-configured out of the box for bicycles with 130mm quick release spacing. If you have a bicycle with 130mm spacing proceed to “Attaching your Bicycle”. For 135mm spacing, remove quick release skewer, reverse Adapter B and reinstall quick release skewer.

FOR 142MM OR 148MM THRU AXLE
Adapters Needed: C and D
To be used with the 12mm thru axle supplied with bicycle.

ATTACHING YOUR BICYCLE
Shift your bicycle chain into the smallest sprocket in the front and rear, then remove your rear wheel. Install your bicycle on the KICKR by aligning the chain with the smallest sprocket on the KICKR and pressing down to fully seat the dropouts on the KICKR's axle.
For bicycles with quick release - Secure your bicycle by tightening the quick release acorn nut and clamping the quick release lever shut. The quick release lever is “open” when it curves away from the bicycle frame (1); the lever is “closed” when it curves towards the bicycle frame (2). The handle of the quick release skewer is always on the non-drive (non cassette) side of the KICKR. Only use the provided quick release skewer while using the KICKR.

natural_image
Mechanical assembly diagram showing a clamping mechanism with no visible text or symbols
natural_image
Mechanical assembly diagram showing a clamping device with no visible text or symbolsFor bicycles with thru axle - Secure your bicycle by reinstalling your bicycle's thru axle (3) and tightening to manufacturer specifications (4).


natural_image
Pure mechanical diagram showing a lever and speaker without any text or symbolsCAUTION! Failure to properly tighten the quick release skewer or thru axle may result in property damage or personal injury. If you are unsure of the proper tension, please consult your local bike shop or contact Wahoo Fitness for assistance. Do NOT ride the KICKR until the quick release skewer or thru axle is tightened.

PROTIP: Lift the front wheel up while pressing down on the saddle to ensure the bicycle is fully seated on the trainer.
COMPLETE YOUR SETUP USING THE WAHOO FITNESS APP
SPINDOWN: Before using the KICKR for the first time you should perform a spindown to calibrate your device. Additionally, a spindown should be repeated approximately every 2 weeks through the Wahoo Fitness App to ensure the most accurate power data.
START A WORKOUT: From the workout screen select the green "Start" button to begin the workout. Swipe right to view the KICKR page. This page enables you to view your workout and control the KICKR.
KICKR WORKOUT MODES:
The Wahoo Fitness App has the following workout modes that you can use to control your KICKR:
LEVEL: Just like riding on a fluid or wind trainer, the faster you go, the harder it gets. The level you select determines the progression of your power curve.
RESISTANCE: This allows you to set the resistance of the brake anywhere from 0 to 100%. Regardless of speed, the brake will remain set until you decide to change it.
ERG: Set your desired power, the KICKR will increase or decrease the resistance to maintain a constant power output, regardless of speed.
SIM: Enter your weight, bike type, riding position, headwind, and grade and the KICKR will accurately model the power curve just as if you were riding outdoors.
COMPATIBILITY
From your phone, tablet or laptop to your bike computer, heart rate monitor or bike sensors, KICKR Smart Trainers offer the widest range of compatibility and connectivity.
- iOS must be running version 8 or newer
• Android 4.3 or newer and BLE enabled
• Mac requires ANT+ USB Stick or BLE enabled - Windows PC when paired with ANT+ USB Stick or BLE enabled
For a full list of KICKR compatible apps visit: www.wahoofitness.com/fitness-apps#kickr
Atlanta, GA 30342 United States
TELÉFONO:
natural_image
Two mechanical diagrams showing a device with rotating components and directional arrows, labeled (1) and (2), no text or symbols present.
natural_image
Mechanical assembly diagram showing a robotic arm interacting with a bracket (no text or symbols visible)

natural_image
Diagram of a mechanical or electrical component with directional arrows indicating motion (no text or symbols)Adapters Needed: A and B
135mm Configuration (Adapter B)
PARA EJES DE 142 MM O 148 MM
Adapters Needed: C and D
MONTAJE DE LA BICICLETA
natural_image
Mechanical assembly diagram showing a clamping device connected to a bracket (no text or symbols visible)natural_image
Pure mechanical diagram showing a lever and speaker without any text or symbolsAtlanta, GA 30342 United States
TÉLÉPHONE:
natural_image
Mechanical device diagram showing a fan-like structure with rotating components and a pointer indicating motion (no text or symbols)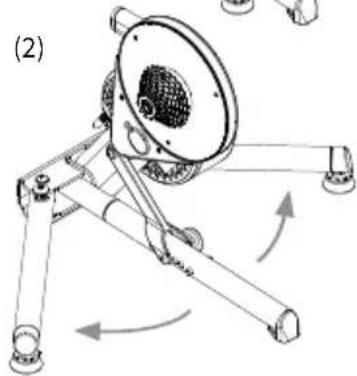
natural_image
Mechanical device with rotating components and directional arrows indicating motion (no text or symbols)
natural_image
Mechanical assembly diagram showing a bracket with bolts and a tool, labeled (3) (no text or symbols present)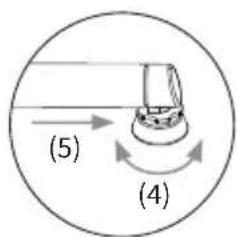
natural_image
Circular diagram showing a mechanical or electrical component with directional arrows, no readable text or symbols present.POUR UNE ATTACHE RAPIDE DE 130 MM OU 135 MM
Adapters Needed: A and B
POUR UN AXE TRAVERSANT DE 142 MM OU 148 MM
Adapters Needed: C and D
ATTACHER VOTRE VÉLO
natural_image
Mechanical assembly diagram showing a lever mechanism and a gear component (no text or symbols)
natural_image
Mechanical assembly diagram showing a clamping device with no visible text or symbolsnatural_image
Pure mechanical diagram showing a lever and speaker without any text or symbolsAtlanta, GA 30342 United States
TELEFONO:
natural_image
Technical line drawings of mechanical components including a motor, sensors, and a bracket (no text or symbols)
natural_image
Simple line drawing of a mechanical tool or lever with a handle and base (no text or symbols)(5)



natural_image
Mechanical device diagram showing a rotating wheel and shaft assembly (no text or symbols)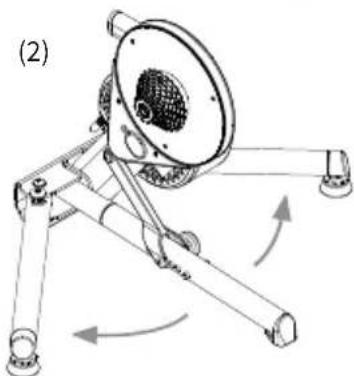
natural_image
Mechanical device with rotating arms and a central fan component, no visible text or symbols
natural_image
Mechanical assembly diagram showing a bracket with bolts and a tool, labeled (3) (no text or symbols present)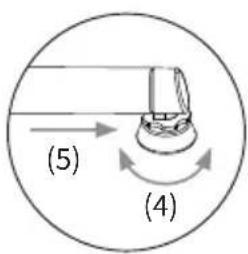

natural_image
Diagram of a rope knot with directional arrows indicating motion (no text or symbols)PER SGANCIO RAPIDO DA 130 MM O 135 MM
Adapters Needed: A and B
PER ASSE PASSANTE DA 142 MM O 148 MM
Adapters Needed: C and D
natural_image
Mechanical assembly diagrams showing two configurations of a switch mechanism (no text or labels)www.wahoofitness.com/support
질문이나 우려사항이 있으시면 연락
해주세요:
Wahoo Fitness
90 W. Wieuca Rd NE
Suite 110
Atlanta, GA 30342 United States
전화:
미국: 1-877-978-1112
natural_image
Mechanical assembly diagram showing two configurations of a device with rotating parts and directional arrows (no text or symbols)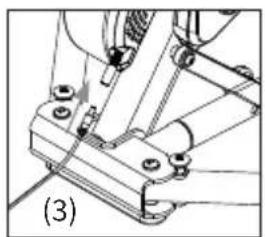
natural_image
Mechanical assembly diagram showing a bracket with bolts and a tool, labeled (3) (no text or symbols present)
natural_image
Diagram of a mechanical or electrical component with directional arrows indicating motion (no text or symbols)Adapters Needed: A and B
Adapters Needed: C and D
자전거 연결하기
natural_image
Mechanical assembly diagram showing a rotating shaft and housing with no visible text or symbols
natural_image
Mechanical assembly diagram showing a clamping device connected to a bracket (no text or symbols visible)natural_image
Pure mechanical diagram showing a lever and speaker without any text or symbolsAtlanta, GA 30342 United States
TELEFONNUMMERN:
USA: 1-877-978-1112
Deutschland: +49-30-568-373827
natural_image
Mechanical device diagram showing a cam mechanism with labeled parts (1) and (2), no readable text or symbols present.(2)

natural_image
Mechanical device with rotating arms and a central fan-like component (no text or symbols visible)
natural_image
Mechanical assembly diagram showing a bracket with bolts and a spring (no text or symbols)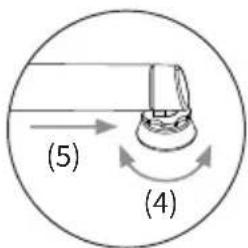

natural_image
Diagram of a rope knot with directional arrows indicating motion (no text or symbols)Adapters Needed: A and B
135mm Configuration (Adapter B)
FÜR 142 MM ODER 148 MM STECKACHSE
Adapters Needed: C and D
FAHRRAD BEFESTIGEN
natural_image
Mechanical assembly diagrams showing two configurations of a device with rotating components (no text or symbols)Atlanta, GA 30342 United States
电话:
美国: 1-877-978-1112
natural_image
Two mechanical diagrams showing a device with rotating components and directional arrows, labeled (1) and (2), no text or symbols present.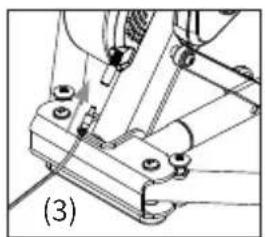
natural_image
Mechanical assembly diagram showing a bracket with bolts and a pin (no text or symbols)

natural_image
Diagram of a mechanical or electrical component with directional arrows indicating motion (no text or symbols)针对130MM或135MM快装板
Adapters Needed: A and B
针对142MM或148MM贯通轴
Adapters Needed: C and D
可配用适于自行车的12mm贯通轴。

连接您的自行车(安装到自行车上)
natural_image
Mechanical assembly diagram showing a bracket and gear assembly (no text or labels)natural_image
Pure mechanical diagram showing a lever and speaker without any text or symbolswww.wahoofitness.com/support
如有問題或顧慮,請聯絡我們:
Wahoo Fitness
90 W. Wieuca Rd NE
Suite 110
Atlanta, GA 30342 United States
電話:
美國: 1-877-978-1112
natural_image
Two mechanical diagrams showing a device with labeled parts and rotational motion arrows (no text or symbols)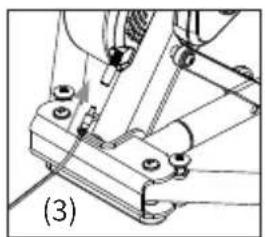
natural_image
Mechanical assembly diagram showing a robotic arm interacting with a bracket (no text or symbols visible)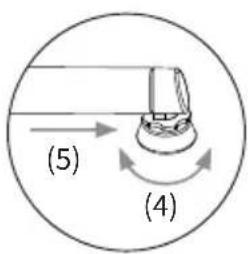
natural_image
Diagram of a mechanical or electrical component with directional arrows indicating motion (no text or symbols)針對130MM或135MM快裝板
Adapters Needed: A and B
針對142MM或148MM貫通軸
Adapters Needed: C and D
相容提供的自行車12mm貫通軸。
連接您的自行車
natural_image
Mechanical assembly diagram showing a clamping device with no visible text or symbols

natural_image
Pure mechanical diagram showing a lever and speaker without any text or symbolsAtlanta, GA 30342 United States
電話:
米国: 1-877-978-1112
natural_image
Technical line drawings of mechanical components including a motor, sensors, and a bracket (no text or symbols)natural_image
Simple line drawing of a mechanical tool or lever (no text or symbols)(5)

(6)*
(7)*
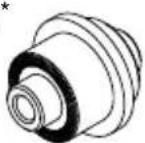
(8)

(9)

natural_image
Mechanical assembly diagram showing two configurations of a device with rotating components and directional arrows (no text or symbols)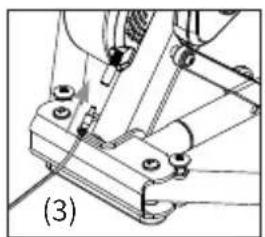
natural_image
Mechanical assembly diagram showing a bracket with bolts and a pin (no text or symbols)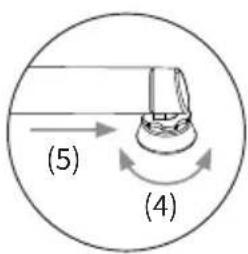

natural_image
Diagram of a mechanical device with rotating components and directional arrows, no readable text or symbolsAdapters Needed: A and B
Adapters Needed: C and D
自転車の取り付け

natural_image
Mechanical assembly diagram showing a clamping device with no visible text or symbolsnatural_image
Pure mechanical diagram showing a lever and speaker without any text or symbols


- KICKR Quick Start Guide
- See full instructions for complete setup.
- Thank you for purchasing the Wahoo KICKR!
- LEARN MORE:
- PLEASE CONTACT US WITH
- QUESTIONS OR CONCERNS AT:
- TELEPHONE:
- UNPACKING
- KICKR SETUP
- FOR 130MM OR 135MM QUICK RELEASE
- Adapters Needed: A and B
- FOR 142MM OR 148MM THRU AXLE
- Adapters Needed: C and D
- ATTACHING YOUR BICYCLE
- COMPLETE YOUR SETUP USING THE WAHOO FITNESS APP
- KICKR WORKOUT MODES:
- COMPATIBILITY
- TELÉFONO:
- PARA EJES DE 142 MM O 148 MM
- MONTAJE DE LA BICICLETA
- TÉLÉPHONE:
- POUR UNE ATTACHE RAPIDE DE 130 MM OU 135 MM
- POUR UN AXE TRAVERSANT DE 142 MM OU 148 MM
- ATTACHER VOTRE VÉLO
- TELEFONO:
- PER SGANCIO RAPIDO DA 130 MM O 135 MM
- PER ASSE PASSANTE DA 142 MM O 148 MM
- 자전거 연결하기
- TELEFONNUMMERN:
- FÜR 142 MM ODER 148 MM STECKACHSE
- FAHRRAD BEFESTIGEN
- 针对130MM或135MM快装板
- 针对142MM或148MM贯通轴
- 连接您的自行车(安装到自行车上)
- 如有問題或顧慮,請聯絡我們:
- 電話:
- 針對130MM或135MM快裝板
- 針對142MM或148MM貫通軸
- 連接您的自行車
- 電話:
- 自転車の取り付け
Brand : Wahoo
Model : Kickr Smart Bike Trainer
Category : Exercise bike