
EDGER - Gardening Tools HUSQVARNA - Free user manual and instructions
Find the device manual for free EDGER HUSQVARNA in PDF.

| Product type | Edger attachment for brushcutter/trimmer |
| Brand | HUSQVARNA |
| Model | EDGER |
| Usage | Creating clean edges along pathways and lawns |
| Compatibility | Approved HUSQVARNA brushcutters/trimmers (see machine manual) |
| Materials | Steel, reinforced plastic |
| Approximate weight | 1.5 kg |
| Tube length | Approximately 1.2 m |
| Blade | Steel knife, interchangeable |
| Cutting depth | Adjustable via locking screw (forward/backward) |
| Protection | Blade guard mandatory included |
| Safety | Safety distance 15 m, wear PPE, emergency stop |
| Lubrication | Flexible drive shaft every 30 hours of service |
| Maintenance | Check before each use, clean after work |
| Spare parts | Original HUSQVARNA spare parts recommended |
| Repairability | Assembly and disassembly possible by user, repairs by professional |
| Instructions | User manual supplied, 52 pages |
| Warranty | Standard manufacturer warranty (see terms) |
Frequently Asked Questions - EDGER HUSQVARNA
User questions about EDGER HUSQVARNA
0 question about this device. Answer the ones you know or ask your own.
Ask a new question about this device
Download the instructions for your Gardening Tools in PDF format for free! Find your manual EDGER - HUSQVARNA and take your electronic device back in hand. On this page are published all the documents necessary for the use of your device. EDGER by HUSQVARNA.
USER MANUAL EDGER HUSQVARNA
natural_image
Line drawing of a handheld device with a curved handle and circular head (no text or symbols)natural_image
Line drawing of a person wearing a hard hat and safety suit (no text or symbols)natural_image
Line drawing of a hand holding a mechanical device (no text or symbols)
text_image
Safety warning illustration showing a worker using a power tool and a prohibition symbol for the knee injury.text_image
Technical diagram showing a hand operating a mechanical device with directional control buttons and a magnified inset of a tool labeled 'FLI'.text_image
F G H J Knatural_image
Diagram of a mechanical device with a lever and handle, showing motion arrows (no text or symbols)
text_image
weight weight
WARNING!
text_image
Diagram showing a hand operating a pipe with water droplets, accompanied by an icon indicating directional control buttons.natural_image
Diagram of a mechanical lever system with a lever and pivot, showing motion direction (no text or symbols)
ADVARSEL!
natural_image
Line drawing of a person wearing a hard hat and safety gear (no text or symbols)natural_image
Line drawing of a hand holding a mechanical device (no text or symbols)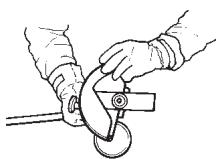
text_image
Safety warning illustration showing a worker using a tool to clean a machine, with a prohibition symbol below.text_image
Technical diagram showing a hand operating a mechanical component with directional indicators and control buttonsnatural_image
Diagram of a mechanical device with a lever and handle, showing motion arrows (no text or symbols)
natural_image
Line drawing of a person using a tool to clean or manage equipment (no text or symbols present)
ADVARSEL!
text_image
Diagram showing a mechanical clamp or connector with directional arrows and control buttons, likely illustrating a process or assembly.text_image
Diagram showing a hand holding a tool with a connector, alongside a control panel with directional arrows and a button labeled 'OFF'.
ADVARSEL!
natural_image
Line drawing of a person wearing a hard hat and safety suit (no text or symbols)natural_image
Line drawing of a hand holding a mechanical device (no text or symbols)
text_image
Safety warning illustration showing a worker using a power tool and a prohibition symbol for cleaning the machine.text_image
Diagram showing a hand operating a mechanical device with directional control buttons and a magnified view of the device's left side.text_image
Diagram showing a hand operating a valve with liquid droplets, accompanied by a directional control panel with '→' and 'STOP' buttons.natural_image
Diagram of a hand holding a tool with a mechanical component, no text or symbols present
VAROITUS!
natural_image
Line drawing of a person wearing a hard hat and safety suit (no text or symbols)natural_image
Line drawing of a hand holding a mechanical device (no text or symbols)
text_image
Safety warning illustration showing a worker using a power tool and a prohibition symbol for the wheel rim.text_image
Technical diagram showing a hand operating a mechanical component with directional indicators and control buttonstext_image
F G H J Ktext_image
Technical diagram showing two different manual labor processes: one using a cutting machine and the other cleaning a worker with a tool.
VAROITUS!
text_image
Diagram showing a hand operating a tool with arrows indicating direction and control buttons, including a speed limit symbol.natural_image
Diagram of a mechanical linkage with a lever and two connected components, no text or symbols present.
WARNUNG!
natural_image
Line drawing of a person wearing a helmet and safety gear (no text or symbols)natural_image
Line drawing of a hand holding a mechanical component (no text or symbols)
text_image
Safety warning illustration showing a worker using a power tool and a prohibition symbol for cleaning the machine.text_image
Technical diagram showing hand operating a mechanical component with directional control buttons and a magnified view of the device.text_image
Technical diagram of a mechanical assembly with labeled parts A through K, showing exploded and assembled views.text_image
Technical diagram showing two-step industrial process: tool positioning and worker cleaning with tool, with directional control buttons.
WARNUNG!
text_image
Diagram showing a hand operating a valve with liquid droplets, accompanied by an instructional panel with directional arrows.natural_image
Diagram of a robotic arm with articulated joints and a connecting rod, no text or symbols present
ATENÇÃO
natural_image
Line drawing of a person wearing a hard hat and safety gear (no text or symbols)natural_image
Line drawing of a hand holding a mechanical component (no text or symbols)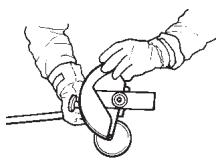
text_image
Safety warning illustration showing a worker using a power cutter and a prohibition symbol for cutting the cutter.text_image
Diagram showing a hand operating a mechanical device with directional arrows and control buttons, including a battery icon labeled 'B'.text_image
F G H J Ktext_image
Technical diagram showing two-step industrial cleaning procedure: hand operating machine and worker using tool
ATENÇÃO!
text_image
Diagram showing a mechanical clamp or lever mechanism with directional arrows and control buttons, likely illustrating a manual or mechanical operation.natural_image
Diagram of a hand holding a tool with a mechanical component, no text or symbols present
ATENCIÓN
natural_image
Line drawing of a person wearing a hard hat and safety gear (no text or symbols)natural_image
Line drawing of a hand holding a mechanical device (no text or symbols)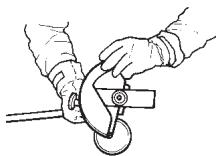
text_image
Safety warning illustration showing a worker using a tool to clean a machine and blocking equipment with a prohibition symbol.text_image
Technical diagram showing hands operating a mechanical device with directional control buttons and a magnified view of the device's motion.text_image
F G H J Ktext_image
Technical diagram showing two different manual labor processes: one using a tool to lift a machine, and another with a worker holding a bucket.
ATENCIÓN
text_image
Diagram showing a mechanical device with force application and control panel, including directional arrows and droplet symbolsnatural_image
Diagram of a mechanical device with a lever and attached motor, showing motion direction (no text or symbols)
WAARSCHUWING!
natural_image
Line drawing of a person wearing a full-body safety gear and helmet (no text or symbols)natural_image
Line drawing of a hand holding a mechanical device (no text or symbols)
text_image
Safety warning illustration showing a worker using a power tool and a prohibition symbol for cutting the cutter into a blade.text_image
Technical diagram showing a hand operating a mechanical device with directional indicators and control buttonstext_image
F G H J Knatural_image
Diagram of a mechanical device with rotating arms and a central shaft (no text or symbols)
natural_image
Line drawing of a person using a tool to lift a weight, with an arrow indicating downward motion (no text or symbols)
WAARSCHUWING!
text_image
Diagram showing a mechanical clamp or lever mechanism with directional control buttons and a water droplet symbol indicating flow or movement.natural_image
Simple line drawing of a mechanical device with a lever and handle, no text or symbols present
AVERTISSEMENT!
natural_image
Line drawing of a person wearing safety gear and helmet (no text or symbols)natural_image
Line drawing of a hand holding a camera lens (no text or symbols)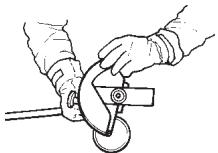
text_image
Safety warning illustration showing a worker using a tool to clean a toothbrush and a prohibition symbol for the tooth profile.text_image
Technical diagram showing a hand operating a mechanical device with directional control buttons and a magnified inset of a tool labeled 'Fillet'.text_image
F G H J Knatural_image
Diagram of a mechanical device with a lever and handle, showing motion direction (no text or symbols)
natural_image
Line drawing of a person using a tool to clean or wash material, no text or symbols present
AVERTISSEMENT!
natural_image
Diagram of a mechanical clamp or lever mechanism with arrows indicating motion, no text or symbols presentnatural_image
Diagram of a mechanical lever system with a hand and two connected components, no text or symbols present.
ATTENZIONE!
natural_image
Line drawing of a person wearing a hard hat and safety suit (no text or symbols)natural_image
Line drawing of a hand holding a mechanical device (no text or symbols)
text_image
Safety warning illustration showing a worker using a power tool and a prohibition symbol for the wheel rim.text_image
Diagram showing a hand using a tool to adjust a mechanical component, with directional arrows and control buttons in the background.text_image
F G H J Ktext_image
Technical diagram showing two-step cleaning or maintenance procedure: tool positioning and worker using a tool.
ATTENZIONE!
text_image
Diagram showing a mechanical clamp or connector being inserted into a cable, with directional arrows and control buttons visible.natural_image
Diagram of a hand holding a mechanical device with a scroll, no text or symbols present
WARNING!
This accessory may only be used together with the intended clearing saw/trimmer, see under heading “Approved accessories” in chapter “technical data” in the machine’s Operator’s Manual.
Edger

WARNING!
This accessory can cause serious personal injury. Read the safety instructions carefully. Learn how the machine should be used.
NOTE! Read the Operator's Manual before using the machine.
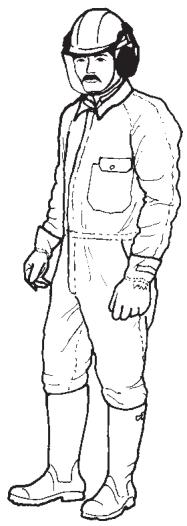
Personal protection
- Always wear boots, and the other safety equipment described in the section "Personal protective equipment".
• Always wear working clothes and heavy-duty, long trousers. - Never wear loose fitting clothes or jewellery.
- Persons with long hair should, for personal safety, put their hair up.

natural_image
Line drawing of a person wearing a full-body protective suit and helmet (no text or symbols)Safety instructions regarding the surroundings
- Never allow children to use the machine.
- Ensure no one comes closer than 15 metres when working.
- Never allow anyone else to use the machine without first ensuring that they have understood the contents of the Operator's Manual.
Safety instructions before starting work
- Inspect the working area. Remove loose objects such as stones, broken glass, nails, steel wire, string, etc. that can be thrown or become entangled in the blade or blade guard.
- Keep unauthorised persons at a distance. Children, animals, onlookers and helpers should be outside the safety zone of 15 meters (50 feet). Stop the machine immediately if anyone approaches.
- Check the entire machine before starting work. Replace damaged parts. Check for fuel leakage and that all safety guards and covers are complete and fastened securely. Check all nuts and bolts.
- Check the blade for cracks or any other damage.
- Ensure the blade guard is mounted and not damaged.
text_image
Technical diagram showing three-step tool application: grip, press, and cutting with directional arrows and control buttons.- Check that the blade and blade guard are correctly secured.
- When adjusting the carburettor make sure the blade is held against the ground and that no one is in the immediate vicinity.
- Make sure the blade does not rotate when idling.
- Make sure the handle and safety features are in order. Never use a machine that has parts missing or has been changed in relation to the specification.
- Ensure the edger is correctly attached to the machine.
- Only use the machine for the purpose it was intended for.
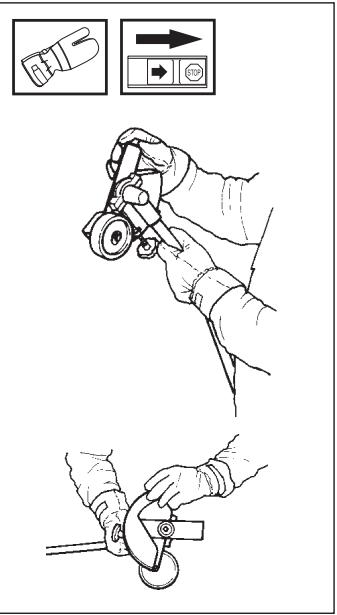
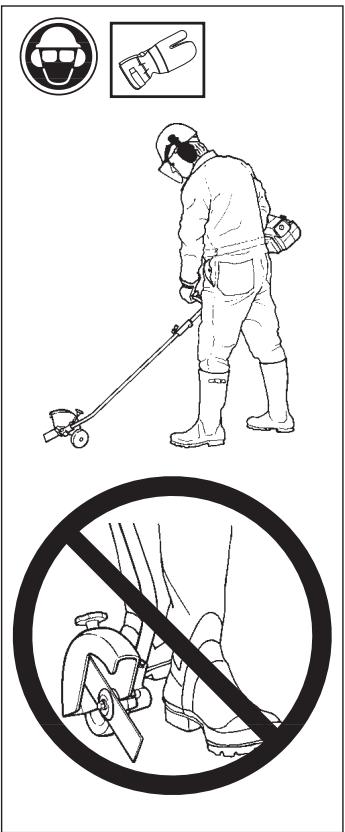
Safety instruction while working
• Always make sure you have a safe and firm foothold.
• Always hold the machine with both hands. Hold the machine to the right of the body.
- Make sure hands and feet do not come into contact with the blade when the engine is running.
- When the engine is switched off keep hands and feet well away from the blade until it has stopped.
text_image
Safety warning illustration showing a worker using a power tool and a prohibition symbol for the wheel rim.• Always keep the blade close to the ground.
- If heavy vibrations occur, stop the engine. Remove the spark plug cable from the spark plug. Check that the machine is not damaged. Repair any damage.
Safety instructions after completing work
- Ensure the blade has stopped before cleaning, carrying out repairs or an inspection. Remove the spark plug cable from the spark plug.
- Wear heavy-duty gloves when carrying out repairs on the edger.
- Store the machine out of reach of children.
- Only use original spare parts with repair.
text_image
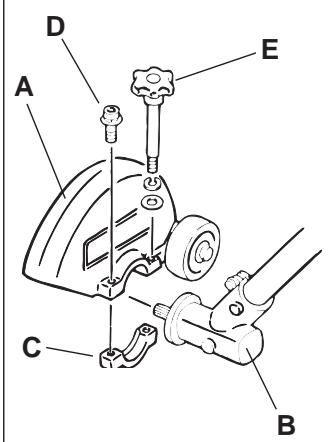
Technical diagram showing hand operating a mechanical device with directional control buttons and tool iconsAssembly of the blade guard and blade
First place the blade guard (A) on the angle gear (B), see the diagram. There is a slot on the guard that fits to a guide flange on the gear housing. Fit the clamp (C) on the opposite side against the guard, on the angle gear. The clamp also has a slot that fits to the gear's guide flange. Insert the bolt (D) and the locking handle (E) and pull together the clamp and guard. See the diagram. Do not tighten too hard. It should be possible for the blade guard to rotate on the gear housing. Rotate the guard on the gear housing until the hole on the gear housing for the locking pin (F) is visible. Fit the drive disc (G) on the gear housing axle and rotate the drive disc until the hole in the drive disc aligns with the hole in the gear housing. Insert the locking pin through the hole in the gear housing and into the hole in the drive disc. Fit the blade (H), washer (J) and tighten the bolt (K). The bolt has a left-hand thread. Tighten securely.
text_image
A D E C B
text_image
F G H J KNOTE! Do not forget to remove the locking pin before using the machine.

WARNING!
Under no circumstances may the edge cutter blade be used without the blade guard fitted.
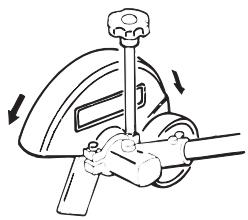
Adjusting the edger's cutting depth
The cutting depth should be adjusted before starting work. Loosen the locking handle (A) and rotate the guard (B) by moving the locking handle backwards or forwards. If the locking handle is moved forwards (from the machine) the cutting depth is increased. If the locking handle is moved backwards (towards the machine) the cutting depth is reduced.
natural_image
Diagram of a mechanical device with arrows indicating motion or force direction (no text or symbols)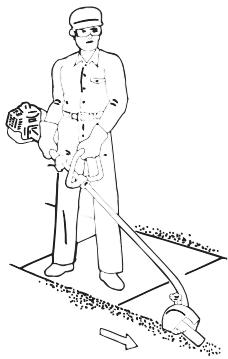
natural_image
Line drawing of a person in uniform spraying water on a surface, with no text or symbols present.
WARNING!
Always bear the machine on the right side of the body. Always wear protective glasses, long trousers and heavy-duty shoes when using the machine. Observe your surroundings, ensure people and animals do not come in the immediate vicinity or can be hit by thrown objects. Apply full throttle before the blade starts to work on the soil.
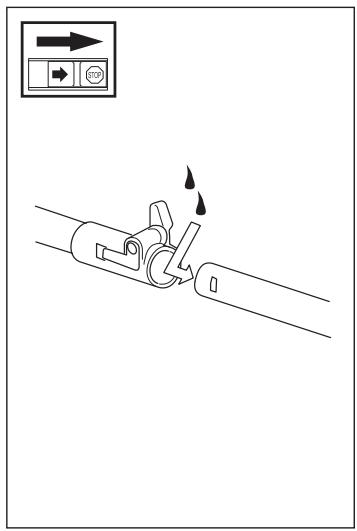
Two-part shaft
The end of the drive axle in the lower shaft should be lubricated with grease every 30 hours. There is a risk that the drive axle ends (splined coupling) on two-part shafts jam if they are not lubricated regularly.
text_image
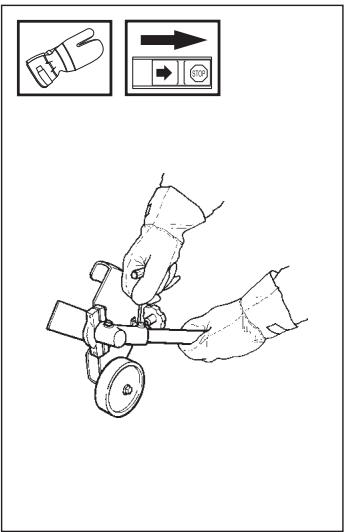
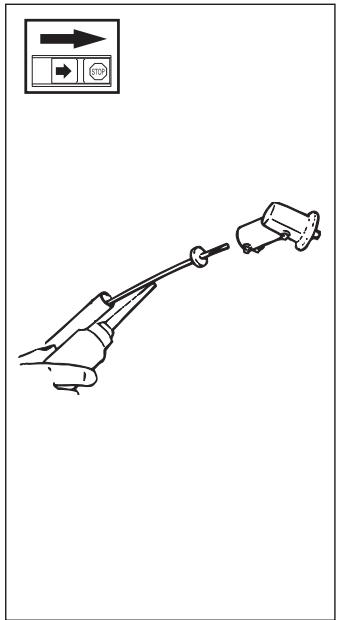
Diagram showing a mechanical clamp or lever mechanism with directional control buttons and motion indicatorsLubricating the flexible drive axle
Inside the edger's drive shaft is a flexible drive axle. The flexible drive axle should be regularly lubricated after 30 hours of operation. Loosen the two screws on the angle gear and remove it. The flexible drive axle is easily removed from the shaft by taking a firm grip on the axle end. Lubricate the flexible drive axle over its entire length and reinsert it in the shaft. Turn the axle while inserting it so that it correctly engages in the clutch. Replace the angle gear on the drive axle shaft and tighten the two screws.
natural_image
Diagram of a mechanical lever system with a lever and pivot, showing motion direction (no text or symbols)
ΠΡΟΣΟΧΗ!
natural_image
Line drawing of a person wearing a hard hat and safety vest (no text or symbols)natural_image
Line drawing of a hand holding a mechanical component (no text or symbols)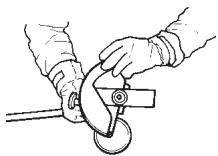
text_image
Safety warning illustration showing a worker using a power tool and a prohibition symbol for the electric toothbrush.text_image
Technical diagram showing a hand operating a mechanical device with directional control buttons and a magnified inset of the device's left side.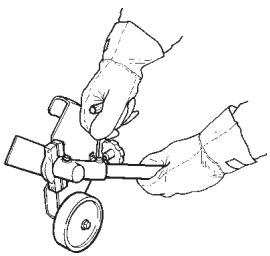
natural_image
Line drawing of two hands operating a small mechanical device (no text or symbols present)text_image
F G H J Knatural_image
Diagram of a mechanical device with a lever and handle, showing motion arrows (no text or symbols)
natural_image
Line drawing of a person using a tool to lift a ball, with an arrow indicating motion (no text or symbols)