
NZ 280 Auto-Off - Iron ECG - Free user manual and instructions
Find the device manual for free NZ 280 Auto-Off ECG in PDF.


| Product Type | Steam Iron |
| Brand | ECG |
| Model | NZ 280 Auto-Off |
| Power Input | 2600 W |
| Nominal Voltage | 230 V ~ 50/60 Hz |
| Water Tank Capacity | 330 ml |
| Temperature Settings | Low, Medium, High (according to fabric) |
| Steam Functions | Dry, Steam, Spray, Steam Burst, Vertical Steam |
| Auto Shut-off | Yes (30s horizontal, 8 min vertical) |
| Anti-Calc System | Yes (filters minerals) |
| Anti-Drip System | Yes (prevents water leakage at low temperature) |
| Self-Cleaning Mode | Yes (recommended every 14 days) |
| Soleplate Material | Not specified (likely stainless steel or non-stick) |
| Safety Features | Auto shut-off, overheat protection, do not immerse |
| Care Instructions | Use distilled or boiled water; clean with damp cloth; do not immerse |
| Repairability | Professional service centre for repairs; no user-serviceable parts |
| Weight | Not specified (estimated ~1.2 kg) |
| Dimensions | Not specified |
Frequently Asked Questions - NZ 280 Auto-Off ECG
User questions about NZ 280 Auto-Off ECG
0 question about this device. Answer the ones you know or ask your own.
Ask a new question about this device
Download the instructions for your Iron in PDF format for free! Find your manual NZ 280 Auto-Off - ECG and take your electronic device back in hand. On this page are published all the documents necessary for the use of your device. NZ 280 Auto-Off by ECG.
USER MANUAL NZ 280 Auto-Off ECG
natural_image
Electric iron with green and black casing, labeled ECG (no additional text or symbols visible)NZ 280 auto-off
NAPAŘOVACÍ ŽEHLIČKA
NÁVOD K OBSLUZE
NAPAROVACIA ŽEHLIČKA
NÁVOD NA OBSLUHU
ŻELAZKO NA PARE
INSTRUKCJA OBSŁUGI
GÖZÖLÖS VASALÓ
HASZNÁLATI ÚTMUTATÓ
DAMPFBÜGELEISEN
BEDIENUNGSANLEITUNG
STEAM IRON
INSTRUCTION MANUAL
PARNO GLAČALO
UPUTE ZA UPORABU
PARNI LIKALNIK
NAVODILA
PEGLA NA PARU
UPUTE ZA UPORABU
AURUTRIIKRAUD
KASUTUSJUHEND
GARU LYGINTUVAS
INSTRUKCIJŲ VADOVAS
TVAIKA GLUDEKLIS
ROKASGRÄMATA
CZ
SK
PL
HU
DE
GB
HR/BIH
SI
SR/MNE
ET
LT
LV
POPIS / POPIS / OPIS / A KÉSZÜLÉK RÉSZEI / BESCHREIBUNG / DESCRIPTION / OPIS / OPIS / OPIS / KIRJELDUS / APRAŠYMAS / APRAKSTS
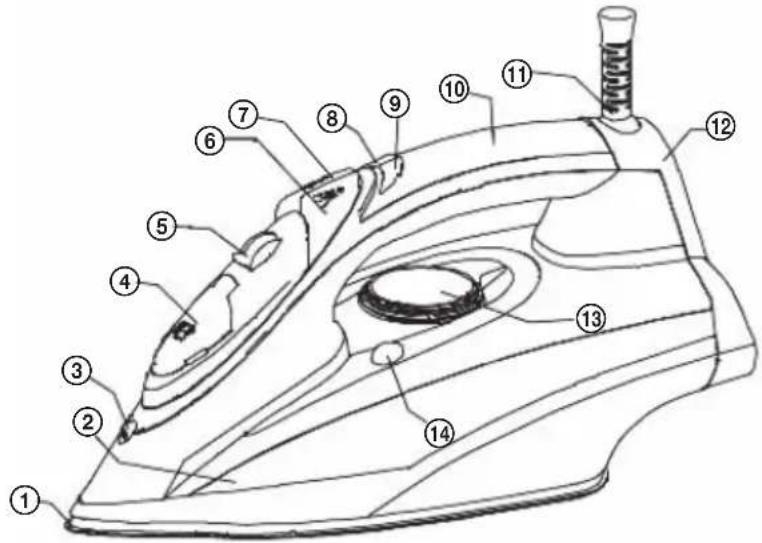
CZ
- Ironing surface with holes for steaming
- Water container
- Sprinkling jet
- Filling hole lid
- Steam regulator
- Watering button
- Steam burst button
- Off/temperature indicator light
- ON indicator light
- Handle
- Power input protection
- Back cover
- Temperature control
- Cleaning button
HR/BIH
-
Površina za glačanje s otvorima za paru
-
Spremnik za vodu
-
Raspršivač
-
Poklopac lijevka
-
Regulator pare
-
Tipka za štrcanje
-
Tipka za mlaz pare
-
Kontrolna žaruljica automatskog isključivanja
-
Kontrolna žaruljica
-
Ručka
-
Štitnik naponskog kabela
-
Stražnji poklopac
-
Regulacija temperature
-
Tipka za čišćenje
SI
Pozor, horúci povrch!
Do not immerse the appliance body in water! – Telo spotrebiča neponárajte do vody!
POKYNY NA POUŽITIE
Read carefully and save for future use!
Warning: The safety measures and instructions, contained in this manual, do not include all conditions and situations possible. The user must understand that common sense, caution and care are factors that cannot be integrated into any product. Therefore, these factors shall be ensured by the user/s using and operating this appliance. We are not liable for damages caused during shipping, by incorrect use, voltage fluctuation or the modification or adjustment of any part of the appliance.
To protect against a risk of fire or electric shock, basic precautions shall be taken while using electrical appliances, including the following:
- Make sure the voltage in your outlet corresponds to the voltage provided on the appliance label and that the socket is properly grounded. The outlet must be installed according to valid safety instructions.
-
Do not operate iron with a damaged cord. All repairs including cord replacements shall be performed by a professional service centre! Do not remove protective covers of the appliance, risk of electric shock!
-
Protect the appliance against direct contact with water and other liquids, to prevent potential electric shock.
-
Close supervision is necessary for operating the steam iron near children! Keep the iron and its power cord away from children younger than 8 years of age when plugged in or cooling off.
-
Do not leave the iron running unattended.
-
Do not operate the steam iron outdoors or in a moist environment and do not touch the cord or appliance with wet hands. Risk of electric shock.
-
The iron shall not be used if it has fallen and has visible signs of damage or is not tight.
-
Use the iron only on stable fl at surfaces.
-
Always disconnect iron from electrical outlet when fi ling with water or emptying.
-
Leaving the iron cord connected to outlet unattended is not recommended. Disconnect the cord from the electrical outlet prior to performing maintenance. Do not pull the cord from the outlet by yanking the cord. Unplug the cord from the outlet by grasping the plug.
-
Do not use the iron near infl ammable items or underneath them, for example, near curtains. Buns can occur from touching hot metal parts, hot water, or steam. Use caution when you turn a steam iron upside down – there may be hot water in the reservoir.
-
Do not allow the cord to touch hot surfaces or lead the cord over sharp edges.
-
Unplug the appliance immediately after you are done using it and let the iron cool completely before putting away.
-
Only use the iron with distilled water or boiled water. Do not fill the iron with other liquids.

Caution: Hot surface
-
Do not use any chemical additives, aromatic substances or descaling means and other accessories, not recommended by the manufacturer. You risk losing the warranty by not observing these instructions.
-
Use the iron only in accordance with the instructions given in this manual. This steam iron is intended for domestic use only. The manufacturer is not liable for damages caused by the improper use of this appliance.
-
This appliance can be used by children ages 8 and older and by the physically and mentally impaired or by individuals with insufficient experience and knowledge, if supervised or trained to use the appliance in a safe manner and understand potential dangers. Children shall not play with the appliance. Cleaning and maintenance operations performed by the user shall not be carried out by children without supervision.
Do not immerse the appliance body in water!
OPERATING INSTRUCTIONS
Before putting into operation
Remove the protective foil from the soleplate first! The iron must be used and stored on a stable surface.
When ironing for the first time, heat the iron to the highest degree without using water. During this process, smoke and bad smell may come from the iron, though will vanish shortly. The water reservoir can be filled afterwards. After filling and heating the iron, leave it to produce steam for at least 1 minute while occasionally pressing the steam button. This removes any residue from production. We recommend trying the iron on some common fabric, e.g. a dish towel, prior to using it on your laundry for the first time.
Filling the water tank
Be sure the iron is unplugged from the electrical outlet before filling with water!
Hold the iron in a tilted position, switch the steam control to "min" and pour water into the open filling hole up to the max symbol. You can use distilled water or tap water in the iron. Do not fill the iron with water directly from the tap, use the container supplied with the iron!
GB
Temperature settings
Before ironing, sort the garments according to the international textile care and labeling codes found on tags. If these are missing, separate the garments based on the type of fabric.
| Laundry tag Type of fabric Temperature control | |||
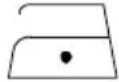 | Chemical fi bresse.g. polyester, viscose | •low temperature | |
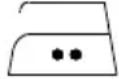 | Silk, wool | ••medium temperature | |
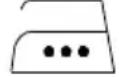 | Cotton, fl ax | •••high temperature | |
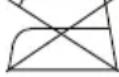 | Fabrics which can not be ironed | ||
We recommend ironing fabrics with uncommon surfaces (e.g. filters, embroidery, printings etc.) at the lowest temperature.
As far as mixes are concerned (e.g. 40% cotton, 60% synthetic material), set the temperature control according to the fabric requiring the lower temperature.
If you are not sure of the fabric composition, determine the suitable temperature by performing a test on the least noticeable part of clothing. Begin with the lowest temperature and slowly increase until the ideal temperature is achieved.
Never iron spots with traces of perspiration etc.: heat from the iron fixates fabric stains which cannot be removed.
Removing grease stains is more effect using a dry iron at medium temperature: excessive heat burns the grease and could result in the formation of yellow stains.
Iron silk, wool and synthetic fabrics inside out to prevent shiny stains from appearing.
Iron velvet fabrics in one direction (in the direction of fibres) and do not press on the iron to prevent shiny stains from appearing.
The more laundry put into the washing machine, the more wrinkled the laundry will be. Laundry will also wrinkle more during high speed centrifugation.
Many fabrics are easier to iron if not completely dry. For example, silk should always be ironed moist.
Use the temperature control to set the ironing temperature according to the type of fabric. A lit indicator signals the heat-up process of the soleplate. The indicator light going out signals the required temperature has been reached and the ironing process can begin.
The plate temperature indicator occasionally lights up when ironing, indicating the temperature setting is maintained. After finishing your ironing at a high temperature and reducing the temperature, do not continue using the iron until the soleplate temperature indicator lights up again.
Note: Since the cooling process takes longer than the heating process, ironing fabrics requiring lower temperatures first is recommended. This way you eliminate the risk of burning the fabric.
IRONING AND STEAMING
Spraying
Press the sprinkling button to dampen hard to remove creases. Make sure there is enough water in the tank.
Ironing without steam
To use as a dry iron, set the steam control to the steam out off position and set the temperature according to the type of fabric.
Ironing with steam
Set the temperature control to … or MAX and the steam control to the steam out off position. As soon as the heating indicator switches off, set the steam control to the desired value. Steam will begin to emit from the iron plate, you may now begin to iron.
Ironing with the steam burst
Press the spray button to iron hard to remove creases with a strong steam spray.
For fine fabrics, we recommend moistening the fabric or to inserting a damp cloth between the fabric and iron before using the spray function.
Vertical steam burst
Hold the iron in an upright position and hold the spray button down to iron and straighten creased drapes, curtains, clothes etc. Wait a few seconds before pressing again. The spray function is only available at high temperatures. Stop using the spray function as soon as the soleplate temperature indicator lights up. Continue ironing only after the indicator light goes out.
Attention: Never direct the steam at persons or animals.
OTHER FUNCTIONS
ANTI-CALC system
The anti-calc feature filters minerals contained in the water and prevents them from settling in the steam chamber.
ANTI-DRIP system
The iron automatically stops the steam output when the temperature is too low to prevent water leaking from the ironing area when the temperature is low.
The iron can cool down to a temperature at which the steam process is not carried out, however, drops of boiling water can cause stains. The anti-drip system is automatically activated in cases like this, preventing the vaporization process so you can iron even the finest of fabrics without the risk of staining or damaging them.
Self-cleaning mode
Attention: Perform the procedure above a sink or other suitable area.
Fill the iron tank using the supplied container to the maximum level, turn on the iron and set the temperature control to the maximum temperature. After about 3 minutes, press 14 auto-cleaning for about 1 minute. The steam chamber will be cleaned with a flow of steam and hot water. We recommend repeating this procedure every 14 days.
Auto shut-off mode
If the iron is idle for a pre-defined time period, it will go into "auto shut-off" mode to save energy. Period for going into the auto shut-off mode: 30 seconds in the horizontal position and 8 minutes in the vertical position. Simply move the iron to restore normal mode. A sound and visual signal will inform you that the appliance has been reactivated.
CLEANING, MAINTENANCE AND STORAGE
After you have finished using the iron, open the nozzle lid, pour out the remaining water, set the steam control to minimum and the temperature control to minimum. Always make sure the steam iron is completely cooled, clean and dry before putting it away. Store the iron in an upright position.
Disconnect the appliance from the electrical output prior to performing any maintenance. Cleaning shall always be performed on a cooled appliance!
Remove any sediments, starch residue or softener using a moist (or wet) dish towel or a fine liquid cleaning agent and dry with soft dry fabric. Using wire wool or metal objects can scratch the soleplate. Never clean the iron under running water, do not rinse or immerse the iron into water!
GB
TECHNICAL DATA
Water tank capacity 330 ml
Nominal voltage: 230 V\~ 50/60 Hz
Nominal input power: 2600 W
USE AND DISPOSAL OF WASTE
Wrapping paper and corrugated paperboard – deliver to scrapyard. Packing foil, PE bags, plastic elements – throw into plastic recycling containers.
DISPOSAL OF PRODUCTS AT THE END OF LIFETIME
Disposal of electric and electronic equipment (valid in EU member countries and other European countries with an implemented recycling system)
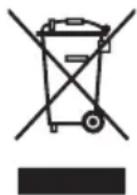
The represented symbol on the product or package means the product shall not be treated as domestic waste. Hand over the product to the specified location for recycling electric and electronic equipment. Prevent negative impacts on human health and the environment by properly recycling your product.
Recycling contributes to preserving natural resources. For more information on the recycling of this product, refer to your local authority, domestic waste processing organization or store, where you purchased the product.
This product complies with EU directive requirements on electromagnetic compatibility and electrical safety.
The instruction manual is available at website www.ecg-electro.eu.
Changes in text and technical parameters reserved.
08/05
SIGURNOSNE UPUTE
Pozor, vroča površina!
Do not immerse the appliance body in water! – Trupa aparata ne potapljajte v vodo!
NAPOTKI ZA UPORABO
Hoiatus: Kuum pealispind
Do not immerse the appliance body in water! – Ärge sukeldage seadme korpust vette!
KASUTUSJUHISED
PEČAT I POTPIS PRODAVATELJA
K+B Progres
PROIZVAJALEC ali DAJALEC GARANCIJE:
K+B Progres, a.s.; MBS: 61860123



- NZ 280 auto-off
- NAPAŘOVACÍ ŽEHLIČKA
- NAPAROVACIA ŽEHLIČKA
- ŻELAZKO NA PARE
- GÖZÖLÖS VASALÓ
- DAMPFBÜGELEISEN
- STEAM IRON
- PARNO GLAČALO
- PARNI LIKALNIK
- PEGLA NA PARU
- AURUTRIIKRAUD
- GARU LYGINTUVAS
- TVAIKA GLUDEKLIS
- POPIS / POPIS / OPIS / A KÉSZÜLÉK RÉSZEI / BESCHREIBUNG / DESCRIPTION / OPIS / OPIS / OPIS / KIRJELDUS / APRAŠYMAS / APRAKSTS
- CZ
- HR/BIH
- SI
- POKYNY NA POUŽITIE
- Read carefully and save for future use!
- Do not immerse the appliance body in water!
- OPERATING INSTRUCTIONS
- Before putting into operation
- Filling the water tank
- Be sure the iron is unplugged from the electrical outlet before filling with water!
- GB
- Temperature settings
- IRONING AND STEAMING
- Spraying
- Ironing without steam
- Ironing with steam
- Ironing with the steam burst
- Vertical steam burst
- OTHER FUNCTIONS
- ANTI-CALC system
- ANTI-DRIP system
- Self-cleaning mode
- Auto shut-off mode
- CLEANING, MAINTENANCE AND STORAGE
- TECHNICAL DATA
- USE AND DISPOSAL OF WASTE
- DISPOSAL OF PRODUCTS AT THE END OF LIFETIME
- SIGURNOSNE UPUTE
- NAPOTKI ZA UPORABO
- KASUTUSJUHISED
- K+B Progres
Brand : ECG
Model : NZ 280 Auto-Off
Category : Iron