
TK 2010 TC - Oven ECG - Free user manual and instructions
Find the device manual for free TK 2010 TC ECG in PDF.


| Product Type | Electric Convector Heater |
| Model | TK 2010 TC |
| Brand | ECG |
| Power Supply | 220-240 V~ 50 Hz |
| Max Power Input | 2000 W |
| Power Settings | 750 W / 1250 W / 2000 W |
| Heating Technology | Hot air convection with built-in ventilator |
| Thermostat | Smooth thermostat regulation |
| Timer | 24-hour programmable timer (15-minute intervals) |
| Turbo Function | Yes, for faster room heating |
| Installation | Free-standing or wall-mounted (with included kit) |
| Safety Features | Internal thermal fuse, overheat protection, cool-touch exterior |
| Usage Environment | Indoor use only, away from water and flammable materials |
| Clearance Requirements | At least 90 cm from surrounding objects |
| Controls | Power level buttons, timer dial, thermostat knob, slide switch (permanent/timer/off) |
| Package Contents | Heater, 2 base pieces, 4 screws, wall mounting kit, manual |
| Cleaning | Wipe exterior with damp cloth; unplug and cool before cleaning |
| Warranty | Standard manufacturer warranty (details not specified) |
| Compliance | EU directives on electromagnetic compatibility and electrical safety |
Frequently Asked Questions - TK 2010 TC ECG
User questions about TK 2010 TC ECG
0 question about this device. Answer the ones you know or ask your own.
Ask a new question about this device
Download the instructions for your Oven in PDF format for free! Find your manual TK 2010 TC - ECG and take your electronic device back in hand. On this page are published all the documents necessary for the use of your device. TK 2010 TC by ECG.
USER MANUAL TK 2010 TC ECG
natural_image
Exterior view of a white ECG power supply unit with perforated panel and control knobs (no visible text or symbols)TK 2010 TC
KONVEKTOR
NÁVOD K OBSLUZE
KONVEKTOR
NÁVOD NA OBSLUHU
GRZEJNIK KONWEKTOROWY
INSTRUKCJA OBSŁUGI
KONVEKTOR
HASZNÁLATI ÚTMUTATÓ
KONVEKTOR
BEDIENUNGSANLEITUNG
HEAT CONVECTOR
INSTRUCTION MANUAL
ELEKTRIČNA GRIJALICA
UPUTE ZA UPORABU
KONVEKTOR
NAVODILA ZA UPORABO
CZ
SK
PL
HU
DE
GB
HR/BIH
SI
CZ
Do not immerse in water! – Neponořovat do vody!
INSTALACE

- Program ZAPNUTO: 12:00.
- Program VYPNUTO: 13:00.
natural_image
Close-up of a circular mechanical dial with numbered segments and a central knob, showing no readable text or symbols.natural_image
Close-up of a circular mechanical dial with numbered segments and a central knob, showing no text or symbols.Read carefully and save for future use!
Warning: The safety measures and instructions, contained in this manual, do not include all conditions and situations possible. The user must understand that common sense, caution and care are factors that cannot be integrated into any product. Therefore, these factors shall be ensured by the user/s using and operating this appliance. We are not liable for damages caused during shipping, by incorrect use, voltage fluctuation or the modification or adjustment of any part of the appliance.
To protect against a risk of fire or electric shock, basic precautions shall be taken while using electrical appliances, including the following:
- Make sure the voltage in your outlet corresponds to the voltage provided on the appliance label and that the socket is properly grounded. The outlet must be installed according to valid safety instructions.
- Do not operate the device if damaged or with a damaged cord. All repairs including cord replacements shall be performed by a professional service centre! Do not remove protective covers of the appliance, risk of electric shock!
- Protect the device against direct contact with water and other liquids, to prevent potential electric shock.
- Do not operate the convector outdoors or in a moist environment and do not touch the cord or appliance with wet hands. Risk of electric shock.
- Close supervision is necessary for operating the heat convector near children!
- Do not use the heat convector near inflammable items or underneath them, for example, near curtains. The temperature of surfaces near the heat convector (0.9 m) can be hotter than usual. Place the heat convector out of reach of other objects to ensure sufficient air circulation needed for its proper operation. Do not cover the heat convector vent!
- Do not use this convector with a program, timer, independent remote control system or any other device, which switches the convector on automatically. Risk of fire if the convector is covered or incorrectly positioned.
- Do not use the convector in the immediate vicinity of a bathtub, shower or swimming pool.
- If an unusual smell or smoke begins to come from the device, disconnect the device immediately and visit a service centre.
- Do not turn the device on or off by plugging or unplugging the power cord. Always turn the heat convector off using the main switch; afterwards you may unplug the cord from the outlet!
- Leaving the heat convector cord connected to outlet unattended is not recommended. Disconnect the cord from the electrical outlet prior to performing maintenance. Do not pull the cord from the outlet by yanking the cord. Unplug the cord from the outlet by grasping the plug.
- Do not allow the cord to touch hot surfaces or lead the cord over sharp edges.
- Do not use the convector in the vicinity of paint, gasoline, solvents or other inflammables!
- The device is equipped with an internal thermal fuse which switches the convector off if overheated. The fuse will switch on again after the heater has cooled down.
- Do not put your fingers or other objects into the openings of the heat convector.
- Use the heat convector only in accordance with the instructions given in this manual. The manufacturer is not liable for damages caused by the improper use of this appliance.
- Children younger than 3 years old should be prevented from access to the appliance unless they are constantly under supervision. Children aged 3 to 8 years old should switch on/off the appliance only if it was placed or installed in its intended normal operating position, and if they are supervised or instructed on the safe use of the product and understand the potential dangers. Children aged 3 to 8 years old may not insert the plug into the outlet, regulate and clean the appliance or perform user's maintenance.
WARNING: Under no circumstances should you operate the heater standing without the base attached.
Do not immerse in water!
INSTALLATION
Make sure the package contains all parts necessary for assembling the convector. Contact your vendor if this is not the case.
Package contents:
- Heat convector: 1 piece
- Base: 2 pieces
- Attachment screws: 4 pieces
- Operating manual: 1 piece
- Assembly kit for wall attachment
Unplug the device, prior to any form of manipulation, to prevent injury by electric shock.
WARNING: Under no circumstances should you operate the heater standing without the base attached.
Installation requirements
Place the convector on a flat surface with a sufficient amount of space around the appliance to ensure the proper function of exhaust vents

The distance between the device and surrounding objects must be at least 90 cm.
CAUTION: To prevent the device from overheating, do not cover the heater. The heater must not be placed directly under an outlet.

DO NOT COVER!
WARNING: Some parts of this product can become very hot and cause burns. Special attention has to be paid in the presence of children and handicapped people.
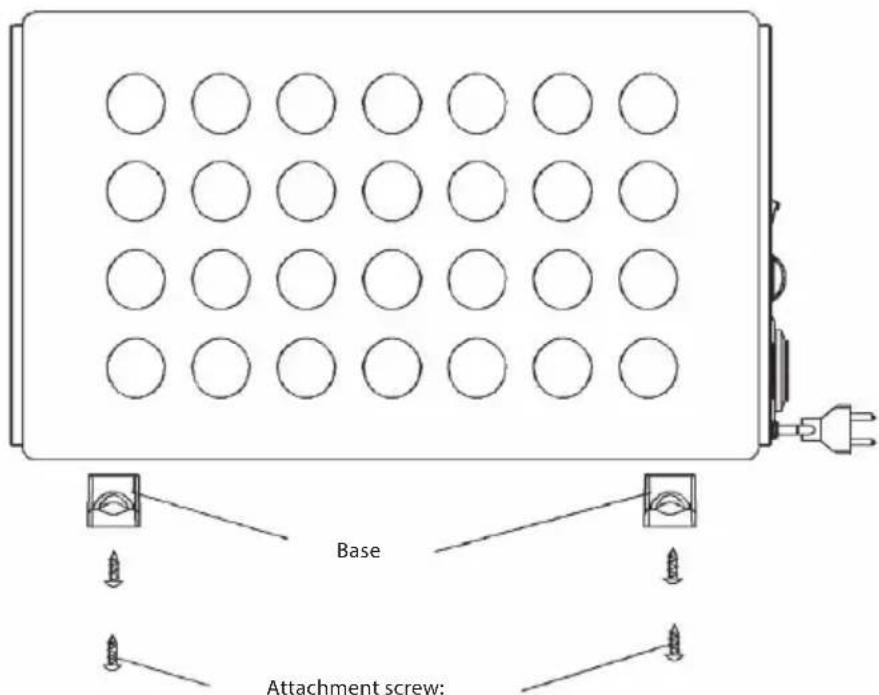
- Place the convector on a fl at surface.
-
Press the base pegs into the holes found on the bottom part of the convector.
-
Tighten the screws carefully and check to see the convector is stable.
USING THE APPLIANCE
This convector uses hot air technology with temperature regulation. It is also equipped with the Turbo function. Temperature control regulates the temperature of the convector. Turn the power control to set the required level: You may also use the Turbo button to heat the room faster.
3 power levels can be set using the ON/OFF buttons
1 = power of 750 W
2 = power of 1250 W
1+2 = power of 2000 W
The device shall only be handled when turned off via the main switch and disconnected from the network outlet.
TIMER
GB
The convector is equipped with an interval 24 hour timer.
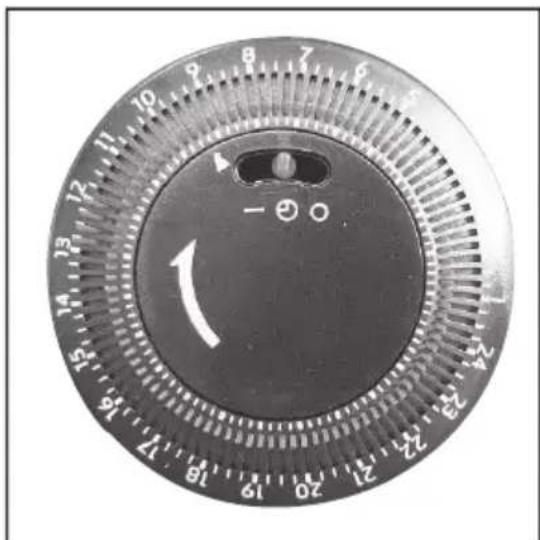
Turn the dial to the right to set the current time by the arrow symbol.
The dial is divided into 96 segments. Each segment represents 15 minutes. The timer switches ON or OFF every 15 minutes according to whether the segment is active (pulled out) or inactive (pushed in).
The timer is equipped with a three-position slide switch ( —)∅ ○
The middle position ( ) of the timer switches the heater on or off according to the position of segments (see Setting the timer below).
The “—” position switches the heating on permanently. The timer remains active but does not effect heating operation. You must switch the heating off by changing the slide switch to “○”. In this position, the appliance is not powered but the timer remains active without aff ecting the heating operation.
Setting the timer
Make sure the slide switch is in hour position ( )
The time is clearly indicated along the outside of the dial in 24 hour format. Turn the outer ring of the dial to the right so the current time is shown next to the arrow symbol.
Example of setting the timer for controlled heating:
- Set the current time to 9:00.
- Program ON: 12:00.
- Program OFF: 13:00.
Change the switch to ⏻.
Now push 4 segments between hours 12 and 13 out towards the outer edge of the ring. (See following picture.)
Set the time for when the timer shall start by pulling out the segments surrounding the ring.
Heating will be active every day for the times set. Remember that heating shall be permanently connected to the network, switches and segments shall be in the proper position and the thermostat shall be set to ensuring the heating actually starts.
For permanent heating, the switch shall be set to " "
To use the timer function, set the switch back to the middle position (①)
natural_image
Close-up of a circular mechanical dial with numbered segments and a central knob, showing no readable text or symbols.Note: When using the timer, keep in mind the heater can start without supervision.
CLEANING AND MAINTENANCE
Unplug the device and let it cool down before cleaning. Clean the outer surface of the convector with a damp cloth. Do not use sharp or abrasive agents to clean the device, otherwise the surface of the convector can become damaged.
The convector can be put away only after it has been properly turned off via the main switch, disconnected from the outlet and cooled down.
TECHNICAL INFORMATION
Max. input power 2000 W
3 settings 750 / 1250 / 2000 W
Built-in ventilator
24 hour timer
Smooth thermostat regulation
Thermal fuse
Free-standing
Possible installation to the wall
Nominal voltage: 220–240 V\~ 50 Hz
Nominal input power: 1800–2000 W
GB
USE AND DISPOSAL OF WASTE
Wrapping paper and corrugated paperboard – deliver to scrapyard. Packing foil, PE bags, plastic elements – throw into plastic recycling containers.
DISPOSAL OF PRODUCTS AT THE END OF LIFETIME
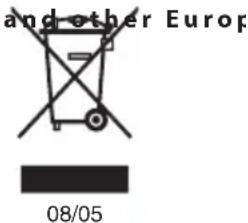
Disposal of electric and electronic equipment (valid in EU member countries and other Europe countries with an implemented recycling system)
The represented symbol on the product or package means the product shall not be treated as domestic waste. Hand over the product to the specified location for recycling electric and electronic equipment. Prevent negative impacts on human health and the environment by properly recycling your product. Recycling contributes to preserving natural resources. For more information on the recycling of this product, refer to your local authority, domestic waste processing organization or store, where you purchased the product.
This product complies with EU directive requirements on electromagnetic compatibility and electrical safety.

The instruction manual is available at website www.ecg-electro.eu. Changes in text and technical parameters reserved.
SIGURNOSNE UPUTE
natural_image
Close-up of a circular mechanical dial with numbered segments and a central knob, showing no text or symbols.Napomena: Kod uporabe timera, imajte na umu da se grijanje može samo uključiti
ČIŠĆENJE I ODRŽAVANJE
Prije čišćenja izvucite naponski kabel iz utičnice i pričekajte dok se grijalica potpuno ne ohladi. Površinu grijalice očistite vlažnom krpom. Za čišćenje ne upotrebljavajte oštre predmete ni abrazivna sredstva za čišćenje jer možete oštetiti površinu grijalice.
Grijalicu možete spremiti nakon što ju isključite pritiskom na glavni prekidač, izvučete naponski kabel iz utičnice te kada se potpuno ohladi.
TEHNIČKE INFORMACIJE
Max. radna snaga 2000 W
natural_image
Close-up of a circular mechanical dial with numbered segments and a central knob, showing no text or symbols.PEČAT I POTPIS PRODAVATELJA
PROIZVAJALEC ali DAJALEC GARANCIJE:
K+B Progres, a.s.; MBS: 61860123

- TK 2010 TC
- KONVEKTOR
- GRZEJNIK KONWEKTOROWY
- HEAT CONVECTOR
- ELEKTRIČNA GRIJALICA
- CZ
- INSTALACE
- Read carefully and save for future use!
- INSTALLATION
- Package contents:
- Installation requirements
- DO NOT COVER!
- USING THE APPLIANCE
- TIMER
- GB
- Setting the timer
- CLEANING AND MAINTENANCE
- TECHNICAL INFORMATION
- USE AND DISPOSAL OF WASTE
- DISPOSAL OF PRODUCTS AT THE END OF LIFETIME
- SIGURNOSNE UPUTE
- ČIŠĆENJE I ODRŽAVANJE
- TEHNIČKE INFORMACIJE
Brand : ECG
Model : TK 2010 TC
Category : Oven