
43K307BF - TV TESLA - Free user manual and instructions
Find the device manual for free 43K307BF TESLA in PDF.


| Product Type | LED TV |
| Screen Size | 43 inches (109 cm) |
| Resolution | 1920 x 1080 (Full HD) |
| Refresh Rate | 60 Hz |
| Backlight Type | Direct LED |
| Dimensions (with stand) | 97 x 57 x 18 cm |
| Dimensions (without stand) | 97 x 57 x 8 cm |
| Weight (with stand) | 7.5 kg |
| Power Consumption (typical) | 70 W |
| Standby Power | < 0.5 W |
| Power Supply | AC 100-240V, 50/60 Hz |
| Energy Class | A+ |
| USB Port | 1 x USB 2.0 |
| HDMI Input | 2 x HDMI (ARC supported) |
| Other Connections | AV (RCA), VGA, Headphone, RF (Antenna) |
| Tuner | DVB-T2/C/S2 |
| VESA Mount | 200 x 200 mm |
| Remote Control | Included (batteries not included) |
| Child Lock | Yes |
| Cleaning | Soft dry cloth; do not use liquid cleaners |
Frequently Asked Questions - 43K307BF TESLA
User questions about 43K307BF TESLA
0 question about this device. Answer the ones you know or ask your own.
Ask a new question about this device
Download the instructions for your TV in PDF format for free! Find your manual 43K307BF - TESLA and take your electronic device back in hand. On this page are published all the documents necessary for the use of your device. 43K307BF by TESLA.
USER MANUAL 43K307BF TESLA
Please read these instructions before operating your set and retain them for future reference.
ALB
UDHËZIM PËR PËR
Safety Warning and Notice 2
Mounting and Connecting .... 3
Packing list 3
Mounting the TV set....3
Connecting peripheral equipment ..... 4
Control Panel Keys....7
Remote Control 8
General Operating Instructions .....10
Power On 10
Standby....10
Signal Source Selection 11
Menu Operation Instruction ..... 11
CHANNEL....11
PICTURE 12
SOUND....13
OPTIONS 14
TIME....14
LOCK....15
REC option....15
Time-shift option....16
EPG option....16
Hotel Function (optional) 16
USB Media Function .....17
Simple troubleshooting....19
Technical Specifications....20
Base Installation Instructions.....21
FEATURES
- High-quality LED backlight LED screen, energy saving, environment-friendly, ultra-thin, with brilliant features.
- With built-in high quality speakers that will give you pure audio-visual enjoyment and save your table space.
- Has many connectors. You can directly connect your DVD, vidicon etc. to appropriate input connectors and enjoy beautiful image. The product can be used as a computer monitor with VGA and HDMI connectors. Also it can be used as a TV device when you insert the antenna.
- Much faster response time completely eliminates shadow on picture. Seeing film and playing game will be more fluent.
- Enough colours.
- Wider viewing angle, higher brightness, higher contrast, lower consumption.
- Intelligent image mode and sound mode offer you intelligent audiovisual effect.
- Built-in the latest digital comb filter, which makes image clearer. The internal 3D De-Interlace technique can totally eliminate the screen dithering caused by interlace signals.
- Has perfect timing functions, you can set time to turn off. It will also be turned off in state of no signals.
- Automatic operation is made convenient with a telecontrol device.
- Auto-setup function helps you set the image to best performance in several seconds in VGA mode.
- Auto colour balance adjustment technology equips your device with the best colour setting for all different kinds of display adapters in VGA mode.
- Automatic noise reduction can significantly eliminate background noise caused by menu interference and the noise caused by weak signals, making the picture on the screen clear.
- Supports USB interface.
- Supports H.264 FULL HD receiver and supports PVR functionality.
- Ultra-thin and super narrow design
SAFETY WARNING AND NOTICE
Thank you for choosing the LED TV with LED backlight made by our company, a valuable product with excellent quality and multiple functions. This device will bring you more audiovisual enjoyment. Its design ensures user's safety. All devices are strictly tested before leaving factory. However, incorrect use can lead to electric shock or fire. In order to ensure safety and extend its life, please read the manual and marking label carefully before using it and comply with the following safety instructions. Please keep the user manual for later use.

Warning Attention May result in casualties

May result in personal injury or property losses

Indicate the behaviours that must be prohibited

Indicate the operations that must be performed
Under Following Conditions:
• Power failure or unstable voltage.
- Abnormal sound or smell coming from the device.
- Damaged AC power cord.
- Damages to the TV set due to falling off, knocking or impact.
- Liquid or foreign matters entering into the TV set.

Turn off the TV set immediately, unplug the power cord from the power outlet, and contact authorized maintenance personnel.
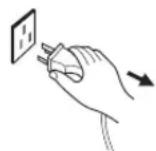
If coal gas or other flammable gases leak, do not unplug the power cord of the TV set or other electric appliances; instead, close the valve of the gas immediately and open the doors and windows.

WARNING

- Only use 240VAC 60/50Hz power supply.
- This TV must be connected to a three pin socket outlet for safety.
- All cables can be connected or disconnected only after power supply is turned off.
-
Do not fix the TV set on instable position, or else it may cause falling off, damage, or even fire.
-
Do not put the TV set in the environment:
-
With direct sunshine, moisture, overheating, undercooling or heavy dust;
-
With flammable or explosive substances;
-
With flammable or corrosive gases;
-
In bathroom, kitchen, etc.
- Do not use damaged or improper power socket, and ensure that the plug and socket are connected properly.
- Keep the power plug and socket free from dust and metal pieces.
- Do not damage the power cord:
- Do not use damaged or improper power socket, and ensure that the plug and socket are connected properly. - Keep the power plug and socket free from dust and metal pieces. - Do not damage the power cord:
- It is prohibited to refit the power cord;
- Do not put heavy objects on the power cord;
- Keep the power cord away from heat sources;
- Do not drag the power cord when unplugging.
- Do not connect too many appliances to one power strip, or else it may cause fire due to high power consumption.
- Do not put open flame (e.g. lit candle) near the TV set, or else it may cause electric shock or fire.
- Do not put the container filled with water on the TV set, to avoid electric shock or fire caused by water splash.
- Do not insert any sharp objects, metals or liquids into the signal connector or air vents, to avoid short circuit and product damage as well as electric shock.
- The slots on the case are designed to release heat, prevent all inside components from reaching extra high temperatures and to enable long-term normal operation. Please do not cover the holes during the positioning.

Do not touch the plug with wet hands, or else it may cause electric shock.

Do not turn on the TV set in thunderstorm weather; instead, unplug the power plug and antenna connector to avoid lightning strike.

Do not disassemble the TV set by yourself as this can cause electric shock or fire. Contact qualified personnel for maintenance.

ATTENTION
- Do not let children climb onto the TV set.
- Keep the small accessories away from children's reach to avoid swallowing.
- If the TV set is not going to be used for a long time, please turn off the device and unplug the power cord.
- Before cleaning the TV set, unplug the power cord and wipe with soft cloth; do not use chemical reagents and avoid situations in which foreign substances can enter the device. The incorrect cleaning agents (such as cleaning fluid, water, etc) can damage product's appearance, erase information provided on the product, even enter the device and damage components and result in the device inability to display programme.
- To adjust the position or angle of the TV set, please disconnect all wires and move them slowly to avoid falling off.
- Do not rub with hard objects and do not hit, bend or squeeze the screen.
- Do not use device immediately after transferring it from low to high temperature environment as this can cause condensation inside your device and its failure.
- If the screen breaks and the liquid splashes on your skin, immediately wash with clean water for 15 minutes and visit your doctor.
- To carry the TV set with hands, please grasp its bottom corners; do not apply force on the panel.
-
When the same image or active image with fixed words is displayed for a long time, icons will leave image persistence on screen which will not disappear long after powering off. This undesirable effect is not covered by warranty.
• Healthy TV watching: -
Watch in appropriate light; poor light or long-term watching can hurt your eyes.
-
If a headset is used, adjust the volume appropriately to avoid hurting your hearing.
-
Unplug the power cord of the device to cut off the power supply.
- If a power plug or appliance coupler is used as a disconnecting device, easy operation should be ensured.
- Power plug should be connected firmly. Loose power plugs may cause sparkle and fire.
- All the technical specifications stated in the user manual and on the package are subject to changes without prior notice. If there are slight deviations between the user manual and actual operation, consider the latter to be valid.
Mounting and Connecting
Packing list
- The TV set. 2. User Manual. 3. Remote control. 4. Power cord (or attached to TV set).
- Component Transfer Cable (Optional)
Mounting the TV set
- The TV set should be mounted near the AC power socket for easy plugging and unplugging.
- For your safety, please select appropriate wall mount bracket or base.
• To avoid injuries, place the TV set on a stable surface or fix it on a firm wall. - Ask qualified personnel to mount the TV set on the wall. Improper mounting may result in instable TV set.
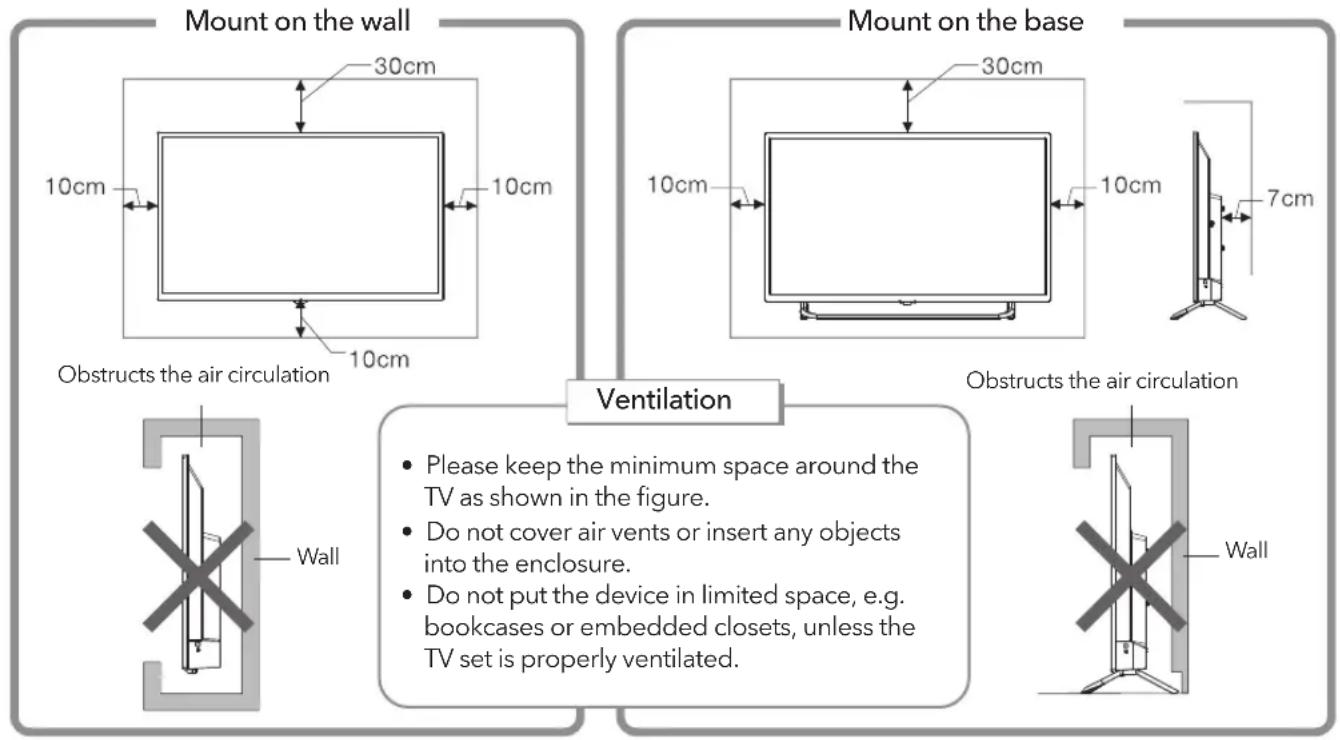
TIPS ON INSTALLATION
- Do not place the TV set in an area with mechanical vibrations.
- Do not place the TV set in an area where insects may enter.
- Do not mount the TV set against air conditioner as internal panel of the display can condense and cause failure.
- Do not place the TV set in an area with strong magnetic field as electromagnetic waves can interfere with it and damaged it.
Connecting peripheral equipment
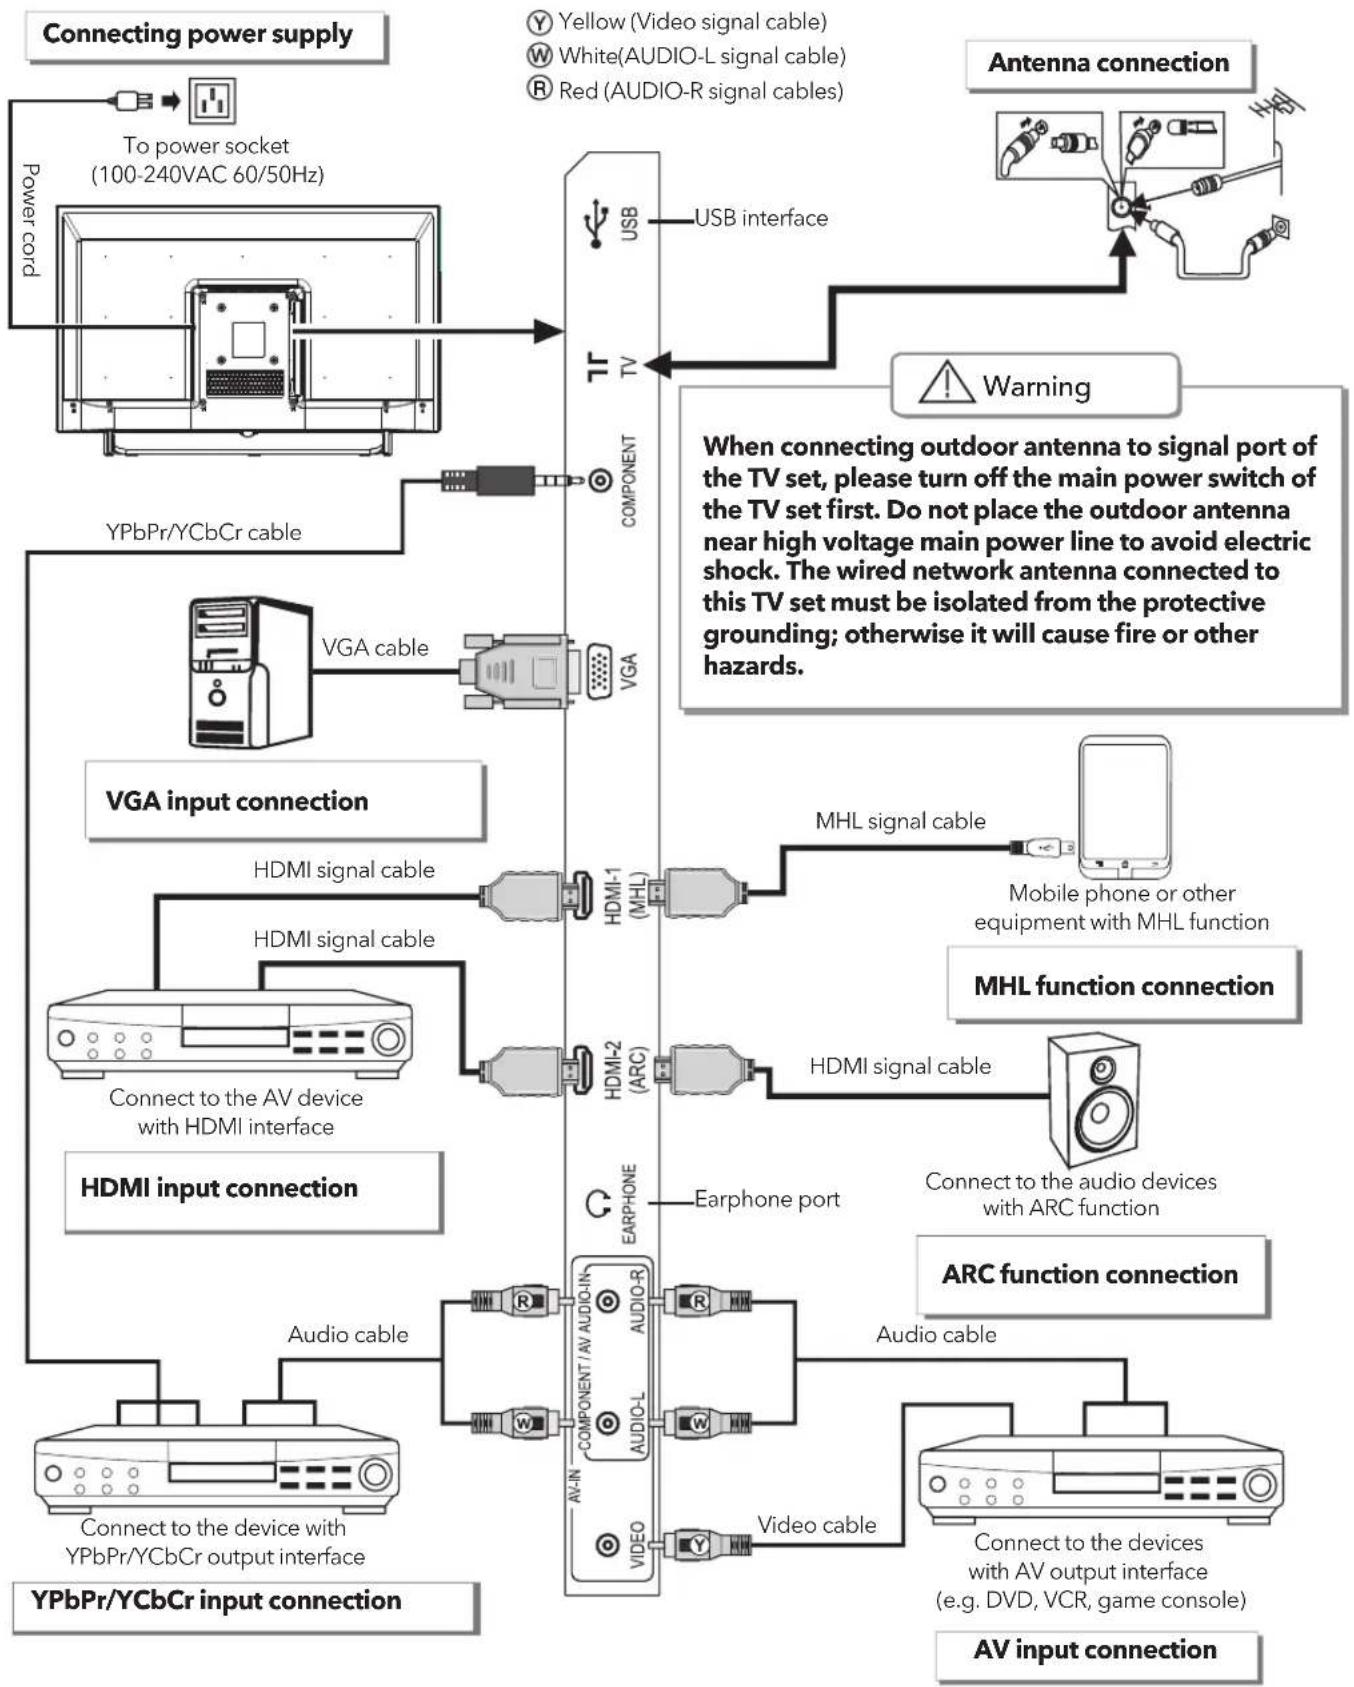
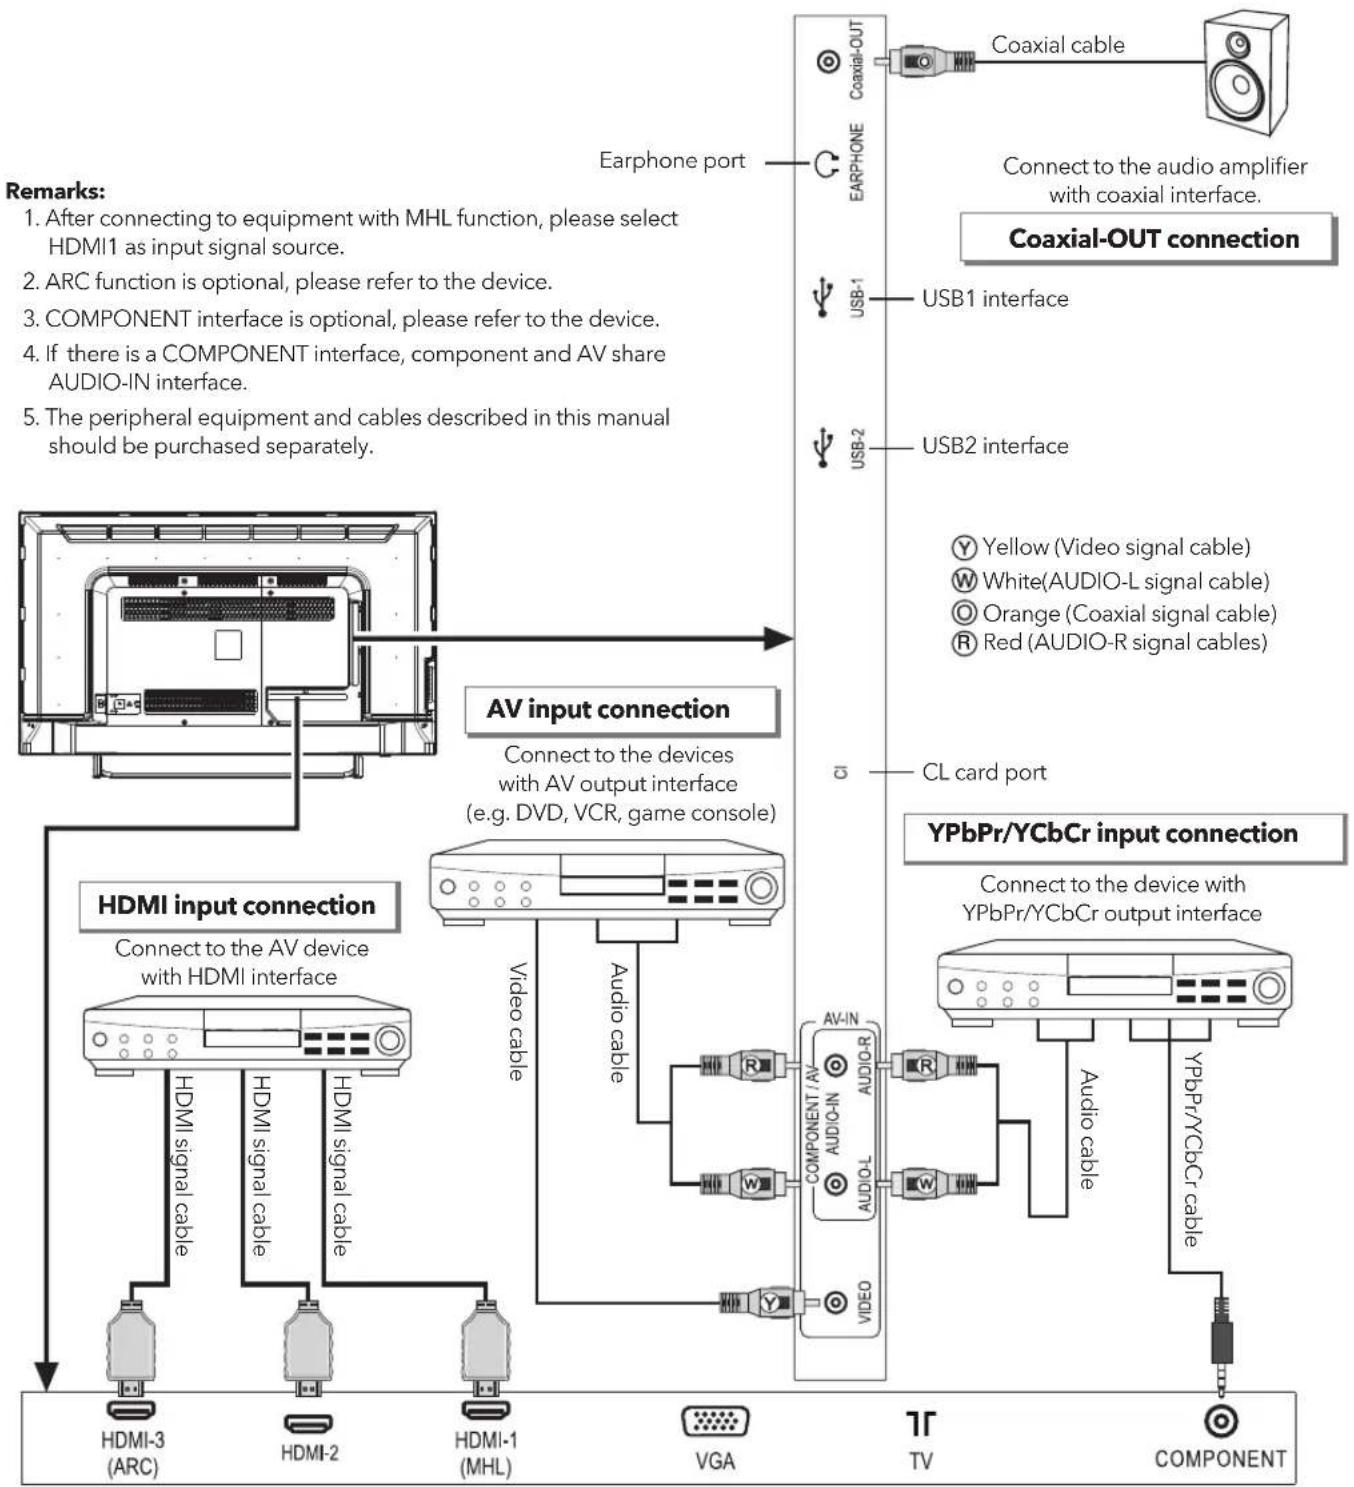
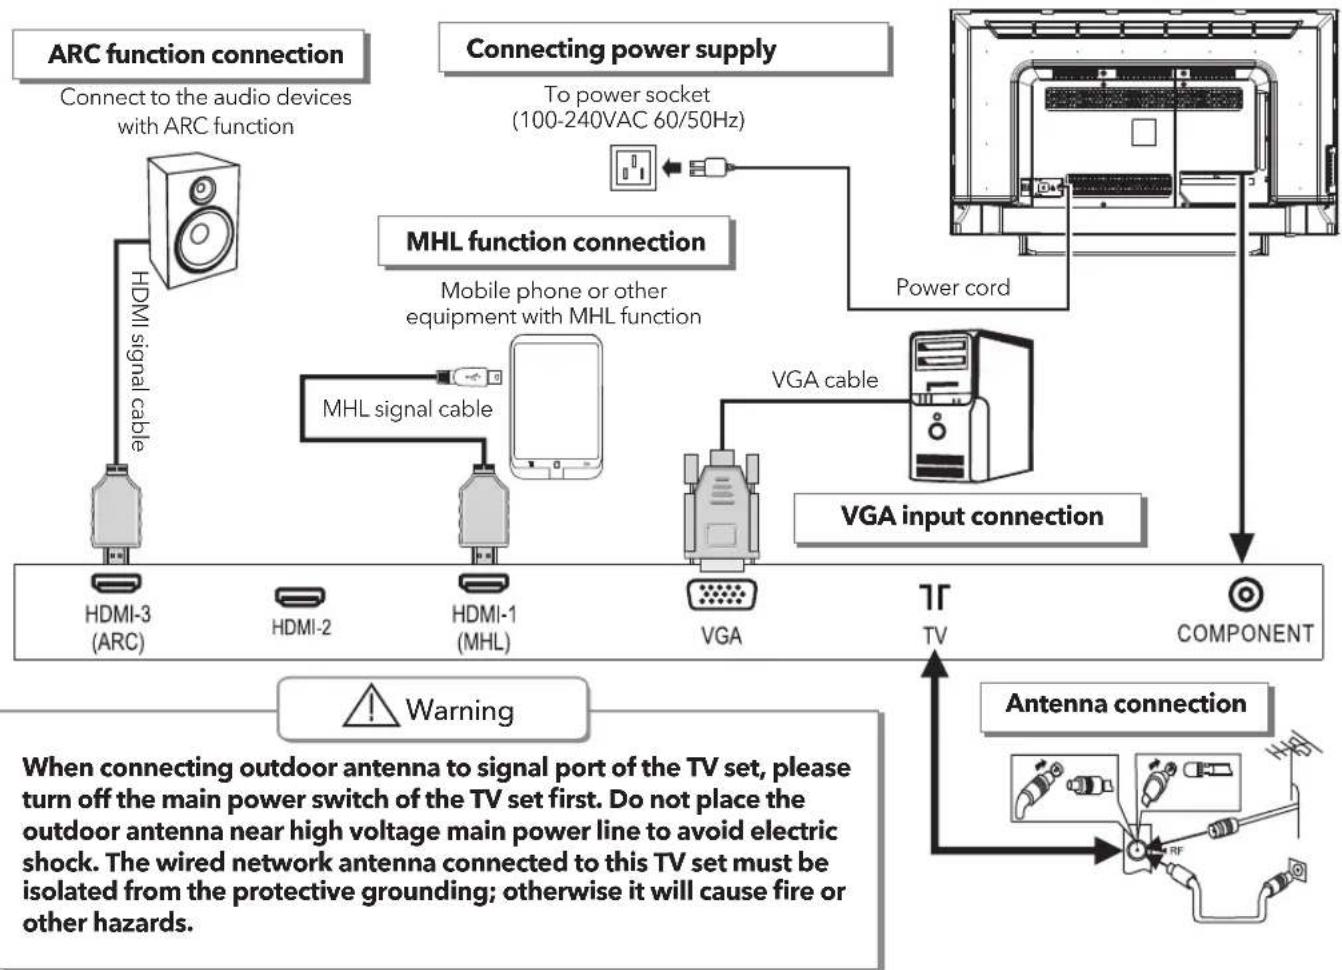
You can connect various devices to the TV set and view high quality images. If a video device has HDMI, AV, PC and other output/input ports, select one of them and connect to the corresponding input or output ports of the TV set. After connecting it, press the "SOURCE"" key and signal source menu will be displayed on the screen. Press "▲" and "▼" key to select the input signal and press "OK" key to confirm. The connecting mode is shown in the figure.
Remarks:
- After connecting to equipment with MHL function, please select HDMI1 as input signal source.
- ARC function is optional, please refer to the device.
- COMPONENT interface is optional, please refer to the device.
- If there is a COMPONENT interface, component and AV share AUDIO-IN interface.
- The peripheral equipment and cables described in this manual should be purchased separately.
32"/40"
ENG
flowchart
graph TD
    A["Connecting power supply"] --> B["To power socket (100-240VAC 60/50Hz)"]
    B --> C["Power cord"]
    C --> D["YPbPr/YCbCr cable"]
    D --> E["USB"]
    E --> F["TV"]
    F --> G["COMPONENT"]
    G --> H["VGIA"]
    H --> I["VGA cable"]
    I --> J["VGIA input connection"]
    J --> K["HDMI-1 (MHL)"]
    K --> L["HDMI-2 (ARC)"]
    L --> M["Audio cable"]
    M --> N["Connect to the device with YPbPr/YCbCr output interface"]
    N --> O["AV-IN"]
    O --> P["COMPONENT / AV AUDIO-IN"]
    P --> Q["AV-IN"]
    Q --> R["Audio cable"]
    R --> S["Connect to the device with AV output interface (e.g. DVD, VCR, game console)"]
    S --> T["Video cable"]
    T --> U["Audio cable"]
    U --> V["Video cable"]
    V --> W["ARC function connection"]
    W --> X["Audio cable"]
    X --> Y["Connect to the devices with AV output interface (e.g. DVD, VCR, game console)"]
    Y --> Z["AV input connection"]
    Z --> AA["Warning"]
    AA --> AB["When connecting outdoor antenna to signal port of the TV set, please turn off the main power switch of the TV set first. Do not place the outdoor antenna near high voltage main power line to avoid electric shock. The wired network antenna connected to this TV set must be isolated from the protective grounding; otherwise it will cause fire or other hazards."]
43"
flowchart
graph TD
    A["Improvement"] --> B["After connecting to equipment with MHL function, please select HDMI1 as input signal source."]
    B --> C["ARC function is optional, please refer to the device."]
    C --> D["COMPONENT interface is optional, please refer to the device."]
    D --> E["If there is a COMPONENT interface, component and AV share AUDIO-IN interface."]
    E --> F["Peripheral equipment and cables described in this manual should be purchased separately."]
    F --> G["AV input connection"]
    G --> H["Connect to the devices with AV output interface (e.g. DVD, VCR, game console)"]
    H --> I["HDMI signal cable"]
    H --> J["HDMI signal cable"]
    H --> K["HDMI signal cable"]
    H --> L["HDMI-3 (ARC)"]
    H --> M["HDMI-2"]
    H --> N["HDMI-1 (MHL)"]
    H --> O["VGA"]
    H --> P["Video cable"]
    H --> Q["Audio cable"]
    H --> R["TV"]
    H --> S["COMPONENT"]
    T["Coaxial-OUT"] --> U["Coaxial cable"]
    U --> V["Coaxial-OUT connection"]
    V --> W["USB1 interface"]
    V --> X["USB2 interface"]
    V --> Y["CL card port"]
    V --> Z["YBbPr/YCbCr input connection"]
    Z --> AA["Connect to the device with YBbPr/YCbCr output interface"]
    AA --> AB["Audio cable"]
    AA --> AC["TV"]
flowchart
graph TD
    A["ARC function connection"] --> B["Connect to the audio devices with ARC function"]
    C["Connecting power supply"] --> D["To power socket (100-240VAC 60/50Hz)"]
    E["MHL function connection"] --> F["Mobile phone or other equipment with MHL function"]
    G["VGA"] --> H["VGA cable"]
    I["VGA input connection"] --> J["TV"]
    K["COMPONENT"] --> L["Antenna connection"]
    M["HDMI-3 (ARC)"] --> N["HDMI-2"]
    O["HDMI-1 (MHL)"] --> P["HDMI-1 (MHL)"]
    Q["Warning"] --> R["When connecting outdoor antenna to signal port of the TV set, please turn off the main power switch of the TV set first. Do not place the outdoor antenna near high voltage main power line to avoid electric shock. The wired network antenna connected to this TV set must be isolated from the protective grounding; otherwise it will cause fire or other hazards."]
Control Panel Keys
32"/40"
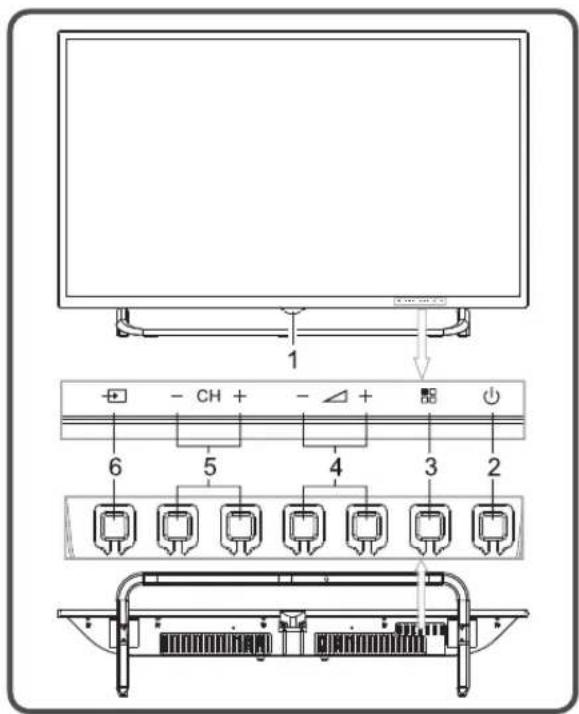
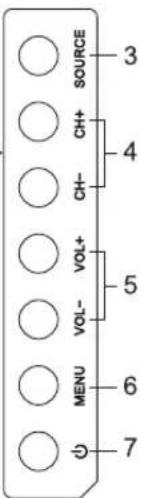
- Power LED indicator and remote receiving window.
- ⏻ Standby: To switch the TV on or back to standby.
- MENU ( ☐ ): Press this key to enter main menu.
- VOL-, VOL+ (−Δ+): Press these two keys to add or reduce volume. In OSD menu, press the two keys to adjust the analogue value of the selected item. These keys have the same functions as ◀/▶ key on the remote control.
- CH-, CH+ (−CH+): Press these two keys to select the channel. In OSD menu, press the two keys, sharing the function with ▲ /▼ key on the remote control, to adjust the items.
- SOURCE (→): Press this key to enter the menu of signal source and choose signal source.
Note: Different models may have different appearances; please refer to the actual device.
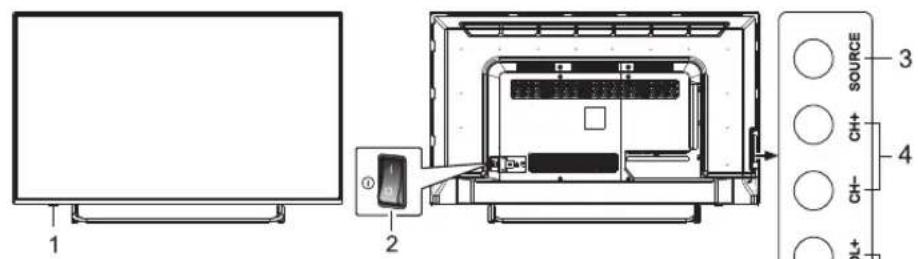
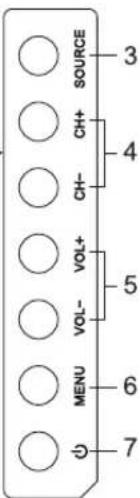
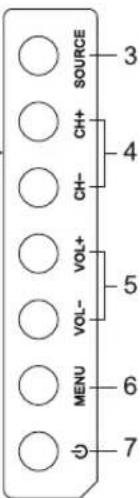
43"
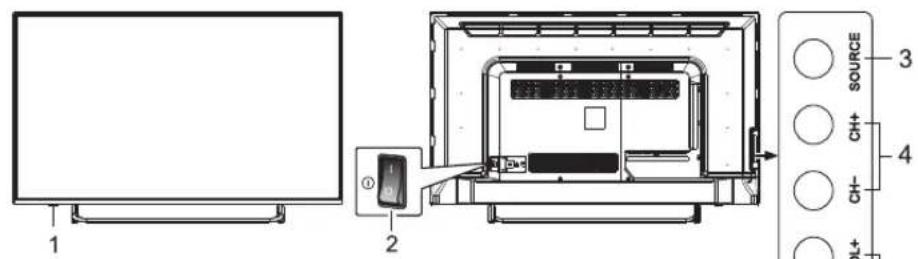
- Power LED indicator and remote receiving window.
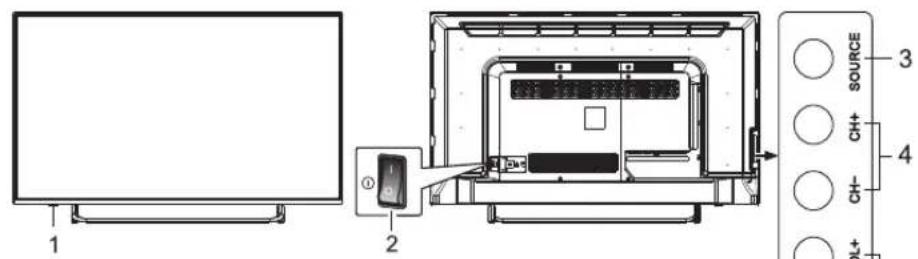
- ① Power switch (optional): Press „I“ end to turn power on, and press „O“ end to turn power off.
- SOURCE: Press this key to enter the menu of signal source and choose signal source.
-
CH-, CH+ (−CH +): Press these two keys to select the channel. In OSD menu, press the two keys, sharing the function with ▲/▼ key on the remote control, to adjust the items.
-
VOL-, VOL+ (−Δ+): Press these two keys to add or reduce volume. In OSD menu, press the two keys to adjust the analogue value of the selected item. These keys have the same functions as ◀/▶ key on the remote control.
-
MENU ( ☐): Press this key to enter main menu.
-
⏻ Standby: To switch the TV on or back to standby.
Note: Different models may have different appearances; please refer to the actual device.
Remote Control
Remote control battery installation method
Take off the cover of battery box, insert two AAA batteries with 1.5 volts, and adjust with the polarity of the remote control battery box.
Precautions for use of remote control
- When using the remote control you should point it to the remote-control inductive window. The objects between the remote control and inductive window may hinder normal operation.
- Do not expose the remote control to fierce vibrations. Furthermore, do not expose the remote control to direct sunlight, for the thermal energy will cause the distortion of the remote control.
- If the remote-control inductive window of the main device is exposed to direct sunlight or intense illumination, the remote control can malfunction; please change the angle of illumination or this device, or approach the inductive window to operate the remote control.
- Low battery voltage influences the remote control distance. You should replace the battery. If you do not use the remote control for long or if the battery is exhausted, please take out the battery, in order to avoid battery leakage causing corrosion of the remote control and its damage.
- Do not use different batteries. Combining new and old batteries is not allowed. You should use batteries in pair.
- Do not throw batteries into fire, do not charge or disassemble, especially do not charge, assemble or disassemble, heat or burn used batteries. Please observe the related environmental protection regulations on used batteries.
Remote Control Key Instruction
Note: Appearance of the remote control can differ from the one shown in the figure. Adjust the provided information to match the actual remote control.
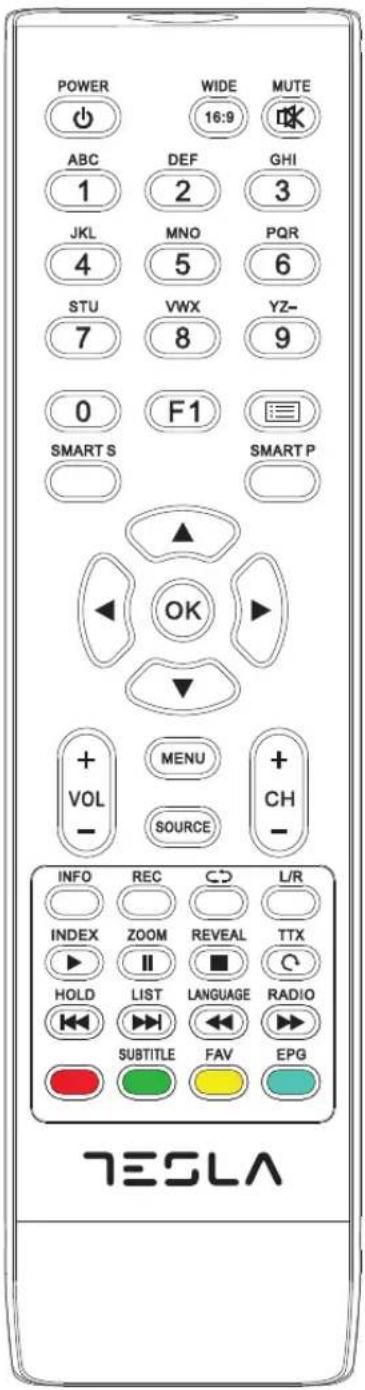
| Name Function Description | |
| POWER(↓) | Switching the receiver in and out of standby mode. |
| WIDE (16:9) | Switching picture ratio. |
| MUTE(OK) | Switching off sound when viewing programme. |
| Numerical | Entering numbers. |
| F1 Picture freeze on or off. | |
| Channel list(回) | Searching through channel list. |
| SMART S Smart sound mode selection. | |
| SMART P Smart image mode selection. | |
| Cursor key(▲,▼,◄)► | Moving cursor up/down/left/right across menu items or change date of EPG. |
| OK Confirmation of current settings. | |
| VOL+/VOL- Press to adjust the volume. | |
| MENU Press this key to display menu. | |
| SOURCE Press this key to display signal source selection menu. | |
| CH+/CH- | Channel changing keys. Changing different pages of current channel EPG. |
| INFO Displaying current programme information. | |
| REC Programme recording. | |
| Return (⊂⊃) | Press this key to return to the last channel watched. |
| L/R Selecting NICAM mode (in ATV signal source) | |
| INDEX(►) | In DTV mode, press "INDEX" key to display a list of recorded programmes. |
| ZOOM(II) | In DTV mode, press "ZOOM" key to zoom aspect ratio if there is a graphic display; if there are no graphic displays and USB port is connected to memory, press this key to delay broadcast of currently played television programmes. |
| REVEAL(■),TTX(○),HOLD(◄◄),LIST(►►),LANGUAGE(◄◄),RADIO(►►) | For teletext operation or USB operation. |
| Red key | Muti-function red key. |
| SUBTITLE(Green key) | Teletext green key or displaying subtitle message if current channel has subtitle option. |
| FAV (Yellow key) | Teletext yellow key or Favourite key used for setting or displaying your favourite programmes. |
| EPG (Blue key) | Teletext blue key, or showing the Electronic Program Guide of current channel during no-menu state. |
Remote control user manual about teletext
TeleText: Press "Teletext" key, it loops in 3 modes: Mix Display > Text Mode > TeleText Off.
Thereinto: TText Mode is Automatic Mode. In Automatic mode, the system automatically selects TOP, Fastext, or Default mode as appropriate, depending on the data being received. In Text Mode or Mix Display, press number 0\~9, "▲/▼" key to select text page.
Reveal: All hidden characters are displayed for 6 seconds.
Hold: Toggle hold on or off for current display pages. If the page is not held, it will become held, which will prevent its update. If the page is currently held, the hold will be removed thus allowing the page to update. When the page is held, this is indicated by a Hold prompt.
Index: In Fastext mode, request the index page if the index link is valid, or the Packet 8/30 initial page if valid, or page 100. In TOP mode, if the Hitlist option is enabled, toggle the system between the current text page and the Hitlist menu; otherwise, request page 100. In List mode, reset the list of preferred pages either to that of the current channel as read from the EEPROM if fitted, or to the default list (pages 100, 101, 102, 899), and request the first page in the list. In Default mode, request the Packet 8/30 initial page if valid, or page 100.
List: Toggle between List mode and the current acquisition mode (Fastext, TOP, or Default).
Red, Green, Yellow, Blue: Request the associated page in the display block according to the acquisition mode. In TOP Hitlist mode, the Red, Green, and Blue commands control selections from the Hitlist menu, while the Yellow command is ignored.
General Operating Instructions
Before switching on the device, please make sure that the power supply is stable and that the antenna cable is well connected.
Power On
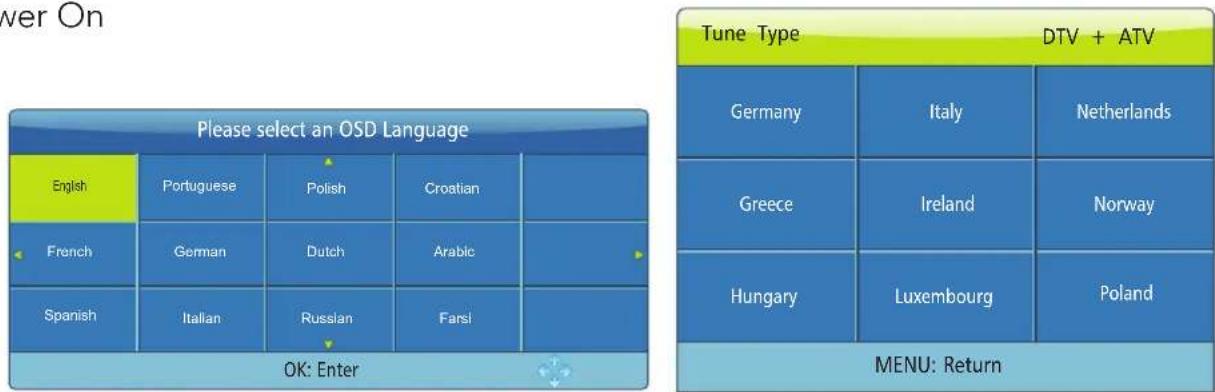
Fig. 1 Fig. 2
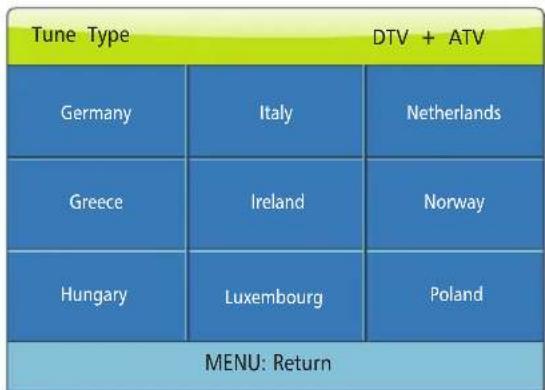
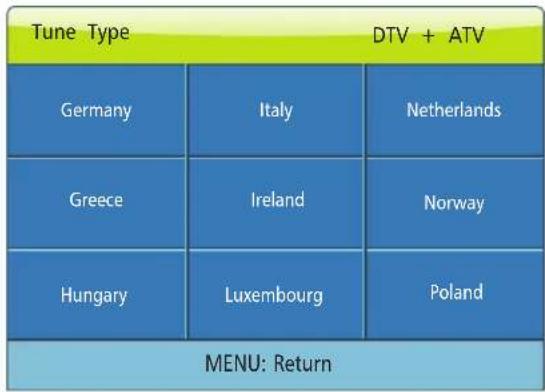
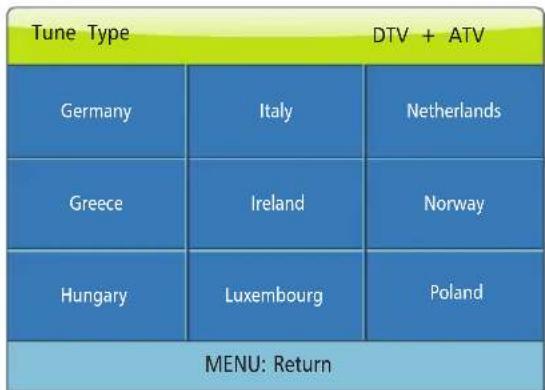
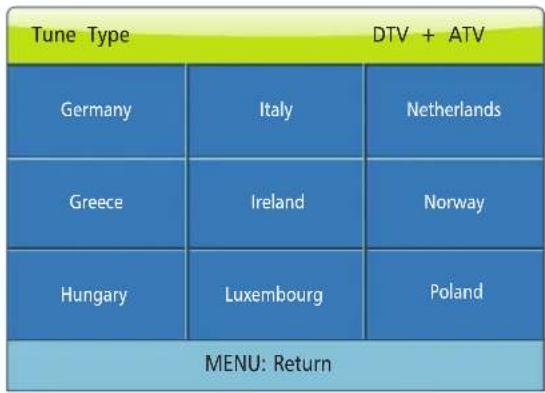
Plug the power cord into electrical socket. Press "∪" key on the remote control or on the TV set to turn on the TV. "Please select an OSD Language" menu (Fig.1) is displayed on the screen. Press "▲/▼/◄/►" key on the remote control to select desired language, then press "OK" key on the remote control to confirm. "Select DVB type" is displayed on the screen. Press "▲/▼" key on the remote control to select desired DVB type, then press "OK" key to continue to the next step (Fig.2). (The provided example shows channel searching DVB type under DVB-T.) Press "◄/►" key to select Tune Type: DTV + ATV, ATV, DTV. Press "▼" key. You can select country where you are by pressing "▲/▼/◄/►", then press "OK" key to confirm. The device will initiate auto tuning.
Standby
Press "↓" key on the remote control, TV will be in standby.
Special Attention:
-
The TV set will automatically switch to standby if there is no signal input for 5 minutes after switching the TV on.
-
The TV set will automatically switch to standby when the preset time for turning off is reached.
-
If you do not use it for a long time, please turn off the power supply of the device. Do not let the device work in standby state for a long time.
Signal Source Selection
Press "SOURCE" key either on the remote control or on the panel. "Input Source" will be displayed on the screen (Fig.3). Then press "▲/▼" key on remote control or "CH+/CH-" key on the panel to select the signal source. Press "OK" key on the remote control and the TV will replace the current signal source with the source you selected.
(Note: YPBPR signal source is optional, please refer to the device.)
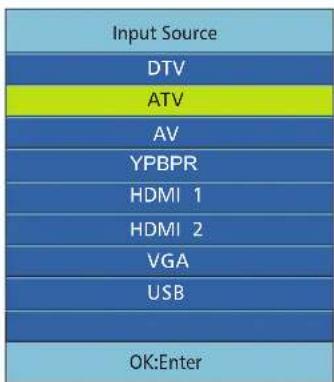
Fig. 3 Fig. 4
Menu Operation Instruction
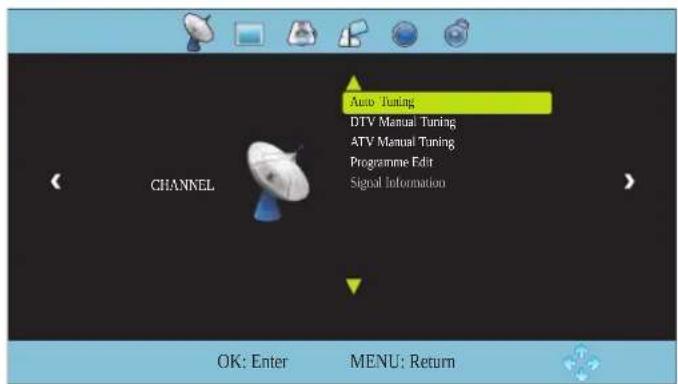
Press "MENU" key on the remote control or on the panel. The screen will display the main menu (Fig.4).
- Press "◀/▶" key on the remote control or "VOL+/VOL-" key on the panel to select the adjustment sort menu, which includes 6 sorts: CHANNEL, PICTURE, SOUND, OPTION, TIME, LOCK.
- Press "▲/▼" key on the remote control or "CH+/CH-" key on the panel to select what you want to adjust in sort menu.
- Press "OK" key on the remote control to set or enter into next menu.
- Press "MENU" key to exit the main menu when the TV displays the Main Menu. Press "MENU" key to return to the previous menu when the TV displays the sub-menu. Press "SOURCE" key to display the signal source menu.
- During the operation, the options which cannot be adjusted at current mode will be hidden automatically and the colour of these options will be changed into gray.
- Menu Operation Instructions provided in this manual is explained according to TV mode. The operations in other modes are similar to the one in TV mode. Users can take it as reference.
Note: "▲/▼/◄/►" keys in this Manual stand for the direction cursor keys on the remote control unless specifically defined otherwise. The operating instructions in the text below are all based on keys on the remote control. Please understand the keys on the panel by yourself.
CHANNEL
Press "MENU" key and CHANNEL menu will be displayed on the screen (Fig.4). Press "▲/▼" key to select the item you want to adjust or set.
Auto Tuning
Press "MENU" key and CHANNEL menu will be displayed on the screen. Press "▲/▼" keys to select Auto Tuning. Press "OK" key and the "DVB Select type" will be displayed on the screen. Press "▲/▼" keys on the remote control to select desired DVB type, then press "OK" key to continue to the next step (Fig.2). (The provided example shows channel searching DVB type under DVB-T.) Press "◀/▶" keys to select Tune Type: DTV + ATV, ATV, DTV. Press "▼" key. You can select desired country by pressing "▲/▼/◀/▶", then press "OK" key to confirm. The device will start auto tuning (Fig.5). During the auto tuning, you can press "MENU" key to return and exit auto tuning.
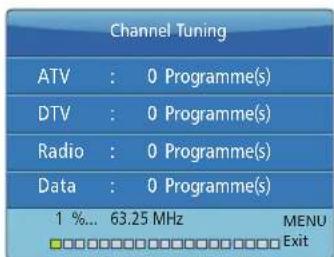
Fig. 5
DTV Manual Tuning
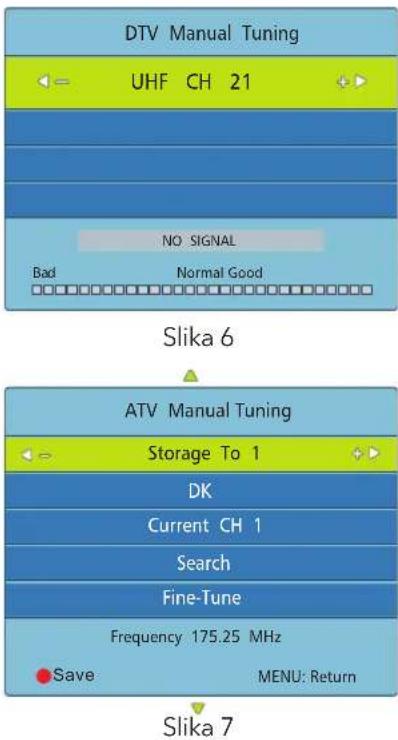
Press "MENU" key and CHANNEL menu will be displayed on the screen. Press "▲/▼" key to select DTV Manual Tuning. Press "OK" key to enter into DTV Manual Tuning menu (Fig.6). Press "◀/▶" key to select channel, then press "OK" key to conduct search. After searching, the DTV Manual Tuning menu will close automatically.
ATV Manual Tuning
Press "MENU" key and CHANNEL menu will be displayed on the screen. Press "▲/▼" key to select ATV Manual Tuning. Press "OK" key to enter ATV Manual Tuning menu (Fig.7). Press "▲/▼" key to select the Current CH. Press "◀/▶" key to search manually. After searching, you can save the searched channel to other positions. At this time, press "◀/▶" key to select Storage To, and then press "▲/▼" key to choose the channel number. After selecting Fine-Tune, press "◀/▶" key to tune from low frequency or high frequency. During manual searching, you can also press "MENU" key to interrupt the search and return to the last menu.
Programme Edit
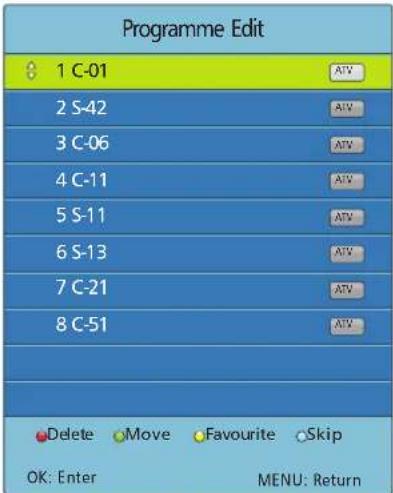
Press "MENU" key and CHANNEL menu will be displayed on the screen. Press "▲/▼" key to select Programme Edit. Press "OK" key to enter Programme Edit menu (Fig.8), then press "▲/▼" key to select the channel you want to edit.
Delete: : Select a channel and press "Red" key to delete it.
Move: Select a channel and press "Green" key, press "▲/▼" key to select the channel position where you want to move the channel. Press "OK" key to confirm. You can press "MENU" key to return last menu.
Favourite: Choose a channel and press "Yellow" key. Favourite icon will appear behind the selected channel. Press "Yellow" key again to cancel it. Press "MENU" key to return main menu.
Skip: Select a channel and press "Blue" key. SKIP icon will appear behind the selected channel. Press "Blue" key again to cancel it. Press "MENU" key to return to main menu.
Signal Information
Press "MENU" key and CHANNEL menu will be displayed on the screen. Press "▲/▼" key to select Signal Information. Press "OK" key to enter into Signal Information menu. You can look through signal information.
Note: Before you press "MENU" key, please select the input source first. You can select it only in DTV mode.
PICTURE
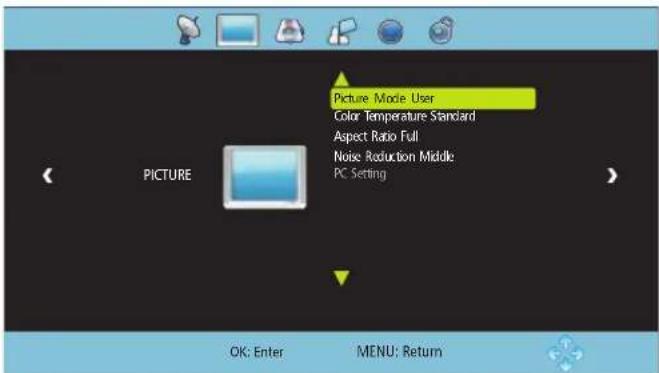
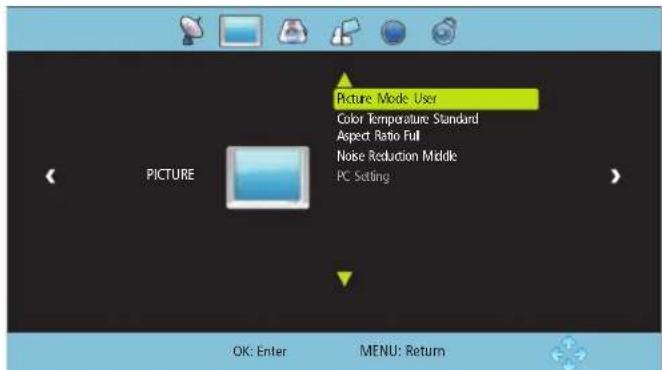
Press "MENU" key and CHANNEL menu will be displayed on the screen. Press "◀/▶" key to select PICTURE (Fig.9), then press "▲/▼" key to choose the item you want to adjust or set.
Picture Mode: Press "OK" key to enter into Picture Mode submenu. Press "▲/▼" key to select item want to adjust or set.
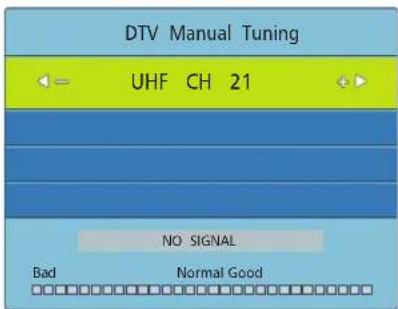
Fig. 6
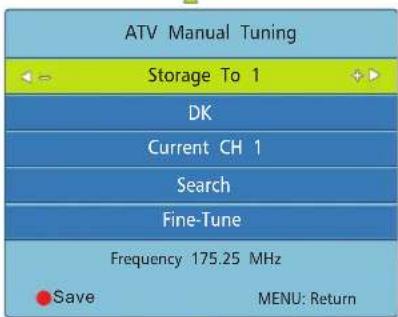
Fig. 7
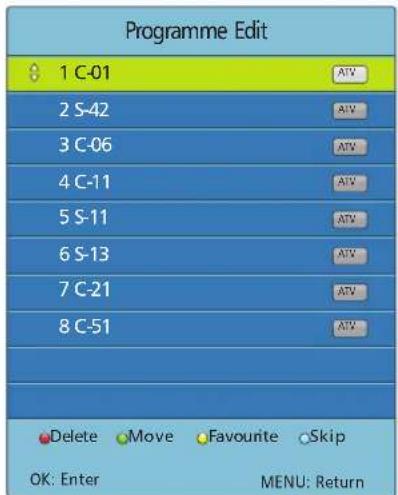
Fig. 8
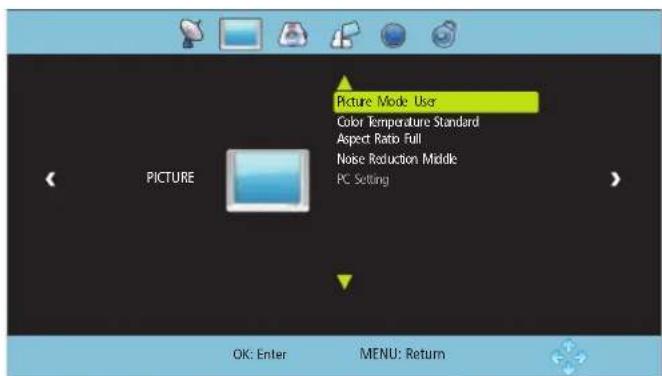
Fig. 9
| Item Function Description | ||
| Picture Mode Selecting picture mode "Standard", "Soft", "User Dynamic" four modes. | ||
| Contrast Adjusting contrast of whole picture Increasing analogue value increases Contrast; Decreasing analogue value decreases Contrast (0~100). | ||
| Brightness Adjusting brightness and black level of whole picture | Increasing analogue value increases brightness; Decreasing analogue value decreases brightness (0~100). | |
| Saturation Adjusting colour depth of images Increasing analogue value increases green; Decreasing analogue value increases purple (0~100). | ||
| Sharpness Adjusting sharpness of whole picture | Increasing analogue value increases definition; Decreasing analogue value decreases definition (0~100). | |
| Tint | Adjusting tint of whole picture | Increase the analogue value to improve the depth; Decrease the analogue value to reduce the depth (0~100). |
Note: Tint can be adjusted only in NTSC system.
Color Temperature: Press "OK" key to enter Colour Temperature submenu. Press "◀/▶" key to select colour temperature mode: Standard, Warm, Cool.
Aspect Ratio: Press "OK" key to enter Aspect Ratio submenu. Press "▲/▼" key to select aspect ratio mode: Auto, 4:3, Full, Film, Subtitle, PC Mode.
Noise Reduction: Press "OK" key to enter Noise Reduction submenu. Press "▲/▼" key to select Noise Reduction mode: Off, Low, Middle, High.
SOUND
Press "MENU" key and CHANNEL menu will be displayed on the screen. Press "◀/▶" key to select SOUND (Fig.10), then press "▲/▼" key to select the item you want to adjust or set.
Sound Mode: Press "OK" key to enter Sound Mode submenu. Press "▲/▼" key to select item you want to adjust or set.
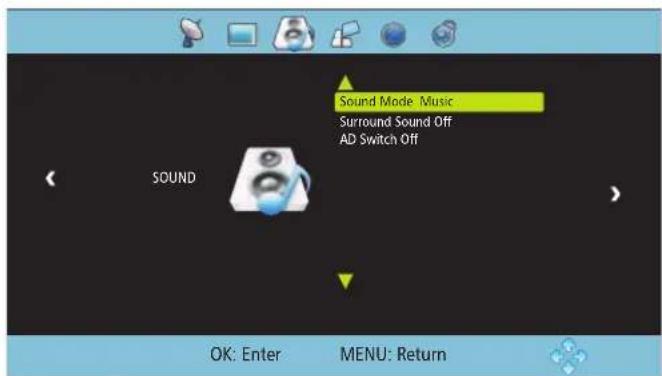
Fig. 10
| Item Function | Description | |
| Sound Mode | Selecting Sound Temperature | "Standard", "Music", "Movie", "User" five modes. |
| Treble | Adjusting treble value | Increasing analog value increases treble; Decreasing analog value decreases treble (0~100). |
| Bass Adjusting bass value | Increasing analogue value increases bass; Decreasing analogue value decreases bass (0~100). | |
| Balance | djusting balance between left and right speaker | Increasing analogue value decreases left volume; Decreasing analogue value decreases right volume (L50 ~R50). |
Surround Sound: Press "OK" key to enter Surround Sound submenu. Press "▲/▼" key to select surround sound mode: Off, Surround, SRS Trusurround XT.
AD Switch: Press "OK" key to enter AD Switch submenu. Press "◀/▶" key to select "On" or "Off". If you select "On", you can adjust AD volume by pressing "◀/▶" key (only available in DTV).
OPTIONS
Press "MENU" key and CHANNEL menu will be displayed on the screen. Press "◀/▶" key to select OPTIONS (Fig.11), then press "▲/▼" key to select the item you want to adjust or set.
OSD Language: Press "OK" key to enter OSD language submenu. Press "▲/▼/◄/►" key to select desired language. Press "MENU" key to return to the previous menu.
Note: The operation method of the Audio Language is the same as that of OSD Language (Only available in DTV).
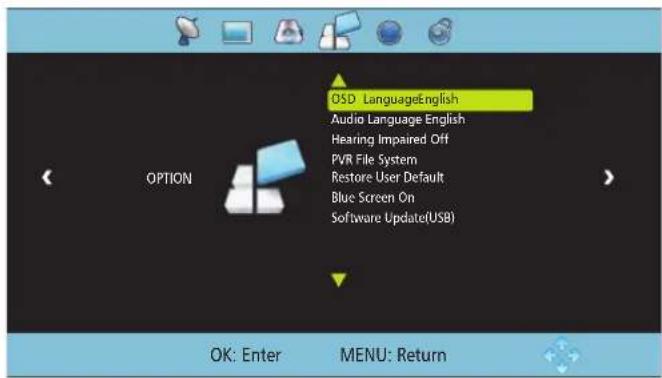
Fig. 11
Hearing Impaired: Press "OK" key to select "On" or "Off" (only available in DTV).
PVR File System: Press "OK" key to enter PVR File System submenu (Fig.12). Choose storage disc in "select disc" submenu. Press "▲/▼" key to select "Check PVR File System" and, after pressing "OK" key, the device will initiate the check. After a successful check, press "MENU" key to exit the menu. Press "REC" key to record.
Note: Insert a U disc into the device interface before operating the PVR File System function.
Restore User Default: After pressing "OK" key, "Are you sure?" will be displayed on the screen. Press "◀" key to resume to the factory setting or "▶" key to cancel
the current operation Blue Screen: Press "OK" key to select "On" or "Off". Open or close Blue Screen function.
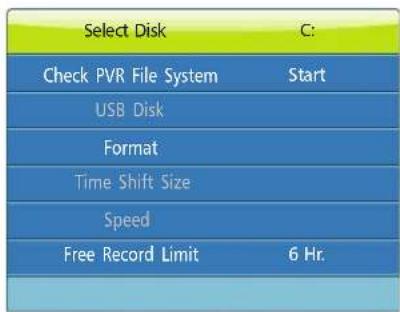
Fig. 12
Software Update (USB): Update software by a U disc.
TIME
Press "MENU" key and CHANNEL menu will be displayed on the screen. Press "◀/▶" key to select TIME (Fig.13), then press "▲/▼" key to select the item you want to adjust or set.
Clock: When in DTV input source, the clock will be synchronized with TV programme.
Off Time: Press "OK" key to enter Off Time submenu. Press "▲/▼" key to select Off Time, Hour and Minute, then press "◄/►" key to adjust the off timer values. The TV will switch off automatically at the time you select.
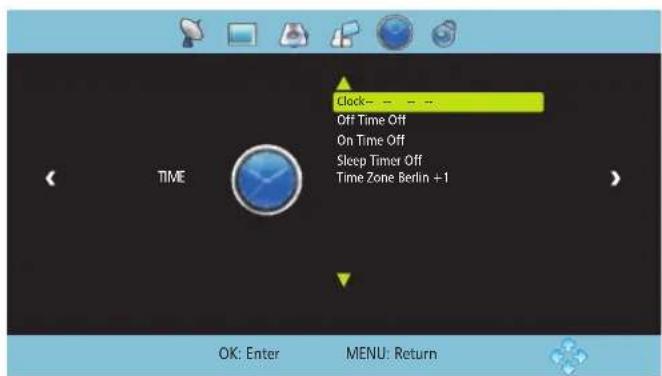
Fig. 13
Note: You can set Hour and Minute only if the Off Time is not in "Off" mode.
On Time: Press "OK" key to enter On Time submenu. Press "▲/▼" key to select On Time, Hour and Minute, Source, Channel, Volume, then press "◀/▶" key to adjust value to set the on timer values. The TV will switch on automatically and tune to the mode of your choice at the time you select.
Sleep Timer: Press "OK" key to enter Sleep Time submenu. Press "▲/▼" key to select sleep time: Off, 10min, 20min, 30min, 60min, 90min, 120min, 180min, 240min.
Time Zone: Press "OK" key to enter into Time Zone submenu. Press "▲/▼/◄/►" key to select your time zone. (Only available in DTV).
LOCK
Press "MENU" key and CHANNEL menu will be displayed on the screen. Press "◀/▶" key to select LOCK. After pressing "OK" key, press Numerical key to input default password 0000 and enter LOCK menu (Fig.14). Then press "▲/▼" key to select the item you want to adjust or set.
Lock System: Press "OK" key to select "On" or "Off". Block program option can work when Lock System option is activated.
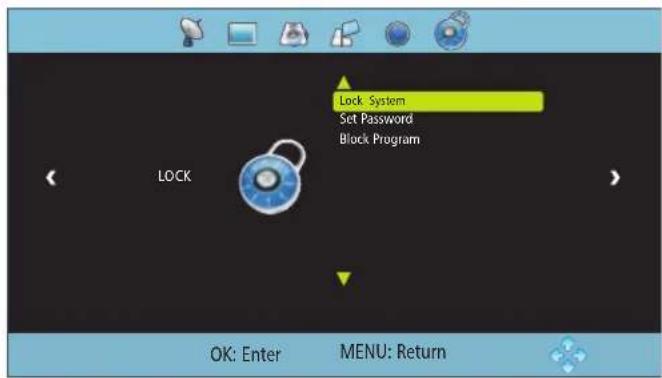
Fig. 14
Set Password: Press "OK" key and "Set Password" dialogue box will appear on the screen. Press the numerical key to input old password, input new password twice to complete the password change and return to last menu. Note: Please make sure you remember your new password after changing. Otherwise, the system will lock forever.
Block Program: Press "OK" key and "Block Program" menu will appear on the screen. Press "▲/▼" key to select the channel that you want to lock, and then press the green key to lock or unlock. Finally press "MENU" key to exit menu operation.
REC option
In DTV mode, press "REC" key and REC option menu will be displayed on the screen (Fig.15). The system will immediately start recording. Press "REVEAL" key to stop and quit recording. After completing the recording process, press "INDEX" key and the recorded list will pop up. Select the file you want to play. You can read the file information by pressing "Green" key or you can delete it by pressing "Red" key. Press "OK" key to play it.
Note: The recording function can only support memory devices with Fat32 file system. Memory devices with other file systems need to be formatted. Before formatting a memory device, back-up useful data because the content of memory devices cannot be recovered after formatting.
![DR 1 Play R6 FF F0 3CS FF 3CS Pause Stop [00:00.29] (0003-10:24) 14:21](/content/2026/05/801068/images/5ce14ac2309101049850f14471a309d0b561d096b68ec43db58b537329677f20.jpg)
Fig. 15
| Icon Description | |
| 1 | Indicates that the system is recording a programme. |
| 2 | Indicates the current programme number. |
| 3 | Indicates the recorded programme duration. |
| 4 | Indicates the longest duration that a U disc can provide (relevant to the capacity of U disc) |
| 5 | Indicates the current programme time. |
| ▶ | Play: Select this icon. Press "OK" key to play the video or set A-B repeat. |
| ◀ | FB: Select this icon. Press "OK" key to fast back. Press "INDEX" key to play normally. |
| ▶ | FF: Select this icon. Press "OK" key to fast forward. Press "INDEX" key to play normally. |
| ◀ | FB 30s: Select this icon. Press "OK" key to play backward 30 seconds. |
| ▶ | FF 30s: Select this icon. Press "OK" key to play forward 30 seconds. |
| ■ | Pause: Select this function. Press "OK" key to play or pause. |
| ■ | Stop: Select this icon. Press "OK" key to stop and quit the display window. |
Time-shift option
In DTV mode, press "ZOOM" key. Time-shift option menu will be displayed on the screen (Fig. 16) and the programme will be in suspended state. Press "INDEX" key to resume the programme. Press "REVEAL" key to stop and quit time-shift. When user leaves programme for a short time, time-shift function can suspend and cache the playing programme to a U disc. The programme can be resumed when user decides to play it.
![DR 1 Time Shift [00:00:00/00:00:06/01:20:00] Play FD FF FD JOS FF SOS Pause Stop 14:23](/content/2026/05/801068/images/a4ebfc9c561e05846cd9e2b2bb7385d2df2b255a489cc514667801d69d6465cd.jpg)
Fig. 16

| Icon Description | |
| 1 | Indicates that the programme is in suspended state. |
| 2 | Indicates the Current programme time. |
| 3 | Indicates the time when the programme was suspended. |
| 4 | Indicates the longest cache time that a U disc can provide. |
| ▶ | Play: Select this icon. Press "OK" key to play the video or set A-B repeat. |
| ◀ | FB: Select this icon. Press "OK" key to fast back. Press "INDEX" key to play normally. |
| ▶ | FF: Select this icon. Press "OK" key to fast forward. Press "INDEX" key to play normally. |
| ◀ | FB 30s: Select this icon. Press "OK" key to play backward 30 seconds. |
| ▶ | FF 30s: Select this icon. Press "OK" key to play forward 30 seconds. |
| ■ | Pause: Select this function. Press "OK" key to play or pause. |
| ■ | Stop: Select this icon. Press "OK" key to stop and quit the display window. |
EPG option
In DTV mode, press "EPG" key and EPG option menu will be displayed on the screen (Fig.17). User can perform the following operations with the red, green, yellow, and blue multifunction keys.
| Icon Description | |
| Record | Press the red key to enter the sub-menu. You can choose the time of the programme you want to record. |
| Info | Press the green key to display the detailed information about the programme. |
| Schedule | Press the yellow key to see your previous settings. |
| Remind | Press the blue key to set the time when you want to be reminded about the programme you want to see. |
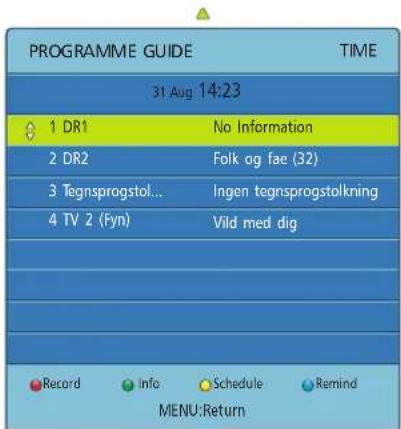
Fig. 17
Hotel Function (optional)
Press "MENU" key on the remote control to display the main TV menu and then press "4578" on the remote control to display the hotel function menu. Press "Up/DOWN" key to enter the menu and select the item you want to adjust. Then press "Left/Right" key to adjust the value or state (Fig. 18).
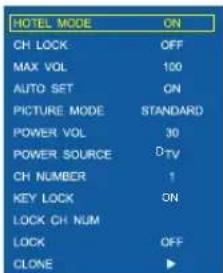
Fig. 18
USB Media Function
Please insert USB storage device into USB interface of TV and press "SOURCE" key. "Input Source" menu will be displayed on the screen. Then press "▲/▼" key to select USB. Press "OK" key to enter USB (Fig.19).
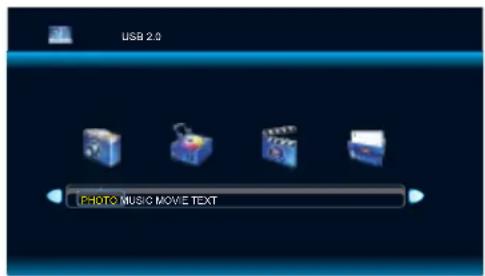
Fig. 19
Note:
-
USB function supports file formats with video file/sound file/graphic file/text file. Certain nonstandard USB storage devices may not be recognised. Please replace these with a standard USB storage device.
-
When playing a file, streaming media system has certain limitations for each format. If a file exceeding the system limit is played, then its reproduction will be wrong.
-
Do not pull out USB storage devices while the system is working. This may cause problems to the system or equipment.
-
The system supports USB1.1 and USB2.0 connector and the standard transport protocol, such as U discs and removable hard disc storage devices. USB device file format must be FAT or FAT32. It does not support NTFS.
-
The USB interface of this TV set can supply a voltage of 5V and the maximum current is 500mA; accurate identification of the multimedia player will be affected when a storage device over 500mA is used, which is a normal phenomenon.
Remote Control Shortcut Keys
The "INDEX", "ZOOM", "REVEAL", "TTX", "HOLD", "LIST", "LANGUAGE", "RADIO" keys on the remote control are used for USB operation.
Press "◀/▶" key to select the adjustment sort menu, which includes 4 sorts: PHOTO, MUSIC, MOVIE, TEXT.
Press "◀/▶" key to select PHOTO. Then press "OK" key to read your photo documents. Press "▲/▼/◀/▶" key to select photo and press "OK" key (After the photo was selected, the file lower right corner displays a red hook. You can choose photos to join them to the playlist.). Press "INDEX" key on the remote control to play. If you do not choose anything, the device will automatically join all the photos from the file in a playlist.
Note: The operation method of the MUSIC, MOVIE and TEXT are the same as that of PHOTO. Please refer to PHOTO options.
Basic Function: When displaying photos, press "INFO" key. A toolbar will be displayed at the bottom of the screen. (Press "▼" key to hide toolbar)
| Icon Description | |
| Play/Pause:Press “◀/▶” key to select this function. Press "OK" key to play or pause. | |
| Prev.:Press “◀/▶” key to select this function. Press "OK" key to read the previous photo. | |
| Next:Press “◀/▶” key to select this function. Press "OK" key to read the next photo. | |
| Stop:Press “◀/▶” key to select this function. Press "OK" key to stop playing and to return to the previous menu. | |
| Repeat:Press “◀/▶” key to select this function. Press "OK" key to select Repeat 1 or Repeat ALL or Repeat None. | |
| Random Off:Press “◀/▶” key to select this function. Press "OK" key to turn on/off random playing. | |
| Music:Press “◀/▶” key to select this function. Press "OK" key to play background music.(Music and photos should be placed in the same folder, or you can select a piece of music from your music file first.) | |
 | Playlist:Press "◀/▶" key to select this function. Press "OK" key to view playlist. |
 | Info.:Press "◀/▶" key to select this function. Press "OK" key to view photo information, including resolution, size and so on. |
 | Rotate:Press "◀/▶" key to select this function. Press "OK" key to rotate photos clockwise. |
 | Rotate:Press "◀/▶" key to select this function. Press "OK" key to rotate photos counter-clockwise. |
 | Zoom In:Press "◀/▶" key to select this function. Press "OK" key to enlarge photos. |
 | Zoom Out:Press "◀/▶" key to select this function. Press "OK" key to reduce photos. |
 | Move View:If photo exceeds the screen, use this function to move across the photo. |
 | FB:Press "◀/▶" key to select this function. Press "OK" key to fast back. Press "INDEX" key to play normally. |
 | FF:Press "◀/▶" key to select this function. Press "OK" key to fast forward. Press "INDEX" key to play normally. |
 | MUTE:Press "◀/▶" key to select this function. Press "OK" key to fast back. Press "MUTE" key to switch off sound. |
 | Goto Time:Press "◀/▶" key to select this function. Press "OK" key to select the time to play. |
 | Set A-B repeat:Press "◀/▶" key to select this function. Press "OK" key to set A and B. The film will be repeated during A to B interval. |
 | Slow Forward:Press "◀/▶" key to select this function. Press "OK" key to slow down play speed. Press "INDEX" key to play normally. |
 | Step Forward:Press "◀/▶" key to select this function. Press "OK" key to play step by step. Press "INDEX" key to play normally. |
 | Aspect Ratio:Press "◀/▶" key to select this function. Press "OK" key to select Auto, 4:3, Full. |
Simple troubleshooting
| Symptom Cause Solution | ||
| Snowflake speckle and sound noise. | 1. Antenna cable connector is loose, cable is damaged.2. Antenna cable type does not match.3. Direction or position of antenna is incorrect.4. Signal is weak. | 1. Check if the antenna cable connector plug is loose and if the cable is perfect.2. Check antenna cable type (VHF/UHF)3. Adjust direction or position of antenna.4. Attempt to use signal amplifier. |
| TV image is better, but has noise. | Antenna cable connector is loose, cable is damaged. | Check if the antenna cable connector plug is loose and check cable condition. |
| No image. No sound. | Power plug is loose, or power supply is not connected. | Check if the power cord is well connected. |
| TV image has stripes. | Signal is exposed to interference, such as car, neon light, electric blower etc. | Do not use electric blower around the device and adjust antenna cable direction to reduce interference. |
| TV image has shadows. | 1. TV signal is reflected against a valley or building.2. Direction of antenna is incorrect. | 1. Use high directional antenna.2. Adjust direction of antenna. |
| TV has no sound. | 1. Volume setting is too low.2. Sound is muted. | 1. Adjust volume to proper value.2. Press "MUTE" key on remote control to eliminate mute. |
| Computer does not display anything and it does not prompt any signal input, red indicator LED twinkling. | Signal cable is loose or disconnected. | Check if the signal cable is loose or disconnected, and reconnect it. |
| Remote control distance is short; it loses control. | 1. Receive window of remote control is covered by objects.2. The battery energy of remote control is too low. | 1. Remove objects obstructing the receiver window of remote control.2. Change batteries. |
| Computer display is faint. | 1. Adjustment is incorrect.2. Display mode is incorrect. | 1. Use auto-adjustment function.2. Use recommended mode. |
| Computer display image does not fill the screen. | 1. Adjustment is incorrect.2. Display mode is incorrect. | 1. Use Auto-adjustment function.2. Enter "PICTURE" to adjust horizontal or vertical position.3. Use recommended mode. |
| Noise Signals while turning off. | Electrical discharge while turning off. It is normal. | |
| Cannot operate this device. | Exterior influence, for example lightning, static electricity and so on, which can potentially interfere with normal operation of this device. | First disconnect the power supply and reconnect it after about 1-2 minutes, then turn on the TV again. |
Technical Specifications
| Panel size | 32" 40" 43" | |||
| Screen size - diagonal | 81cm 102cm 109cm | |||
| Screen resolution | 1366×768 1920×1080 1920×1080 | |||
| Pixel Pitch (mm) | 0.51075×0.51075 0.45735×0.4494 0.4902×0.4902 | |||
| Active Area (mm) | 697.685×392.256 878.112×485.352 941.184×529.416 | |||
| Audio output power (L+R) | 6W +6W 6W +6W 8W +8W | |||
| Working voltage | 100-240V~ 50/60Hz | |||
| Rated power consumption | Normal working ≤55W | ≤55W ≤75W | ||
| Standby ≤0.5W ≤0.5W | ≤0.5W | |||
| Dimensions Excluding base (LxHxW mm) | 730×430×77 | 904×521×82 | 968×567×78 | |
| Dimensions Including base (mm) | 730×474×193 | 904×571×222 | 968×616×222 | |
| Net Weight (kg) | 4.0 | 6.5 | 8.0 | |
| Gross Weight (kg) | 5.2 | 8.5 | 10.0 | |
| Operating environment | 5°~40°; RH: 10%~85%; atmospheric pressure: 86kPa~104kPa | |||
| Storage environment | -20°~55°; RH: 5%~95%; atmospheric pressure: 86kPa~104kPa | |||
| Supported Systems | ATV: PAL D/K, I, B/G, SECAM D/K, B/G, LDTV: DVB-T/C/T2 | |||
| TV (RF) | 75Ω Imbalance | |||
| AV Video-Input | 75Ω, 1±0.1VP-P, RCA | |||
| AV Audio-Input | 20KΩ, 0.2~2V RMS | |||
| HDMI Video Input | 480i, 480p, 576i, 576p, 720p, 1080i, 1080p | |||
Base Installation Instructions
Different bases follow different installation methods. Please choose the appropriate installation method according to the actual situation.
Place the TV on a flat working table. Put the TV base at the bottom of the device as shown by arrows on the picture. Adjust the base in a way that the holes on it are aligned with the holes at the bottom of the TV, then fasten the screw.
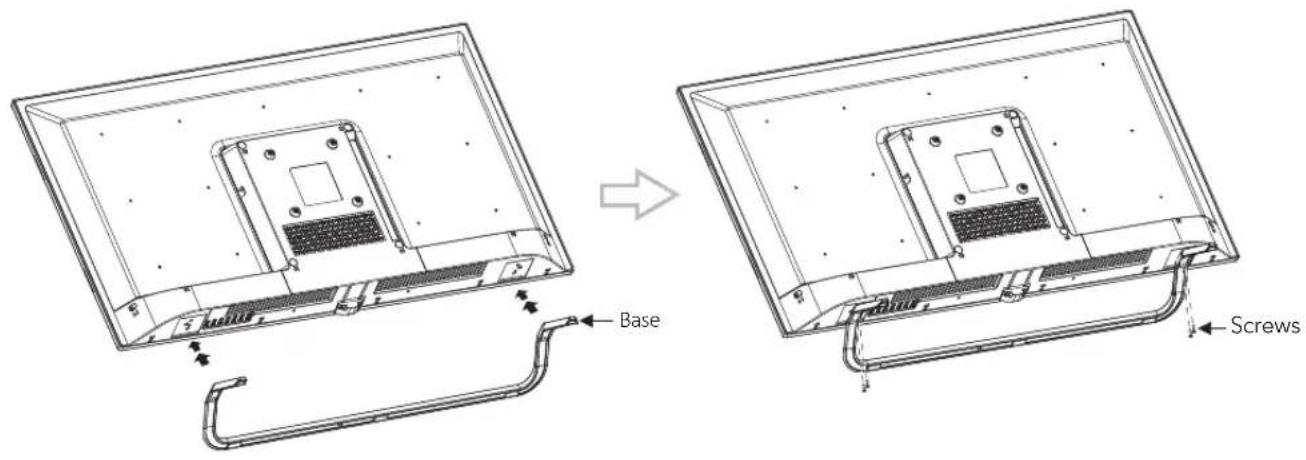
Remark: The actual base and device appearance may be different from pictures; please refer to the actual device.
Përmbajtja
Karakteristikat....23
32"/40"
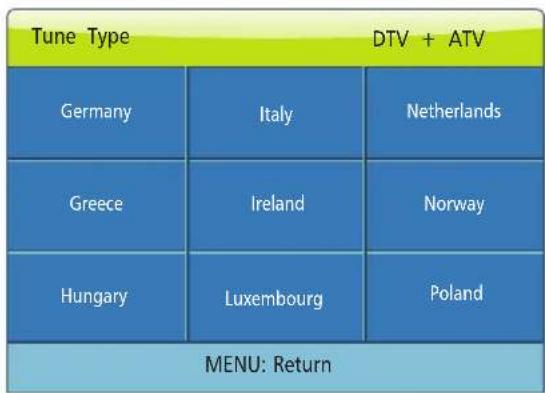
Foto. 1 Foto. 2
Foto. 8
Foto. 9
Foto. 16

natural_image
Top-down schematic of a computer monitor layout showing front, top, and side views (no text or labels)32"/40"
43"
- LED indikator napona i prijemnik signala daljinskog upravljača.
- ① Prekidač za napajanje (opcionalno): Pritisnite "I" za uključivanje i pritisnite "O" za isključivanje.
- IZVOR (SOURCE →): Da uđete u meni za izvor signala i odaberete izvor signala, pritisnite ovaj taster.
- CH-, CH+ (−CH+): Da izaberete kanal, pritisnite jedan od ova dva tastera. Ova dva tastera, koja imaju istu funkciju kao i tasteri ▲/▼na daljinskom upravljaču, možete koristiti za podešavanja stavki u OSD meniju.
- VOL-, VOL+ (−Δ+): Da povećate ili smanjite jačinu zvuka, pritisnite neki od ova dva tastera. Da podesite analognu vrijednost izabrane stavke u OSD meniju, pritisnite jedan od ova dva tastera. Ovi tasteri imaju istu funkciju kao i tasteri ◀/▶ na daljinskom upravljaču.
- MENI (MENU ☐): Da udete u glavni meni, pritisnite ovaj taster.
- ⏻ Pripravnost (Standby): Za ponovno uključivanje TV-a ili vraćanje u režim pripravnosti.
Slika 1 Slika 2
Priključite kabl za napajanje u električnu utičnicu. Da uključite TV, pritisnite taster „„ na daljinskom upravljaču ili na TV setu. Na ekranu je prikazan meni „Izaberite OSD jezik“ (slika 1). Da izaberete željeni jezik, pritisnite taster „▲/▼/◄/►“ na daljinskom upravljaču, a zatim pritisnite taster „OK“ radi potvrde izbora. Na ekranu stoji „Izaberite tip DVB režima“. Da izaberete željeni tip DVB režima, pritisnite taster „▲/▼“ na daljinskom upravljaču, a zatim pritisnite taster „OK“ da predete na sledeći korak (slika 2). (Prikazan je primer traženja kanala u DVB režimu za DVB-T.) Pritisnite taster „◄/►“ da izaberete tip podešavanja: DTV + ATV, ATV, DTV. Pritisnite taster „▼“. Pritiskom na „▲/▼/◄/►“ možete da odaberete državu u kojoj se nalazite, a zatim pritisnite taster „OK“ radi potvrde izbora. Uređaj će započeti sa automatskom pretragom.
Uputstvo za upravljanje menijem
- Pritisnite taster „MENI” (MENU) bilo na daljinskom upravljaču, bilo na uređaju. Na ekranu će se pojaviti glavni meni (slika 4).
- Pritisnite taster „◀/▶“ na daljinskom upravljaču ili taster „VOL+/VOL-“ na uređaju kako biste izabrali meni za podešavanje opcija koji sadrži 6 opcija: „KANAL“, „SLIKA“, „ZVUK“, „OPCIJE“, „VRIJEME“, „ZAKLJUČAVANJE“.
- Da izaberete ono što želite da podesite u meniju za podešavanje opcija, pritisnite taster „▲ /▼” na daljinskom upravljaču ili taster „CH+/CH-“ na uređaju.
- Pritisnite taster „OK“ na daljinskom upravljaču da podesite ili da uđete u sledeći meni.
- Kada je na TV-u prikazan glavni meni, pritisnite taster „MENI“ (MENU) da izadete iz glavnog menija. Kada je na TV-u prikazan pod-meni, pritisnite taster „MENI“ (MENU) da se vratite na prethodni meni. Pritisnite taster „IZVOR“ (SOURCE) da dobijete prikaz menija izvora signala.
- Tokom rada, elementi koji se u datom režimu ne mogu podešavati biće automatski skriveni, a njihova boja će se promjeniti u sivu.
- Uputstvo za upravljanje menijem u okviru ovog uputstva odnosi se na rad u TV režimu. Rad u drugim režimima je sličan radu u okviru TV režima. Korisnici ga mogu uzeti kao primer.
- Napomena: Taster "▲/▼/◄/►" navedeni u ovom uputstvu odnose se na pravce tastera za navigaciju daljinskog upravljača osim ukoliko nije posebno definisano drugačije. Dole navedeno uputstvo za rad u celosti je zasnovano na tasterima daljinskog upravljača. Molimo vas da funkcije tastera na uređaju sami shvatite.
KANAL (CHANNEL)
Pritisnite taster „MENI“ (MENU) i na ekranu će se pojaviti meni „KANAL“ (slika 4). Pritisnite taster “▲/▼” da izaberete stavku koju želite da doterate ili podesite.
Automatsko traženje (Auto Tuning)
Pritisnite taster „MENI“ (MENU) i na ekranu će se pojaviti meni „KANAL“. Pritisnite taster „▲/▼“ da izaberete automatsko traženje. Pritisnite taster „OK“ i na ekranu će se pojaviti „Izaberite tip DVB režima“. Pritisnite taster „▲/▼“ na daljinskom upravljaču kako biste izabrali željeni tip DVB režima, a zatim pritisnite taster „OK“ kako biste prešli na sledeći korak (Slika 2). (Prikazan je primjer traženja kanala u DVB režimu za DVB-T.) Pritisnite taster „◀/▶“ da izaberete tip podešavanja: DTV + ATV, ATV, DTV. Pritisnite taster „▼“. Pritiskom na „▲/▼/◀/▶“ možete da odaberete željenu državu, a zatim pritisnite taster „OK“ radi potvrde izbora. Uređaj će započeti sa automatskim traženjem (slika 5). Tokom automatskog traženja, možete da pritisnete taster „MENI“ (MENU) kako biste se vratili nazad i izašli iz automatskog traženja.
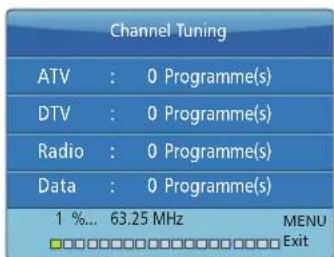
Slika 5
Ručno traženje u DTV režimu (DTV Manual Tuning)
Pritisnite taster „MENI“ (MENU) i na ekranu će se pojaviti meni „KANAL“. Da odaberete ručno traženje u DTV režimu, pritisnite taster „▲/▼“. Pritisnite taster „OK“ da uđete u meni Ručno traženje u DTV režimu (slika 6). Pritisnite taster „◀/▶“ kako biste odabrali kanal, a zatim pritisnite taster „OK“ da pokrenete pretragu. Nakon pretraživanja, meni Ručno traženje u DTV režimu će se automatski zatvoriti.
Ručno traženje u ATV režimu (ATV Manual Tuning)
Pritisnite taster „MENI“ (MENU) i na ekranu će se pojaviti meni „KANAL“. Da odaberete ručno traženje u ATV režimu, pritisnite taster „▲/▼”. Pritisnite taster „OK“ da uđete u meni Ručno traženje u ATV režimu (slika 7). Pritisnite taster „▲/▼“ da biste označili trenutno odabrani kanal. Pritisnite taster „◀/▶“ za ručnu pretragu. Nakon pretraživanja, pronađeni kanal možete da sačuvate na bilo kojoj drugoj poziciji. U ovom trenutku, pritisnite taster „◀/▶“ kako biste odabrali „Sačuvaj na“ (Storage To), a zatim pritisnite taster „▲/▼“ da odaberete broj kanala. Nakon što izaberete „Fino podešavanje“ (Fine-Tune), pritisnite taster „◀/▶“ da obavite pretragu niske ili visoke frekvencije. Tokom ručnog pretraživanja, možete da pritisnete taster „MENI“ (MENU) kako biste prekinuli pretragu i vratili se u prethodni meni.
Editovanje programa (Programme Edit)
Pritisnite taster „MENI“ (MENU) i na ekranu će se pojaviti meni „KANAL“. Pritisnite taster „▲/▼“ da odaberete editovanje programa. Pritisnite taster „OK“ kako biste ušli u meni „Editovanje programa“ (slika 8), a zatim pritisnite taster „▲/▼“ kako biste odabrali kanal koji želite da editujete.
Brisanje (Delete): Izaberite kanal i pritisnite crveni taster da biste ga obrisali.
Premiještanje (Move): Izaberite kanal i pritisnite zeleni taster, a zatim i taster „▲/▼“ kako biste izabrali poziciju na koju želite da premijestite izabrani kanal. Pritisnite taster „OK“ radi potvrde izbora. Da se vratite u prethodni meni, pritisnite taster „MENI“ (MENU).
Omiljeni kanali (Favourite): Izaberite kanal i pritisnite žuti taster. Iza izabranog kanala pojaviće se ikonica omiljenog kanala. Da poništite izbor, ponovo pritisnite žuti taster. Da se vratite u glavni meni, pritisnite taster „MENI“ (MENU).
Preskakanje (Skip): Izaberite kanal i pritisnite plavi taster. Iza izabranog kanala pojaviće se ikonica preskakanja kanala. Da poništite izbor, ponovo pritisnite plavi taster. Da se vratite u glavni meni, pritisnite taster „MENI“ (MENU).
Podaci o signalu (Signal Information)
Pritisnite taster „MENI“ (MENU) i na ekranu će se pojaviti meni „KANAL“. Da izaberete opciju „Podaci o signalu“, pritisnite taster „▲/▼“. Da uđete u meni „Podaci o signalu“, pritisnite taster „OK“. Možete da pregledate podatke o signalu.
Napomena: Prije nego što pritisnete taster „MENI“ (MENU), izaberite izvor ulaznog signala. Izvor ulaznog signala možete izabrati jedino u DTV režimu.
SLIKA (PICTURE)
Pritisnite taster „MENI“ (MENU) i na ekranu će se pojaviti meni „KANAL“. Da izaberete opciju SLIKA, pritisnite taster „◀/▶” (slika 9), a zatim pritisnite taster „▲/▼“ kako biste izabrali stavku koju želite da dotjerate ili podesite.
Režim prikaza slike (Picture Mode): Da udete u pod-meni „Režim prikaza slike“, pritisnite taster „OK“. Da izaberete stavku koju želite da dotjerate ili podesite, pritisnite taster „▲/▼“.
Slika 8
Slika 9
| Stavka Funkcija Opis | ||
| Režim prikaza slike (Picture Mode) | Odabir režima prikaza slike | Standardno (Standard), blago (Soft), lično (User), dinamično (Dynamic), četiri režima. |
| Kontrast (Contrast) | Podešavanje kontrasta cijele slike | Povećanjem analogne vrijednosti povećava se kontrast; Smanjenjem analogne vrijednosti smanjuje se kontrast (0~100). |
| Osvjetljenje (Brightness) | Podešavanje osvjetljenja i nivoa crnog cijele slike | Povećanjem analogne vrijednosti povećava se osvetljenje; Smanjenjem analogne vrijednosti smanjuje se osvetljenje (0~100). |
| Zasićenje (Saturation) | Podešavanje dubine boja slike | Povećanjem analogne vrijednosti povećava se intenzitet zelene boje; Smanjenjem analogne vrijednosti smanjuje se intenzitet ljubičaste (0~100). |
| Oštrina (Sharpness) | Podešavanje oštrine cijele slike | Povećanjem analogne vrijednosti povećava se definisanost; Smanjenjem analogne vrijednosti smanjuje se definisanost (0~100). |
| Nijansa (Tint) | Podešavanje nijanse cijele slike | Povećanjem analogne vrijednosti povećavate dubinu; Smanjenjem analogne vrijednosti umanjujete dubinu (0~100). |
Napomena: Nijansa se može podešavati jedino u NTSC sistemu.
Temperatura boja (Colour Temperature): Da uđete u pod-meni „Temperatura boja“, pritisnite taster „OK“. Da izaberete jedan od ponuđenih režima temperature boja: „standardno“ (Standard), „toplo“ (Warm) ili „hladno“ (Cool), pritisnite taster „◀/▶“.
Format slike (Aspect Ratio): Da uđete u pod-meni „Format slike“, pritisnite taster „OK“. Da izaberete jedan od ponuđenih režima formata slike: „automatski“ (Auto), „4:3“, „cijeli ekran“ (Full), „film“ (Film), „titlovi“ (Subtitle) ili „PC“, pritisnite taster „▲/▼“.
Umanjenje šuma (Noise Reduction): Da uđete u pod-meni „Umanjenje šuma“, pritisnite taster „OK“. Da izaberete jedan od ponuđenih režima umanjenja šuma: „isključeno“ (Off), „slabo“ (Low), „srednje“ (Middle) ili „jako“ (High), pritisnite taster „▲/▼“.
ZVUK (SOUND)
Pritisnite taster „MENI“ (MENU) i na ekranu će se pojaviti meni „KANAL“. Da izaberete opciju ZVUK, pritisnite taster „◀/▶“ (slika 10), a zatim pritisnite taster „▲/▼“ kako biste izabrali stavku koju želite da dotjerate ili podesite.
Režim podešavanja zvuka (Sound Mode): Da uđete u pod-meni „Režim podešavanja zvuka“, pritisnite taster „OK“. Da izaberete stavku koju želite da dotjerate ili podesite, pritisnite taster „▲/▼”.
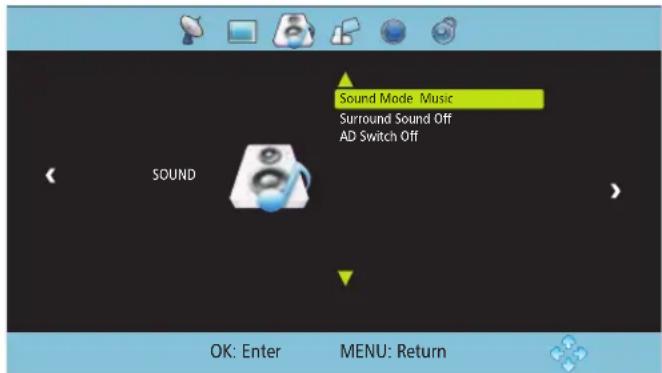
Slika 10
| Stavka Funkcija Opis | ||
| Režim podešavanja zvuka (Sound Mode) | Odabir temperature zvuka | Standardno (Standard), Muzika (Music), Film (Movie), Lično (User), pet režima. |
| Visoki (Treble) | Podešavanjevrijednosti visokih tonova | Povećanjem analogne vrijednosti povećava se vrijednost visokih tonova; Smanjenjem analogne vrijednosti smanjuje se vrijednost visokih tonova (0~ 100). |
| Bas (Bass) | Podešavanjevrijednosti niskih tonova | Povećanjem analogne vrijednosti povećava se vrijednost niskih tonova; Smanjenjem analogne vrijednosti smanjuje se vrijednost niskih tonova (0~ 100). |
| Balans (Balance) | Podešavanje balansa između lijevog i desnog zvučnika | Povećanjem analogne vrijednosti smanjuje se jačina lijevog zvučnika; Smanjenjem analogne vrijednosti smanjuje se jačina desnog zvučnika (L50~ R50). |
Zvuk okruženja (Surround Sound): Da uđete u pod-meni „Zvuk okruženja“, pritisnite taster „OK“. Da izaberete jedan od ponuđenih režima zvuka okruženja: „isključeno“ (Off), „okruženje“ (Surround) ili SRS Trusurround XT, pritisnite taster “▲/▼”.
AD prekidač (AD Switch): Da uđete u pod-meni „AD prekidač“, pritisnite taster „OK“. Da izaberete „uključeno“ (On) ili „isključeno“ (Off), pritisnite taster“◀/▶”, “. Ako izaberete opciju „uključeno“, AD možete podesiti pritiskom na taster “◀/▶” (dostupno jedino u DTV režimu).
OPCIJE (OPTIONS)
Pritisnite taster „MENI“ (MENU) i na ekranu će se pojaviti meni „KANAL“. Da izaberete opciju „OPCIJE“, pritisnite taster „◀/▶“ (slika 11), a zatim pritisnite taster „▲/▼“ kako biste izabrali stavku koju želite da dotjerate ili podesite.
OSD jezik (OSD Language): Da uđete u pod-meni „OSD jezik“, pritisnite taster „OK“. Da izaberete željeni jezik, pritisnite taster „▲/▼/◀/▶“. Da se vratite u prethodni meni, pritisnite taster „MENI“ (MENU).
Napomena: Postupak upravljanja „Jezikom zvuka" (Audio Language) je isti kao i postupak upravljanja „OSD jezikom" (dostupno jedino u DTV režimu).
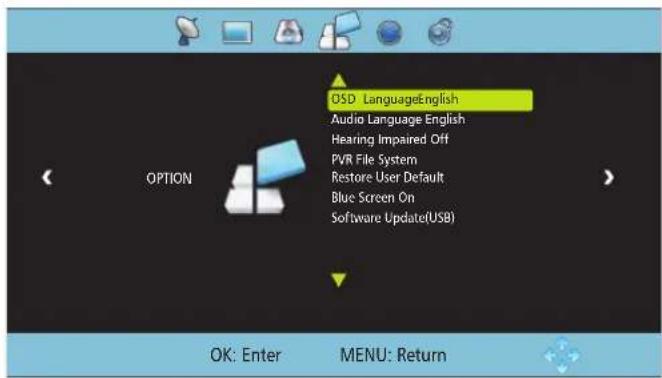
Slika 11
Osobe sa oštećenim sluhom (Hearing Impaired): Da izaberete opciju „uključeno“ („On“) ili „isključeno“ („Off“), pritisnite taster „OK“ (dostupno jedino u DTV režimu).
PVR sistem datoteka (PVR File System): Da uđete u pod-meni „PVR sistem datoteka“ (slika 12), pritisnite taster „OK“. Izaberite disk za čuvanje podataka u pod-meniju „izbor diska“ (select disc). Da izaberete opciju „Provera PVR sistema datoteka“ (Check PVR File System), pritisnite taster „▲/▼“ i, nakon što pritisnete taster „OK“, uređaj će početi da vrši provjeru. Nakon uspješne provjere, pritisnite taster „MENI“ (MENU) da izadete iz datog menija. Za snimanje, pritisnite taster „REC“.
Napomena: Prije nego što započnete rad u okviru funkcije „PVR datotečni sistem“, povežite USB disk na interfejs uređaja.
Vraćanje na korisničke fabričke vrijednosti (Restore User Default): Nakon što pritisnete taster „OK“, na ekranu će se pojaviti „Da li ste sigurni?“ („Are you sure?“). Pritisnite taster „◀“ da biste nastavili sa uspostavljanjem fabričkih vrijednosti ili pritisnite taster „▶“ da poništite operaciju koja je u toku.
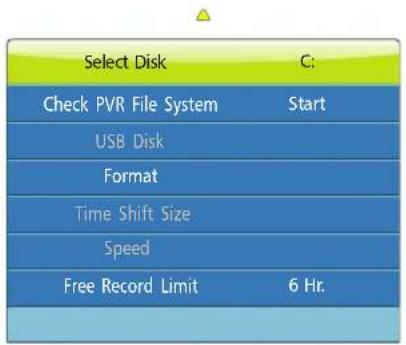
Slika 12
Plavi ekran (Blue Screen): Da izaberete „uključeno“ (On) ili „isključeno“ (Off), pritisnite taster „OK“. Otvorite ili zatvorite funkciju „Plavi ekran“.
Ažuriranje softvera (USB) (Software Update(USB)): Ažurirajte softver koristeći USB disk.
VRIJEME (TIME)
Pritisnite taster „MENI“ (MENU) i na ekranu će se pojaviti meni „KANAL“. Da izaberete opciju „VRIJEME“, pritisnite taster „◀/▶“ (slika 13), a zatim pritisnite taster „▲/▼“ kako biste izabrali stavku koju želite da dotjerate ili podesite.
Slika 15
| Ikonica Opis | |
| 1 | Pokazuje da sistem snima program. |
| 2 | Prikazuje broj trenutno izabranog programa. |
| 3 | Prikazuje trajanje snimljenog programa. |
| 4 | Prikazuje maksimalno trajanje koje dati USB disk može da podrži (odnosi se na kapacitet USB diska) |
| 5 | Prikazuje vreijme trajanja trenutno izabranog programa. |
| ▶ | Reproduktovanje (Play): Označite ovu ikonicu. Pritisnite taster „OK“ za reproduktovanje video sadržaja ili za podešavanje ponavljanja programa od trenutka A do trenutka B (A-B repeat). |
| ◀◀ | Brzo premotavanje unatrag (FB): Označite ovu ikonicu. Pritisnite taster „OK“ za brzo premotavanje unatrag. Pritisnite taster „INDEKS“ (INDEX) za normalno reproduktovanje. |
| ▶▶ | Brzo premotavanje unaprijed (FF): Označite ovu ikonicu. Pritisnite taster „OK“ za brzo premotavanje unapred. Pritisnite taster „INDEKS“ (INDEX) za normalno reproduktovanje. |
| ◀◀ | Brzo premotavanje 30 sekundi unatrag (FB 30s): Označite ovu ikonicu. Pritisnite taster „OK“ za brzo premotavanje 30 sekundi unatrag. |
| ▶▶ | Brzo premotavanje 30 sekundi unaprijed (FF 30s): Označite ovu ikonicu. Pritisnite taster „OK“ za brzo premotavanje 30 sekundi unaprijed. |
| ▶▶ | Pauza (Pause): Označite ovu funkciju. Pritisnite taster „OK“ da pokrenete ili pauzirate reproduktovanje. |
| ▶▶ | Zaustavljanje (Stop): Označite ovu ikonicu. Pritisnite taster „OK“ da zaustavite i napustite prozor za reproduktovanje. |
Opcija time-shift snimanja
U DTV režimu, pritisnite taster „ZUMIRANJE“ (ZOOM). Na ekranu će se pojaviti meni time-shift opcije (slika 16), a program će biti odložen. Da nastavite sa reprodukovanjem programa, pritisnite taster „INDEKS“ (INDEX). Da zaustavite i napustite opciju time-shift snimanja, pritisnite taster „SKRIVENI PODACI“ (REVEAL). Ukoliko korisnik nakratko napusti program, time-shift funkcija omogućava odlaganje i čuvanje programa koji je u toku na USB disk. Reprodukovanje programa se može nastaviti kada korisnik to poželi.
![DR 1 Time Shift [00:00:00/00:02:08/01:20:00] Play F0 5F F0 30S FF 30S Pause Stop 14:23](/content/2026/05/801068/images/c10b09907ccd2db891c253f5660420843ec6cb25ed06622b2bb845af80fce32a.jpg)
Slika 16
| Ikonica Φpis | |
| 1 | Pokazuje da je program odložen. |
| 2 | Prikazuje vrijeme programa koji je u toku. |
| 3 | Prikazuje vrijeme odlaganja programa. |
| 4 | Prikazuje maksimalno vrijeme čuvanja koje USB disk može da omogući. |
| ▶ | Reprodukovanje (Play): Označite ovu ikonicu. Pritisnite taster „OK“ za reprodukovanje video sadržaja ili za podešavanje ponavljanja programa od trenutka A do trenutka B (A-B repeat). |
| ◀ | Brzo premotavanje unatrag (FB): Označite ovu ikonicu. Pritisnite taster „OK“ za brzo premotavanje unatrag. Pritisnite taster „INDEKS“ (INDEX) za normalno reprodukovanje. |
| ▶ | Brzo premotavanje unaprijed (FF): Označite ovu ikonicu. Pritisnite taster „OK“ za brzo premotavanje unaprijed. Pritisnite taster „INDEKS“ (INDEX) za normalno reprodukovanje. |
| ◀ | Brzo premotavanje 30 sekundi unatrag (FB 30s): Označite ovu ikonicu. Pritisnite taster „OK“ za brzo premotavanje 30 sekundi unatrag. |
| ▶ | Brzo premotavanje 30 sekundi unaprijed (FF 30s): Označite ovu ikonicu. Pritisnite taster „OK“ za brzo premotavanje 30 sekundi unaprijed. |
| II | Pauza (Pause): Označite ovu funkciju. Pritisnite taster „OK“ da pokrenete ili pauzirate reprodukovanje. |
| ■ | Zaustavljanje (Stop): Označite ovu ikonicu. Pritisnite taster „OK“ da zaustavite i napustite prozor za reprodukovanje. |
EPG (Vodič kroz elektronske programe) opcija
U DTV režimu, pritisnite taster „EPG” i meni EPG opcije će se pojaviti na ekranu (slika 17). Korisnik može da obavlja slijedeće operacije pomoću crvenog, zelenog, žutog i plavog višenamjenskog tastera.
| Ikonica Opis | |
| ●Snimanje (Record) | Pritisnite crveni taster da biste ušli u pod-meni. Možete da izaberete vrijeme emitovanja programa koji želite da snimite. |
| ●Informacije (Info) | Pritisnite zeleni taster za prikaz detaljnih podataka o programu. |
| ●Raspored (Schedule) | Pritisnite žuti taster da pogledate svoja prethodna podešavanja. |
| ●Podsetnik (Remind) | Pritisnite plavi taster da podesite vrijeme podsećanja na program koji želite da pogledate. |
Hotelski režim (opcionalno)
Pritisnite taster „MENI“ (MENU) na daljinskom upravljaču kako biste dobili prikaz glavnog menija TV-a, a zatim na daljinskom upravljaču pritisnite „4578“ za prikaz menija hotelskog režima. Pritisnite taster „Gore/DOLE“ (Up/DOWN) da uđete u meni i izaberete stavku koju treba da podesite. Zatim pritisnite taster „Levo/Desno“ (Left/Right) da podesite vrijednosti ili stanje (slika 18).
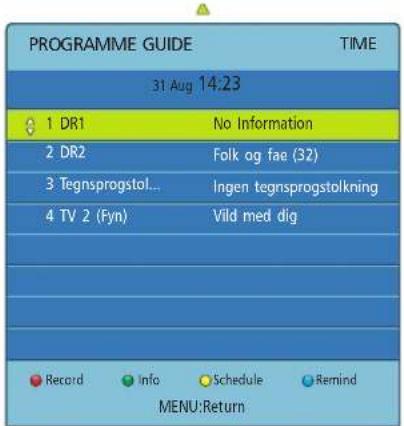
Slika 17
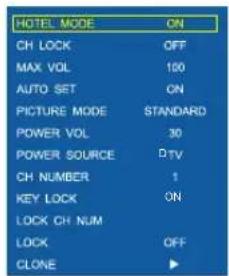
Slika 18
USB medijski režim
Priključite USB memorijski uređaj na USB interfejs TV-a i pritisnite taster „IZVOR“ (SOURCE). Na ekranu će se pojaviti meni „Izvor ulaznog signala“. Zatim pritisnite taster „▲/▼“ da izaberete USB. Pritisnite taster „OK“ da uđete u USB memoriju (slika 19).
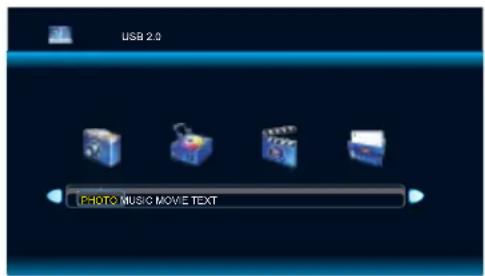
Slika 19
Napomena:
-
USB režim podržava datotečne formate sa video datotekama/audio datotekama/grafičkim datotekama/tekstualnim datotekama. Može doći do neprepoznavanja određenih nestandardnih USB memorijskih uređaja. Zamijenite ih standardnim USB memorijskim uređajem.
-
Sistem strujanja medija prilikom reprodukovanja datoteke pokazuje određena ograničenja kod svakog od formata. Ukoliko se reprodukuje datoteka koja je veća od ograničenja sistema, reprodukovanje će biti pogrešno.
-
Ne vadite USB memorijske uređaje dok rade u okviru sistema. Ovo može da dovede do pojave problema u sistemu i opremi.
-
Sistem ima USB1.1 i USB2.0 priključak i standardni prenosni protokol, kakav su USB diskovi i prenosivi hard diskovi. Datotečni format na USB uređajima treba da bude FAT ili FAT32. Ne podržava NTFS.
-
USB interfejs ovog TV seta može da omogući napon od 5V i maksimalnu struju od 500mA; upotreba memorijskog uređaja koji zahtijeva više od 500mA uticaće na tačnu identifikaciju mulitedijalnog uređaja za reprodukciju, što se obično dešava.
OPTIONS (Опци) .....80
BPEME....80
LOCK (ЗАКЛЮЧВАНЕ) .....81
Опция REC 81
Time-shift option
natural_image
Technical line drawing of a computer monitor chassis with front panel and internal components (no text or labels)Връзка с AV вход

TV
Coaxial-OUT
EARPHONE
USB-1
USB-2
32"/40"
43"
Сл. 1 Сл. 2
Сл. 8
Сл. 9
Сл. 15
SLIKA (PICTURE)....78
ZVUK (SOUND)....79
OPCIJE (OPTIONS) 80
VRIJEME (TIME)....80
ZAKLJUČAVANJE (LOCK) .....81
Opcija snimanja (REC option)....81
TIME-SHIFT OPTION ....82
EPG OPCIJA ....82
Hotelski mod (opciono) .....82
USB Media funkcija ....83
Rješavanje jednostavnih problema....85
32"/40"
- Snaga LED indikatora i daljinsko upravljanje.
- Standby: Tipka prebacuje između uobičajenog i standby moda.
- MENU 📄 Tipka za biranje izbornika.
- VOL-, VOL+ (−Δ+): Pritisnite ove dvije tipke za pojačavanje ili stišavanje glasnoće. U OSD meniju, pritisnite ove dvije tipke za podešavanje analogne vrijednosti odabranih predmeta, koji imaju iste funkcije kao tipka na daljinskom upravljaču.
- CH-, CH+ (−CH+): Pritisnite ove dvije tipke da odaberete program. U OSD meniju, pritisnite ove dvije tipke za podešavanje odabranih predmeta, koji imaju iste funkcije kao tipka na daljinskom upravljaču.
- SOURCE ➕: Pritisnite ovu tipku da udete u meni izvora signala i izaberite izvor signala.
Napomena: Različiti modeli mogu imati različite karakteristike; molimo Vas pogledajte aktualni uređaj
43"
- Snaga LED indikatora i daljinsko upravljanje.
- ① Prekidač za napajanje (opcijski): Pritisnite tipku "l" za uključivanje i pritisnite tipku "O" za isključivanje.
-
SOURCE →: Pritisnite ovu tipku da udete u meni izvora signala i izaberite izvor signala.
-
CH-, CH+ ( -CH + ): Pritisnite ove dvije tipke da odaberete program. U OSD meniju, pritisnite ove dvije tipke za podešavanje odabranih predmeta, koji imaju iste funkcije kao tipka na daljinskom upravljaču.
-
VOL-, VOL+ (−Δ+): Pritisnite ove dvije tipke za pojačavanje ili stišavanje glasnoće. U OSD meniju, pritisnite ove dvije tipke za podešavanje analogne vrijednosti odabranih predmeta, koji imaju iste funkcije kao tipka na daljinskom upravljaču.
-
MENU 📁 Tipka za biranje izbornika.
Standby: Tipka prebacuje između uobičajenog i standby moda.
Slika 1 Slika 2
Uključite kabel za napajanje u električnu utičnicu. Pritisnite „U” na daljinskom upravljaču ili na TV prijemniku uključite TV. Zaslon “Molimo odaberite OSD JEZIK” izbornika (slika 1), pritisnite „▲/▼/◄/►” na daljinskom upravljaču za odabir jezika koji želite i pritisnite „OK” na daljinskom upravljaču za potvrdu, prikaz na zaslonu “DVB odaberite tip”, pritisnite „▲/▼” na daljinskom upravljaču za odabir DVB tip koji želite, zatim pritisnite „OK” za sljedeći korak (Sl.2). (Sljedeći primjer- kanal potrazi tip DVB pod DVB-T.) Pritisnite „◄/►” za odabir Tune Tip: DTV + ATV, ATV, DTV i pritisnite „▼”, možete odabrati zemlju u kojoj ste pritiskom „▲/▼/◄/►”, zatim pritisnite „OK” za potvrdu, TV prijemnik počinje automatsko ugađanje.
Rad u glavnom izborniku
Slika 8
Slika 9
| Stavka Funkcija Opis | ||
| Picture Mode (Izbor slike) | Izaberite slikovni mod. Ponuđeni izbor slike: ‘Standardno’, ‘Blago’, ‘Osobno’, ‘Dinamično’ | |
| Kontrast (Contrast) | Podešavanje kontrasta cijele slike | Povećanjem analogne vrijednosti povećava se kontrast; Smanjenjem analogne vrijednosti smanjuje se kontrast (0~100). |
| Osvjetljenje (Brightness) | Podešavanje osvjetljenja i nivoa crnog cijele slike | Povećanjem analogne vrijednosti povećava se osvijetljenje; Smanjenjem analogne vrijednosti smanjuje se osvijetljenje (0~100). |
| Zasićenje (Saturation) | Podešavanje dubine boja slike | Povećanjem analogne vrijednosti povećava se intenzitet zelene boje; Smanjenjem analogne vrijednosti smanjuje se intenzitet ljubičaste (0~100). |
| Oštrina (Sharpness) | Podešavanje oštrine cijele slike | Povećanjem analogne vrijednosti povećava se definiranosti ; Smanjenjem analogne vrijednosti smanjuje se definiranosti (0~100). |
| Nijansa (Tint) | Podešavanje nijanse cijele slike | Povećanjem analogne vrijednosti povećavate dubinu; Smanjenjem analogne vrijednosti umanjujete dubinu (0~100). |
Napomena: Nijansa se može podešavati jedino u NTSC sistemu.
Temperatura boja (Colour Temperature): Pritisnite „OK“ za ulazak u Color Temperature podizbornik. Pritisnite „◀/▶“ za odabir temperature boje: Standardno, Toplo, Hladno.
Omjer (Aspect Ratio): Pritisnite „OK“ za ulazak u podizbornik omjera. Pritisnite „▲/▼“ za odabir formata slike: Auto, 4: 3, Full, Film, Titlovi, PC mod.
Slika 15
| Ikonica Opis | |
| 1 | Pokazuje da sistem snima program. |
| 2 | Prikazuje broj trenutno izabranog programa. |
| 3 | Prikazuje trajanje snimljenog programa. |
| 4 | Prikazuje maksimalno trajanje koje dati USB disk može da podrži (odnosi se na kapacitet USB diska) |
| 5 | Prikazuje vreijme trajanja trenutno izabranog programa. |
| ▶ | Reprodukcija (Play): Označite ovu ikonicu. Pritisnite tipku „OK“ za reprodukciju video sadržaja ili za podešavanje ponavljanja programa od trenutka A do trenutka B (A-B repeat). |
| ◀ | Brzo premotavanje unatrag (FB): Označite ovu ikonicu. Pritisnite tipku „OK“ za brzo premotavanje unatrag. Pritisnite tipku „INDEKS“ (INDEX) za normalno reprodukciju. |
| ▶ | Brzo premotavanje unaprijed (FF): Označite ovu ikonicu. Pritisnite tipku „OK“ za brzo premotavanje unapred. Pritisnite tipku „INDEKS“ (INDEX) za normalnu reprodukciju. |
| ◀ | Brzo premotavanje 30 sekundi unatrag (FB 30s): Označite ovu ikonicu. Pritisnite tipku „OK“ za brzo premotavanje 30 sekundi unatrag. |
| ▶ | Brzo premotavanje 30 sekundi unaprijed (FF 30s): Označite ovu ikonicu. Pritisnite tipku „OK“ za brzo premotavanje 30 sekundi unaprijed. |
| ■ | Pauza (Pause): Označite ovu funkciju. Pritisnite tipku „OK“ da pokrenete ili pauzirale reprodukciju. |
| ■ | Zaustavljanje (Stop): Označite ovu ikonicu. Pritisnite tipku „OK“ da zaustavite i napustite prozor za reprodukciju. |
TIME-SHIFT OPTION
Slika 16
| Ikonica | Opis |
| 1 | Pokazuje da je program odložen. |
| 2 | Prikazuje vrijeme programa koji je u toku. |
| 3 | Prikazuje vrijeme odlaganja programa. |
| 4 | Prikazuje maksimalno vrijeme čuvanja koje USB disk može da omogući. |
| ▶ | Reprodukcija (Play): Označite ovu ikonicu. Pritisnite tipku „OK“ za reprodukciju video sadržaja ili za podešavanje ponavljanja programa od trenutka A do trenutka B (A-B repeat). |
| ◀ | Brzo premotavanje unatrag (FB): Označite ovu ikonicu. Pritisnite tipku „OK“ za brzo premotavanje unatrag. Pritisnite tipku „INDEKS“ (INDEX) za normalno reprodukciju. |
| ▶ | Brzo premotavanje unaprijed (FF): Označite ovu ikonicu. Pritisnite tipku „OK“ za brzo premotavanje unaprijed. Pritisnite tipku „INDEKS“ (INDEX) za normalno reprodukciju. |
| ◀ | Brzo premotavanje 30 sekundi unatrag (FB 30s): Označite ovu ikonicu. Pritisnite tipku „OK“ za brzo premotavanje 30 sekundi unatrag. |
| ▶ | Brzo premotavanje 30 sekundi unaprijed (FF 30s): Označite ovu ikonicu. Pritisnite tipku „OK“ za brzo premotavanje 30 sekundi unaprijed. |
| II | Pauza (Pause): Označite ovu funkciju. Pritisnite tipku „OK“ da pokrenete ili pauzirate reprodukciju. |
| ■ | Zaustavljanje (Stop): Označite ovu ikonicu. Pritisnite tipku „OK“ da zaustavite i napustite prozor za reprodukciju. |
EPG OPCIJA
U DTV režimu, pritisnite tipku „EPG“ i meni EPG opcije će se pojaviti na ekranu (slika 17). Korisnik može obavljati slijedeće operacije pomoću crvenog, zelenog, žutog i plavog višenamjenske tipke.
Napomena: Izgled postolja i uređaja koji imate može se razlikovati od onoga prikazanog na slici; pogledajte uređaj koji imate.
TARTALOM
JELLEMZÖK....111
BIZTONSÁGI FIGYELMEZTETÉS ÉS
MEGJEGYZÉS....112
43"
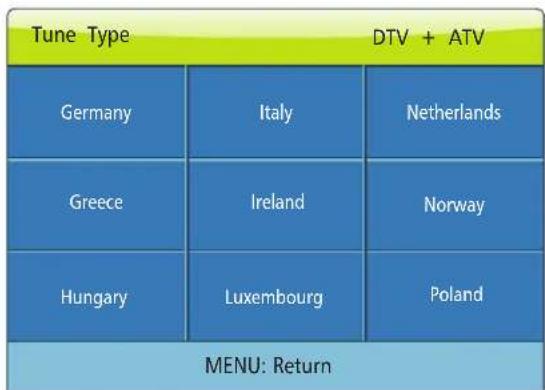
Fig. 1 Fig. 2
Fig. 3 Fig. 4
Fig. 8
Fig. 9
KÉP
Fig. 16

natural_image
Architectural floor plan showing room layouts and equipment layout (no text or labels)32"/40"
43"
Сл. 1 Сл. 2
Сл. 8
Сл.9
Сл. 14
Сл. 15
Сл. 16
32"/40"
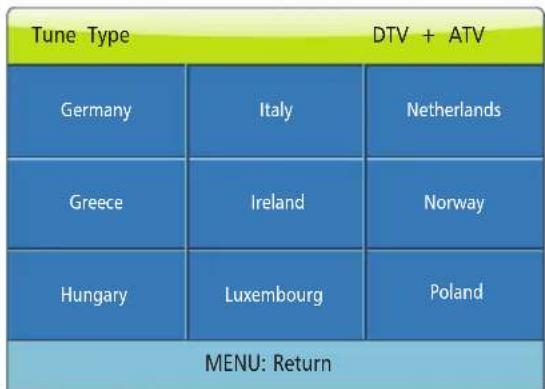
Fig. 1 Fig. 2
Fig. 8
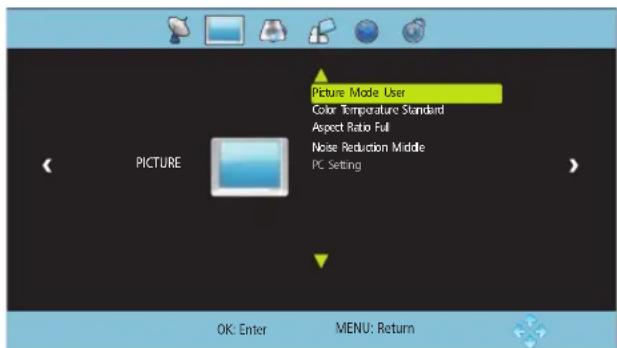
Fig. 9
Note: The recording function can only support memory devices with Fat32 file system. Memory devices with other file systems need to be formatted. Before formatting a memory device, back-up useful data because the content of memory devices cannot be recovered after formatting.
The Ground Truth image displays a single, solid horizontal line. According to Rule 2 (UNDERSCORE & LINE RULES), this is a stylistic or background line, not a placeholder underscore. Therefore, the OCR result must ignore it. The provided OCR content is "____", which consists of four underscores. This is an incorrect interpretation of the line as a placeholder, violating the rule that stylistic lines must be ignored. The OCR has hallucinated text (underscores) where none should exist based on the GT's visual context. Hence, the OCR result is inconsistent with the Ground Truth.
32"/40"
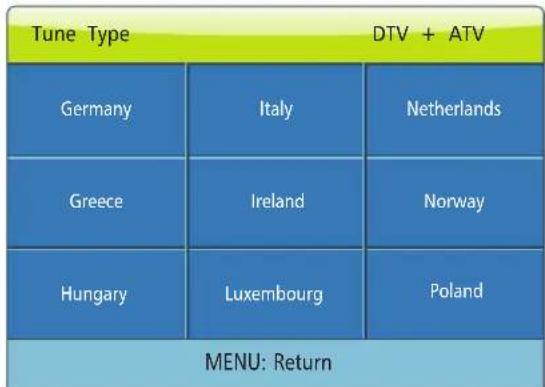
Slika 1 Slika 2
Slika 8
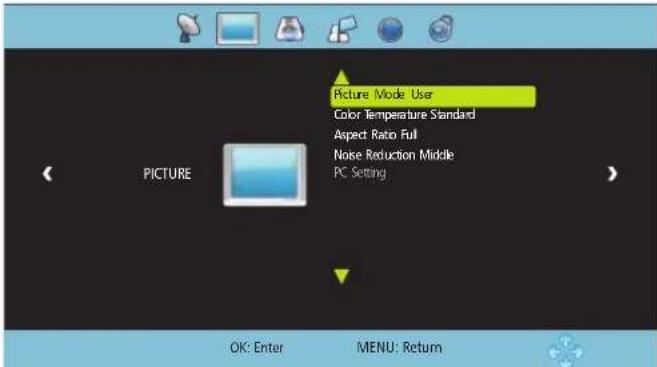
Slika 9
Slika 14
Slika 15
| Ikona Opis | |
| 1 | Označuje, da sistem trenutno snema oddajo. |
| 2 | Označuje trenutno številko programa. |
| 3 | Označuje trajanje posnete oddaje. |
| 4 | Označuje, kako dolg posnetek je še mogoče shraniti na disk (odvisno od kapacitete diska). |
| 5 | Označuje trenutni čas programa. |
| ▶ | Predvajaj: Izberite to ikono in pritisnite gumb OK za predvajanje video posnetka ali ponavljanje. |
| ◀ | Previj nazaj: Izberite to ikono in pritisnite gumb OK za previjanje. Za predvajanje pri običajni hitrosti pritisnite gumb INDEX. |
| ▶ | Previj naprej: Izberite to ikono in pritisnite gumb OK za previjanje. Za predvajanje pri običajni hitrosti pritisnite gumb INDEX. |
| ◀ | 30 s nazaj: Izberite to ikono in pritisnite gumb OK za preskok za 30 s nazaj. |
| ▶ | 30 s naprej: Izberite to ikono in pritisnite gumb OK za preskok za 30 s naprej. |
| || | Premor: Izberite to funkcijo in pritisnite gumb OK za premor ali nadaljevanje predvajanja. |
| ■ | Zaustavi: Izberite to ikono in pritisnite gumb OK za zaustavitev predvajanja. |
Časovni zamik
Slika 16
| Ikona O | pis |
| 1 | Označuje, da je oddaja zaustavljena. |
| 2 | Označuje trenutni čas programa. |
| 3 | Označuje, kdaj je bila oddaja zaustavljena. |
| 4 | Označuje, koliko prostora je na disku za shranjevanje tekočega programa. |
| ▶ | Predvajaj: Izberite to ikono in pritisnite gumb OK za predvajanje video posnetka ali ponavljanje. |
| ◀◀ | Previj nazaj: Izberite to ikono in pritisnite gumb OK za previjanje. Za predvajanje pri običajni hitrosti pritisnite gumb INDEX. |
| ▶▶ | Previj naprej: Izberite to ikono in pritisnite gumb OK za previjanje. Za predvajanje pri običajni hitrosti pritisnite gumb INDEX. |
| ◀◀ | 30 s nazaj: Izberite to ikono in pritisnite gumb OK za preskok za 30 s nazaj. |
| ▶◀ | 30 s naprej: Izberite to ikono in pritisnite gumb OK za preskok za 30 s naprej. |
| ◀◀ | Premor: Izberite to funkcijo in pritisnite OK za premor ali nadaljevanje predvajanja. |
| ■ | Zaustavi: Izberite to ikono in pritisnite gumb OK za zaustavitev predvajanja. |
SLIKA (PICTURE)....210
ZVUK (SOUND)....211
OPCIJE (OPTIONS) .....212
VREME (TIME) 212
ZAKLJUČAVANJE (LOCK) .....213
Opcija snimanja (REC option)....213
Opcija time-shift snimanja .....214
EPG opcija .....214
Hotelski režim (opcionalno)....214
USB medijski režim....215
Otklanjanje jednostavnih problema .....217
32"/40"
- LED indikator napona i prijemnik signala daljinskog upravljača.
- ⏻ Pripravnost (Standby): Za ponovno uključivanje TV-a ili vraćanje u režim pripravnosti.
- MENI (MENU ☐): Da uđete u glavni meni, pritisnite ovaj taster.
- VOL-, VOL+ (−Δ+): Da povećate ili smanjite jačinu zvuka, pritisnite neki od ova dva tastera. Da podesite analognu vrednost izabrane stavke u OSD meniju, pritisnite jedan od ova dva tastera. Ovi tasteri imaju istu funkciju kao i tasteri ◀/▶ na daljinskom upravljaču.
- CH-, CH+ ( -CH + ): Da izaberete kanal, pritisnite jedan od ova dva tastera. Ova dva tastera, koja imaju istu funkciju kao i tasteri ▲ /▼na daljinskom upravljaču, možete koristiti za podešavanja stavki u OSD meniju.
- IZVOR (SOURCE ☐): Da udete u meni za izvor signala i odaberete izvor signala, pritisnite ovaj taster.
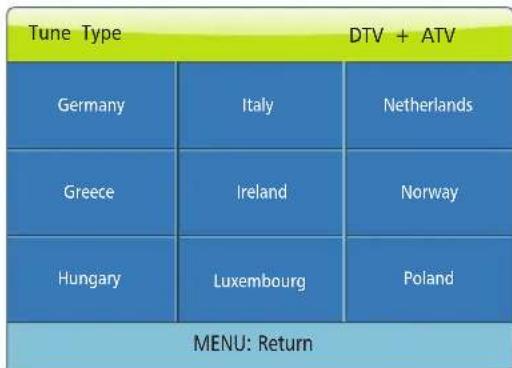
Slika 1 Slika 2
Priključite kabl za napajanje u električnu utičnicu. Da uključite TV, pritisnite taster „„ na daljinskom upravljaču ili na TV setu. Na ekranu je prikazan meni „Izaberite OSD jezik“ (slika 1). Da izaberete željeni jezik, pritisnite taster „▲/▼/◀/▶” na daljinskom upravljaču, a zatim pritisnite taster „OK“ radi potvrde izbora. Na ekranu stoji „Izaberite tip DVB režima”. Da izaberete željeni tip DVB režima, pritisnite taster „▲/▼“ na daljinskom upravljaču, a zatim pritisnite taster „OK“ da predete na sledeći korak (slika 2). (Prikazan je primer traženja kanala u DVB režimu za DVB-T.) Pritisnite taster „◀/▶“ da izaberete tip podešavanja: DTV + ATV, ATV, DTV. Pritisnite taster „▼“. Pritiskom na „▲/▼/◀/▶“ možete da odaberete državu u kojoj se nalazite, a zatim pritisnite taster „OK“ radi potvrde izbora. Uređaj će započeti sa automatskom pretragom.
Uputstvo za upravljanje menijem
Pritisnite taster „MENI” (MENU) bilo na daljinskom upravljaču, bilo na uređaju. Na ekranu će se pojaviti glavni meni (slika 4).
- Pritisnite taster „◀/▶“ na daljinskom upravljaču ili taster „VOL+/VOL-“ na uređaju kako biste izabrali meni za podešavanje opcija koji sadrži 6 opcija: „KANAL“, „SLIKA“, „ZVUK“, „OPCIJE“, „VREME“, „ZAKLJUČAVANJE“.
- Da izaberete ono što želite da podesite u meniju za podešavanje opcija, pritisnite taster „▲ /▼” na daljinskom upravljaču ili taster „CH+/CH-“ na uređaju.
- Pritisnite taster „OK“ na daljinskom upravljaču da podesite ili da uđete u sledeći meni.
- Kada je na TV-u prikazan glavni meni, pritisnite taster „MENI” (MENU) da izadete iz glavnog menija. Kada je na TV-u prikazan pod-meni, pritisnite taster „MENI” (MENU) da se vratite na prethodni meni. Pritisnite taster „IZVOR” (SOURCE) da dobijete prikaz menija izvora signala.
- Tokom rada, elementi koji se u datom režimu ne mogu podešavati biće automatski skriveni, a njihova boja će se promeniti u sivu.
- Uputstvo za upravljanje menijem u okviru ovog uputstva odnosi se na rad u TV režimu. Rad u drugim režimima je sličan radu u okviru TV režima. Korisnici ga mogu uzeti kao primer.
Napomena: Taster "▲/▼/◄/►" navedeni u ovom uputstvu odnose se na pravce tastera za navigaciju daljinskog upravljača osim ukoliko nije posebno definisano drugačije. Dole navedeno uputstvo za rad u celosti je zasnovano na tasterima daljinskog upravljača. Molimo vas da funkcije tastera na uređaju sami shvatite.
KANAL (CHANNEL)
Pritisnite taster „MENI“ (MENU) i na ekranu će se pojaviti meni „KANAL“ (slika 4). Pritisnite taster “▲/▼” da izaberete stavku koju želite da doterate ili podesite.
Automatsko traženje (Auto Tuning)
Pritisnite taster „MENI“ (MENU) i na ekranu će se pojaviti meni „KANAL“. Pritisnite taster „▲/▼“ da izaberete automatsko traženje. Pritisnite taster „OK“ i na ekranu će se pojaviti „Izaberite tip DVB režima“. Pritisnite taster „▲/▼“ na daljinskom upravljaču kako biste izabrali željeni tip DVB režima, a zatim pritisnite taster „OK“ kako biste prešli na sledeći korak (Slika 2). (Prikazan je primer traženja kanala u DVB režimu za DVB-T.) Pritisnite taster „◀/▶“ da izaberete tip podešavanja: DTV + ATV, ATV, DTV. Pritisnite taster „▼“. Pritiskom na „▲/▼/◀/▶“ možete da odaberete željenu državu, a zatim pritisnite taster „OK“ radi potvrde izbora. Uređaj će započeti sa automatskim traženjem (slika 5). Tokom automatskog traženja, možete da pritisnete taster „MENI“ (MENU) kako biste se vratili nazad i izašli iz automatskog traženja.
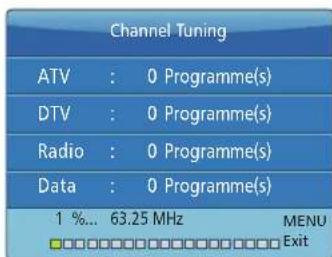
Slika 5
Ručno traženje u DTV režimu (DTV Manual Tuning)
Pritisnite taster „MENI“ (MENU) i na ekranu će se pojaviti meni „KANAL“. Da odaberete ručno traženje u DTV režimu, pritisnite taster „▲/▼”. Pritisnite taster „OK“ da uđete u meni Ručno traženje u DTV režimu (slika 6). Pritisnite taster „◀/▶“ kako biste odabrali kanal, a zatim pritisnite taster „OK“ da pokrenete pretragu. Nakon pretraživanja, meni Ručno traženje u DTV režimu će se automatski zatvoriti.
Ručno traženje u ATV režimu (ATV Manual Tuning)
Pritisnite taster „MENI“ (MENU) i na ekranu će se pojaviti meni „KANAL“. Da odaberete ručno traženje u ATV režimu, pritisnite taster „▲/▼“. Pritisnite taster „OK“ da uđete u meni Ručno traženje u ATV režimu (slika 7). Pritisnite taster „▲/▼“ da biste označili trenutno odabrani kanal. Pritisnite taster „◀/▶“ za ručnu pretragu. Nakon pretraživanja, pronađeni kanal možete da sačuvate na bilo kojoj drugoj poziciji. U ovom trenutku, pritisnite taster „◀/▶“ kako biste odabrali „Sačuvaj na“ (Storage To), a zatim pritisnite taster „▲/▼“ da odaberete broj kanala. Nakon što izaberete „Fino podešavanje“ (Fine-Tune), pritisnite taster „◀/▶“ da obavite pretragu niske ili visoke frekvencije. Tokom ručnog pretraživanja, možete da pritisnete taster „MENI“ (MENU) kako biste prekinuli pretragu i vratili se u prethodni meni.
Editovanje programa (Programme Edit)
Pritisnite taster „MENI“ (MENU) i na ekranu će se pojaviti meni „KANAL“. Pritisnite taster „▲/▼“ da odaberete editovanje programa. Pritisnite taster „OK“ kako biste ušli u meni „Editovanje programa“ (slika 8), a zatim pritisnite taster „▲/▼“ kako biste odabrali kanal koji želite da editujete.
Brisanje (Delete): Izaberite kanal i pritisnite crveni taster da biste ga obrisali.
Premeštanje (Move): Izaberite kanal i pritisnite zeleni taster, a zatim i taster „▲/▼“ kako biste izabrali poziciju na koju želite da premestite izabrani kanal. Pritisnite taster „OK“ radi potvrde izbora. Da se vratite u prethodni meni, pritisnite taster „MENI“ (MENU).
Omiljeni kanali (Favourite): Izaberite kanal i pritisnite žuti taster. Iza izabranog kanala pojaviće se ikonica omiljenog kanala. Da poništite izbor, ponovo pritisnite žuti taster. Da se vratite u glavni meni, pritisnite taster „MENI” (MENU).
Preskakanje (Skip): Izaberite kanal i pritisnite plavi taster. Iza izabranog kanala pojaviće se ikonica preskakanja kanala. Da poništite izbor, ponovo pritisnite plavi taster. Da se vratite u glavni meni, pritisnite taster „MENI“ (MENU).
Podaci o signalu (Signal Information)
Pritisnite taster „MENI“ (MENU) i na ekranu će se pojaviti meni „KANAL“. Da izaberete opciju „Podaci o signalu“, pritisnite taster „▲/▼“. Da uđete u meni „Podaci o signalu“, pritisnite taster „OK“. Možete da pregledate podatke o signalu.
Napomena: Pre nego što pritisnete taster „MENI” (MENU), izaberite izvor ulaznog signala. Izvor ulaznog signala možete izabrati jedino u DTV režimu.
SLIKA (PICTURE)
Pritisnite taster „MENI“ (MENU) i na ekranu će se pojaviti meni „KANAL“. Da izaberete opciju SLIKA, pritisnite taster „◀/▶„ (slika 9), a zatim pritisnite taster „▲/▼“ kako biste izabrali stavku koju želite da doterate ili podesite.
Režim prikaza slike (Picture Mode): Da uđete u pod-meni „Režim prikaza slike“, pritisnite taster „OK“. Da izaberete stavku koju želite da doterate ili podesite, pritisnite taster „▲/▼“.
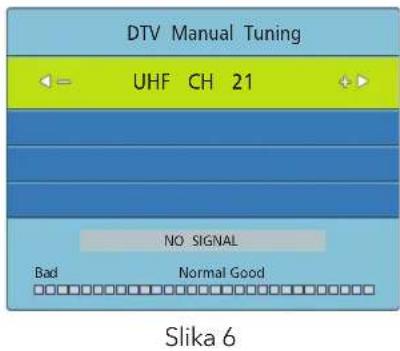
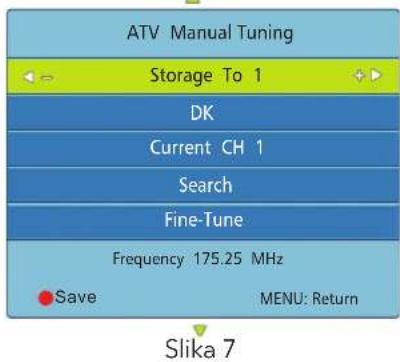
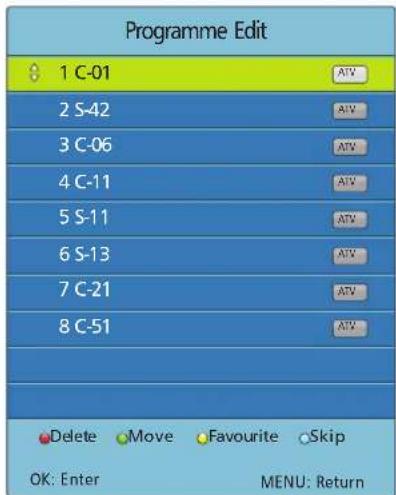
Slika 8
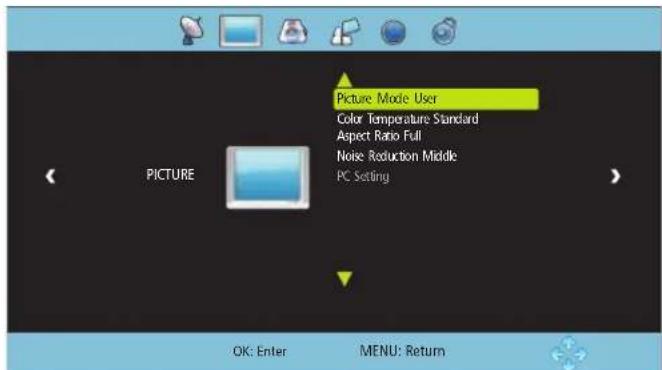
Slika 9
| Stavka Funkcija Opis | ||
| Režim prikaza slike (Picture Mode) | Odabir režima prikaza slike | Standardno (Standard), blago (Soft), lično (User), dinamično (Dynamic), četiri režima. |
| Kontrast (Contrast) | Podešavanje kontrasta cele slike | Povećanjem analogne vrednosti povećava se kontrast; Smanjenjem analogne vrednosti smanjuje se kontrast (0~100). |
| Osvetljenje (Brightness) | Podešavanje osvetljenja i nivoa crnog cele slike | Povećanjem analogne vrednosti povećava se osvetljenje; Smanjenjem analogne vrednosti smanjuje se osvetljenje (0~100). |
| Zasićenje (Saturation) | Podešavanje dubine boja slike | Povećanjem analogne vrednosti povećava se intenzitet zelene boje; Smanjenjem analogne vrednosti smanjuje se intenzitet ljubičaste (0~100). |
| Oštrina (Sharpness) | Podešavanje oštrine cele slike | Povećanjem analogne vrednosti povećava se definisanost; Smanjenjem analogne vrednosti smanjuje se definisanost (0~100). |
| Nijansa (Tint) | Podešavanje nijanse cele slike | Povećanjem analogne vrednosti povećavate dubinu; Smanjenjem analogne vrednosti umanjujete dubinu (0~100). |
Napomena: Nijansa se može podešavati jedino u NTSC sistemu.
Temperatura boja (Colour Temperature): Da uđete u pod-meni „Temperatura boja“, pritisnite taster „OK“. Da izaberete jedan od ponuđenih režima temperature boja: „standardno“ (Standard), „toplo“ (Warm) ili „hladno“ (Cool), pritisnite taster „◀/▶“.
Format slike (Aspect Ratio): Da uđete u pod-meni „Format slike“, pritisnite taster „OK“. Da izaberete jedan od ponuđenih režima formata slike: „automatski“ (Auto), „4:3“, „ceo ekran“ (Full), „film“ (Film), „titlovi“ (Subtitle) ili „PC“, pritisnite taster „▲/▼“.
Umanjenje šuma (Noise Reduction): Da uđete u pod-meni „Umanjenje šuma“, pritisnite taster „OK“. Da izaberete jedan od ponuđenih režima umanjenja šuma: „isključeno“ (Off), „slabo“ (Low), „srednje“ (Middle) ili „jako“ (High), pritisnite taster „▲/▼“.
ZVUK (SOUND)
Pritisnite taster „MENI“ (MENU) i na ekranu će se pojaviti meni „KANAL“. Da izaberete opciju ZVUK, pritisnite taster „◀/▶“ (slika 10), a zatim pritisnite taster „▲/▼“ kako biste izabrali stavku koju želite da doterate ili podesite.
Režim podešavanja zvuka (Sound Mode): Da uđete u pod-meni „Režim podešavanja zvuka“, pritisnite taster „OK“. Da izaberete stavku koju želite da doterate ili podesite, pritisnite taster „▲/▼“.
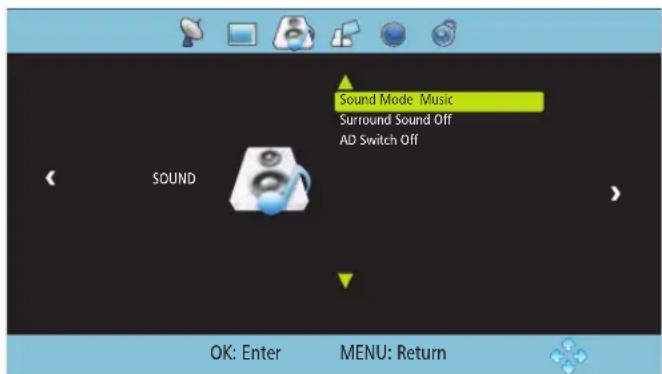
Slika 10
Slika 15
| Ikonica Opis | |
| 1 | Pokazuje da sistem snima program. |
| 2 | Prikazuje broj trenutno izabranog programa. |
| 3 | Prikazuje trajanje snimljenog programa. |
| 4 | Prikazuje maksimalno trajanje koje dati USB disk može da podrži (odnosi se na kapacitet USB diska) |
| 5 | Prikazuje vreme trajanja trenutno izabranog programa. |
| ▶ | Reprodukovanje (Play): Označite ovu ikonicu. Pritisnite taster „OK“ za reprodukovanje video sadržaja ili za podešavanje ponavljanja programa od trenutka A do trenutka B (A-B repeat). |
| ◀◀ | Brzo premotavanje unatrag (FB): Označite ovu ikonicu. Pritisnite taster „OK“ za brzo premotavanje unatrag. Pritisnite taster „INDEKS“ (INDEX) za normalno reprodukovanje. |
| ▶▶ | Brzo premotavanje unapred (FF): Označite ovu ikonicu. Pritisnite taster „OK“ za brzo premotavanje unapred. Pritisnite taster „INDEKS“ (INDEX) za normalno reprodukovanje. |
| ◀◀ | Brzo premotavanje 30 sekundi unatrag (FB 30s): Označite ovu ikonicu. Pritisnite taster „OK“ za brzo premotavanje 30 sekundi unatrag. |
| ▶▶ | Brzo premotavanje 30 sekundi unapred (FF 30s): Označite ovu ikonicu. Pritisnite taster „OK“ za brzo premotavanje 30 sekundi unapred. |
| ▶▶ | Pauza (Pause): Označite ovu funkciju. Pritisnite taster „OK“ da pokrenete ili pauzirate reprodukovanje. |
| ▶▶ | Zaustavljanje (Stop): Označite ovu ikonicu. Pritisnite taster „OK“ da zaustavite i napustite prozor za reprodukovanje. |
Opcija time-shift snimanja
U DTV režimu, pritisnite taster „ZUMIRANJE“ (ZOOM). Na ekranu će se pojaviti meni time-shift opcije (slika 16), a program će biti odložen. Da nastavite sa reprodukovanjem programa, pritisnite taster „INDEKS“ (INDEX). Da zaustavite i napustite opciju time-shift snimanja, pritisnite taster „SKRIVENI PODACI“ (REVEAL). Ukoliko korisnik nakratko napusti program, time-shift funkcija omogućava odlaganje i čuvanje programa koji je u toku na USB disk. Reprodukovanje programa se može nastaviti kada korisnik to poželi.
![DR 1 1 Time Shift [00:00:00/00:00:06/31:20:00] Play FB FF F0 30S FF 30S Pause Stop 14:23](/content/2026/05/801068/images/f491c55f5a4b1aeb183fc59f35da3866aa0855a6355173a66512efc1b97887d5.jpg)
Slika 16
| Ikonica | Opis |
| 1 | Pokazuje da je program odložen. |
| 2 | Prikazuje vreme programa koji je u toku. |
| 3 | Prikazuje vreme odlaganja programa. |
| 4 | Prikazuje maksimalno vreme čuvanja koje USB disk može da omogući. |
| ▶ | Reprodukovanje (Play): Označite ovu ikonicu. Pritisnite taster „OK“ za reprodukovanje video sadržaja ili za podešavanje ponavljanja programa od trenutka A do trenutka B (A-B repeat). |
| ◀ | Brzo premotavanje unatrag (FB): Označite ovu ikonicu. Pritisnite taster „OK“ za brzo premotavanje unatrag. Pritisnite taster „INDEKS“(INDEX) za normalno reprodukovanje. |
| ▶ | Brzo premotavanje unapred (FF): Označite ovu ikonicu. Pritisnite taster „OK“ za brzo premotavanje unapred. Pritisnite taster „INDEKS“(INDEX) za normalno reprodukovanje. |
| ◀ | Brzo premotavanje 30 sekundi unatrag (FB 30s): Označite ovu ikonicu. Pritisnite taster „OK“ za brzo premotavanje 30 sekundi unatrag. |
| ▶ | Brzo premotavanje 30 sekundi unapred (FF 30s): Označite ovu ikonicu. Pritisnite taster „OK“ za brzo premotavanje 30 sekundi unapred. |
| II | Pauza (Pause): Označite ovu funkciju. Pritisnite taster „OK“ da pokrenete ili pauzirate reprodukovanje. |
| ■ | Zaustavljanje (Stop): Označite ovu ikonicu. Pritisnite taster „OK“ da zaustavite i napustite prozor za reprodukovanje. |
EPG (Vodič kroz elektronske programe) opcija
U DTV režimu, pritisnite taster „EPG“ i meni EPG opcije će se pojaviti na ekranu (slika 17). Korisnik može da obavlja sledeće operacije pomoću crvenog, zelenog, žutog i plavog višenamenskog tastera.
| Ikonica Opis | |
| ●Snimanje (Record) | Pritisnite crveni taster da biste ušli u pod-meni. Možete da izaberete vreme emitovanja programa koji želite da snimite. |
| ●Informacije (Info) | Pritisnite zeleni taster za prikaz detaljnih podataka o programu. |
| ●Raspored (Schedule) | Pritisnite žuti taster da pogledate svoja prethodna podešavanja. |
| ●Podsetnik (Remind) | Pritisnite plavi taster da podesite vreme podsećanja na program koji želite da pogledate. |
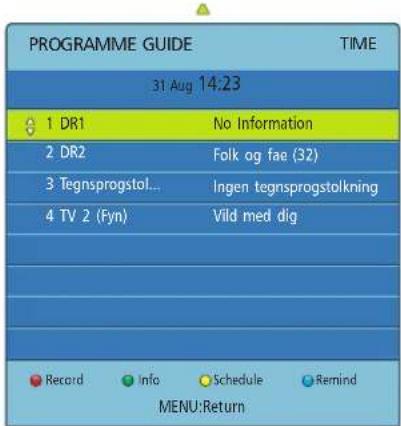
Slika 17
Hotelski režim (opcionalno)
Pritisnite taster „MENI“ (MENU) na daljinskom upravljaču kako biste dobili prikaz glavnog menija TV-a, a zatim na daljinskom upravljaču pritisnite „4578“ za prikaz menija hotelskog režima. Pritisnite taster „Gore/DOLE“ (Up/DOWN) da uđete u meni i izaberete stavku koju treba da podesite. Zatim pritisnite taster „Levo/Desno“ (Left/Right) da podesite vrednosti ili stanje (slika 18).
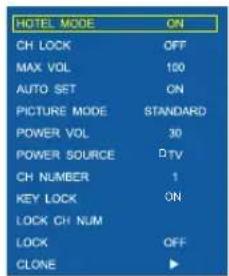
Slika 18
USB medijski režim
Priključite USB memorijski uređaj na USB interfejs TV-a i pritisnite taster „IZVOR“ (SOURCE). Na ekranu će se pojaviti meni „Izvor ulaznog signala“. Zatim pritisnite taster „▲/▼“ da izaberete USB. Pritisnite taster „OK“ da uđete u USB memoriju (slika 19).
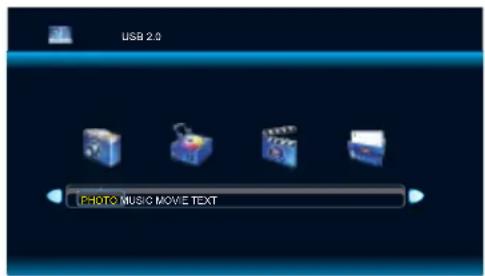
Slika 19
Napomena:
-
USB režim podržava datotečne formate sa video datotekama/audio datotekama/grafičkim datotekama/tekstualnim datotekama. Može doći do neprepoznavanja određenih nestandardnih USB memorijskih uređaja. Zamenite ih standardnim USB memorijskim uređajem.
-
Sistem strujanja medija prilikom reprodukovanja datoteke pokazuje određena ograničenja kod svakog od formata. Ukoliko se reprodukuje datoteka koja je veća od ograničenja sistema, reprodukovanje će biti pogrešno.
-
Ne vadite USB memorijske uređaje dok rade u okviru sistema. Ovo može da dovede do pojave problema u sistemu i opremi.
-
Sistem ima USB1.1 i USB2.0 priključak i standardni prenosni protokol, kakav su USB diskovi i prenosivi hard diskovi. Datotečni format na USB uređajima treba da bude FAT ili FAT32. Ne podržava NTFS.
-
USB interfejs ovog TV seta može da omogući napon od 5V i maksimalnu struju od 500mA; upotreba memorijskog uređaja koji zahteva više od 500mA uticaće na tačnu identifikaciju mulitedijalnog uređaja za reprodukciju, što se obično dešava.
- UDHËZIM PËR PËR
- FEATURES
- SAFETY WARNING AND NOTICE
- Under Following Conditions:
- WARNING
- ATTENTION
- Mounting and Connecting
- Packing list
- Mounting the TV set
- TIPS ON INSTALLATION
- Connecting peripheral equipment
- Remarks:
- 32"/40"
- 43"
- Control Panel Keys
- Remote Control
- Precautions for use of remote control
- Remote Control Key Instruction
- Remote control user manual about teletext
- General Operating Instructions
- Standby
- Special Attention:
- Signal Source Selection
- Menu Operation Instruction
- CHANNEL
- Auto Tuning
- DTV Manual Tuning
- ATV Manual Tuning
- Programme Edit
- Signal Information
- PICTURE
- SOUND
- OPTIONS
- TIME
- LOCK
- REC option
- Time-shift option
- EPG option
- Hotel Function (optional)
- USB Media Function
- Note:
- Remote Control Shortcut Keys
- Base Installation Instructions
- Përmbajtja
- Uputstvo za upravljanje menijem
- KANAL (CHANNEL)
- Automatsko traženje (Auto Tuning)
- Ručno traženje u DTV režimu (DTV Manual Tuning)
- Ručno traženje u ATV režimu (ATV Manual Tuning)
- Editovanje programa (Programme Edit)
- Podaci o signalu (Signal Information)
- SLIKA (PICTURE)
- ZVUK (SOUND)
- OPCIJE (OPTIONS)
- VRIJEME (TIME)
- Opcija time-shift snimanja
- EPG (Vodič kroz elektronske programe) opcija
- Hotelski režim (opcionalno)
- USB medijski režim
- Napomena:
- Rad u glavnom izborniku
- EPG OPCIJA
- TARTALOM
- KÉP
- Časovni zamik
Brand : TESLA
Model : 43K307BF
Category : TV