
266 - Chain saw HUSQVARNA - Free user manual and instructions
Find the device manual for free 266 HUSQVARNA in PDF.
| Product type | Petrol chainsaw |
| Brand | HUSQVARNA |
| Model | 266 |
| Displacement | 66.7 cm³ |
| Bore | 50 mm |
| Stroke | 34 mm |
| Spark plug | Champion CJ 7Y or PAL P8Y |
| Electrode gap | 0.5 mm |
| Carburettor | Diaphragm type Tillotson HS 163 A |
| Fuel tank capacity | 0.75 L |
| Oil tank capacity | 0.45 L |
| Chain pitch | 3/8" |
| Guide bar length | 15 inches (38 cm) |
| Weight (without bar and chain) | 7.0 kg (without chain brake) |
| Weight (with chain brake) | 7.4 kg |
| Ignition type | Advance 25° before TDC at 8500 rpm |
| Idle speed | 2300-2500 rpm |
| Maximum speed | 11,500 rpm |
| Main features | Swed-o-Matic chain brake, oil pump adjustment, carburettor adjustment (L, H, T) |
| Maintenance | Daily cleaning of air filter and guide, regular chain sharpening, drain tanks once a month |
| Safety | Chain brake, anti-vibration protection, emergency stop, recommended personal protective equipment |
| Spare parts | Available at Husqvarna dealers |
| General information | Two-stroke engine, oil-petrol mixture 1:50 (Husqvarna oil) or 1:25 (standard oil) |
Frequently Asked Questions - 266 HUSQVARNA
User questions about 266 HUSQVARNA
0 question about this device. Answer the ones you know or ask your own.
Ask a new question about this device
Download the instructions for your Chain saw in PDF format for free! Find your manual 266 - HUSQVARNA and take your electronic device back in hand. On this page are published all the documents necessary for the use of your device. 266 by HUSQVARNA.
USER MANUAL 266 HUSQVARNA
Ignition advance. 25° before t.d.c. at 8500 rpm
Sparking Plug . . . . Champion CJ 7Y, PAL P8Y
Electrode gap . . . . 0.5 mm
Carburettor . . . . Diaphragm type
Tillotson HS 163 A
Fuel tank capacity . . . .0.75 l
Oil tank capacity . . . . . . 0.45 l
Sawing chain. . . . . .3/8" pitch
Guide Bar 15
Weight empty, incl. 15"
guide bar, chain . . . . . 7.0 kg (SE)
and chain brake . . . . . 7.4 kg (SG)
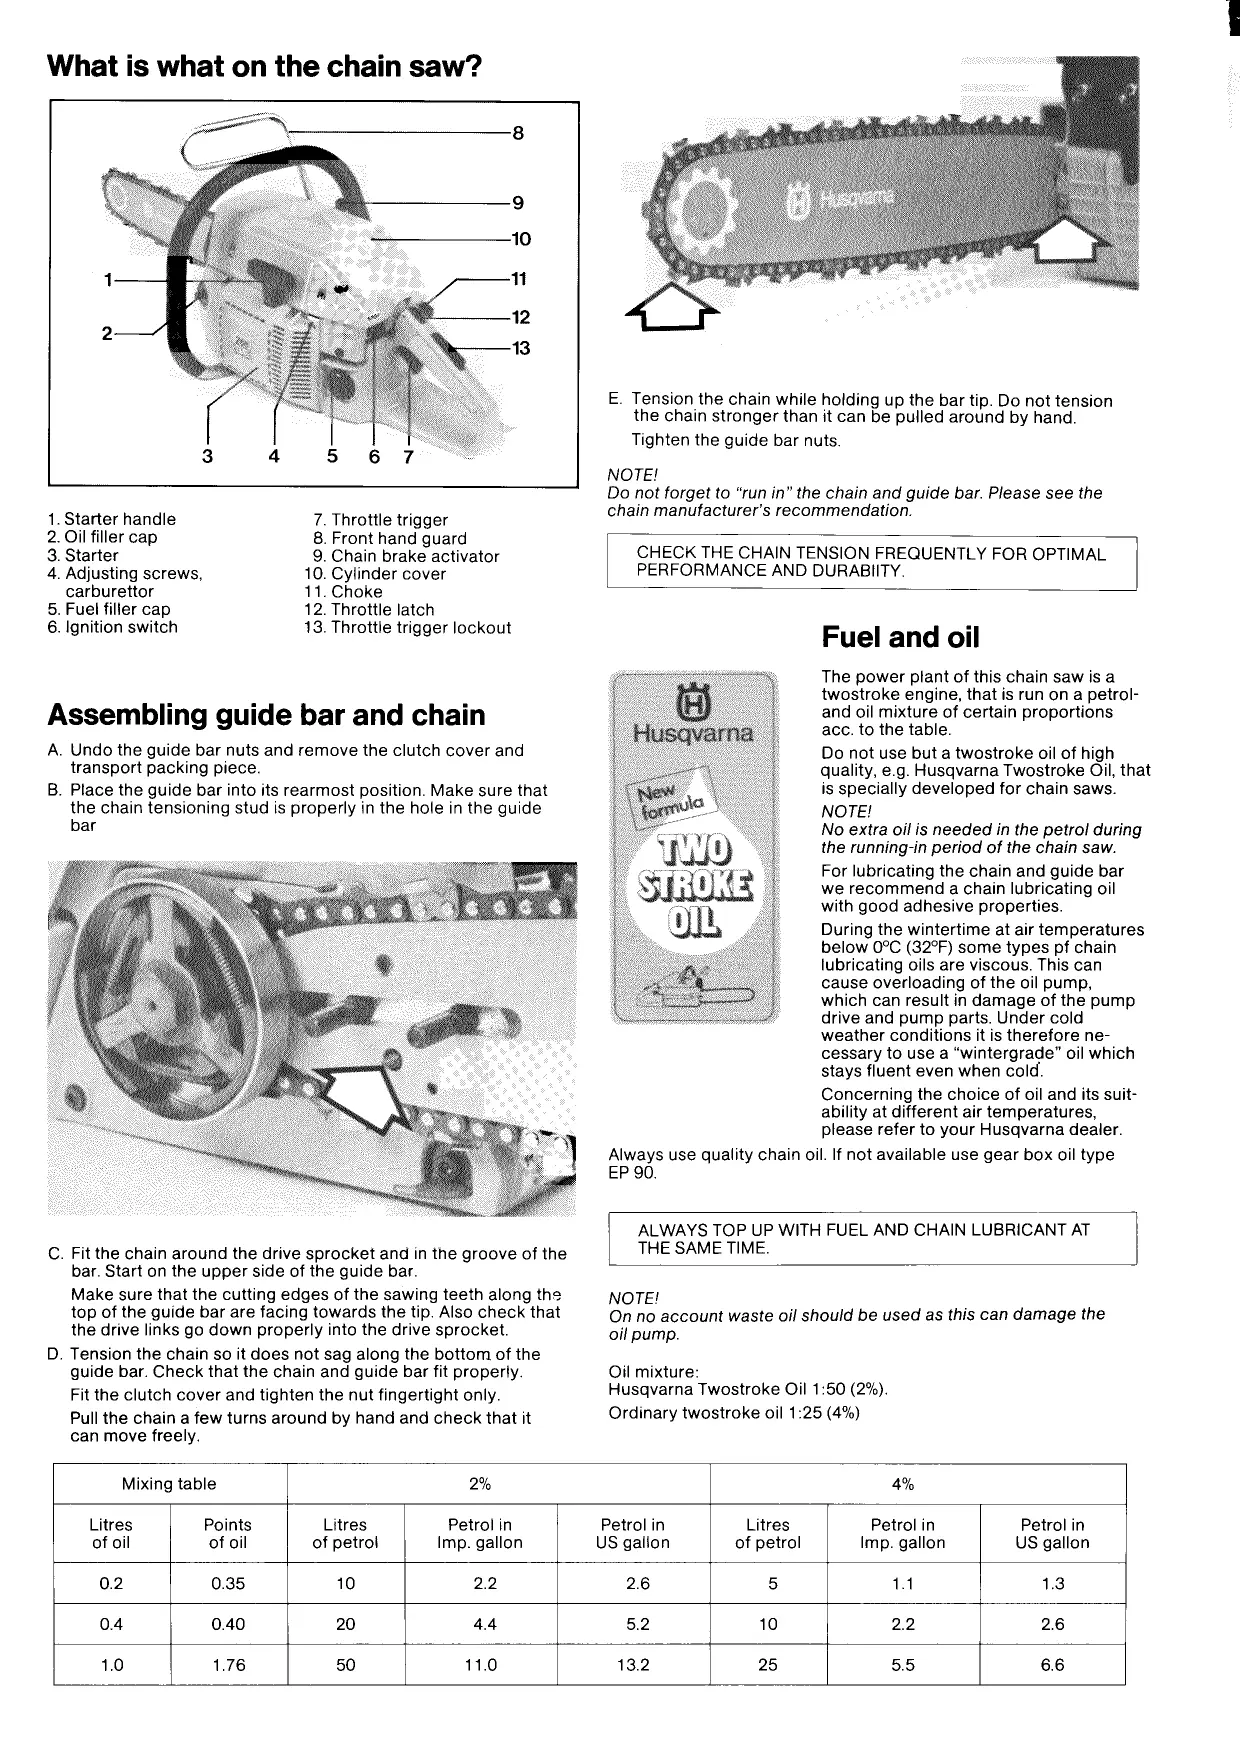
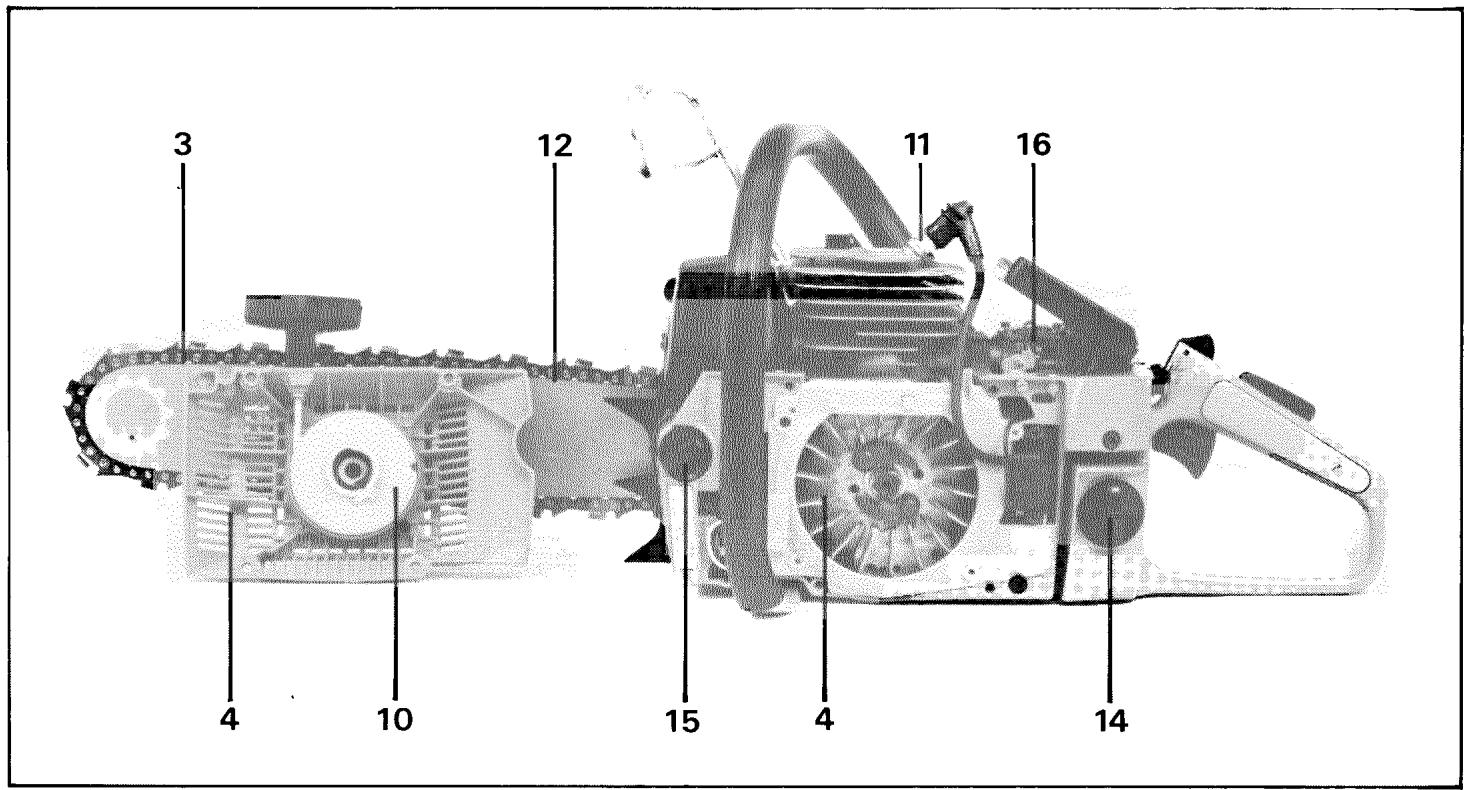
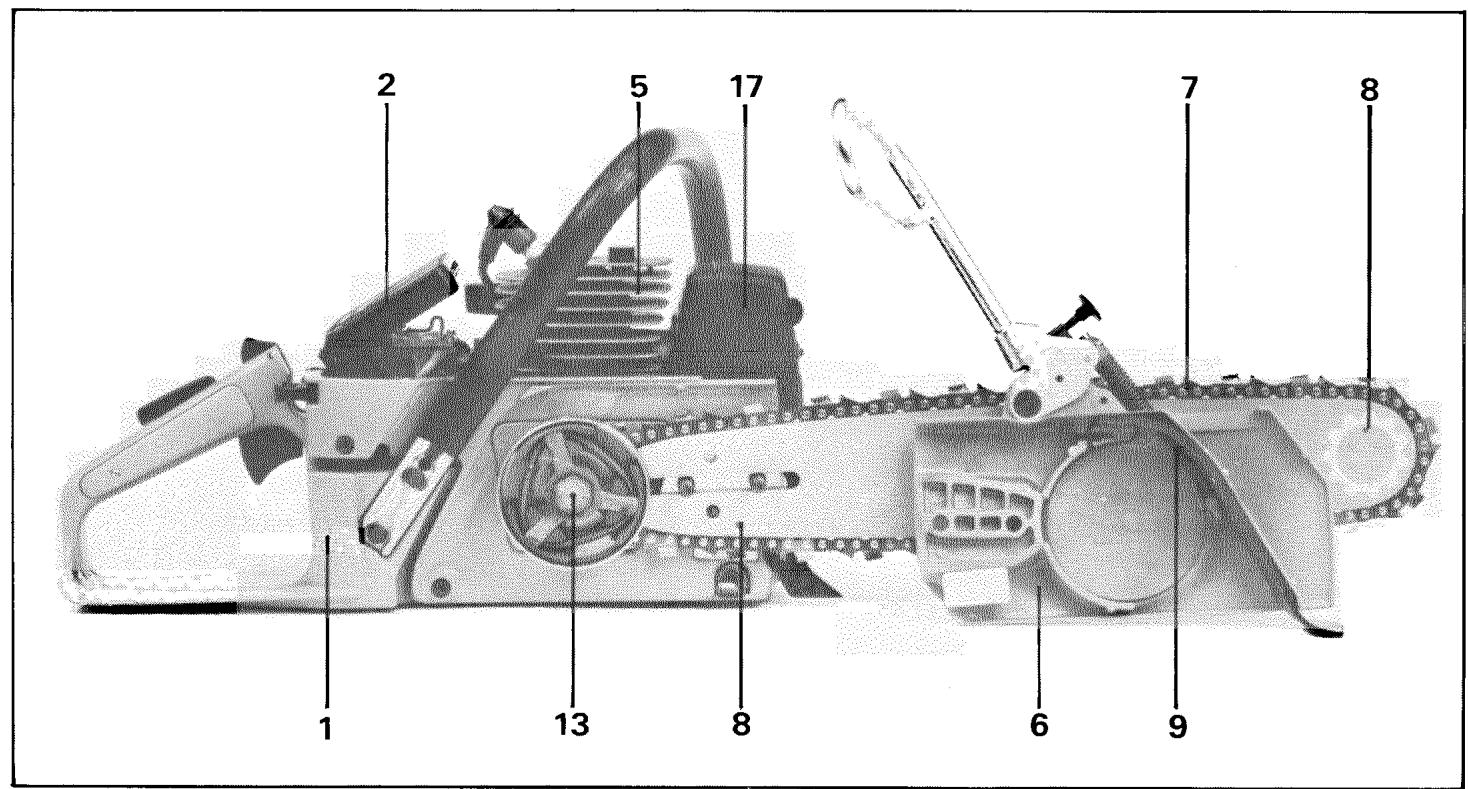
What is what on the chain saw?
- Starter handle
- Oil filler cap
- Starter
- Adjusting screws, carburettor
- Fuel filler cap
-
Ignition switch
-
Throttle trigger
- Front hand guard
- Chain brake activator
- Cylinder cover
- Choke
- Throttle latch
- Throttle trigger lockout
Assembling guide bar and chain
A. Undo the guide bar nuts and remove the clutch cover and transport packing piece.
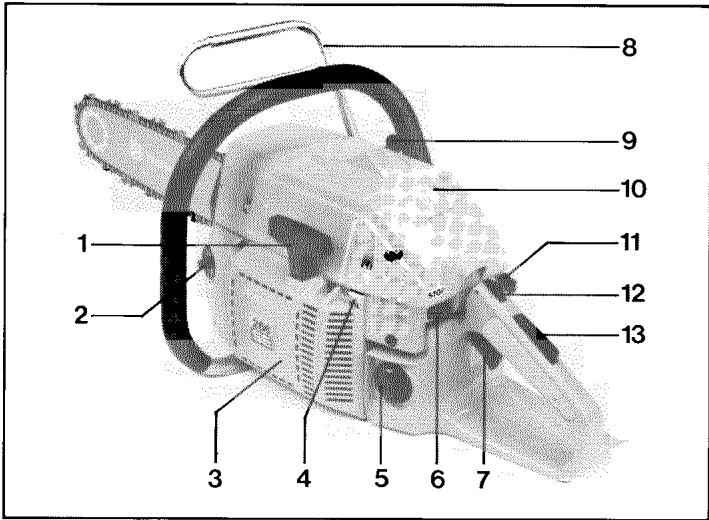
B. Place the guide bar into its rearmost position. Make sure that the chain tensioning stud is properly in the hole in the guide bar
C. Fit the chain around the drive sprocket and in the groove of the bar. Start on the upper side of the guide bar.
Make sure that the cutting edges of the sawing teeth along the top of the guide bar are facing towards the tip. Also check that the drive links go down properly into the drive sprocket.
D. Tension the chain so it does not sag along the bottom of the guide bar. Check that the chain and guide bar fit properly.
Fit the clutch cover and tighten the nut fingertight only. Pull the chain a few turns around by hand and check that it can move freely.
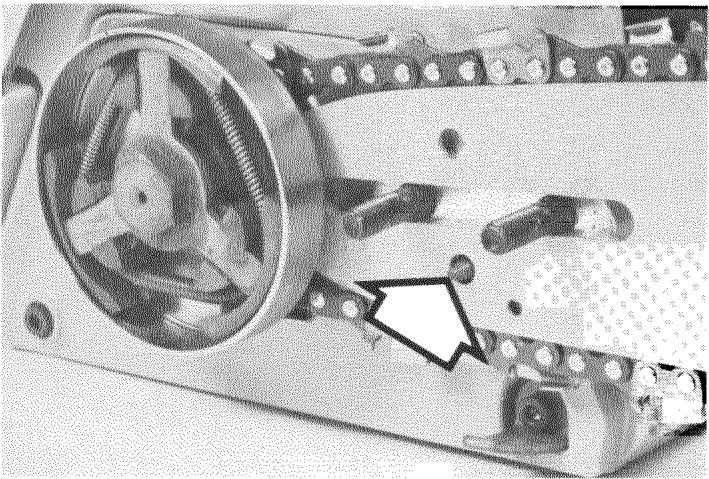
E. Tension the chain while holding up the bar tip. Do not tension the chain stronger than it can be pulled around by hand. Tighten the guide bar nuts.
NOTE!
Do not forget to "run in" the chain and guide bar. Please see the chain manufacturer's recommendation.
CHECK THE CHAIN TENSION FREQUENTLY FOR OPTIMAL PERFORMANCE AND DURABILITY.
Fuel and oil

The power plant of this chain saw is a twostroke engine, that is run on a petrol- and oil mixture of certain proportions acc. to the table.
Do not use but a twostroke oil of high quality, e.g. Husqvarna Twostroke Oil, that is specially developed for chain saws.
NOTE!
No extra oil is needed in the petrol during the running-in period of the chain saw.
For lubricating the chain and guide bar we recommend a chain lubricating oil with good adhesive properties.
During the wintertime at air temperatures below 0^ (32^) some types pf chain lubricating oils are viscous. This can cause overloading of the oil pump,
which can result in damage of the pump drive and pump parts. Under cold weather conditions it is therefore necessary to use a "wintergrade" oil which stays fluent even when cold.
Concerning the choice of oil and its suitability at different air temperatures, please refer to your Husqvarna dealer.
Always use quality chain oil. If not available use gear box oil type EP 90.
ALWAYS TOP UP WITH FUEL AND CHAIN LUBRICANT AT THE SAME TIME.
NOTE!
On no account waste oil should be used as this can damage the oil pump.
Oil mixture:
Husqvarna Twostroke Oil 1:50 (2%)
Ordinary twostroke oil 1:25 (4%)
| Mixing table | 2% | 4% | |||||
| Litres of oil | Points of oil | Litres of petrol | Petrol in Imp. gallon | Petrol in US gallon | Litres of petrol | Petrol in Imp. gallon | Petrol in US gallon |
| 0.2 | 0.35 | 10 | 2.2 | 2.6 | 5 | 1.1 | 1.3 |
| 0.4 | 0.40 | 20 | 4.4 | 5.2 | 10 | 2.2 | 2.6 |
| 1.0 | 1.76 | 50 | 11.0 | 13.2 | 25 | 5.5 | 6.6 |
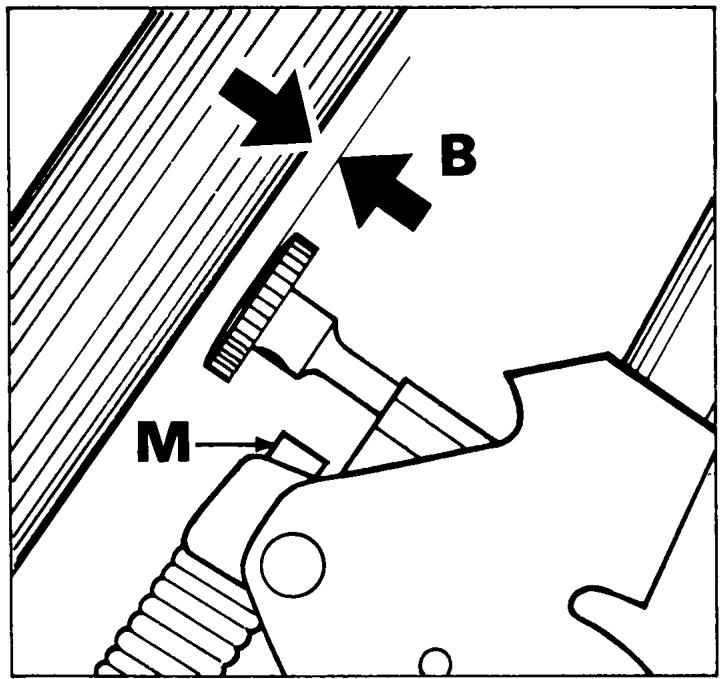
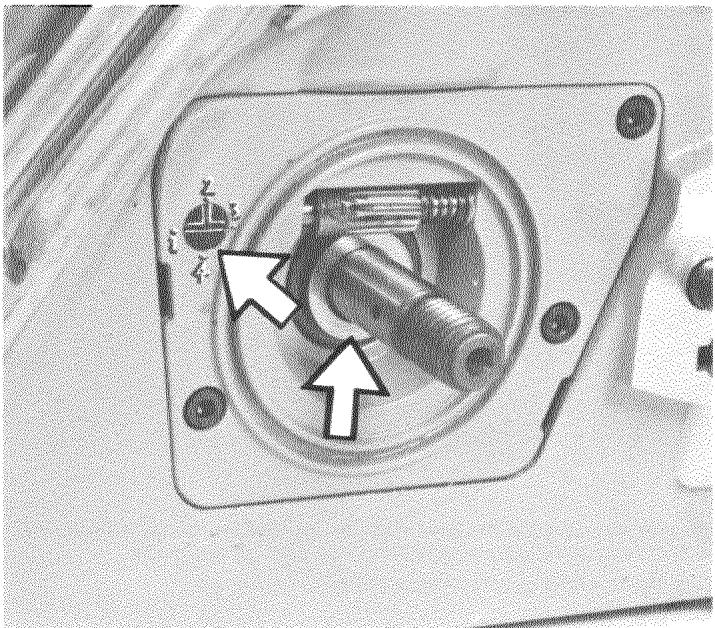
Chain brake activator "Swed-o-Matic"
The Swed-o-Matic should release the chain brake at a certain load on the guide bar tip.
Adjusting the release power
The distance between the Swed-o-Matic release screw and the front handle (B) determines the release power. A smaller gap means reduced release power.
The release power can be checked as follows: Push the guide bar tip against a spring balance. With a 15^ guide bar the chain brake should be released at a load of 10-15 kp.
The forestry worker could make a rough check on the spot as follows: Hold the saw horizontally over a trunk, at a height of abt 35cm . As the saw by force of its own weight swings around the rear handle and hits the trunk, the brake should be released.
Note that during this check the engine must not be running. If the brake is not released, contact your service workshop.
Nut M should be tightened completely.
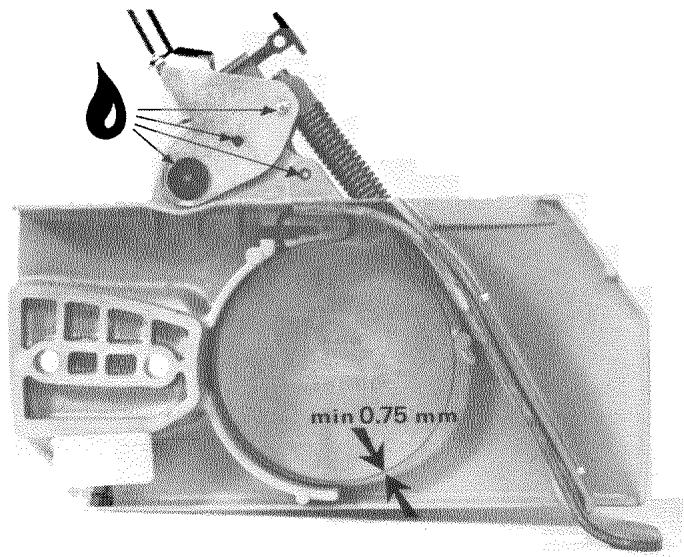
Maintenance of the chain brake
Clean the brake band and the mechanism. Check that the band has at least 0.75mm thickness on the most worn part.
Lubricate the links and supports of the brake mechanism with two-stroke oil. Release and lock the brake repeatedly to check that the mechanism works smoothly.
Check the chain brake function regularly. Start the saw on clear ground making sure that the chain runs freely. Apply full throttle and release the chain brake. The chain should immediately stop rotating. If not, contact your service workshop.
Starting the chain saw
A. Cold engine
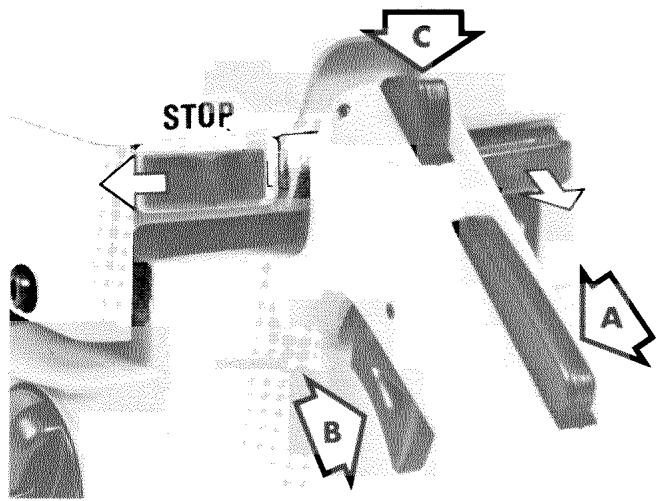
- Switch on the ignition (push the switch to the left so that the 1 is visible).
- Pull out the choke control.
- Push down the throttle trigger lockout (A).
- Open the throttle fully (B).
- Push the throttle latch backwards (C).
Now all the controls are in starting position and the chain saw is ready to be started.
6 Put your right foot on the plate beneath the rear handle.
7. Grasp the front handle with your left hand and press the saw against the ground.
8. Grasp the starter handle with your right hand and pull out the starting cord slowly until the starter pawl engage.
9. Give the starting cord a short sharp tug.
NOTE!
Do not pull the starting cord entirely out or release the starter handle in pulled out position, as this can cause damages on the chain saw.
10. Normally the engine will start after 2-3 starting attempts. Push the choke control as soon the engine starts. Open rapidly the throttle wide and the latch will disengage.
To stop the engine push the ignition switch to the right so that the O is visible.
B. Warm engine
Use the same starting procedure as for cold engine but without pulling out the choke control.

NOTE!
One of the most common causes of starting difficulties is that too many starting attempts have been made with a closed choke flap. If this is the case, remove the spark plug and wipe it dry. Open the choke flap fully.
Before you reassemble the spark plug, we recommend you to pull the starter handle several times to "ventilate the cylinder", the ignition switch in 0-position.
Assemble the spark plug and make a new starting attempt with open choke flap and full throttle.
CAUTION!
Guide bar, chain and clutch cover must be assembled before the engine is started, otherwise the clutch may come loose and cause injuries.
Adjusting the carburettor
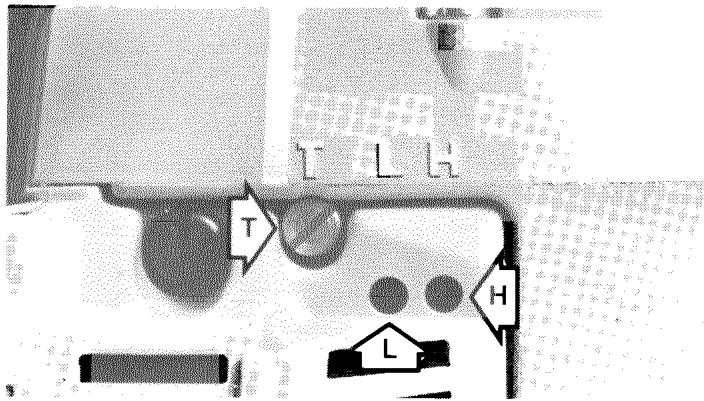
The carburettor has three adjusting screws:
L = Low speed needle
H = High speed needle
T = Throttle adjusting screw
A. Basic setting
Clean the air filter
Check the spark plug and its electrodes.
Check that the fuel filter is not clogged.
Screw the needles H and L carefully right in.
Then screw the needles out to recommended basic position:
$$ H = 3 / 4 \text {t u r n o u t}, L = 1 \text {t u r n o u t} $$
Start the engine and warm it up. Adjust the idling speed by means of the throttle adjusting screw to that speed at which the chain just starts rotating.
B. Adjustment of L-needle
- Screw in the L-needle slowly and the speed will increase. Screw in the needle a little further and the speed will slow down again as the fuel supply becomes too "lean". Notice the position of the needle at the highest speed.
- Open the L-needle again and notice the highest position. Note that the speed slows down at "richer" supply.
- Adjust the L-needle to the highest speed position. Then open it equivalent to 10 min on a clock-face to obtain a somewhat "richer" supply to aid acceleration.
- By means of the T-screw, adjust the idling speed to 2.300-2.500 r/min, ensuring that the chain does not rotate when engine is idling.
- Give full throttle a couple of times to check that the engine "responds". If not, open the L-needle by abt 3 min. Check again.
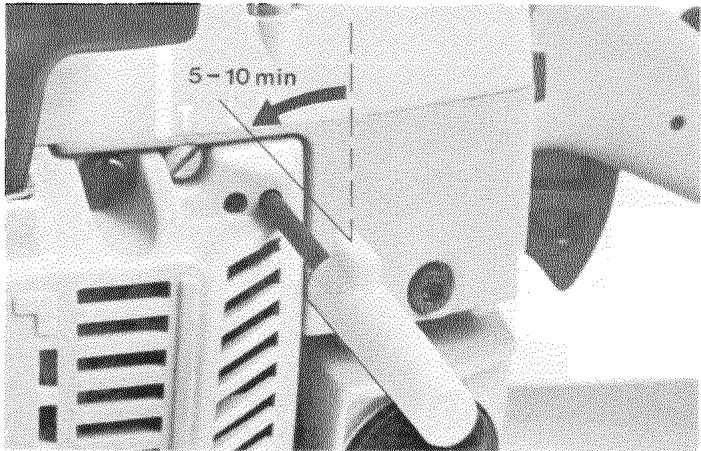
C. Adjustment of H-needle
At correct adjustment of the H-needle the engine should be four-stroking. Screw in the H-needle slowly until there is no more four-stroking. Then screw the needle out equivalent to 10 min on a clockface.
Check by means of a revolution counter that the high idle speed does not exceed 11.500 r/min.
Cleaning the air filter
A clean air filter is necessary for optimal carburettor function and optimal engine power.
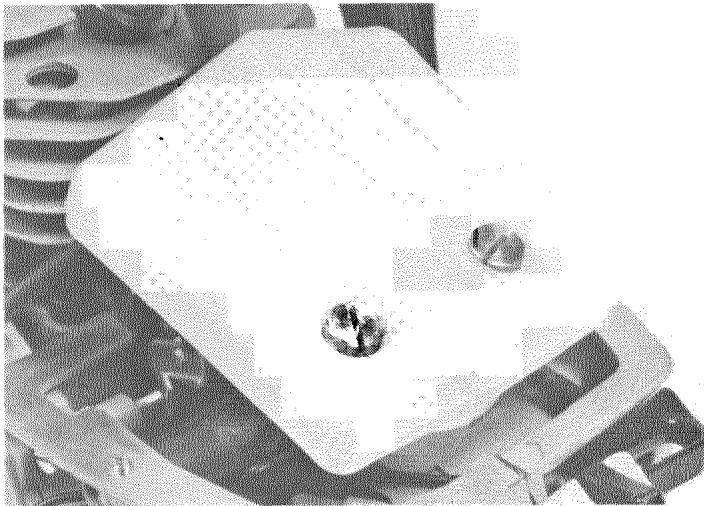
In order to get at the air filter, remove the cylinder cover by undoing the retaining screws and lifting the cover off upwards-backwards.
Remove the heaviest dirt from the air filter. Undo the screw and lift the filter off carefully to prevent dirt from falling down into the carburettor.
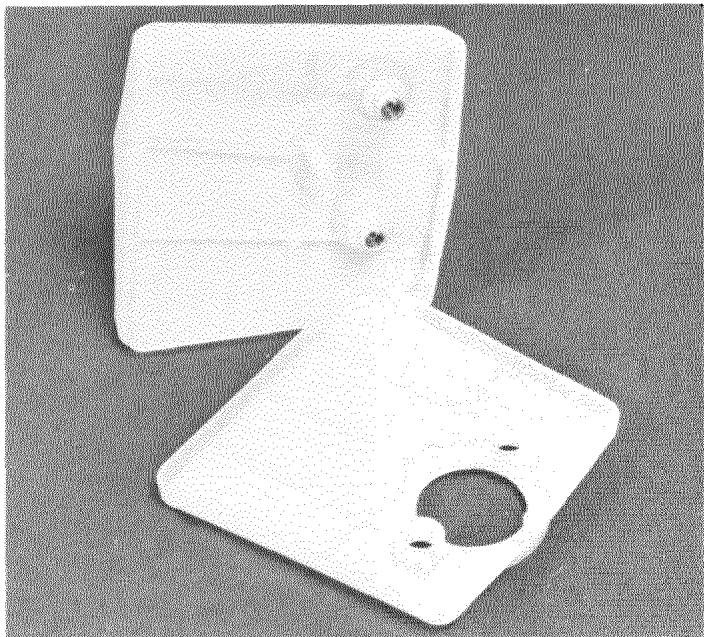
Separate the two filter halves by means of a screwdriver or a knife.
Clean the filter halves carefully in warm soapy water.
Avoid cleaning them in chain saw petrol.
Dry the filter with compressed air.
Reassemble the filter and make sure that it lies close to the carburettor.
Use two air filters alternately.
Clean the filter each day!
Changing starter cord and return spring
Loosen the four screws that retain the starter. Remove the starter. Pull out the cord approx. 30~cm and lift it up into the notch in the periphery of the pulley.
Zero-set the return spring by carefully letting the pulley rotate backwards.
Undo the screw in the centre of the pulley and remove the pulley.
In case you change the return spring as well, undo the screws that retain the plastic cassette, which then can be removed.
Change the spring and lubricate it with engine oil.
Assemble the remaining parts in reverse order. Lift up the starter cord into the notch on the pulley. Tension the return spring by turning the pulley clockwise about two turns.
NOTE!
Make sure that it is possible to turn the pulley at least 1/4 of a turn further when the cord is fully pulled out.
Winter use
In winter, extreme cold and powdery snow can cause running problems.
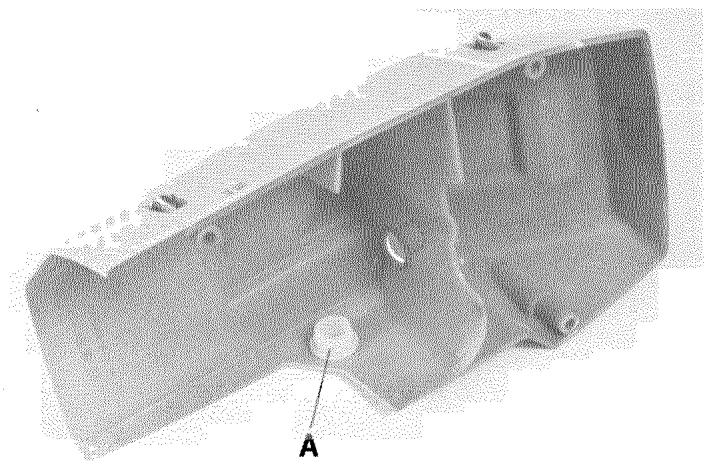
The cylinder cover is prepared for extreme cold working conditions. In the partition wall of the cover there is a hole, that is covered by a cap (A) when operating at normal temperatures.
In case of extreme cold, this cap shall be removed so that heated air from the cylinder can flow into the carburettor space and prevent the air filter from being iced up.
NOTE! Under normal temperature conditions the cap has to be mounted. Otherwise there is a certain risk of overheating the chain saw.
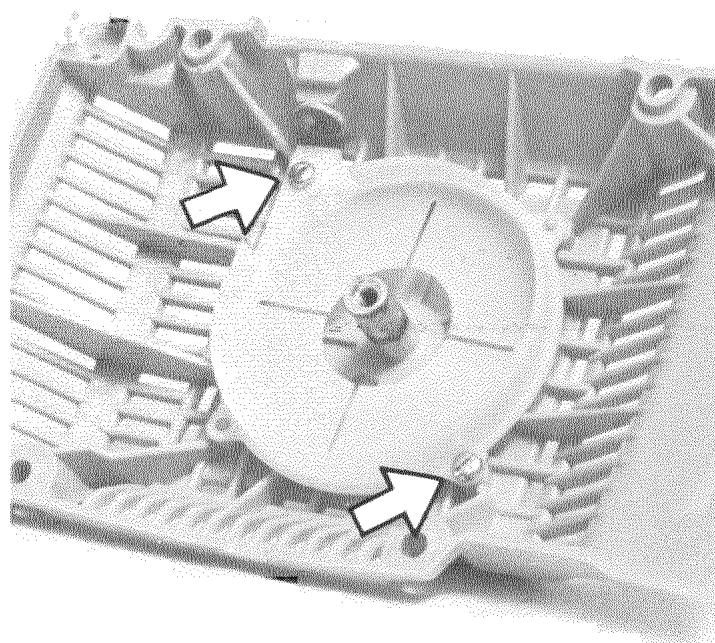
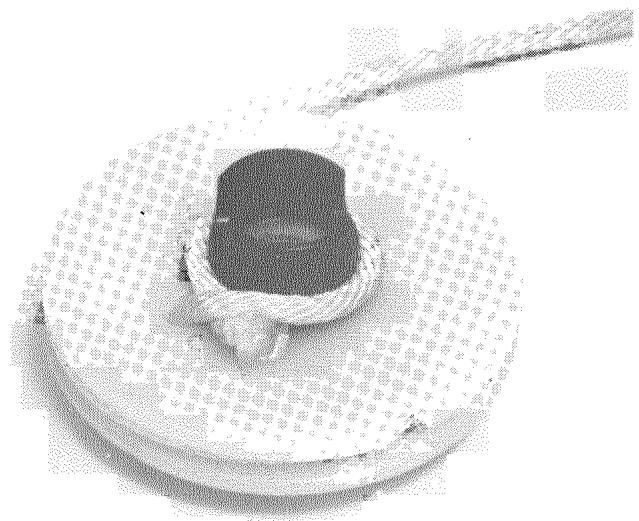
Adjusting the oil pump capacity
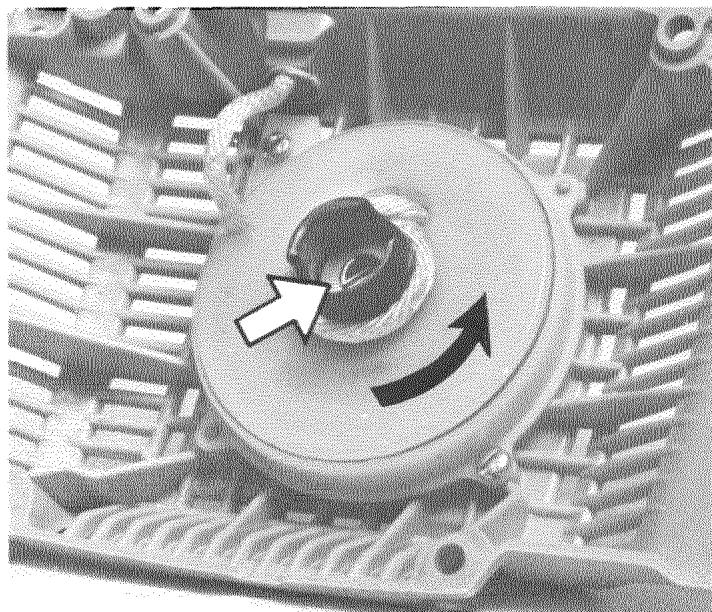
The oil pump is adjustable for four different capacities. Adjustment is to be done after removal of chain, guide bar, clutch cover, centrifugal clutch and clutch drum.
With a screwdriver the oil capacity can be adjusted by turning the screw. The index on the screw should face the capacity wanted. Figure shows the position for capacity 2.
Recommended positions: Bar 15":Pos.2. Bar 18^ and more:Pos.3-4.
Before assembling the clutch drum check that the washer between drum and sealing ring is not lost.
Daily maintenance
- Clean the saw body from the outside.
- Clean the air filter. Change if necessary.
- Turn around the guide bar, lower edge up. Clean the bar groove.
- Clean the fan and air intakes in the starter cover.
- Clean the cooling fins on the cylinder
- Clean the space under the clutch cover.
- Sharpen the chain and check its tension.
- Check the oiling system for the chain and the guide bar.
- Clean the chain brake. Make it a habit to lock the chain brake during pauses and transports.
Weekly maintenance
- Check the starter, its cord and return spring.
- Clean the spark plug from the outside and check the gap. Adjust the gap or change the plug if necessary.
- File off burrs if any on the sides of the guide bar.
- Lubricate the bearings of the clutch drum.
Monthly maintenance
- Wash out the fuel tank with petrol.
- Wash out the oil tank with petrol.
- Clean the carburettor.
- Check the fire-fighting screen inside the silencer. Clean or change if necessary.
Safety reminders
Handling
- When transporting the saw, fit the chain protection.
- Do not smoke when filling the fuel tank.
- Before cutting, fix the barking support properly
- When using the saw, keep both hands on the handles.
- Nobody is allowed to be within the swing area of the saw
- Always stop the engine before checking and adjusting the chain tension or exchanging the chain.
Personal safety equipment
- To protect the hearing organ, wear protective wad, plugs or ear caps.
Procedure
- When felling, always step aside from the falling tree and watch out for falling branches.
- When cutting split wood, look out for ejecting wood pieces.
- When bucking a felled tree on sloping ground, always stand above the tree.
-
Be calm and collected when working, eliminate the risk of injury to other persons.
-
When cutting, wear gloves of chrome leather.
- When felling, wear a protective helmet
- Wear suitable clothes which do not hinder your work.
- What is what on the chain saw?
- Assembling guide bar and chain
- NOTE!
- Fuel and oil
- Oil mixture:
- Chain brake activator "Swed-o-Matic"
- Adjusting the release power
- Maintenance of the chain brake
- Starting the chain saw
- Cold engine
- Warm engine
- CAUTION!
- Adjusting the carburettor
- Basic setting
- Adjustment of L-needle
- Adjustment of H-needle
- Cleaning the air filter
- Changing starter cord and return spring
- Winter use
- Adjusting the oil pump capacity
- Daily maintenance
- Weekly maintenance
- Monthly maintenance
- Safety reminders
- Handling
- Personal safety equipment
- Procedure
Brand : HUSQVARNA
Model : 266
Category : Chain saw