
P-ZT26 CE - Chainsaw HUSQVARNA - Free user manual and instructions
Find the device manual for free P-ZT26 CE HUSQVARNA in PDF.


| Product Type | Chainsaw |
| Brand | Husqvarna |
| Model | P-ZT26 CE |
| Engine Type | 2-stroke gasoline |
| Displacement | 26 cc |
| Power Output | 1.5 kW (2.0 hp) |
| Bar Length | 35 cm (14 inches) |
| Chain Pitch | 3/8 inch |
| Chain Gauge | 0.050 inch |
| Chain Speed | 19.5 m/s |
| Fuel Tank Capacity | 0.3 L |
| Oil Tank Capacity | 0.2 L |
| Weight (excluding bar and chain) | 4.3 kg |
| Vibration Control | LowVib® |
| Chain Brake | Inertia activated |
| Air Filter | Centrifugal cleaning |
| Ignition System | Electronic (CDI) |
| Carburetor | Adjustable |
| Maintenance | Easy-access air filter and spark plug |
| Safety Features | Chain brake, throttle lockout, hand guard |
| Repairability | Replaceable bar, chain, and sprocket; serviceable carburetor |
Frequently Asked Questions - P-ZT26 CE HUSQVARNA
User questions about P-ZT26 CE HUSQVARNA
0 question about this device. Answer the ones you know or ask your own.
Ask a new question about this device
Download the instructions for your Chainsaw in PDF format for free! Find your manual P-ZT26 CE - HUSQVARNA and take your electronic device back in hand. On this page are published all the documents necessary for the use of your device. P-ZT26 CE by HUSQVARNA.
USER MANUAL P-ZT26 CE HUSQVARNA
Gasoline containing up to 10% ethanol (E10) is acceptable for use in this machine. The use of any gasoline exceeding 10% ethanol (E10) will void the product warranty.
Please read the operator's manual carefully and make sure you understand the instructions before using the machine.
English/Spanish

SAFETY RULES

IMPORTANT: THIS CUTTING MACHINE IS CAPABLE OF AMPUTATING HANDS AND FEET AND THROWING OBJECTS. FAILURE TO OBSERVE THE FOLLOWING SAFETY INSTRUCTIONS COULD RESULT IN SERIOUS INJURY OR DEATH.

Look for this symbol to point out important safety precautions. It means CAUTION!!! BE COME ALERT!!! YOUR SAFE TY IS IN VOLVED.

WARNING: In order to prevent ac ci dental starting when setting up, trans port-ing, adjusting or making repairs, always dis con nect spark plug wire and place wire where it can not come in contact with plug.

CAUTION: Muffler and other engine parts become extremely hot during operation and remain hot after engine has stopped. To avoid severe burns on contact, stay away from these areas.

WARNING: Engine exhaust, some of its constituents, and certain vehicle com po nents contain or emit chem i-cals known to the State of Cal i for nia to cause can cer and birth defects or oth er re pro duc tive harm.

WARNING: Battery posts, terminals and related accessories contain lead and lead compounds, chemicals known to the State of Cal i for nia to cause can cer and birth defects or oth er re pro duc tive harm. Wash hands after handling.

WARNING: This lawn mower is equipped with an internal combustion engine and should not be used on or near any unimproved forest-covered, brush-covered or grass-covered land unless the engine's exhaust system is equipped with a spark arrester meeting applicable local or state laws (if any). If a spark arrester is used, it should be maintained in effective working order by the operator.
In the state of California the above is required by law (Section 4442 of the California Public Resources Code). Other states may have similar laws. Federal laws apply on federal lands. A spark arrester for the muffler is available through your nearest authorized service center.
I. CHILDREN

WARNING: CHILDREN CAN BE SERIOUSLY INJURED OR KILLED BY THIS EQUIPMENT. Carefully read and follow all of the safety instructions below.
The American Academy of Pediatrics recommends that children be a minimum of 12 year of age before operating a pedestrian controlled lawn mower and a minimum of 16 years of age before operating a riding lawn mower.
Tragic accidents can occur if the oper a tor is not alert to the presence of children. Children are often attracted to the machine and the mowing activity. Never assume that children will remain where you last saw them.
- Keep children out of the mowing area and under the watchful care of a responsible adult other than the operator.
- Be alert and turn machine off if chil dren enter the area.
- Before and while walking back wards, look behind and down for small chil dren.
- Never allow children to operate the machine.
II. GENERAL OPERATION
- Read, understand, and follow all in struc tions on the machine and in the manual(s) before starting. Be thor ough ly familiar with the controls and the proper use of the machine before starting.
- Do not put hands or feet near or under rotating parts. Keep clear of the discharge opening at all times.
- Only allow responsible individuals, who are familiar with the in struc tions, to operate the machine.
- Clear the area of objects such as rocks, toys, wire, bones, sticks, etc., which could be picked up and thrown by blade. Stay behind the handle when the engine (motor) is running.
- Be sure the area is clear of other people before mowing. Stop ma chine if anyone enters the area.
- Do not operate machine bare footed or while wearing sandals. AI ways wear substantial footwear with good ankle support while mowing.
- Do not pull mower backwards unless absolutely necessary. Always look down and behind before and while moving backwards.
- Never direct discharged material toward anyone. Avoid discharging material against a wall or obstruction. Material may richochet back toward the operator. Stop blade when crossing gravel surfaces.
- Do not operate the mower without proper guards, plates, grass catcher or other safety protective devices in place.
- See manufacturer's instructions for proper operation and installation of accessories. Only use accessories approved by the manufacturer.
- Stop the blade(s) when crossing gravel drives, walks, or roads.
- Never leave a running machine unattended.
- Stop the engine (motor) and wait until the blade comes to a complete stop before cleaning the machine, removing the grass catcher, or unclogging the discharge chute.
- Mow only in daylight or good artificial light.
-
Do not operate the machine while under the influence of alcohol or drugs.
-
Never operate machine in wet grass. Always be sure of your footing: keep a firm hold on the handle; walk, never run.
- Disengage the drive system, if so equipped, before starting the engine (motor).
- If the equipment should start to vi brate abnormally, stop the engine (motor) and check immediately for the cause. Vibration is generally a warning of trouble.
• Always wear eye protection when oper at ing machine. - Use extra care when approaching blind corners, shrubs, trees, or other objects that may obscure vision.
- When loading or unloading this machine, do not exceed the maximum recommended operation angle of 15° .
- Wear proper Personal Protective Equipment (PPE) while operating this machine, including (at a minimum) sturdy footwear, eye protection, and hearing protection. Do not mow in shorts or open toed footwear.
Always let someone know you are outside mowing.
Slopes are a major factor related to slip & fall accidents, which can result in severe injury. All slopes require extra caution. If you feel uneasy on a slope, do not mow it.
DO:
- Mow across the face of slopes: never up and down. Exercise extreme caution when changing direction on slopes.
- Remove obstacles such as rocks, tree limbs, etc.
- Watch for holes, ruts, bumps or hidden objects. Uneven terrain could cause a slip and fall accident. Tall grass can hide obstacles.
DO NOT:
- Do not mow near drop-offs, ditches or embankments. You could lose your footing or balance.
- Do not mow on wet grass or excessively steep slopes. Poor footing could cause a slip and fall accident.
IV. SAFE HANDLING OF GASOLINE
To avoid personal injury or property damage, use extreme care in handling gasoline. Gasoline is extremely flammable and the vapors are explosive.
- Extinguish all cigarettes, cigars, pipes and other sources of ignition.
- Use only an approved container.
- Never remove gas cap or add fuel with the engine running.
-
Allow engine to cool before refueling.
-
Never refuel the machine indoors.
- Never store the machine or fuel container where there is an open flame, spark or pilot light such as a water heater or on other appliances.
- Never fill containers inside a vehicle, on a truck or trailer bed with a plastic liner. Always place containers on the ground away from your vehicle before filling.
- Remove gas-powered equipment from the truck or trailer and refuel it on the ground. If this is not possible, then refuel such equipment with a portable container, rather than from a gasoline dispenser nozzle.
- Keep the nozzle in contact with the rim of the fuel tank or container opening at all times until fueling is complete. Do not use a nozzle lock-open device.
- If fuel is spilled on clothing, change clothing immediately.
- Never overfill fuel tank. Replace gas cap and tighten securely.
V. GENERAL SERVICE
- Never run a machine inside a closed area.
- Never make adjustments or repairs with the engine (motor) running. Disconnect the spark plug wire, and keep the wire away from the plug to prevent acci den tal starting.
- Keep all nuts and bolts tight to be sure the equipment is in safe working condition.
- Never tamper with safety devices. Check their proper operation regularly. Never do anything to interfere with the intended function of a safety device or reduce the protection provided by a safety device.
- Keep machine free of grass, leaves, or other debris build-up. Clean oil or fuel spillage. Allow machine to cool before storing.
- Stop and inspect the equipment if you strike an object. Repair, if neces sary, before restarting.
- Never attempt to make wheel height adjustments while the engine is running.
- Grass catcher components are subject to wear, damage, and deterioration, which could expose moving parts or allow objects to be thrown. Frequently check components and replace with manufacturer's recommended parts, when necessary.
- Mower blades are sharp and can cut. Wrap the blade(s) or wear gloves, and use extra caution when servicing them.
- Do not change the engine governor setting or over-speed the engine.
- Maintain or replace safety and instruction labels, as necessary.
TABLE OF CONTENTS
SAFETY RULES 2-3
PRODUCT SPECIFICATIONS 4
CUSTOMER RESPONSIBILITIES 4
ASSEMBLY....4-5
OPERATION....6-9
MAINTENANCE SCHEDULE 10
MAINTENANCE 10-12
SERVICE AND AD JUST MENTS 13
STORAGE 13-14
TROU BLE SHOOT ING....15
WARRANTY 16-17
CONGRATULATIONS on your purchase of a new lawn mower. It has been designed, engineered and man u fac tured to give you the best possible dependability and performance.
Should you experience any problem you cannot easily remedy, please contact your nearest authorized service center. We have competent, well-trained tech ni cians and the proper tools to service or repair this lawn mower.
Please read and retain this manual. The instructions will enable you to assemble and maintain your lawn mower properly. Always observe the "SAFETY RULES".
SERIAL
NUMBER:
DATE OF PURCHASE:
THE MODEL AND SERIAL NUMBERS WILL BE FOUND ON A DECAL ATTACHED TO THE REAR OF THE LAWN MOWER HOUSING.
YOU SHOULD RECORD BOTH SERIAL NUMBER AND DATE OF PURCHASE AND KEEP IN A SAFE PLACE FOR FUTURE REFERENCE.
PRODUCT SPECIFICATIONS
| Gasoline Capacity and Type: | 0.8 Quarts (0.9 Liters) (Unleaded Regular Only) |
| Oil Type (API SG-SL): | SAE 30 (above 0°C/32°F); SAE 5W-30 (below 0°C/32°F) |
| Oil Capacity: | 16 Ounces (0.45 Liters) |
| Spark Plug (Gap: 0.030" / 0.76mm): | Champion RC12YC |
| Blade Bolt Torque: | 35-40 ft. lbs. (47-54 Nm) |
CUSTOMER RESPONSIBILITIES
- Read and observe the safety rules.
- Follow a regular schedule in maintaining, caring for and using your lawn mower.
- Follow the instructions under "Maintenance" and "Storage" sections of this owner's manual.
ASSEMBLY
Read these instructions and this man u al in its entirety before you attempt to assemble or operate your new lawn mower.
IMPORTANT: THIS LAWN MOWER IS SHIPPED WITHOUT OIL OR GASOLINE IN THE ENGINE.
Your new lawn mower has been as sem bled at the factory with the exception of those parts left unassembled for shipping purposes. All parts such as nuts, washers, bolts, etc., necessary to complete the as sem bly have been placed in the parts bag. To ensure safe and proper operation of your lawn mower, all parts and hard ware you assemble must be tightened securely. Use the correct tools as necessary to ensure proper tightness.
TO RE MOVE LAWN MOW ER FROM CAR TON
- Remove loose parts included with mower.
- Cut down two end corners of carton and lay end panel down flat.
- Remove all packing materials except padding between upper and lower handle and padding holding operator presence control bar to up per handle.
- Roll lawn mower out of carton and check carton thoroughly for ad dition al loose parts.
HOW TO SET UP YOUR LAWN MOW ER TO UNFOLD HANDLE (See Fig. 1)
IMPORTANT: UNFOLD HANDLE CAREFULLY SO AS NOT TO PINCH OR DAMAGE CON TROL CABLES.
- Raise handles until lower handle section locks into place in mowing position.
- Insert bolt through handle and bracket and secure with nut.
-
Remove protective padding, raise upper handle section into place on lower handle and tighten both handle knobs.
-
Remove handle padding holding operator pres ence control bar to upper handle.
Your handles may be adjusted for your mowing comfort. Refer to "ADJUST HANDLE" in the Service and Adjustments section of this man u al.

FIG. 1
ASSEMBLY
TO ASSEMBLE GRASS CATCHER (See Fig. 2)
- Put grass catcher frame into grass bag with rigid part of bag on the bottom. Make sure the frame handle is outside of the bag top.
- Slip vinyl bindings over frame.
NOTE: If vinyl bindings are too stiff, hold them in warm water for a few minutes. If bag gets wet, let it dry before using.

FIG. 2
INSTALL STARTER ROPE (See Fig. 3)
- Loosen T-knob.
- Hold control bar against upper handle.
- Slowly pull engine starter rope out until rope will slip into loop of rope guide.
- Tighten T-knob.


FIG. 3
TO INSTALL ATTACHMENTS
Your lawn mower was shipped ready to be used as a mulcher. To convert mower to bagging or discharging, see "TO CON VERT MOWER" in the Operation section of this man u al.
OPERATION
KNOW YOUR LAWN MOWER
READ THIS OWNER'S MANUAL AND SAFETY RULES BEFORE OPERATING YOUR LAWN MOWER.
Compare the illustrations with your lawn mower to familiarize yourself with the location of various controls and adjustments. Save this manual for future reference.
These symbols may appear on your lawn mower or in literature supplied with the product. Learn and understand their meaning.


IMPORTANT: This lawn mower is shipped WITHOUT OIL OR GASOLINE in the engine.
NOTE: Gasoline containing up to 10% ethanol (E10) is acceptable for use in this machine.
The use of any gasoline exceeding 10% ethanol (E10) will void the product warranty.
MEETS CPSC SAFETY REQUIREMENTS
Our rotary walk-behind power lawn mowers conform to the safety standards of the American National Standards Institute and the U.S. Consumer Product Safety Commission. ▲WARNING: The blade turns when the engine is running.
OPERATOR PRESENCE CONTROL BAR – must be held down to the handle to start the engine. Release to stop the engine.
STARTER HANDLE – used for starting the engine.
MULCHER DOOR – allows conversion to discharge or bagging operation.
OPERATION

The operation of any lawn mower can result in foreign objects thrown into the eyes, which can result in severe eye damage. Always wear safety glasses or eye shields while operating your lawn mower or performing any adjustments or repairs. We recommend standard safety glasses or a wide vision safety mask over spectacles.

Use ear protectors to avoid damage to hearing.
HOW TO USE YOUR LAWN MOWER ENGINE SPEED
The engine speed was set at the factory for optimum performance. Speed is not adjustable.
ENGINE ZONE CONTROL

CAUTION: Federal regulations require an engine control to be installed on this lawn mower in order to minimize the risk of blade contact injury. Do not under any cir cum stanc es attempt to defeat the function of the operator control. The blade turns when the engine is running.
- Your lawn mower is equipped with an operator presence control bar which requires the operator to be positioned behind the lawn mower handle to start and operate the lawn mower.
Raise wheels for low cut and lower wheels for high cut, adjust cutting height to suit your requirements. Me di um position is best for most lawns.
- To change cutting height, squeeze adjuster lever to ward wheel. Move wheel up or down to suit your requirements. Be sure all wheels are in the same setting.
NOTE: Adjuster is properly positioned when plate tab inserts into hole in lever. Also, 9-position adjusters (if so equipped) allow lever to be positioned between the plate tabs.
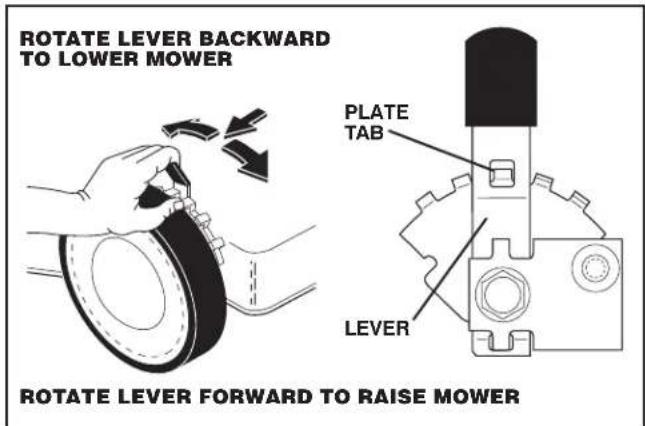
FIG. 4
TO CONVERT MOWER
Your lawn mower was shipped ready to be used as a mulcher. To convert to bagging or discharging:
REAR BAGGING (See Fig. 5)
- Lift rear door of the lawn mower and place the grass catcher frame hooks onto the door pivot pins.
• To convert to mulching or dis charging operation, remove grass catch er and close rear door.
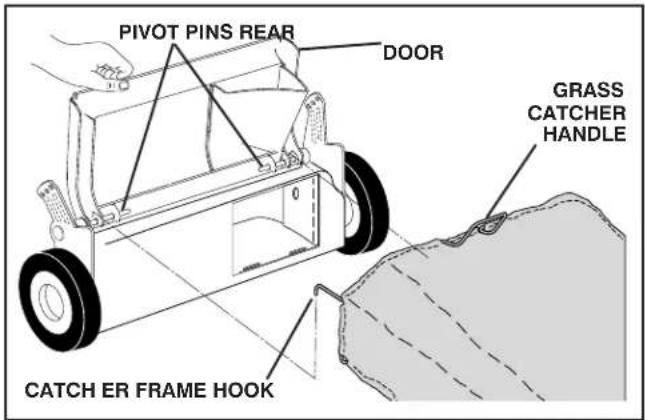
FIG. 5
SIDE DISCHARGING (See Figs. 6 and 7)
- Rear door must be closed.
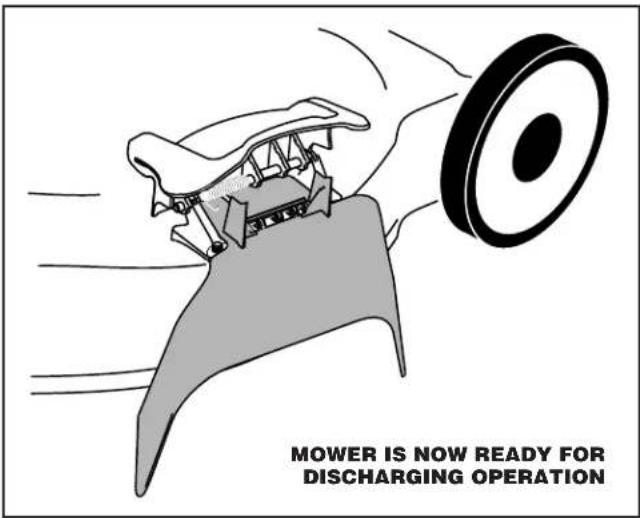
- Open mulcher door and install dis charge deflector under door as shown.
- Mower is now ready for discharging operation.
- To convert to mulching or bagging operation, discharge deflector must be removed and mulcher door must be closed.

FIG. 6
OPERATION
- Rear door closed.
- Mulcher door closed.
FOR REAR BAGGING -
- Grass catcher installed.
- Mulcher door closed.
- Rear door closed.
- Discharge deflector installed.

CAUTION: Do not run your lawn mower with out rear door closed or ap proved grass catcher in place. Never at tempt to operate the lawn mower with the rear door re moved or propped open.
TO EMPTY GRASS CATCHER (See Fig. 8)
- Lift up on grass catcher using the frame handle.
- Remove grass catcher with clippings from under lawn mower han dle.
- Empty clippings from bag.
NOTE: Do not drag the bag when emptying; it will cause unnecessary wear.

FIG. 8
BEFORE STARTING ENGINE
ADD OIL (See Fig. 9)
Your lawnmower is shipped without oil in the engine. For type and grade of oil to use, see "ENGINE" in the Maintenance section of this manual.

CAUTION: DO NOT overfill engine with oil, or it will smoke heavily from the muffler on startup.
- Be sure lawnmower is level.
- Remove oil dipstick from oil fill spout.
- You receive a container of oil with the unit. Slowly pour the entire container down the oil fill spout into the engine.
NOTE: Initial oil fill requires only 18 oz. due to residual oil in engine from the manufacturers 100% quality testing. When changing oil you may need 20 oz.
- Insert and tighten dipstick.
IMPORTANT:
- Check oil level before each use. Add oil if needed. Fill to full line on dipstick.
- Change the oil after every 25 hours of operation or each season. You may need to change the oil more often under dusty, dirty conditions. See "TO CHANGE ENGINE OIL" in the Maintenance section of this manual.
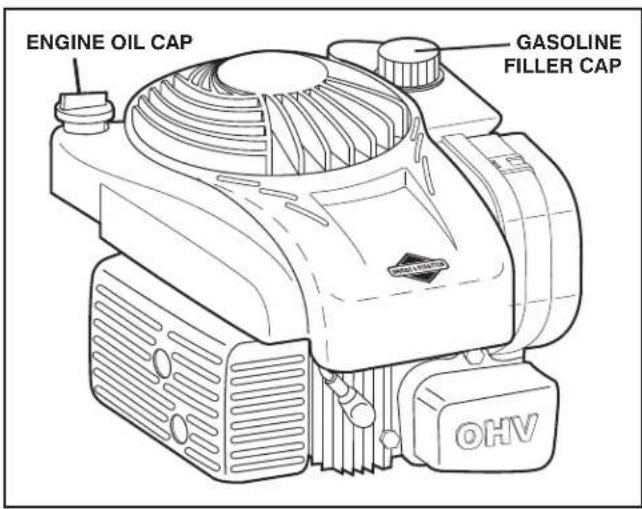
FIG. 9
ADD GASOLINE (See Fig. 9)
- Fill fuel tank to bottom of tank filler neck. Do not overfill. Use fresh, clean, regular unleaded gasoline with a minimum of 87 octane. Do not mix oil with gasoline. Purchase fuel in quantities that can be used within 30 days to assure fuel freshness.

CAUTION: Wipe off any spilled oil or fuel. Do not store, spill or use gasoline near an open flame.
OPERATION

Alcohol blended fuels (called gasohol or using ethanol or methanol) can attract moisture which leads to separation and for ma tion of acids during storage. Acidic gas can damage the fuel system of an engine while in storage. To avoid engine problems, the fuel system should be emptied before stor age of 30 days or longer. Empty the gas tank, start the engine and let it run until the fuel lines and carburetor are empty. Use fresh fuel next season. See Storage In struc tions for additional information. Never use engine or carburetor cleaner products in the fuel tank or permanent damage may occur.
TO STOP ENGINE
- To stop engine, release operator presence control bar.
TO START ENGINE
NOTE: Due to protective coatings on the engine, a small amount of smoke may be present during the initial use of the product and should be considered normal.
NOTE: Your engine is equipped with an automatic choke system. No priming or choking is required before starting.
- To start engine, hold operator presence control bar down to the handle and pull starter handle quickly. Do not allow starter rope to snap back.
MOWING TIPS

CAUTION: Do not use de-thatcher blade attachments on your mower. Such attachments are hazardous, will damage your mower and could void your warranty.
- Under certain conditions, such as very tall grass, it may be necessary to raise the height of cut to reduce pushing effort and to keep from overloading the engine and leaving clumps of grass clippings. It may also be necessary to reduce ground speed and/or run the lawn mower over the area a second time.
- For extremely heavy cutting, reduce the width of cut by overlapping previously cut path and mow slowly.
- For better grass bagging and most cutting conditions, the engine speed should be set in the fast position.
- Pores in cloth grass catchers can become filled with dirt and dust with use and catchers will collect less grass. To prevent this, regularly hose catcher off with water and let dry before using.
- Keep top of engine around starter clear and clean of grass clippings and chaff. This will help engine air flow and extend engine life.
MULCHING MOWING TIPS
IMPORTANT: FOR BEST PERFORMANCE, KEEP MOWER HOUSING FREE OF BUILT-UP GRASS AND TRASH. SEE "CLEANING" IN THE MAINTENANCE SECTION OF THIS MANUAL.
- The special mulching blade will recut the grass clippings many times and reduce them in size so that as they fall onto the lawn they will disperse into the grass and not be noticed. Also, the mulched grass will biodegrade quickly to provide nutrients for the lawn. Always mulch with your highest engine (blade) speed as this will provide the best recutting action of the blades.
- Avoid cutting your lawn when it is wet. Wet grass tends to form clumps and interferes with the mulching action. The best time to mow your lawn is the early afternoon. At this time the grass has dried, yet the newly cut area will not be exposed to direct sunlight.
- For best results, adjust the lawn mower cutting height so that the lawn mower cuts off only the top one-third of the grass blades (See Fig. 10). If the lawn is overgrown it will be necessary to raise the height of cut to reduce pushing effort and to keep from overloading the engine and leaving clumps of mulched grass. For extremely heavy mulching, reduce your width of cut by overlapping previously cut path and mow slowly.
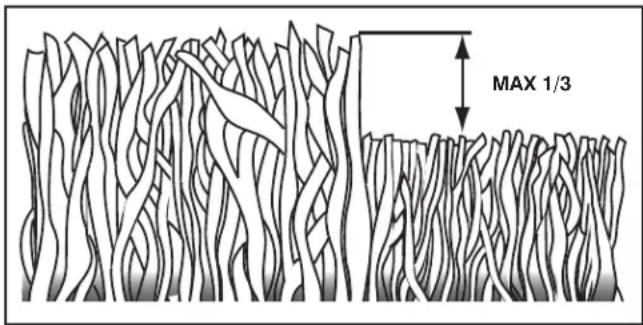
FIG. 10
- Certain types of grass and grass conditions may require that an area be mulched a second time to completely hide the clippings. When doing a second cut, mow across (perpendicular) to the first cut path.
- Change your cutting pattern from week to week. Mow north to south one week then change to east to west the next week. This will help prevent matting and graining of the lawn.
MAINTENANCE
| MAINTENANCE SCHEDULE | BEFORE EACH USE | AFTER EACH USE | EVERY 10 HOURS | EVERY 25 HOURS OR SEASON | EVERY 100 HOURS | BEFORE STORAGE | |
| LAWN MOWER | Check for Loose Fasteners | √ | √ | ||||
| Clean / Inspect Grass Catcher * | √ | √ | √ | ||||
| Check Tires | √ | ||||||
| Check Drive Wheels *** | √ | ||||||
| Clean Lawn Mower **** | √ | √ | |||||
| Clean under Drive Cover *** | √ | ||||||
| Check Drive Belt / Pulleys *** | √ | ||||||
| Check / Sharpen / Replace Blade | √3 | ||||||
| Lubrication | √ | ||||||
| Clean and Recharge Battery ** | √ | √4 | |||||
| ENGINE | Check Engine Oil level | √5 | |||||
| Change Engine Oil | √1,2 | ||||||
| Clean Air Filter | √2 | ||||||
| Inspect Muffler | √ | ||||||
| Replace Spark Plug | √ | ||||||
| Replace Air Filter Paper Cartridge | √2 | ||||||
| Empty fuel system or add Stabilizer | √ | ||||||
* (if so equipped)
** Electric-Start mowers
*** Power-Propelled mowers
**** Use a scraper to clean under deck
1 - Change more often if operating under a heavy load or in high outdoor temperatures.
2 - Service more often if operating in dirty or dusty conditions.
3 - Replace blades more often when mowing in sandy soil.
4 - Charge 48 hours at end of season.
5 - And after each 5 hours of use.
GENERAL RECOMMENDATIONS
The warranty on this lawn mower does not cover items that have been subjected to operator abuse or negligence. To receive full value from the warranty, operator must maintain mower as instructed in this manual.
Some adjustments will need to be made periodically to properly maintain your unit.
At least once a season, check to see if you should make any of the adjustments described in the Service and Adjustments section of this manual.
- At least once a year, replace the spark plug, clean or replace air filter element and check blade for wear. A new spark plug and clean/new air filter element assure proper air-fuel mixture and help your engine run better and last longer.
- Follow the maintenance schedule in this manual.
BEFORE EACH USE
- Check engine oil level.
- Check for loose fasteners.
LUBRICATION
Keep unit well lubricated (See "LUBRICATION CHART").
IMPORTANT: DO NOT OIL OR GREASE PLASTIC WHEEL BEARINGS. VISCOUS LU BRI CANTS WILL ATTRACT DUST AND DIRT THAT WILL SHORT EN THE LIFE OF THE SELF-LU BRI CAT ING BEARINGS. IF YOU FEEL THEY MUST BE LU BRI CATED, USE ONLY A DRY, POW DERED GRAPHITE TYPE LUBRICANT SPAR INGLY.
LUBRICATION CHART
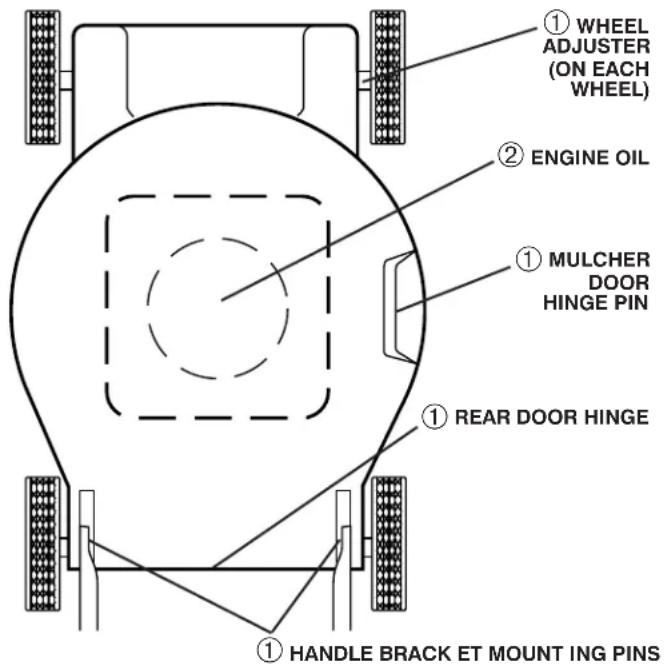
① SPRAY LUBRICANT
② SEE "ENGINE" IN MAINTENANCE SECTION
MAINTENANCE
LAWN MOWER
Always observe safety rules when performing main tenance.
TIRES
- Keep tires free of gasoline, oil, or insect control chemicals which can harm rubber.
- Avoid stumps, stones, deep ruts, sharp objects and other hazards that may cause tire damage.
BLADE CARE
For best results, mower blade must be kept sharp. Re place bent or dam aged blades.

CAUTION: Use only a replacement blade approved by the manufacturer of your mower. Using a blade not approved by the manufacturer of your mower is hazardous, could damage your mower and void your warranty.
TO REMOVE BLADE (See Fig. 11)
- Disconnect spark plug wire from spark plug and place wire where it cannot come in contact with plug.
- Turn lawn mower on its side. Make sure air filter and carburetor are up.
- Use a wood block between blade and mower housing to prevent blade from turning when re moving blade bolt.
NOTE: Protect your hands with gloves and/or wrap blade with heavy cloth.
-
Remove blade bolt by turning counter-clockwise.
-
Remove blade and attaching hardware (bolt, lock wash er and hardened wash er).
NOTE: Remove the blade adapter and check the key inside hub of blade adapter. The key must be in good condition to work properly. Replace adapter if damaged.
TO REPLACE BLADE (See Fig. 11)
- Position the blade adapter on the engine crank shaft. Be sure key in adapter and crankshaft key way are aligned.
- Position the blade on the blade adapter aligning the two (2) holes in the blade with the raised lugs on the adapter.
- Be sure the trailing edge of blade (opposite sharp edge) is up toward the engine.
- Install the blade bolt with the lock washer and hardened washer into blade adapter and crank shaft.
- Use block of wood between blade and lawn mower housing and tighten the blade bolt, turning clock wise.
- The recommended tightening torque is 35-40 ft. lbs. (47–54 Nm).
IMPORTANT: BLADE BOLT IS HEATTREATED. IF BOLT NEEDS REPLACING, REPLACE ONLY WITH APPROVED BOLT.
TO SHARPEN BLADE
NOTE: We do not recommend sharpening blade - but if you do, be sure the blade is balanced. An un balanced blade will cause eventual damage to lawn mower or engine.
- The blade can be sharpened with a file or on a grinding wheel. Do not attempt to sharpen while on the mower.
- To check blade balance, drive a nail into a beam or wall. Leave about one inch of the straight nail exposed. Place center hole of blade over the head of the nail. If blade is balanced, it should remain in a horizontal position. If either end of the blade moves downward, sharpen the heavy end until the blade is balanced.

FIG. 11
GRASS CATCHER
- The grass catcher may be hosed with water, but must be dry when used.
- Check your grass catcher often for damage or de teri o ra tion. Through normal use it will wear. If catcher needs replacing, replace only with approved replacement catcher shown in the Repair Parts section of this manual. Give the mower model number when ordering.
ENGINE
LUBRICATION
Use only high quality detergent oil rated with API service classification SG–SL. Select the oil's SAE viscosity grade according to your expected operating temperature.

NOTE: Although multi-viscosity oils (5W30, 10W30 etc.) improve starting in cold weather, these multi-viscosity oils will result in increased oil consumption when used above 32° F. Check your engine oil level more frequently to avoid possible engine damage from running low on oil.
Change the oil after every 25 hours of operation or at least once a year if the lawn mower is not used for 25 hours in one year.
Check the crankcase oil level before starting the engine and after each five (5) hours of continuous use. Tighten oil plug securely each time you check the oil level.
MAINTENANCE
TO CHANGE ENGINE OIL (See Fig. 12)
NOTE: Before tipping lawn mower to drain oil, empty fuel tank by running engine until fuel tank is empty.
- Disconnect spark plug wire from spark plug and place wire where it cannot come in contact with plug.
- Remove engine oil cap; lay aside on a clean surface.
- Tip lawn mower on its side as shown and drain oil into a suitable container. Rock lawn mower back and forth to remove any oil trapped inside of engine.
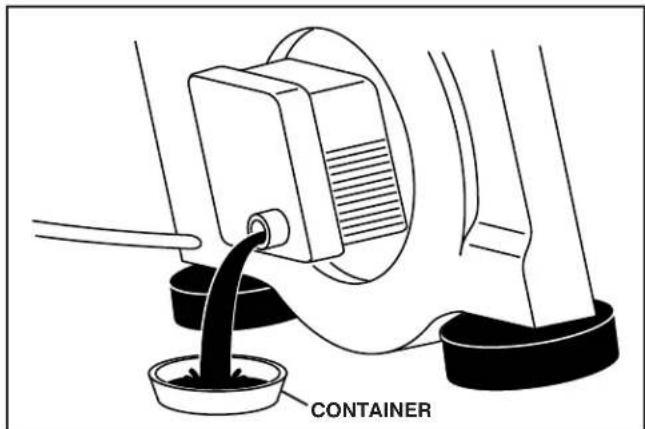
FIG. 12
- Wipe off any spilled oil from lawn mower or side of engine.
- Slowly pour oil down the oil fill spout, stopping every few ounces to check the oil level with the dipstick.
- Stop adding oil when you reach the FULL mark on the dipstick. Wait a minute to allow oil to settle.
- Continue adding small amounts of oil, rechecking the dipstick until oil level settles at FULL. DO NOT overfill, or engine will smoke heavily from the muffler on startup.
- Always be sure to retighten oil dipstick before starting engine.
- Re con nect spark plug wire to spark plug.
AIR FILTER (See Fig. 13)
Your engine will not run properly and may be damaged by using a dirty air filter. Replace the air filter every 100 hours of operation or every season, whichever occurs first. Service air cleaner more often under dusty conditions.
TO CLEAN AIR FILTER
- Remove cover.
- Carefully remove cartridge.
- Clean by gently tapping on a flat surface. If very dirty, replace cartridge.
- Install cartridge, then replace cover.

CAUTION: Petro leum solvents, such as ker o sene, are not to be used to clean car tridge. They may cause dete ri o ra tion of the cartridge. Do not oil car tridge. Do not use pres sur ized air to clean or dry car tridge.

FIG. 13
MUFFLER
Inspect and replace corroded muffler as it could create a fire hazard and/or damage.
SPARK PLUG
Replace spark plug at the beginning of each mowing season or after every 100 hours of operation, whichever occurs first. Spark plug type and gap setting are shown in the "PRODUCT SPECIFI CA TIONS" section of this manual.
CLEANING
IMPORTANT: FOR BEST PERFORMANCE, KEEP MOWER HOUSING FREE OF BUILT-UP GRASS AND TRASH. CLEAN THE UNDERSIDE OF YOUR MOWER AFTER EACH USE.

CAUTION: Disconnect spark plug wire from spark plug and place wire where it cannot come in contact with plug.
- Clean the underside of your lawn mower by scraping to remove build-up of grass and trash.
- Clean engine often to keep trash from accumulating. A clogged engine runs hotter and shortens engine life.
- Keep finished surfaces/wheels free of all gasoline, oil, etc.
- With the exception of the water washout port (if equipped), we do not recommend using a garden hose to clean the outside of your lawn mower unless the elec tri cal system, muffler, air filter and carburetor are covered to keep water out. Water in engine can result in shortened engine life.
SERVICE AND ADJUSTMENTS

CAUTION: TO AVOID SERIOUS INJURY, BEFORE PERFORMING ANY SERVICE OR ADJUSTMENTS:
- Release control bar and stop engine.
- Make sure the blade and all moving parts have completely stopped.
- Disconnect spark plug wire from spark plug and place where it cannot come in contact with plug.
LAWN MOWER
See "TO ADJUST CUTTING HEIGHT" in the Operation section of this manual.
REAR DEFLECTOR
The rear deflector, attached between the rear wheels of your mower, is provided to minimize the possibility that objects will be thrown out of the rear of the mower into the operator's mowing position. Replace the deflector if damaged.
ENGINE
ENGINE SPEED
Your engine speed has been factory set.
CARBURETOR
Your carburetor is not adjustable.
IMPORTANT: NEVER TAMPER WITH THE ENGINE GOVERNOR, WHICH IS FACTORY SET FOR PROPER ENGINE SPEED. OVER SPEED ING THE ENGINE ABOVE THE FACTORY HIGH SPEED SETTING CAN BE DANGEROUS. IF YOU THINK THE ENGINE-GOVERNED HIGH SPEED NEEDS ADJUSTING, CONTACT YOUR NEAREST AUTHORIZED SERVICE CENTER, WHICH HAS PROPER EQUIP MENT AND EXPERIENCE TO MAKE ANY NEC ES SARY ADJUSTMENTS.
STORAGE
Immediately prepare your lawn mower for storage at the end of the season or if the unit will not be used for 30 days or more.
LAWN MOWER
When lawn mower is to be stored for a period of time, clean it thoroughly, remove all dirt, grease, leaves, etc. Store in a clean, dry area.
- Clean entire lawn mower (See "CLEANING" in the Maintenance section of this manual).
- Lubricate as shown in the Maintenance section of this manual.
- Be sure that all nuts, bolts, screws, and pins are securely fastened. Inspect moving parts for damage, breakage and wear. Replace if necessary.
- Touch up all rusted or chipped paint surfaces; sand lightly before painting.
HANDLE (See Figs. 14 and 15)
You can fold your lawn mower handle for storage.
- Remove bolts and nuts.
- Squeeze the bottom ends of the lower handle toward each other until the lower handle clears the handle bracket, then move handle forward.
- Loosen upper handle mounting bolts enough to allow upper handle to be folded back.
IMPORTANT: WHEN FOLDING THE HANDLE FOR STORAGE OR TRANSPORTATION, BE SURE TO FOLD THE HANDLE AS SHOWN OR YOU MAY DAMAGE THE CONTROL CABLES.
- When setting up your handle from the storage position, the lower handle will automatically lock into mowing position.
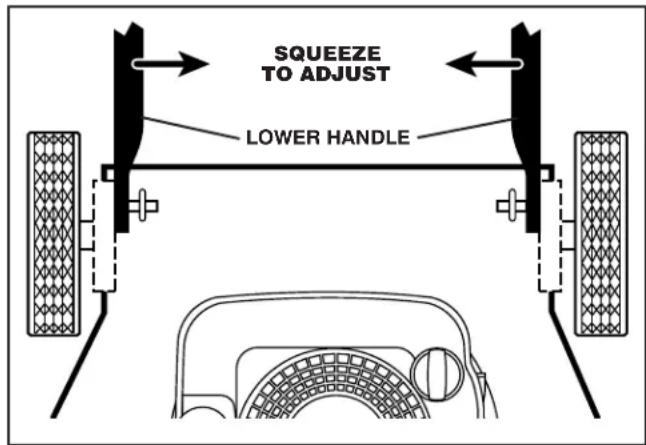
FIG. 14
STORAGE
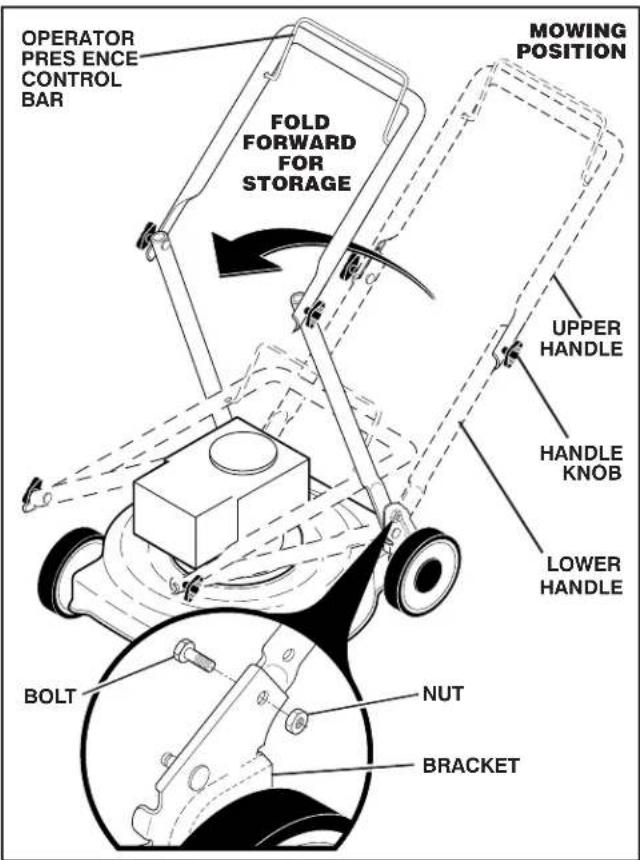
FIG. 18
ENGINE FUEL SYSTEM
IMPORTANT: IT IS IMPORTANT TO PREVENT GUM DEPOSITS FROM FORMING IN ESSENTIAL FUEL SYSTEM PARTS SUCH AS CARBURETOR, FUEL FILTER, FUEL HOSE, OR TANK DURING STORAGE. ALCOHOL BLENDED FUELS (CALLED GASOHOLOR USING ETHANOL OR METHANOL) CAN ATTRACT MOISTURE WHICH LEADS TO SEPARATION AND FORMATION OF ACIDS DURING STORAGE. ACIDIC GAS CAN DAMAGE THE FUEL SYSTEM OF AN ENGINE WHILE IN STORAGE.
- Empty the fuel tank by starting the engine and letting it run until the fuel lines and carburetor are empty.
- Never use engine or carburetor cleaner products in the fuel tank or permanent damage may occur.
• Use fresh fuel next season.
NOTE: Fuel stabilizer is an acceptable alternative in minimizing the formation of fuel gum deposits during stor age. Add stabilizer to gasoline in fuel tank or storage container. Always follow the mix ratio found on stabilizer container. Run engine at least 10 minutes after adding stabilizer to allow the stabilizer to reach the carburetor. Do not empty the gas tank and carburetor if using fuel stabilizer.
ENGINE OIL
Drain oil (with engine warm) and replace with clean engine oil. (See "ENGINE" in the Maintenance section of this manual).
CYLINDER
- Remove spark plug.
- Pour one ounce (29 ml) of oil through spark plug hole into cylinder.
- Pull starter handle slowly a few times to distribute oil.
- Replace with new spark plug.
OTHER
- Do not store gasoline from one season to another.
- Replace your gasoline can if your can starts to rust. Rust and/or dirt in your gasoline will cause problems.
- If possible, store your unit indoors and cover it to give protection from dust and dirt.
- Cover your unit with a suitable protective cover that does not retain moisture. Do not use plastic. Plastic cannot breathe, which allows condensation to form and will cause your unit to rust.
IMPORTANT: NEVER COVER MOWER WHILE ENGINE AND EXHAUST AREAS ARE STILL WARM.

CAUTION: Never store the lawn mower with gasoline in the tank inside a building where fumes may reach an open flame or spark. Allow the engine to cool before storing in any enclosure.
TROUBLESHOOTING POINTS
| PROBLEM | CAUSE | CORRECTION |
| Does not start1. Out of fuel.2. Stale fuel.3. Water in fuel.5. Spark plug wire is disconnected.6. Bad spark plug.7. Control bar in 8. Control bar in 9. Control bar defective.10. Fuel valve lever (if equipped) in OFF position.11. Weak battery (if equipped).12. Disconnected battery connector (if equipped). | Dirty air filter.1. Clean/replace air filter.Fill fuel tank.Empty fuel tank and refill tank with fresh,Empty fuel tank and refill tank with fresh,Empty fuel tank and refill tank with fresh,Connect wire to plug.Replace spark plug.7. Loose blade or broken blade adapter.Released position.8. Depress control bar to handle.Defective.9. Replace control bar.Fuel valve lever (if equipped) in OFF position.10. Turn fuel valve lever to the ON position.11. Charge battery.Disconnected battery connector (if equipped). | cleanclean7. Tighten blade bolt or replace blade adapter. |
| Loss of power2. Cutting too much grass.3. Dirty air filter.4. Buildup of grass, leaves and trash under mower.5. Too much oil in engine.6. Walking speed too fast. | Rear of lawn mower housing or cutting blade dragging in heavy grass.Raise cutting height.Clean/replace air filter.Clean underside of mower housing.Check oil level.Cut at slower walking speed. | Raise cutting height. |
| Poor cut – uneven | Worn, bent or loose blade.Wheel heights uneven.Buildup of grass, leaves and trash under mower. | Replace blade. Tighten blade bolt.Set all wheels at same height.Clean underside of mower housing. |
| Excessive vibration | Worn, bent or loose blade.Bent engine crankshaft. | Replace blade. Tighten blade bolt.Contact a qualified service center. |
| Starter rope hard to pull2. Bent engine crankshaft.3. Blade adapter broken.4. Blade dragging in grass. | Engine flywheel brake is on when control bar is released.Contact a qualified service center.Replace blade adapter.Move lawn mower to cut grass or other hard surface before starting. | Depress control bar to upper handle before pulling starter rope. |
| Grass catcher not filling (if so equipped) | Cutting height too low.Lift on blade worn off.Catcher not venting air. | Raise cutting height.Replace blade.Clean grass catcher. |
| Hard to push2. Rear of lawn mower housing or cutting blade dragging in heavy grass.3. Grass catcher too full.4. Handle height position not right for you. | Grass is too high or wheel height is too low.Raise rear of lawn mower housing one (1) setting higher.Empty grass catcher.Adjust handle height to suit. | Raise cutting height. |
LIMITED WARRANTY
What is covered. We warrant that this product is free from defects in material or workmanship under normal use and maintenance. Certain components, such as normal wear parts, engines, and transmissions are excluded from this warranty. We will, at our option, repair or replace any defective product or part covered by the Limited Warranty, free of charge at any authorized Servicing Dealer/Center using OEM replacement parts, subject to the limitations and exclusions described below.
Limited Warranty period. We will warrant the product to the original retail purchaser from the date of retail purchase for the applicable period of time shown on the chart below.
What is NOT covered. This Limited Warranty does not cover:
(a) Engines and transmissions, except as noted on the chart below; a separate warranty provided with your product might apply.
(b) Normal wear parts (parts and items that normally wear out with use), including without limitation spark plugs, bulbs, filters, lubricants, starter cords, belts, blades, and blade adapters are not covered, nor is damage due to normal wear, such as abrasion to mower decks, tires punctured by an external source, natural discoloration of materials, or dulling or damage to blades due to contact with abrasives, rocks, rods, or other foreign objects.
(c) Emissions control equipment and components to the extent regulated by the U.S. Environmental Protection Agency or similar government agencies. These are covered by a separate emission control warranty contained in the operator's manual.
(d) Depending on the product, there is either NO WARRANTY or a reduced warranty if the product is used for commercial, non-residential, or rental purposes and, in such circumstances, this Limited Warranty is offered instead of and replaces any warranty regime provided by law. Please refer to the chart below.
(e) Damage related to abuse, misuse, neglect, modifications, alterations, use of unauthorized attachments, improper storage, or lack of lubrication or engine failure due to the use of oils that do not meet engine manufacturer's specifications, pressure cleaning or steam cleaning the product, excessive dirt, abrasives, salt water, moisture, corrosion, rust, or varnish. Failure to perform required maintenance as described in the operator's manual will void this warranty.
(f) Damage or failures due to improper set up, pre-delivery service or repair service by anyone other than an authorized servicing dealer during the warranty period.
(g) Damage caused by use of gasoline containing more than 10% (E10) ethanol content (e.g. E15, E25, E30, E50, E85), use of ether or similar starting fluids, or stale fuel.
(h) Damage to sprayers from using caustic or flammable materials in the sprayer, or lack of or broken strainers.
Your Responsibilities. To preserve your rights under this Limited Warranty, you must exercise reasonable care and use of the product, including following the preventive maintenance, storage, and fuel and oil usages as prescribed in the operator's manual. Any adjustment (e.g. to the throttle cable or belt guides) after the first thirty days of purchase and any preventive maintenance as outlined in the operator's manual are NOT covered. In addition, you must cease using the product immediately upon any failure or damage, and take the product to an authorized servicing dealer prior to any further use.
WARRANTY EXCLUSIONS, DISCLAIMERS, AND LIMITED RIGHTS. WE WILL NOT BE LIABLE FOR ANY INCIDENTAL OR CONSEQUENTIAL DAMAGES. YOUR REMEDY IS LIMITED TO REPAIR OR REPLACEMENT OF THE PRODUCT OR PART, AT OUR DISCRETION. THERE ARE NO EXPRESS WARRANTIES OTHER THAN THOSE SET FORTH HEREIN. ANY WARRANTY IMPLIED BY STATE LAW (WHETHER OF MERCHANTABILITY OR FITNESS FOR A PARTICULAR USE OR OTHERWISE) IS HEREBY DISCLAIMED; WHERE SUCH A DISCLAIMER IS NOT PERMITTED BY LAW, THEN SUCH IMPLIED WARRANTY IS LIMITED FOR THE DURATION OF THE APPLICABLE LIMITED WARRANTY PERIOD LISTED IN THE CHART BELOW. SOME LOCALITIES, INCLUDING THE PROVINCE OF QUEBEC, DO NOT ALLOW EXCLUSIONS OF INCIDENTAL OR CONSEQUENTIAL DAMAGES OR LIMITATIONS ON HOW LONG AN IMPLIED WARRANTY LASTS, SO THE ABOVE EXCLUSIONS AND LIMITATIONS MAY NOT APPLY TO YOU. THIS LIMITED WARRANTY GIVES YOU SPECIFIC LEGAL RIGHTS, AND YOU MAY ALSO HAVE OTHER RIGHTS BASED ON YOUR LOCALITY.
How to obtain service. To obtain warranty service, you must take your product to an authorized Servicing Dealer/Center. To find your nearest authorized Servicing Dealer/Center, visit our website and use the Dealer Locator feature, or call 1-800-487-5951 from 8:00 AM to 7:00 PM EST. Any costs to transport or ship the product are your responsibility. You must present proof of purchase (including date, product model and serial number) to an authorized Servicing Dealer/Center for warranty service. Proof of purchase rests solely with you. You may register your product using our online product registration site to help ensure that you are notified of important product information. However, registering your product is not a condition of warranty service.
Husqvarna®
www.husqvarna.com/us or www.husqvarna.com/ca
2015 587 70 46-01 Rev. A 2014-10-01
| Husqvarna® Warranty Chart 2015 587 70 46-01 | Consumer (personal, household use only) | Commercial (any commercial, professional, agricultural, institutional or income producing use) | Rental (any rental usage) | |
| HANDHELD PRODUCTS | ||||
| Chain Saws (1)(2) | 2 Years | 90 days (3) | 90 days | |
| Power Cutters (1) | See Note 8 | 1 Year (4) | 90 days | |
| 100 Series Line Trimmers, 125 Series Blowers, and Attachments (split boom models) (1)(2) | 2 Years | 90 days | 90 days | |
| 223L, 224L, 323L Line Trimmers, and Attachments (split boom models) (1) | 2 Years | 1 Year | 90 days | |
| All Other Handheld Products and Attachments (Split boom models) (1)(2) | 2 Years | 2 Years | 90 days | |
| WHEELED PRODUCTS | ||||
| Consumer Wheeled Products | ||||
| RZ - Zero Turn Mowers, Tractors, Lawn Mowers, High Wheel Trimmer (5)(6)(7) | 3 Years | No Warranty | No Warranty | |
| MZ - Zero Turn Mowers (5)(6) | 3 Years | 1 Year | No Warranty | |
| Commercial Wheeled Products | ||||
| M-ZT & P-ZT - Zero Turn Mowers, Commercial Lawn Mowers (5)(6) | See Note 8 | 2 Years | 90 days | |
| PZ - Zero Turn Mowers (5)(6) | See Note 8 | 3 Years (3rd yr. parts only) | 90 days | |
| Other Wheeled Products | ||||
| Log Splitter (5) | 2 Years | No Warranty | No Warranty | |
| Tillers (5)(5) | 3 Years | 90 days | 90 days | |
| 100, 200, and 300 Series Snow Throwers | 3 Years | 90 days | 90 days | |
| Husqvarna Snow Thrower Engines | 5 Years | 90 days | 90 days | |
| Cast iron impeller and cast iron gear box | 10 Years | 90 days | 90 days | |
| Robotic Mowers | ||||
| Robotic Mower | 2 Years | 90 days | 90 days | |
| Battery | 1 Year | 1 Year | 1 Year | |
| Lead-Acid Batteries (for all wheeled products) (9) | 180 days | 180 days | 180 days | |
| Engines | ||||
| Rato, LCT, Locin | 2 years | 90 days | No Warranty | |
| All Others | See Note 5 | See Note 5 | See Note 5 | |
| Transmission / Drive Systems | ||||
| Tuff Torq, General Transmission | 2 Years | No Warranty | No Warranty | |
| Peerless | 3 Years | No Warranty | No Warranty | |
| Hydro-Gear, All Others | See Note 6 | See Note 6 | See Note 6 | |
| Decks | ||||
| Zero-Turn Mowers and Tractors with steel reinforced stamped deck shell | 10 Years | No Warranty | No Warranty | |
| Zero-Turn Mowers and Tractors fabricated deck shell | See Note 1 | No Warranty | No Warranty | |
| OTHER PRODUCTS, PARTS AND ACCESSORIES | ||||
| Parts and Accessories (if purchased) (10) | ||||
| Collection Systems and Baggers | 1 Year | 90 days | No Warranty | |
| personnel protective equipment, etc.) | 90 days | 30 days | No Warranty | |
| Parts (e.g., belts, blades, starter covers, starter springs, etc.) | 30 days | 30 days | No Warranty | |
| Reconditioned or Refurbished Products | 30 days | No Warranty | No Warranty | |
| Sprayers | 1 Year | 1 Year | 1 Year | |
Ignition modules, tiller tines, fabricated decks, and trimmer shafts all have a "Limited Lifetime Warranty," and are warranted for the life of the product or 7 (seven) years after the product's final production run, whichever comes first.
Parts and labor are included in the initial warranty period; labor is excluded after the initial warranty period expires. Deck shell replacement will be limited to a maximum of two (2) deck shells within the Limited Lifetime Warranty. Pole Saws and Pole Hedge Trimmers are excluded from the "Limited Lifetime Warranty."
2 Handheld Battery powered products. Warranty covers the unit, battery, and charger.
3 XP Chainsaws have a 180 day Commercial Warranty (Includes XP battery chainsaw unit, battery, and charger)
4 Power cutter K1260 only has a 90 day Commercial Warranty
5 Engines are warranted separately by the engine manufacturer; please refer to the separate engine warranty provided with the product.
6 RZ - (EZT Integrated transmission): Hydro-Gear warrants transmission for two (2) years consumer use, parts and labor.
MZ - (ZT3100 transmission): Hydro-Gear warrants transmission for one (1) year commercial use and two (2) years consumer use, parts and labor. M-ZT / P-ZT - (ZT3400 transmission): Hydro-Gear warrants transmission for two (2) years, parts and labor.
PZ - (Pump & Wheel Motor or ZT5400 transmission) three (3) year warranty, as follows:
Hydro-Gear warrants the first (1) year - parts and labor
Hydro-Gear warrants the second (2) year - parts only. Husqvarna warrants the labor in the second year.
Husqvarna warrants the third (3) year - parts only.
Snow Throwers and Tractors: Hydro-Gear warrants transmission for two (2) years consumer use, parts and labor.
For all others, your transmission is warranted separately by the transmission manufacturer; please refer to the separate transmission warranty provided with your product.
7 Tractor frame, chassis, and front axle have a five year consumer warranty
8 As warranted for commercial use.
9 Battery warranty does not include discharged or uncharged batteries.
10 Replacement parts and accessories are warranted only for the BALANCE of the warranty period applicable to the part or accessory that was replaced.
Product Registration
Please register your product at www.husqvarna.com/us or www.husqvarna.com/ca.
Go to 'Support' then 'Product Registration'
You may call 1-800-487-5951 (US) or 1-800-805-5523 (Canada) to have your product registered.
Please have all product information ready prior to calling Consumer Support.
Thank you for choosing Husqvarna.

REGLAS DE SEGURIDAD

IMPORTANTE: ESTA MAQUINA CORTADAORA ES CAPAZ DE AMPUTAR LAS MANOS Y LOS MANOS Y LOS PIES Y DE LANZAR OBJETOS. SI NO SE OBSERVAN LAS INSTRUCCIONES DE SEGURIDAD SIGUIENTES SE PUEDEN PRODUCIR LESIONES GRAVES O LA MUERTE.


- SAFETY RULES
- CHILDREN
- GENERAL OPERATION
- DO
- DO NOT
- SAFE HANDLING OF GASOLINE
- GENERAL SERVICE
- TABLE OF CONTENTS
- CUSTOMER RESPONSIBILITIES
- ASSEMBLY
- TO RE MOVE LAWN MOW ER FROM CAR TON
- HOW TO SET UP YOUR LAWN MOW ER TO UNFOLD HANDLE (SEE FIG. 1)
- TO ASSEMBLE GRASS CATCHER (SEE FIG. 2)
- INSTALL STARTER ROPE (SEE FIG. 3)
- TO INSTALL ATTACHMENTS
- OPERATION
- KNOW YOUR LAWN MOWER
- MEETS CPSC SAFETY REQUIREMENTS
- HOW TO USE YOUR LAWN MOWER ENGINE SPEED
- ENGINE ZONE CONTROL
- TO CONVERT MOWER
- TO EMPTY GRASS CATCHER (SEE FIG. 8)
- BEFORE STARTING ENGINE
- ADD OIL (SEE FIG. 9)
- IMPORTANT
- ADD GASOLINE (SEE FIG. 9)
- TO STOP ENGINE
- TO START ENGINE
- MOWING TIPS
- MULCHING MOWING TIPS
- MAINTENANCE
- GENERAL RECOMMENDATIONS
- BEFORE EACH USE
- LUBRICATION
- LAWN MOWER
- TIRES
- BLADE CARE
- GRASS CATCHER
- ENGINE
- TO CHANGE ENGINE OIL (SEE FIG. 12)
- AIR FILTER (SEE FIG. 13)
- TO CLEAN AIR FILTER
- MUFFLER
- SPARK PLUG
- CLEANING
- SERVICE AND ADJUSTMENTS
- REAR DEFLECTOR
- ENGINE SPEED
- CARBURETOR
- STORAGE
- HANDLE (SEE FIGS. 14 AND 15)
- ENGINE FUEL SYSTEM
- ENGINE OIL
- CYLINDER
- OTHER
- LIMITED WARRANTY
- HUSQVARNA®
- PRODUCT REGISTRATION
- PLEASE REGISTER YOUR PRODUCT AT WWW.HUSQVARNA.COM/US OR WWW.HUSQVARNA.COM/CA
- GO TO 'SUPPORT' THEN 'PRODUCT REGISTRATION
- REGLAS DE SEGURIDAD
Brand : HUSQVARNA
Model : P-ZT26 CE
Category : Chainsaw