RDI102 - Radio Manta - Free user manual and instructions
Find the device manual for free RDI102 Manta in PDF.


| Brand | Manta |
| Model | RDI102 |
| Product Type | Portable Radio with MP3/USB/SD Playback and Recording |
| Power Supply | AC 220–240 V ~ 50/60 Hz or DC 6 V (4× AA batteries not included) or built‑in rechargeable battery |
| Battery Type | Built‑in rechargeable battery (or 4× AA, not included) |
| Charging Time | Approx. 8 hours for first full charge |
| Battery Autonomy | Approx. 3–8 hours (depending on volume and usage) |
| Radio Band | FM 88 – 108 MHz |
| Audio Formats Supported | MP3, WMA, WAV |
| Media Sources | USB flash drive, SD card |
| Recording | Radio to USB/SD card; sound recording via built‑in or external microphone |
| Output Power | 1.5 W (6 V --- 1.5 W) |
| Display | LCD screen with icons (e.g., REC USB, REC SD) |
| Additional Features | LED torch light, earphone jack, auxiliary input (karaoke), telescopic FM antenna |
| Controls | Power switch (ON/OFF/LED), Mode, Vol‑, Vol+, Play/Pause/Record/Scan |
| Safety | Indoor use only; do not expose to dripping or splashing; keep away from heat sources |
| Maintenance | Clean with a soft, dry cloth |
| Accessories Included | Power cord (for charging), external microphone |
| Manufacturer | Manta, Made in P.R.C. |
| Support | www.manta.info.pl |
Frequently Asked Questions - RDI102 Manta
User questions about RDI102 Manta
0 question about this device. Answer the ones you know or ask your own.
Ask a new question about this device
Download the instructions for your Radio in PDF format for free! Find your manual RDI102 - Manta and take your electronic device back in hand. On this page are published all the documents necessary for the use of your device. RDI102 by Manta.
USER MANUAL RDI102 Manta
natural_image
Abstract black-and-white circular logo with interlocking curved shapes (no text or symbols)MANTA
RADIO
Model:
RDI102
Instrukcja obsługi
User's Manual
Bedienungsanleitung
Manual de usuario
Istruzioni d'uso
Návod k obsluze
natural_image
Pure diagram of a mechanical component with no text, numbers, or symbolsRys. 4
- This appliance is not intended for use by persons (including children) with reduced physical, sensory or mental capabilities, or lack of experience and knowledge, unless they have been given supervision or instrucon concerning use of the appliance by a person responsible for their safety.
- Children should be supervised to ensure that they do not play with the appliance.
- For indoor use only.
- The apparatus shall not be exposed to dripping or splashing and that no objects filled with liquids, such as vases, shall be placed on the apparatus.
- Batteries (battery pack or batteries installed) should not be exposed to excessive heat such as sunshine, fire or the like.
- Where the MAINS plugs or an appliance coupler is used as the disconnect device, the disconnect device shall remain readily operable.
I. PRODUCT DESCRIPTION

Fig. 1 : Side view

Fig. 2 : Side view
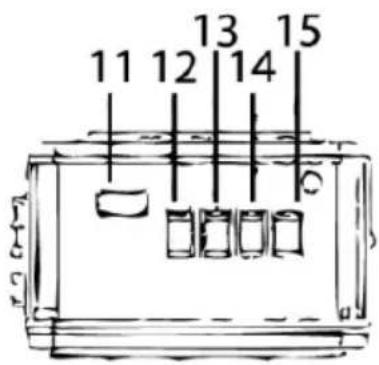
Fig. 3 : Top view
- DC 6V socket (DC cable not supplied)
- Power switch (LED/ON/OFF)
- Battery Charge Indicator
- Monitor
- Auxiliary input jack (Karaoke input jack)
- Earphone jack
-
FM antenna
-
AC socket (only for charge)
-
SD card slot
-
LED TORCH LIGHT
-
USB slot
-
Vol-/
-
▶//MP3/REC/SCAN
-
Vol+/
-
Mode
II. OPERATING INSTRUCTION
Before use, you should choose one of the following radio power modes:
- AC plug: plug your power cord one side into the AC socket (8) and another side into a standard AC outlet before use.
- Integrated rechargeable battery: Use the power cord for battery charging, the battery charge indicator (3) lights. Unplug the AC cable when this indicator (3) is turned off which indicates the integrated rechargeable battery is fully charged.
- The rechargeable battery has to be fully charged before their first use (full charging time is around 8 hours).
- We recommend fully charging your integrated battery every time before use.
- 4xAA batteries: insert four AA batteries into battery compartment before use.
USE
- Slide power switch (2) to ON posion.
- The radio will be play directly if neither the USB/SD nor the wired microphone is inserted.
- If not, you can fast press the mode button (15) to choose between Radio, USB/SD and Karaoke.
- Fast press Vol-/ (12), ▶/MP3/REC/SCAN (13) or Vol+/ ▶ (14) for getting previous, pause/replay or next funcons use.
- Long press Vol-/ (12) or Vol+/ (14) to increase or decrease the volume.
- In radio play mode, long press ▶//MP3/REC/SCAN (13) to scan and record automatically the radio staons, and then the first scanned channel will be played directly. Please re-do this procedure if needed.
- Slide power switch (2) to OFF posion to turn off.
- Slide power switch (2) to LED posion to turn on the torch light.
III. RECORDING PROCEDURES
RECORDING FROM RADIO TO USB/SD CARD
- Insert your USB drive or SD card into the USB/SD slot (see figure 4 below for SD card installation).

natural_image
Pure diagram of a mechanical or electrical component with no text, numbers, or symbolsFig. 4
- Press mode button (15) to choose radio play funcon.
• And then choose your desired station. - Fast press ▶/MP3/REC/SCAN (13) two mes to start the recording. You can see the “REC USB” or “REC SD” icon appears on the LCD screen.
- Fast press ▶/MP3/REC/SCAN (13) again to stop the recording and play the recorded program.
RECORDING SOUND TO USB/SD CARD
- Insert your USB drive or SD card into the USB/SD slot.
- Press mode button (15) to choose USB/SD Card play function.
- Please choose USB play funcon if you desire record sound to the USB drive. Please choose SD play funcon if you desire record sound to the SD Card. If there is no file in your USB/SD Card, the "NO" icon appears on the LCD screen.
- You can also record your sound by using the supplied microphone. However, there is a built-in microphone for sound recording.
- Fast press ▶/MP3/REC/SCAN (13) two mes to start sound recording. You can see the “REC USB” or “REC SD” icon appears on the LCD screen.
- Fast press ▶//MP3/REC/SCAN (13) again to stop the recording and play the recorded le.
NOTE:
- "REC USB" icon means that your sound is recording to the USB drive.
- "REC SD" icon means that your sound is recording to the SD Card.
- In USB/SD play mode, long press both Vol-/ (12) and Vol+/ (14) button at same time to delete the current playing file.
- Please make sure the playing volume is high enough and no extra sound is present for a good recording.
IV. TECHNICAL CHARACTERISTICS
- 220 – 240V \~ 50/60Hz
- 6V --- 1.5W
• 4XAA (not supplied) 6V
- Autonomy of the rechargeable battery after full charge: Approx. 3 – 8 hours depending on the volume and other factors.
• Audio format : MP3/WMA/WAV
• Frequency FM: 88 – 108 MHz
V. WARNING ON BATTERIES
- Never mix alkaline, standard (carbon-zinc) and rechargeable (nickel hydride).
- Don't mix new and used batteries.
- Don’t attempt to recharge non rechargeable batteries.
- Remove rechargeable batteries from the device (if possible) before charging them.
- Rechargeable batteries must always be recharged under adult supervision.
- Remove used batteries.
- Never short the power supply terminals.
• Always use the recommended or equivalent battery types.
• Always pay attenon to battery polarity.

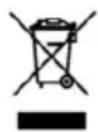
WARNING: You should not dispose of this device with your household waste.
A selective collecon system for this type of product is implemented by your local authorities. Please contact your local authorities to find out how and where collecon takes place. These restricons apply because electrical and electronic devices contain dangerous substances that have harmful effects on the environment or on human health and must be recycled.
This symbol indicates that electrical and electronic devices are collected selectively. The symbol shows a waste container crossed out with an X symbol.
If the power cable is damaged, it must be replaced by the manufacturer, his aer sales service, or a person qualified in this area in order to avoid any accidents arising.
Note!
Product design and Technical parameters may be change without noce. This mainly concerns parameters technical, software and user manual present. User's Manual is a general orientation on service product. Manufacturer and distributor do not assume any responsibility as compensation for any inaccuracies errors in the descripons appearing in this user manual.
ACHTUNG
natural_image
Pure diagram of a mechanical or electrical component with no text, numbers, or symbolsAbb. 4
natural_image
Pure diagram of a mechanical or electrical component with no text, numbers, or symbolsDib. 4
natural_image
Pure diagram of a mechanical or electrical component with no text, numbers, or symbolsDis. 4
natural_image
Pure diagram of a mechanical or electrical component with no text, numbers, or symbolsObr. 4
natural_image
Pure diagram of a mechanical or electrical component with no text, numbers, or symbolsРис.4
natural_image
Abstract black-and-white circular logo design with interlocking curved shapes (no text or symbols)MANTA
INFOLINIA SERWISOWA
The manufacturer reserves the right to make changes to product specicaons without noce.
Home: www.manta.com.pl Home support: www.manta.info.pl


Made in P.R.C. FOR MANTA EUROPE


Brand : Manta
Model : RDI102
Category : Radio