RDI101 - Radio Manta - Free user manual and instructions
Find the device manual for free RDI101 Manta in PDF.


| Product Type | Portable Radio |
| Brand | Manta |
| Model | RDI101 |
| Dimensions (approx.) | 200 x 120 x 60 mm |
| Weight (approx.) | 0.5 kg |
| Power Supply | AC 100-240V via adapter or 4 x AA batteries (not included) |
| Radio Bands | FM / AM |
| FM Frequency Range | 87.5 - 108 MHz |
| AM Frequency Range | 520 - 1710 kHz |
| Preset Stations | Up to 20 (FM/AM) |
| Display | LCD with backlight |
| Speaker | Built-in, 3W |
| Headphone Jack | 3.5 mm stereo |
| Antenna | Telescopic for FM |
| Additional Features | Alarm clock, sleep timer, volume control |
| Maintenance | Clean with a soft, dry cloth. Do not use liquids. |
| Safety Instructions | Do not expose to water or extreme temperatures. Unplug during storms. |
| Spare Parts / Repairability | Contact Manta support for service options. |
Frequently Asked Questions - RDI101 Manta
User questions about RDI101 Manta
0 question about this device. Answer the ones you know or ask your own.
Ask a new question about this device
Download the instructions for your Radio in PDF format for free! Find your manual RDI101 - Manta and take your electronic device back in hand. On this page are published all the documents necessary for the use of your device. RDI101 by Manta.
USER MANUAL RDI101 Manta
natural_image
Abstract black-and-white circular logo with interlocking curved shapes (no text or symbols)MANTA
Radio kuchenne
RDI101
Instrukcja Obsługi
User's Manual
natural_image
Technical line drawing of a device casing with a labeled component (16), no readable text or symbols present.
OPIS:
natural_image
Symbol of a trash bin with crossed lines indicating no waste or discharge, and a solid black rectangle below (no text or labels)Carefully read and understand instructions contained in this manual before operating the unit. Please refer to this manual in case of doubts about functions of the product. Keep instructions for future refer
Safety instructions
To reduce risk of fire and electric shock do not expose this unit to rain or moisture. To inform end user of possible dangers on the apparatus or on its components the following symbols can be applied.

The lightning flash with arrowhead symbol within an equilateral triangle is intended to alert the user to the presence of uninsulated dangerous
legat

The exclamation point within an equilateral triangle is intended to alert the user to the presence of important operating and maintenance (servicing instructions in the literature accompanying the appliance.
Power cord protection
To avoid any malfunctions of the unit and to protect against electric shock, fire or personal injury please observe following instructions.
- Hold the plug firmly when connecting or disconnecti
- Keep the AC cord away from heating appliances.
- Never put any heavy object on the AC power cord
- Do not attempt to repair or reconstruct the AC powe
- Never make or change connections with the power si
- Always make sure that power in your home can supp label of the unit or of its AC adaptor.
- Do not overcharge multiple sockets or extension cab
- During storm disconnect the unit from the mains.
- Do not use components or accessories different from
Placement
Do not expose the unit to direct sunlight, near radiators, in closed automobiles where it is possible to reach high temperatures (over 35°), at high humidity levels (over 90%), in dusty areas as the internal parts may be seriously damaged. Do not place the unit on sofa or carpet or near other objects but in a well-ventilated area.
Do not place the unit on an unstable surface to avoid falls and damage of the unit and of third party. Place the unit in a horizontal and stable position, far from vibrations.

When the unit is not being used, turn it off. When left unused for a long period of time the unit, the unit should be unplugged from batteries should be taken out.

Touching internal parts of this unit is dangerous. Do not attempt to disassemble the unit. Do not put any foreign object in the unit.

Keep the unit away from flower vases, tubs, sinks, etc. If liquids are spilled into the unit, serious damage could occur.

Stacking
Place the unit in horizontal position and do not place anything heavy on it.
Do not install this equipment in a confined or building-in space such as a book case or similar
unit, and remain a well ventilation conditions. The ventilation should not be impeded by
covering the ventilation openings with items such as newspaper, table-cloths, curtains etc
W A R N I N G : O n l y u s e a t t a c h m
manufacturer (such as the exclusive supply adapter, battery etc).
WARNING: Please refer th
and
safety information before installing or operating the apparatus.
W A R N I N G : To reduce the r
apparatus to rain
or moisture. The apparatus shall not be exposed to dripping or splashing and that objects
filled with liquids, such as vases, shall not be
W A R N I N G : T h e b a t t e r y ( b a
to
excessive heat such as sunshine, fire or the like.
W A R N I N G : Ex c e s s i v e s o u n d
hearing loss.
W A R N I N G : T h e m a i n s p l u g i
shall remain
readily operable.
Warning: To reduce the risk of electric shock, do as there are no user-serviceable parts inside. Refer servicing to qualified personnel.
natural_image
Technical line drawing of a mechanical device with a central square component and labeled part '16' (no text or symbols beyond the number)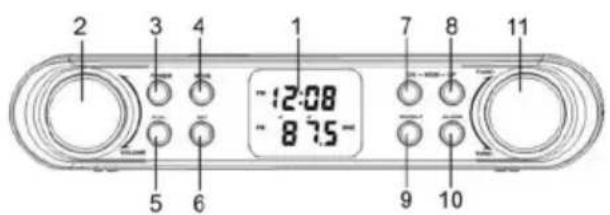

DESCRIPTIONS:
- LCD Display
- VOLUME Control
- POWER Button
- MODE Button
- FUNCTION Button
- SET Button
- MEM DOWN Button
- MEM UP Button
- SNOOZE / SLEEP Button
- ALARM Button
- TUNE+ / TUNE - Knob
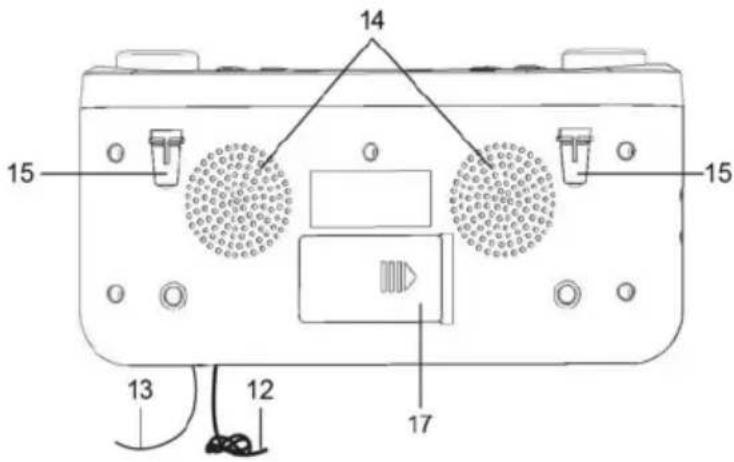
- Power cable and plug
- FM antenna
- Speaker
- Folding Stands
- Battery compartment
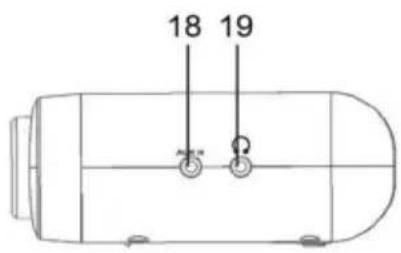
- Aux-in Jack
-
Earphone Jack
-
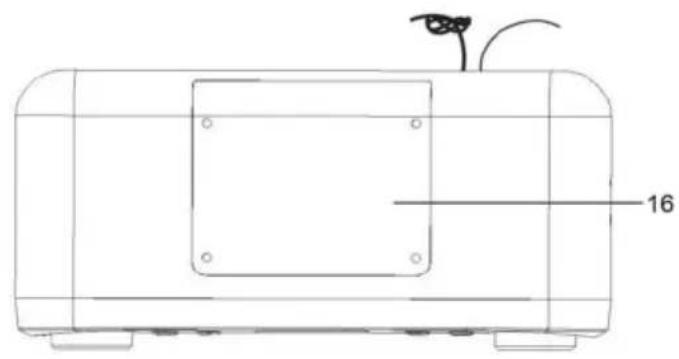
Mounting Plate (under cupboard installation)
Sub-structure assembly instructions
If you don't want to use the device as a standalone follows:
- Remove all objects from the cupboard and anyth adjacent cupboards.
- For the installation the cupboard must fulfill the following conditions: Thick of the cupboard floor between 16 mm and 20 mm.
- The wall mounting of the cupboard must be wall with at least 2 screws.
- Important! Do not install the device above a
- When installing the device it must be ensured that there is a power socket within reach.
- The mains socket must be within easy reach removed in an emergency.
- Important! Do not connect the device to their installation!
- The device cannot be installed under cupbo strip.
- For mounting, you may need the following supplies:
Reamer or nail, screwdriver, measuring tape, adhe
Supplied mounting accessories
4 Screws (if necessary, check the battery compartment)
1 Assembly template
CAUTION:
- Please adhere to the dimensions stated in the ins
- You should use only the installation access
Installation
- Stick the template to the bottom of the wall cabinet with adhesive tape. With help of a gimlet or nail pierce the crosses at the attachment points and use it to mark the holes.
- Remove the mounting plate (2) from the device. mounting plate backwards.
- Remove the template and fit the mounting plate
- 4 screws below the cabinet.
CAUTION:
- Use a screwdriver and not a cordless screwdriver.
- If you use different screws or if the thickness screws may push through the cabinet floor.
- Now hang the radio onto the mounting plate into place.
Start-up of the device / Introduction
- Read the operating instructions thoroughly before
- If applicable, remove the protective film from
Location
.)51( sblats et twolldF
- Select a suitable location for the device. Suitable would be an even, non-slip surface on which you can easily operate the device.
- Ensure that the device is adequately ventilat
PREPARATION
- Remove all packaging materials and check the dev
- Open the battery compartment (17) and remove the plastic bag with the 4 mounting screws. Close the battery compartment.
- Keep the original packaging. You can use it for transportation or storing. Dispose of packaging materials you no longer require in an environmentally-friendly way according to applicable regulations and keep them out of the reach of children.
UNDER CUPBOARD INSTALLATION
- The kitchen radio is installed beneath a hangi site near a power outlet. The installation site should be chosen so that the unit is not exposed to splashing water. A stencil is included for marking the drill holes.
- Remove the mounting plate (16). Use the stencil cupboard's bottom side. Mark 4 holes on the cupboard's bottom side and drill them.
I ton of way that erus deal
- Attached the mounting plate with the 4 provided screws. Use a screwdriver.
- Before installation, lay out the power cable (12) and FM antenna (13) completely.
- Install the kitchen radio by pushing it onto the mounting plate. The unit's mounting slots fit onto the mounting plate's mounting bars. Push the kitchen radio onto the mounting plate until it is secure.
Remark:
The installation site (for example, kitchen wall the unit.
- Unfold the stand (15) and place the unit on a clean, stable, dry and even surface. The unit is outfitted with non-slip rubber feet to ensure stability.
INSERTING BATTERIES AND CONNECTING TO THE POWER SUPPLY
Open the battery compartment (17) on the unit's back / bottom side and insert two 1.5V batteries, type AA (batteries not included). The batteries provide backup power in case of
temporary power outage. Close the battery compartment. Connect the power plug to an appropriate power outlet (230V \~ 50Hz).
SWITCHING THE DEVICES ON/OFF (3)
Switch the device to the standby mode with the POWER button (the date display will appear). If this button is pressed once more, the device switches on again.
Notes: After about 10 minutes, the device will
SETTING THE TIME (IN STANDBY MODE)
When the unit is connected to the power supply, 0:00 appears in the LCD display. The time is set in off mode. The unit can show the time in 12 or 24 hour format.
-
To set the time, press SET button (6) once, the LCD display blinks. Use TUNE+/TUNE-knob (11) to set the minutes. Press SET button once again, the LCD display blinks. Use TUNE+/TUNE-knob to set the hours. Each time the TUNE+/TUNE-knob is turned, the set time advances or reverses one hour or one second, respectively. If you turn the knob and hold, the set time advances or reverse more rapidly.
-
After you set the time, press SET button once again, LCD display blinks and 24 Hr appears. Use TUNE+ / TUNE- knob to select 24 hr or 12 hr.
SETTING THE CALENDAR (IN STANDBY MODE)
When the unit is connected to the power supply, 1 - 1 appears in the LCD display.
To set the calendar, press MODE button (4) once the LCD display. Then, press SET button once, the LCD display blinks. Use TUNE+/TUNE-knob (11) to set the date. Press SET button once again, the LCD display blinks. Use TUNE+/TUNE-knob to set the month. Press SET button after setting the month, the LCD display blinks, use TUNE+/TUNE-knob to set the year. The year can be set up to 2099.
SETTING THE ALARMS
There are 2 alarms ALM 1 and ALM 2 can be set once, ALM 1 --:-- appears in the LCD display. Press ALARM Button once -- appears in the LCD display.
Use TUNE+ / TUNE- knob to select alarm mode, the symbol 📄 or 🌐 goes out. Select symbol 📋 if you want to set the alarm in wake up by buzzer mode. Select 🐃 symbol if you want to set the alarm in wake up by radio mode.
WAKE BY BUZZER
-
Use TUNE+ / TUNE- knob to select alarm mode, the symbol 📁 or 🌿 goes out. Select symbol 🔒, the alarm time shows 0:00. Press SET button, the LCD display blinks. Use TUNE+ /TUNE- knob (11) to set the alarm minutes. . Press SET button once again, the LCD display blinks. Use TUNE+ / TUNE- knob to set the hours. Each time the TUNE+/TUNE- knob is turned, the set time advances or reverses one hour or one second, respectively. If you turn the knob and hold, the set time advances or reverse more rapidly.
-
Press MODE button twice, the LCD display shows the current month, date and time.
-
When the alarm sounds, pushing any button will turn it off.
Notes: The alarm time defaulted in 24-hour di
WAKE BY RADIO
-
Use TUNE+ / TUNE- knob to select alarm mode, the symbol 📋 or 🐎 goes out. Select symbol 🐎, the alarm time shows 0:00. Press SET button, the LCD display blinks. Use TUNE+ /TUNE- knob (11) to set the alarm minutes. . Press SET button once again, the LCD display blinks. Use TUNE+ / TUNE- knob to set the hours. Each time the TUNE+/TUNE- knob is turned, the set time advances or reverses one hour or one second, respectively. If you turn the knob and hold, the set time advances or reverse more rapidly.
-
After you set the alarm time, press SET button once, the LCD display blinks. Use TUNE+/TUNE-knob to select the radio mem
-
Adjust the volume to your desired volume level by turning volume control knob.
-
Press MODE button twice, the LCD display shows time.
-
When the alarms sounds, pushing any button will turn off.
Notes: The alarm time is in 24-hour display m
SETTING THE TIMER
Use the timer setting for example to keep track of certain cooking time in the kitchen.
- Press FUNCTION button (5) once, the LCD display bli
-
0:00 and TMR appear on the LCD display.
-
Press SET button once, the LCD display blinks. Use TUNE+/TUNE-knob (11) to set the minutes. Press SET button once again, the LCD display blinks. Use TUNE+/TUNE-knob to set the hours. Each time the TUNE+/TUNE-knob is turned, the set time advances or reverses one hour or one second, respectively. If you turn the knob and hold, the set time advances or reverse more rapidly.
-
After set the timer, LCD display returns to previous mode. It shows current month, date and time.
-
When the timer runs out a signal tone sounds for about 1 minute. Pushing any button turns off the signal tone.
-
The TIMER saves the previous setting.
-
The timer can set up to 99 mins 59 sec.
SETTING THE STOP WATCH
-
Press FUNCTION button (5) twice, 0:00 00 STW appea
-
Use TUNE+/TUNE- knob to activate stop watch.
-
Stop watch can count up to 23:59:59.
-
Press SNOOZE / SLEEP button (9) to stop the stop wa
RADIO OPERATION
-
Press POWER button (3) to turn on the radio. Press FUNCTION button (5) to select Radio or Aux-in Function. In Radio mode, the currently set radio frequency appears in the LCD display along with FM symbol.
-
Use VOLUME Control to set the volume.
-
Rotate TUNE+/TUNE-knob to manually set the FM :
- Rotate and hold TUNE+/TUNE-knob to start the au scanning stops when a new station is found.
SLEEP FUNCTION
If you want to listen the radio when fall asleep. sleep time.
- With radio on, press SNOOZE / SLEEP BUTTON (9) to enter into Sleep mode, 120 SLEEP shows on the LCD display.
- Press Sleep button to choose your desired sleep tim 40, 30, 20, 10. The sleep timer will change by 10 minutes each time you press the Sleep button. The unit will stop playing when the timer countdowns from pr sleep time to the end and then switch off by itself.
SNOOZE FUNCTION
On alarm sound mode, press SNOOZE / SLEEP Button (9) to stop, the LCD display appears SNOOZE icon, and the alarm buzzer will resume after 5 minutes.
LCD BACKLIGHT
Press POWER button (3) once to turn off the LCD back LCD display will automatically off during 23:00 – 05:00
EARPHONE JACK
It can be connected with earphone plug. A match E ARPHONE Jack (19), the audio from the SPEAKER radio by earphone.
Warning: Excessive sound pressure from earphones and headphones can cause hearing loss.
AUX-IN JACK
To connect analogue replay devices. Via this socket you can also hear the sound of other playback devices such as MP3 players, CD players etc. through the loudspeakers.
- Please connect the external device with a 3.5 mm socket (18).
- Turn on the device with the POWER button (3). Press the FUNC button (5) repeatedly until "AUD" is shown.
- Through the loudspeakers you can hear the playback of the sound from the external device; with the VOLUME control (2) you can change the volume.
- For the remaining procedure please see the operating instructions of the external sound source.
N O T E :
- Adjust the volume of the external device to a comfortable level.
- After ca. 10 minutes without signal, the device will automatically switch to standby.
RDI101 EN
PRECAUTION
If disorder or faint display occurs on the LCD DI installation or the batteries.
CLEANING AND MAINTENANCE
CAUTION! The unit must be turned off and unplugged before cleaning.
CAUTION! Do not use alcohol, acetone, benzene, scouring cleaning agents, etc., to clean the synthetic parts of the device. Do not use hard brushes or metallic objects.
Clean the unit from time to time with a dry dust cloth.
Unplug the unit and remove the batteries for extended periods of issue.
Store the unit at a dry, cool location shielded from moisture and direct sunlight.
SPECIFICATION
.24VtegR youprF
Power Supply: AC 220V - 240V / 50Hz
Back Up Battery: DC 6V (AAA battery x 2), batteries not included

natural_image
Symbol of a trash bin crossed with two crossed lines, representing waste or discharge (no text or labels)
Correct Disposal of this product.
This marking indicates that this product should not be disposed with other household wastes throughout the EU. To prevent possible harm to the environment or human health from uncontrolled waste disposal, recycle it responsibly to promote the sustainable reuse of material resources. To return your used device, please use the return and collection systems or contact the retailer where the product was purchased. They can take this product for environmental safe recycling.

This equipment is a Class II or double insulated electrical appliance. It has been designed in such a way that it does not require a safety connection to electrical earth.
Note!
Product design and Technical parameters may be channel concerns parameters technical, software and user manual present. User's Manual is a general orientation on service product. Manufacturer and distributor do not assume responsibility as compensation for any inaccuracies errors in the descriptions appear this user manual.

natural_image
Abstract black-and-white circular logo with interlocking curves (no text or symbols)MANTA
INFOLINIA SERWISOWA
from Monday to Friday. 9.00-17.00
The manufacturer reserves the right to make changes to product specifications without notice.
Home: www.manta.com.pl
Home support: www.manta.info.pl


Made in P.R.C.
FOR MANTA EUROPE


- MANTA
- Radio kuchenne
- RDI101
- OPIS:
- Safety instructions
- Power cord protection
- Placement
- Stacking
- DESCRIPTIONS:
- Sub-structure assembly instructions
- Supplied mounting accessories
- CAUTION:
- Installation
- Start-up of the device / Introduction
- PREPARATION
- UNDER CUPBOARD INSTALLATION
- INSERTING BATTERIES AND CONNECTING TO THE POWER SUPPLY
- SWITCHING THE DEVICES ON/OFF (3)
- SETTING THE TIME (IN STANDBY MODE)
- SETTING THE CALENDAR (IN STANDBY MODE)
- SETTING THE ALARMS
- WAKE BY BUZZER
- WAKE BY RADIO
- SETTING THE TIMER
- SETTING THE STOP WATCH
- RADIO OPERATION
- SLEEP FUNCTION
- SNOOZE FUNCTION
- LCD BACKLIGHT
- EARPHONE JACK
- AUX-IN JACK
- RDI101 EN
- PRECAUTION
- CLEANING AND MAINTENANCE
- SPECIFICATION
- Correct Disposal of this product.
- Note!
- INFOLINIA SERWISOWA
Brand : Manta
Model : RDI101
Category : Radio