
HG01045 - Uncategorized Livarno Lux - Free user manual and instructions
Find the device manual for free HG01045 Livarno Lux in PDF.


| Product Type | LED Solar Spotlight |
| Brand | Livarno Lux |
| Model | LSS 520 A1 |
| Dimensions (Spotlight, incl. bracket) | Approx. 11.4 x 16.5 x 15.6 cm (W x H x D) |
| Dimensions (Solar Panel, excl. mounting plate) | Approx. 21 x 16 x 1.6 cm (W x H x D) |
| Weight (Spotlight) | Approx. 677 g |
| Weight (Solar Panel, incl. mounting plate) | Approx. 540 g |
| Power Consumption (Total) | 8.6 W ±10% (at 520 lm, fully charged battery) |
| Power Consumption (LEDs only) | 6.0 W ±10% (at 520 lm, fully charged battery) |
| Battery Type | Lithium-ion, 1,800 mAh / 7.4 V (built-in, non-removable) |
| Solar Panel Type | Polycrystalline, 3.5 W / 14.5 V |
| LED Type | 9 x 1 W max., color temperature 5000 K ±500 K, 520 lm ±5% |
| LED Lifetime | Approx. 25,000 hrs |
| Motion Sensor Detection Angle | Max. 180° |
| Motion Sensor Range | Max. 12 m (adjustable) |
| Illumination Time (Adjustable) | Approx. 10 sec to 4 min |
| Twilight Switching Level | 5 lux ±5 lux to 20,000 lux ±10 lux |
| Protection Class | IP44 (splash proof) |
| Cable Length (Solar Panel to Spotlight) | Approx. 3 m |
| Mounting | Wall mount (sturdy support required, e.g., concrete) |
| Intended Use | Outdoor, non-commercial (e.g., garden, garage) |
| Warranty | 3 years from date of purchase |
| Conformity | CE, EMC Directive 2014/30/EU, Low-voltage Directive 2014/35/EU, ErP 2009/125/EC, RoHS 2011/65/EU |
| Maintenance | Clean with soft dry cloth; do not use liquids or solvents |
| Repairability | LEDs not replaceable; battery built-in and non-removable |
Frequently Asked Questions - HG01045 Livarno Lux
User questions about HG01045 Livarno Lux
0 question about this device. Answer the ones you know or ask your own.
Ask a new question about this device
Download the instructions for your Uncategorized in PDF format for free! Find your manual HG01045 - Livarno Lux and take your electronic device back in hand. On this page are published all the documents necessary for the use of your device. HG01045 by Livarno Lux.
USER MANUAL HG01045 Livarno Lux
natural_image
Product image of a solar panel and a streetlight with a cable, no visible text or symbols on the main components.LED SOLAR SPOTLIGHT LSS 520 A1
TARGA GMBH
Conularweg 45 99494 SOFFET
GERMANY
表决意见:无
Last Information Update - Leguttibbi adafriunita
User manual and service information
HU
English 2
Magyar 15
Slovenščina 29
Česky 43
Slovensky....57
Deutsch....71
Table of contents
Introduction.... 3
Intended use.... 3
Package contents 3
Specifications 4
Safety instructions 5
Copyright 7
Before start-up 7
Proper mounting location....8
Required tools....8
Before starting assembly....8
Assembly....9
Initial start-up 10
Configuring the motion sensor....10
Configuring the illumination time (TIME): 10
Configuring the sensor sensitivity (SENS)....10
Configuring the photosensitivity (LUX) 10
Maintenance/Cleaning 11
Troubleshooting 11
Environmental and waste disposal information.... 12
Conformity 12
Guarantee and service 13
Introduction
Thank you for choosing a LIVARNO LUX product.
Intended use
This solar LED spotlight is not intended for commercial use. It is suitable for outdoor use, in particular in places without a mains outlet (e.g., a garage or garden shed). The built-in LED lamp provides ample illumination. The motion sensor detects movement and automatically turns the solar LED spotlight on or off. The device meets the requirements of all relevant standards related to CE conformity. Conformance to these standards is no longer guaranteed if a change is made to the solar LED spotlight without the authorisation of the manufacturer.
Package contents
Unpack the device and all accessories. Remove all packaging materials and check all parts for completeness and for signs of damage. If any parts are missing or damaged, please contact the manufacturer.
• Solar LED spotlight LSS 520 A1
- Solar panel
- Mounting materials for solar LED spotlight (2x large screw and 2x large dowel)
- Mounting materials for solar panel (4x small screw and 4x small dowel)
- User manual including safety instructions
This user manual contains a cover that can be unfolded. The inside of the cover provides a schematic of the solar LED spotlight and a number legend. The numbers identify the following parts/functions:
1 Solar LED spotlight LSS 520 A1
2 On/Off switch
3 Mounting bracket
4 Arresting screw
5 Motion sensor
6 Cable (with socket)
7 Solar panel
8 Cable (with plug)
9 LUX knob
10 SENS knob
11 TIME knob
Specifications
Solar LED spotlight (1):
| Brand: LIVARNO LUX | |
| Model designation: LSS 520 A1 | |
| Lamp type: LG LED: 9 x 1 W max. | |
| LED colour temperature: 5000 K +/-500 K | |
| Ra (colour rendering index of the LED) 80 | |
| LED light emission angle: Approx. 120° | |
| LED service life: approx. 25,000 hrs | |
| Max. illumination duration (fully charged battery): | approx. 1.3 hrs |
| Operating voltage: 12 V (power supply via solar panel only) | |
| Lithium-ion battery: 1,800 mAh / 7.4 V | |
| Power consumption of entire spotlight unit | 8.6 W +/-10% (given 520 lm and a fully charged battery) |
| Complete power consumption of LEDs | 6.0 W +/-10% (given 520 lm and a fully charged battery) |
| Total luminous flux (with cover) 520 lm +/-5% (when battery is fully charged) | |
| Protection class: IP44 (splash protection) | |
| Dimensions (W x H x D): | approx. 11.4 x 16.5 x 15.6 cm (incl. mounting bracket) |
| Weight: approx. 677 g |
Solar panel (7):
| Type: Polycrystalline / 3.5 W / 14.5 V | |
| Length of connection cable: | approx. 3 m |
| Dimensions (W x H x D): 21 x 16 x 1.6 cm (without mounting plate) | |
| Weight (incl. mounting plate): | approx. 540 g |
Motion sensor (5):
| Sensor detection angle: | Max. 180° |
| Sensor range (adjustable): | max. 12 m |
| Twilight switching level: | 5 lux +/- 5 lux to 20,000 lux +/- 10 lux |
| Swivelling (mechanically): approx. 150° horizontally / approx. 180° vertically | |
| Illumination time (adjustable): approx. 10 sec +/- 5 sec to 4 min +/- 1 min | |
The specifications and design are subject to change without notice.
Safety instructions
Before using the solar LED spotlight (1) for the first time, please read the following instructions carefully and observe all warnings, even if you are familiar with using electronic devices. Keep this user manual in a safe place for future reference. If you give the solar LED spotlight (1) away or sell it, please ensure that you also pass on this user manual as it is part of the device.

DANGER! This icon, together with the word 'DANGER', indicates an impending dangerous situation which, if not prevented, can lead to serious injuries or even death.

WARNING! This icon, together with the word 'WARNING', indicates important information for the safe operation of the solar LED spotlight (1) and for user safety.

This icon indicates further information on the topic.
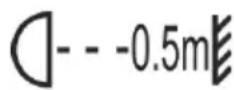
Fire hazard: Mount the solar LED spotlight (1), observing a minimum clearance of 0.5 m to materials exposed to the light. Excessive heat can cause a fire.
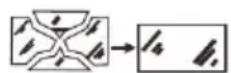
A shattered protective cover must be replaced.

DANGER! Keep electrical equipment out of reach of children. Also, people with reduced mental, sensory or motor abilities should use electrical devices within the limits of their capabilities only. Ensure that children and people with reduced mental, sensory or motor abilities never use electrical devices unsupervised, unless they have been properly familiarised with the equipment or are being supervised by a person in charge of their safety. Children should generally be supervised to ensure they do not play with this device. Keep children away from the working area when mounting the solar LED spotlight (1). The package contents include various small parts that can result in serious injuries or even death when swallowed. Children are not always able to identify possible threats. Therefore, also keep the packaging film away from children. There is the risk of suffocation.

DANGER! If you notice any smoke, unusual noises or smells, immediately switch off the solar LED spotlight (1). In these cases, you must not continue to use the device until it has been checked by a specialist. Do not inhale smoke possibly caused by a burning device. If you inhaled smoke, consult a physician. Inhaling smoke can be harmful to your health.

DANGER! The housing of the solar LED spotlight (1) and the solar panel (7) must be free of damage. A damaged housing can result in risk of injury.

DANGER! Do not operate the solar LED spotlight (1) in a potentially explosive atmosphere due to the presence of combustible gases, vapours or dust, as this would result in risk of explosion.

DANGER! Never look directly into the light beam with the aid of optical instruments, such as a magnifying lens. There is the risk of injuring your eyes. If you suspect that you may have injured your eyes, immediately consult a physician.

WARNING! Do not attach any objects to the solar LED spotlight (1) or the solar panel (7). The housing is not designed to carry any weights. Ignoring this warning may result in damage to the solar LED spotlight (1) or the solar panel (7).
Copyright
All contents of these operating instructions are subject to copyright law, and are provided to the user solely as a source of information. Any form of copying or reproduction of data and information is prohibited without the express written permission of the author. This also concerns commercial use of the contents and data. The text and illustrations describe the technical status at the time of printing. All information is subject to change.
Before start-up
Remove the solar LED spotlight (1) and the mounting materials from the packaging.
Check the solar LED spotlight (1) for signs of damage. If the solar LED spotlight (1) is damaged, it must not be put into operation.
Fully charge the built-in lithium-ion battery before initial start-up. Please make sure that the On/Off switch (2) is set to 'OFF'.

The duration of the charging process depends on the intensity of the solar radiation. In sunny weather, charging takes approx. 3 days (given about 4 hours daily and approx. 60,000 lux).
Proper mounting location
Carefully choose the mounting location and thoroughly prepare for assembly.
Systematically arrange all individual parts, required tools and mounting materials and place them within easy reach.
The solar LED spotlight (1) may only be mounted on a sturdy support, such as a masonry wall etc.
Do not mount the solar LED spotlight (1) above a heat source or within direct proximity of other light sources. Also account for Figure [D] on the cover page when selecting the mounting location.
The built-in battery of the solar LED spotlight (1) is exclusively charged via the solar panel (7) part of the delivery scope. The cable (8) is approx. 3 m long. Therefore, the mounting location of the solar panel (7) must be chosen such that the plug can be connected to the cable (6) socket of the solar LED spotlight (1) without difficulty. When doing so, lay the cable (8) in a manner so it does not obstruct people or become a tripping hazard. Ideally, mount the solar panel (7) at a bright location exposed to direct sunlight.
Choose a mounting location that protects the solar LED spotlight (1) from wind, rain and soiling.
➢ Determine in advance which mounting materials are suitable for the designated mounting location. The solar LED spotlight (1) is delivered with mounting materials suitable for concrete.
Required tools
The package does not include the following tools. This list is provided to offer general orientation. The precise characteristics of the required tools depend on the chosen mounting location.
Ladder
▶ Spirit level, yardstick, pencil
Drilling machine and drill
➢ Phillips screwdriver, flat-tip screwdriver
➢ Open-ended spanner, combination pliers, wire cutter
Before starting assembly

When drilling holes, ensure you do not damage any hidden cables or pipes.

Mount the device using the proper tools.
Before assembly, make yourself familiar with the individual parts of the solar LED spotlight (1) as well as with the instructions and illustrations, and observe them during assembly.
Assembly
Solar LED spotlight (1):
➢ Detach the mounting bracket (3) from the solar LED spotlight (1).
Utilise the mounting bracket (3) as a template for marking the position of the two outer drill holes.
Then drill these holes and attach the mounting bracket (3) using the supplied large dowels and screws.
Now attach the solar LED spotlight (1) to the mounting bracket (3) using the previously removed screws, spring washers and flat washers. Please make sure that the spring washers are located between the solar LED spotlight (1) and the mounting bracket (3). The flat washers must be located between the screw head and the mounting bracket (3).
Solar panel (7):
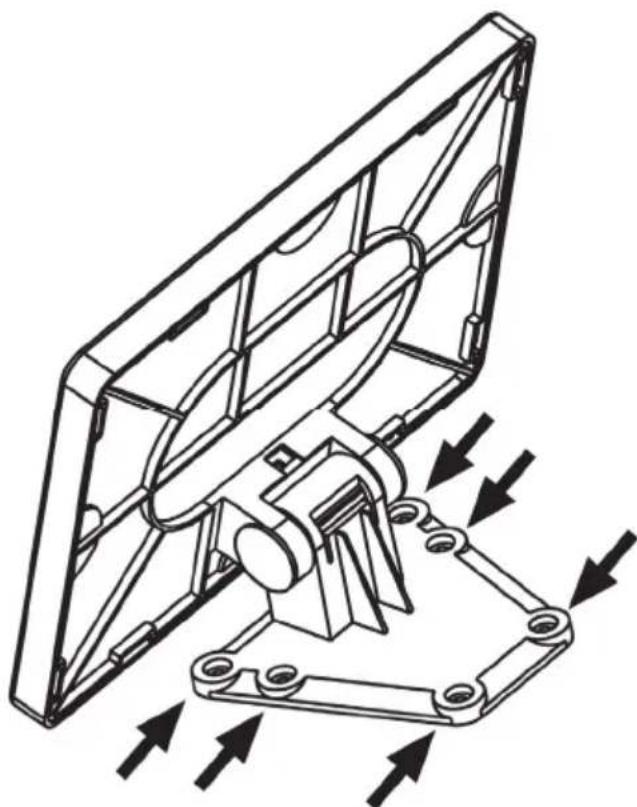
A mounting plate with 6 drill holes for screws is located at the back of the solar panel (7).
Mount the solar panel at the designated location using the 4 small screws and dowels. Depending on the topography of the mounting location, you can freely choose 4 of the drill holes in the mounting plate; however, you should ideally select 2 drill holes on the right and left each. The solar panel (7) is connected to the mounting plate via a swivel joint. Align the mounting plate such that you can fasten the 4 small screws with ease.
Then lay the cable (8) and connect the plug to the cable (6) socket of the solar LED spotlight (1).
The solar panel (7) is connected to the mounting plate via a swivel joint. Orient the solar panel in a manner that ensures maximum exposure to sunlight.
natural_image
Technical line drawing of a mechanical assembly with directional arrows indicating force or movement (no text or symbols present)Initial start-up
Turn on the solar LED spotlight (1) using the On/Off switch (2) by putting it into the 'ON' position.
Configuring the motion sensor

Ensure that no places where traffic is common (e.g., sidewalks, streets) are located within the motion sensor's (5) range.

When setting the photosensitivity of the motion sensor (5), you should do so at a time when the lighting conditions configured to trigger the solar LED spotlight (1) are prevalent.
- Align the motion sensor (5) so as to ensure maximum coverage of the area to be monitored. This means that no obstructing objects should be present in the path.
- You can change the horizontal position of the motion sensor (5) by pivoting it.
- If you wish to change the vertical alignment of the motion sensor (5), first loosen the arresting screw (4). Once the motion sensor (5) is aligned as desired, retighten the arresting screw (4).
Configuring the illumination time (TIME):
Use the TIME knob (11) at the bottom of the motion sensor (5) to adjust the illumination time (approx. 10 sec to 4 min). Turn the TIME knob (11) clockwise (+ direction) to increase the illumination time, or turn it counter-clockwise (- direction) to reduce the illumination time.
Please note:
In order to minimise battery consumption, set the illumination time to as short a duration as meets your needs.
The device is preset to an illumination time of approx. one minute.
Configuring the sensor sensitivity (SENS)
Use the SENS knob (10) at the bottom of the motion sensor (5) to adjust the sensor sensitivity. Turn the SENS knob (10) clockwise (+ direction) to increase the sensitivity, or turn it counter-clockwise (- direction) to reduce the sensitivity. The higher the sensitivity, the larger the detection range (max. 12 metres).
Configuring the photosensitivity (LUX)
Use the LUX knob (9) at the bottom of the motion sensor (5) to adjust the photosensitivity. This setting determines what ambient light level will trigger the twilight sensor to turn the solar LED spotlight (1) on or off.
Turn the LUX knob (9) clockwise (★ direction) to make the motion sensor (5) trigger in brighter ambient conditions.
Turn the LUX knob (9) counter-clockwise (C direction) to make the motion sensor (5) trigger in darker ambient conditions.
Maintenance/Cleaning
Maintenance
The lamp component of the solar LED spotlight (1) comprises 9 long-life LEDs. These cannot be replaced and thus do not require maintenance.
Cleaning

Ensure that no liquids enter the housing of the solar LED spotlight (1) as this might damage the solar LED spotlight (1).
Clean the solar LED spotlight (1) and the solar panel (7) using a soft, dry cloth, and never use cleaning agents or solvents that react with plastic. If the device is heavily soiled, slightly moisten the cloth before cleaning.
Troubleshooting
The light does not go on
The On/Off switch (2) is set to 'OFF'.
The motion sensor (5) is not properly aligned. Correct its alignment.
The built-in battery is fully discharged. Ensure that the solar panel (7) is properly aligned, and fully charge the battery. If necessary, shorten the illumination time to reduce the power consumption. In order to fully charge the battery, set the On/Off switch (2) to 'OFF' for the duration of the charging process. After charging is complete, switch the On/Off switch (2) back to the 'ON' position.

The duration of the charging process depends on the intensity of the solar radiation. In sunny weather, charging takes approx. 3 days (given about 4 hours daily and approx. 60,000 lux).
The light goes on and off in rapid succession
The sensor is experiencing interference caused by an external light source or bright, reflecting surfaces. Remove the external light source or the surfaces that cause interference.
The light does not go off
There are persons or objects in the sensor range of the motion sensor (5). Remove these.
The solar LED spotlight (1) is swaying in the wind, causing the motion sensor (5) to trigger continuously. Make sure the solar LED spotlight (1) is firmly attached to a sturdy surface.
Environmental and waste disposal information
natural_image
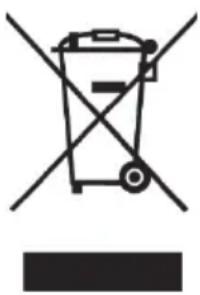
Symbol of a trash bin crossed out by two crossed lines, with a solid black rectangle below (no text or labels)Devices marked with this symbol are subject to the European Directive 2012/19/EU. All electrical and electronic equipment must not be put in the household waste, but must be disposed of via designated public disposal centres.
By properly disposing of the old device, you can avoid environmental damage and hazards to your health. Further information regarding proper disposal of the old device can be obtained from your local authority or the shop where you purchased the device.
The built-in battery cannot be removed for disposal!
Make sure the packaging is disposed of in an environmentally friendly manner. Cardboard packaging can be put out for waste-paper collection or taken to public collection points for recycling. The plastic packaging used for your device is collected by your local waste management company and disposed of in an environmentally sound manner.
Conformity

This device complies with the basic and other relevant requirements of the EMC Directive 2014/30/EU, the Low-voltage Directive 2014/35/EU, the ErP Directive 2009/125/EC and the RoHS Directive 2011/65/EU.
To obtain a complete EU Declaration of Conformity, send an e-mail to the following e-mail address: ce@targa.de
Guarantee and service
Warranty of TARGA GmbH
Dear Customer,
This device is sold with three years warranty from the date of purchase. In the event of product defects, you have legal rights towards the seller. These statutory rights are not restricted by our warranty as described below.
Warranty conditions
The warranty period commences upon the date of purchase. Please keep the original receipt in a safe place as it is required as proof of purchase. If any material or manufacturing faults occur within three years of purchase of this product, we will repair or replace the product free of charge as we deem appropriate.
Warranty period and legal warranty rights
The warranty period is not extended in the event of a warranty claim. This also applies to replaced and repaired parts. Any damage or defects discovered upon purchase must be reported immediately when the product has been unpacked. Any repairs required after the warranty period will be subject to charge.
Scope of warranty
The device was carefully manufactured in compliance with stringent quality guidelines and subjected to thorough testing before it left the works. The warranty applies to material and manufacturing faults. This warranty does not cover product components which are subject to normal wear and which can therefore be regarded as wearing parts, or damage to fragile components such as switches, rechargeable batteries or components made of glass. This warranty is void if the product is damaged, incorrectly used or serviced. To ensure correct use of the product, always comply fully with all instructions contained in the user manual. The warnings and recommendations in the user manual regarding correct and incorrect use and handling of the product must always be observed and complied with. The product is solely designed for private use and is not suitable for commercial applications. The warranty is rendered void in the event of incorrect handling and misuse, if it is subjected to force, and also if any person other than our authorised service technicians interfere with the device. No new warranty period commences if the product is repaired or replaced.
Submitting warranty claims
To ensure speedy handling of your complaint, please note the following:
Before using your product for the first time, please read the enclosed documentation carefully. Should any problems arise which cannot be solved in this way, please call our hotline.
- Always have your receipt, the product article number as well as the serial number (if available) to hand as proof of purchase.
- If it is not possible to solve the problem on the phone, our hotline support staff will initiate further servicing procedures depending on the fault.

Service

Phone: 020 - 70 49 04 03
E-Mail: service.GB@targa-online.com

Phone: 01-4370121
E-Mail: service.IE@targa-online.com

Phone: 027 78 11 03
E-Mail: service.MT@targa-online.com

Phone: 02 - 20 09 025
E-Mail: service.CY@targa-online.com
IAN: 275085

Manufacturer
Please note that the following address is not a service address. First contact the service point stated above.
TARGA
GmbH
Coesterweg 45
59494 SOEST
GERMANY
Tartalom
Bevezetés.... 16
natural_image
Technical line drawing of a mechanical assembly with directional arrows indicating force or movement (no text or symbols present)Üzembe helyezés
natural_image
Symbol of a trash bin crossed out by two crossed lines, with no text or labels present.natural_image
Technical line drawing of a mechanical assembly with directional arrows indicating motion or force (no text or symbols)Prva uporaba
Vklopite solarni LED-reflektor (1) s stikalom za vklop/izklop (2), tako da ga pomaknete v položaj »ON« (vklopljeno).
natural_image
Symbol of a trash bin crossed with no text or labels, accompanied by a black rectangular block below (no readable text or symbols)natural_image
Technical line drawing of a mechanical assembly with directional arrows indicating force or movement (no text or symbols present)Uvedení do provozu
natural_image
Symbol of a trash bin crossed out by two diagonal lines, with no text or labels present.natural_image
Technical line drawing of a mechanical assembly with directional arrows indicating motion or force (no text or symbols)natural_image
Symbol of a trash bin crossed out by two crossed lines, with no text or labels present.natural_image
Technical line drawing of a mechanical assembly with directional arrows indicating force or movement (no text or symbols present)Inbetriebnahme
natural_image
Symbol of a trash bin crossed out by two crossed lines, with a solid black rectangle below (no text or labels)


- LED SOLAR SPOTLIGHT LSS 520 A1
- Table of contents
- Introduction
- Intended use
- Package contents
- Specifications
- Safety instructions
- Copyright
- Before start-up
- Proper mounting location
- Required tools
- Before starting assembly
- Assembly
- Solar LED spotlight (1):
- Solar panel (7):
- Initial start-up
- Configuring the motion sensor
- Configuring the illumination time (TIME):
- Configuring the sensor sensitivity (SENS)
- Configuring the photosensitivity (LUX)
- Maintenance/Cleaning
- Maintenance
- Cleaning
- Troubleshooting
- The light does not go on
- The light goes on and off in rapid succession
- The light does not go off
- Environmental and waste disposal information
- The built-in battery cannot be removed for disposal!
- Conformity
- Guarantee and service
- Warranty of TARGA GmbH
- Warranty conditions
- Warranty period and legal warranty rights
- Scope of warranty
- Submitting warranty claims
- Service
- Manufacturer
- Tartalom
- Üzembe helyezés
- Prva uporaba
- Uvedení do provozu
- Inbetriebnahme
Brand : Livarno Lux
Model : HG01045
Category : Uncategorized