
IAN 307584 - Uncategorized ULTIMATE SPEED - Free user manual and instructions
Find the device manual for free IAN 307584 ULTIMATE SPEED in PDF.

| Product Type | Axle Stands (Pair) |
| Brand | Ultimate Speed |
| Model | IAN 307584 / HG03066 |
| Max. Load per Stand | 2000 kg |
| Number of Height Settings | 6 |
| Height Range | 24 cm to 38 cm (approx.) |
| Intended Use | Privately jacking up a car for tire changes |
| Material | Steel (assumed) |
| Warranty | 3 years from date of purchase |
| Scope of Delivery | 2 axle stands, 2 safety pins, holding bolts |
| Assembly Required | Yes: insert middle pole, secure with bolt and pin |
| Safety Features | Folding mechanism, holding bolt with safety pin, stable legs |
| Surface Requirement | Level, stable, load-bearing surface (no gravel) |
| Usage Requirement | Always use both stands simultaneously |
| Maintenance | Inspect welds and mechanism before each use; clean with damp cloth |
| Spare Parts Availability | None; discard if damaged |
| Disposal | Recyclable packaging; contact local waste authority for worn-out product |
| Country of Service (UK) | Great Britain: Tel. 0800 404 7657, E-Mail: owim@lidl.co.uk |
Frequently Asked Questions - IAN 307584 ULTIMATE SPEED
User questions about IAN 307584 ULTIMATE SPEED
0 question about this device. Answer the ones you know or ask your own.
Ask a new question about this device
Download the instructions for your Uncategorized in PDF format for free! Find your manual IAN 307584 - ULTIMATE SPEED and take your electronic device back in hand. On this page are published all the documents necessary for the use of your device. IAN 307584 by ULTIMATE SPEED.
USER MANUAL IAN 307584 ULTIMATE SPEED
natural_image
Two metallic industrial stand holders with chain links, displayed against a plain background (no text or symbols visible)AXLE STANDS
GB
AXLE STANDS
Assembly, operating and safety instructions
HU
TÁMASZTÓBAK
GB Assembly, operating and safety instructions Page 3
We congratulate you on the purchase of your new product. You have chosen a high quality product. Familiarise yourself with the product before using it for the first time. In addition, please carefully refer to the operating instructions and the safety advice below. Only use the product as instructed and only for the indicated field of application. Keep these instructions in a safe place. If you pass the product on to anyone else, please ensure that you also pass on all the documentation with it.
Instructions
Please read the instructions carefully and follow the safety advice. To avoid personal and property damage, use the product carefully and only for the intended use. Damage caused by incorrect handling or non-observance of the instructions is not covered by the warranty.
IMPORTANT: RETAIN INSTRUCTIONS FOR FUTURE REFERENCE.
- Intended use
Only for private use – Jacking up a car for tire changes.
● Technical specifications
Model number: HG03066
Max. load: 2000 kg (per axle stand)
Hub height l: 24 cm
Hub height II: 26.7 cm
Hub height III: 29.5 cm
Hub height IV: 32.2 cm
Hub height V: 35 cm
Hub height VI: 377 cm

Safety instructions
■ Always check that the axle stands are in perfect working order. Never use damaged axle stands.
■ Use the axle stands only on a level, stable surface.
- Never use the axle stands individually – always use both at once.
Before first, use, familiarise yourself with the axle stands and the folding mechanism, and ensure that the holding bolt and safety pin are seated correctly.
⚠ WARNING! Always let the vehicle off the axle stands slowly and carefully.
■ Before beginning work on the vehicle, ensure that the axle stands and vehicle are stable.
■ Always use 2 axle stands for a vehicle, never more than 2.
■ Never use the jack on a vehicle that is already on the axle stands.
■ Never use the axles stands for 3-wheeled vehicles or for trailers.
CAUTION! Never exceed the maximum load for each pair of axle stands (2000 kg per axle stand). Excess load may damage the axle stands or destroy them completely. Always position the load in the middle of the ramp! Unless you are lifting the car, always use the axle stands 2 at a time on a level surface which is able to take the weight. Using the axle stands on a surface which cannot take the weight may lead to uneven weight distribution and possible complete loss of load-bearing capacity. Do not use on gravel. Non-observance of these instructions may cause damage of the axle stands, loss of the load and therefore to property damage, severe personal injury or a fatal accident.
Use this product only with the components described in the instructions and use it only for the intended use.
■ Support the raised weight immediately with the axle stands.
- Scope of delivery
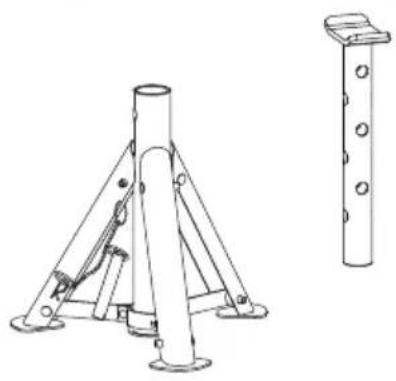
natural_image
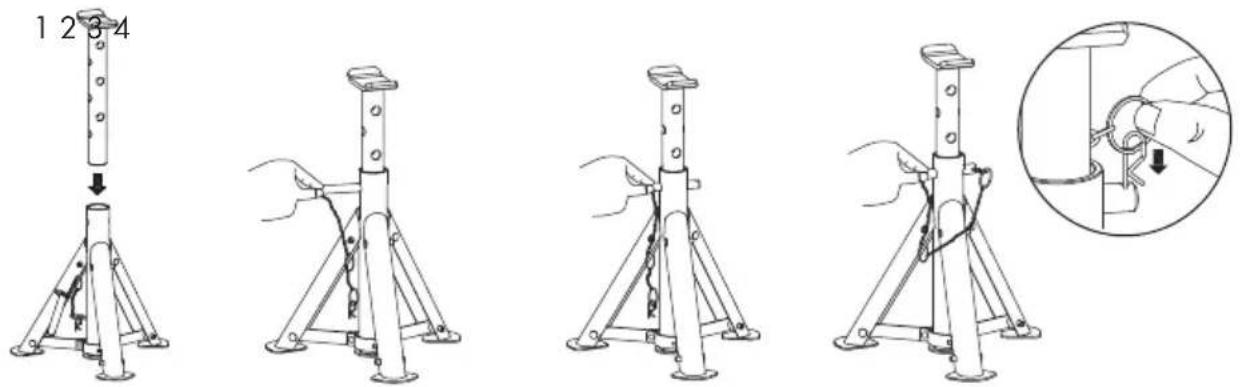
Technical line drawing of a tripod support structure and a vertical cylindrical component with mounting holes (no text or symbols)● Assembly instructions
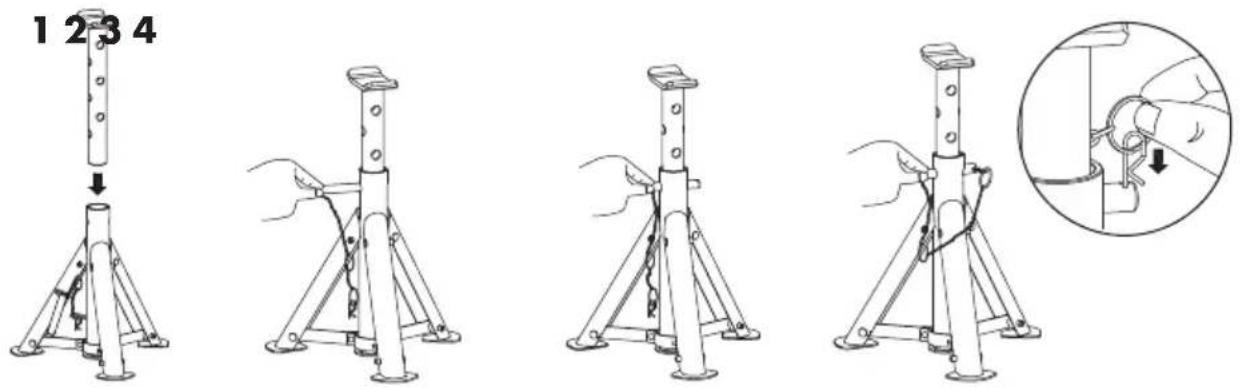
Using the axle stands
- Familiarise yourself with the function and components such as the folding mechanism and adjustable legs. Check that the axle stands are in perfect working order.
- Install the middle pole through the middle hole at the required height and secure it with the holding bolt.
Note: During use, always push the pin through the support and insertion pipes.
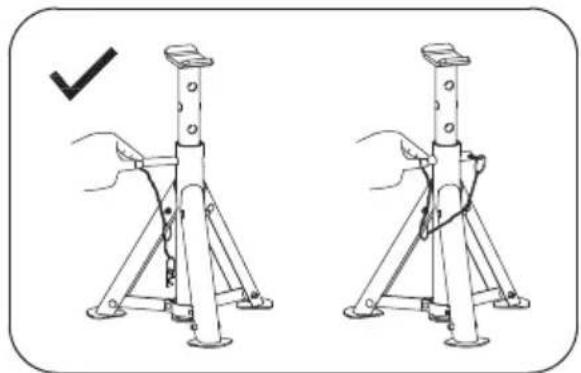
natural_image
Illustration of two mechanical support structures with hands and a checkmark indicating a detail (no text or symbols present)
natural_image
Two identical diagrams of a tripod support structure being adjusted, with one marked by an 'X' symbol (no text or labels present)- Always secure the vehicle against rolling away as follows:
- Apply wedges for wheels
- Put the vehicle in gear ("P" on an automatic gearbox)
- Put the hand-brake on
-
The legs of the axle stands must be completely unfolded.
-
Check that the holding bolt is correctly seated (it must protrude from the other side of the middle pole). Secure the holding bolt against slipping out with the safety pin.
-
Check that the support positions provided by the manufacturer are in prefect working order.
-
Position the axle stands under the vehicle at the points provided, or at a position that is very close to the indicated point (see the vehicle manual).
-
Lower the vehicle slowly and carefully onto the axle stands. The axle stands must be secured and level.
-
After using the axle stands: When removing the holding bolt, hold onto the middle pole so that this does not fall down through the middle hole.
● Maintenance and checking
Before each use, check the axle stands and the welds. Never use damaged axle stands.
There are no spare parts available for this product. In case the product is damaged or broken, discard the product.
■ The holding bolt and holding mechanism must be in perfect working order.
⚠ WARNING! Danger of injury! Never use the axle stands or its parts for any other use except that described by the manufacturer. The manufacturer accepts no responsibility for incorrect use of the axle stands!
● Cleaning and care
For cleaning and care, use only a slightly damp, fluff-free cloth.
● Disposal
The packaging is made entirely of recyclable materials, which you may dispose of at local recycling facilities.
Contact your local refuse disposal authority for more details of how to dispose of your worn-out product.
Warranty
The product has been manufactured to strict quality guidelines and meticulously examined before delivery. In the event of product defects you have legal rights against the retailer of this product. Your legal rights are not limited in any way by our warranty detailed below.
The warranty for this product is 3 years from the date of purchase. Should this product show any fault in materials or manufacture within 3 years from the date of purchase, we will repair or replace it – at our choice – free of charge to you.
The warranty period begins on the date of purchase. Please keep the original sales receipt in a safe location. This document is required as your proof of purchase. This warranty becomes void if the product has been damaged, or used or maintained improperly.
The warranty applies to defects in material or manufacture. This warranty does not cover product parts subject to normal wear, thus possibly considered consumables (e.g. batteries) or for damage to fragile parts, e.g. switches, rechargeable batteries or glass parts.
Warranty claim procedure
To ensure quick processing of your case, please observe the following instructions:
Please have the till receipt and the item number (e.g. IAN 123456_7890) available as proof of purchase.
You will find the item number on the type plate, an engraving on the front page of the instructions (bottom left), or as a sticker on the rear or bottom of the appliance.
If functional or other defects occur, please contact the service department listed either by telephone or by e-mail.
You can return a defective product to us free of charge to the service address that will be provided to you. Ensure that you enclose the proof of purchase (till receipt) and information about what the defect is and when it occurred.
Service
GB
Service Great Britain
Tel.: 0800 404 7657
E-Mail: owim@lidl.co.uk
TÁMASZTÓBAK
Bevezető
natural_image
Technical line drawing of a tripod support structure and its side view (no text or symbols)natural_image
Illustration of two mechanical support structures with hands and a checkmark indicating a detail (no text or symbols present)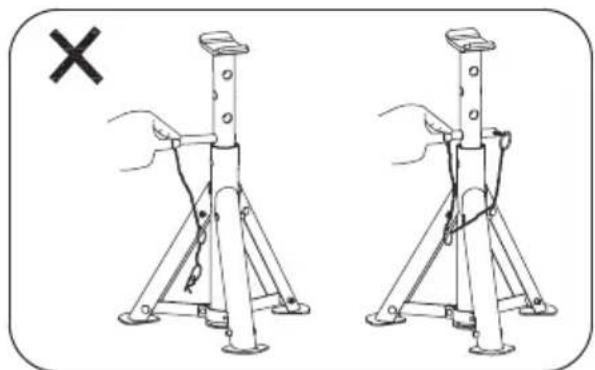
natural_image
Two identical diagrams of a tripod support structure being adjusted, with one marked by an 'X' symbol (no text or labels present)natural_image
Technical line drawing of a tripod support structure and a vertical cylindrical component (no text or symbols)● Navodila za sestavljanje

Uporaba osnih stojal
natural_image
Two identical diagrams showing hand positioning of a mechanical support structure, one with a checkmark indicating the correct position (no text or symbols present)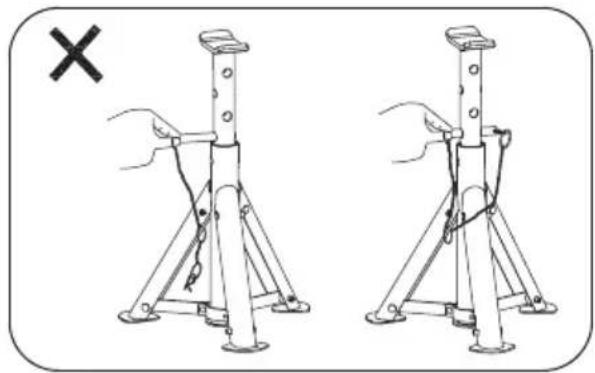
natural_image
Two identical line drawings of a mechanical support structure with hands and a cross mark, no text or symbols present.Pooblaščeni serviser:
OWIM GmbH & Co. KG
Stiftsbergstraße 1
74167 Neckarsulm
Nemčija
natural_image
Technical line drawing of a tripod support structure and its side view (no text or symbols)Montážní pokyny
natural_image
Illustration of two mechanical support structures with hands and a checkmark indicating a detail (no text or symbols present)
natural_image
Two identical line drawings of a tripod support structure with hands operating, showing no text or symbols.natural_image
Technical line drawing of a tripod support structure and a vertical cylindrical component (no text or symbols)● Pokyny na montáž

natural_image
Illustration of two mechanical support structures with hands and a checkmark indicating a detail (no text or symbols present)
natural_image
Two identical diagrams of a tripod support structure being adjusted, with one marked by an 'X' symbol (no text or labels present)natural_image
Technical line drawing of a tripod support structure and a vertical cylindrical component with mounting holes (no text or symbols)Aufbauanleitung

natural_image
Two identical diagrams of a mechanical support structure with hands performing maintenance, no text or symbols present.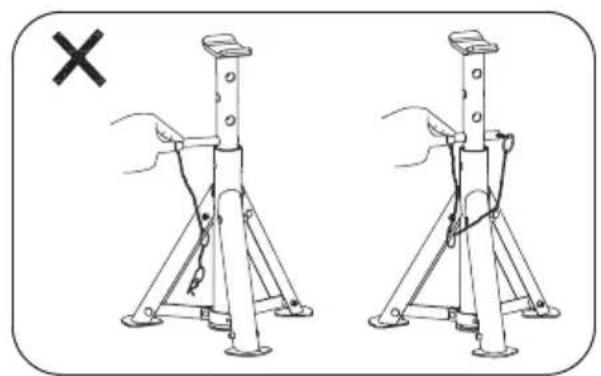
natural_image
Illustration of two mechanical support structures with hands and a cross mark, no text or symbols present


- AXLE STANDS
- TÁMASZTÓBAK
- Instructions
- IMPORTANT: RETAIN INSTRUCTIONS FOR FUTURE REFERENCE.
- - Intended use
- ● Technical specifications
- Safety instructions
- ⚠ WARNING! Always let the vehicle off the axle stands slowly and carefully.
- - Scope of delivery
- ● Assembly instructions
- Using the axle stands
- ● Maintenance and checking
- ● Cleaning and care
- ● Disposal
- Warranty
- Warranty claim procedure
- Service
- Bevezető
- ● Navodila za sestavljanje
- Uporaba osnih stojal
- Pooblaščeni serviser:
- Montážní pokyny
- ● Pokyny na montáž
Brand : ULTIMATE SPEED
Model : IAN 307584
Category : Uncategorized