Zephyr ZMX862 - Mixer ALTO - Free user manual and instructions
Find the device manual for free Zephyr ZMX862 ALTO in PDF.

| Product type | 8-channel analog mixer |
| Brand and model | Alto Zephyr ZMX862 |
| Number of channels | 8 mono channels + 2 stereo |
| Power supply | AC 100-240V, 50/60 Hz |
| Power consumption | 30 W |
| Microphone inputs | 8 XLR inputs with preamp |
| Line inputs | 8 6.35mm jack inputs |
| Equalization | 3-band per channel (treble, mid, bass) |
| Outputs | Main L/R, Aux, Headphone, Recording |
| Additional features | Built-in FX, Bluetooth, USB audio |
| Dimensions (W x D x H) | 400 x 300 x 100 mm |
| Weight | 3.5 kg |
| Chassis material | Metal and ABS plastic |
| Maintenance and cleaning | Use a dry, soft cloth. Avoid abrasive products. |
| Safety | Unplug before cleaning. Do not expose to moisture. |
| Spare parts and repairability | Contact Alto after-sales service for parts. |
Frequently Asked Questions - Zephyr ZMX862 ALTO
User questions about Zephyr ZMX862 ALTO
0 question about this device. Answer the ones you know or ask your own.
Ask a new question about this device
Download the instructions for your Mixer in PDF format for free! Find your manual Zephyr ZMX862 - ALTO and take your electronic device back in hand. On this page are published all the documents necessary for the use of your device. Zephyr ZMX862 by ALTO.
USER MANUAL Zephyr ZMX862 ALTO
ZMX862
QUICKSTART GUIDE
ENGLISH (2-4)
MANUAL DE INICIO RÁPIDO
ESPANOL (5 - 7)
GUIDE D'UTILISATION RAPIDE
FRANÇAIS (8 - 10)
GUIDA RAPIDA
ITALIANO (11 - 13)
- ZEPHYR mixer
- Power adapter
- Quickstart Guide
• Safety Instructions & Warranty Information booklet
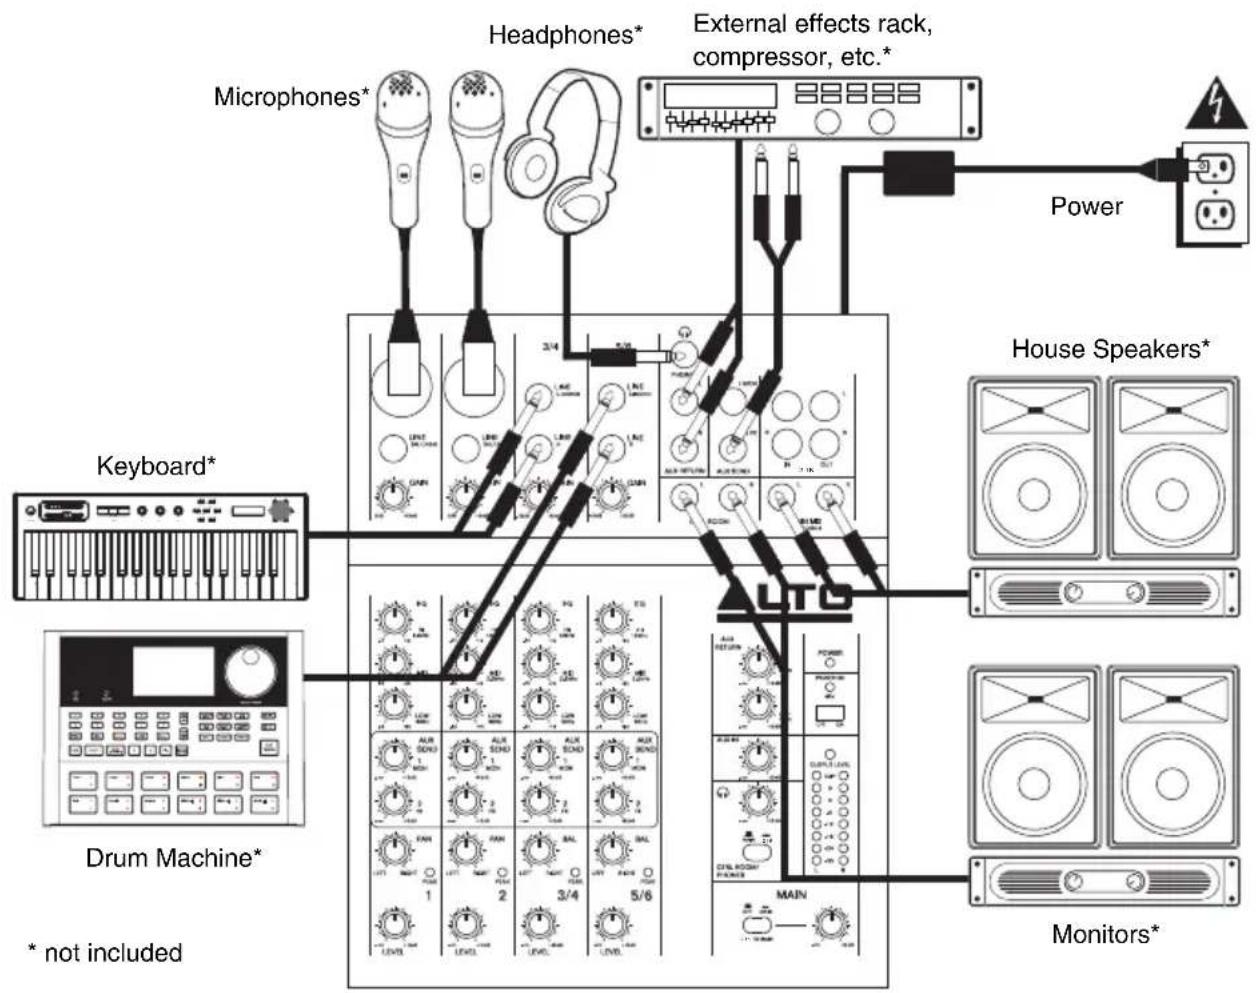
CONNECTION DIAGRAM
flowchart
graph TD
    A["Microphones*"] --> B["Headphones*"]
    C["Keyboard*"] --> D["Drum Machine*"]
    E["External effects rack, compressor, etc.*"] --> F["LTO"]
    G["House Speakers*"] --> H["Monitors*"]
    I["Power"] --> J["External effects rack, compressor, etc.*"]
    K["Main"] --> L["LMTC"]
    M["3/4"] --> N["LED indicators"]
    O["1/2"] --> P["Control knobs"]
    Q["3/4"] --> R["Control knobs"]
    S["5/6"] --> T["Control knobs"]
Notes:
- Microphones, monitors, amplifier, speakers, cables, etc. are not included.
- To reduce electrical hum at high gain settings, keep the mixer's power supply away from your guitar cable and the mixer's channel inputs.
- To use an external effects rack unit, compressor, etc., use a Y-cable (1/4" stereo to two 1/4" mono) to connect the AUX SEND "2 FX" output to the left and right inputs your external device. Connect the outputs of your external device to the left and right AUX RETURN INPUTS.
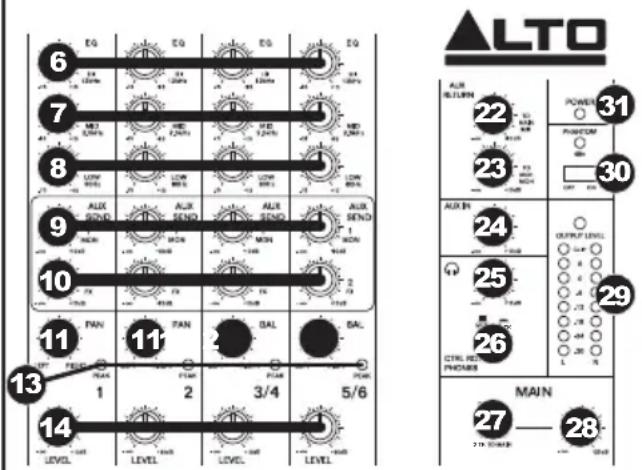
FEATURES
- POWER IN – Use the included power adapter to connect the mixer to a power outlet. While the power is switched off, plug the power supply into the mixer first, then plug the power supply into a power outlet.
- POWER SWITCH – Turns the mixer on and off. Turn on the mixer after all input devices have been connected and before you turn on amplifiers. Turn off amplifiers before you turn off the mixer.
- MIC INPUT - Connect a microphone to these inputs with an XLR cable.
- LINE INPUT * - Connect line-level devices to these inputs with 1/4" cables.
- GAIN - Adjusts the channel audio level (pre-fader and pre-EQ gain). Adjust this so that the PEAK LED just barely lights up during the loudest parts of the song.
- HI EQ (TREBLE) – Adjusts the high (treble) frequencies of the channel.
- MID EQ - Adjusts the mid-range frequencies of the channel.
- LO EQ (BASS) – Adjusts the low (bass) frequencies of the channel.
- AUX SEND 1 MON – Adjusts the channel audio (pre-EQ) level that is sent to the AUX SEND output labeled "1 MON." You can use this to create a custom monitor mix for yourself or your musicians.
- AUX SEND 2 FX – Adjusts the channel audio (post-EQ) level that is sent to the mixer's internal effects processor. Turn this up for the channels that you want internal effects applied to. You can use this to apply external effects to individual channels.
- CHANNEL PAN - Adjusts the (mono) channel's position in the stereo field.
- BALANCE (CH 3/4 & 5/6) – Adjusts the balance between Channels 3 and 4 and Channels 5 and 6.
- PEAK LED - The LED will flash if the signal is clipping. If this happens, decrease the setting of the GAIN knob or CHANNEL VOLUME knob.
- CHANNEL VOLUME – Adjusts the audio level on the channel.
- AUX RETURN INPUTS ** - You can connect the outputs of an external device to these inputs with 1/4" mono cables. This is usually used for outboard


* When using LINE INPUTS 3/4, 5/6 and the AUX RETURNS:
- If only the left channel is used, the signal will be heard in both left and right channels and the balance will not be adjustable.
- If only the right channel is used, the signal will be heard in the right channel only.
** To use an external effects rack unit, compressor, etc., use a Y-cable (1/4" stereo to two 1/4" mono) to connect the AUX SEND "2 FX" output to the left and right inputs your external device. Connect the outputs of your external device to the left and right AUX RETURN INPUTS.
effects devices but can also be used like an extra input channel for synthesizers, drum machines, etc. If your source is mono, plug it into the left jack and it will be heard on both the left and right sides.
-
AUX SEND OUTPUTS ** – You can use a 1/4" TRS cable to connect the AUX 1 MON output to the input of an external amplifier or active monitor to create a custom monitor mix for onstage musicians. You can adjust this level with the AUX RETURN LEVEL knob labeled "TO AUX 1 MON." To use an external effects rack unit, compressor, etc. with the mixer, you can use a Y-cable to connect the AUX 2 FX output to the input of your external device, then connect the outputs of the device to the AUX RETURN INPUTS of the mixer.
-
2-TRACK INPUTS – You may connect these inputs to the outputs of an external sound source using a standard stereo RCA cable (sold separately). You can send this channel to the monitor mix (using the MAIN/2-TRACK switch) and/or the main mix (using the 2-TRACK TO MAIN switch).
- 2-TRACK OUTPUTS – You may connect these outputs to the inputs of an external recording device using a standard stereo RCA cable (sold separately).
- CTRL ROOM OUTPUTS - Use standard 1/4" cables to connect these outputs to your monitor or amplifier system. The level of these outputs is controlled by the CTRL ROOM / PHONES knob.
- MAIN MIX OUTPUTS - Use standard 1/4" cables to connect these outputs to the house speaker or amplifier system. The level of these outputs is controlled by the MAIN VOLUME knob.
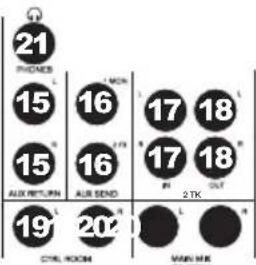
- PHONES – Connect your 1/4" stereo headphones to this output. The CTRL ROOM / PHONES knob controls the volume.
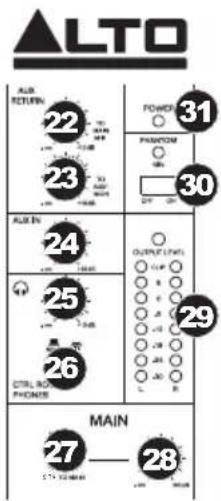
- AUX RETURN TO MAIN MIX – Adjusts the volume of the signal being sent into the AUX RETURN INPUTS and routed to the MAIN MIX OUTPUTS.
- AUX RETURN TO AUX 1 MON – Adjusts the volume of the signal being sent into the AUX RETURN INPUTS and routed to the CTRL ROOM OUTPUTS.
- 2-TRACK IN LEVEL – Adjusts the input signal level of the AUX INPUTS.
- CTRL ROOM / PHONES – Adjusts the volume of the CTRL ROOM OUTPUTS and your headphones.
- MAIN / 2-TRACK – Press this button to select which signal is routed to the CTRL ROOM OUTPUTS and your headphones – the main mix or the signal from the 2-TRACK INPUTS.
- 2-TRACK TO MAIN – Press this button to select which signal is routed to the MAIN MIX OUTPUTS – the main mix or the signal from the 2-TRACK INPUTS.
- MAIN VOLUME – Adjusts the volume of the MAIN OUT.
- LED METERS – Shows the audio level of the main mix. Turn the volume down if the CLIP LED lights up excessively.
- PHANTOM POWER - This switch activates and deactivates phantom power. When activated, phantom power supplies +48V to the XLR mic inputs and the LED above the switch will be lit. Please note that most dynamic microphones do not require phantom power, while most condenser microphones do. Consult your microphone's documentation to find out whether it needs phantom power.
- POWER LED – Illuminates when the mixer is on.
CONTENIDO DE LA CAJA
All 0.005% (@in4pdBu, 1 kHz) <
GAIN RANGE: Mic inputs (Channels 1-2): 0 – 50 dB
Line inputs (Channels 1-2): 15 dBu - 35 dBu
Line inputs (Channels 3-6): -20 dBu - +20 dBu
MAX VOLTAGE GAIN: 70 dB (MIC INPUT to MAIN MIX OUTPUT)
80 dB (MIC INPUT to CTRL ROOM / PHONES OUPTUT)
60 dB (MIC INPUT to AUX SEND)
SNR:
All inputs:140 dBu
PHANTOM POWER: +45 \~ +49V with switch control (Mic Pin2/Pin3 and Pin1)
IMPEDANCE: Mic inputs: 3.9 kΩ
| All | oth k | inputs: | > |
| Aux | outputs: | 1 | k |
| All outputs: 120 | |||
EQUALIZATION: High: ±15 dB @ 12 kHz
Mid: ±15 dB @ 2.5 kHz
Low: ±15 dB @ 80 Hz
CROSSTALK: Adjacent inputs: <
| Inputs | -80 dB @ 1 kHz |
| _to75 dB @ 1 kHz (stereo L/R, Channels 1-2, panned hard left or right) |
MAIN MIX: AUX OUTPUT, PHONES OUTPUT: 0 dBu, unbalanced, 1/4" jacks
Max output: +22 dBu, unbalanced, 1/4" jacks
| B | -90 dB @ 20 Hz ~ 22 kHz (Channel and Main Mix levels at 0 dB, i others at minimum) |
POWER SUPPLY: 18 V, 1000mA
POWER CONSUMPTION:
18 W
DIMENSIONS ( W x D x H ): 8" x 9.8" x 2.3" (202 mm x 250 mm x 58 mm)
WEIGHT: 3.8 lbs (1.7 kg)
* Specifications are subject to change without notice.
Under rare circumstances, if this product is exposed to electromagnetic interference during use, there may be a slight drop in signal-to-noise ratio.
This unit is well designed to prevent any inrush current.
www.altoprofessional.com