
Live 1202 - Mixer ALTO - Free user manual and instructions
Find the device manual for free Live 1202 ALTO in PDF.


| Product Type | Analog Mixing Console |
| Brand | ALTO |
| Model | Live 1202 |
| Number of Channels | 12 (6 mono + 3 stereo) |
| Microphone Inputs | 6 (XLR, with switchable 48V phantom power) |
| Line Inputs | 6 (6.35mm jack) + 6 stereo inputs (RCA/jack) |
| Main Outputs | 2 (XLR or 6.35mm jack) |
| Headphone Output | 1 (6.35mm jack, adjustable volume) |
| Equalizer | 3 bands per channel (treble, mid, bass) |
| Auxiliary Sends | 2 (pre/post switchable) |
| Power Supply | 12V DC power adapter (included) |
| Dimensions (W x D x H) | 360 x 280 x 80 mm |
| Weight | 3.2 kg |
| Maintenance | Use a soft, dry cloth. Avoid chemical products. |
| Cleaning | Unplug before cleaning. Do not expose to moisture. |
| Safety | Use only the supplied adapter. Do not open the device. |
| Spare Parts | Power adapter, audio cables (not supplied) |
| Repairability | Refer to a qualified technician. |
Frequently Asked Questions - Live 1202 ALTO
User questions about Live 1202 ALTO
0 question about this device. Answer the ones you know or ask your own.
Ask a new question about this device
Download the instructions for your Mixer in PDF format for free! Find your manual Live 1202 - ALTO and take your electronic device back in hand. On this page are published all the documents necessary for the use of your device. Live 1202 by ALTO.
USER MANUAL Live 1202 ALTO
LIVE1202
User Guide
English (3 - 7)
Guía del usuario
Español (8 - 12)
Guide d'utilisation
Français (13 - 17)
Guida per l'uso
Italiano (18 - 22)
Benutzerhandbuch
Deutsch (23 - 27)
User Guide (English)
Introduction
Box Contents
Live 1202
Power Cable
User Guide
Safety & Warranty Manual
Support
For the latest information about this product (system requirements, compatibility information, etc.) and product registration, visit altoprofessional.com/live1202.
For additional product support, visit altoprofessional.com/support.
Quick Start / Connection Diagram
![graph TD A["Microphones"] --> B["External Effects Processor"] C["Stage Monitor"] --> B D["Headphones"] --> B E["House Loudspeakers"] --> F["VOE1202"] G["Power"] --> F H["Smartphone, tablet, MP3 player, etc."] --> F I["View"] --> F J["Top"] --> K["Panel"] L["Panel"] --> M["View"] N["Rear"] --> O["Rea…](/content/2026/06/1271322/images/b7339a7725c60e4093da1928b3bbe2ce8e54642ba01a176d4f8da1b9e6c02566.jpg)
Items not listed in Box Contents are not included.
Features
Top Panel
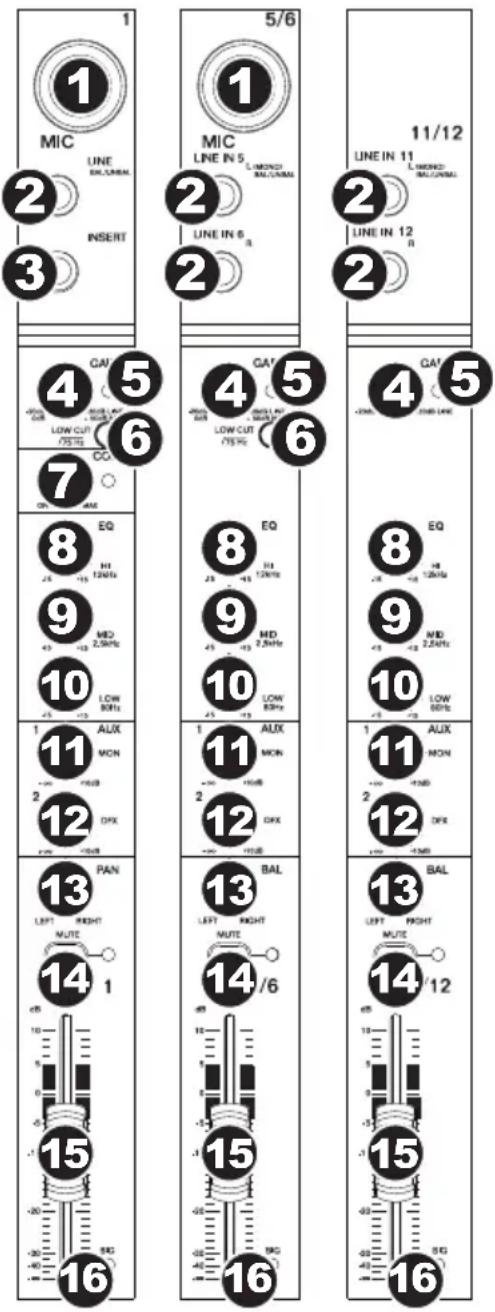
Note: The channels have essentially the same controls with some minor variations between Channels 1-4, 5-10, and 11-12. The three different channel types are shown here.
- Mic Input: Connect a microphone or line-level device to these inputs with an XLR cable.
- Line Input: Connect line-level devices to these inputs with 1/4" cables.
- Insert: Use a standard 1/4" TRS cable to connect an external processor (such as a compressor, limiter, external EQ unit, etc.) to this jack. The signal will be taken after the channel's gain control and returned before the channel's EQ controls. The tip of the TRS connection is the send, and the ring is the return.
- Gain: Adjusts the channel audio level (pre-fader and pre-EQ gain). Adjust this so that the Signal LED lights up.
- Peak LED: The LED will flash if the signal is clipping. If this happens, decrease the setting of the Gain knob.
- Low Cut Filter: When this button is depressed, that channel's audio will be sent through a 75 Hz low-frequency filter with a slope of 18 dB per octave. This is useful for reducing low-frequency noise when using microphones.
- Compressor: Adjusts the amount of compression on the channel, applied by the mixer's built-in compressor. The LED next to the knob will light up when the compressor is on.
- Hi EQ: Adjusts the high (treble) frequencies of the channel.
- Mid EQ: Adjusts the mid-range frequencies of the channel.
- Low EQ: Adjusts the low (bass) frequencies of the channel.
- Monitor Knob: Adjusts the pre-fader level of the signal sent from that channel to the Monitor Mix, whose level is controlled by the Monitor Fader.
- DFX Knob: Adjusts the post-fader level of the signal sent to the mixer's effects processor, whose level is controlled by the DFX Return Fader (DFX Rtn).
- Channel Pan / Balance: If this knob is labeled Pan, it adjusts the (mono) channel's position in the stereo field. If the knob is labeled Bal, it adjusts the balance between the left and right channels of that stereo signal.
- Channel Mute: Press this button to mute/unmute the channel. The LED next to the button will light up when the channel is muted.
- Channel Fader: Adjusts the audio level on the channel.
- Signal LED (Sig): Indicates that the channel's incoming audio signal is within an optimal range.
- Aux Send: Use 1/4" TRS cables to connect these outputs to the inputs of an external amplifier or active monitor. Use the Monitor Knob (Mon) on each channel to control the level of the signal sent to Aux Send 1. This is useful for creating a custom monitor mix for onstage musicians.
- Aux Return (Aux Rtn): Connect the outputs of an external device to these inputs with 1/4" mono cables. If your source is mono, plug it into the left jack and it will be heard on both the left and right sides.
- Aux Return Fader (Aux Rtn): Controls the audio level sent into the Aux Return (Aux Rtn) inputs.
- Graphic Equalizer: When the EQ On/Off switch is on (depressed), you can use these controls to adjust the equalization of the main mix.
- EQ On/Off: Enables or disables the Graphic Equalizer.
- Main Out / Monitor Out: When this button is raised, the Graphic Equalizer will affect the signal sent to the Main Mix Outputs. When this button is depressed, the Graphic Equalizer will affect the signal sent to the Aux 1 (Mon) Output.
- Effect Selector: This knob determines what effect the mixer's internal effects processor will apply to the various channels. Turn the knob to change the effect number, and push the knob to select it. The display next to the DFX Mute button will show the preset number. Each channel can send different levels of audio to the processor by adjusting its DFX Knob. See the Effects section for an explanation of the available effects.
- DFX Mute: Press this button to mute/unmute the effects.
- DFX Peak LED: The LED will flash if the signal is clipping. If this happens, decrease the setting of your source channels' DFX Knobs. When the effects
- DFX Return Fader (DFX Rtn): Adjusts the volume of the audio sent from the mixer's effects processor.
- DFX Bypass: You can connect a standard 1/4" latching-style footswitch (sold separately) to this input and use it to bypass the mixer's internal effects processor (when the footswitch is in its "closed" position).
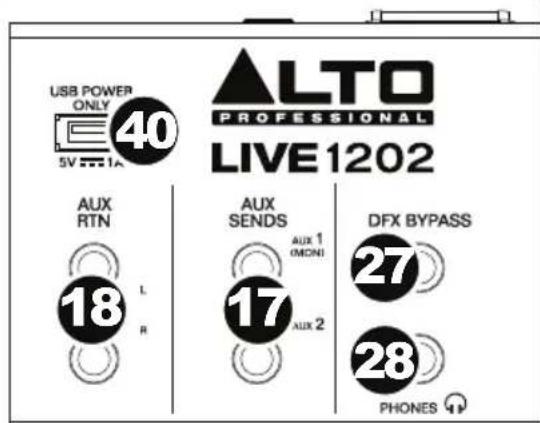


- Phones Output: Connect 1/4" stereo headphones to these outputs. The Phones Volume knob controls the volume. The Phones Source button sets what signal is sent to this output.
- Phones Source: When this button is raised, the signal from the Main Mix Outputs will be heard in the Phones Output. When this button is depressed, the signal from the Control Room Outputs (Ctrl Out) will be heard in the Phones Output.
- Phones Volume: Adjusts the volume of Phones Output.
- USB In Source: When this button is raised, the signal sent to the mixer through its USB Port will be sent to the Main Mix Outputs. When this button is depressed, the signal sent to the mixer through its USB Port will be sent to the Control Room Outputs (Ctrl Out).
- USB In Level: Adjusts the level of the signal sent to the mixer through its USB Port.
- 2 Track In Source: When this button is raised, the signal from the 2 Track In will be sent to the Main Mix Outputs. When this button is depressed, the signal from the 2 Track In will be sent to the Control Room Outputs (Ctrl Out).
- 2 Track In Level: Adjusts the level of the 2 Track In.
- Monitor Fader: Adjusts the level of the Aux Send 1 (Mon) output (the Monitor Mix).
- Main Fader: Adjusts the level of the Main Mix Outputs.
- LED Meters: Shows the audio level of the Main Mix Outputs. The Clip LED can light up occasionally, but if it happens too often, reduce the volume of the mix and/or individual channels.
- Phantom Power: Activates/deactivates phantom power. When activated, phantom power supplies +48V to the XLR mic inputs and the LED next to the button will light up. Please note that most dynamic microphones do not require phantom power, while most condenser microphones do. Consult your microphone's documentation to find out whether it needs phantom power.
- Power LED: Illuminates when the mixer is on.
- USB Power Connection: You can use this USB port to connect and power (or charge) a device that requires power from a 5V USB bus.
Effects
To apply effects, turn the Effects Preset Knob and press it to select one of the available presets. To send a channel's signal to the effects processor, turn up that channel's DFX Knob (Aux 2).
Each effect has 10 variations. Select one that suits the environment and your preferences.
| Numbers | Effect | Description | |
| 00-09 | Delay | Reproduces the signal after a small period of time. | |
| 10-19 | Delay+Verb | Delay | effect with room reverb. |
| 20-29 | Tremolo | Rapidly | increases and decreases the signal volume at a regular rate. |
| 30-39 | Plate | Simulates | bright plate reverb. |
40-49 Chorus Simulates the full, complex, watery sound of several instruments playing the same thing.
50-59 Vocal Reverb, simulating a room with a small delay time.
60-69 Rotary Simulates the classic Doppler effect of the spinning horn inside an organ speaker.
70-79 Small Room Reverb simulating a bright studio space.
80-89 Flange+Verb Applies room reverb plus a classic stereo flanging effect.
90-99 Large Hall Reverb simulating a large acoustic space.
Rear Panel

- Power In: Use the included power cable to connect the mixer to a power outlet. While the power is switched off, connect the power cable into the mixer first, then connect the power cable to a power outlet.
- Fuse Cover: If the fuse is broken, use a screwdriver or other tool to lift this tab, and replace the fuse with a fuse with the same rating (printed just above the Power In). Using a fuse with an incorrect rating can damage the unit and/or fuse.
- Power Switch: Powers the mixer on and off. Turn on the mixer only after connecting all of your input devices but before turning on your amplifiers. Turn off amplifiers before you turn off the mixer.
- Main Mix Outputs: Use standard XLR or 1/4" cables to connect either pair of these outputs to your loudspeakers or amplifier system. Use the Main Fader to control the level of these outputs.
- Control Room Outputs (Ctrl Out): Use standard 1/4" cables to connect these outputs to your control room (booth) monitors or amplifier system.
-
USB Port: Use a standard USB cable to connect this USB port to a computer. The mixer can send or receive audio to or from your computer through this connection.
-
When sending audio, the main mix will be sent from the mixer to your computer.
-
When receiving audio, it will be sent from your computer to the Main Mix Outputs or Control Room Outputs (Ctrl Out), depending on the position of the mixer's USB In Source button.
-
2-Track Inputs (2 Track In): Connect these inputs to the outputs of an external sound source using a standard stereo RCA cable (sold separately). Use the 2 Track In Source button to send this signal either to the Main Mix Outputs or to the Control Room Outputs (Ctrl Out).
-
2-Track Outputs (2 Track Out): Connect these outputs to the inputs of an external recording device using a standard stereo RCA cable (sold separately).
Assistance technique
Technical Specifications
| Mono Input Channels | Microphone inputs: Electronically balanced, discrete input configurationFrequency response: 20 Hz to 20 kHz, ±0.5 dBTHD+N: <0.02% at 0 dBu, 1 kHzGain range: 0 dB to 45 dB (Mic)SNR: 90 dB |
| Line Inputs | Electronically balancedFrequency response: 20 Hz to 20 kHz, ±0.5 dBTHD+N: <0.03% at 0 dBu, 1 kHzSensitivity range: -15 dBu to 30 dBu |
| Impedances | Microphone inputs: 51.1 KΩChannel insert return: 200 KΩAll other inputs: >100 KΩMain outputs: 200 Ω2-Track outputs: 10 KΩAll other outputs: 20 KΩ |
| Equalization | High-shelving: ±15 dB @ 12 kHzMid-bell (mono): ±15 dB @ 2.5 kHzLow-shelving: ±15 dB @ 80 HzMain EQ: 9 EQ bands (63 Hz, 125 Hz, 250 Hz, 500 Hz, 1 kHz, 2 kHz, 4 kHz, 8 kHz, 16 kHz), ±15 dB |
| DSP Section (DFX) | A/D & D/A converters: 24-bitDSP Resolution: 24-bitEffects: 10 DSP effects families with 10 variations available per familyPresets: 100 totalControls: Rotary encoder to select preset, DSP mute switch, peak LED indicator |
| Main Mix | Noise (bus noise):Fader 0 dB, channels muted: -64 dBr (ref: +4 dBu)Fader 0 dB, all input channels assigned & set to unity gain: -64 dBr (ref: +4 dBu)Phantom Power: Mic Pin2/Pin3 and Pin1 47±2V |
| Power Supply | Main voltage:USA/Canada: 100-120 VAC ~60 HzUK/Australia: 240 VAC ~50 HzEurope: 210-240 VAC ~50 HzPower consumption: 50 WFuse: 1.25 AMain connection: Standard IEC receptacle |
| Dimensions(width x depth x height) | 14.1" x 13.6" x 3.1"358 mm x 346 mm x 80 mm |
| Weight | 9.0 lbs.4.1 kg |
Specifications are subject to change without notice.
Trademarks and Licenses
Alto Professional is a trademark of inMusic Brands, Inc., registered in the U.S. and other countries.
All other product or company names are trademarks or registered trademarks of their respective owners.
altoprofessional.com


Brand : ALTO
Model : Live 1202
Category : Mixer