
Carillon - Baby bouncer Foppapedretti - Free user manual and instructions
Find the device manual for free Carillon Foppapedretti in PDF.


| Product type | Baby swing and lounger |
| Brand | Foppapedretti |
| Model | Carillon |
| Dimensions (approx.) | 75 x 55 x 65 cm |
| Weight (approx.) | 5 kg |
| Power supply | AC adapter (included) or 4 C LR14 batteries (1.5 V) + 2 AAA LR03 batteries (1.5 V) + CR2025 battery (3 V) for remote control |
| Usage | From birth to 9 kg max or until child can sit up alone |
| Backrest positions | 3 adjustable positions |
| Rocking | 5 speeds with timer (15, 30, 60 minutes) |
| Melodies and sounds | 16 melodies + 5 nature sounds |
| Remote control | Yes (CR2025 battery included) |
| Toy arch | Rotating with light, 2 AAA LR03 batteries (not included) |
| Restraint system | Adjustable 5-point harness |
| Headrest reducer | Included |
| Tray | Removable with rigid leg divider |
| Material | Fabric cover, metal frame |
| Care | Clean cover with water and mild detergent; plastic and metal parts with damp sponge |
| Standards | EN 16232:2013 + A2:2023 (swing), EN 12790-1:2023 (lounger) |
| Warranty | 12 months |
Frequently Asked Questions - Carillon Foppapedretti
User questions about Carillon Foppapedretti
0 question about this device. Answer the ones you know or ask your own.
Ask a new question about this device
Download the instructions for your Baby bouncer in PDF format for free! Find your manual Carillon - Foppapedretti and take your electronic device back in hand. On this page are published all the documents necessary for the use of your device. Carillon by Foppapedretti.
USER MANUAL Carillon Foppapedretti
natural_image
Product photo of a baby in a baby boom chair with decorative fans and toys (no visible text or symbols)EN 12790-1:2023
EN 16232:2013+A2:2023
EN Assembly instructions
Valid only for toys and music device
EN - IMPORTANT! KEEP FOR FUTURE REFERENCE.
FR - IMPORTANT ! À CONSERVER EN CAS DE BESOIN ULTÉRIEUR.
natural_image
Diagram of a vehicle interior with red cables and a directional arrow indicating movement (no text or symbols)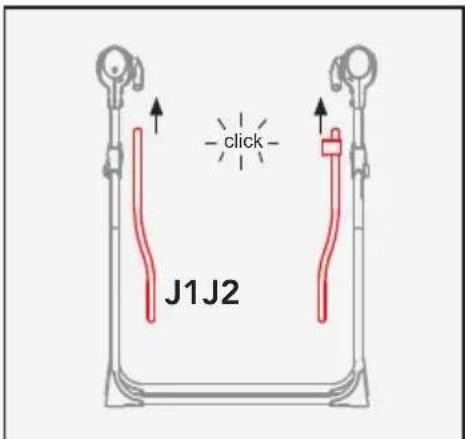
natural_image
Line drawing of a baby boom seat with red outline and arrow indicating movement (no text or symbols)natural_image
Line drawing of a baby in a baby boom lift using a stand mixer (no text or symbols)2
3
natural_image
Line drawing of a manual manual tool with a handle and blade, no text or symbols presentnatural_image
Line drawing of a baby seat with a red circular head, showing the process from lifting to holding and adjusting (no text or symbols)MODO D'USO:
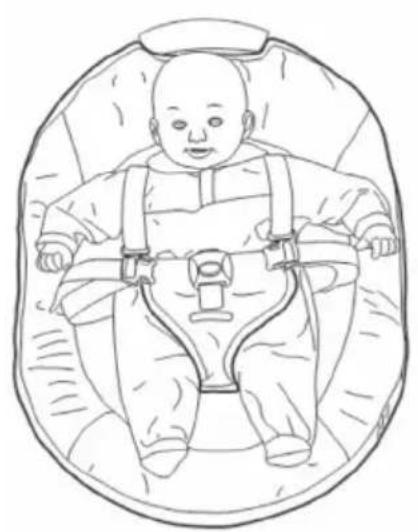
natural_image
Line drawing of a baby in a seatbelt, no text or symbols present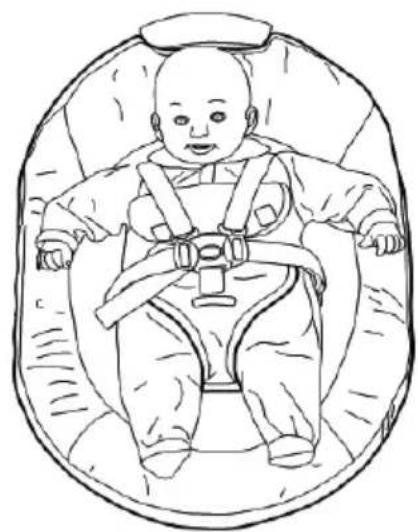
natural_image
Line drawing of a baby in a seatbelt, no text or symbols presentLED VELOCITÀ
LED TIMER
PULSANTE SUONI NATURA
PRESA PER SPINA CONNETTORE DEL TRASFORMATORE.
IMPORTANTE:
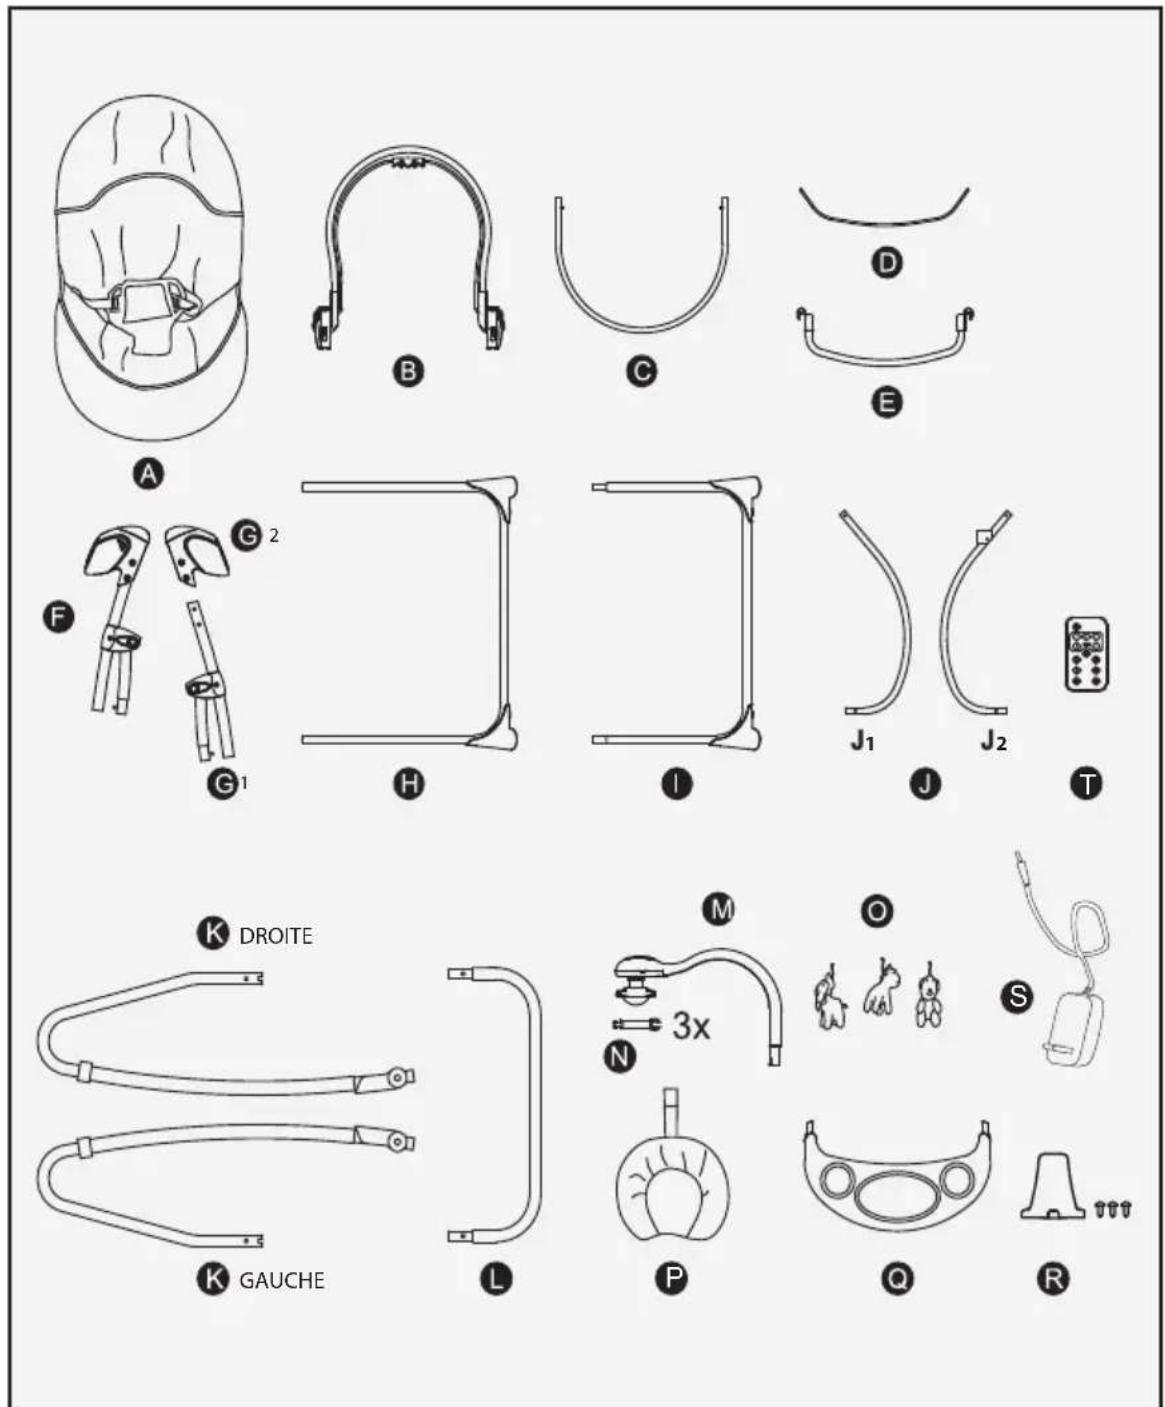
A. Seat fabric
B. Backrest tube
C. Seat support tube
D. Fabric fixed steel wire
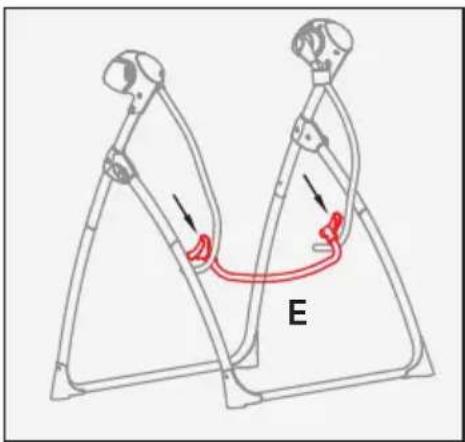
E. Cross tube
F. Left driving part group
G. Right driving part group
H. Front leg
I. Rear leg
J. Hanging tubes
K. Rocking tubes
L. Bouncer connect tube
M. Toy bar main
N. Toy bar arm
O. Toys
P. Head support
Q. Front tray
R. Rigid crotch strap
S. Power adapter
T. Remote control
ASSEMBLY:
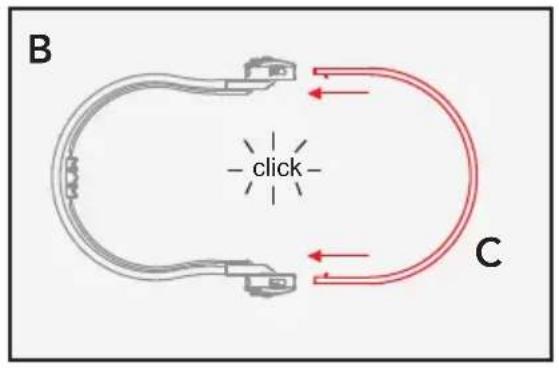
- Insert the seat support tube (B) into the backrest tube (C). When the components are assembled correctly, the metal pins will slot into the holes on the fixture tubes. At this point you will hear them click into place.
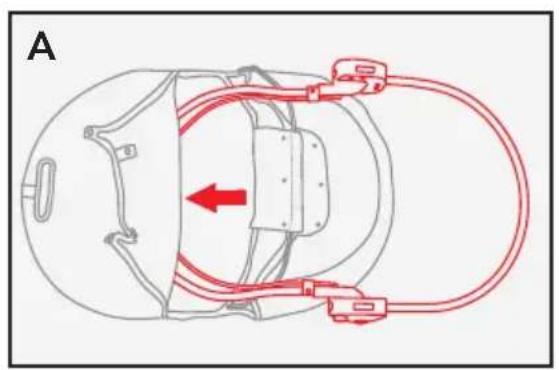
natural_image
Diagram of a vehicle interior with red cables and a directional arrow indicating movement (no text or symbols)- Put on the seat cover (A) to the seat frame.
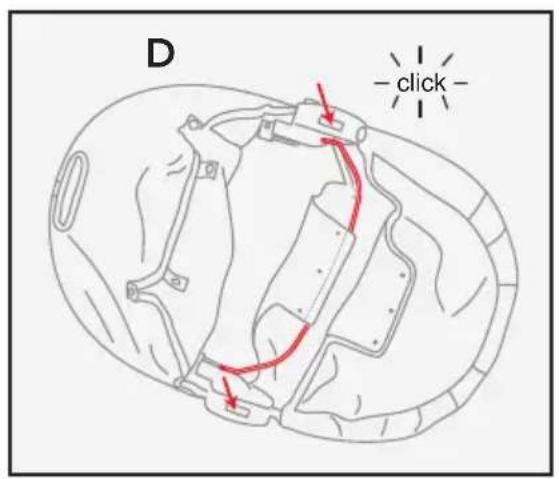
- Install the fabric fixed steel wire (D) into the holes under the seat until a "click".
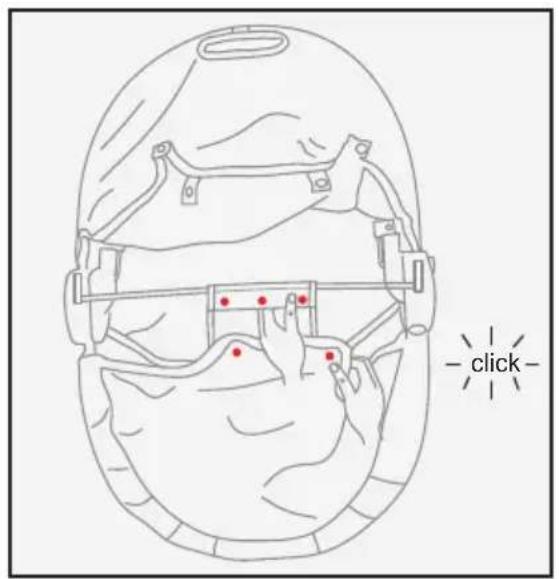
- Fix the seat fabric with the buttons.
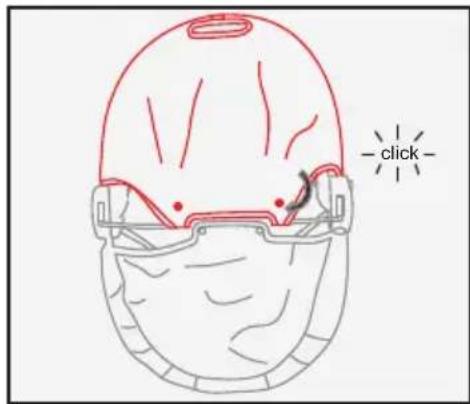
- Fix the backrest fabric onto the steel wire with the buttons.
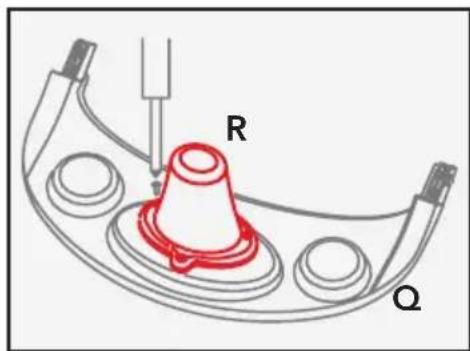
6A. Fix the rigid crotch strap (R), onto the tray (Q) with the screws.
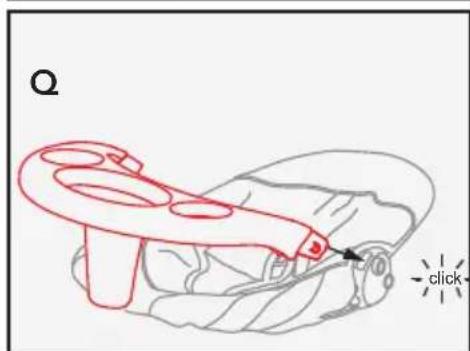
6B. Install the font tray (Q) into the holes until a "click".
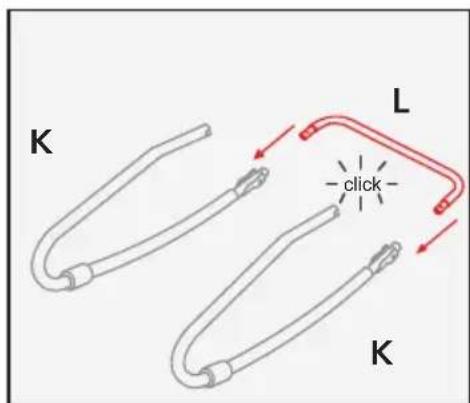
- Assemble the bouncer frame by insert the rear connect tube (L) into the two seat tubes (K). When the components are assembled correctly, the metal pins will slot into the holes on the fixture tubes. At this point you will hear them click into place.
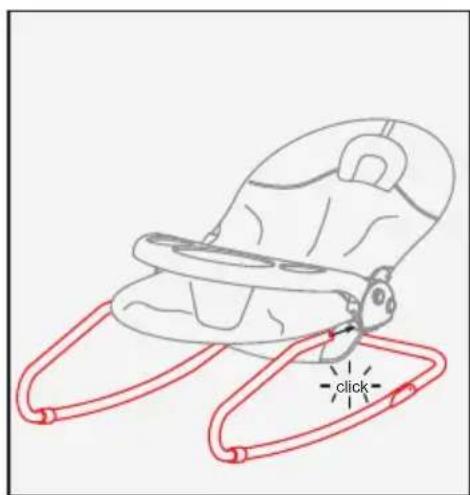
- Install the seat unit onto the bouncer frame. When the components are assembled correctly, the metal pins will slot into the holes on the fixture tubes. At this point you will hear them click into place.
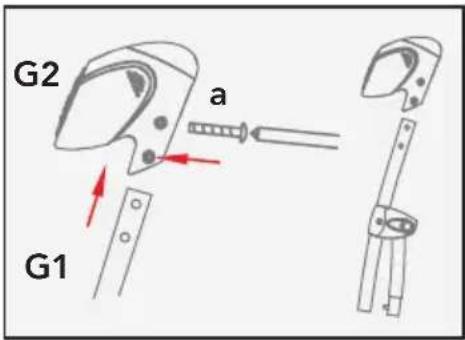
9A. Remove the fixing screws (a).
IMPORTANT: Make sure the locking nut doesn't protrude from its seat. Insert the leg G1 into the pivot containing the music device G2 and fix it with screws and nuts.
IMPORTANT: During the assembly of the pivot the buttons for unfolding the legs must always be turned outwards.
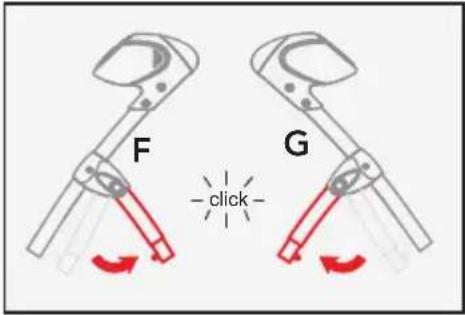
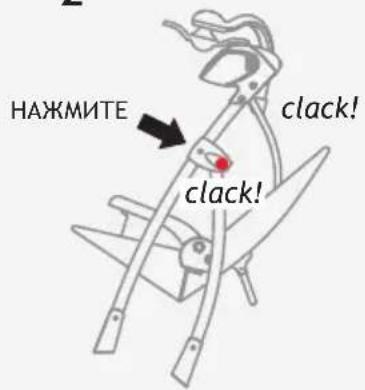
9B. Open the 2 driving system parts (F) and (G) until a "click".
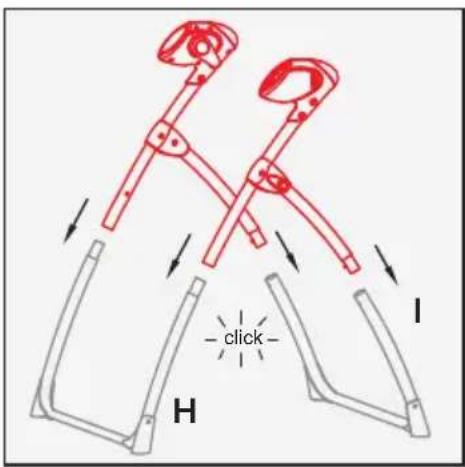
- Install the front legs (H) and rear legs (I) by insert the two legs into the upper part tube. When the components are assembled correctly, the metal pins will slot into the holes on the fixture tubes. At this point you will hear them click into place.

- Install the hanging tubes: Insert the 2 hanging tubes (J1) and (J2) into the plastic part holes. When the components are assembled correctly, the metal pins will slot into the holes on the fixture tubes. At this point you will hear them click into place.
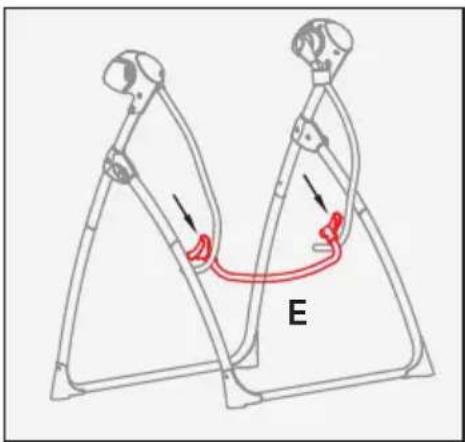
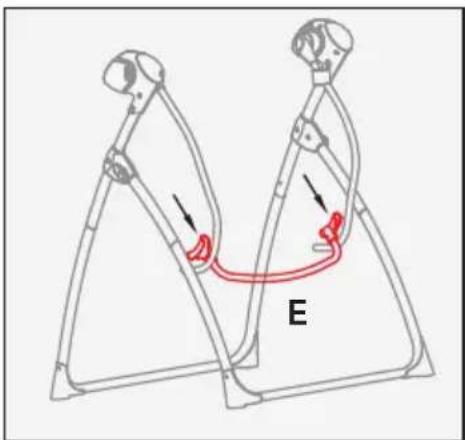
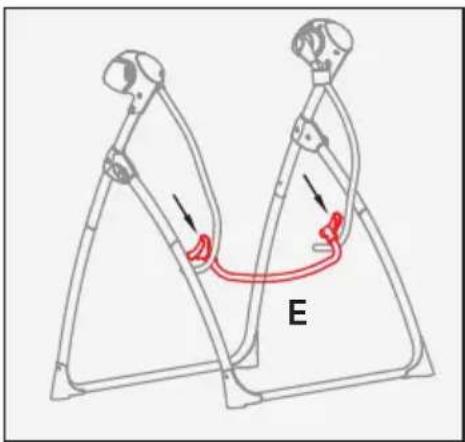
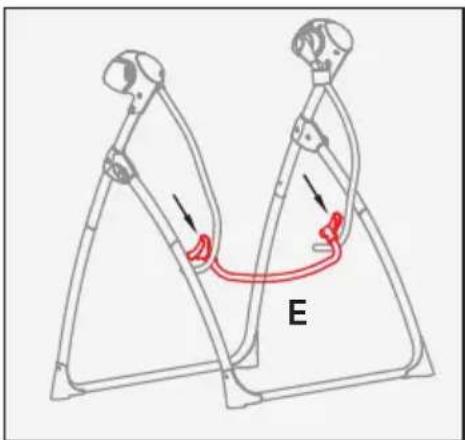
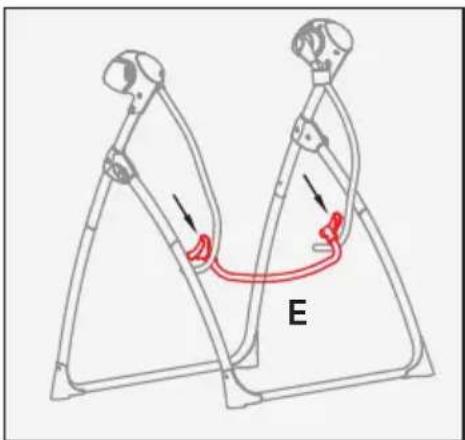
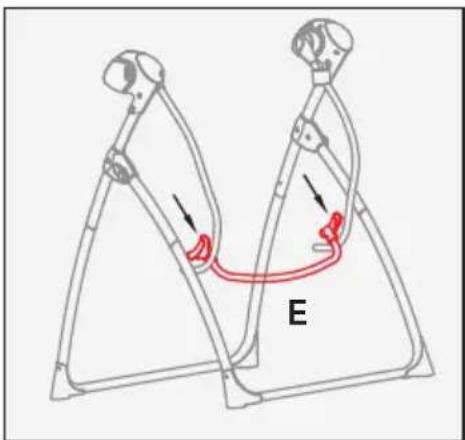
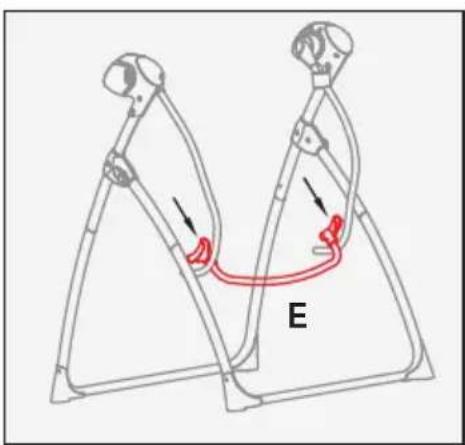
- Install the cross support tube: Install the cross tube (E) by click onto the 2 hanging tubes.
natural_image
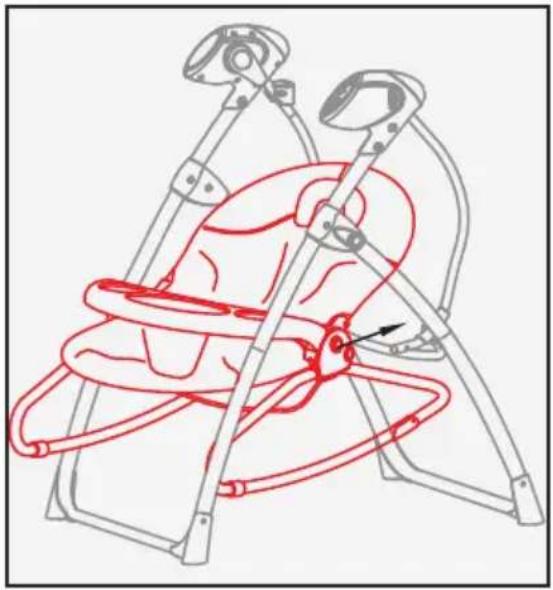
Line drawing of a baby boom chair with red outline and arrow indicating motion (no text or symbols)- Install the seat unit: Install the seat unit by insert the 2 hanging tubes into the seat socket until a "click".
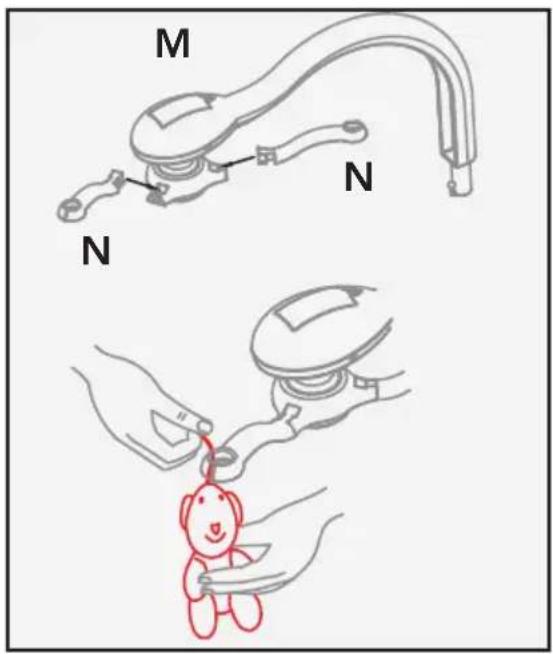
- Assemble the toy bar: put on the 3 wings (N) onto the toy bar, and then put on the 3 plush toys into the holes of the wing (M).
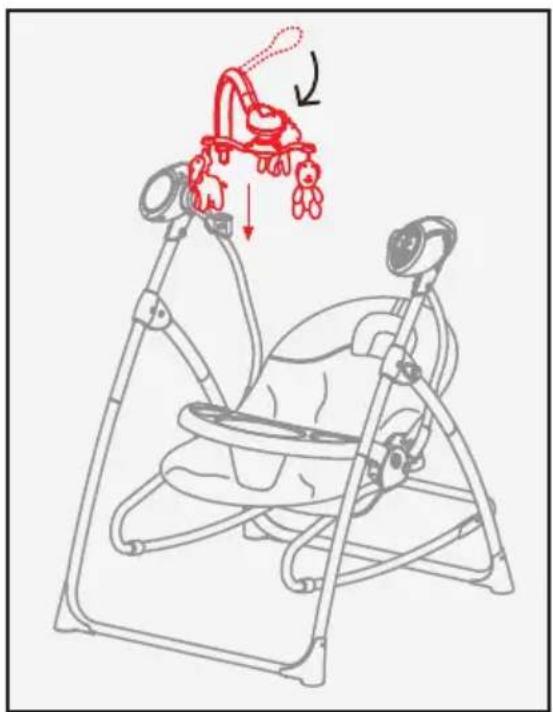
- Install toy bar set onto the swing: Insert the toy bar frame into the swing main frame socket until a "click".
IN USE:
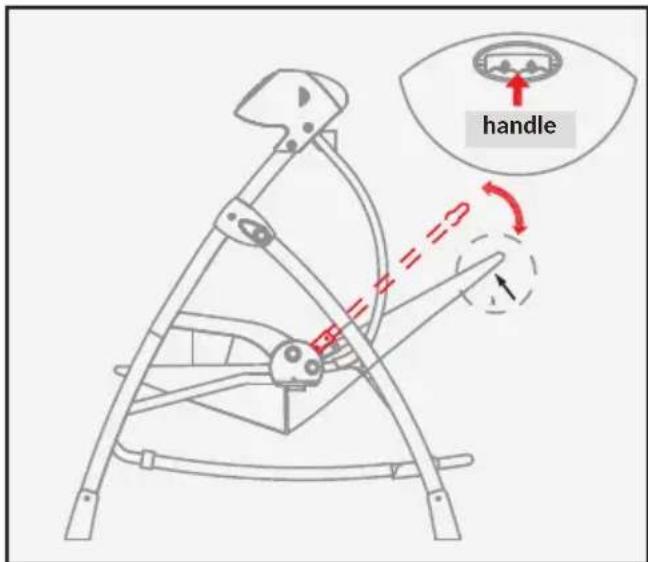
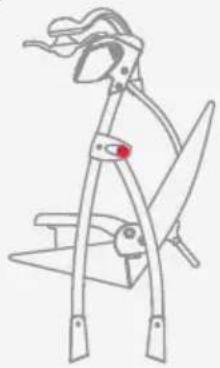
- Adjust the backrest positions: there are 3 positions of backrest position, adjust it by pulling handle of the backrest.
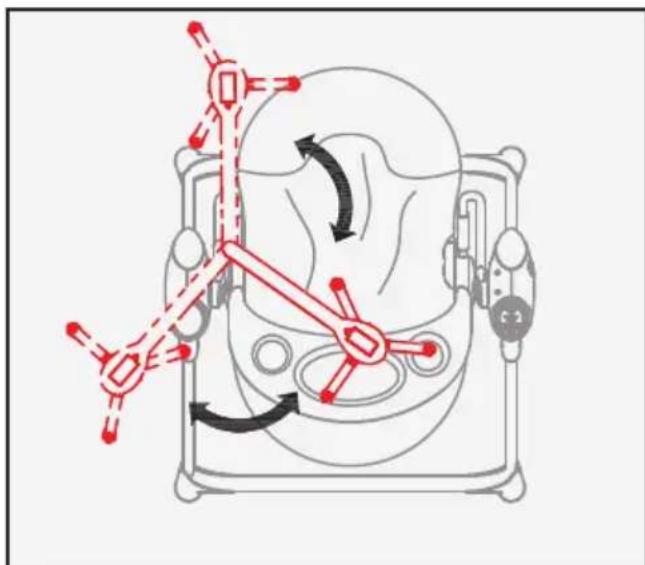
- Adjust the positions of toy bar: The toy bar can be hand moved to different positions as you like, easy for parents to access baby.
-
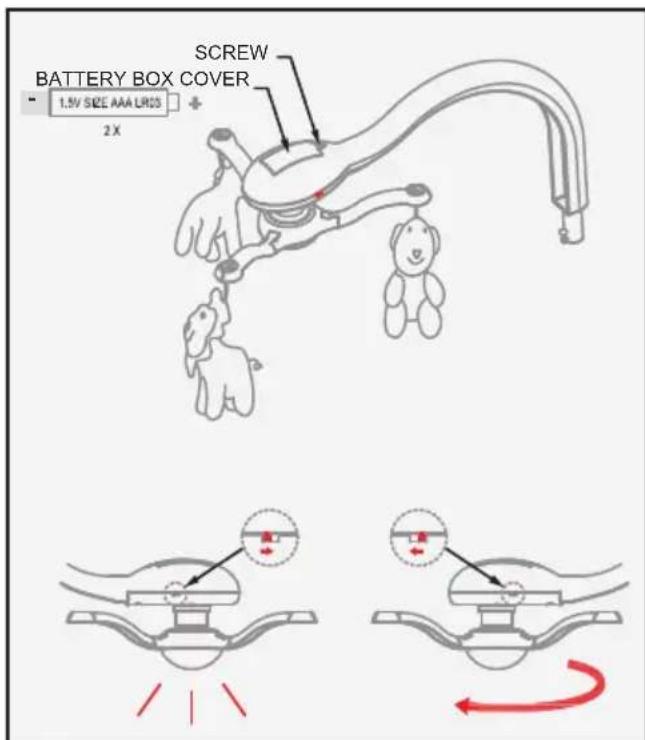
Install the battery of toy bar: Install 2 pcs 1.5V AAA LR03 size batteries, and turn on the toy bar button, then the toy bar can be turned around automatically, turn on the light button can open the lamp light.
-
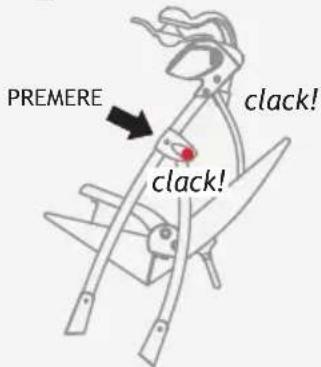
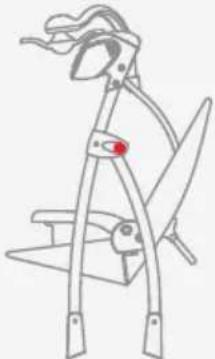
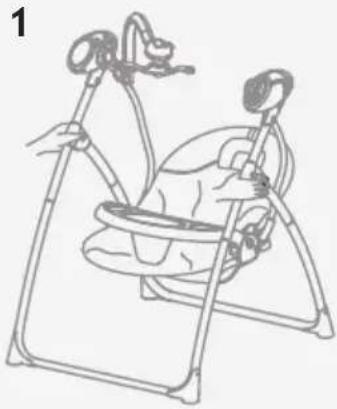
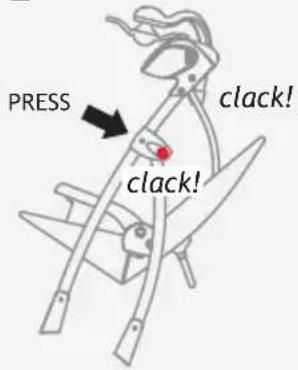
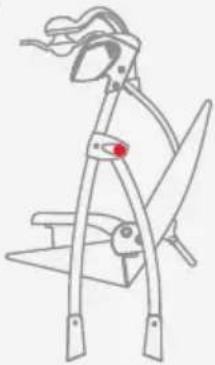
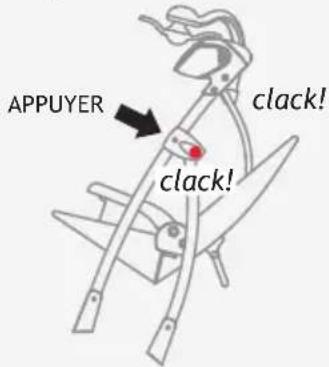
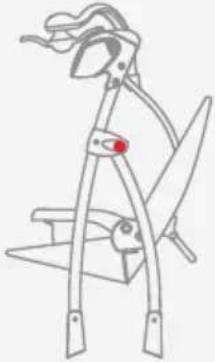
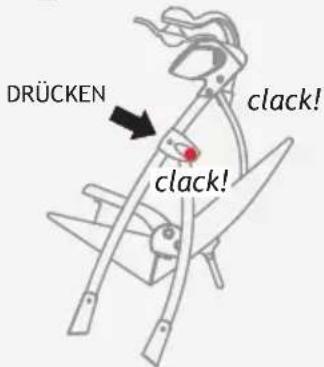
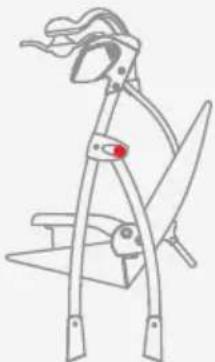
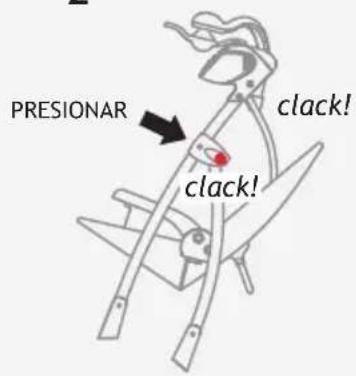
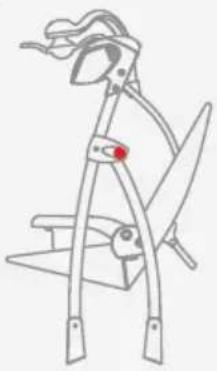
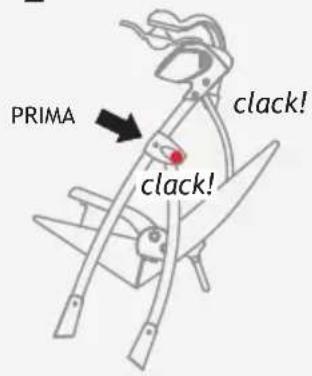
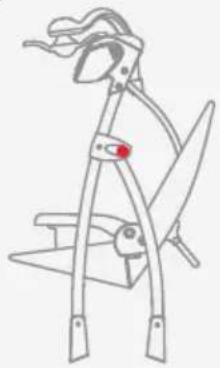
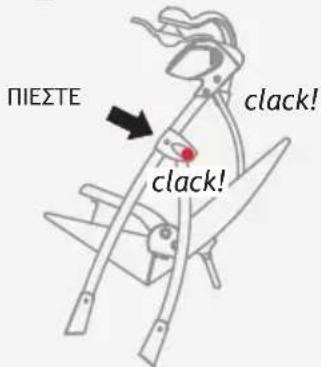
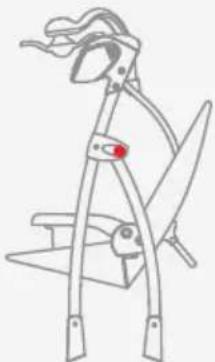
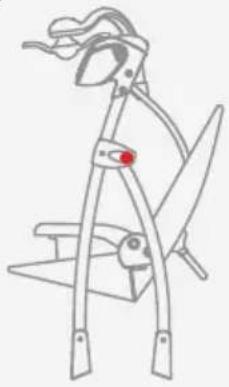
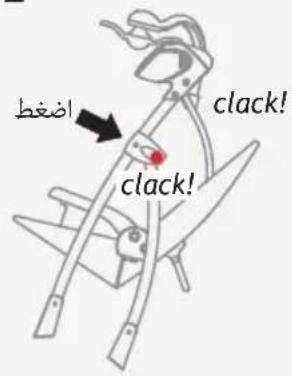
Folding: Folding the swing by pressing the 2 buttons on the 2 sides of the swing frame.
natural_image
Line drawing of a baby baby boom device with no text or symbols2
3
natural_image
Line drawing of a manual manual tool with a red handle, no text or symbols present- To be bouncer: Release the seat unit from the hanging tubes, then the swing become a bouncer.
NEVER remove the baby rocker when the child is sitting on it.
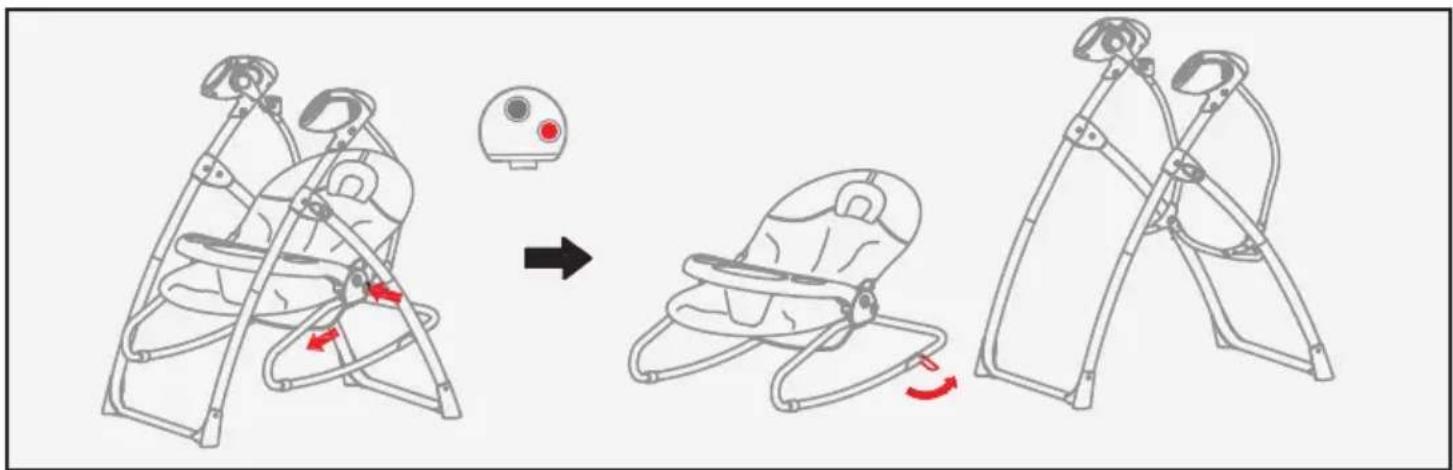
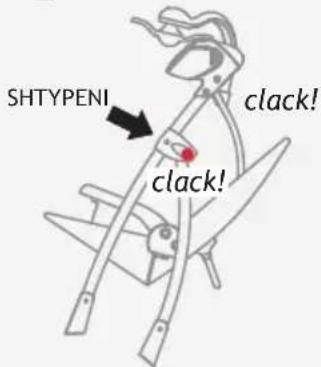
- Release front tray: Release the front tray by press the 2 side buttons.
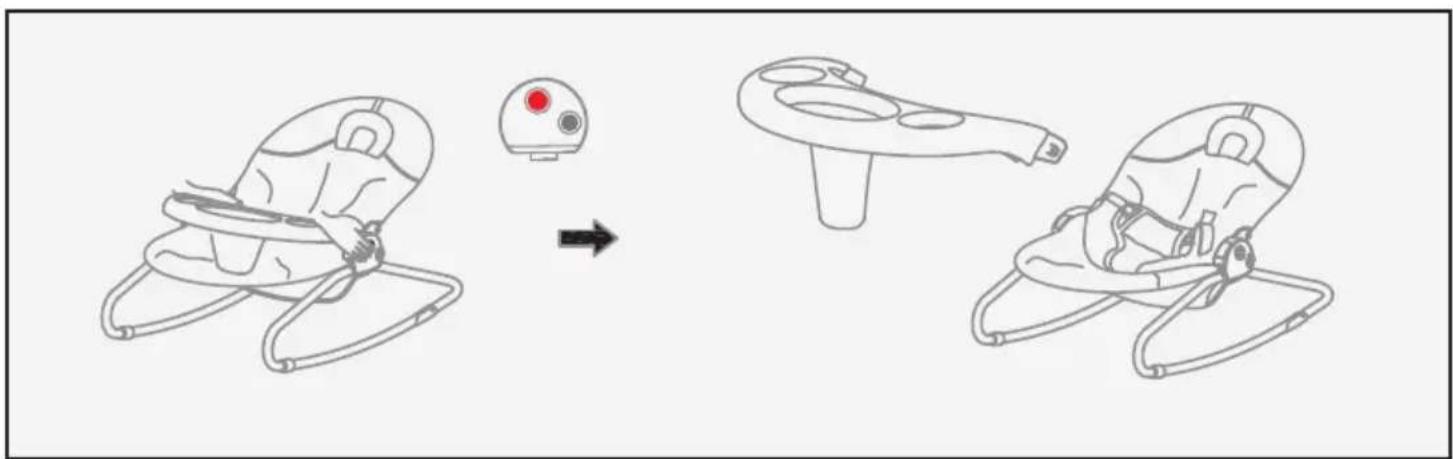
natural_image
Line drawing of a baby seat with a red indicator light and a device, showing three sequential steps (no text or symbols)IN USE:
natural_image
Line drawing of a baby in a full-body seatbelt (no text or symbols)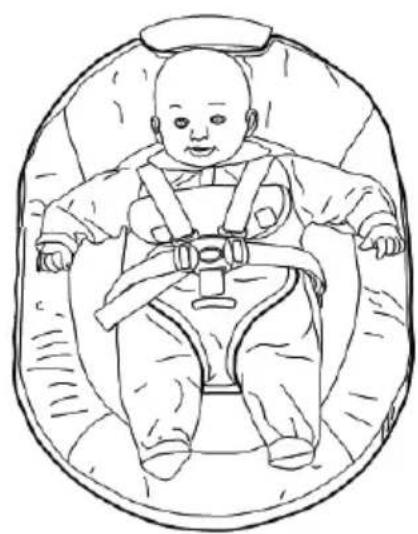
natural_image
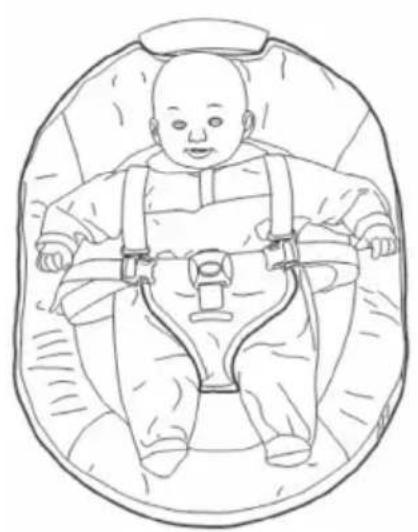
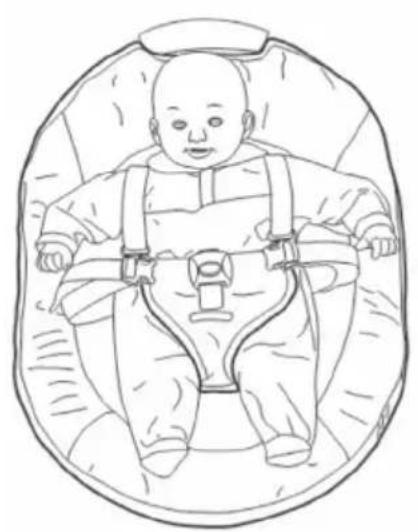
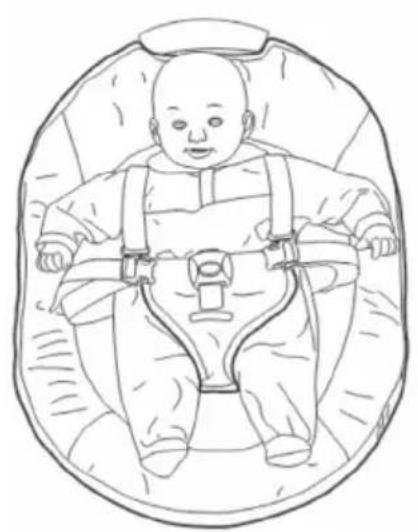
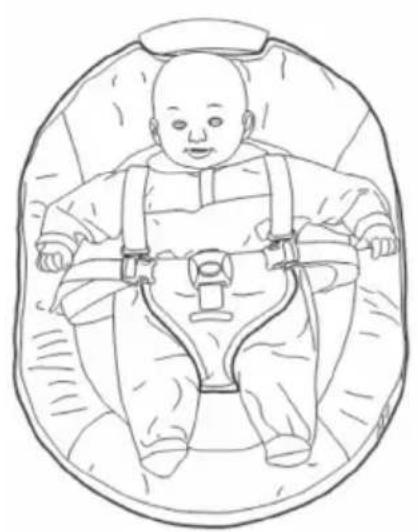
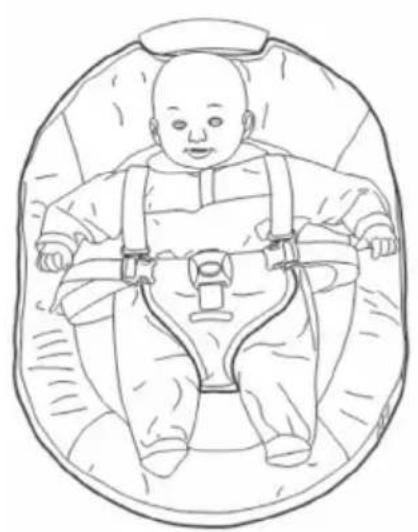
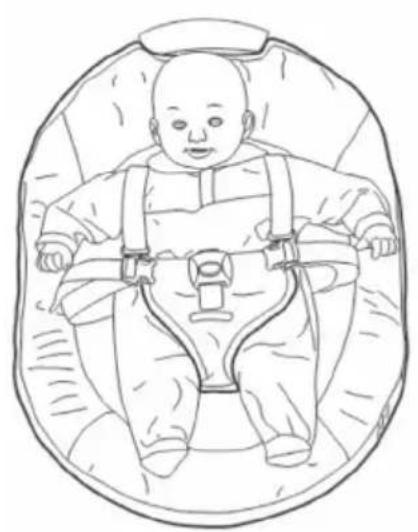
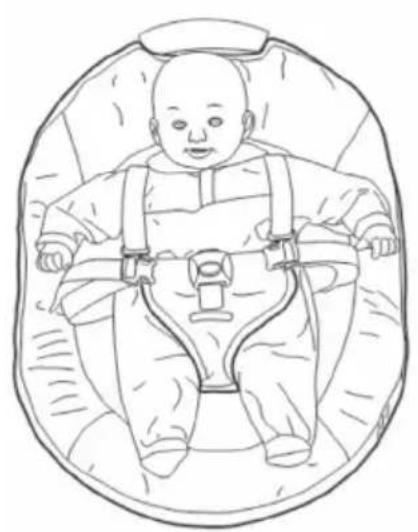
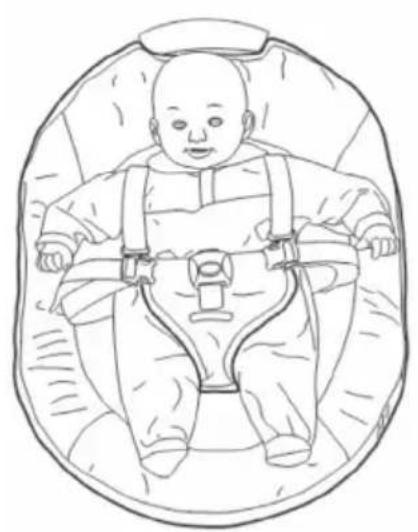
Line drawing of a baby in a full-body seatbelt (no text or symbols)Place the child in the seat as shown in figure. Insert the left and right sets of straps into the restraint latch. A “click” will indicate the correct fastening.
Adjust the harness to fit the height of your child, using the restraint fits.
The harness should fit snugly but not too tightly. The right regulation should allow to insert a finger.
IMPORTANT: Adjust the chest belts according to the height of your child.
For this reason the harness straps have to pass through the closest buckles in height of the shoulders of the child. On the back of the backrest there are two buckles to use for adjusting the harness to fit the height of your child.
IMPORTANT: Both the chest belts, jutting out from the back rest, have coincide with the height of the shoulders of the child and be at the same height.
Always secure the child with the restraint latch correctly adjusted and hooked/locked.
SWING CONTROL PLATE INSTRUCTIONS
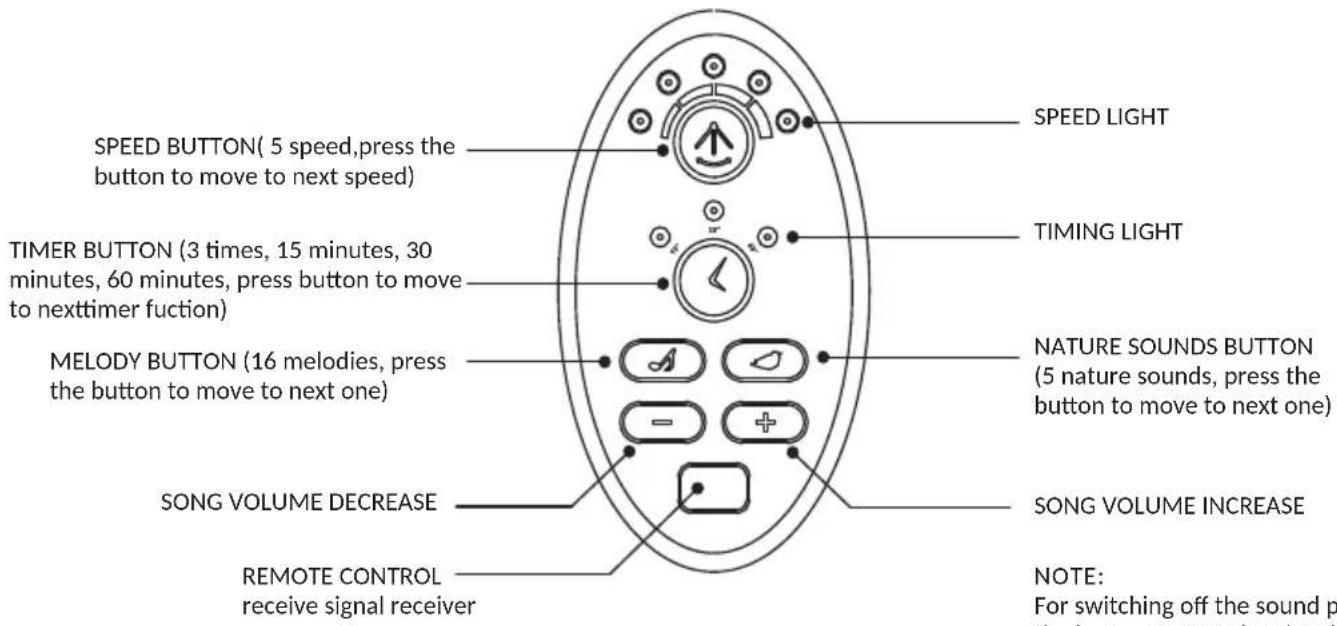
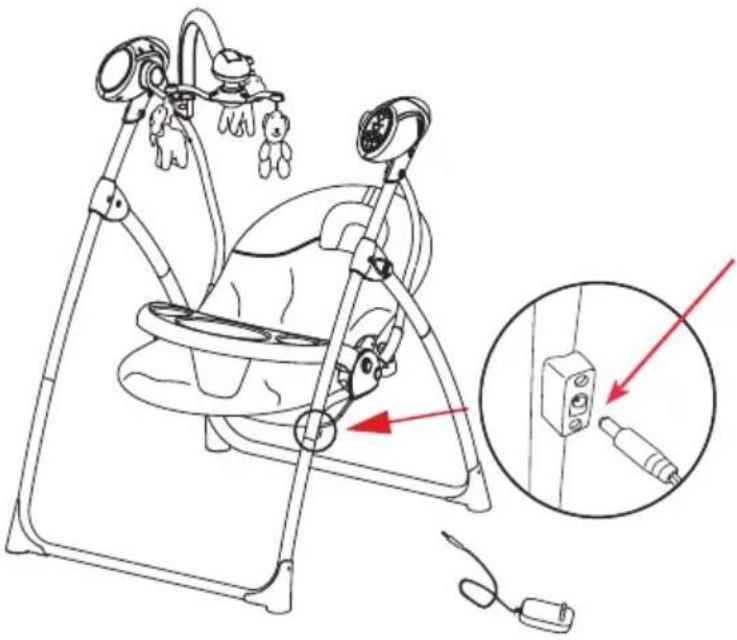
DC ADAPTOR CONNECTOR
IMPORTANT:
Ensure that the power cord of the AC/DC adapter is totally out of reach of children.
Fixing the power adapter cable at chassis using a clamp or a fastener.
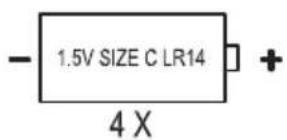
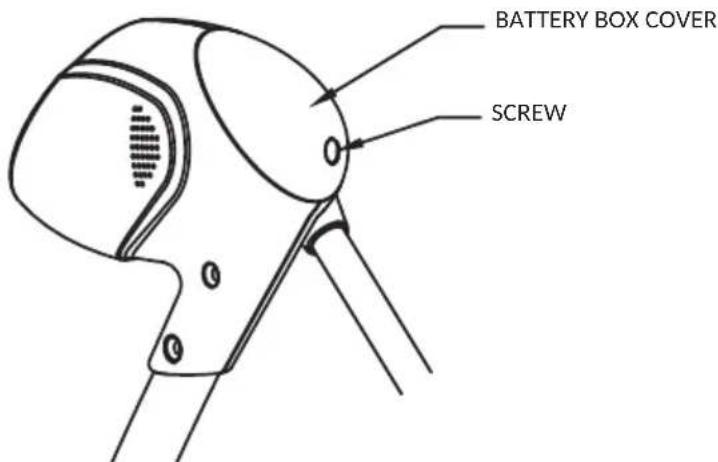
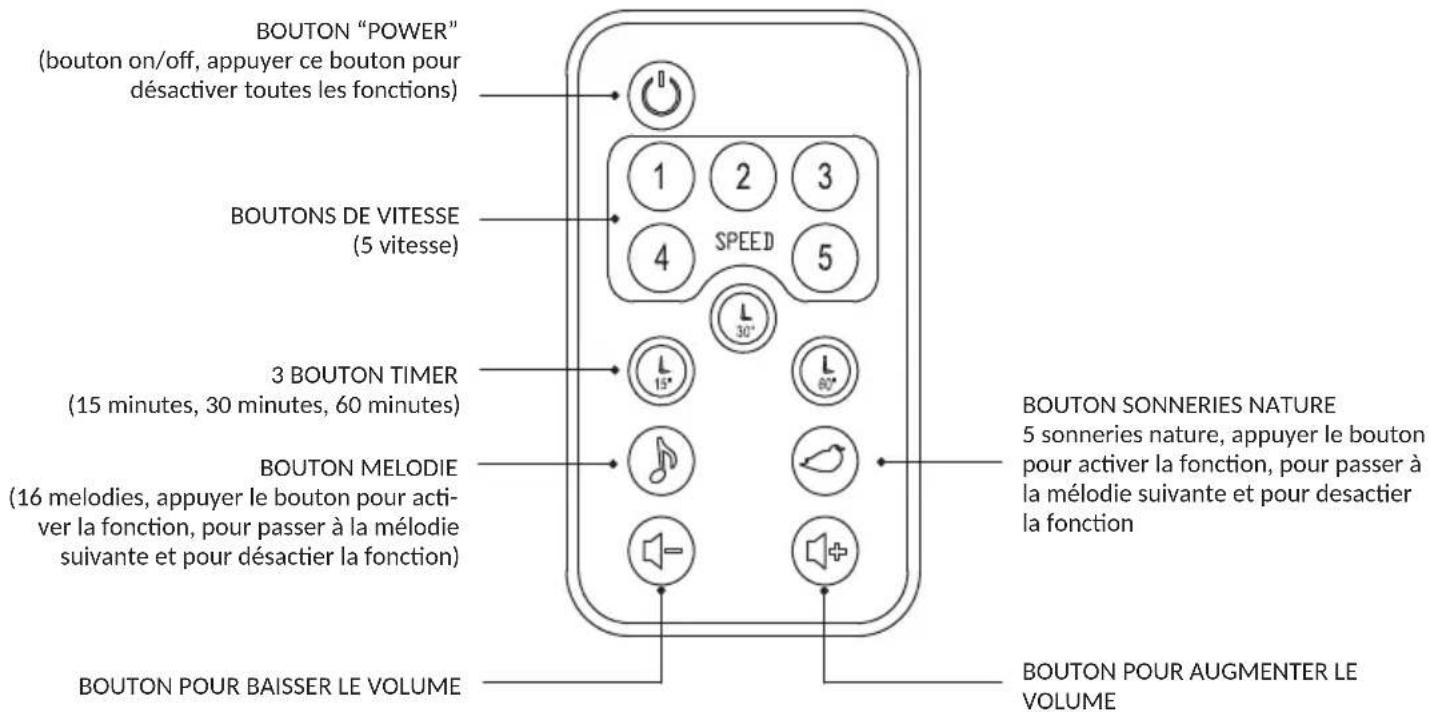
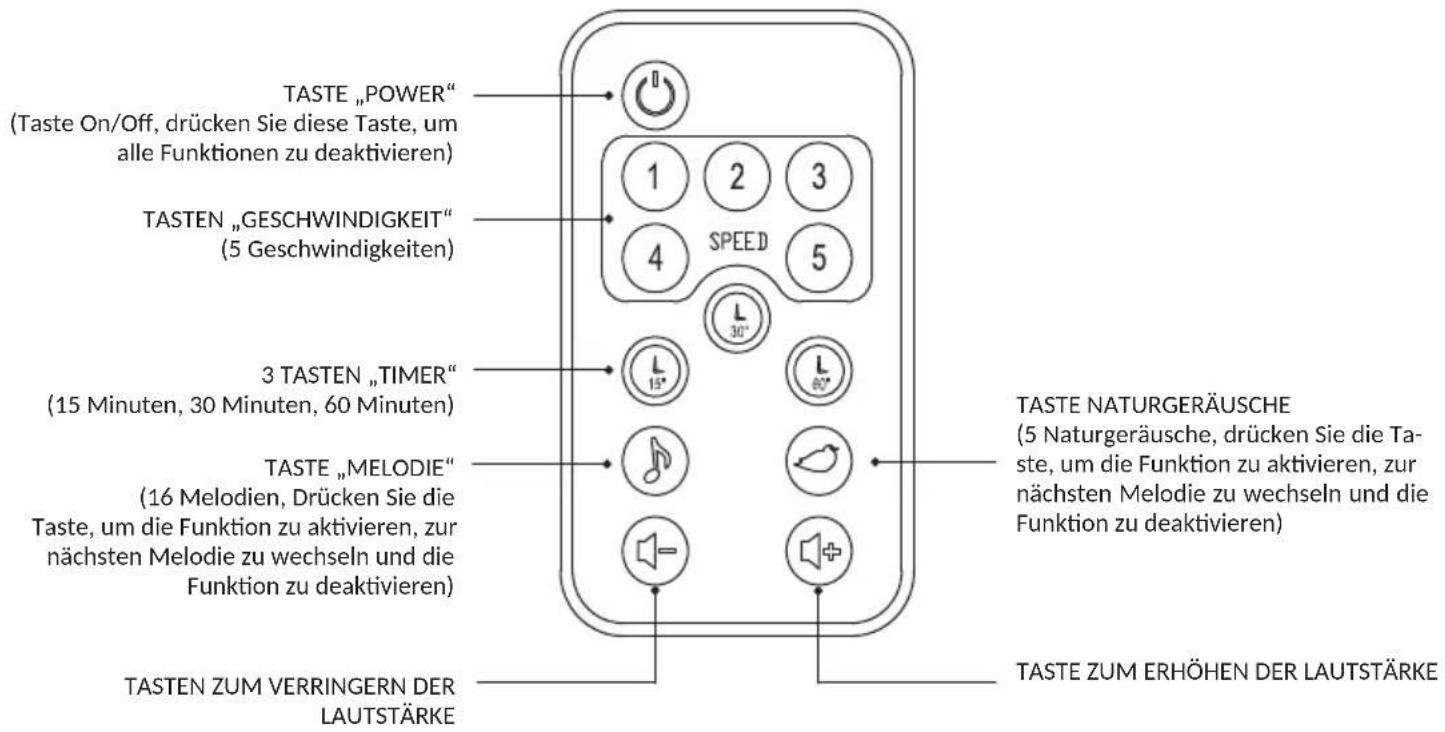
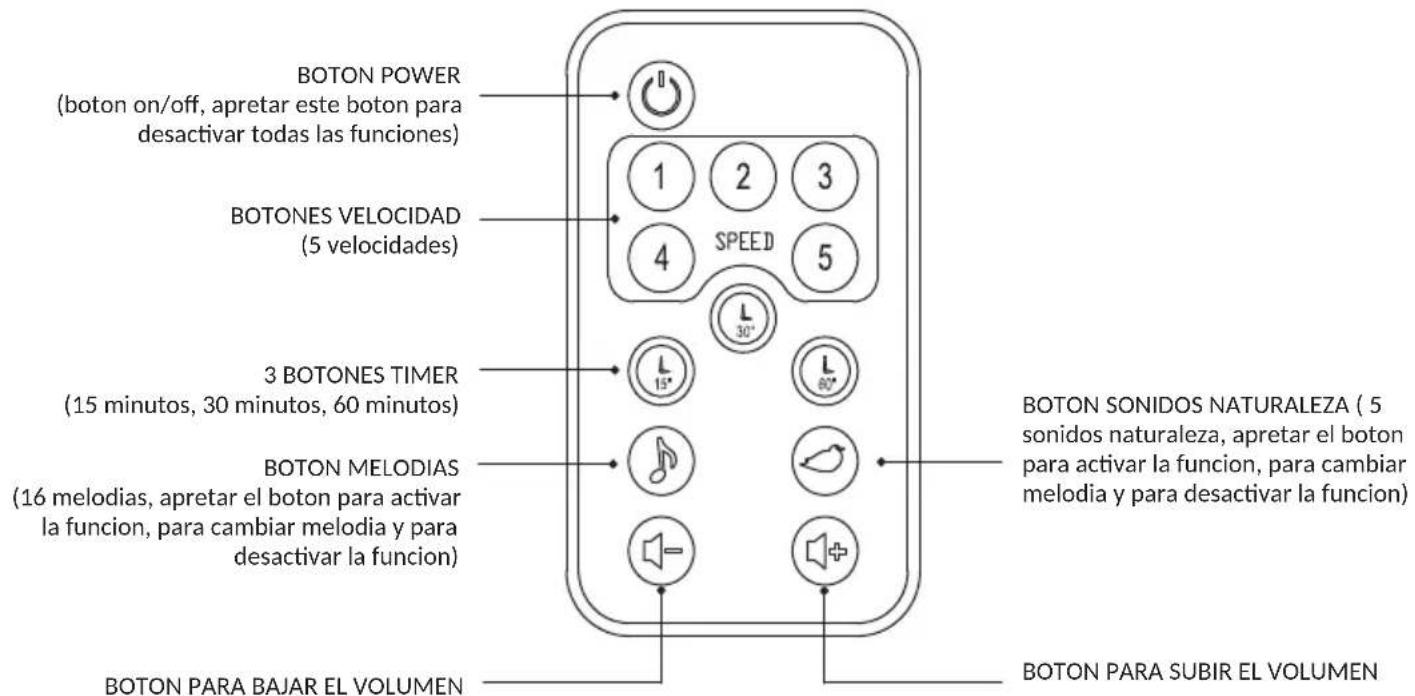
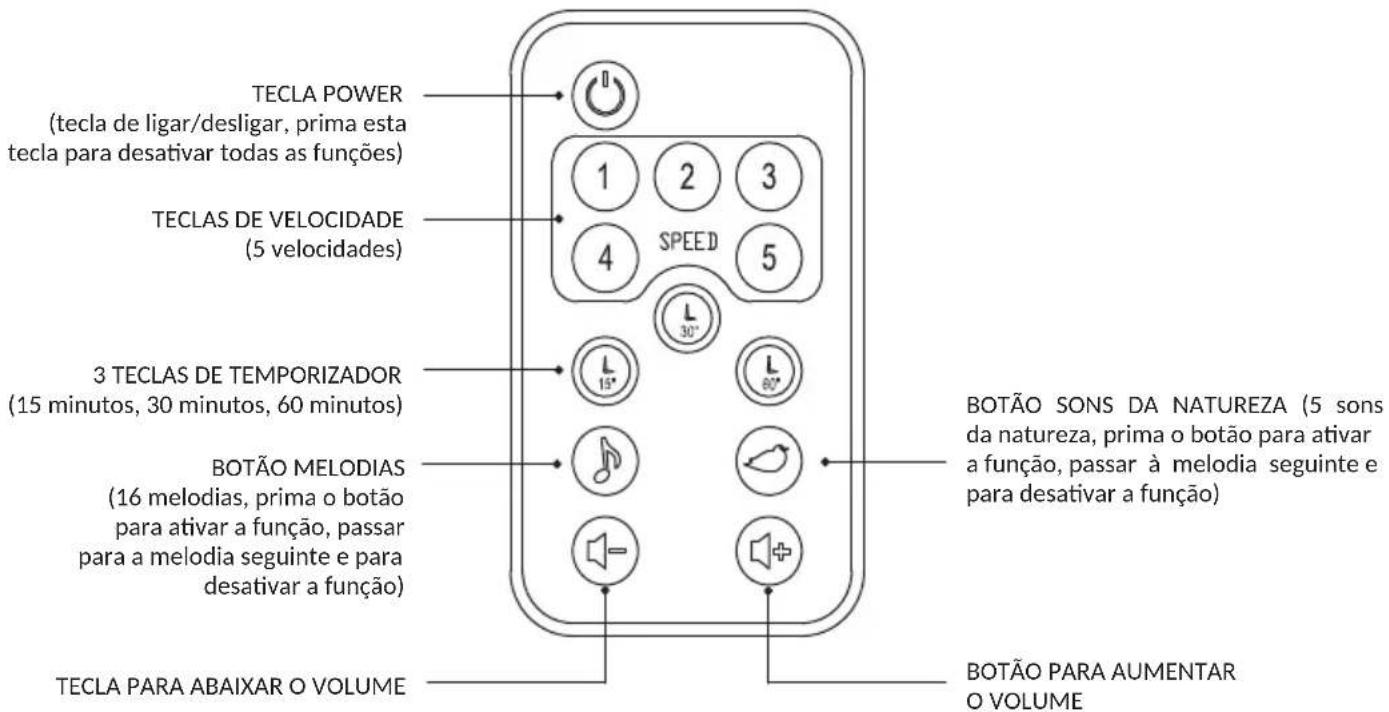
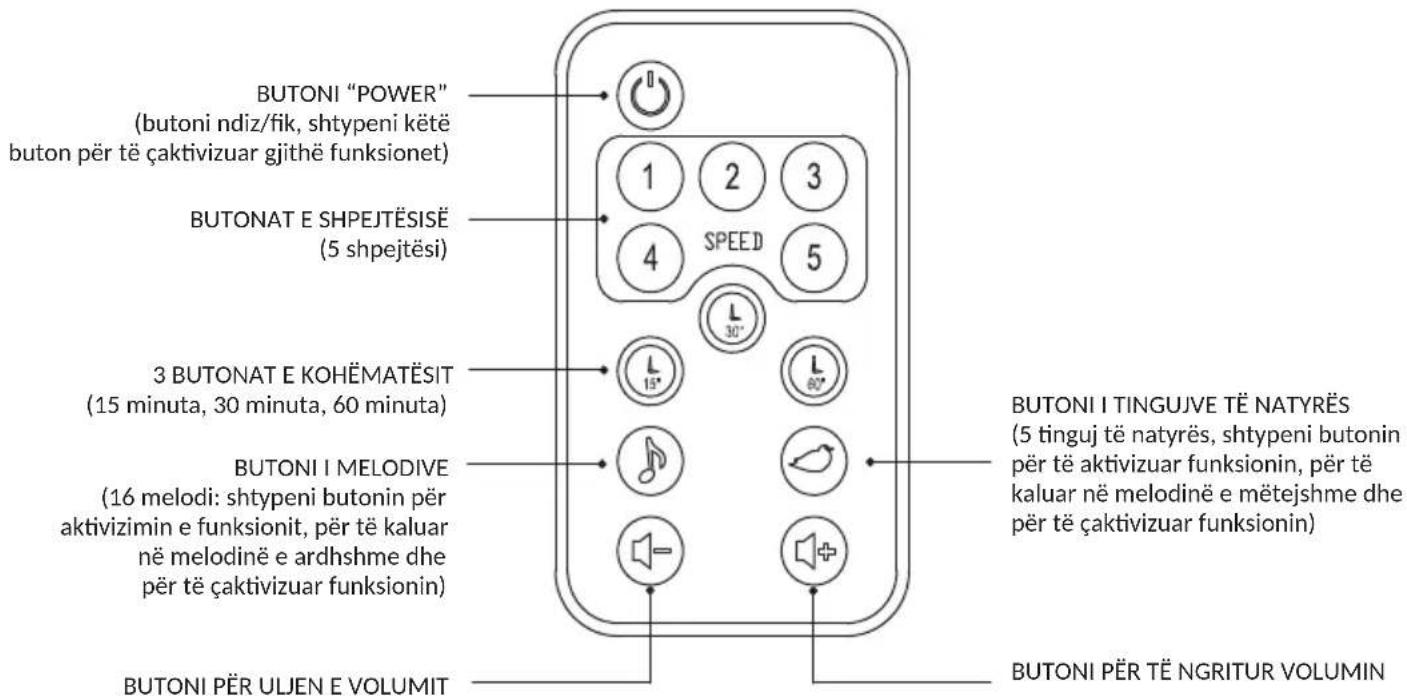
REMOTE CONTROL FUNCTIONS:
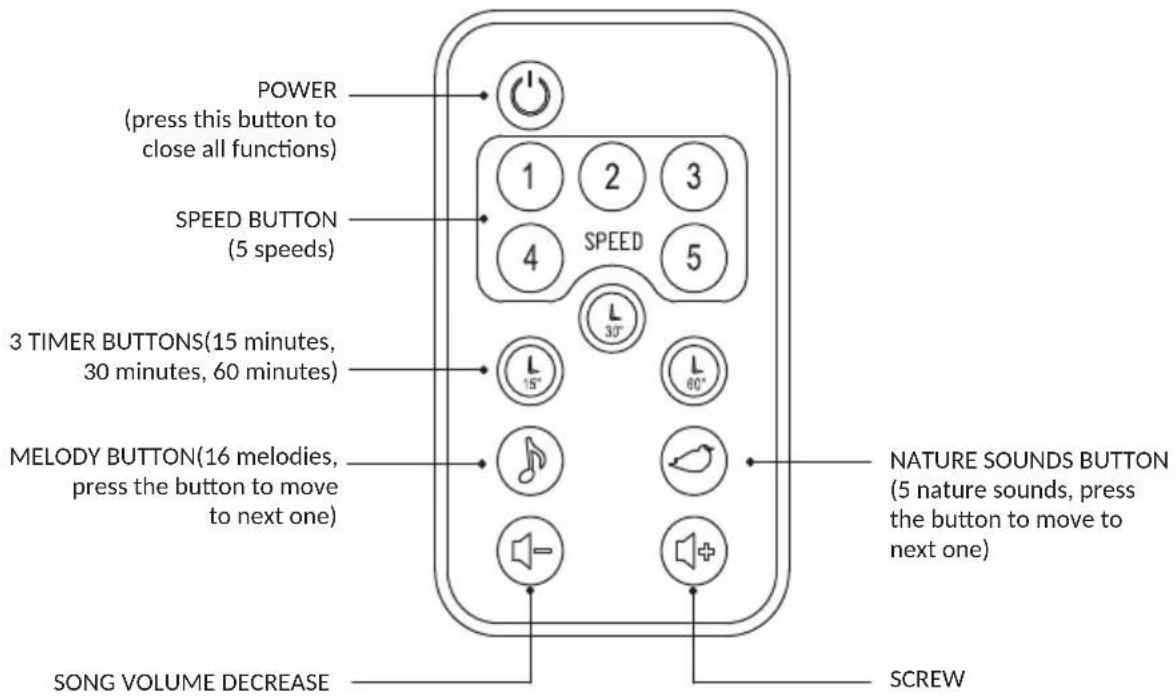
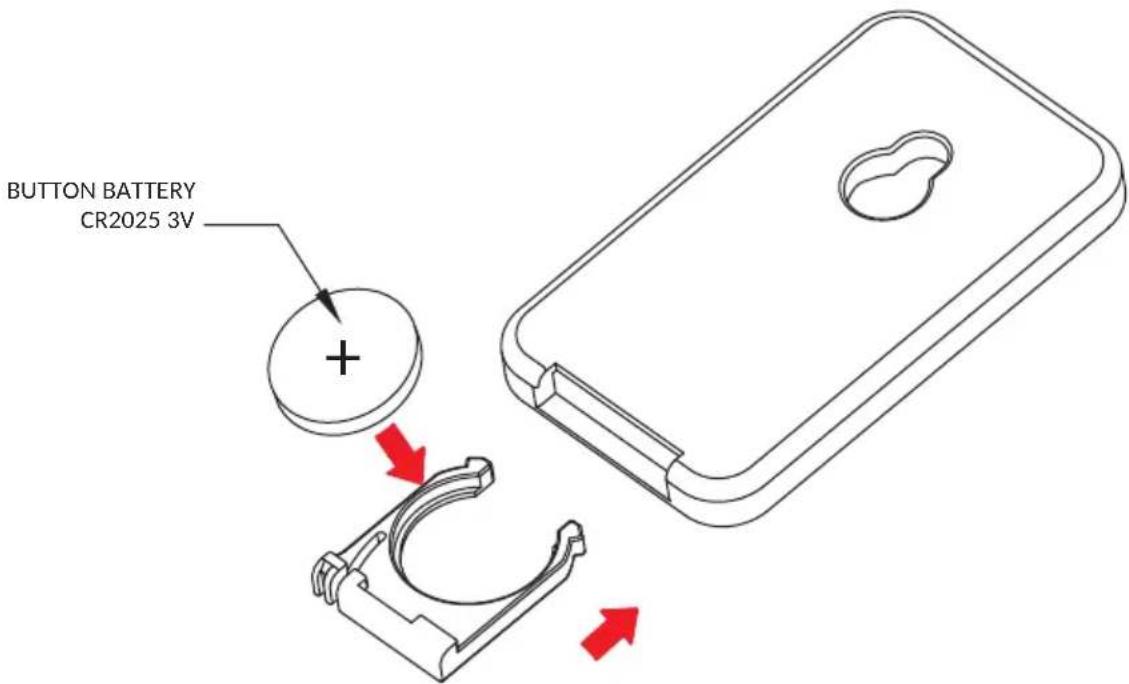
WARNING:
The CARILLON can be used either as swing or as a reclined cradle.
SWING USE (EN 16232:2013 +A2:2023)
IMPORTANT! READ CAREFULLY AND KEEP FOR FUTURE REFERENCE.
WARNING:
- Never leave the child unattended
- Do not use this product once your child can sit up unaided or weighs more than 9 kg.
- Never use this product on an elevated surface (e.g. a table).
• Always use the restraint system.
• Always make sure the safety harness and the crotch strap are fastened properly when the child is placed in the seat. - To avoid injury ensure that children are kept away when unfolding and folding this product.
- Do not let children play with this product.
- Do not move or lift this product with the baby inside it.
- Never let the child sleep in this product. This product does not replace a cot or a crib. Should the child fall asleep, then it should be placed in a suitable cot or crib.
- Do not use the product if any components are broken or missing.
- Do not use accessories or replacement parts other than those approved by the manufacturer.
- Transformers used with the infant swing are to be regularly examined for damage to the cord, plug, enclosure and other parts, and in the event of such damage, they shall not be used;
- The infant swing shall only be used with the transformer provided or recommended by the manufacturer.
RECLINED CRADLE USE (EN 12790-1:2023)
IMPORTANT! READ CAREFULLY AND KEEP FOR FUTURE REFERENCE.
WARNING
- Never leave the child unattended.
- Stop using the product when the child starts trying to sit up.
- Never use this product on an elevated surface (e.g. a table).
• Always use the restraint system. - Never use the toy bar to carry the product.
- Do not move or lift this product with the baby inside it.
- Never let the child sleep in this product. This product does not replace a cot or a crib. Should the child fall asleep, then it should be placed in a suitable cot or crib.
- Do not use the product if any components are broken or missing.
WARNING:
- Do not use accessories or replacement parts other than those approved by the manufacturer.
- Transformers used with the product are to be regularly examined for damage to the cord, plug, enclosure and other parts, and in the event of such damage, they shall not be used;
- The product shall only be used with the recommended transformer.
- WARNING: This product contains a coin/button battery. A coin/button battery can cause serious internal chemical burns if swallowed.
- WARNING: Dispose of used batteries immediately. Keep new and used batteries away from children. If you think batteries may have been swallowed or placed inside any part of the body, seek immediate medical attention.
- To prevent the risk of fire, never place the product near electrical appliances, gas cookers or other sources of intense heat
- Make sure that the fabric is always fitted correctly on the seat and backrest frame.
• Always keep children at a safe distance when opening and closing the swing to prevent injury risks
• Always use under the supervision of an adult. - Do not use the swing for more than one child at a time.
- Never use the product on soft surfaces such as beds, sofas, cushions, as the swing could fall over and cause suffocation.
- Never leave the swing on surfaces which are not perfectly level
- Do not allow other children to play unsupervised near the swing.
- Never use this swing to carry a child in motorized vehicles.
• Always check that all the components are fitted and assembled correctly. - Make sure the product is assembled properly before using it
- Periodically check for worn parts, loose screws, worn or frayed fabrics and immediately replace any damaged parts.
- Do not place the swing near windows or walls, where strings, curtains or other objects may be used by the child to climb out of the swing seat, and to prevent the risk of suffocation or choking.
- Do not place the swing near windows or walls, to prevent the child from affecting the stability of the swing, making it topple over, by pushing with his feet against the wall.
• Always check there are no objects that can interfere with or block the movement of the swing. - Do not attach toys or accessories onto the toy bar or directly on the product which have not been supplied by the manufacturer.
- Do not make changes that might affect the safety of the child.
- Remove the packaging and dispose of it safely
MAINTENANCE:
- The fabric may be cleaned by sponging lightly using warm water and a mild detergent.
- Plastic and metal parts may be sponged clean with warm water and a mild detergent.
- Never clean with abrasive, ammonia based, bleach based or spirit type cleaners. WARNING: The swing must only be switched ON and OFF by an adult.
SAFETY OF THE ELECTRICAL PARTS:
- WARNING: Batteries must only be replaced and fitted by an adult.
- WARNING: Batteries may leak acid or explode if thrown into a fire.
- WARNING: Always dispose of leaking batteries immediately: They can cause burns or their types of injuries.
- WARNING: Non-rechargeable batteries are not to be recharged; they might explode.
- WARNING: Do not leave the product out in the rain; water infiltrations will damage the electronic circuit.
- WARNING: Only use batteries which are equivalent to those recommended.
- WARNING: Batteries are to be inserted with the correct polarity.
- WARNING: Different types of batteries or new and used batteries are not to be mixed.
- WARNING: Exhausted batteries are to be removed from the product.
- WARNING: Do not short-circuit the battery terminals.
- WARNING: If the music console on the swing is not used for long periods of time, it is recommended to remove the batteries from their compartment.
- WARNING: Only use alkaline batteries of the same type or equivalent to the type recommended for the correct function of this product, for the remote control: CR2025 -3V; for the swing: C LR14 -1.5V; for the toys bar LR03 AAA - 1.5V.
- WARNING: The use of rechargeable batteries is not recommended as the product may not work properly.
- WARNING: Rechargeable batteries must only be recharged under adult supervision.
- WARNING: Rechargeable batteries must be removed from the product during recharging.
- WARNING: Remove the batteries from the product before disposing of the product.
- WARNING: Always keep batteries and tools out of the reach of children.
- Transformers used with the infant swing are to be regularly examined for damage to the cord, plug, enclosure and other parts, and in the event of such damage, they shall not be used.
- The infant swing shall only be used with the transformer provided or recommended by the manufacturer.
CHANGING THE BATTERIES:
To change the batteries, unscrew the lid of the function box with a star screwdriver, remove the spent batteries and place the new batteries correctly, ensuring the correct polarity, then replace the lid and screw down.
INFORMATION ON THE BATTERIES:
IMPORTANT: Keep batteries out of the reach of children.
RECOMMENDED BATTERIES:
- 1 battery CR2025 -3V, for remote control (included)
- 4 batteries C LR14 - 1,5V and 2 batteries LR03 AAA - 1.5V (not included).
- The use of alkaline batteries to be thrown away is recommended.
- The use of rechargeable batteries is not recommended for this product.
- Replace the batteries when the sound or swing does not work correctly.
PRECAUTIONS WITH THE BATTERIES:
• Always insert the batteries with the correct polarity.
- Do absolutely not throw the batteries in a fire. They can explode.
- The batteries can easily be swallowed by children and cause dangerous consequences.
- If you think that your child swallowed a battery, contact urgently a doctor.
- Never leave children to handle the batteries. Keep the batteries away from their reach.
- Never mix different types of batteries or new and old together. Always substitute all batteries at the same time.
- For safety, remove worn out batteries from the product.
- Never recharge normal not rechargeable or alkaline batteries. It could cause explosion or leakage of liquids.
- Remove the batteries if you won't use the product for long time.
- Do not short-circuit the power clamps.
- Do not throw batteries in the garbage, but bring them to collection points.
CORRECT DISPOSAL OF THIS PRODUCT (Waste Electrical & Electronic Equipment)
(Applicable in the European Union and other European countries with separate collection systems)
This marking shown on the product or its literature, indicates that it should not be disposed with other household wastes at the end of its working life.
To prevent possible harm to the environment or human health from uncontrolled waste disposal, please separate this from other types of wastes and recycle it responsibly to promote the sustainable reuse of material resources.
Household users should contact either the retailer where they purchased this product, or their local government office, for details of where and how they can take this item for environmentally safe recycling. This product should not be mixed with other commercial wastes for disposal.
If the waste material should be disposed of illegally, fines may be applied, as provided for by the Decree Law in force.
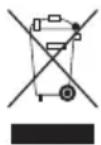
COMPLIANCE WITH EU REGULATION 2023/1542 AND SUBSEQUENT AMENDMENTS.
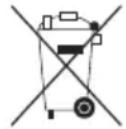
The crossed-out wheelie bin symbol on batteries or product packaging indicates that, at the end of their useful life, they must be treated separately from household waste and must not be disposed of as municipal waste. Instead, they must be taken to a separate collection centre or returned to the retailer when purchasing new, equivalent rechargeable and non-rechargeable batteries. Any chemical symbols Hg, Cd, Pb, placed under the crossed-out bin indicate the type of substance contained in the battery: Hg=Mercury, Cd=Cadmium, Pb=Lead. The user is responsible for delivering end-of-life batteries to the appropriate collection facilities in order to facilitate treatment and recycling.
Proper separate collection for the subsequent recycling, treatment and environmentally compatible disposal of used batteries helps to avoid possible negative effects on the environment and human health and promotes the recycling of the substances of which the batteries are composed. Improper disposal of the product by the user causes damage to the environment and human health. For more detailed information on the collection systems available, please contact your local waste disposal service or the shop where you purchased the product.
FORMAL GUARANTEE:
The contents of this document as stated below will come into effect as from 01.01.2005 and replace, on every account and in full, any previous message referring to the guarantee provided by Foppa Pedretti S.p.A.
FORMAL GUARANTEE
Foppa Pedretti S.p.A. the head office of which is located at n. 11 Via Volta, Grumello del Monte (Italy), guarantees directly to the Consumer that this brand new product is free of faults with regard to the materials, design and manufacture and that it complies with the
characteristics as declared by the manufacturer. This formal guarantee is valid in all Member Countries of the European Union and it neither excludes nor limits the Consumer's rights in accordance with mandatory measures provided for by the law with regard to the Retailer of the Product.
To take advantage of this formal guarantee, the Consumer must return the faulty product to the Retailer, presenting to the same the proof of purchase of the Product which must clearly show the Retailer's address, the date of purchase of the Product with the Retailer's stamp and signature and an indication of the Product itself or, alternatively, the receipt which must not have been altered and which must clearly show the same information as that referred to above.
The formal guarantee is valid for twelve (12) months from the date of purchase of the Product. During this period, Foppa Pedretti S.p.A. will repair or replace the faulty product, at its own discretion. The formal guarantee is granted to the end buyer of the Product (Consumer) and it neither excludes nor limits the mandatory rights of the Consumer as provided for by the law and/or the rights that the Consumer may have with regard to the Dealer/Retailer of the Product.
EXCLUSIONS TO THE FORMAL GUARANTEE.
The formal guarantee is excluded in the case of damage caused to the Product for the following reasons: if the product is used in a way that does not comply with the information contained in the use and assembly instruction sheet, if the product is knocked or dropped, if the Product is exposed to humidity or extreme heat or environmental conditions, or to sudden changes in the same, corrosion, oxidization, unauthorized alterations or repairs to the Product, repairs using unauthorised spare parts, improper use, improper maintenance or failure to carry out the same, improper maintenance compared to the information given on the use and assembly instruction sheet, incorrect assembly, accidents, damage caused by food or drink, damage caused by chemical products, cases of force majeure.
In any case, Foppa Pedretti S.p.A. declines all responsibility for damage caused to persons or to property, other than the Product, when such damage is caused by a failure to comply with the instructions/advice/warnings cont a ined in the manua I or, alternatively, in the use and assembly instruction sheet provided with each Product for the owner/user. (Purely as an example, in the case of a cot: “Check your baby constantly. Make sure that the sheets and blankets do not cover the baby’s head...”).
Furthermore, Foppa Pedretti S.p.A. declines all responsibility for damage to persons and to property when the breakage of its products is due to a deterioration in the components of the Product that are subject to wear. All the components of the Product made of plastic are considered to be components subject to wear.
COMPOSANTS:
natural_image
Diagram of a vehicle interior with red cables and a directional arrow indicating movement (no text or symbols)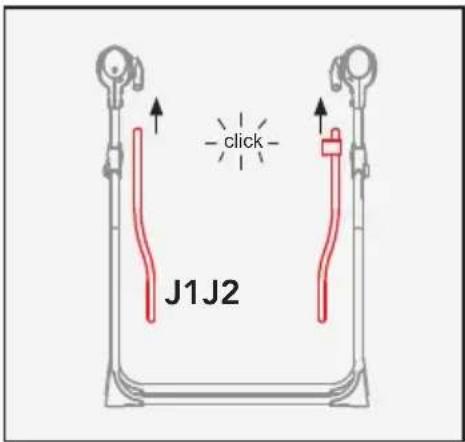
9A. Enlever les vis de fixation (a).
natural_image
Line drawing of a baby boom seat with red outline and arrow indicating movement (no text or symbols)natural_image
Line drawing of a baby in a baby boom chair with hands operating the seat (no text or symbols)2
3
natural_image
Line drawing of a mechanical device with a handle and base, no text or symbols presentnatural_image
Line drawing of a baby seat with a red circular head indicator and a blue circular button, showing three sequential steps (no text or symbols)MODE D'EMPLOI:
natural_image
Line drawing of a baby in a full-body seatbelt (no text or symbols)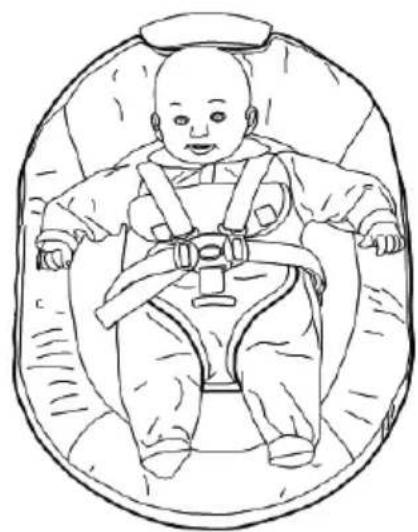
natural_image
Line drawing of a baby wearing a seatbelt and safety harness, enclosed in a circular frame (no text or symbols)LED VITESSE
LED TIMER
PRISE DE BRANCHEMENT DE L'ADAPTATEUR.
natural_image
Line drawing of a handheld device with a handle and control knob (no text or symbols). EMPLACEMENT PILES VIS DE SÉCURITÉ ANTI-OUVERTURE.
TELECOMMANDE:
INFORMATIONS SUR LES PILES:
GARANTIE CONVENTIONNELLE:
EXCLUSIONS DE LA GARANTIE CONVENTIONNELLE.
A. Sitz
B. Rohr Rückenlehne
C. Stützrohr Sitz
D. Querstange aus Metall
natural_image
Diagram of a vehicle interior with red cables and a directional arrow indicating movement (no text or symbols)natural_image
Line drawing of a baby boom seat with red outline and arrow indicating movement (no text or symbols)natural_image
Line drawing of a baby in a baby boom lift using a stand mixer (no text or symbols)2
3
natural_image
Line drawing of a manual manual tool with a handle and blade, no text or symbols presentnatural_image
Line drawing of a baby seat with a red circular head indicator and a directional arrow, showing three sequential steps (no text or symbols)VERWENDUNGSWEISE:
natural_image
Line drawing of a baby in a full-body seatbelt (no text or symbols)
natural_image
Line drawing of a baby in a seatbelt, no text or symbols presentANSCHLUSS FÜR TRANSFORMATORSTECKER.
WICHTIG:
natural_image
Line drawing of a handheld device with a handle and control knob (no text or symbols)BATTERIEFACH ÖFFNUNGSSCHUTZSCHRAUBE DES BATTERIEFACHS.
FERNBEDIENUNG:
natural_image
Diagram of a vehicle interior with red cables and a directional arrow indicating movement (no text or symbols)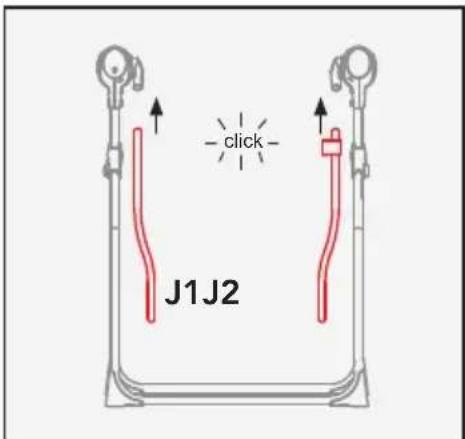
natural_image
Line drawing of a baby boom lift with red outline and arrow indicating seat (no text or symbols)natural_image
Line drawing of a baby in a baby boom lift using a stand (no text or symbols)2
3
natural_image
Line drawing of a manual tool with a handle and blade, no text or symbols presentnatural_image
Line drawing of a baby seat with a red circular head indicator and a blue circular button, showing three sequential steps (no text or symbols)MODO DE USO:
natural_image
Line drawing of a baby in a full-body seatbelt (no text or symbols)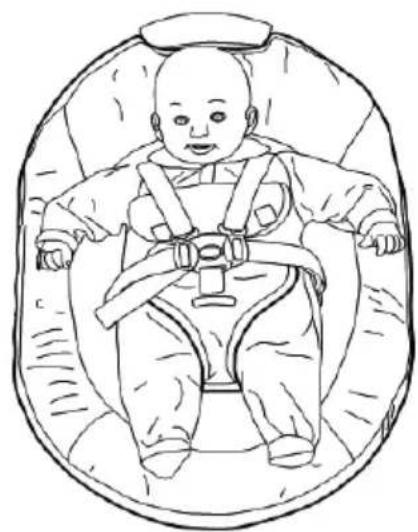
natural_image
Line drawing of a baby wearing a seatbelt and cap, seated inside a circular frame (no text or symbols)LED VELOCIDAD
LED TEMPORIZADOR
TOMA PARA ENCHUFE CONECTOR DEL TRANSFORMADOR
natural_image
Line drawing of a handheld device with a handle and control knob (no text or symbols)COMPARTIMENTO PARA LAS PILAS TORNILLOS DE SEGURIDAD ANTIAPERTURA DEL COMPARTIMENTO PARA LAS PILAS
TELEMANDO:
natural_image
Diagram of a vehicle interior with red cables and a directional arrow indicating movement (no text or symbols)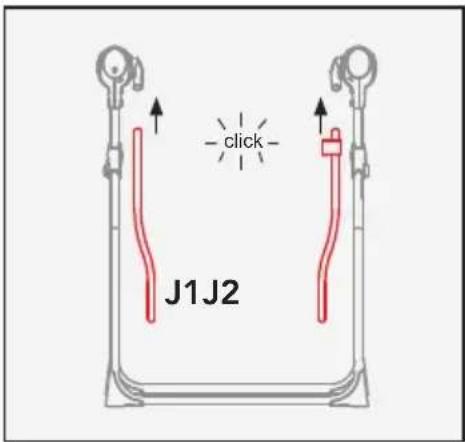
natural_image
Line drawing of a baby boom seat with red outline and arrow indicating movement (no text or symbols)natural_image
Line drawing of a baby in a baby boom lift using a stand (no text or symbols)2
3
natural_image
Line drawing of a manual tool with a handle and blade, no text or symbols presentnatural_image
Line drawing of a baby seat with a red circular head indicator and a directional arrow, showing three sequential steps (no text or symbols)MODO DE UTILIZAÇÃO:
natural_image
Line drawing of a baby in a full-body seatbelt (no text or symbols)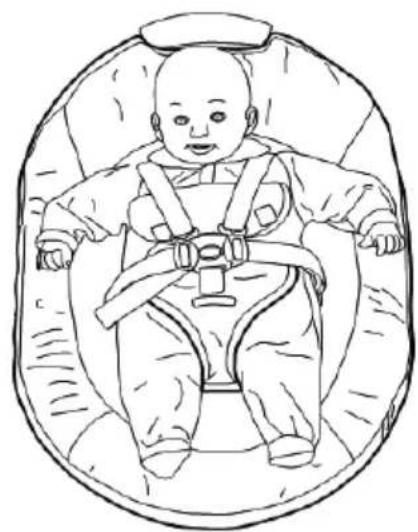
natural_image
Line drawing of a baby wearing a seatbelt and cap, seated inside a circular frame (no text or symbols)TOMADA PARA FICHA CONETOR DO TRANSFORMADOR.
IMPORTANTE:
natural_image
Line drawing of a handheld device with a speaker and antenna (no text or symbols)COMPARTIMENTO DAS PILHAS
PARAFUSO DE SEGURANÇA ANTIABERTURA DO COMPARTIMENTO DAS PILHAS.
CONTROLO REMOTO:
natural_image
Diagram of a vehicle interior with red wiring and a directional arrow indicating movement (no text or symbols)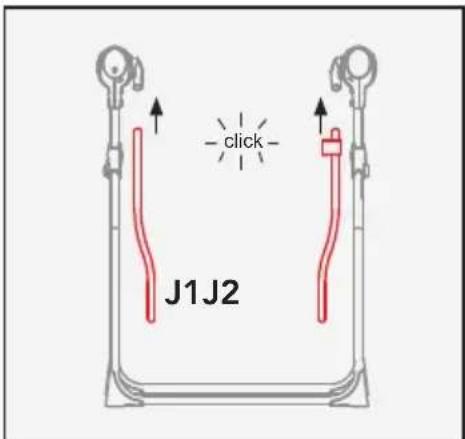
natural_image
Line drawing of a baby boom seat with red outline and arrow indicating movement (no text or symbols)natural_image
Line drawing of a baby in a baby boom lift using a stand mixer (no text or symbols)2
3
natural_image
Line drawing of a manual manual tool with a handle and blade, no text or symbols presentnatural_image
Line drawing of a baby seat with a red circular head indicator and a blue circular device, showing three sequential steps (no text or symbols)ΤΡΟΠΟΣ ΧΡΗΣΗΣ:
natural_image
Line drawing of a baby in a full-body seatbelt (no text or symbols)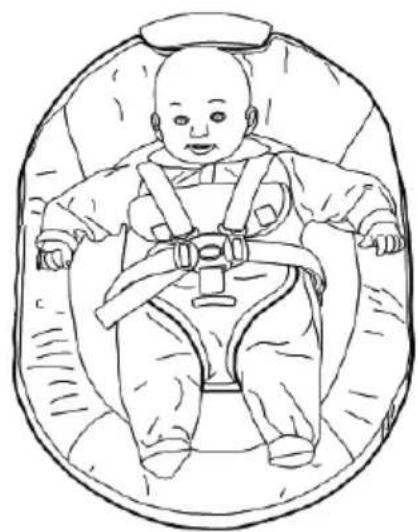
natural_image
Line drawing of a baby wearing a seatbelt and cap, seated inside a circular frame (no text or symbols)LED TAXYTHTAΣ
LED XPONODIAKOPTH
natural_image
Line drawing of a handheld device with a handle and control knob (no text or symbols)natural_image
Diagram of a car interior with red cables and a directional arrow indicating movement (no text or symbols)natural_image
Line drawing of a baby boom seat with red outline and arrow indicating movement (no text or symbols)natural_image
Line drawing of a baby in a baby boom chair with hands operating the seat (no text or symbols)2
3
natural_image
Line drawing of a manual chair with a handle and seat, no text or symbols presentnatural_image
Line drawing of a baby seat with a red circular head, showing the process from lifting to adjusting (no text or symbols)СПОСОБ ПРИМЕНЕНИЯ:
natural_image
Line drawing of a baby in a baby seatbelt, no text or symbols present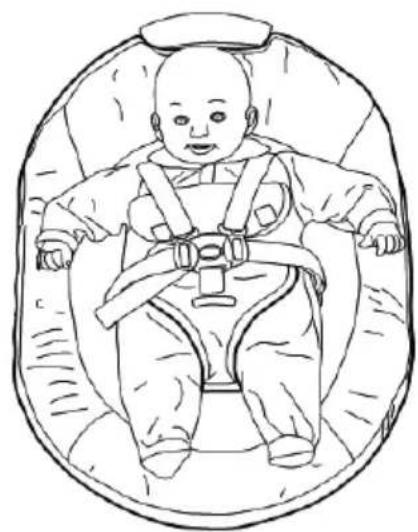
natural_image
Line drawing of a baby wearing a seatbelt and cap, seated inside an oval frame (no text or symbols)natural_image
Line drawing of a handheld device with a handle and control knob (no text or symbols)БАТАРЕЙНЫЙ ОТДЕЛ
natural_image
Diagram of a vehicle interior with red cables and a directional arrow indicating movement (no text or symbols)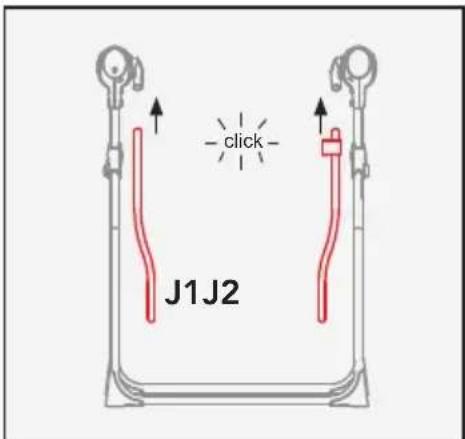
9A. Hiqni vidat fiksuese (a).
natural_image
Line drawing of a baby boom seat with red outline and arrow indicating movement (no text or symbols)natural_image
Line drawing of a baby in a baby boom lift using a stand mixer (no text or symbols)2
3

natural_image
Line drawing of a manual manual tool with a handle and blade, no text or symbols presentnatural_image
Line drawing of a baby seat with a red indicator light and a directional arrow, showing the same steps (no text or symbols)MËNYRA E PËRDORIMIT:

natural_image
Line drawing of a baby in a full-body seatbelt (no text or symbols)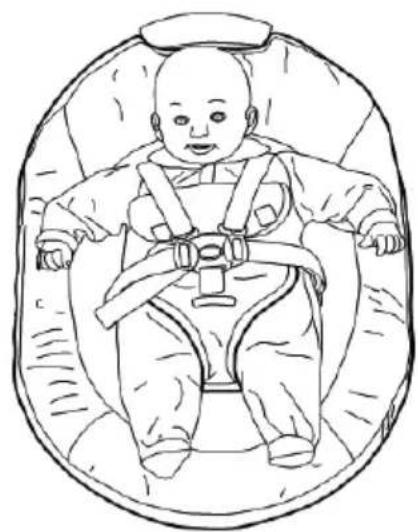
natural_image
Line drawing of a baby wearing a seatbelt and cap, seated inside a circular frame (no text or symbols)DRITA LED E SHPEJTËSISË
DRITA LED E KOHËMATËSIT
BUTONI I TINGUJVE TË NATYRËS
FOLEJA PËR SPINËN E KONTEKTORIT TË TRANSFORMATORIT.
E RËNDËSISHME:
natural_image
Line drawing of a handheld device with a handle and control knob (no text or symbols)FOLEJA E BATERIVE
VIDAT E SIGURISË KUNDËR HAPJES SË FOLESË SË BATERIVE.
TELEKOMANDA:
natural_image
Diagram of a vehicle interior with red cables and a directional arrow indicating movement (no text or symbols)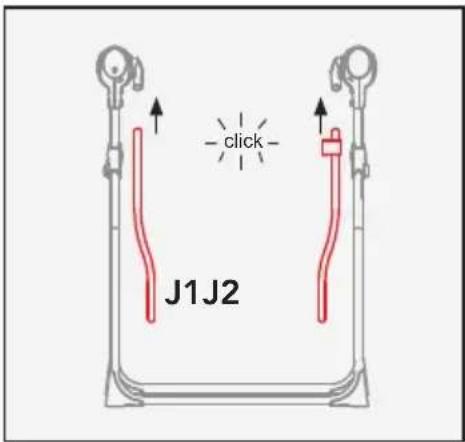
natural_image
Line drawing of a baby boom seat with red outline and arrow indicating movement (no text or symbols)natural_image
Line drawing of a baby in a baby boom lift using a stand (no text or symbols)2
3
natural_image
Line drawing of a manual tool with a handle and blade, no text or symbols presentnatural_image
Line drawing of a baby seat with a red circular head indicator and a blue circular button, showing three sequential steps (no text or symbols)طريقة الاستخدام
natural_image
Line drawing of a baby in a full-body seatbelt (no text or symbols)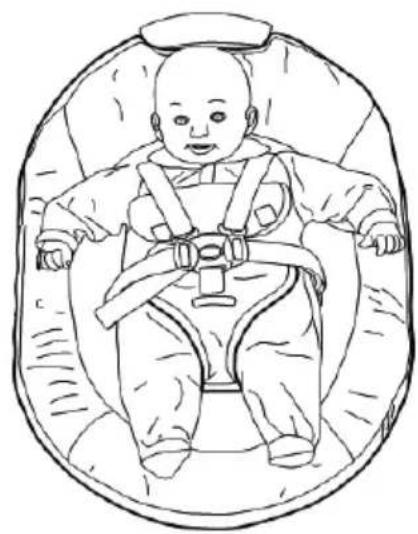
natural_image
Line drawing of a baby wearing a seatbelt and cap, seated inside a circular frame (no text or symbols)natural_image
Technical line drawing of a handheld device with no visible text or symbolsمكان وضع البطاريات



- MODO D'USO:
- PULSANTE SUONI NATURA
- IMPORTANTE:
- ASSEMBLY:
- IN USE:
- SWING CONTROL PLATE INSTRUCTIONS
- IMPORTANT:
- REMOTE CONTROL FUNCTIONS:
- WARNING:
- IMPORTANT! READ CAREFULLY AND KEEP FOR FUTURE REFERENCE.
- WARNING
- MAINTENANCE:
- SAFETY OF THE ELECTRICAL PARTS:
- CHANGING THE BATTERIES:
- INFORMATION ON THE BATTERIES:
- RECOMMENDED BATTERIES:
- PRECAUTIONS WITH THE BATTERIES:
- CORRECT DISPOSAL OF THIS PRODUCT (Waste Electrical & Electronic Equipment)
- (Applicable in the European Union and other European countries with separate collection systems)
- COMPLIANCE WITH EU REGULATION 2023/1542 AND SUBSEQUENT AMENDMENTS.
- FORMAL GUARANTEE:
- FORMAL GUARANTEE
- EXCLUSIONS TO THE FORMAL GUARANTEE.
- COMPOSANTS:
- MODE D'EMPLOI:
- TELECOMMANDE:
- INFORMATIONS SUR LES PILES:
- GARANTIE CONVENTIONNELLE:
- EXCLUSIONS DE LA GARANTIE CONVENTIONNELLE.
- VERWENDUNGSWEISE:
- FERNBEDIENUNG:
- MODO DE USO:
- TELEMANDO:
- MODO DE UTILIZAÇÃO:
- CONTROLO REMOTO:
- ΤΡΟΠΟΣ ΧΡΗΣΗΣ:
- СПОСОБ ПРИМЕНЕНИЯ:
- БАТАРЕЙНЫЙ ОТДЕЛ
- MËNYRA E PËRDORIMIT:
- BUTONI I TINGUJVE TË NATYRËS
- E RËNDËSISHME:
- FOLEJA E BATERIVE
- TELEKOMANDA:
- طريقة الاستخدام
Brand : Foppapedretti
Model : Carillon
Category : Baby bouncer