ZSM2001X - Grill Zelmer - Free user manual and instructions
Find the device manual for free ZSM2001X Zelmer in PDF.

| Product Type | Electric Grill |
| Model | ZSM2001X |
| Brand | Zelmer |
| Power Supply | 220-240 V ~ 50/60 Hz |
| Power Consumption | 2000 W |
| Dimensions (L x W x H) | 45 x 30 x 15 cm |
| Weight | 3.5 kg |
| Cooking Surface | Non-stick coated, approx. 30 x 25 cm |
| Temperature Control | Adjustable thermostat with indicator light |
| Functions | Grilling, searing, and browning |
| Grill Plates | Removable and dishwasher safe |
| Drip Tray | Removable for easy cleaning |
| Safety Features | Automatic shut-off, cool-touch handles, non-slip feet |
| Maintenance | Wipe with damp cloth; avoid abrasive cleaners |
| Spare Parts Availability | Replacement grill plates and drip trays available |
| Repairability | Modular design; professional repair recommended |
| Included Accessories | Grill plates, drip tray, user manual |
| Color | Black / Stainless steel accents |
| Certifications | CE, RoHS |
Frequently Asked Questions - ZSM2001X Zelmer
User questions about ZSM2001X Zelmer
0 question about this device. Answer the ones you know or ask your own.
Ask a new question about this device
Download the instructions for your Grill in PDF format for free! Find your manual ZSM2001X - Zelmer and take your electronic device back in hand. On this page are published all the documents necessary for the use of your device. ZSM2001X by Zelmer.
USER MANUAL ZSM2001X Zelmer
natural_image
Black and silver photo of a Zeimer grater with handle and control buttons (no visible text or symbols)PL INSTRUKCJA UŻYTKOWANIA
OPIEKACZ DO KANAPEK 3–5
CZ NÁVOD K POUŽITÍ
SENDVIČOVAČ 6–8
SK NÁVOD NA OBSLUHU
SENDVIČOVAČ 9–11
HU HASZNÁLATI UTASÍTÁS
SZENDVICSSÜTŐ 12–14
RO INSTRUCTIUNI DE UTILIZARE
APARAT PENTRU
SANDVICIURI 15–17
ИНСТРУКЦИЯ ПО ЭКСПЛУАТАЦИИ
СЭНДВИЧ-ТОСТЕР 18–20
BG ИНСТРУКЦИЯ ЗА УПОТРЕБА
УРЕД ЗА САНДВИЧИ 21–23
UA ІНСТРУКЦІЯ З КОРИСТУВАННЯ
ТОСТЕР ДЛЯ БУТЕРБРОДІВ 24–26
EN USER MANUAL
SANDWICH MAKER 27–29
A
B
natural_image
Person holding a black flatbread grill with open lid and internal compartments (no text or symbols visible)
natural_image
Close-up of a hand pressing down on a black appliance with a close-up inset showing the handle (no text or symbols visible)》

natural_image
Hand holding a black plug connected to an electrical outlet, with a magnified inset showing two colored buttons (red and green) inside a device.
natural_image
Close-up of a Zeimer device with two glossy oval buttons (red and green) on a black surface, no visible text or symbols beyond branding.》
natural_image
Close-up of hands installing or adjusting a black plastic bag with a magnified inset showing the interior detail (no text or symbols visible)》
natural_image
Hand placing a sandwich into a black griddle (no text or symbols visible)
natural_image
Close-up of a hand pressing down on a black robotic vacuum cleaner with a magnified inset showing the handle (no text or symbols visible)》
natural_image
Close-up of hands installing a black griddle or grater piece with a magnified inset showing the detail (no text or symbols visible)[Non-Text]
natural_image
Hand inserting a plug into a black plastic fuel pump plug, next to an electrical outlet (no text or symbols visible)PL
Szanowni Klienci!
Congratulations on your choice of our appliance, and welcome among the users of Zelmer products.
Please read this instruction manual carefully. Pay special attention to important safety instructions. Keep this instruction manual for future reference.
Safety precautions
Read this entire manual carefully before appliance.

DANGER! / WARNING!
Risk of injury
• Always use the appliance on a and stable work surface.
- Do not operate the appliance, when you find the supplying cord damaged or when the casing or heating plates are visibly damaged. Check the appliance visually before each operation.
- If the supply cord is damaged, it must be replaced by the manufacturer, its service agent or similarly qualified persons in order to avoid a hazard.
- The appliance can be repaired by qualified staff only. Incorrectly performed repair may cause serious hazard to the user. In case of any defects, it is advised to return the appliance to an authorised service facility.
- Do not touch hot surfaces. Handle with care as the appliance may generate hot steam when operating. Risk of burns!
- Never immerse the sandwich maker (or any part of it), supply cord and/or plug in water or any other liquid to avoid the risk of electric shock.
- This appliance can be used by children aged from 8 years and
above and persons with reduced physical, sensory or mental capabilities or lack of experience and knowledge if they have been given supervision or instruction concerning use of the appliance in a safe way and understand the hazards involved. Children shall not play with the appliance. Cleaning and user maintenance shall not be made by children unless they are older than 8 and supervised.
dry • Keep the appliance and its cord out of reach of children less than 8 years.
- When not in use and/or before cleaning, unplug the appliance from the socket and allow it to cool down.
- Do not cover the sandwich maker with or put into it packaging made of metal foil or other materials, as it involves a risk of electric shock or fire.
- The temperature of accessible surfaces may be high when the appliance is operating. Do not touch
the surface marked with the symbol.


WARNING!
Risk of property damage
The appliance must be plugged only to an alternating current socket with power corresponding to the power stated on the name plate of the appliance.
Never unplug or move the appliance by pulling the supply cord.
Do not drag the supply cord over sharp edges. Do not let it bend.
Never let the supply cord hang over sharp edges of a table or worktop. Do not let it touch hot surfaces or be knotted.
The appliance is not intended to be operated by means of an external timer or separate remote-control system.
Never leave the appliance unattended when in use as bread may burn.
It is best to remove toasted bread with wooden, dull-edged utensils. Metallic objects such as knives, forks, etc. may damage cooking plates.
Never place the appliance on or near gas or electric cookers or in places where it might touch a hot oven or microwave.
Never cover the appliance when it is hot or connected to the mains supply.

Product information and tips on its use
The appliance is intended solely for household use, indoors.
Technical data
The technical parameters are given on the data plate of the product.
This device complies with Commission Regulation (EC) no. 1275/2008 on eco-design requirements.
Characteristics of the appliance
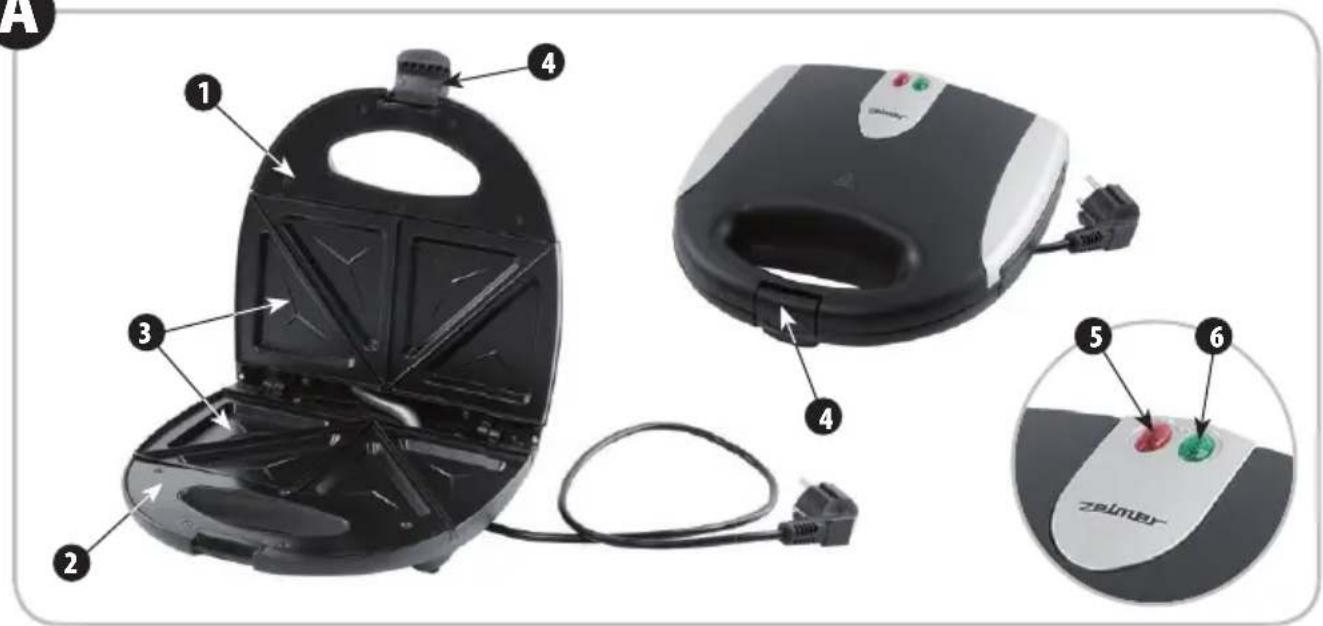
With the sandwich maker you will be able to toast sandwiches with filling quickly. The sandwich maker allows you to cook one or two slices of bread for toasting at the same time. The cooking plates are divided into four triangular zones and covered with a specially designed layer to prevent the sandwiches from sticking to the cooking plate. The sandwich maker has two indicators:
– red: the red light indicates that the appliance has been connected to the mains supply,
– green: you can use the appliance for toasting now.
Features of your sandwich maker

1
Upper lid
2
Lower lid
3
Cooking plates
4
Catch
5
Red indicator
6
Green indicator
Before using for the first time
Remove your sandwich maker from the packaging.
Make sure that the voltage shown on the rating plate of the appliance corresponds to that in the mains supply.
Clean the inside of the sandwich maker with a slightly damp cloth or paper towel.
Brush the cooking zones with a small amount of oil or butter.
Pre-heat the sandwich maker for about 5 minutes with the lid open to remove any remnants originating from the manufacturing process.

en using the sandwich maker for the first time, with the cooking zones getting hotte you may notice a fine smoke haze. It dangerous nor is it a sign that your appliance is defective. The appliance should cease to emit the haze after several cooking cycles.
Remove the plug from the mains socket, and allow the sandwich maker to cool down fully.
When the appliance has cooled down, wipe the remnants of oil away from the cooking plates with paper towel.
How to use and how your sandwich maker works

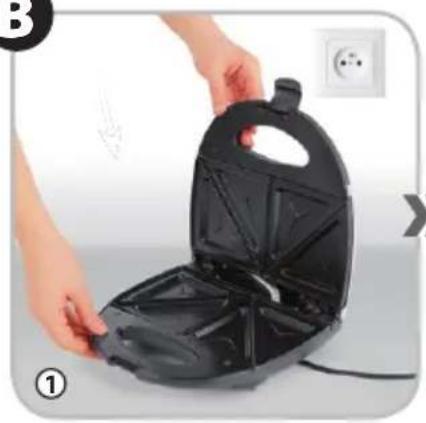
① Place your sandwich maker on a dry, even surface near the mains socket.
② Close and latch the toaster.
③ Plug the appliance into the mains socket. The red light will come On.
④ Wait for about 3-4 minutes for the green indicator to illuminate. The green light shows that the cooking plates have reached the correct cooking temperature.

e green indicator will cycle On and Off. This is a sign showing that the correct cooking temperature is maintained.

get golden brown sandwiches, spread the outside of bread with butter.
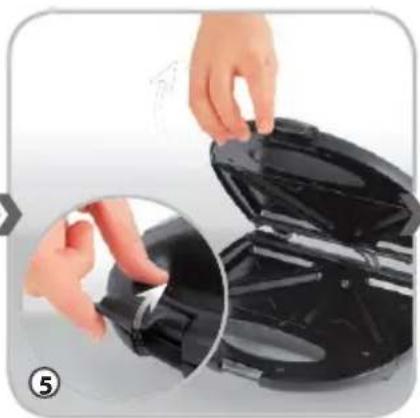
⑤ Unlatch and open the toaster.
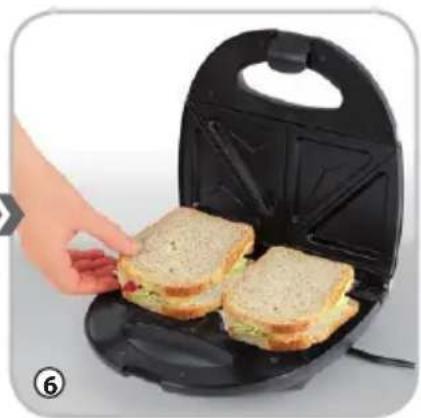
⑥ Place sandwiches on the lower cooking plate.
⑦ Close the lid carefully. If necessary, use a wooden spatula to hold the sandwiches in place. If you cannot close the lid properly, it means that the sandwiches are overfilled, and you need to remove some of the filling.

not force the lid down. This can dama your sandwich maker.

Testing time depends on your taste and the type of bread. Sandwiches are usually toasted for ca. 3-8 minutes. You can unlatch and open the lid to decide if you still want to toast your sandwiches.

careful. The appliance may generate hot steam when operating. The hot steam may also escape when you open the lid. Risk of burns!
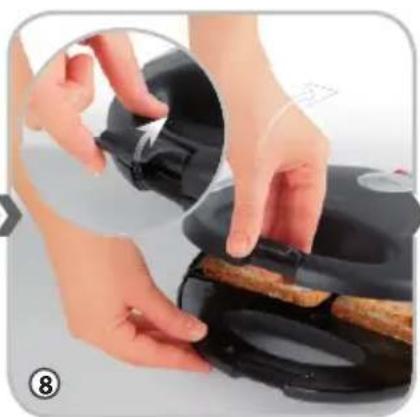
⑧ Unlatch and open the lid.
Remove the toasted sandwiches.

e a wooden spatula to remove sandwiches and remnants from the sandwich maker. Sharp and/or metallic objects may damage the cooking plates.

e cooking plates are hot. Be very careful to avoid burns.
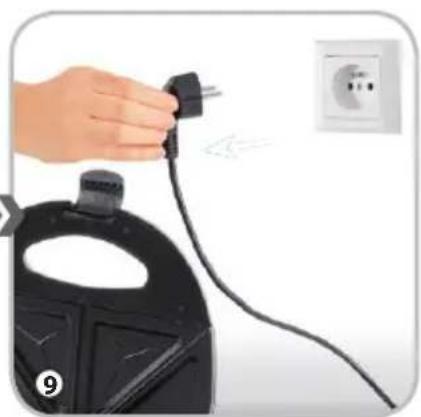
⑨ When you have finished the toasting, switch the appliance off, and allow it to cool down fully. Remove the plug from the mains socket to switch the appliance off.

ortly after the toasting, the filling may still be hot. When eating, take special care to avoid the risk of burns.
Cleaning and maintenance of sandwich maker
Your sandwich maker does not require any specific maintenance.
Keep and store the sandwich maker clean, as it has contact with food.
Unplug the appliance from the mains socket before cleaning, and allow it to cool down fully.
Wipe your sandwich maker with a soft, slightly damp cloth, and then dry it with a soft, clean cloth.
Do not use cleaners that may scratch or damage external surfaces and a protective layer of the heating plates.
Remove crumbs and remnants from the plates after each use, and then wipe the plates with paper towel. The paper towel will absorb the grease accumulated during the cooking.
Ecology – Environment protection
Each user can protect the natural environment. It is neither difficult nor expensive.
In order to do it: put the cardboard packing into recycling paper container; put the polyethylene (PE) bags into container for plastic.
When worn out, dispose the appliance to particular disposal centre, because of the dangerous elements of this appliance, which can be hazardous for natural environment.

Do not dispose into the domestic waste disposal!
The manufacturer does not accept any liability for any damages resulting from unintended use or improper handling.
The manufacturer reserves his rights to modify the product any time in order to adjust it to law regulations, norms, directives, or due to construction, trade, aesthetic or other reasons, without notifying in advance.
Notes
Notes

natural_image
Close-up of a black rubber ring component with a cut section, shown in close-up (no text or symbols visible)
natural_image
Close-up of a mechanical component with a curved base and a small protrusion, no visible text or symbols