
Digi Lancetta - Iron Eta - Free user manual and instructions
Find the device manual for free Digi Lancetta Eta in PDF.


| Product Type | Steam Iron |
| Brand | Eta |
| Model | Digi Lancetta |
| Weight (without water) | Approximately 1.4 kg |
| Water Tank Capacity | 300 ml |
| Voltage | Specified on type label (e.g., 220-240 V) |
| Power Consumption | Specified on type label (e.g., 2000-2600 W) |
| Soleplate Material | Eloxium layer (hard, scratch-resistant) |
| Steam Functions | Dry ironing, steam ironing, vertical steaming, steam shock |
| Spray Function | Yes (additional spray for moistening) |
| Self-Cleaning System | SELF CLEAN function |
| Anti-Drip System | DRIP STOP (prevents water leakage at low temperature) |
| Anti-Calc System | ANTI CALC (permanent decalcification, no maintenance) |
| Auto Shut-Off | Yes, after 30 seconds horizontal, 10 minutes vertical |
| Temperature Control | Electronic with display, pre-set programs for fabrics |
| Programs | SYNTHETIC, SILK, WOOL, COTTON, MAX, PWR JEANS, STAND-BY |
| Accessories | Filling cup |
| Safety Features | Double-pole disconnection, auto shut-off, never immerse in water |
| Maintenance | Wipe with damp cloth; clean soleplate with SELF CLEAN monthly |
| Manufacturer | ETA a.s., Poličská 444, 539 01 Hlinsko, Czech Republic |
Frequently Asked Questions - Digi Lancetta Eta
User questions about Digi Lancetta Eta
0 question about this device. Answer the ones you know or ask your own.
Ask a new question about this device
Download the instructions for your Iron in PDF format for free! Find your manual Digi Lancetta - Eta and take your electronic device back in hand. On this page are published all the documents necessary for the use of your device. Digi Lancetta by Eta.
USER MANUAL Digi Lancetta Eta
natural_image
Black and white photo of a steam iron with a numbered label (7) in the top-left corner, no other text or symbols visible.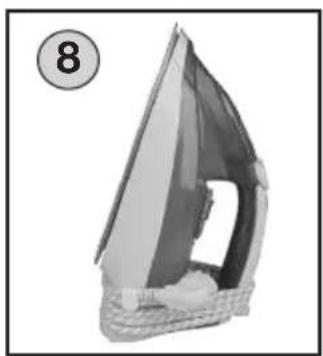
natural_image
3D rendered image of a sailboat or steamer with visible hull and side panel, labeled with number 8 (no text or symbols on the diagram itself)9
flowchart
graph TD
    A["PUR JEANS"] --> B["1X"]
    B --> C["MAX"]
    C --> D["1X"]
    D --> E["COTTON"]
    E --> F["1X"]
    F --> G["WOOL"]
    G --> H["1X"]
    H --> I["SILK"]
    I --> J["1X"]
    J --> K["ACRYLATE"]
    K --> L["1X"]
    L --> M["SYNTHETI"]
    M --> N["1X"]
    N --> O["STAND-BY"]

    style A fill:#f9f,stroke:#333
    style O fill:#f9f,stroke:#333

    %% Temperature labels (TEMP.OK) are not present in the diagram; actual process flow is implied by arrows on the left and right sides of the diagram.
flowchart
graph TD
    A["STAND-BY"] --> B["ETA"]
    B --> C["TEMP.OK SYNTHETI"]
    C --> D["TEMP.OK ACRYLATE"]
    D --> E["TEMP.OK SILK"]
    E --> F["TEMP.OK WOOL"]
    F --> G["TEMP.OK COTTON"]
    G --> H["TEMP.OK MAX"]
    H --> I["TEMP.OK PWR-JEANS"]
NÁVOD K OBSLUZE
TEMP. OK
The ironing plate has the Eloxium layer that ensures extreme hardness of the coating, it is resistant to scratching and it keeps its excellent gliding property permanently. The iron enables both dry ironing and steam ironing. According to the type it is equipped with elements increasing comfort of use – intensive/vertical steaming, sprinkling device, safety electronics and systems DRIP STOP, SELF CLEAN, ANTI CALC. The handle of the iron is closed and it is adapted for ironing with the right and the left hand. At the back side the handle forms a support that enables putting it in the rest position. Handling while ironing is easier thanks to a swing-out power cable terminal. The electronics automatically switch the heating element on and off during ironing that maintains the set temperature.
Regulation of the ironing plate temperature takes place in pre-set steps.
I. SAFETY WARNING
- Before the first use, read all the instructions for use carefully, look at the picture and keep the instructions for later use. Consider the instructions for use as a part of the appliance and pass them on to any other user of the appliance.
- Check whether the data on the type label correspond with the voltage in your socket. The power cord plug has to be connected to the properly connected and grounded socket according to the Czech national standard.
- Never use the appliance if its power cord or plug is damaged, if it does not work properly, if it fell down and was damaged and is leaking. In this case take the appliance to a special service to check its safety and proper function.
- Do not insert to or take out the plug from a socket with wet hands and do not pull the power cord!
- Do not leave the iron plugged in power supply without supervision!
- The appliance is not intended for use by people (including children) whose physical, sensual or mental inability or lack of experience and knowledge prevents safe use of the appliance if they are not supervised or if they have not been instructed regarding the use of the appliance by a person responsible for their safety. Children should be supervised to make sure they will not be playing with the appliance.
- The appliance is intended for use in households only and for similar use! It is not designed for commercial use!
- After finishing work, always disconnect the appliance from power supply by taking the connector of the power cord out of the electric socket.
- In the case of unexpected power blackout, disconnect the appliance from the electric power by unplugging it from the electric socket. If you let the appliance plugged in the electric power, it will go to the stand-by state after restoration of the power supply.
- Never immerse the appliance into water (even its parts)!
- Do not place the iron in such a way that could represent harm (e.g. fire, burn and scalding).
- Use and place the iron on a stable surface.
- When putting the iron on a stand, make sure that the surface that the stand is placed on is stable.

- Due to production tests, the internal iron container can be misted up. Do not consider it to be a defect when purchasing the iron.
- When switching the iron for the first time, set the highest temperature and let the iron in operation on for at least 10 minutes without water. There can be light fume coming out of the iron which is caused by burning of the used lubricants and binding agents in the steam chamber.
- When filling in the container with utility water for the first time, we recommend letting out the steam from the entire container outside the ironed fabric.
- Never pour water to the container that was produced by defrosting of a freezer, water condensed in a dryer, air-conditioning or dehumidifying units, certain types of mineral waters, water enriched with alcohol, perfume and preparations for treatment and for stiffening fabrics (e.g. starch, fabric conditioners) or vinegar, decalcifying agents, softeners or other chemical substances.
- Whenever you fill the container with water during ironing and empty the container after ironing, unplug the iron from the electric power.
- When ironing, be very careful, tilting of the iron may result in the hot water pouring out of the filling hole.
- Make sure that the power cord does not hang over the edge of the working table where children could reach it.
- Make sure that the power cord is always dry and it is not damaged.
- The power cord must not be damaged with sharp or hot objects, open fire, it must not be sunk into water or bent over sharp edges.
- The appliance is portable and it is equipped with a movable connector with a plug which ensures double-pole disconnection from power supply.
- If you need to use the extension cord, it has to be uncorrupted and it has to comply with the valid standards.
- If the power cord of the appliance is corrupted, it has to be replaced by the producer, its service technician or a similarly qualified person so as to prevent dangerous situations.
- Never use the appliance for any other purpose than for that described in these instructions for use!
- The producer is not responsible for damage caused by improper use of the appliance (e. g. burning, scalding, fire, clothes damage, scratching and contamination of the ironing plate) and its guarantee for the appliance does not apply to situations when the safety warnings above have not been complied with.
II. DESCRIPTION OF THE APPLIANCE (Fig. 1)
A – ironing plate
B – additional spray jet
C - filling hole lid
D – steaming regulator
E – additional spray button
F – steam shock button
G - display
H – program setting control
I – water container
J - SELF CLEAN button
K - rest board
L - space for power cord wind-up
M - power cord
N - filling cup
GB
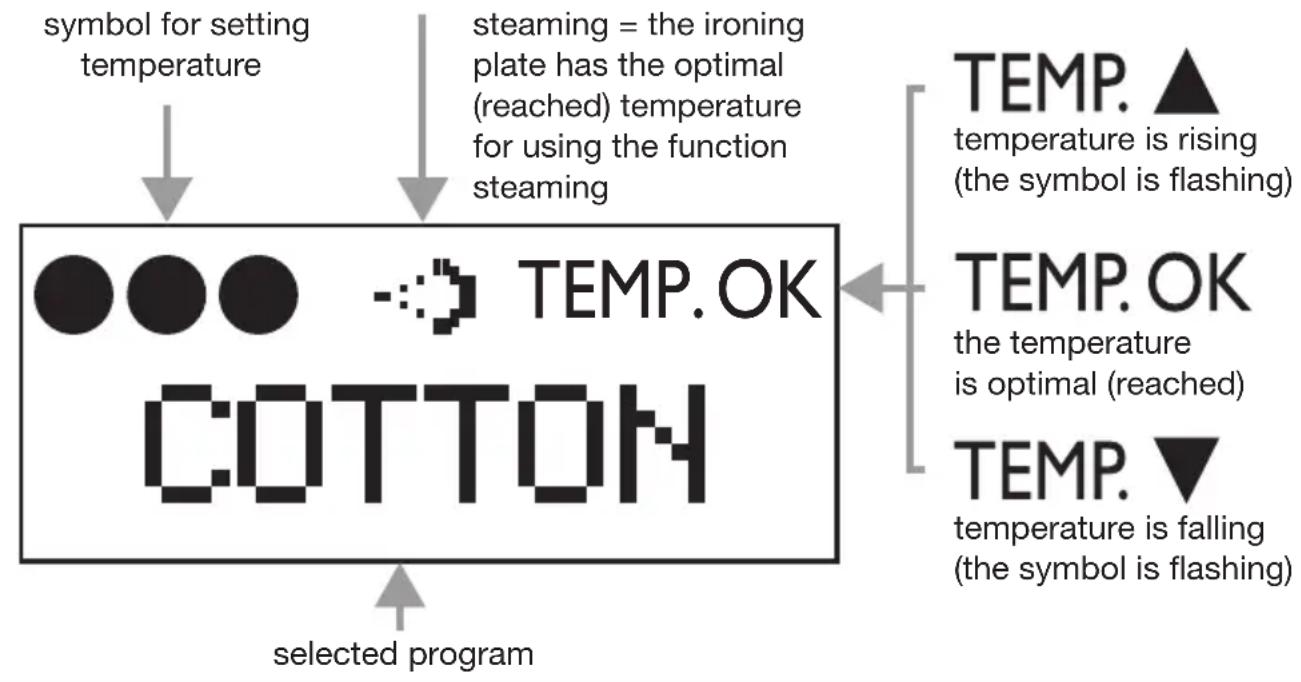
Description of information shown on the display
flowchart
graph TD
    A["symbol for setting temperature"] --> B["● ● ●"]
    B --> C["steaming = the ironing plate has the optimal (reached) temperature for using the function steaming"]
    C --> D["TEMP. OK"]
    D --> E["● ● ●"]
    E --> F["TEMP. OK"]
    F --> G["● ● ●"]
    G --> H["steaming = the ironing plate has the optimal (reached) temperature for using the function steaming"]
    H --> I["TEMP. ↑"]
    I --> J["● ● ●"]
    J --> K["steaming = the ironing plate has the optimal (reached) temperature for using the function steaming"]
    K --> L["TEMP. OK"]
    L --> M["● ● ●"]
    M --> N["steaming = the ironing plate has the optimal (reached) temperature for using the function steaming"]
    N --> O["TEMP. ↓"]
    O --> P["● ● ●"]
    P --> Q["steaming = the ironing plate has the optimal (reached) temperature for using the function steaming"]
    Q --> R["TEMP. OK"]
    R --> S["● ● ●"]
    S --> T["steaming = the ironing plate has the optimal (reached) temperature for using the function steaming"]
    T --> U["TEMP. OK"]
    U --> V["● ● ●"]
    V --> W["steaming = the ironing plate has the optimal (reached) temperature for using the function steaming"]
    W --> X["TEMP. OK"]
    X --> Y["● ● ●"]
    Y --> Z["steaming = the ironing plate has the optimal (reached) temperature for using the function steaming"]
    Z --> AA["TEMP. OK"]
    AA --> AB["● ● ●"]
    AB --> AC["steaming = the ironing plate has the optimal (reached) temperature for using the function steaming"]
    AC --> AD["TEMP. OK"]
    AD --> AE["● ● ●"]
    AE --> AF["steaming = the ironing plate has the optimal (reached) temperature for using the function steaming"]
    AF --> AG["TEMP. OK"]
    AG --> AH["● ● ●"]
    AH --> AI["steaming = the ironing plate has the optimal (reached) temperature for using the function steaming"]
    AI --> AJ["TEMP. OK"]
    AJ --> AK["● ● ●"]
    AK --> AL["steaming = the ironing plate has the optimal (reached) temperature for using the function steaming"]
    AL --> AM["TEMP. OK"]
    AM --> AN["● ● ●"]
    AN --> AO["steaming = the ironing plate has the optimal (reached) temperature for using the function steaming"]
    AO --> AP["TEMP. OK"]
    AP --> AQ["● ● ●"]
    AQ --> AR["steaming = the ironing plate has the optimal (reached) temperature for using the function steaming"]
    AR --> AS["TEMP. OK"]
    AS --> AT["● ● ●"]
    AT --> AU["steaming = the ironing plate has the optimal (reached) temperature for using the function steaming"]
    AU --> AV["TEMP. OK"]
    AV --> AW["● ● ●"]
    AW --> AX["steaming = the ironing plate has the optimal (reached) temperature for using the function steaming"]
    AX --> AY["TEMP. OK"]
    AY --> AZ["● ● ●"]
    AZ --> BA["steaming = the ironing plate has the optimal (reached) temperature for using the function steaming"]
    BA --> BB["TEMP. OK"]
    BB --> BC["● ● ●"]
    BC --> BD["steaming = the ironing plate has the optimal (reached) temperature for using the function steaming"]
    BD --> BE["TEMP. OK"]
    BE --> BF["● ● ●"]
    BF --> BG["steaming = the ironing plate has the optimal (reached) temperature for using the function steaming"]
    BG --> BH["TEMP. OK"]
    BH --> BI["● ● ●"]
    BI --> BJ["steaming = the ironing plate has the optimal (reached) temperature for using the function steaming"]
    BJ --> BK["TEMP. OK"]
    BK --> BL["● ● ●"]
    BL --> BM["steaming = the ironing plate has the optimal (reached) temperature for using the function steaming"]
    BK --> BN["TEMP. OK"]
    BN --> BO["● ● ●"]
    BO --> BP["steaming = the ironing plate has the optimal (reached) temperature for using the function steaming"]
    BP --> BQ["TEMP. OK"]
    BQ --> BR["● ● ●"]
    BR --> BS["steaming = the ironing plate has the optimal (reached) temperature for using the function steaming"]
    BS --> BT["TEMP. OK"]
    BT --> BU["● ● ●"]
    BU --> BV["steaming = the ironing plate has the optimal (reached) temperature for using the function steaming"]
    BV --> BW["TEMP. OK"]
    BW --> BX["● ● ●"]
    BX --> BY["steaming = the ironing plate has the optimal (reached) temperature for using the function steaming"]
    BX --> BZ["TEMP. OK"]
    BZ --> CA["● ● ●"]
    CA --> CB["steaming = the ironing plate has the optimal (reached) temperature for using the function steaming"]
    CB --> CC["TEMP. OK"]
    CC --> CD["● ● ●"]
    CD --> CE["steaming = the ironing plate has the optimal (reached) temperature for using the function steaming"]
    CE --> CF["TEMP. OK"]
    CF --> CG["● ● ●"]
    CG --> CH["steaming = the ironing plate has the optimal (reached) temperature for using the function steaming"]
    CH --> CI["TEMP. OK"]
    CI --> CJ["● ● ●"]
    CJ --> CK["steaming = the ironing plate has the optimal (reached) temperature for using the function steaming"]
    CK --> CL["TEMP. OK"]
III. INSTRUCTIONS FOR USE
Remove all the packing material and take out the iron with the accessories. Remove any labels, protective foils or covers from the ironing plate before the first use.
Ironing temperatures
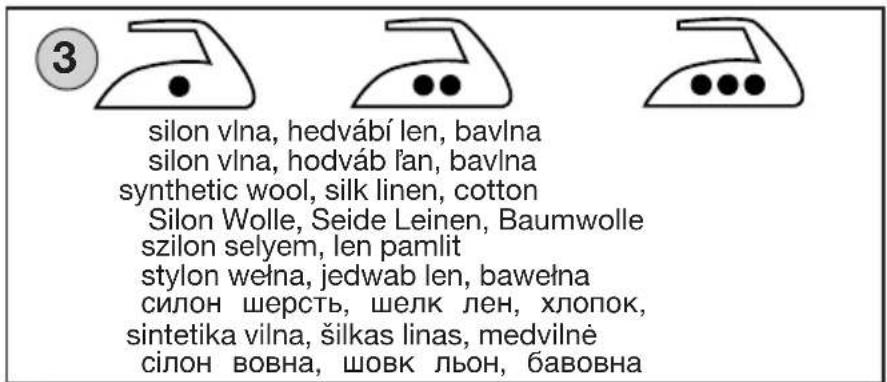
- Sort laundry and iron according to the instructions for treatment (e.g. manufacturer's recommendation - the label on clothes). If the instruction is missing and you know the material of the clothes, follow the table on picture 3. The table applies to basic materials only, not to possible decorations, material treatment, etc.
- Start to iron from the lowest temperatures to higher temperatures. If clothes consist of e.g. two and more materials or if they contain stringing, purls, embossing, stretch material, etc., always iron according to the material requiring the lower temperature only. If you do not know the material, find the suitable place that is not visible when wearing and try suitable temperature for ironing at the place.
- When ironing woolen fabrics, we recommend ironing on the back side of the fabric and you can iron virgin wool through additional cloth. Velvet and similar fabrics can be ironed in one direction (you will prevent creation of glossy areas).
- Steam ironing is not suitable for fabrics from synthetic and silk fibers (e.g. acrylon, nylon, polyamide or polyester).
- We recommend using soft textile permeable base materials for steam ironing.
- Make sure that the ironed fabric is tensed up properly so that steam does not leak to the sides.
- For the ironing plate to remain smooth, protect it from direct contact with sharp metal objects (e.g. zip fasteners, buttons, snap buttons, decorative objects).
Control

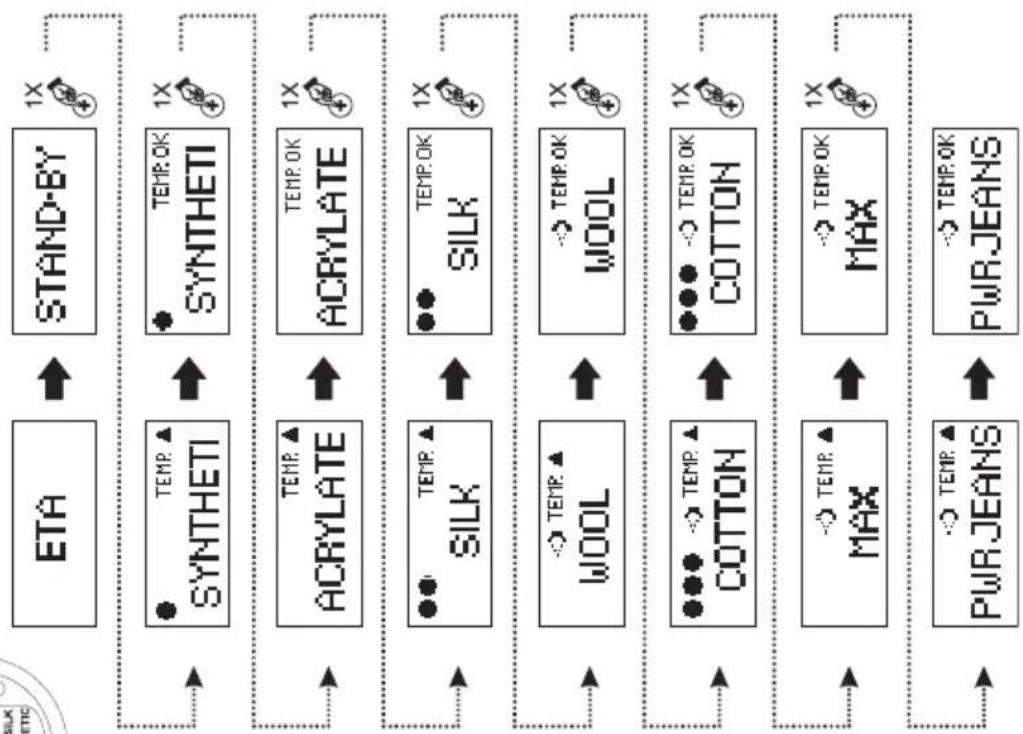
- Plug the power cord M to a socket. You will see the ETA sign on the display, then the iron is switched automatically to the stand-by regime and the STAND-BY sign is shown on the display.
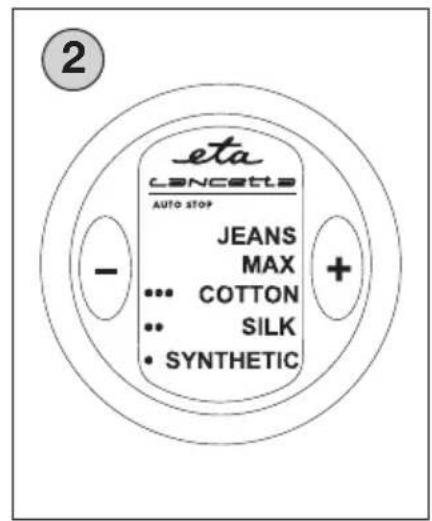
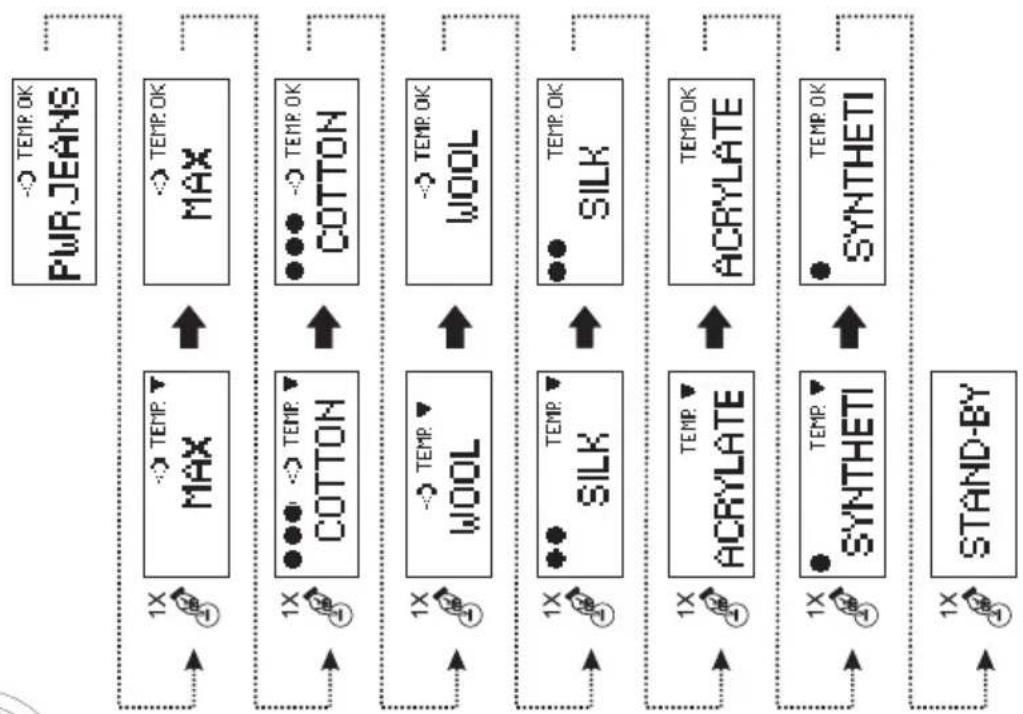
- Set the selected program (i.e. the fabric material) using the control.
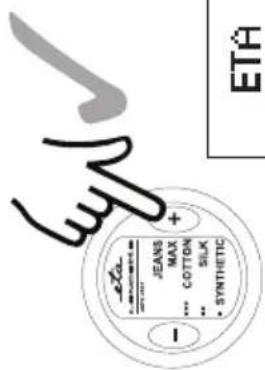
By pressing the control at the place marked with the + symbol you increase the temperature and by pressing the control at the place marked with the - symbol you reduce the temperature.
- The respective information is shown gradually on the display using signs and symbols (fig. 9).
- Increasing (▲) or reducing (▼) the temperature is signaled by a flashing symbol.
- Reaching the proper temperature is signaled by the TEMP.OK sign and a sound signal.
Sound signaling
- Every pushing of the control in requirement for setting the fabric material beyond the allowed pre-set range = "1 very short beep".
Note: when setting the STAND-BY program, every other pushing of the - control is without any effect, when setting the PWR JEANS program, every other pushing of the + control is without any effect.
- Every pushing of the control (i.e. change of the program) = "1 short beep".
- Reaching the temperature of the set program = "1 long beep".
- Activation of the safety function AUTO-STOP = "permanent beeping".
Ironing without steaming
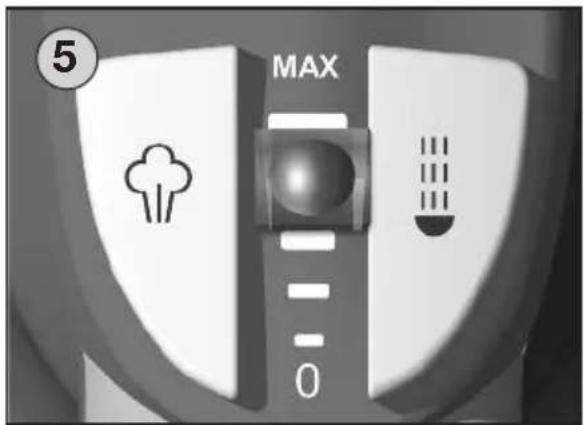
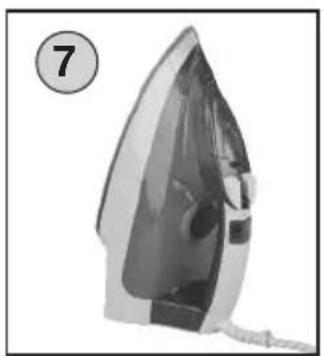
Put the iron to the rest position (fig. 7). Turn the steaming regulator D to the 0 position, steaming off (fig. 5) or pour out water from the container I. Plug the power cord M to a socket. Set the program on the display using control H according to the selected fabric material (Fig. 2). Reaching the required temperature is shown on the display and announced by sound signaling.
Warning
Control H (Fig. 2) is marked with international symbols that recommend the optimum ironing temperature and they are the same as marking on some types of laundry and textiles (Fig. 3). When the temperature is increased from the cold state or if the temperature is set from higher to lower, we recommend waiting for a while (see the information on the display and listen for sound signaling) due to stabilization of the ironing plate temperature.
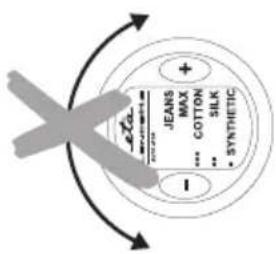
Never turn the control, set programs only by light pushing of the control at places marked with symbols plus (+) and minus (-).
Steam ironing
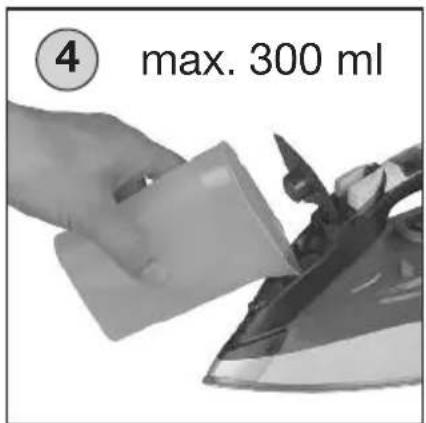
Hold the iron disconnected from power supply in your hand, turn steaming regulator D to 0 position (Fig. 5) and lift off cover C to open the filling container lid. Pour in water to container I using the enclosed cup N (Fig. 4) and close the filling hole lid in the opposite direction. Keep the position of the iron for pouring in water. Plug power cord M to a socket. Put the iron into the rest position (Fig. 7) and using control H set one of the programs enabling steaming on the display (i.e. WOOL, COTTON, MAX or PWR JEANS). When you hear a sound signal (indicating reached selected temperature), move regulator

D towards the handle. The more you move the regulator towards MAX, the bigger amount of outgoing steam there will be (Fig. 5). Place the iron to the rest position, atic creation of steam will stop (more steam may be going out for a short time).
Warning
- Be extra careful to avoid accidental pushing of the SELF CLEAN button.
- When water container I is filled with water over the permitted limit (max. 300 ml), steam can be created even in the rest position.
- At places with hard water we recommend diluting it with distilled water. You will get the information about water hardness at the water-management authorities, or at the local sanitary station. For water hardness > 15 °N we recommend filling the iron in the following ratio:
Water hardness Ratio of tap water : distilled water
medium 2:1
hard 1 : 1
very hard 1:2
Sprinkling appliance (additional spray)
It is used for moistening fabrics and it is effective in ironing extremely creased fabrics. It is activated by repeated pressing of additional spray button E. We do not recommend applying additional spray for fine fabrics (e.g. silk and synthetic) as the used water may stain the fabric.
Intensive steaming (steam shock)
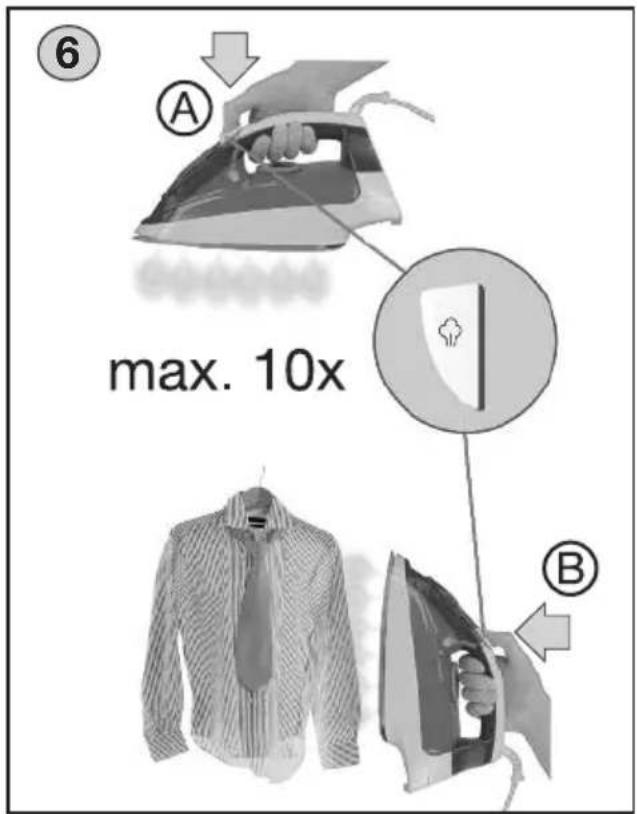
Use only if the steam ironing is insufficient. In this case press intensive steaming button F several times (Fig. 6A ≈ 2). Thus you will get additional steam except for the steam created by standard steaming.
Warning
When you press intensive steaming button F several times, water may drip from the ironing plate due to excess water in the steam chamber. Do not consider this as faulty operation.
VERTICAL system
It is intensive vertical steaming for steaming freely hanging textiles (e.g. hanging clothes, curtains, drapes). Using control H set one of the programs for steaming on the display (i.e. WOOL, COTTON, MAX or PWR JEANS). When you hear the sound signal, stretch the fabric slightly with one hand and move the iron vertically bottom-up (Fig. 6B ), at the same time push intensive steaming button F to achieve vertical steam surge. Do not hold the intensive steaming button pressed continuously and do not use it more than 10 times consecutively.
CAUTION
- Use the VERTICAL function only if the programs COTTON, MAX or PWR JEANS are set.
- Do not iron clothes that you or other people are wearing!
- Never direct steam flow to persons or animals!
DRIP STOP
The appliance prevents leaking water from the ironing plate when its temperature is insufficient.

Safety electronics (AUTO STOP)
The safety electronics ensure switching off heating of the ironing plate within 30 seconds when the iron is left without moving in the horizontal position and in the case of tilting of the iron on the side or within 10 minutes when it is left in the vertical position. The function of safety electronics is signaled by display flashing and by sound signal. The iron is switched on automatically when ironing is continued.
Self-cleaning system (SELF CLEAN)
Hold the iron disconnected from power supply in your hand, turn steaming regulator D to 0 position (Fig. 5) and lift off cover C to open the filling container lid. Pour water into container I using the enclosed cup N to fill half of it and close the filling hole lid (Fig. 4) by snapping it. Keep the position of the iron for pouring water in it. Plug power cord M into a socket. Put the iron to the rest position (Fig. 7) and set the PWR JEANS program on the display by control H. When you hear the sound signal (indicating reached selected temperature), disconnect the iron from the electric power. Hold the iron in the horizontal position over a sink. Press the SELF CLEAN button repeatedly (two to three times), each time for about 5 seconds. Then wait till water stops going out from the ironing plate. If the iron still contains a lot of impurities, repeat the procedure while pushing the intensive steaming button between individual pushing of the SELF-CLEAN button.
After completing the cleaning, plug the iron into the electric power, set the selected program and then iron a clean piece of cotton cloth so that the ironing plate is cleaned.
Clean the ironing plate using the SELF CLEAN function regularly (about once a month).
Storage
After finishing ironing, pour out the unused water from the container (be careful, it can be hot), or let the rest of the water evaporate and let the iron cool down. Then turn regulator D to 0 position (steam switched off). Wind power cord M over the back side of cover L and put the iron to the rest position (Fig. 8) out of reach of children and incapacitated persons.
IV. MAINTENANCE
Before every maintenance, unplug the iron from power supply by taking the fork of the power cord out of the socket! Do not use rough and aggressive detergents (e.g. sharp objects, peelers, pot scourers, caustic agents for cleaning or other solvents). Wipe the entire iron with a wet cloth in the cooled state and dry up. If brown film is created on the ironing plate (e.g. when ironing starched laundry), you can remove the film by a detergent containing fine sand. The iron is equipped with a permanent decalcification system ANTI CALC that does not require maintenance. But the system cannot prevent creation of calcareous sediments.
| Iron is not heated. Power supply not connected Check the cord, plug and the socket | ||
| Iron does not create steam container | is no water in the Pour water into the container | |
| Steaming regulator is Move the regulator into the steaming in 0 position position | ||
| Low temperature is set for Set a program by the control, during activating the DRIP-STOP which you can use steaming and wait till function the iron is heated for using it | ||
| Iron does not create steam shock | Low temperature is set for activating DRIP-STOP function | Set a program by the control, during which you can use steaming and wait till the iron is heated for using it |
| The function of steam shock was used too often during a short period of time | Let the iron heat and wait for a while before using the electric shock function again | |
| Sprinkling equipment (additional spray) does not sprinkle water | There is no water in the Pour water into the container | |
| The water system is aerated | Tighten finger on the additional spray jet hole and at the same time press the sprinkling device button several times | |
| Water is dripping from the ironing plate | The lid of the pouring hole of the container is not closed properly. | Close the pouring hole lid |
| Low temperature is set | Set a program by the control, during which you can use steaming and wait till the iron is heated for using it | |
| The steam shock function was used when temperature below ●●● was set | Set the program COTTON, MAX or PWR JEANS by the control | |
| The SELF CLEAN button was pressed during ironing function | Do not use the SELF CLEAN GB | |
| After finishing ironing, the iron was put into the horizontal position and the steaming iron regulator is not in 0 position | Move the steaming regulator to 0 position, empty the container and put the into the rest position | |
| Flakes and other Contrary impurities are peeled off undiluted water is used with the ironing plate excessive | to recommendation Use water diluted with distilled water | |
| hardness >15 °N Clean the iron | using the SELF CLEAN function and steam shock | |
| Brown liquid is pouring Improper chemical agents Do not add any chemical agents into the out of the ironing plate were used for removing scale water container for removing scale | ||
| The ironing plate is dirty or it has brownish colour | High temperature is set | Set the program/temperature by the control that corresponds to the ironed material so that the material is not burned on the ironing plate |
| Laundry is not sufficiently rinsed and it contains residues of washing powder, softeneror starch | Clean the ironing plate (see Maintenance). Rinse the laundry properly. | |
| The ironing plate surface is scratched | The plate was in contact with sharp and hard objects while ironing | During ironing, avoid contact with metal objects containing sharp edges and do not put the iron on a metal base with sharp edges and protrusions |
VI. ENVIRONMENTAL PROTECTION
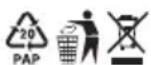
If the dimensions allow, there are labels of materials used for production of packing, components and accessories as well as their recycling on all parts of the appliance. The symbols specified on the product or in the accompanying documentation mean that the used electrical or electronic products must not be disposed of together with municipal waste. For proper disposal, hand them over at the special collection places where they will be accepted free of charge. Suitable disposal of the product can help to maintain

valuable natural resources and to prevent possible negative impacts on the environment and human health, which could be the possible consequences of improper waste disposal. Ask for more details at the local authorities or at a collection site.
Fines can be imposed for improper disposal of this type of waste in agreement with the national regulations.
If the appliance is to be put out of operation for good, after disconnecting it from power supply we recommend cutting off the power cord and in this way it will not be possible to use the appliance again.
More extensive maintenance or maintenance requiring intervention in the inner parts of the appliance must be carried out by professional service! Failure to comply with the instructions of the manufacturer will lead to expiration of the right to guarantee repair!
VII. TECHNICAL DATA
Voltage (V) specified on the type label
Input (W) specified on the type label
Water volume (volume ml) 300
Weight without water (kg) about 1,4
The product has received ES declaration of conformity according to Act as amended.
The product matches the requirements of the below statutory order as amended.
- Committee Regulation No. 2006/95/ES as amended, setting the technical requirements of the electrical appliance as low.
- Committee Regulation No. 2004/108/ES as amended, setting the technical requirements of products in terms of their electromagnetic compatibility.
The manufacturer reserves the right to make insignificant changes to the standard design that do not affect the function.
DO NOT IMMERSE IN WATER
TO AVOID DANGER OF SUFFOCATION, KEEP THIS PLASTIC BAG AWAY FROM BABIES AND CHILDREN. DO NOT USE THIS BAG IN CRIBS, BEDS, CARRIAGES OR PLAYPENS. THIS BAG IS NOT A TOY.
MANUFACTURER: ETA a.s., Poličská 444, 539 01 Hlinsko, Czech Republic.
BEDIENUNGSANLEITUNG
TO AVOID DANGER OF SUFFOCATION, KEEP THIS PLASTIC BAG AWAY FROM
BABIES AND CHILDREN. DO NOT USE THIS BAG IN CRIBS, BEDS, CARRIAGES OR PLAYPENS. THIS BAG IS NOT A TOY.
Guarantee certificate is valid only for Czech Republic and Slovak Republic.
- NÁVOD K OBSLUZE
- SAFETY WARNING
- DESCRIPTION OF THE APPLIANCE (Fig. 1)
- GB
- Description of information shown on the display
- INSTRUCTIONS FOR USE
- Ironing temperatures
- Control
- Sound signaling
- Ironing without steaming
- Warning
- Steam ironing
- Water hardness Ratio of tap water : distilled water
- Sprinkling appliance (additional spray)
- Intensive steaming (steam shock)
- VERTICAL system
- CAUTION
- DRIP STOP
- Safety electronics (AUTO STOP)
- Self-cleaning system (SELF CLEAN)
- Storage
- MAINTENANCE
- ENVIRONMENTAL PROTECTION
- TECHNICAL DATA
- BEDIENUNGSANLEITUNG
Brand : Eta
Model : Digi Lancetta
Category : Iron