
H-2780 - Measuring equipment Uline - Free user manual and instructions
Find the device manual for free H-2780 Uline in PDF.

User questions about H-2780 Uline
0 question about this device. Answer the ones you know or ask your own.
Ask a new question about this device
Download the instructions for your Measuring equipment in PDF format for free! Find your manual H-2780 - Uline and take your electronic device back in hand. On this page are published all the documents necessary for the use of your device. H-2780 by Uline.
USER MANUAL H-2780 Uline
natural_image
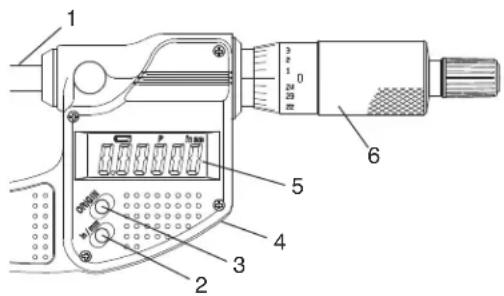
Line drawing of a micrometer caliper (no text or symbols)OVERVIEW OF CONTROLS
text_image
Technical diagram of a micrometer with labeled parts including scale and connector components| # DESCRIPTION |
| 1 Spindle |
| 2 Inch/Millimeter Select Button |
| 3 Origin Button |
| 4 Battery Compartment Cover (at rear) |
| 5 LCD Display |
| 6 Thimble |
SPECIFICATIONS
| Measuring Range 0 to 25 mm/0 to 1" | |
| Resolution 0.001 mm/0.00005" | |
| Instrumental Error (68°F) +/- 2μm (Excluding the quantizing error) | |
| Quantizing Error +/- 1 Count | |
| Measuring Force 5 to 10N | |
| Display LCD (6 digits and a minus sign) | |
| Power Supply | Silver Oxide Battery (SR44) |
| Battery Life Approx. 2.4 Years | |
| Operating Temperature Range | 41° to 104°F |
| Storage Temperature Range | 14° to 140°F |
| Standard Accessories | Wrench |
SAFETY
To ensure operator safety, use this instrument in conformance with the directions and specifications given in these instructions.

WARNING! The silver oxide battery used for this instrument contains an irritating substance. Should the liquid accidentally come into contact with eyes or skin, rinse with water immediately, then consult a physician. Should it get into the mouth, immediately rinse inside the mouth with water, then consult a physician.

WARNING! The tip of the contact point on this micrometer is sharp. Handle it with care, so as not to scratch yourself.
SAFETY CONTINUED

IMPORTANT! Do not disassemble. Do not modify this instrument. It may damage the instrument.
- Do not use and store the micrometer at sites where the temperature will change abruptly. Prior to use, thermally stabilize the micrometer at room temperature.
- Do not store the micrometer in a humid or dusty environment or use where the micrometer could be subjected to water and oil.
- Protect the micrometer from sudden impacts, including a drop.
• Always zero the micrometer prior to measurement. - Wipe off dust, cutting chips, and moisture from the micrometer before and after use.
-
To clean the micrometer, use a soft cloth soaked in a diluted neutral detergent. Do not use organic solvent (thinner, etc.). It may deform or damage the instrument.
-
Do not grip the display. It may damage the micrometer.
- The spindle is designed so that it cannot be removed from the inner sleeve. Do not move it past the upper limit of the measuring range, as it may damage the micrometer.
- Do not use an electric engraving pen or other such devices on the micrometer. It may damage the micrometer.
- Do not charge or disassemble the battery. Doing so may cause a short circuit.
- If the micrometer is not in use for more than three months, remove the battery. The battery could leak and cause damage to the micrometer.
- The warranty shall not apply if the product fails or is damaged as a result of wear and tear, including battery drain.
SETUP
INSTALLING THE BATTERY

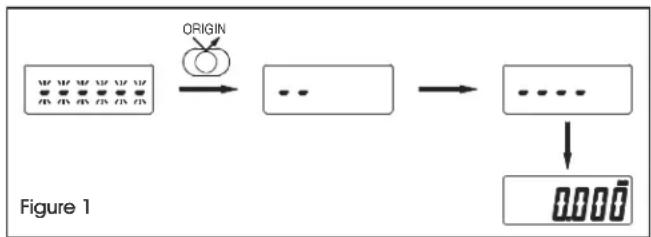
IMPORTANT! When the battery has been installed, first press the ORIGIN button to zero the micrometer, but do not rotate the thimble while the preset values are being set. (See Figure 1)
- Rotating the thimble at this time may result in the failure of setting default settings by the electrical unit. This will prevent obtaining a correct count. Reinstall the battery if you moved the thimble during this time.
flowchart
graph LR
    A["Input Image"] --> B{ORIGIN}
    B --> C["..."]
    C --> D["..."]
    D --> E["Output Image"]
    style A fill:#f9f,stroke:#333
    style E fill:#bbf,stroke:#333
- If the battery is removed then reinstalled, the origin (zero point) set is canceled. If this happens, set the origin again. (Refer to Zeroing the Micrometer on page 3)
- Use only an SR44 button-type silver oxide cell. The battery is used only for the purpose of checking the functions and performance of the micrometer. It may not satisfy the specified battery life.
- Carefully mount the battery cover so that the cover is completely engaged with the hole thread and the seal does not extend off the cover. Unless the battery cover and the seal are mounted properly, the micrometer may not display a correct value.
- When an abnormal display appears, such as an error display or count failure, the battery should be removed and then reinstalled.
- Follow the local ordinances or regulations for battery disposal.
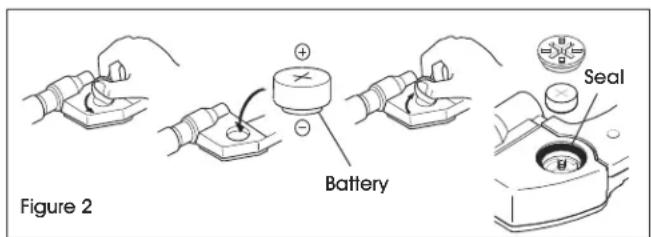
• Install the supplied battery. (See Figure 2)
text_image
Figure 2 Battery SealOPERATION
BUTTON FUNCTION
Press the ORIGIN button to zero the micrometer.

CAUTION! The LCD automatically turns off if it has been idle for 20 minutes. To turn on the LCD, turn the thimble.
IMPORTANT! When the battery has been installed, first press the ORIGIN button, but do not rotate the thimble while the preset values are being set. (See Figure 1) Rotating the thimble during this time may result in the failure of setting the default settings. Reinstall the battery if you moved the thimble during this time.
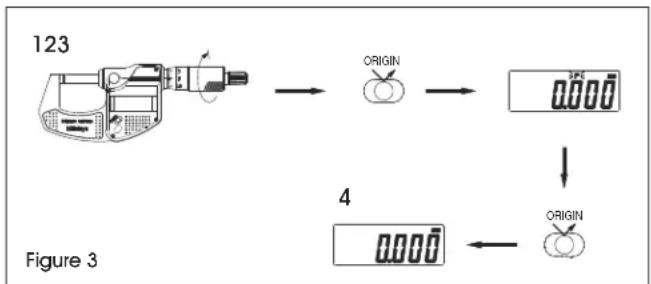
- Before measuring, check the origin (zero point) according to Figure 3.
- Remove dust/oil from the measuring faces before zeroing the micrometer.
- It is recommended that the micrometer is held in the same position and under the same conditions for both zeroing and actual measurement.
flowchart
graph TD
    A["123"] --> B["ORIGIN"]
    B --> C["ORIGIN"]
    C --> D["4"]
    D --> E["ORIGIN"]
    style A fill:#f9f,stroke:#333
    style B fill:#ccf,stroke:#333
    style C fill:#cfc,stroke:#333
    style D fill:#fcc,stroke:#333
    style E fill:#cff,stroke:#333
Zero the micrometer by following the procedure below: (See Figure 3)
- Turn the thimble to gently bring the spindle into contact with the anvil. Apply the rated measuring force using the ratchet stop/friction thimble.
- Press the ORIGIN button.
- If 0.000 is displayed and "P" is flashing, press the ORIGIN button again. The display value will not change while "P" is flashing.
- "P" disappears, indicating the micrometer has zeroed.

CAUTION! If the ORIGIN button is accidentally pressed during measurement, press the ZERO/ABS button to restore. Zero the micrometer again if measurement function is still not restored.
TROUBLESHOOTING
| ERROR MESSAGE OPERATING ISSUE RECOMMENDATIONS | ||
| The battery is depleted. Replace the battery. | ||
| Err-o5 | Error indicates when a counting error occurred due to noise or moving spindle too fast. | Reset the battery and zero the micrometer. |
| Err-S | Error indicates when a counting error occurred due to an error in the electronic unit during the initial setting of the micrometer. | Reset the battery and zero the micrometer. |
If the problem persists, or if the troubleshooting section does not resolve or describe your problem, contact Uline Customer Service at 1-800-295-5510.


