
H-12539 - Glue gun Uline - Free user manual and instructions
Find the device manual for free H-12539 Uline in PDF.

User questions about H-12539 Uline
0 question about this device. Answer the ones you know or ask your own.
Ask a new question about this device
Download the instructions for your Glue gun in PDF format for free! Find your manual H-12539 - Uline and take your electronic device back in hand. On this page are published all the documents necessary for the use of your device. H-12539 by Uline.
USER MANUAL H-12539 Uline
Read all safety precautions and instructions carefully before use.
- Do not touch the nozzle or molten glue with bare skin as they are hot. The operating temperature of this tool is approximately 380^ . Protective gloves should always be worn. Careless handling can cause skin burns.
- If molten glue comes into contact with the skin, immerse the affected area immediately in plenty of cold water. Seek medical advice if necessary.
- In addition to the safety instructions herein, any statutory regulations, local fire insurance regulations, or other generally valid regulations for accident prevention must be complied with when using this tool.
- Repairs should only be undertaken by competent personnel with the adequate electrical knowledge. Before proceeding with any maintenance or repair operation, disconnect the tool from the main electricity supply. For assistance, contact Uline Customer Service at 1-800-295-5510.

WARNING! To reduce the risk of fire or electric shock, do not use this tool in damp rooms. Do not expose to rain or moisture, and do not immerse in water. Store indoors.
- This tool is fitted with a polarized plug (one blade wider than the other). To reduce the risk of electric shock, such a plug is intended to fit a polarized outlet one way. If the plug does not fit fully into the outlet, reverse the plug. If it still does not fit, contact a qualified electrician. Do not attempt to modify the plug in any way.
STOP
WARNING! Do not leave the tool unattended when switched on. Place the tool on its stand after use and allow it to cool down before storage.
- Never use the tool if it is damaged in any way. If the supply cord is damaged, it must be replaced by the manufacturer, its service agent or similar qualified persons to avoid a hazard.
- Do not use this tool while under the influence of drugs or alcohol.
- Do not use this tool in the vicinity of any heat-sensitive materials, or any flammable materials, liquids or gases, and do not apply to the same place for a long time.
- This tool can be used by children aged from three years and above and persons with reduced physical, sensory or mental capabilities, or lack of experience or knowledge, if they have been given supervision or instruction concerning the safe use of the tool, understand the resulting dangers and are supervised during use. Children under three years old are not allowed to use the tool even under supervision.
Children should be supervised to ensure that they do not play with the tool. Cleaning and user maintenance must not be performed by children. - Keep the tool and its cord out of reach of children aged less than three years.
- This tool is intended for use at altitudes not exceeding 6,561'.
- Only use extension cables with a wire cross-section of 1.5mm^2 / 16 a.w.g. and no more than 65' in length.
- Never pull on the tool's connecting cable.
OPERATION

PARTS
| # DESCRIPTION |
| 1 Tool Stand |
| 2 Rear Loading Hole |
| 3 Trigger |
| 4 On/Off Switch |
| 5 Power Cord |

Do not connect tool to the outlet at this point.
- Attach the tool stand.
- Plug power cord into gun.
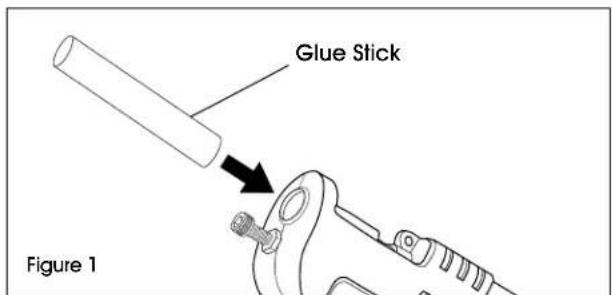
- Insert a glue stick into the rear of the gun. (See Figure 1)
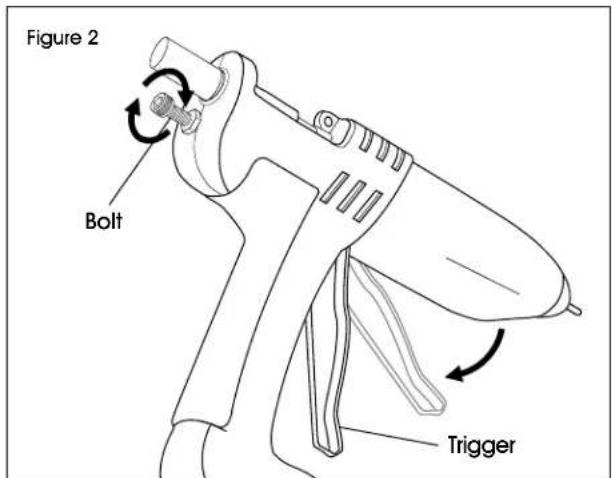
- Operate the trigger to feed the glue stick forward until resistance is felt. Use provided bolt to adjust output of glue per stroke. (See Figure 2)
- Connect power cord to outlet and switch tool on.

NOTE: Tool may take approximately five minutes to fully heat up.
- Operate the trigger to extrude glue until the stick has been completely drawn into the rear of the tool.
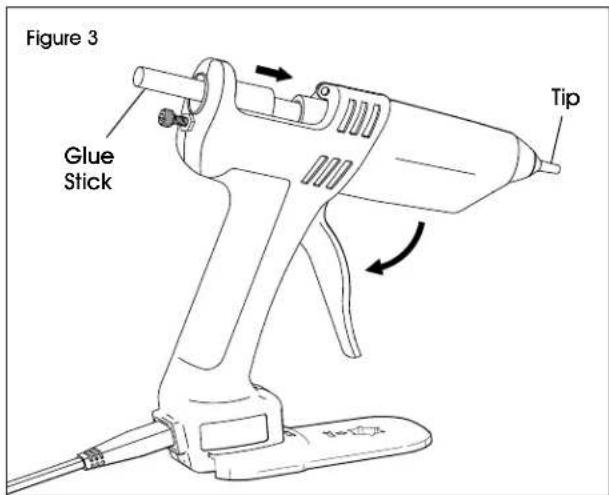
- Gently squeeze the trigger to push the glue into the heat block. Melted glue will flow from the tip. (See Figure 3)

CAUTION! Do not force glue. Excessive force can damage the applicator and cause molten glue to flow out the rear.
- Insert a new glue stick into the tool as needed.
- When finished, switch the tool off and disconnect from outlet.
OPERATION CONTINUED
TIPS
- Ensure tool has reached temperature before operating.
- Do not leave tool switched on for long periods without use. If tool is not to be used for more than 40 minutes, switch off and restart when required.
-
Never lay the tool on its side. Always use stand provided, the optional bench stand or the suspension unit.
-
Only use glue sticks designed for use with this tool.
- Never remove a partially used glue stick. This can lead to irreparable damage.
- Hot melt glue can be used instead of nails, staples, tapes and liquid glues. However, it should not be used in place of structural connections when heavy loads are involved.
- Do not use hot melt glue for objects that are exposed to extreme heat. Some glues that can be used in this tool will soften at 140^ .
MAINTENANCE
PREVENTATIVE MAINTENANCE

CAUTION! Avoid contact with hot glue and glue gun tip. This may cause burns. Wear personal protective equipment per workplace and industry standard operating practices and procedures when using and cleaning or changing tip. Keep tip pointed away from body parts.
To maintain proper operation, follow these steps:
- Inspect nozzle tip daily. Ensure it is clean and clear of foreign matter.
- Keep glue clean and free of airborne contaminants.
TROUBLESHOOTING
| OPERATING ISSUE CAUSES RECOMMENDATIONS | ||
| Low or no glue flow. | No heat. Check to see that the electrical 120 VAC service is turned on. Thermal fuse in the thermostat may have blown. | |
| Shutdown procedure was not observed. | Allow the glue gun to heat up for at least 30 minutes. | |
| Plugged tip. If the glue gun was left on overnight, the tip may be plugged. This may block glue flow and cause backmelt. CAUTION! Do not force glue. Clear the tip with a small nail or paperclip. Extrude the remaining glue stick and add one new glue stick to clear the opening. | ||
TROUBLESHOOTING CONTINUED
| OPERATING ISSUE CAUSES RECOMMENDATIONS | |
| Low or no glue flow (continued). | Backmelt. Remove the clip and feeder from the track of the glue gun. Push the existing glue stick back into the sleeve approximately 3/4" with a new glue stick. Remove the new glue stick before it melts and look into the black sleeve. Look for a thin skin of glue around the inside of the black sleeve. Scrape this skin toward the heat block. CAUTION! Do not damage the black sleeve. Extrude one glue stick to clear the sleeve. To avoid backmelt, observe the start-up and shut-down procedures. Do not force glue through the glue gun. |
| Dripping nozzle.* | Backmelt. Refer to preceding paragraph on backmelt. |
| Contaminated glue. Keep glue clean and free of contamination. | |
*Thermal expansion may cause some dripping during start-up. This is normal.


