
H-11043 - Glue gun Uline - Free user manual and instructions
Find the device manual for free H-11043 Uline in PDF.

User questions about H-11043 Uline
0 question about this device. Answer the ones you know or ask your own.
Ask a new question about this device
Download the instructions for your Glue gun in PDF format for free! Find your manual H-11043 - Uline and take your electronic device back in hand. On this page are published all the documents necessary for the use of your device. H-11043 by Uline.
USER MANUAL H-11043 Uline
natural_image
Line drawing of a pair soldering iron with a base and handle (no text or symbols)SAFETY

WARNING! Indicates a hazardous situation which, if not avoided, could result in serious injury or death.

CAUTION! Indicates a hazardous situation which, if not avoided, could result in minor or moderate injury and/or property damage.

NOTE: Indicates a situation which, if not avoided, could result in property damage.

WARNING! Read instructions thoroughly before operating or performing any maintenance on 3M™ glue gun.

WARNING! To reduce the risk of electrical shock or injury, observe the following safety rules:
- This appliance is not intended for use by persons (including children) with reduced physical, sensory or mental capabilities, or lack of experience and knowledge, unless they have been given supervision or instruction concerning use of the appliance by a person responsible for their safety.
- Children or persons needing supervision should be supervised to ensure they do not play with the appliance.
- Operate and service the applicator only as described in these instructions.
- Connect the applicator only to a properly grounded outlet.
- Do not unplug the applicator by pulling on the cord. Grasp the plug, not the cord, to unplug.
-
Do not handle the plug or applicator with wet hands.
-
Do not use the applicator outdoors or on wet surfaces.
- Do not use the applicator if the cord or plug is damaged.
- Do not use the applicator if it is not working properly or has been damaged, submerged in water or left outdoors.
- Use only authorized replacement parts. Use of other replacement parts may cause hazardous conditions or damage the applicator. Repair should only be performed by a qualified repair person.
- If supply cord is damaged, it must be replaced by a qualified repair person or Uline. Contact Uline Customer Service at 1-800-295-5510 for assistance.
- Do not use near highly flammable items.
- If an extension cord is used, use an extension cord that complies with local electrical requirements and is properly rated for your application. Use of an improper extension cord may cause electrical shock.
- Do not clean or remove the 3M ^TM hot melt adhesive with solvent. This may cause fire. For additional health and safety information, see the product label and safety data sheet for 3M ^TM hot melt adhesive used.
- Do not modify the plug provided with the applicator or use with an adaptor or ungrounded outlet. Improper grounding connection of the applicator may cause electrical shock. Check with a qualified electrician or service person to determine whether the plug is properly grounded. If the plug will not fit the outlet, have a qualified electrician or service person install the proper outlet.
SAFETY CONTINUED
- This tool must be placed on its stand when not in use. Do not leave the tool unattended when switched on.
- Place tool on its stand after use and allow it to cool down before storage.
- This tool is intended for use at altitudes not exceeding 6,561'.

CAUTION! Avoid contact with hot adhesive and applicator tip. This may cause burns. Wear personal protective equipment per workplace and industry standard operating practices and procedures when using and cleaning or changing tip. Keep tip pointed away from body parts.
- Do not damage the black sleeve.
-
Do not pull adhesive sticks from the rear of the applicator while in operation. Removing adhesive from the rear may cause molten adhesive to flow out of the rear of the applicator, which may cause burns and damage the applicator.
-
Use only 3M ^TM adhesive sticks. Other adhesives may cause backmelt and possible injury. Use of other adhesives may damage the applicator or result in hazardous conditions.
- Do not use low-temperature adhesives with high-temperature applicators.
- Reduce risks associated with hazardous work positions to avoid minor or moderate injuries. Avoid raising the elbow, bending the wrist, reaching and bending over when using this device.
- Gently squeeze the trigger to push the adhesive stick into the heat block. The adhesive is melted by the heat block and pushed out through the tip. A fixed thermostat on the heat block maintains heat block temperature.
- Do not overtighten. Overtightening damages threads.
OPERATION

WARNING! Use only 3M ^™ hot melt 12 " x 12" adhesive sticks. Other adhesives may cause backmelt and possible injury. Do not use near highly flammable materials.

NOTE: Use only a 110-230V grounded receptacle. Allow 6-10 minutes to heat up before using.

WARNING! Tip and valve are hot. Keep tip pointed away from body parts.

NOTE: To avoid charring or plugging of the tip, extrude at least one adhesive stick every three hours that the applicator is turned on.
OPERATION CONTINUED
text_image
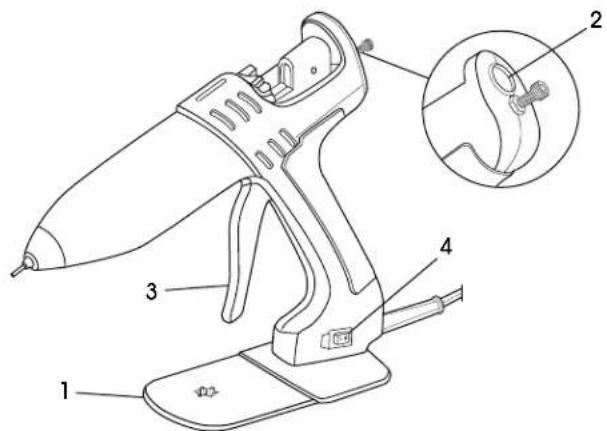
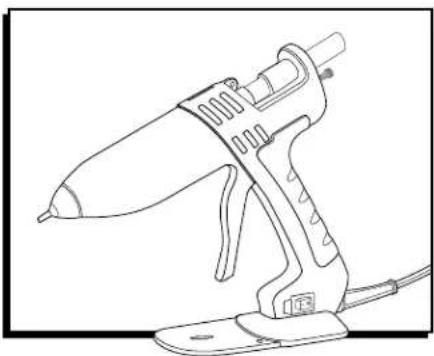
Technical diagram of a hairdryer with labeled parts and an inset detail view showing the component.PARTS
| # DESCRIPTION |
| 1 Tool Stand |
| 2 Rear Loading Hole |
| 3 Trigger |
| 4 On/Off Switch |

NOTE: Do not connect to main electrical supply at this point.
- Attach tool stand.
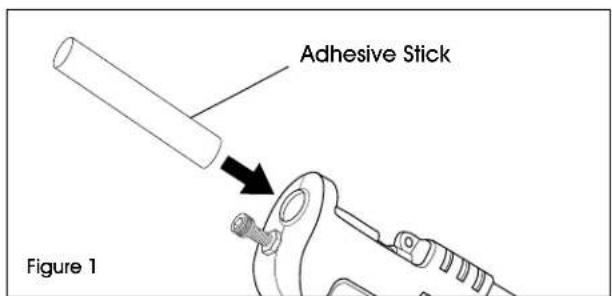
- Load tool by inserting an adhesive stick into rear. (See Figure 1)
text_image
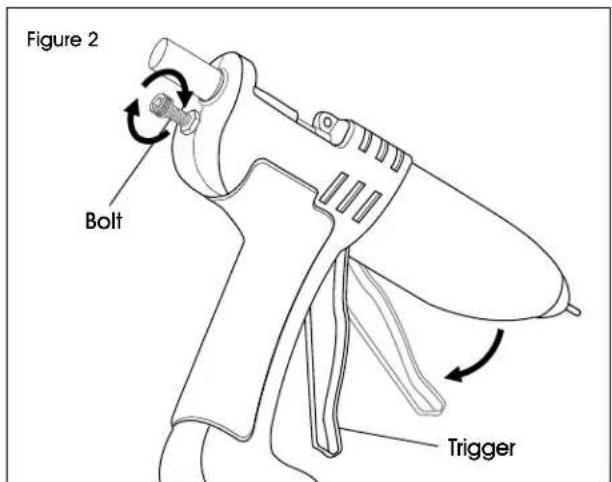
Adhesive Stick Figure 1- Operate trigger to feed adhesive stick forward until resistance is felt. Use provided bolt to adjust trigger pull. (See Figure 2)
text_image
Figure 2 Bolt Trigger- Connect to main electrical supply and switch on tool.
- Wait six minutes to warm tool.
- Operate trigger to extrude adhesive until adhesive stick has been drawn into the tool.
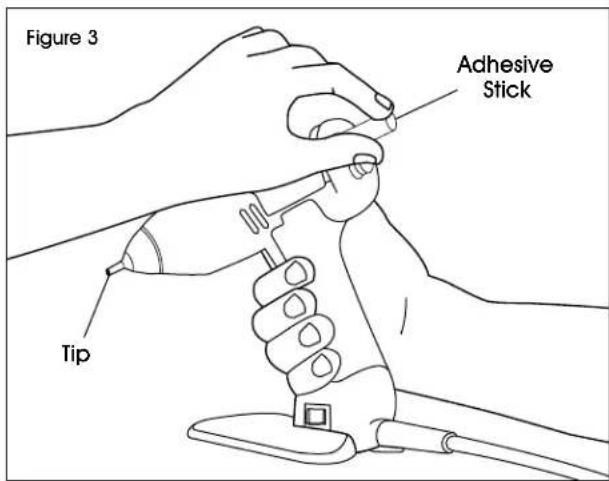
- Gently squeeze the trigger to push the adhesive into the heat block. Melted adhesive will flow from the tip. (See Figure 3)

CAUTION! Do not force adhesive. Excessive force can damage the applicator and cause molten adhesive to flow out the rear.
text_image
Figure 3 Adhesive Stick Tip- Insert additional adhesive sticks as needed.
OPERATION CONTINUED
- Shut-off: Switch off tool and disconnect from main electrical supply.
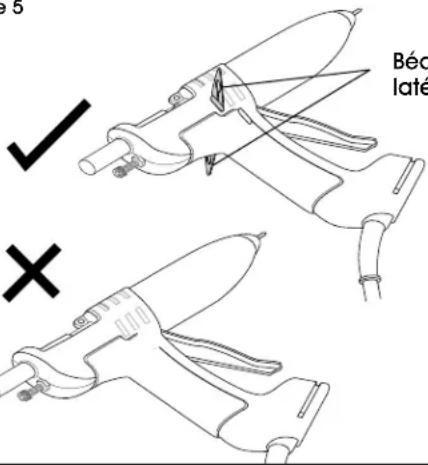
- Provided side inserts are attached to bottom of the tool stand. These can be installed to prevent the applicator from lying completely flat. (See Figures 4-5)

text_image
Figure 4 Side Inserts Bottom of Tool Stand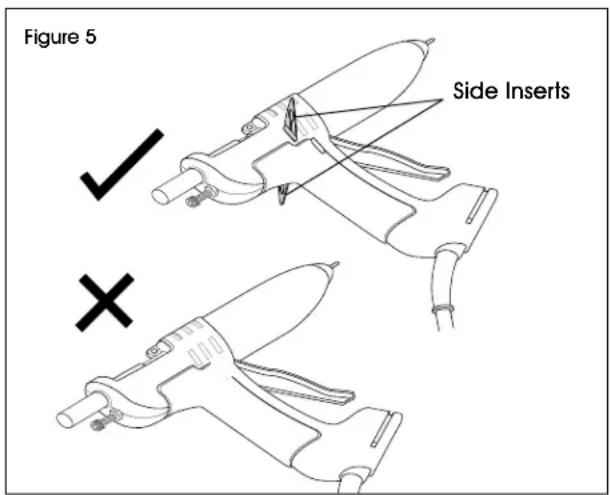
text_image
Figure 5 ✓ Side Inserts ×- Optional: Extrude one adhesive stick to cool down the applicator.
MAINTENANCE
PREVENTATIVE MAINTENANCE

CAUTION! Avoid contact with hot adhesive and glue gun tip. This may cause burns. Wear personal protective equipment per workplace and industry standard operating practices and procedures when using and cleaning or changing tip. Keep tip pointed away from body parts.
To maintain proper operation, follow these steps:
- Inspect nozzle tip daily. Ensure it is clean and clear of foreign matter.
- Keep adhesive clean and free of airborne contaminants.
AVOIDING PROBLEMS
- Ensure tool has reached temperature before operating.
- Do not leave tool switched on for long periods without use. If tool is not to be used for more than 40 minutes, switch off and restart when required.
- Never lay tool on its side without optional side inserts. Always use tool stand provided.
- Only use adhesives designed for use with this tool.
- Never remove a partially used glue stick. This can lead to irreparable damage.
- Hot melt glue can be used instead of nails, staples, tapes and liquid glues. They should not be used in place of structural connections when heavy loads are involved.
- Do not use hot melt glue for objects that are exposed to extreme heat. Some glues that can be used in this tool will soften at 140°F.
TROUBLESHOOTING
| OPERATING ISSUE CAUSES RECOMMENDATIONS | ||
| Low or no adhesive flow. | No heat. Check to see that the electrical 120 Vac service is turned on.Thermal fuse in the thermostat may have blown. | |
| Shutdown procedure was not observed. | Allow the glue gun to heat up for at least 30 minutes. | |
Plugged tip. If the glue gun was left on overnight, the tip may be plugged. This may block adhesive flow and cause backmelt. CAUTION! Do not force adhesive. Clear the tip with a small nail or paperclip. Extrude the remaining adhesive stick and add one new adhesive stick to clear the opening. CAUTION! Do not force adhesive. Clear the tip with a small nail or paperclip. Extrude the remaining adhesive stick and add one new adhesive stick to clear the opening. | ||
| Backmelt. Remove the clip and feeder from the track of the glue gun. Push the existing adhesive stick back into the sleeve approximately 3/4" with a new adhesive stick. Remove the new adhesive stick before it melts and look into the black sleeve. Look for a thin skin of adhesive around the inside of the black sleeve. Scrape this skin toward the heat block.CAUTION! Do not damage the black sleeve. Extrude one adhesive stick to clear the sleeve.To avoid backmelt, observe the start-up and shut-down procedures. Do not force adhesive through the glue gun. | ||
| Dripping nozzle.* | Backmelt. Refer to preceding paragraph on backmelt. | |
| Contaminated adhesive. | Keep adhesive clean and free of contamination. | |
*Thermal expansion may cause some dripping during start-up. This is normal.
natural_image
Line drawing of a pair-of-throw iron with handle and base (no text or symbols)SEGURIDAD

text_image
Technical diagram of a hairdryer with labeled parts and an inset detail view showing the component.PARTES
text_image
Technical diagram of a hairdryer with labeled parts and an inset detail view showing the component.PIÈCES
natural_image
Technical line drawing of a mechanical assembly with no visible text or symbolsnatural_image
Line drawing of a spray gun with an arrow indicating the lever (no text or symbols present)Figure 5
text_image
Béc laté ✓ ×Béquilles latérales


