
Aivia M8600 V2 - Mouse GIGABYTE - Free user manual and instructions
Find the device manual for free Aivia M8600 V2 GIGABYTE in PDF.

| Product | Wireless/Wired Mouse |
| Brand | Gigabyte |
| Model | Aivia M8600 V2 |
| Sensor Type | Pro-laser Laser |
| Resolution (DPI) | 800 / 1600 / 3200 / 5600 DPI (4 adjustable levels) |
| Report Rate | 125 / 250 / 500 / 1000 Hz |
| Number of Programmable Buttons | 10 buttons |
| Profiles | 5 profiles with color LED indicators (26 colors) |
| Connectivity | Wireless (2.4 GHz) and Wired (USB Mini) |
| Battery Life | Rechargeable battery (Lithium-ion) with spare battery included |
| Charging | Via charging dock or mini-USB cable |
| Feet | Ultra-Durable™ Teflon |
| Software | GHOST Macro Engine (compatible Windows 98/2000/XP/7) |
| Left/Right-handed mode | Yes, switchable via software |
| Operating Modes | Gaming and Power Saving |
| Maintenance | Clean with a soft, dry cloth |
| Spare Parts | Spare battery, mini-USB cable, charging dock |
Frequently Asked Questions - Aivia M8600 V2 GIGABYTE
User questions about Aivia M8600 V2 GIGABYTE
0 question about this device. Answer the ones you know or ask your own.
Ask a new question about this device
Download the instructions for your Mouse in PDF format for free! Find your manual Aivia M8600 V2 - GIGABYTE and take your electronic device back in hand. On this page are published all the documents necessary for the use of your device. Aivia M8600 V2 by GIGABYTE.
USER MANUAL Aivia M8600 V2 GIGABYTE
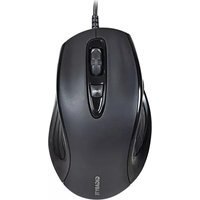
M8600 Wireless Macro Gaming Mouse
User's Manual
multi-language:


GHOST
MACRO ENGINE
www.gigabyte.com
All intellectual property rights, including without limitation to copyright and trademark of this work and its derivative works are the property of, or are licensed to, GIGA-BYTE TECHNOLOGY CO., LTD. Any unauthorized use is strictly prohibited.
Aivia M8600 Wireless Macro Gaming Mouse
Aivia, an integrated acronymic word, is derived from its key features – advanced, intuitive, and versatile interface archetype. The series is to emphasize the combination of subconscious, design and function as well as the pursuit of archetype. GIGABYTE believes each mouse and keyboard are the scrupulous work of mankind's brainpower. Aivia is not only an extension to the human intellect, but also an intuitive extension to the use of artificial intelligence.
The Aivia M8600 Wireless Macro Gaming mouse breaks free from the constraint of tangled wires while achieving tough mission during game play.
Having ultra-high precision gaming sensor and 2.4GHz gaming-grade wireless technology, Aivia M8600 demonstrates not only excellent performance but also incredible rapid transmission even as a wireless gaming mouse.
The battery life lasts continuously over 24 hours in the gaming mode and with introduction of the unique QSBSTM Technology – Quick-swap Battery System, you will enjoy a fast battery reload and lag-free game.
32KB onboard memory enables 5 profile settings on your M8600, and allows you to bring your personal settings wherever you go. Combining that with 6600DPI and 1000Hz report rate, the Aivia M8600 now becomes your ultimate weapon.
Feature
- GamePlay™ Wireless Technology
• Over 24hr battery life in game play - Dual mode wired/ wireless functionality
- GHOST™ Macro Engine
Mouse Introduction
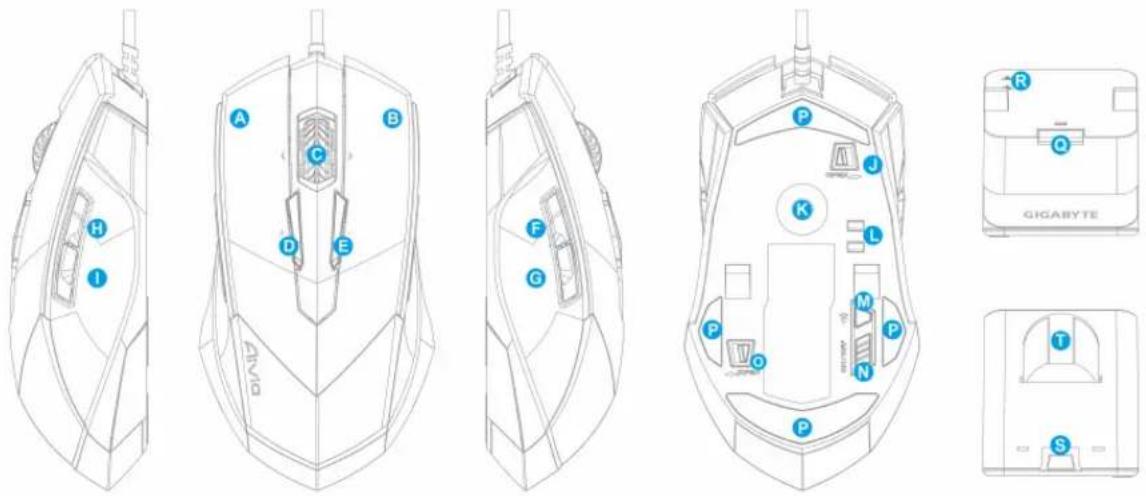
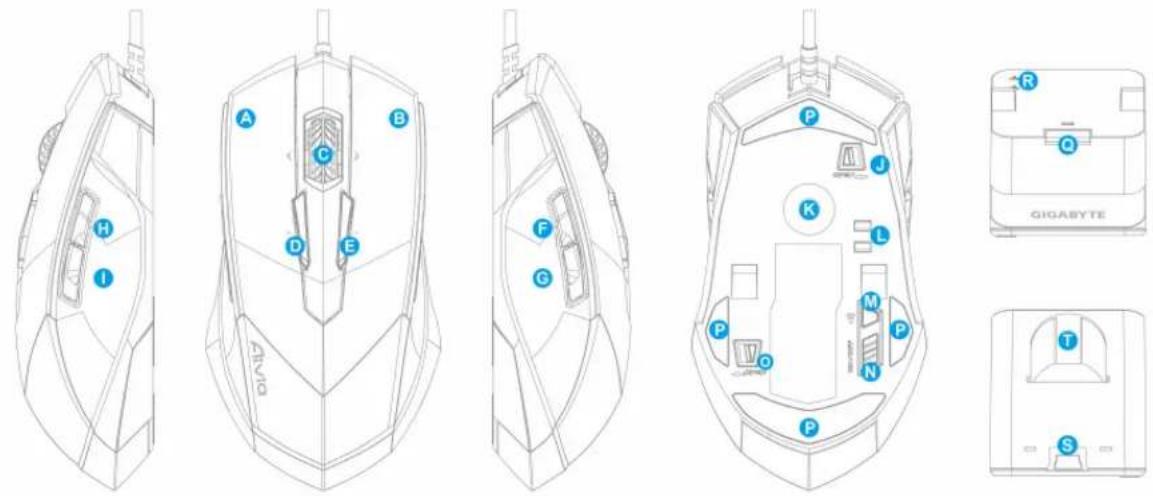
Default button assignments
A Mouse button 1 – Left Click
B Mouse button 2 – Right Click
C Mouse button 3 – Middle Click and 4 ways Scrolling Wheel
D Mouse button 4 – DPI Switching Up
E Mouse button 5 - DPI Switching Down
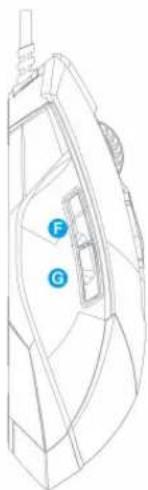
F Mouse button 6 – Forward
G Mouse button 7 -Back
H Mouse button 8 –Profile Change
I Mouse button 9 – Back
J Cable Lock/ Unlock Switch
K Pro-laser Gaming Sensor
L Battery Charging Connector
M ID Pairing Button
N Power on/off Switch
O Battery Lock/Unlock Switch
P Ultra-DurableTM Teflon feet
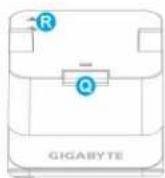
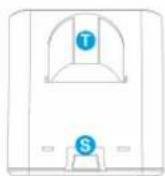
Q Pairing Button
R Charging Contact Spring Band
S Connector Jack for mini USB cable
T Battery Slot
Installation
Wireless Mode
- Remove the sticker between battery and mouse before using.
- Switch on M8600.
- Connect the Charging Dock to your computer with the mini-USB cable.
- Press the connecting buttons on M8600 and Charging Dock at the same time. When the pairing process is completed, your M8600 is then ready for use in wireless mode.
- To charge M8600 in wireless mode, just place it on the Charging Dock. There is also a spare charging battery to replace.(For the first time use, please recharge the battery at least 8 hours.)
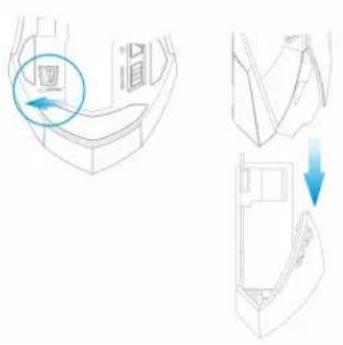
- To replace the battery with the spare battery, push the battery switch to the left as shown. The battery will pop out instantly.
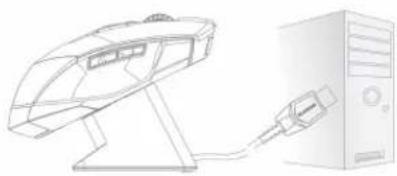
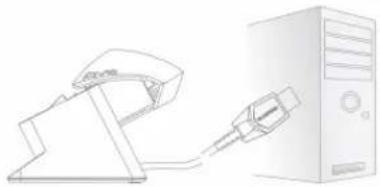
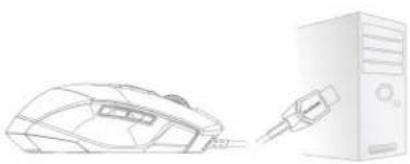
Wired Mode
- Connect the mini-USB end of the cable to M8600.
- Plug mouse into the USB port of your computer. M8600 is then ready for use as a wired mouse. Besides, its battery will start charging automatically in this wired mode.
- To remove the cable, push the cable switch to the right as shown before pulling out the mini-USB connector.
natural_image
Technical line drawing showing three views of a car interior with a highlighted circular component (no text or symbols)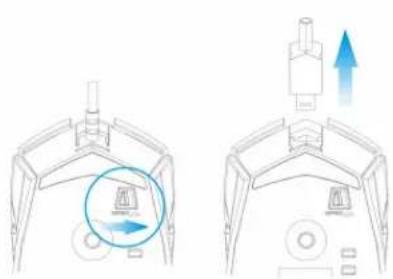
natural_image
Diagram showing two views of a device with arrows indicating movement or force (no text or symbols present)Charging Methods
- There are three different charging methods below.
 | Place M8600 on the charging dock connected to your PC. There will be running green light on the front side of mouse to indicate charging process. |
 | Insert your battery to battery slot of the charging dock. Connect the charging dock to your PC. The red light on charging dock will turn into green to indicate charging process. When the battery is fully charged, the LED on charging dock will come back to red light. |
 | Connect M8600 to your PC with the mini USB. The mouse will start charging automatically in wired mode |
LED Light System
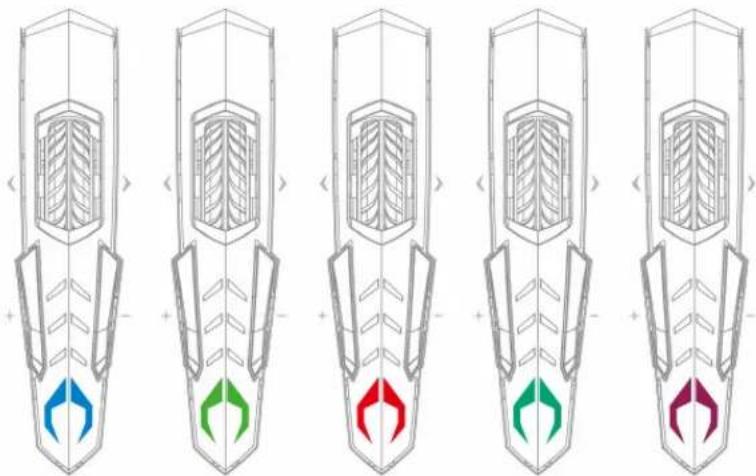
M8600 has a profile/Battery/Sensitivity LED indicator on its front side, which displays the status of profile/ battery life/sensitivity/ stage.
Profile Indicator
natural_image
Five identical wireframe diagrams of a mechanical component with internal structure and colored directional arrows, no text or symbols present.The color of the mode indicator LEDs changes along with profile switch. There are 5 different LED colors corresponding to the 5 available profiles on the mouse. The LED color can be selected from the GHOST Engine software based on your preference.
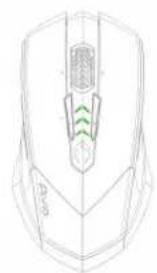
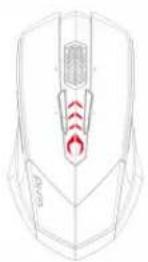
Battery Indicator
The GREEN LEDs shows the remaining battery life:
• 61 - 100% Battery: 3 green LED arrows
• 31 - 60% Battery: 2 green LED arrows
• 11 - 30% Battery: 1 green LED arrow
• Less than 10% Battery: 3 green blinking LEDs arrows
natural_image
Technical line drawing of a computer mouse head with green internal structure (no text or symbols)
natural_image
Technical line drawing of a mechanical component with internal channels and a green arrow indicating direction (no text or symbols)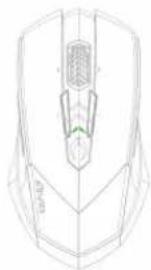
natural_image
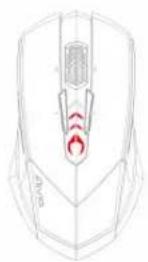
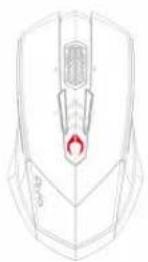
Technical line drawing of a mechanical component with no visible text or symbolsSensitivity Stage Indicator
The LEDs will turn into RED light while adjusting sensitivity.
• Sensitivity Stage 1: 1 red LED
- Sensitivity Stage 2: 2 red LEDs
- Sensitivity Stage 3: 3 red LEDs
- Sensitivity Stage 4: full red LEDs

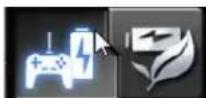
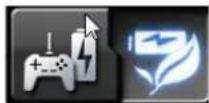
GHOST™ Macro Engine
GHOST™ Macro Engine supports Windows 98, Windows 2000, Windows XP, and Windows7. Install the software to assign buttons and set up your personal profile.
Please make sure to connect your M8600 with mini USB cable to PC while editing macro and assigning buttons through GHOST™ Engine software. (In wireless mode you are only allowed to adjust sensitivity, left-handed/right-handed mode and gaming/power saving mode)
Left Hand/ Right hand Mode
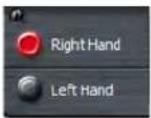
Aivia M8600 is designed both for left-handed and right-handed user. You may simply switch the left hand/right hand mode from the options of GHOSTTM Engine. The description of the buttons then will swap around symmetrically.
Gaming Mode/ Power Saving Mode
- Gaming mode:
In gaming mode, the mouse will stay longer in a standby status before going into sleeping status when mouse is not active. Therefore, it would consume more energy as gaming mode.
• Power Saving mode:
In power saving mode, the mouse will go into sleeping mode sooner when it is not active. The mouse consumes less energy while in power saving mode.
Color Option
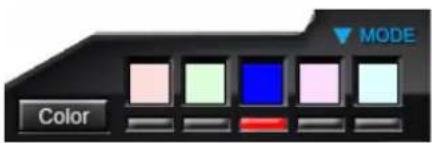
There are five default color LED lights on the panel which indicate five different profiles set up by users.
Each individual profile can be assigned various settings to 10 programmable buttons. Moreover, you can also change the color of LED light for each profile(There are 26 colors and a light-off selection to choose from).
Button Assignment
User can assign various functions to buttons from both "BASIC FUNCTION" and "MACRO SCRIPTS". All you have to do is drag the function icon and simply drop to the button you would like to assign. Remember that you may edit each macro script in the "MACRO EDITING" tab.
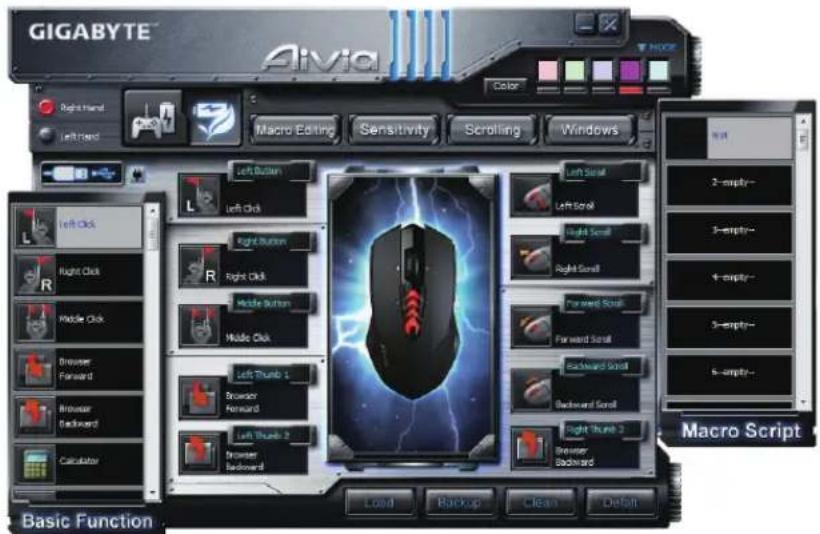
More Tips:
- You can swap around two button assignments by dragging one to the other.
- You may delete a button assignment by dragging the function icon out of that button assignment. The button then becomes no functional.
- Dragging a set function icon to the empty button, you would copy that function to the empty button.
- Load and Backup:
In case you require more profiles (button assignments) and macros and do not wish to delete the existing profiles, simply "backup" the existing profi les to your hard disk and load them back when needed.
Macro Editing
The macro editing tab allows you easily to record all the commands, including key bindings and the press of mouse button.
Each single macro also can be imported and exported onto your hard disk for further usage.
Start with:
Step1 Click "Record the duration or intervals" if you'd like to record intervals between two commands.
Step2 Double-click "Cycle through selection of action mode" to change the execute mode.
Step3 Click "Record" to start creating a macro and recording all the keystrokes or mouse commands.
Step4 Click "Stop" to finish recording this macro when a macro is done.
Step5 You can also insert additional commands on the "Quick-insert bar" left.
Step6 After recording a macro, you may drag commands of the macro and drop into "On-board script" to store this macro on the mouse.
Step7 Double-click on the macro scrip to rename this macro. Moreover, you may also change icon of your personal macro through clicking “change icon”.
Step8 Come back to "Button Assign" tab, the macro you had built would become one application of "Macro scrip" in this tab.
Learn more:
Record the duration or intervals (Time lag)
If this function is marked, it allows you to record the intervals between two commands.
Cycle through selection of action mode
- Execute once:
To execute a macro once. - Loop mode:
Re-pressing to stop: Executing a macro continuously, and re-pressing the assigned button to stop the running macro. - Fire-button mode:
Executing a macro continuously until you release the assigned button.
Delete
You can delete a command or a whole macro script by dragging the command or the macro script to "Delete" can.
Record Keyboard only
Clicking this option would ignore the press of mouse and just record keystrokes when recording a macro.
Press Pause Key to Stop Recording
Clicking this option would enable you to stop recording by pressing "Pause" key when recording a macro.
Change Icon
Here you can select your preferred icon for the macro. Furthermore, you can make your personal icon with any pictures in jpg or bmp format. What you need to do is click an empty icon of the icon base and press "Replace" to browse your files. Press "Remove" if you would like to remove the icon.
Export
To export your a macro to the PC.
Import
To import a macro to the macro editing in GHOST engine application program.
Re-edit the macro
Dragging the macro script back to macro editing allows you to re-edit this macro.
Sensitivity
Sensitivity:
As default setting, there are four sensitivity stages: 800, 1600, 3200 and 5600DPI (dots per inch). You can set up preferred sensitivity value of four sensitivity stages via GHOST Engine, you can then simply adjust DPI through on-the-fly switch. Check “set X and Y axis separately” option to adjust X-Y sensitivity levels.
Report rate:
The report rate determines the time intervals that your PC retrieves data from your mouse. You can set the report rate to 125Hz (8ms), 250Hz (4ms), 500Hz (2ms), or 1000Hz (1ms) by moving the knob on the slider.
Scrolling
You can adjust vertical & horizontal scroll wheel speed by moving the knob on the slider.
Product Specification
Mouse and Receiver:
Antenna Gain=0dBm
Operating Frequency: 2402/ 2439/ 2450/ 2411/ 2468/ 2425/ 2447/ 2479MHz
Channel Number: 8 channels
Transmitter Output Power: 0 dBm
Modulation:2.4G GFSK modulator
Operating Temperature Range: 0°C(32°F) \~ 40°C(104°F)
Power Type of wireless module:
Mouse : Battery supply voltage
Receiver : NB or PC USB Port Supply Voltage
Battery:
Battery Pack: BURNABY INTERNATIONAL TECHNOLOGY
Model: SANYO NP 80/3.7Vdc 1500mAh
Note: Please recharge the battery at least 8 hours for the first use.
Caution:
- Please DO NOT directly look into the laser beam.
- Risk of explosion if battery is replaced by an incorrect type
- Dispose of used batteries according to the instruction
Important information:
Long period of repetitive motion using an improperly set-up workplace, or incorrect body posture may be associated with physical discomfort and injury to nerves, tendons, and muscles.
Safety
FCC Declaration:
- This device has been tested and found to comply with the limits for a Class B digital device, pursuant to Part 15 of the FCC Rules. These limits are designed to provide reasonable protection against harmful interference in a residential installation. This equipment generates, uses and can radiated radio frequency energy and, if not installed and used in accordance with the instructions, may cause harmful interference to radio communications. However, there is no guarantee that interference will not occur in a particular installation. If this equipment does cause harmful interference to radio or television reception, which can be determined by turning the equipment off and on, the user is encouraged to try to correct the interference by
one or more of the following measures:
-Reorient or relocate the receiving antenna.
-Increase the separation between the equipment and receiver.
-Connect the equipment into an outlet on a circuit different from that to which the receiver is connected.
-Consult the dealer or an experienced radio/TV technician for help.
- This device complies with part 15 of the FCC Rules. Operation is subject to the following two conditions: (1) This device may not cause harmful interference, and (2) this device must accept any interference received, including interference that may cause undesired operation.
FCC Caution:
- Changes or modifications not expressly approved by the party responsible for compliance could void the user's authority to operate the equipment.
- The antenna(s) used for this transmitter must not be co-located or operating in conjunction with any other antenna or transmitter.
滑鼠功能說明
滑鼠預設功能
有線模式
natural_image
Diagram showing two views of a device with arrows indicating motion or force direction (no text or symbols present)LED燈光系統
natural_image
Five identical wireframe diagrams of a rocket or missile viewed from above, each with colored arrows indicating directional flow (no text or symbols)natural_image
Three technical line drawings of a computer mouse head with internal components and green alignment lines (no text or symbols)靈敏度指示燈
natural_image
Four identical line drawings of a computer mouse head with internal red activation zones, shown from different angles (no text or symbols)GHOST™巨集編輯引擎
natural_image
Technical line drawing of a car interior showing three views: top view with a magnified inset, side view with a blue arrow indicating direction (no text or symbols)有线模式
natural_image
Diagram showing two views of a mechanical device with arrows indicating motion or force direction (no text or symbols present)LED灯光系统
natural_image
Five identical wireframe diagrams of a mechanical component with internal structure and colored directional arrows (no text or symbols)natural_image
Three technical line drawings of a computer mouse head with internal components and green highlighted areas (no text or symbols)灵敏度指示灯
natural_image
Four identical line drawings of a computer mouse head with internal red highlighted regions, shown from different angles (no text or symbols)GHOST™ 宏编辑引擎
natural_image
Technical line drawing of a car interior showing seat, side view, and rear view with directional arrows (no text or symbols)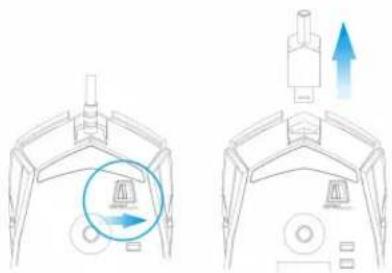
natural_image
Diagram showing two views of a device with arrows indicating motion or movement, no text or symbols present.Lademodus
natural_image
Five identical wireframe diagrams of a rocket or missile viewed from above, each with a colored arrow indicating direction (no text or symbols present)natural_image
Three technical line drawings of a computer mouse head with green internal structures (no text or symbols)natural_image
Line drawings of four identical computer mouse head profiles with red highlighted regions, no text or symbols present.GHOST™ Macro Engine
natural_image
Diagram of a mechanical device with a piston and arrow indicating upward motion (no text or symbols)Méthode de Charge
natural_image
Five identical wireframe diagrams of a mechanical component with internal structure and colored directional arrows (no text or symbols)natural_image
Three technical line drawings of a computer mouse head with internal components (no text or symbols)natural_image
Four identical line drawings of a computer mouse head with internal red activation zones, shown from different angles (no text or symbols)natural_image
Technical line drawing of a car interior showing seat, door, and window components with directional arrows (no text or symbols)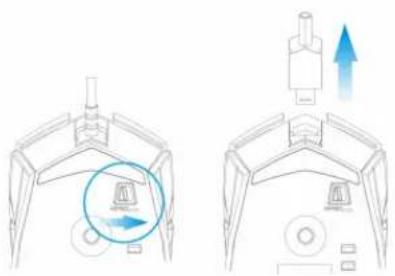
natural_image
Diagram showing two views of a device with arrows indicating movement or force, no text or symbols present.natural_image
Five identical wireframe diagrams of a mechanical component with internal structure and colored directional arrows (no text or symbols)natural_image
Three technical line drawings of a computer mouse head with internal components and green highlighted areas (no text or symbols)natural_image
Four identical line drawings of a computer mouse head with internal red highlighted regions, no text or symbols present.GHOST™ Macro Engine
natural_image
Technical line drawing showing a mechanical component with a highlighted circular feature and two side views (no text or symbols)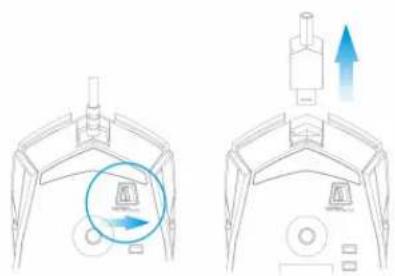
natural_image
Diagram showing two views of a device with arrows indicating direction, no text or symbols presentMétodos de Carga
natural_image
Five identical line drawings of a stylized rocket or rocket with internal blades and colored directional arrows, no text or symbols present.natural_image
Three identical line drawings of a computer mouse head with internal components, shown from different angles (no text or symbols)natural_image
Four identical line drawings of a computer mouse head with red flame-like internal structures, no text or symbols present.GHOST™ Macro Engine
natural_image
Diagram of a mechanical device with an upward arrow indicating motion or force (no text or symbols present)Способ зарядки
natural_image
Five identical wireframe diagrams of a mechanical component with internal structure and colored directional arrows (no text or symbols)natural_image
Three technical line drawings of a computer mouse head with internal components and green arrows indicating motion or force (no text or symbols)natural_image
Four identical line drawings of a computer mouse head with red activation indicators (no text or symbols)Программа GHOST™ Macro Engine
natural_image
Technical line drawing of a car interior showing front and side views with directional arrows (no text or symbols)유선 모드
natural_image
Diagram showing two views of a device with arrows indicating movement or change, no text or symbols present.충전 방법
natural_image
Five identical wireframe diagrams of a mechanical component with colored arrows indicating direction (no text or symbols)natural_image
Three technical line drawings of a computer mouse head with internal components and green indicator lights (no text or symbols)민감도 단계 표시등
natural_image
Four identical line drawings of a computer mouse head with internal red highlighted regions, no text or symbols present.GHOST™ Macro Engine
natural_image
Technical line drawing of a car interior showing door opening and side profile views (no text or symbols)Režim s kabelem
natural_image
Diagram showing two views of a device with arrows indicating motion or movement, no text or symbols present.Způsob nabíjení
natural_image
Five identical wireframe diagrams of a mechanical component with colored directional arrows indicating flow or movement (no text or symbols)natural_image
Three technical line drawings of a computer mouse head with green internal structures (no text or symbols)Ukazatel citlivosti
natural_image
Four identical line drawings of a computer mouse head with internal components and red highlighted regions, no text or symbols present.natural_image
Technical line drawing of a mechanical component with labeled parts (H and I), no readable text or symbols present.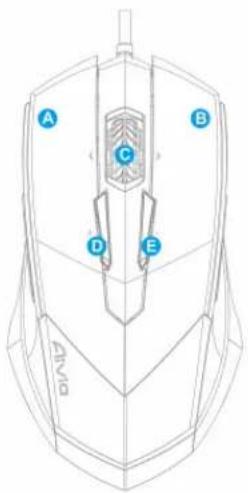
natural_image
Technical line drawing of a mechanical component with labeled parts F and G (no text or symbols beyond labels)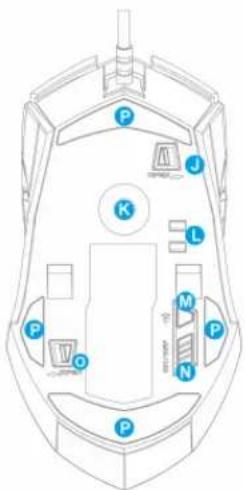
natural_image
Technical line drawing of a car interior showing seat, seatbelt, and seat cover with blue arrows indicating movement (no text or symbols)Vezetékes üzemmód
natural_image
Diagram showing two views of a device with arrows indicating motion or movement, no text or symbols present.A töltés módja
natural_image
Five identical wireframe diagrams of a rocket or rocket with colored directional arrows indicating flow or movement (no text or symbols)natural_image
Three technical line drawings of a computer mouse head with internal components (no text or symbols)natural_image
Line drawings of four identical computer mouse head profiles with red indicator lights and control buttons (no text or symbols)GHOST™ Macro Engine
natural_image
Technical line drawing of a car interior showing internal components and directional arrows (no text or symbols)Tryb przewodowy
natural_image
Diagram showing two views of a device with arrows indicating motion or force direction (no text or symbols present)Sposób ładowania
natural_image
Five identical wireframe diagrams of a rocket or missile viewed from above, each with a colored arrow indicating direction (no text or symbols present)natural_image
Three technical line drawings of a mechanical component with internal channels and green accents (no text or symbols)natural_image
Four line drawings of a computer mouse head with red flame outlines, shown from different angles (no text or symbols)Cycle through selection of action mode
Press Pause Key to Stop Recording

- M8600 Wireless Macro Gaming Mouse
- User's Manual
- Aivia M8600 Wireless Macro Gaming Mouse
- Feature
- Mouse Introduction
- Default button assignments
- Installation
- Wireless Mode
- Wired Mode
- Charging Methods
- LED Light System
- Profile Indicator
- Battery Indicator
- The GREEN LEDs shows the remaining battery life:
- Sensitivity Stage Indicator
- The LEDs will turn into RED light while adjusting sensitivity.
- GHOST™ Macro Engine
- Left Hand/ Right hand Mode
- Gaming Mode/ Power Saving Mode
- Color Option
- Button Assignment
- More Tips:
- Macro Editing
- Start with:
- Learn more:
- Cycle through selection of action mode
- Delete
- Record Keyboard only
- Press Pause Key to Stop Recording
- Change Icon
- Export
- Import
- Re-edit the macro
- Sensitivity
- Sensitivity:
- Report rate:
- Scrolling
- Product Specification
- Mouse and Receiver:
- Power Type of wireless module:
- Battery:
- Caution:
- Important information:
- Safety
- FCC Declaration:
- FCC Caution:
- 滑鼠預設功能
- 有線模式
- LED燈光系統
- 靈敏度指示燈
- GHOST™巨集編輯引擎
- 有线模式
- LED灯光系统
- 灵敏度指示灯
- GHOST™ 宏编辑引擎
- Lademodus
- Méthode de Charge
- Métodos de Carga
- Способ зарядки
- Программа GHOST™ Macro Engine
- 유선 모드
- 충전 방법
- 민감도 단계 표시등
- Režim s kabelem
- Způsob nabíjení
- Ukazatel citlivosti
- Vezetékes üzemmód
- A töltés módja
- Tryb przewodowy
- Sposób ładowania
Brand : GIGABYTE
Model : Aivia M8600 V2
Category : Mouse