MS-ST - Workbench JCB - Free user manual and instructions
Find the device manual for free MS-ST JCB in PDF.


User questions about MS-ST JCB
0 question about this device. Answer the ones you know or ask your own.
Ask a new question about this device
Download the instructions for your Workbench in PDF format for free! Find your manual MS-ST - JCB and take your electronic device back in hand. On this page are published all the documents necessary for the use of your device. MS-ST by JCB.
USER MANUAL MS-ST JCB
To reduce the risk of injury, the user must read the instruction manual.

This symbol is used throughout this manual to warn the user about potential risks. Please read & understand these sections before using the device.


Personal Protective Equipment (P.P.E.), such as ear defenders, eye protection, safety gloves and a dust mask, must be worn during the operation of the device.


Contents
SAFETYWARNINGS 4
COMPONENT LIST 5
TECHNICAL DATA 6
OPERATING INSTRUCTIONS 7
Intended Use 7
Before starting the equipment 7
ASSEMBLY AND OPERATION 8
Cleaning, maintenance, storage and transport | |
WARRANTY STATEMENT 12
Terms and Conditions 12-13

SAFETYWARNINGS
Use the litre saw stand only in conjunction with suitable electric power tools!
Check the litre saw stand for damage each time before use. Electric power tools shall not be mounted or operated on damaged support arms / crossbars.
Electric power tools must be bolted to the support arms / crossbars and be secured on the metre saw stand in accordance with the manufacturers instructions.
Do not use the stand on uneven surfaces. The stand is designed to be used on a stable flat surface.
Do not use on a slippery surface. The stand load capacity is greatly reduced if used on a slippery surface.
Always ensure the litre saw stand is secure when setting it up.
Always ensure that you assume a natural and safe standing position when working.
Do not use the litre saw stand for purposes for which it is not intended.
Modifications or unauthorised changes to the litre saw stand as well as the use of unapproved parts is forbidden.
All parts of the litre saw stand, including any safety devices, must be correctly mounted in order to guarantee trouble-free operation.Keep the litre saw stand out of reach of children. Store the device in a location that is inaccessible to unauthorised persons and children.
Do not exceed the maximum working load specified on the product label. It is unsafe to climb, sit or stand on the table.
ATTENTION!
When using electric power tools, in conjunction with the metre saw stand, the respective machine-specific safety measures must be implemented as protection against electric shock, and the risk of injury or fire. Read all of the instructions for the electric power tool that you intend to mount and operate before using the tool.
Safety instructions for the electric device mounted must likewise be observed. Store these safety instructions safely.
Observe all safety instructions. If you disregard the safety instructions, you endanger yourself and others.
COMPONENT LIST
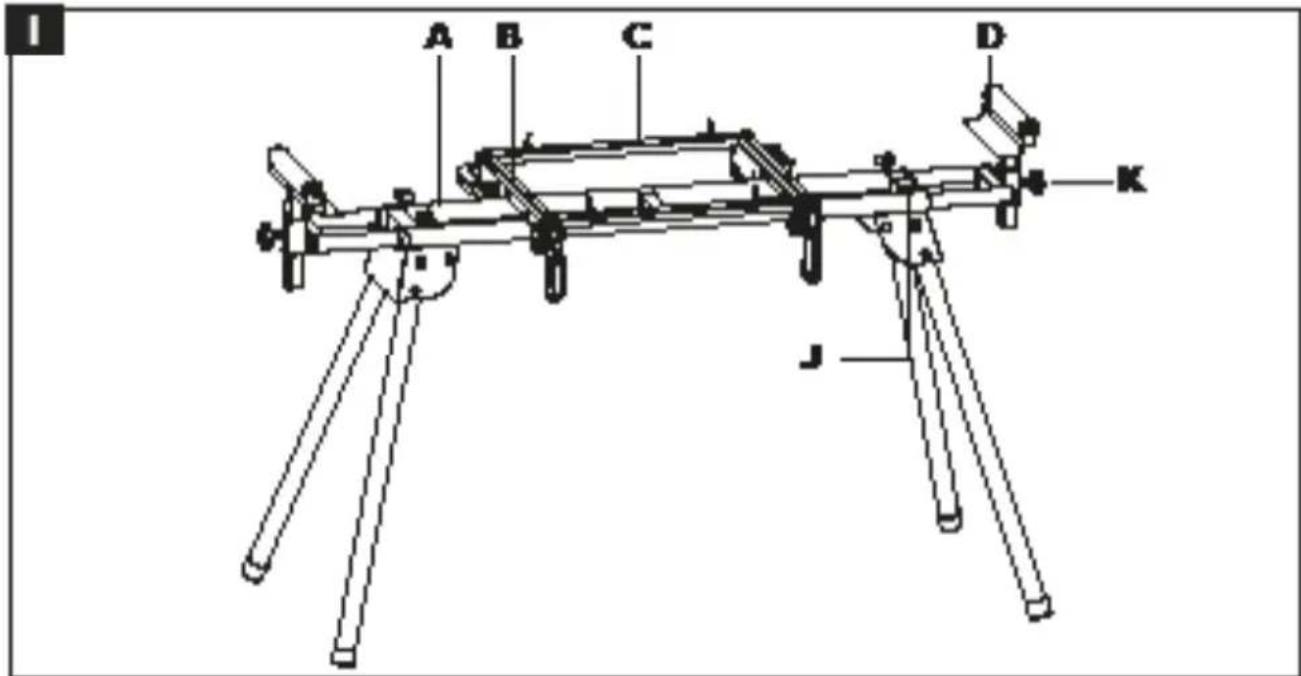
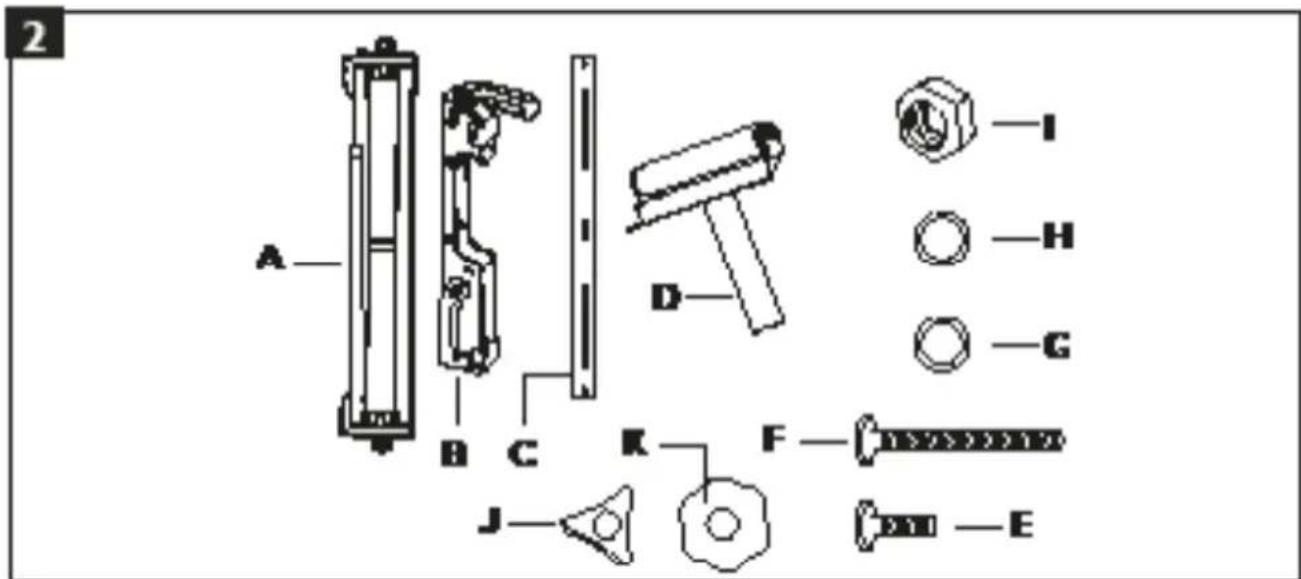
A Mitre saw stand
B Support arm 2x
C Crossbar 2x
D Adjustable workpiece support 2x
E Coach bolt M6x16 4x
F Coach bolt M6x60 4x
G Washer 6mm 8x
H Spring washer 6mm 8x
Nut M6 8x
J Star-grip screw (small) 4x
K Star-grip screw (large) 2x
TECHNICAL DATA
| Dimensions (LxWxH) in mm | 1000 - 1650 x 580 x 810 - 910mm |
| Table height | 750mm |
| Height range of the workpiece supports | 810 - 910mm |
| Width range of the workpiece supports | 1000 - 1650mm |
| Max. permissible load | 200kg |
| Weight net / gross | 13.3 / 15.1kg |
OPERATING INSTRUCTIONS
Intended Use
Always observe the proper use of your litre saw stand.
The litre saw stand is designed for use with tabletop devices such as litre saws, scroll saws, circular table saws, etc.
Electric power tools without suitable mounting holes are not permitted to be fitted to the litre saw stand and shall not be operated in conjunction with the litre saw stand. Electric power tools must be firmly bolted to the litre saw stand before starting them up.
The litre saw stand is also designed as a workpiece support when working with litre saws, scroll saws, circular table saws, and other similar electric power tools.
The maximum workpiece length is 3m
Additional workpiece supports may have to be used (e.g. a roller trestle) in order to prevent longer workpieces tilting.
Attention: Ensure that the workpiece support is secure and not tilted!
Do not use the litre saw stand as a ladder or as scaffolding. Ensure that all handgrips, nuts and screws are tightened before use. Electric power tools on this device shall not exceed an overall height of 130cm . The maximum permissible load is 200kg . Ensure that the litre saw stand is on a level, firm and stable floor. Any use beyond this is improper use.
The manufacturer is not responsible for the resultant damages, the user bears this risk alone.
Before starting the equipment
Check the device for transport damage. Immediately report any damage to the transport company that delivered the device.
ASSEMBLY AND OPERATION
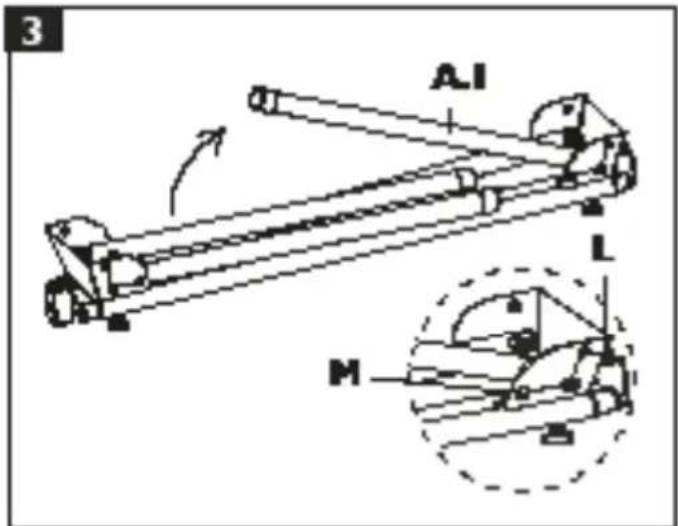
The litre saw stand is largely assembled and you need only fit the support arms and the crossbars as follows:
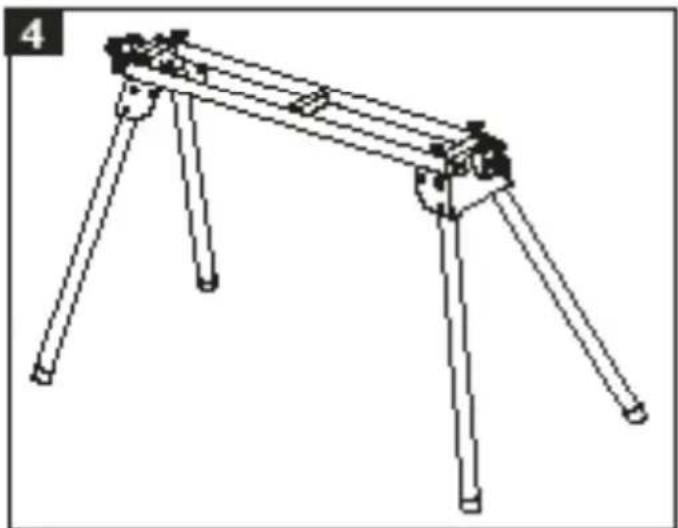
Erecting the litre saw stand (Fig. 3-4)
Place the litre saw stand (A) on the floor or on a workbench such that the frame legs (A.1) are uppermost.
Press the spring pins (M) and fold out the frame legs.
Once the spring pin latches into the intended position, the frame leg is locked.
Rotate the litre saw stand and set down on its feet.
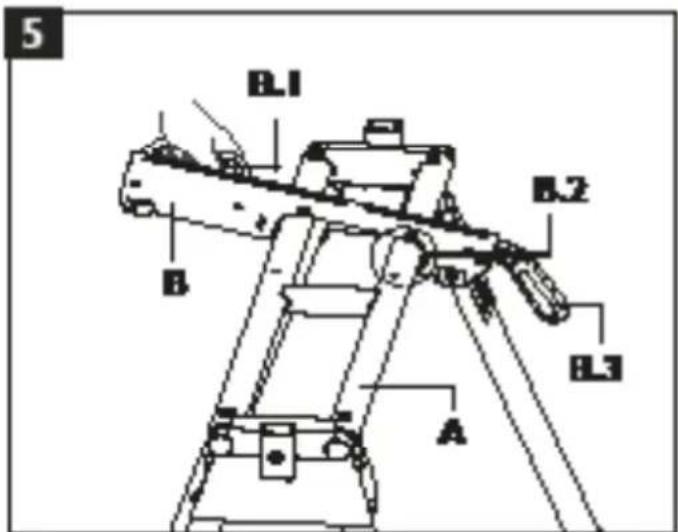
Mounting support arms (Fig. 5)
Fit the support arms (B) to the frame bed (A) by pulling the locking lever (B.3) upwards to unlock it and then latching the arm into place on the frame base, firstly on the front side (B.2).
Lower the rear side onto the bed and fasten the support arm in place on the frame bed by pressing the locking lever (B.3).
Disassembly is performed in reverse order.
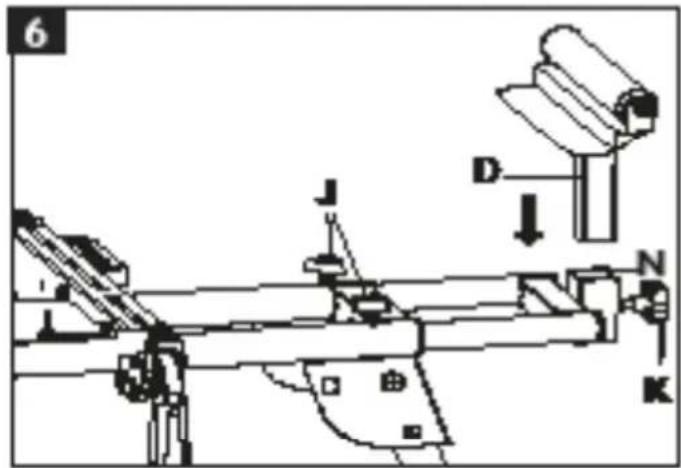
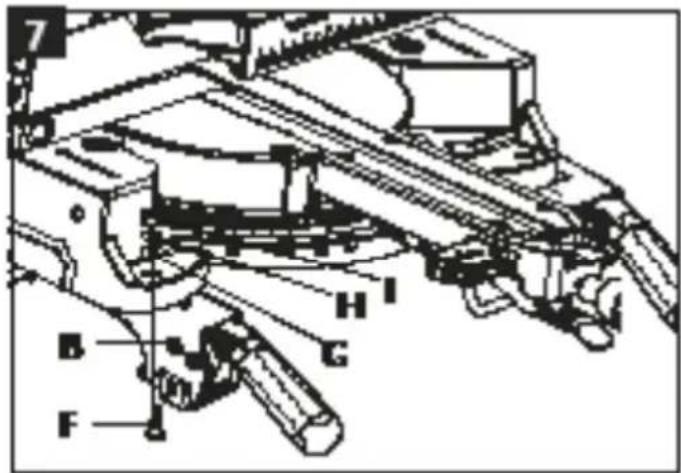
Fitting the workpiece supports (Fig. 6-7)
Insert the workpiece support (D) into the support post (N) of the frame bed and fasten in place with the star-grip screw (K).
Repeat the above for the other support.
The width and height of the workpiece supports can be adjusted with the star-grip screws (J, K). (Fig. 6)
Fastening your tabletop machine (Fig. 7)
Different tabletop machines can be fastened to your litre saw stand by adjusting the support arms (B) to the spacing of the mounting holes on your machine.
Place your tabletop machine (e.g. mitresaw) on the support arms (B) (Fig. 7).
Fasten the tabletop machine with 4 coach screws (F), 4 washers (G), 4 spring washers (H) and 4 hexagonal nuts (I) on each of the support arms.
Tighten the screws after assembly.
Fasten the support arms (B) with the mounted tabletop machine on the mitre saw stand, as described on page 8.
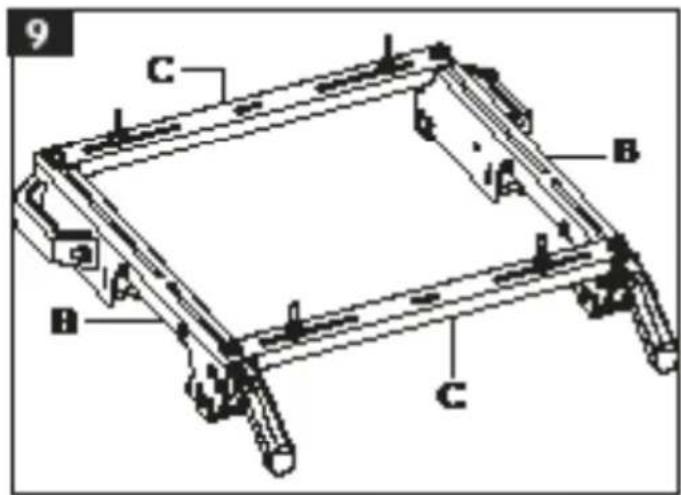
If your machine has different hole spacing for mounting, use the crossbars (C) provided as an adapter as follows:
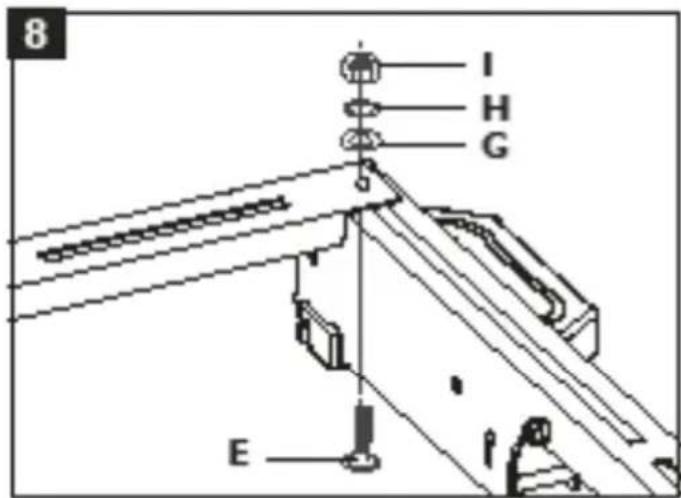
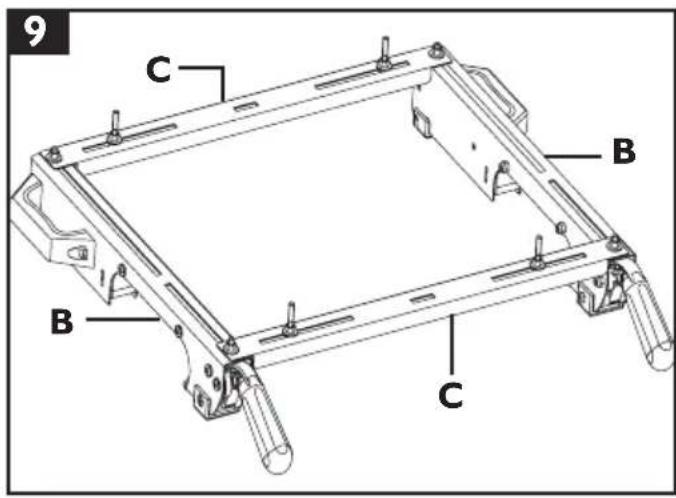
Position the crossbars (C) on the support arms (B) and secure them with 4 coach screws (E), 4 washers (G), 4 spring washers (H) and 4 hexagonal nuts (I). (Fig. 8-9)
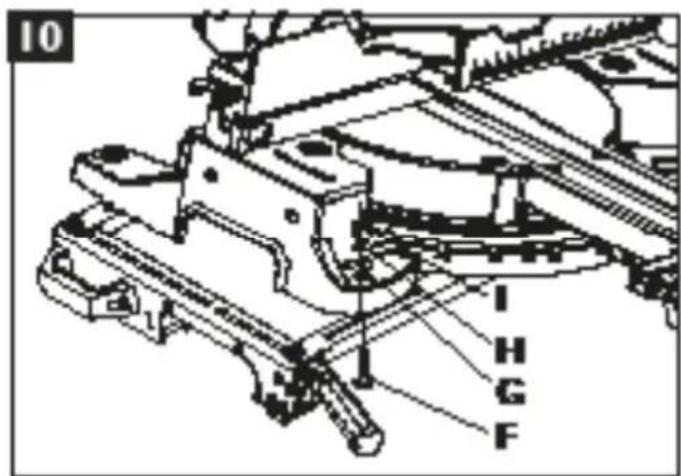
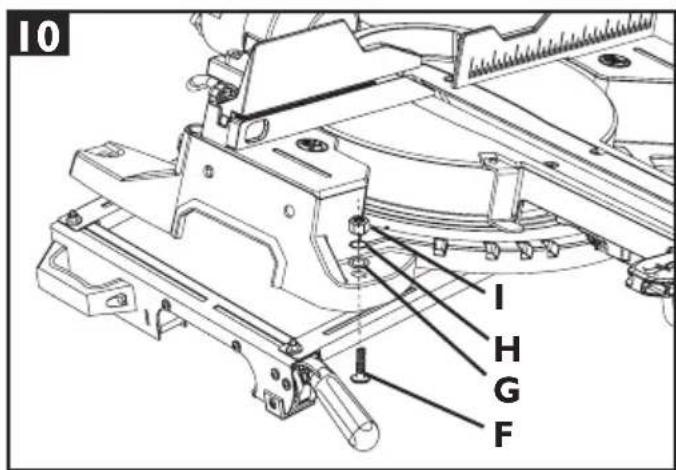
Place your tabletop machine on the crossbars (C). (Fig. 10)
Fasten the tabletop machine with 4 coach screws (F), 4 washers (G), 4 spring washers (H) and 4 hexagonal nuts (I) on each of the crossbars (C).
Tighten the screws after assembly.
Fastenthe support arms with the mounted tabletop machine on the litre saw stand, as described on page 8.
Using the workpiece stops, Fig. 12
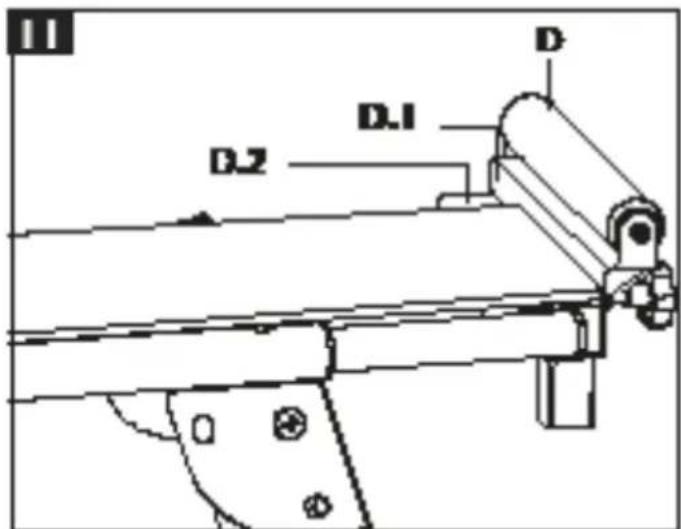
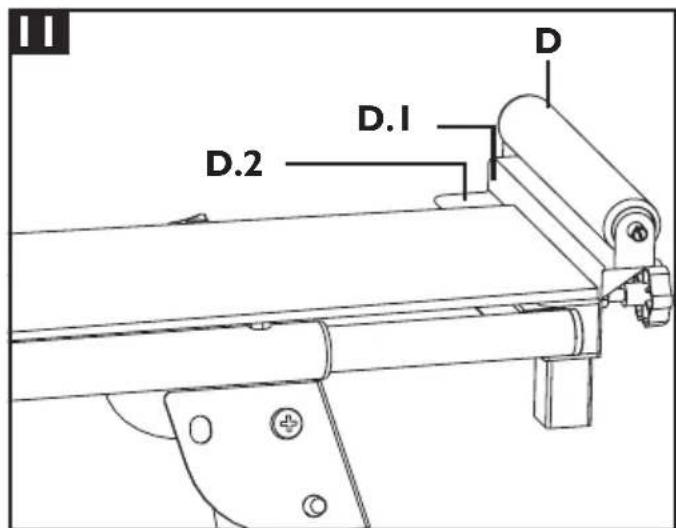
The workpiece supports (D) have integrated workpiece stops (D.2), which can be used to saw multiple pieces of wood to the same length. (Fig. 11)
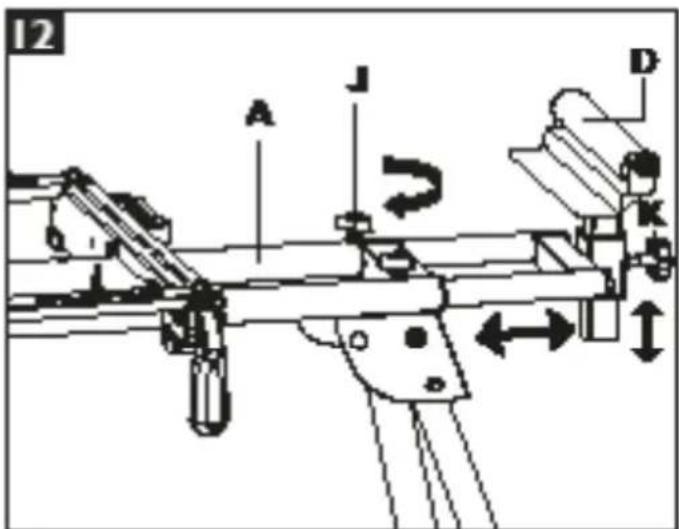
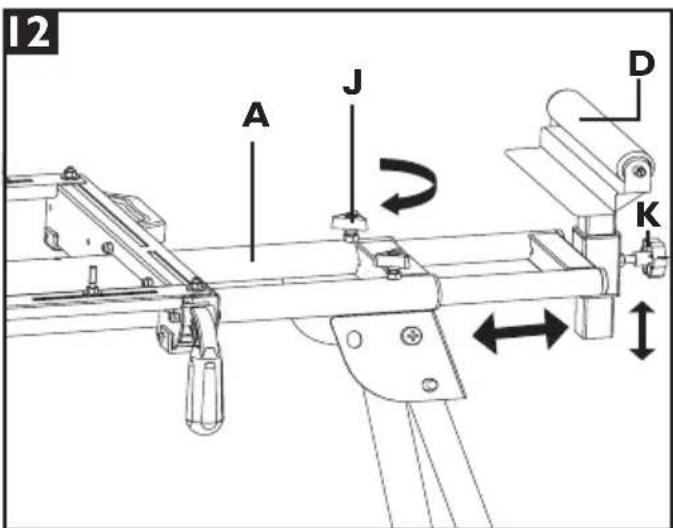
Loosen the star-grip screw (K) on the desired side of the litre saw stand and adjust the height of the workpiece support (D) such that the support surface (D.2) is at the same height as the workpiece support of the saw. (Fig. 12)
Loosen the star-grip screws (J) to slide the workpiece support horizontally.
Set the desired distance between the saw blade and the stop surface (D.1). (Fig. 11)
Lock your setting by tightening the star-grip screws (J) again.
CLEANING, MAINTENANCE, STORAGE AND TRANSPORT
IMPORTANT!
Before any cleaning or maintenance work, the electrical tool fitted must be switched off and the mains plug disconnected, or battery pack removed! Risk of injury!
Cleaning
Keep the litre saw stand as free of dust and dirt as possible. Rub the litre saw stand clean with a clean cloth or blow debris off with compressed air at low pressure.
We recommend that you clean the mitre saw stand immediately after every use.
Clean the stand at regular intervals using a damp cloth and a little soft soap. Do not use any cleaning products or solvents - they could attack the plastic parts of the mitre saw stand.
Storage
ATTENTION!
Store the litre saw stand only in dry locations. Do not allow access to the litre saw stand by unauthorised persons or children.
Transport
ATTENTION!
Do not transport whilst the electric power tool is running.
Before moving the litre saw stand, pull out the mains plug, or remove the battery pack, of the electric power tool mounted on it! Risk of injury due to electric shock and unexpected start-up of the power tool!
Two people can lift the litre saw stand by its frame bed in order to move the litre saw stand within rooms (do not drag it along the ground).
If being transported in a vehicle, remove the electric power tool first. Fold up the legs for transport.
Ensure that the load is well secured if transporting the litre saw stand in a motor vehicle.
JCB TOOLS WARRANTY TERMS AND CONDITIONS
JCB Power Tools are guaranteed against manufacturing defects for up to 3 years from date of purchase. Proof of purchase required. This does not affect your statutory rights.
The original sales receipt will be required in the event of any claim within the warranty period. Warranty cover commences from the date of purchase on the retail sales receipt and is valid only for JCB Tools products bearing the CE mark and a visible serial number. In the unlikely event your JCB Power Tool is subject to a manufacturing fault within the warranty period, please contact the seller/retailer where the item was purchased.
The above repair or replacement of products will be undertaken providing that:
The product has been subject to fair wear and tear only.
The product has not been subject to accidental or cosmetic damage.
The product has not been misused and has been used only in accordance with the instruction manual provided.
The product has not been subject to overload or insufficient servicing and maintenance.
The product has not been subject to any abnormal environmental conditions or inappropriate operating conditions.
Repairs have not been attempted by an unauthorised person and no modifications have been made to the product.
Repairs have not been undertaken using non-genuine spare parts.
JCB Power Tools used for Hire Fleets or as part of B2B and Service Contracts are not covered by these terms and conditions.
JCB Tools Warranties excludes the following (where relevant):
Components normally subject to wear such as carbon brushes.
Batteries, Chucks and Chargers.
Accessories and consumable items.
Cases and tool storage products.
Delivery and repair charges may apply at our discretion should the warranty claim be invalid for any of the reasons illustrated above. In the event charges are not accepted the product will be retained by JCB Tools and remain the property of JCB Tools. Only products purchased from JCB Tools authorised sellers are covered by the warranty.
JCB TOOLS WILL NOT BE LIABLE FOR ANY INJURIES OR CONSEQUENTIAL DAMAGES RESULTING FROM USE OF THIS PRODUCT.
CONDITIONS GÉNÉRALES DE LA GARANTIE JCB TOOLS
CINCBK CKOMNOHEHTN 5
TEXHnueCKn DAHHN 6
INHCTPYKUN 3A PABOTA 7
IpeHa3NaueHa ynoTpe6a 7
Ipei da 3aOnuHete pa6ota c o6OpyDbaneto 7
CΓΟΥBAHE έρΑΒΟΤΑ 8
UnpouHaTa N BnCOuHaTa Ha NoDnpnte
3a pa6oTHnMaTePnaI MoTa Da ce peRyInpAT C BnHTOBeTe CbC 3Be3do06pa3H npkoXBaTk (J, K). (Фиr. 6)
ФИКСИРане Ha HacToJHaTa Maшинa (ФИr.7)
KbM cToiKaTa 3a Notanu CnpkyIpa Moar Ta ce fncnpat pa3nHn HactoHn MaunHn Ype3 peyInpaHe Ha nOpnHte paMeHe (B) cnpraMo pa3ctOHNeTo Ha MOHTaXHnTe OTBOpN Ha MaunHaTa.
ПocTaBeTe HAcToJIHaTa MaUHnHa (HaIpIeMep NotaTЯu CInpKyIaR) Bbpxy noDnpHnTe pameHe (B) (fIr.7).
3aTeHHeT HeactoHaTa MaunHa c 4 BnHTa (F), 4 wai6n (G), 4 npyHHn Wai6n (H) n 4 WectobbLnH raikn (I) 3a BCaKO OT NOdNOPHnTe paMeHe.
3aTeHHeTe BnHTOBeTe CneI CrlNo6BaHeTo.
ФИКСИРаTe NOДПОРНITE pameHe (B)c MOHTIpaHaTа HaCTOJIHa MaIINHa Bbpxy CTоИKaTа 3a NotaIaUцИркУлр, KaKTo e OписаHo Ha cTp.8.
Ako MaunHaTa Bn NMa pa3NHyOp a3CToHHe Ha MOHTaXHnTe OTBOpN, n3NoJ3BaIte npedocTaBeHnTe HanpeuHn rpeDn (C) KaTo aadanTep, KaKTo cneDbA:
ПозиционирайTe HanpeuHnTe rpei (C)Ha noДпорнite pameme (B)иг 3aterheTe c 4 BnHTa (E),4 sha6n (G),4 npyxHHn Sha6n (H) n 4 weecToBbHn raikn (I). (ФИr.8-9)
ПocstabeteHaCTOJIHaTaMaIINHa Bbpxy HanpeuHnTe rpeiN (C). (Фиг.10)
3aTeHHeTe HactoHaTa MaunHa c 4 BnHTa (F), 4 wai6n (G), 4 npyXHHn Wai6n (H) n 4 WectobIHNr RaIKn (I) 3a BCraKa OT HanpeuHnte rpeN.
3aTeHHe BnHTOBe CneI crNo6BaHTo.
ФИКСИРаTe NOДПОРНte pamHe (B)c MOHTIpaHaTa HAcTOLHa MaUHnHa Bbpxy CToIkaTa 3a Notanuц npKyJnp, KaKTo e OINcAHO Ha Ctp.8.
I3noJ3BaHe Ha cTonepuTe 3a pa6oTeH npodyKT, qnr.12
IopnpTe 3a pa60THnI npOyKT (D) nmat BrpaJeHn cToepn 3a pa60THnI npOyKT (D.2), konTO morat da ce n3POnl3BaT 3a pR3aHe Ha pa3nUHn napyeTa DbPBO c eHa n cbua dblxHa. (Φnr.11)
Pa3xla6eTe BnHTa CbC 3Be3do06pa3Ha pBkoXBaTka (K) ot XeJHaTa CTpaHa Ha cToiKaTa 3a Notanu ZnPkyIrp N peryInpaIte BnCOunHaTa Ha NoOpopaTa 3a pa6oTeH npOyKT (D), Taka ye NOBbPxHocTTa Ha NoOpopaTa (D.2) da e Ha CbUata BnCOUnHa KaTO NoOpopaTa 3a pa6oTeH npOyKT Ha znPkyIpa. (ФИг.12)
Pa3xa6eTe BnHTOBe TcBc 3Be3do06pa3HN pkoXBaTK (J), 3a Da Nb3HeTe NoOpata 3a pa6oTeH npOdyKT XOpN3OHTaIIHO.
3aaiTe XeJHaHTo pa3CTOAHne MeXdy HOxHa CnRPKylpa N NOBbPxHocTtHa cTopepa (D.1). (Фиг. 11)
3aKIOUeTe HAcTPOIKAta, KaTO 3aTeHHeTe BnHTOBeTe CbC 3Be3DOO6pa3HN pbKOXBATKN (J) OTHOBO.
ПОЧECTBAHE, ПОДДРьЖKA, СбхPAHEHNE I TPAHCПOPTИРАНЕ
BAKHO!
IpeN KaKbTo n da 6nlo pa6oTa no
NouchBaHe nn PoDpBxKa, MOHTnpaHnT
eNeKtpnueckn HnCTpyMeNT Tpr6Ba Da ce
n3KnOuHn UePceJIbT Da ce N3BaDi OT
KOHTa nn 6aTePnra Ta da Ce n3BaDi! Puck
OT HapaHyaHe!
Почистванe
ДрьхTe cToiKaTa 3a notanuI cyPkynrBb3MOxHO Ha-NUCTa OT npax N 3ambpCyaHn. N3TbPKBaIte cToiKaTa 3a NOTAnuI cyPkynrP C Kbpna 3a NOUcTBaHe nIN N3dYXBaIte 3AmbpCyaHnTa CbC CbCTeH Bb3dYx NOI HNCKO HAIraHe.
ПрелорьВаме Ви Да NOУСТВаTe CTойКаТа 3a NOTаПЯЦИРКУЛЯн HeNOCpeДСТВЕНО СLEД BCЯ yNoTpe6a.
Поунстваite StOKaTa Ha peDOBHn INHTepBaJIc C BlaJXHa KbPna N MaIko Jek canyH. He n3NoI3BaIte NoUCTBaU npenapatn IIN pa3TBOpNTeN - Te MoRaT Da yBpeJrT PIACTMaCObITE KOMNOHeHTN Ha StOKaTa 3a Notanpa TnpKylp.
CbxpaHeHne
BHIMAHNE!
CbXpaHЯBaIte cToiKaTa 3a NotanJUcNpKyIep cAmO Ha cyxN MeCTa. He DOnyckaIte DoCTbI N DO cToiKaTa 3a NotanJUcNpKyIep OT CTPaHa Ha HeynblHomOuSeH NIIua NII neLa.
TpaHcnpTnpaHe
BHIMAHNE!
He TpaHcnpOpTnpaIte,doKaTo eNeKtpnuecknT nHcTpymeHT pa6OTn.
Ipei Da MeCTIe cToiKaTa 3a Notanu
UnpKyIep, N3BaTe Te UeIcEla IIN
N3BaTe 6aTePnraTa Ha MOHTpaHna
Ha He JEleKtpnueckn INCTpyMeNT! PnCK
OT HapaHbAHe NopaDi TOKOB yAp n
HeouaKBaHO CTapTnpaHe Ha eEleKtpnueckn
INCTpyMeNT!
ДВама Души могат Да NOВДИГНAT CTОКАТ 3a NOTAPЯЦИРКУЛР 3a ЛERПОТ HA pAMKATA, 3a Дa MOrAT Дaя пЕмecтЯТ B paMKITE Ha NOMEUSEHNETo (HeЯ ВlaЧeTe ПОЗмЯТ).
Ako ige ce TpaHcnpTnpa B npeBO3Ho CpeDCTBO, NpBPO DeMOHTnpaIte eNeKtpnueckn HnCTpymEn. PpeN TpaHCnpTnpaHe cBBAInTe KpaKaTa. YBepTe ce, ye ToBapbTe eo6pe oBe3OpaceH, aKO TpaHCnpTnpaTe cToiKaTa 3a Notanu CuPKyJrp B MOTOPHO npeBO3Ho CpeDCTBO.
OBsIgTAPAHcIOHn YCIOBna HA JCB TOOLS
JCB Power Tools ca rapaHTnpaHn cpeu npOn3BOndBeHn deΦeKtn Do 3 rOuHn OT daTata Ha 3aKynyBaHe. Heo6xOIMO e doka3aTeNCTBO 3a NOKyPkA. ToBa He 3acra BaunTe 3aKOHOBn npaba.
OpunnaHaata pa3ncca 3a npda6ata ige ce n3ncBa B cnuya H a peKnaMaunB paMKnte Ha rapaHOnHHn cPOK.
TapaHcnoHTo nokpnte 3anOuBa OT daTata Ha 3aKynBaHe Ha pa3nckaTa 3a npodaXbHa dp6Ho I e BaIiDHO camo 3a npodykTu Ha JCB Tools, Hocese m MapKnipOBka CE i BvIM cepneH Homep.
B cnuyaHa BepoTHOCT Baunr JCB Power Tool e o6eKHa npOn3BOdCTBeHa NobpeHa paMKnTe Ha rapaHcIOHHna nepnoD, MoJ, CbPKeTe ce c npOdaBaUa / TbProBeua, KbDeTo e 3aKynen apTNUkIbT.
Tognnt pemont nnn noJamHa Ha npOdykTu ue ce npedpneMe npu ycNoBue ue:
PpOdykTbTe nOJIOxKeH cMo Ha cnpaBeJIINBO N3HOcBaHe.
IpoDyKTBHe e 6nI NOdNoXeH Ha clyaHn nn Ko3MeTuHn NobpeiN.
IpoDyKbT He e 3IoynOTpe6aHaN i Ce n3NoJ3Ba cAmO B CbOTBeTCTBHe C npEIOCTaBEHOTOp bKOBoCTBO 3a yNoTpe6a.
IpoodykTbT He e 6nI IoIIOxHn Ha IpeTOBapBaHe nIi HnEOCTaTbUHO O6CnyXBaHe nIooIpbKka.
IpoDyKbT He e 6nI IoDnoKeH Ha HeoBuaHn ycNoBna Ha OKoHaTa cpea nn HneOxOJaun EKCnloaTaunOHn ycNoBna.
Pemontn He ca npabehn OT Heotopn3npaHO Iune n He ca Hapabehn IpomeH B IpodykTa.
He ca npednpneTn peMOHTn c n3noJ3BaHe Ha opuHnHaHn pe3epBn qactn.
EneKtpOnHcTpymEnTe Ha JCB, n3noJ3BaHn 3a fNoTn noI Haem nn KaTo qacr ot B2B n Dorobopn 3a ycnyr, He ca o6XbaHaTn OT HactoJnte yCNOBna.
Tapaunnte 3a JCB Tools n3KIOuBaT cIeHOTo (Korato e npnoxmo):
KOMHOHEHTnte, KOINTO O6NKHOBeHO Ca N3IOXeHN Ha N3HOCBaHe, KaTO BbTpeoHN YeTkn.
BaTePnN, naTpoHHnCn n 3apAaHn.
Akecoapn KOHCymaTbN.
Kanbfo n npoyn 3a cbxpaHeHne Ha nHCTpyMeHTn.
Ako Baunr npOyKT Bb3HnKHe NOBpea, CbpxKeTe ce c npOdaBaay / TbproBeua, KbJeTo e 3aKyneH, 3aeHNO C pa3nckata 3a npOdaK6n.
Takcnte 3a doctabka n peMOHT MOraT da ce npnilarat no Hawa npeeHka, aKO rapaHcuOHHaTa npetehn e HeBaJIiHa nO HAKoA OT npuHInTe, nIOCTpnpaHn no-rope. B clyuay che Takcnte He ce npneMaT, npodukTBt 6bde 3aIbpxaH ot JCB Tools n ige octaHe co6CTbeHocr Ha JCB Tools.
Tapaunra ce nokpna camo OT npodyktn, 3akynenOT OTopn3npaHn npdaBauHa JCB Tools.
JCB INHCTPYMEHTITE HAMA DA OTROBAPRT 3A HNIO HAPUJEHNAI NIOCLENYBPEKDAHNA, PE3YJTATN OT YNOTPEBA HA TOBA IPODyKT.