46S Combi - Lawn mower JCB - Free user manual and instructions
Find the device manual for free 46S Combi JCB in PDF.


| Product Type | Pedestrian Lawnmower (Self-Propelled) |
| Brand | JCB |
| Model | 46S Combi |
| Engine | Honda GCV 135 |
| Cutting Width | 46 cm |
| Cutting Height | 27-80 mm (5 positions) |
| Weight | 30 kg |
| Overall Dimensions (L x W x H) | 150 x 52 x 107 cm |
| Grass Collection | Grass-catcher included |
| Mulching Capability | Yes (requires deflector cap) |
| Blade Brake | Yes (engine stops when lever released) |
| Drive Engagement | Lever-operated forward drive |
| Blade Code | 81004346/0 |
| Blade Torque | 35-40 Nm |
| Belt Tension Adjustment | 6 mm deflection |
| Noise Level (Operator Ear) | 80.7 dB(A) |
| Guaranteed Sound Power Level | 96 dB(A) |
| Vibration Level | 6.0 m/s² |
| Warranty | 3 years (subject to service) |
| Safety Features | Stone-guard, blade brake, engine brake lever |
| Recommended Engine Oil | See engine manual |
| Fuel Type | Petrol (unleaded) |
| Customer Helpline | 0845 6005526 |
Frequently Asked Questions - 46S Combi JCB
User questions about 46S Combi JCB
0 question about this device. Answer the ones you know or ask your own.
Ask a new question about this device
Download the instructions for your Lawn mower in PDF format for free! Find your manual 46S Combi - JCB and take your electronic device back in hand. On this page are published all the documents necessary for the use of your device. 46S Combi by JCB.
USER MANUAL 46S Combi JCB
Safety and operating manual
Pedestrian Lawnmowers
JCB 46S COMBI
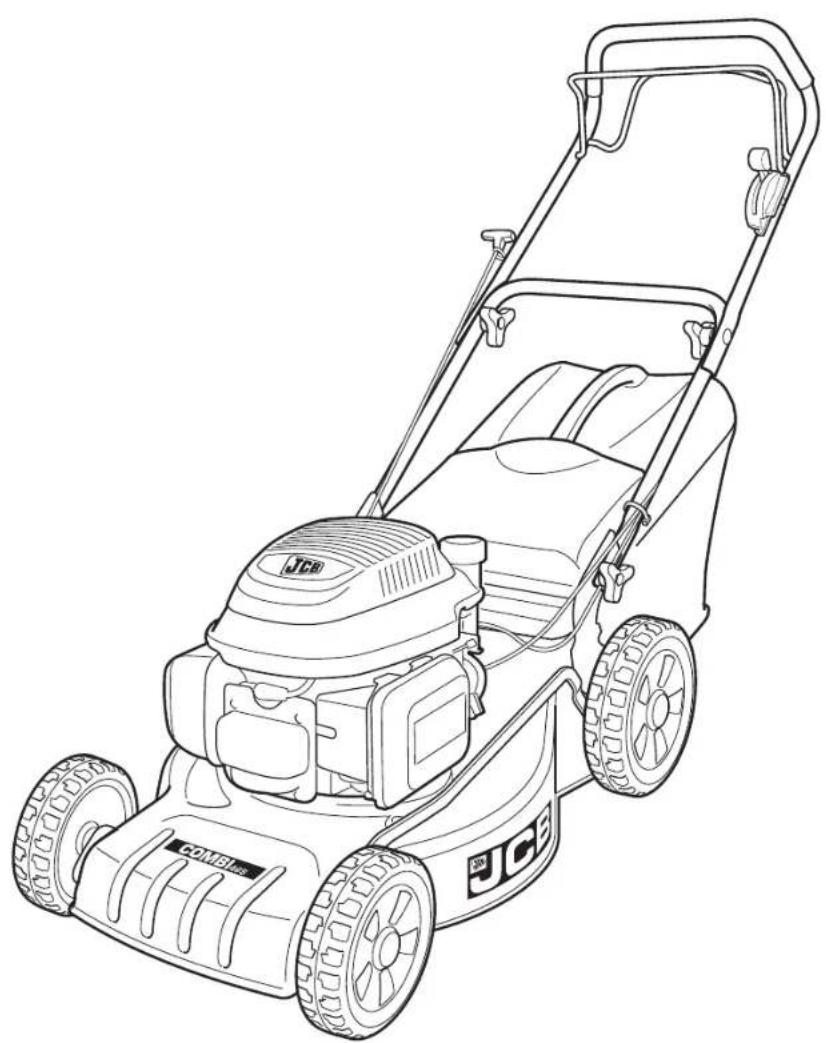
natural_image
Line drawing of a JCB lawn mower with visible blades and wheels (no text or symbols)ORIGINAL INSTRUCTIONS
JCB, SO53 3LE
www.JCBDIY.com
Customer Helpline 0845 6005526
Identification label, main components and symbols
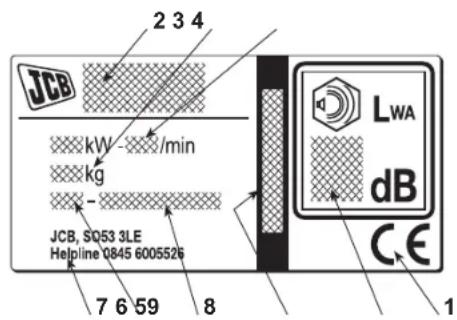
Identification label
- Conformity mark according to directive 2006/42/CE
- Type of machine
- Weight in kg
- Operating engine power and speed
- Acoustic power level according to directive 2000/14/CE
- Serial number
- Name and address of manufacturer
- Article Code
- Year of manufacture
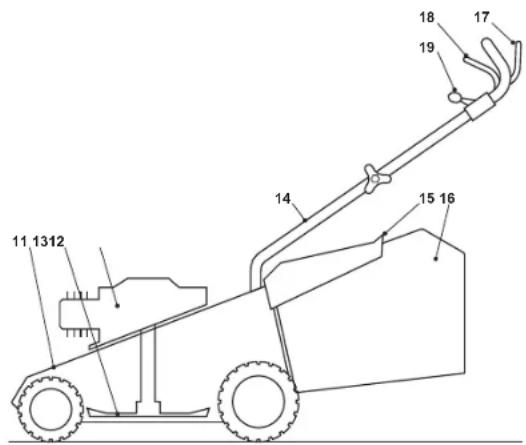
Identification of main components
- Chassis
- Blade
- Engine
- Handle
- Stone-guard
- Grass-catcher
- Drive engagement lever
- Engine brake lever
- Throttle control

Symbols of safety requirements
Your lawnmower should be used with due care and attention. Symbols have therefore been placed on various parts of the machine to remind you of the main precautions to be taken. Their meaning is explained below. You are also asked to carefully read the safety regulations in the applicable chapter of this handbook.
- Important: Read the instruction handbook before using the machine.
- Danger of thrown objects. Keep other people at a safe distance whilst working.
- Danger of cutting. Blades in movement. Do not put hands or feet near the blades. Remove the spark plug lead and read instructions before carrying out any repair or maintenance.
- Only for electric lawnmowers.
- Only for electric lawnmowers.
Safety Regulations - To be followed carefully
A) TRAINING
1) Read the instructions carefully. Get familiar with the controls and proper use of the equipment. Learn how to stop the engine quickly.
2) Only use the lawnmower for the purpose for which it was designed, i.e. for cutting and collecting grass. Any other use can be hazardous, causing damage to the machine. Examples of improper use may include, but are not limited to:
- transport of people, children or animals on the machine;
– being transported by the machine;
– using the machine to tow or push loads;
– using the machine for leaf or debris collection;
- using the machine to trim hedges, or for cutting vegetation other than grass;
– use of the machine by more than one person;
– using the blade on surfaces other than grass.
3) Never allow children or people unfamiliar with these instructions
to use the lawnmower. Local regulations may restrict the age of the operator.
4) Never use the lawnmower:
- When people, especially children, or pets are nearby.
- If the operator has taken medicine or substances that can affect his ability to react and concentrate.
5) Remember that the operator or user is responsible for accidents or hazards occurring to other people or their property.
B) PREPARATION
1) While mowing, always wear sturdy footwear and long trou sers. Do not operate the equipment when barefoot or wea ring open sandals.
2) Thoroughly inspect the area where the equipment is to be used and remove all objects which may be thrown by the machine or damage the cutter assembly and the engine (stones, sticks, metal wire, bones, etc.)
3) WARNING: DANGER! Engine fuel is highly flammable:
- Store fuel in containers specifically designed for this purpose.
- Refuel using a funnel and outdoors only. Do not smoke while refuelling or whenever handling the fuel.
- Add fuel before starting the engine. Never remove the cap of the fuel tank or add fuel while the engine is running or when the engine is hot.
- If fuel is spilled, do not attempt to start the engine but move the machine away from the area of spillage and avoid crea ting any source of ignition until the fuel has evaporated and the vapour dispersed.
– Replace all fuel tanks and containers caps securely.
4) Substitute faulty silencers.
5) Before use, always inspect the machine, especially the condition of the blades, and check that the screws and cutting assembly are not worn or damaged. Replace worn or damaged blades and screws in sets to preserve balance.
6) Before mowing, attach the discharge opening guards (grass-catcher or stone-guard).
C) OPERATION
1) Do not operate the engine in a confined space where dange rous carbon monoxide fumes can collect.
2) Mow only in daylight or good artificial light.
3) If possible, avoid operating the equipment in wet grass.
4) Always be sure of your footing on slopes.
5) Walk, never run and do not allow yourself to be pulled along by the lawnmower.
6) Mow across the face of slopes, never up and down.
7) Exercise extreme caution when changing direction on slo pes.
8) Do not mow on slopes of more than 20°.
9) Exercise extreme caution when pulling the lawnmower to wards you.
10) Stop the blade if the lawnmower has to be tilted for transportation when crossing surfaces other than grass, and when transporting the lawnmower to and from the area to be mowed.
11) Never operate the lawnmower with defective guards, or without safety devices, such as the stone-guard and/or grass-catcher,
in place.
12) Do not change the engine governor settings or overspeed the engine.
13) On power-driven models, disengage the drive clutch before starting the engine.
14) Start the engine carefully, following the instructions and keeping feet well away from the blade.
15) Do not tilt the lawnmower when starting the engine. Start the engine on a flat surface that is free of obstacles and tall grass.
16) Do not put hands or feet near or under rotating parts. Keep clear of the discharge opening at all times.
17) Never pick up or carry a lawnmower while the engine is running.
18) Stop the engine and disconnect the spark plug wire:
- Before carrying out any work underneath the cutting deck or be fore unclogging the chute;
– Before checking, cleaning or working on lawnmower;
- After striking a foreign object. Inspect the lawnmower for damage and make repairs before restarting and operating the lawn mower;
- If the lawnmower begins to abnormally vibrate (Immediate look for the cause of the vibrations and take for necessary controls at a Specialised Centre).
19) Stop the engine:
- Whenever you leave the lawnmower unattended. Remove the key from models with electric starters.
- Before refuelling.
– Every time you remove or replace the grass-catcher.
– Before adjusting the grass cutting height.
20) Reduce the throttle before turning off the engine and turn the fuel off when you have finished mowing, following the in structions in the engine handbook.
21) When mowing, always keep to a safe distance from the rotating blade. This distance is the length of the handle.
1) Keep all nuts, bolts and screws tight to be sure the equipment is in safe working condition. Regular maintenance is essential for safety and performance.
2) Never store the equipment with fuel in the tank inside a building where vapour may reach a flame or a spark or a source of extreme heat.
3) Allow the engine to cool before storing in an enclosed space.
4) To reduce the fire hazard, keep the engine, exhaust si len cer, battery compartment and fuel storage area free of grass, leaves, or excessive grease. Do not leave containers with grass cuttings in rooms.
5) Check the stone-guard and grass-catcher frequently for wear and deterioration.
6) If the fuel tank has to be drained, this should be done outdoors and when the engine is cool.
7) Wear strong work gloves when removing and re assembling the blade.
8) Keep the blade balanced during sharpening. All operations on the blade (dismantling, sharpening, balancing, re moun ting and/or replacing) require a certain familiarity and special tools. For safety reasons, these jobs are best carried out at a specialized centre.
9) For safety reasons, never use the machine when it has worn or damaged parts. Parts are to be replaced and not repaired. Use genuine spare parts. Parts that are not of the same quality can damage the equipment and impair your safety.
E) TRANSPORTATION AND HANDLING
1) Whenever the machine is to be handled, raised, transported or tilted you must:
- wear strong working gloves;
- grasp the machine at the points that offer a safe grip, taking account of the weight and its distribution.
- use an appropriate number of people for the weight of the machine and the characteristics of the vehicle or the place where it has to be placed or collected.
2) During transport, fasten the machine securely with ropes or chains.
Assembly Instructions
Tools required, not supplied
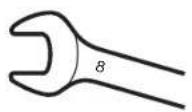
NOTE - The machine can be supplied with some parts already assembled.
WARNING - Unpacking and completing the assembly should be done on a flat and stable surface, with enough space for machine handling and its packaging, always making use of suitable equipment.
Disposal of the packaging should be done in accordance with the local regulations in force.
Fittings supplied
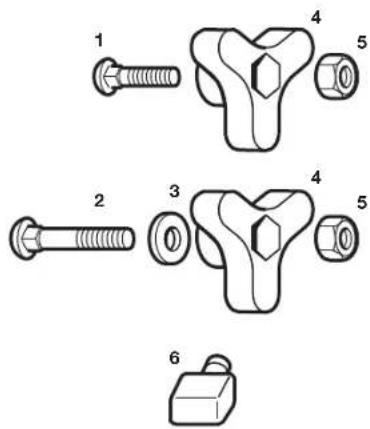
Ref. Description Q.ty
1 Round Head square neck Bolt M8 x 35 2
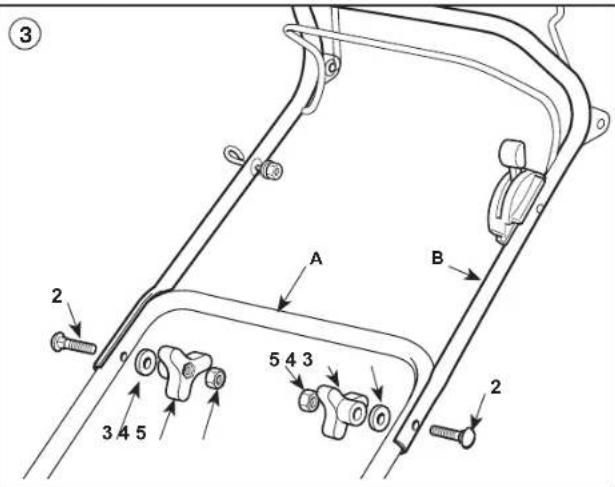
2 Round Head square neck Bolt M8 x 55 2
3 Washer 2
4 Hanle Fixing Knob 4
5 Hexagonal Nut M8 4
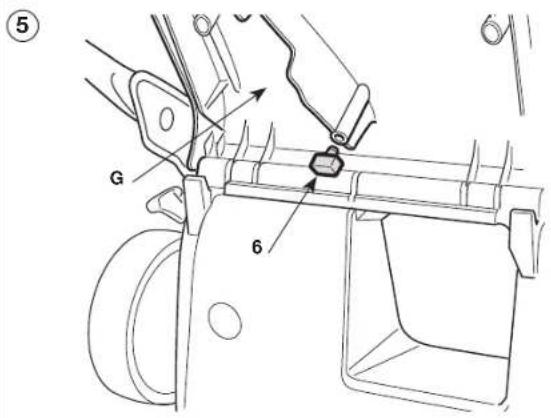
6 Plastic pin 1
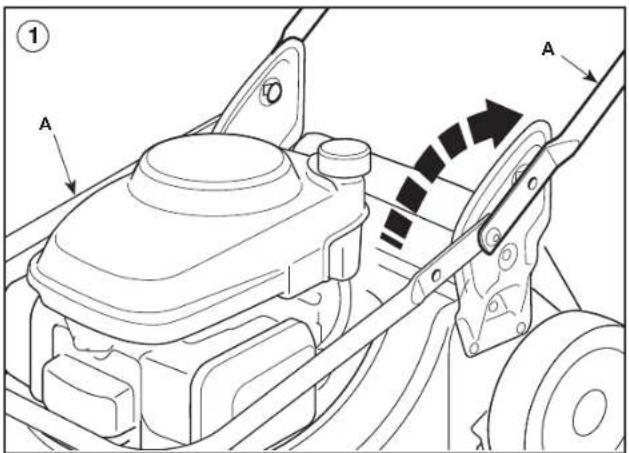
1.
Raise the lower part of the pre-fitted handle (A) to its working position.
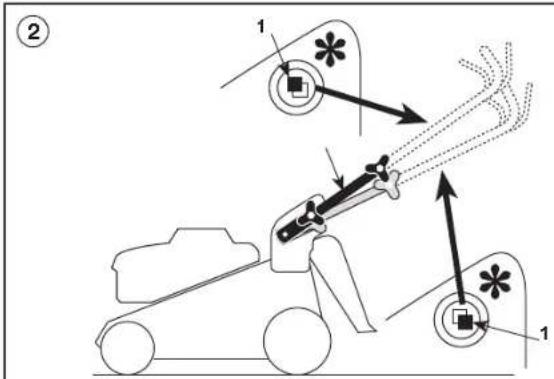
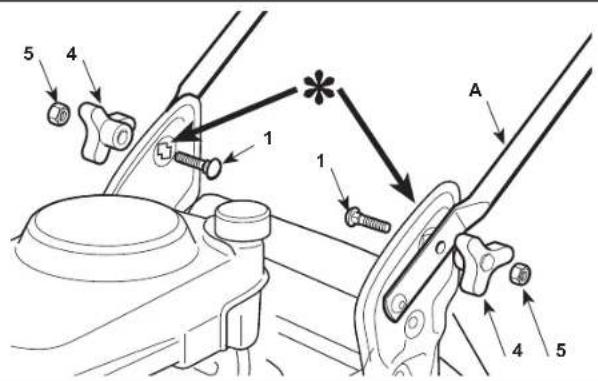
2.
To achieve the proper height of the handle, insert the square part of each bolt (1) in one of the two square seats of the side brackets and secure the lower part of the handle (A) to the chassis brackets using the knobs (4) and nuts (5) supplied.
Assembly Instructions
3.
Attach the top of the handle (B) using the bolts (2), washers (3), knobs (4) and nuts (5) supplied, as shown.
4.
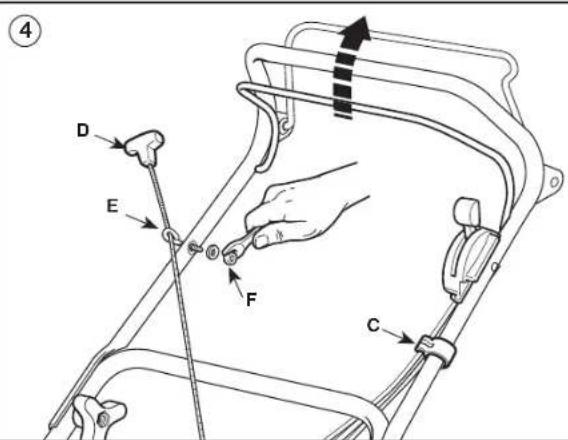
Fit the cable clamp (C) as shown and secure the control cables.
Release the blade brake by holding the control lever against the handle.
Pull the starter rope (D), fit it in the guide spiral (E) and tighten the nut (F).
5.
Fit the pin (6) in the hole provided inside the stone-guard (G).
6.
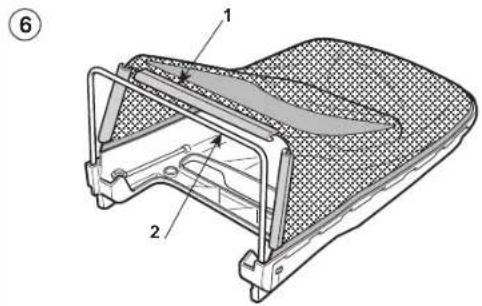
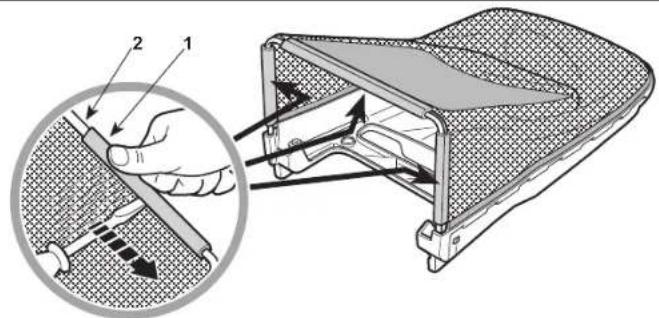
With the top upside-down, attach the plastic bars (1) to the frame (2) using a screwdriver, as shown in the drawing.
7.
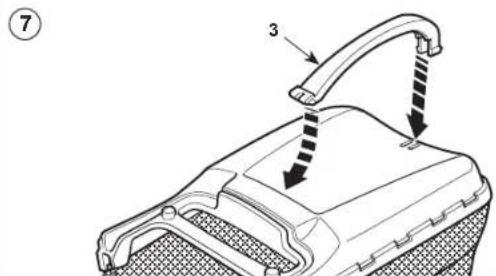
Fit the handle (3) onto the top of the grass-catcher so that it clicks into place.
Description of controls
natural_image
Line drawing of a car seatbelt mechanism (no text or symbols)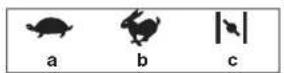
Throttle trigger
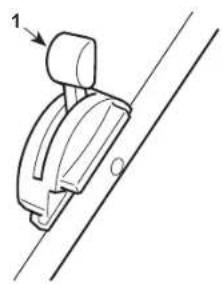
The throttle (where fitted) is controlled by the lever (1) and positioned as shown on the relative plate.
a. Slow
b. Fast
c. Choke
Blade brake lever
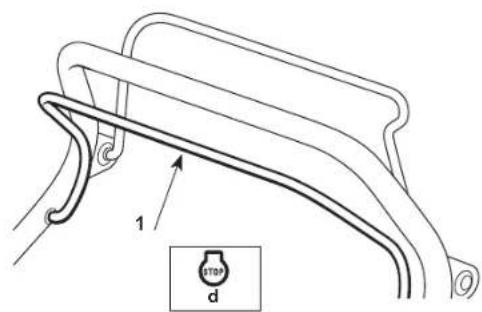
The blade brake is controlled by the lever (1), which should be held against the handle when starting and using the lawnmower.
The engine stops when the lever is released.
d. Engine stop
Drive engagement lever
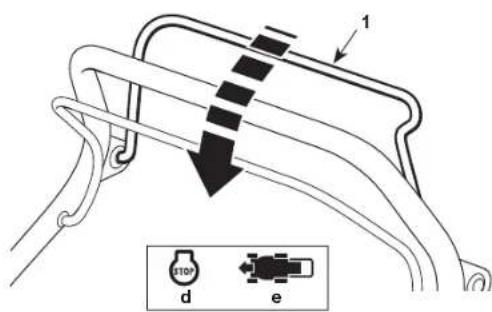
Draw the lever (1) towards the handle for forward movement.
The lawnmower stops moving forward when the lever is released.
d. Engine stop
e. Drive on
Cutting height adjustment
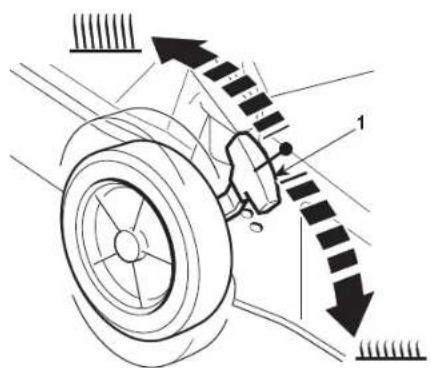
The cutting height is adjusted using the lever (1).
MAKE THIS ADJUSTMENT ONLY WHEN THE BLADE HAS STOPPED MOVING.
Operation
IMPORTANT:
Before starting the engine for the first time, carefully read the instructions as set out in the engine handbook.
CAUTION! Check oil level before starting.
For instructions regarding the engine, read the relevant manual.
Preparing the machine
This machine cuts lawns in various modes; before starting work, prepare the machine based on how the lawn is to be mowed.
MAKE THIS ADJUSTMENT WHEN THE ENGINE IS OFF.
1
2
3
1.
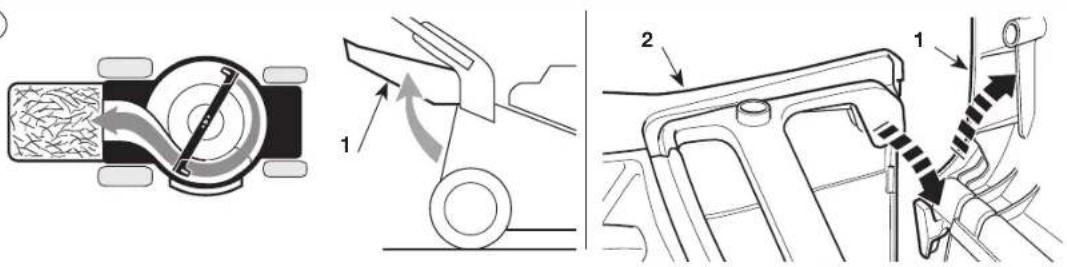
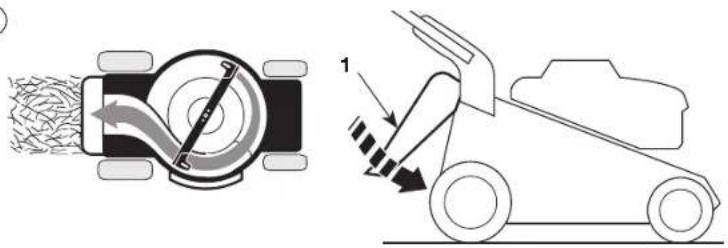
Preparation for grass cutting and collection in grass-catcher:
- Lift the rear stone-guard (1) and correctly hook on the grass-catcher (2) as shown in the figure.
2.
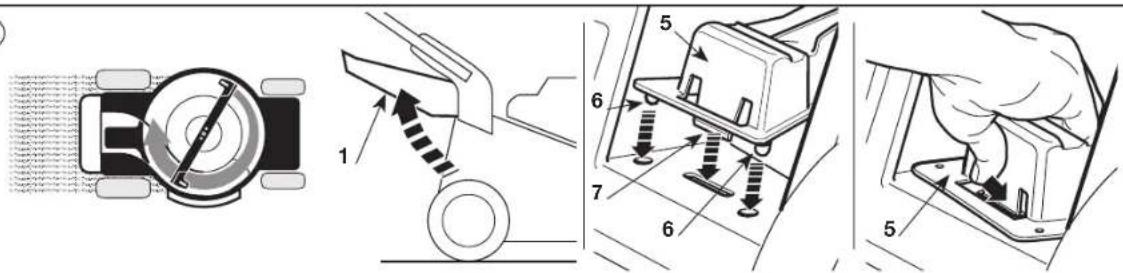
Preparation for grass cutting and rear discharge:
- Remove the grass-catcher and check that the rear stone-guard (1) maintains its lowered position;
3.
Preparation for grass cutting and mulching
- Lift the rear stone-guard (1) and fit the deflector cap (5) in the outlet, keeping it slightly tilted to the right. Fasten it by fitting the two pins (6) into the holes provided until the fastener tooth clicks into place (7).
To remove the deflector cap (5), lift the stone-guard (1) and press down on the centre until the tooth (7) is released.
Operation
Starting the engine
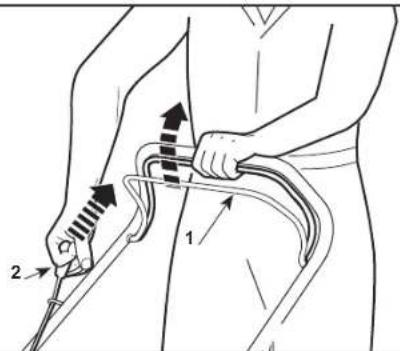
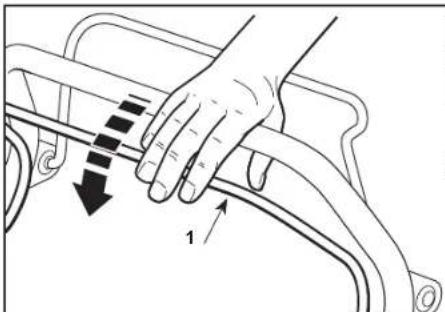
To start, follow the instructions in the engine manual, pull the blade brake lever (1) against the handle and firmly pull the starter cable knob (2).
natural_image
Diagram of a heat exchanger with two numbered components and a central chamber (no text or symbols)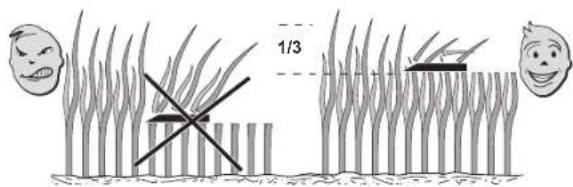
Grass cutting
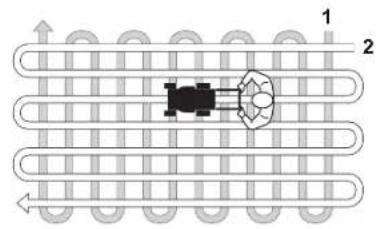
The lawn will look better if it is always cut to the same height and in alternate directions.
A machine with the MULCHING system cuts the grass, chops it finely and then blows it down into the lawn.
The grass clippings need not be collected.
The following rules should be observed to give the best MULCHING effect:
- Use a high engine speed (full throttle).
- Do not mow when the grass is wet.
- Do not cut the grass too short. Not more than 1/3rd of the length should be cut off.
- Ensure that the area under the mower casing is always kept clean.
- Always use a well-sharpened blade.
natural_image
Illustration of a hand pressing down on a car wheel, showing motion direction (no text or symbols)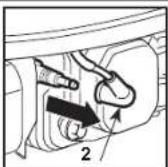
End of operations
When you have finishing mowing, release the brake lever (1) and disconnect the spark plug cap (2).
WAIT FOR THE BLADE TO STOP before carrying out any type of work on the machine.
LAWN CARE RECOMENDATIONS
Each type of grass has different features and may thus require different ways to care for the lawn; always read the instructions on seed boxes for mowing height for the growth conditions in the work area.
Keep in mind that most grass is made up of a stem and one or more leaves. If leaves are fully cut, the lawn is damaged and growth is more difficult.
The following indications generally apply:
- too low a cut causes grass tears and uprooting, with a "spotted" aspect;
- in the summer, cutting must be higher to avoid the ground from drying;
- do not cut wet grass; this could reduce blade efficiency due to sticky grass and tear the lawn;
- for particularly high grass, initially mow at maximum cutting height followed by a second mow after two or three days.
Maintenance
IMPORTANT – Regular, careful maintenance is essential for keeping the safety level and original performance of the machine unchanged in time. Store the lawnmower in a dry place.
1) Wear strong working gloves during any cleaning, maintenance or adjustment operation on the machine.
2) Carefully clean the machines with water after each cut; remove the grass debris and mud accumulated inside the chassis to avoid their drying and thus making the next start-up difficult.
3) The paintwork on the inside of the chassis may peel
off in time due to the abrasive action of the cut grass; in this case, intervene promptly by touching up the paintwork using a rustproof paint to prevent the formation of rust that would lead to corrosion of the metal.
4) Should it be necessary to access the lower part, only tilt the machine from the side shown in the engine handbook; following the relative instructions.
5) Do not drip petrol onto the plastic parts of the motor or the machine to prevent damaging them and remove all traces of spilt petrol immediately. The warranty does not cover damage to plastic parts caused by petrol.
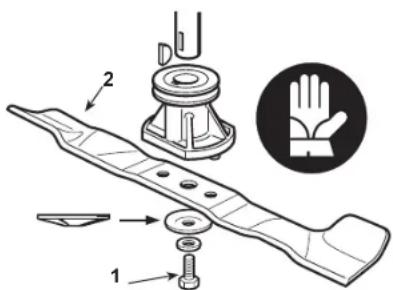
Maintenance on the blade is best if conducted at a specialised Centre that has the most appropriate tools.
Only blades with the following codes must be used on this machine:
81004346/0
Blades must always be marked ▲Given the product evolution, the above mentioned blade may be replaced in time by others, with similar interchangeable and operating safety characteristics.
Reassemble the blade (2) with the code and markings facing the ground, following the order indicated in the illustration.
Tighten the central screw (1) using a torque wrench set to 35-40 Nm.
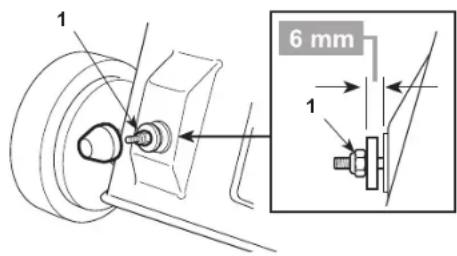
If necessary, adjust the tension of the belt with the nut (1), to get the right measurement (6 mm).
Environmental protection
Environmental protection should be a priority of considerable importance when using the machine, for the benefit of both social coexistence and the environment in which we live.
- Try not to cause any disturbance to the surrounding area.
- Scrupulously comply with local regulations and provisions for the disposal of waste materials after cutting.
- Scrupulously comply with local regulations and provi-
sions for the disposal of packaging, oils, petrol, batteries, filters, damaged parts or any elements which have a strong impact on the environment; this waste must not be disposed of as normal waste, it must be separated and taken to specified waste disposal centres where the material will be recycled.
- At the time of decommissioning, do not pollute the environment with the machine, hand it over to a disposal centre, in accordance with the local laws in force.
Specifications
Maximum noise and vibration levels
Operator ear noise pressure level (according to
regulation 81/1051/EEC).... db(A) 80.7
- Measurement uncertainty (2006/42/EC - EN 27574) . db(A) 0.8
Measured acoustic output level (according to
directive 2000/14/EC, 2005/88/EC). db(A) 94.2
- Measurement uncertainty (2006/42/EC - EN 27574).. db(A) 0.7
Guaranteed acoustic output level (according to
directive 2000/14/EC, 2005/88/EC) db(A) 96
Vibration level (according to the standard EN 1033) ..... m/s 6.0
- Measurement uncertainty (2006/42/EC - EN 12096) .. m/s ^3 0.7
Engine. . . . . . . . . . . . . . . . . . . . . . . . . . . . . . . . . . . . . . . . . . . . . . . . . . . . . . . . . . . . . . . . . . . . . . . . . . . . . . . . . . . . . . . . . . Honda GCV 135
Dimensions (L x W x H) cm ..... 150 x 52 x 107
Weight kg 30
Cutting width cm 46
Cutting Heigh (5 positions) mm 27 - 80
Warranty Statement
Cutting edge construction technology in your hands
In 1945 JCB began producing construction equipment. Today, we build the world's number one diggers, each one the product of our unswerving focus on innovation, quality and engineering. JCB lawn mowers are built to give you the same world beating standards of performance. The same innovation, to always get the job done better, the same quality, to never let you down, the same engineering heritage and expertise that you can trust 100% .
JCB lawn mowers are guaranteed against manufacturing defects for a period of 3 years from the date of purchase. If your JCB lawn mower becomes defective within this warranty period, we guarantee to:
- Replace or repair all defective parts, free of charge, or
• Repair products free of charge, or - Replace the unit with a new or re-conditioned unit, free of charge.
Conditions
Your 3 year guarantee is subject to the machine receiving a service at the recommended intervals by an authorised agent and does not cover defects caused by or
resulting from:
• overload, misuse, or neglect
• normal wear and tear, including accessory wear
- trade or hire use
- repairs attempted by anyone other than an authorised agent
- damage caused by foreign objects, substances or accidents
Your 3 year guarantee does not cover:
- battery packs as they are guaranteed for a 12 month period
• accessories supplied with the lawn mower - delivery or collection of the machine to a repair agent.
Warranty claims
For guarantee claims, please contact JCB Customer Services. You will be required to submit proof of purchase.
JCB CUSTOMER HELPLINE 0845 6005526
Terms
This guarantee does not affect your statutory rights. JCB SO53 3LE (Registered in England under No. 973387).

- Safety and operating manual
- Pedestrian Lawnmowers
- JCB 46S COMBI
- Identification label, main components and symbols
- Identification label
- Identification of main components
- Symbols of safety requirements
- Safety Regulations - To be followed carefully
- A) TRAINING
- B) PREPARATION
- C) OPERATION
- E) TRANSPORTATION AND HANDLING
- Assembly Instructions
- Ref. Description Q.ty
- 1.
- 2.
- 3.
- 4.
- 5.
- 6.
- 7.
- Description of controls
- Throttle trigger
- Blade brake lever
- Drive engagement lever
- Cutting height adjustment
- Operation
- IMPORTANT:
- CAUTION! Check oil level before starting.
- Preparing the machine
- Preparation for grass cutting and collection in grass-catcher:
- Preparation for grass cutting and rear discharge:
- Preparation for grass cutting and mulching
- Starting the engine
- Grass cutting
- End of operations
- LAWN CARE RECOMENDATIONS
- Maintenance
- Environmental protection
- Specifications
- Maximum noise and vibration levels
- Warranty Statement
- Cutting edge construction technology in your hands
- Conditions
- Warranty claims
- JCB CUSTOMER HELPLINE 0845 6005526
- Terms
Brand : JCB
Model : 46S Combi
Category : Lawn mower