Easy 90 Prestige - Cooker NOVY - Free user manual and instructions
Find the device manual for free Easy 90 Prestige NOVY in PDF.

User questions about Easy 90 Prestige NOVY
0 question about this device. Answer the ones you know or ask your own.
Ask a new question about this device
Download the instructions for your Cooker in PDF format for free! Find your manual Easy 90 Prestige - NOVY and take your electronic device back in hand. On this page are published all the documents necessary for the use of your device. Easy 90 Prestige by NOVY.
USER MANUAL Easy 90 Prestige NOVY
natural_image
Technical line drawing of a mechanical assembly with a flat plate, internal cavity, and mounting bracket (no text or symbols)NOVY
4 BESCHRIJVING VAN HET APPARAAT 8
4 BESCHRIJVING VAN HET APPARAAT
text_image
Technical diagram of a device with numbered components, likely an optical or mechanical assembly.text_image
B2 B1 A2 A1natural_image
Technical line drawing of a mechanical ventilation system with airflow indicators (no text or symbols)natural_image
Technical diagram of a ventilation system with airflow arrows indicating airflow direction (no text or symbols)natural_image
Four geometric shapes with diagonal cross marks on horizontal lines, no text or symbols presentnatural_image
Diagram of a hand pressing down on a grid-like structure mounted on a flat base (no text or symbols)natural_image
Technical diagram of a mechanical component with a magnified inset showing internal structure (no text or symbols)natural_image
Technical line drawing of a mechanical assembly with a rectangular component and mounting base (no text or symbols)Reinigen vetfilter
natural_image
Technical line drawing of a mechanical assembly with no visible text or symbolsNa het vervangen
text_image
Technical diagram of a device with numbered components, likely illustrating a mechanical assembly or assembly.text_image
B2 B1 A2 A1natural_image
Technical line drawing of an air duct assembly with internal components and airflow direction (no text or symbols)natural_image
Technical diagram of an air duct system with airflow arrows indicating movement (no text or symbols)natural_image
Four geometric shapes with diagonal cross marks, no text or symbols presentnatural_image
Diagram of a hand pressing down on a mechanical component with a tray and base (no text or symbols)natural_image
Technical line drawing of a mechanical assembly with mounting plate and component (no text or symbols)natural_image
Technical line drawing of a mechanical assembly with no visible text or symbolsActiver/désactiver le Power
text_image
Technical diagram of a device with numbered components, likely an optical or mechanical assembly.text_image
B2 B1 A2 A1natural_image
Technical diagram of a mechanical assembly with internal components and directional arrows (no text or symbols)natural_image
Technical diagram of an air vent system with airflow direction arrows (no text or labels)natural_image
Four geometric shapes with diagonal cross marks, no text or symbols presentnatural_image
Diagram of a hand pressing a slotted rectangular component on a flat base (no text or symbols)natural_image
Technical diagram of a mechanical component with a magnified inset showing internal structure (no text or symbols)natural_image
Technical line drawing of a mechanical assembly with a rectangular component and mounting base (no text or symbols)natural_image
Technical line drawing of a mechanical assembly with no visible text or symbolsNach dem Austausch:
2.1 Packaging material 114
2.2 Disposal of old appliance 114
2.3 Tips for reducing energy consumption and increasing efficiency 115
3 USING THE APPLIANCE 116
3.1 First use of the appliance 116
3.2 Precautions against damage 116
4 DESCRIPTION OF THE DEVICE 117
4.1 Principle of induction 117
4.2 Technical specifications of the induction hob 118
4.3 Noise caused by induction 118
4.4 Global overview 119
5 INDUCTION HOB 120
5.1 Control panel 120
5.2 Operation with rotary control knob 120
5.3 Controlling the hob 121
5.3.1 Switch on and off 121
5.3.2 Pan detection 122
5.3.3 Indication of residual heat 122
5.3.4 Power function 123
5.3.5 Programming auto heat up 125
5.3.6 Keep warm function 126
5.3.7 Flexzone 127
5.3.8 Child lock 128
6 EXTRACTOR 129
6.1 Control panel 129
6.2 Operation with rotary control knob 130
6.3 Operating modes 131
6.3.1 Recirculation mode (default setting) 131
6.3.2 Extraction mode 131
6.4 Extractor controls 132
6.4.1 Switch on and off 132
6.4.2 Automatic extraction 133
6.4.3 Automatic run-on function 133
7 CLEANING INDICATIONS 135
7.1 Grease filter cleaning indicator 135
7.2 Recirculation filter replacement indicator (recirculation mode only) 135
EN
8 COOKING ADVICE 136
9 CLEANING AND MAINTENANCE 138
9.1 Maintenance of the hob 138
9.2 Maintenance of the extractor 140
9.2.1 Remove the inlet grille 140
9.2.2 Replace inlet grille 140
9.2.3 Cleaning the grease filter 141
9.2.4 Replacing the monoblock recirculation filter (recirculation mode only) 142
10 TROUBLESHOOTING MINOR FAULTS 143
10.1 Messages on the hob 143
10.2 Messages at the extraction 144
10.3 Service 144
OVERVIEW FUNCTIONS NOVY EASY PRESTIGE 145
1GENERALINFORMATION
Carefully read the safety instructions, mounting instructions and user manual before installation and putting it into operation.
The safety instructions are listed in a separate booklet supplied with the appliance and listed on our website www.novy.com.
Follow the safety instructions, mounting instructions and user manual to prevent injury and material damage.
This manual makes use of a number of symbols. The meanings of these symbols are given below.
| Symbol | Meaning | |
 | Indication Explanation of an indication on the device. | |
| [YSWW] | Information/Warning | This symbol indicates an important tip or a dangerous situation |
2ENVIRONMENTAND SAVINGS
2.1 Packaging material
This appliance is protected against damage during transport by packaging. The materials used are not hazardous to the environment and are suitable for recycling. Ensure environmentally-friendly disposal of the packaging.
2.2 Disposal of old appliance
Your appliance also contains many materials that can be recycled.
Therefore, used appliances should be separated from other waste. The recycling of appliances organised by your manufacturer is in this way carried out under the best conditions, in accordance with European Directive 2012/19/EU on electrical and electronic waste. Ask your municipality or your salesperson about the closest collection point for your old appliance.
Keep old appliances out of the reach of children.
2.3 Tips for reducing energy consumption and increasing efficiency
The new appliance is exceptionally efficient and economical with energy. Some tips follow below for making your appliance even more energy-efficient and efficient.
Choose a cooking zone that matches the size of the pan. The bottom of the pan should cover the cooking zone as much as possible.
Make sure the pan is always in the centre of the cooking zone.
- Use cookware with a base diameter that matches the diameter of the cooking zone.
Place lids on pans. This prevents unnecessary heat escaping and reduces cooking fumes and condensation.
Use pans with flat bottoms. A pan with a non-flat bottom consumes more energy.
Use cookware that matches the amount of food.
A small pan requires less energy than a large, not-quite-full pan.
Use as little water as possible. The more water in the pan, the more energy is needed to heat it up.
After boiling or frying, switch back to a lower power setting in time to reduce energy consumption and to limit overproduction of vapours.
Position your cookware in such a way that rising vapours reach the extraction surface of the fan
Turn on the appliance's fan at the lowest speed when you start cooking to control humidity and eliminate cooking odours.
Increase the appliance's fan speed only when the amount of cooking vapour requires it.
Use the highest fan speed only when absolutely necessary.
If a lot of cooking vapour is released, switch to a higher fan speed in time. This is more efficient than trying to catch vapour that has already spread throughout the kitchen by using the appliance for a long time.
Use the delay mode if the appliance has one. Do not let the appliance ventilate unnecessarily after cooking.
Keep the appliance filter/filters clean to optimise grease and odour filtering efficiency.
- Ensure adequate air supply in the room, so that the appliance can operate efficiently and economically.
Avoid any draught above the cooking surface for efficient operation.
3 USING THE APPLIANCE
3.1 First use of the appliance
Scan your QR code on the warranty sticker and register your device.
- Remove all labels and stickers from the glass.
Before the first use, clean the glass plate with a damp cloth and dry it off. Do not use detergent; this can result in a bluish haze appearing.
3.2 Precautions against damage
Damaged cooking pans or cooking pans with rough bases (cast iron without enamelling) can cause damage to the glass.
Sand or other abrasive materials may cause damage to the glass.
- Do not allow items (even small ones) to fall on the glass.
- Avoid the impact of cooking pans against the edge of the glass.
Do not place or leave empty cooking pans on the hob.
– Never place a hot pan on the control zone.
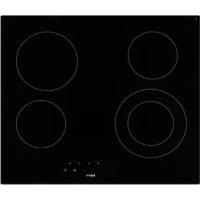
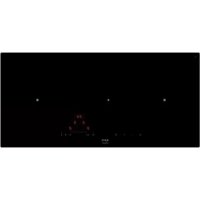
4 DESCRIPTION OF THE DEVICE
The appliance is an induction hob with integrated worktop extraction. The induction hob has 4 cooking zones with an integrated extractor at the centre of the hob that ensures the removal of cooking vapours.
The hob and extractor can be operated separately. You will find an explanation of the operation of the device further in this manual.
4.1 Principle of induction
There is an induction coil under each cooking zone. When this is on, it produces a variable electromagnetic field that produces an induction current in the bottom of the cooking pan. This results in the warming up of the cooking pan on the cooking zone.
Of course, suitable cooking pans are required for this:
- Recommended cooking pans include those with a magnetic base (you can check this using a magnet): a cast iron kettle, black iron pan, enamelled metal cooking pans, stainless steel pans with magnetic base, etc.
– Unsuitable cooking pans include copper, stainless steel, aluminium, glass, wood, ceramics, pottery, stainless steel without magnetic base, etc.
The induction cooking zone immediately takes the size of the cooking pan into account. If the diameter is too small, the cooking pan will not work. The diameter varies as a function of the diameter of the cooking zone. Should the cooking pan not be adjusted to the hob, the symbol will continue to flash.
4.2 Technical specifications of the induction hob
| Type 1866 | ||
| Total power | 7400 | W |
| Energy consumption of the EChob cooking plate** | 180.5 | Wh/kg |
| Cooking zones | 240 x 210 | mm |
| Detection cooking pan | ∅ 110 | mm |
| Normal* | 2100 | W |
| With Power* | 3000 | W |
| Super Power* | - | W |
| Cooking utensils** | A | |
| Energy consumption ECcw** | 186.4 | Wh/kg |
* the power transfer may vary, dependent on the sizes and the materials of the cooking pans
** calculated following the methods for measuring the performance (EN 60350-2)
4.3 Noise caused by induction
When using an induction hob, all kinds of noises may occur. These noises are dependent on the construction and the materials of the bottom of the cooking utensils.
Humming
This occurs when cooking at a higher power and this is caused by the amount of energy that is transferred from the hob to the cooking utensils. The noise disappears or becomes weaker when you set the hob to a lower position.
Sputtering
This noise occurs when the utensils consist of layers of different materials. The noise is caused by vibrations in the areas where the different material layers touch each other.
Whistling
Such noises generally arise when cooking with utensils consisting of layers of different materials and when two adjacent cooking zones are used simultaneously at maximum power. The whistling noise disappears or becomes weaker when you set the hob to a lower position.
Clicking
At lower power positions clicking noises may occur at electronic switches.
Buzzing
A buzzing sound may occur when the fan is switched on. This fan cools the electronics at intensive use of the hob. When the temperature is too high, the fan will keep running after the hob has been switched off.
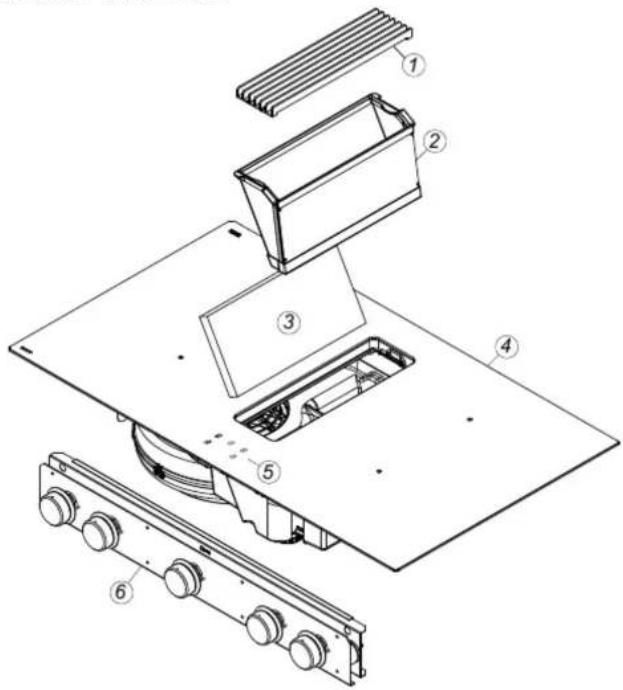
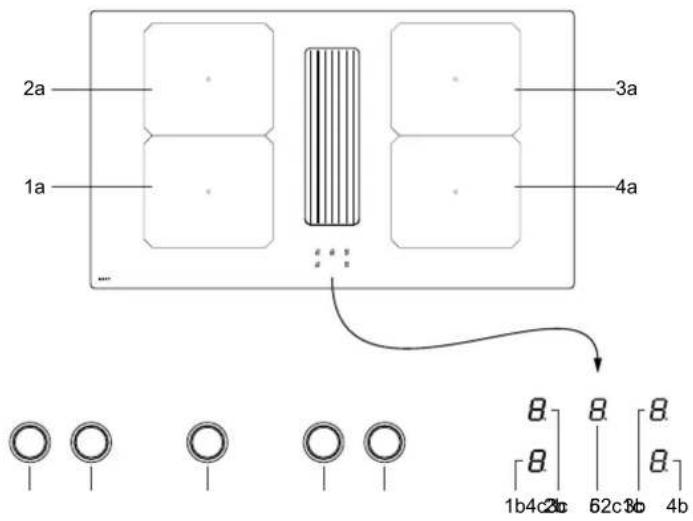
4.4 Global overview
text_image
Technical diagram of a device with numbered components, likely an optical or mechanical assembly.| 1 Inlet grille |
| 2 Grease filter |
| 3 Monoblock filter (recirculation mode only) |
| 4 Induction hob |
| 5 Indicator |
| 6 Controls |
5INDUCTIONHOB
5.1 Control panel

text_image
2a 1a ... 3a 4a 8 8 8 8 1b4c20 62c30 4b| Hob control | |
| 1a Front left cooking zone | |
| 2a Rear left cooking zone | |
| 3a Rear right cooking zone | |
| 4a Rear right cooking zone | |
| 1b Front left cooking zone indicator | |
| 2b Rear left cooking zone indicator | |
| 3b Rear right cooking zone indicator | |
| 4b Front right cooking zone indicator | |
| 1c Front left cooking zone knob | |
| 2c Rear left cooking zone knob | |
| 3c Rear right cooking zone knob | |
| 4c Front right cooking zone knob | |
| 5 Extractor indicator | |
| 6 Extractor control knob |
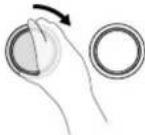
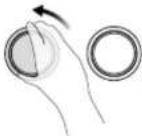
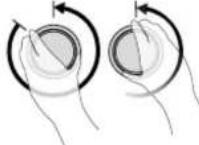
5.2 Operation with rotary control knob
The appliance is controlled by rotary knobs on the front panel of the kitchen.
The knobs are stepless and can be turned clockwise and anti-clockwise.
Different functions are activated by turning the knobs. This activation is indicated by a light, a reading and/or an audible signal.
If one or more knobs are turned longer or at the same time (e.g. by continuing to turn the power function buttons), the function will not be activated.
The symbol will flash and the appliance switches off after a few seconds.
To clear the ' symbol, turn the same knob or switch the hob off and on.
5.3 Controlling the hob
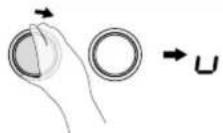
5.3.1 Switch on and off
| Switching a cooking zone on and off: | |||
| Switch on Display | |||
| Select the zone by turning the relevant knob clockwise. The control indicator of relevant cooking zone will light up. | U-9 | ||
 |  |  |   |
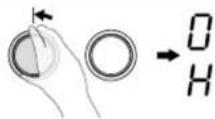
| Switch off Display | |||
| Turn the knob counterclockwise until the control indicator shows ☐ or H1. | ☐H | ||
 |  |  |   |
Immediately afterwards, place cookware suitable for induction on the cooking zone. The pan detection switches on the induction hob. The pan is heated.
As long as no pan is placed on the cooking zone, the indicator switches between the selected cooking heat and the symbol. If no pan is placed on the cooking zone, it will switch off after 10 minutes. You can find more on this in the '5.3.2 Pan detection' section.
5.3.2 Pan detection
This hob is equipped with an interactive control system that makes use of the hob even easier.
When you place a pan on the hob, it is automatically detected.
The induction hob does not work:
In case there is no pan on the cooking zone or if the pan is unsuitable for induction, it is impossible to put the power on and the symbol will appear on the display.
The operation is suspended when the pan is removed from the cooking zone during cooking. The symbol will appear on the display. The symbol will disappear when the pan is placed back onto the cooking surface.
The cooking will then continue at the same power level as selected previously.
Switch off the cooking zone after use. The pan detection U will no longer be active.
5.3.3 Indication of residual heat
After the cooking zone or hob has been switched off completely, the hob glass will still be warm, which can be seen by H. The H symbol disappears when the cooking zone glass can be handled without danger.
WARNING: As long as the residual heat indication remains active, the cooking zone(s) must not be touched and no heat-sensitive items should be placed on the cooking zone. Risk of fire and burns.
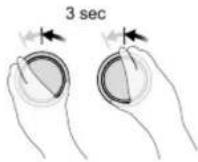
5.3.4 Power function
The Power function P increases the power rating of the selected cooking zone. If this function is activated, these cooking zones will be subjected to considerably higher power for 10 minutes.
The Power function is designed to quickly heat large quantities of water, for pasta for example.
| Switching Power on and off | ||
| Switch Power on Display | ||
| Turn the relevant knob clockwise up to the stop and hold for approx. 2 sec. until a signal is heard. | ||
 |  | 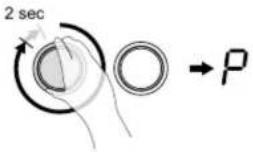 |
| Switch Power off Display | ||
| Turn the knob counterclockwise. | 9-0 | |
 |  | 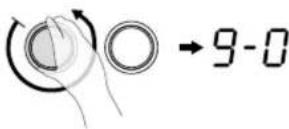 |
Management of maximum power:
The hob is divided into 2 separate heating groups.
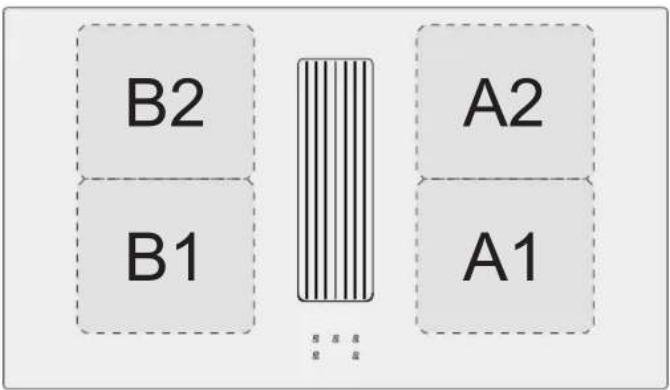
text_image
B2 B1 A2 A1If this power limit is exceeded when switching to a high selected cooking heat or switching the power function on, the power management module reduces the cooking position of the relevant cooking zone. This cooking zone will first flash, and it is then automatically reduced to the maximum possible cooking heat
The maximum individual power for each zone is 3000 W. If simultaneous cooking is taking place on zones A1 and A2 or B1 and B2, the power of 3700 W is divided between these 2 zones A1 and A2 or B1 and B2.
| Cooking zone in cm | Power (W) | |
| A1 | 24 x 21 | |
| A2 | 24 x 21 | Normal: 2100 |
| B1 | 24 x 21 | Power: 3000 |
| B2 | 24 x 21 | |
| Power limit Display | |
| Selected cooking zone with Power function | P |
| Power limit activated | B |
| [9] reduced to [8] and flashes | |
In order to be able to make use of the maximum possible power for 2 zones at the same time, use a combination of zone A1 or A2 and B1 or B2.
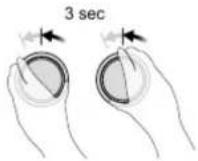
5.3.5 Programming auto heat up
All cooking zones are equipped with an auto heat up function. The cooking zone will initially operate at full power for a certain amount of time before automatically reducing to the selected power level.
Automatic heat up is suitable for dishes that are placed on the hob cold, heated at high power and do not require permanent monitoring in the simmering mode (e.g. boiling soup meat).
| Programming auto heat up | ||||
| Activating auto heat up Display | ||||
| Turn the relevant knob counterclockwise up to the stop and hold for approx. 2 sec. until a signal is heard. | ||||
 |  |  | 2 sec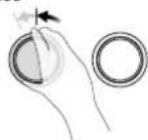 | |
| Immediately return the knob to the desired auto heat up mode. | ||||
 |  |  |  | |
| Switching auto heat up off Display | ||||
| Turn the relevant knob all the way to the left or turn counterclockwise until the desired cooking heat is reached. | ||||
 |  |  |  | |
Automatic heat up proceeds as programmed. After a certain time (see table), the cooking process continues in the auto heat up mode. The R symbol turns off.
| Auto heat up table | |
| Set value for auto heat up | Auto heat up function Time (min:sec) |
| 1 | 0:40 |
| 2 | 01:12 |
| 3 | 02:00 |
| 4 | 02:56 |
| 5 | 04:16 |
| 6 | 07:12 |
| 7 | 02:00 |
| 8 | 03:12 |
| 9 | --:-- |
5.3.6 Keep warm function
This function makes it possible to automatically reach and maintain a temperature of 42^ C.
This prevents pans overflowing or your food sticking to the bottom of the pans.
| Switching on Display | ||
| Turn the relevant knob clockwise up to the first stop. | ||
 | ○ |  |
| Switching off Display | ||
| Turn the knob counterclockwise until the control indicator shows □ or H1, or clockwise to select the desired cooking heat. | ||
 | ○ |  |
or  | ○ | 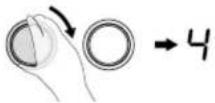 |
The maximum duration of the keep warm function is 2 hours.
5.3.7 Flexzone
This function allows you to join the 2 left and 2 right zones so they operate as 2 large flex zones. This function can be activated manually when a large pot/pan be placed on the cooking surface.
| Flexzone | ||
| Manual activation | Display | |
| Turn the knobs of the front and rear cooking zones (A1 + A2 or B1 + B2) simultaneously clockwise until the stop and hold for approx. 2 sec. until a signal is heard.The Flexzone is enabled, the symbol is displayed. | 97 | |
[242K]   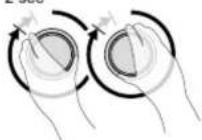 →7 →7 | ||
| Decrease power | Display | |
| The knobs of the front cooking zone are used for operation. Turn this knob counterclockwise until you reach the desired power. | 9-0 | |
   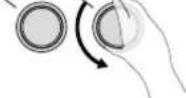 →9-0 →9-0 | ||
| Increase the power | Display | |
| The knobs of the front cooking zone are used for operation. Turn this knob counterclockwise until you reach the desired power. | 1-9 | |
   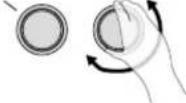 →1-9 →1-9 | ||
| Switch Flexzone off | Display | |
| Turn the knobs of the front and rear cooking zones (A1 + A2 or B1 + B2) simultaneously counterclockwise until the control indicator shows H1. | H | |
    →H →H | ||
5.3.8 Child lock
The child lock should prevent children from accidentally or deliberately switching on the induction hob. It blocks the controls.
Note that the child lock can only be activated when all cooking zones and the fan are switched off.
| Child lock | |||
| Lock | Display | ||
| First, switch off all cooking zones and the fan.Turn the two left-hand knobs of the left front and rear cooking zones simultaneously counterclockwise until the stop and hold for approx. 2 sec.An [L] will appear in the cooking mode displays to indicate activation of the child lock; the control is locked. | L | ||
 |  |  |  |
| Unlock | Display | ||
| Once again turn the two left-hand knobs of the left front and rear cooking zones simultaneously counterclockwise until the stop and holdfor approx. 2 sec. to switch the child lock off.The [L] will disappear. | LED goes out | ||
 |  |  |  |
In the event of a power failure, the enabled child lock is disabled, i.e. deactivated.
6EXTRACTOR
6.1 Control panel
text_image
2a 1a 3a 4a ... 8 8 8 8 1b4c20 62c30 4b| Hob control | |
| 1a Front left cooking zone | |
| 2a Rear left cooking zone | |
| 3a Rear right cooking zone | |
| 4a Rear right cooking zone | |
| 1b Front left cooking zone indicator | |
| 2b Rear left cooking zone indicator | |
| 3b Rear right cooking zone indicator | |
| 4b Front right cooking zone indicator | |
| 1c Front left cooking zone knob | |
| 2c Rear left cooking zone knob | |
| 3c Rear right cooking zone knob | |
| 4c Front right cooking zone knob | |
| 5 Extractor indicator | |
| 6 Extractor control knob |
6.2 Operation with rotary control knob
The appliance is controlled by rotary knobs on the front panel of the kitchen.
The knobs are stepless and can be turned clockwise and anti-clockwise.
Different functions are activated by turning the knobs. This activation is indicated by a light, a reading and/or an audible signal.
If one or more knobs are turned longer or at the same time (e.g. by continuing to turn the power function buttons), the function will not be activated.
The symbol will flash and the appliance switches off after a few seconds.
To clear the r^1 symbol, turn the same knob or switch the hob off and on.
6.3 Operating modes
This appliance can be used in extraction or recirculation mode (default setting on delivery).
6.3.1 Recirculation mode (default setting)
The air drawn in is first cleaned by the grease filters. The scents are then removed by the recirculation filter before re-entering the kitchen.
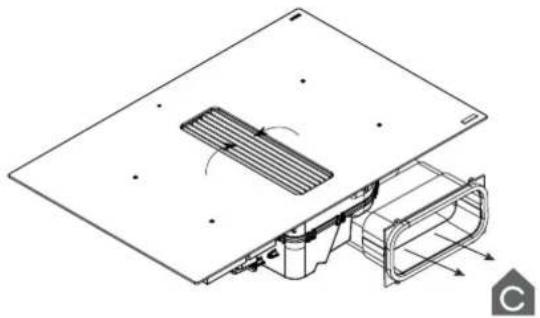
natural_image
Technical line drawing of a mechanical assembly with internal components and directional arrows (no text or symbols)Provide adequate ventilation in the kitchen for optimal efficiency of the recirculation system.
6.3.2 Extraction mode
To change recirculation mode to extraction mode, see the explanation in the installation manual.
The air drawn in is first cleaned by the grease filters before being expelled outside. This can be done by making use of ducting connected between the appliance and a wall outlet grille.
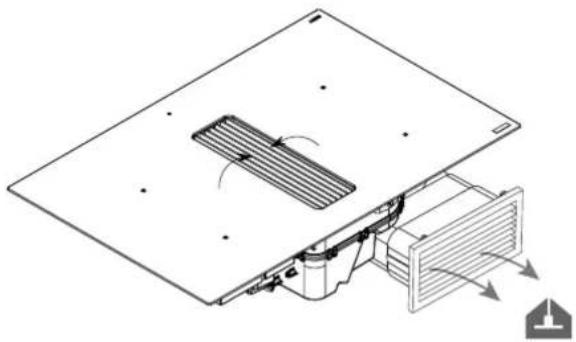
natural_image
Technical diagram of an air vent system with airflow arrows indicating airflow direction (no text or labels)Ensure adequate air supply to the kitchen for the system to work efficiently.
6.4 Extractor controls
6.4.1 Switch on and off
| Extractor | ||
| Switch on/Increase extraction power Display | ||
| Turn the knob of the fan clockwise for the desired power setting. 1-9 | ||
  → 1-9 → 1-9 | ||
| Reduce extraction power Display | ||
| Turn the knob of the fan counterclockwise for the desired power setting. 9-1 | ||
  → 9-1 → 9-1 | ||
| Switch off extractor Display | ||
| Turn the knob of the fan counterclockwise all the way. 0 | ||
  → 0 → 0 |
6.4.2 Automatic extraction
This function automatically adjusts the extraction power depending on the power used of the cooking zone(s). When this function is active when switching off the appliance, it is automatically activated when switching on again.
| Switch on automatic extraction Display | |||
| Turn the knob of the fan clockwise until [R] is shown in the display. | |||
 |  | →R | |
| Switch off automatic extraction Display | |||
| Turn the knob of the extactor counterclockwise to turn off the fan or clockwise for the desired power setting. | |||
 |  | →0 | |
| or | |||
 |  | →1-9 | |
Switch off automatic extraction Display
6.4.3 Automatic run-on function
The appliance is equipped with an automatic run-on function.
Speed 1 or, in automatic mode, A is displayed by a flashing point.
| Switch on run-on function Display | |||
| Turn off all cooking zones by turning all the knobs to the left. R. or I | |||
 [SZWD] [SZWD] 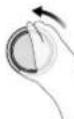  | |||
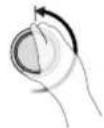
| Switch off run-on function Display | |||
| Turn the extraction knob to the left. 0 | |||
   |
Run-on function recirculation mode (default setting)
This function starts up after the cooking stops. With it, all the last cooking vapours are extracted from the kitchen for a pre-set time by the extraction hood at low extraction power. With recirculation, the recirculation filters are dried, and the run-on time is by default set to 30 minutes. It is advisable always to carry out this function completely. After the end of the run-on time, the extractor switches off automatically.
The run-on function cannot be manually turned off.
Run-on function extraction mode
This function starts up after the cooking stops. With it, all the last cooking vapours are extracted from the kitchen for a pre-set time by the extraction hood at low extraction power. The run-on time is by default set to 10 minutes in extraction mode. It is advisable always to carry out this function completely. After the end of the run-on time, the extractor switches off automatically.
The run-on function cannot be manually turned off.
7CLEANINGINDICATIONS
7.1 Grease filter cleaning indicator
The grease filter should be cleaned after 20 hours of cooking. This is automatically indicated by the appliance.
After 20 cooking hours, a blinking [F] appears on the fan display.
| Grease filter |
| Resetting the grease filter indicator Display |
| Turn the fan control knob counterclock-wise for about 3 seconds. F |
Follow the cleaning instructions set out in the chapter 9 Cleaning and Maintenance.
7.2 Recirculation filter replacement indicator (recirculation mode only)
The Monoblock filter should be changed after 450 hours of cooking. This is automatically indicated by the appliance. After 450 cooking hours, a blinking [☐] appears on the fan display.
| Recirculation filter | |
| Resetting the recirculation filter indicator | Display |
| Turn the fan control knob counterclockwise for about 3 seconds. | [ ] |
Follow the replacement instructions set out in the chapter 9 Cleaning and Maintenance.
Even if the appliance is used in extraction mode, the flashing [ ] should also be reset after 450 cooking hours.
8COOKINGADVICE
Quality of the pots and pans
Suitable cookware, pots and pans include: steel, enamelled steel, cast iron, stainless steel with magnetic base, aluminium with magnetic base ( ± 100mm min). Unsuitable pans include: aluminium and stainless steel without magnetic base, copper, brass, ceramics, porcelain. The manufacturers will state whether their products are suitable for induction.
In order to ensure your pans are suitable:
Pour a little water in a pan and place it on an induction cooking zone set to 9. The water should be hot within a few seconds.
- Hold a magnet to the base of the pan. The magnet should stick.
Some cooking pots hum when they are placed on an induction cooking zone. This does not mean the device is faulty, and it will not affect operation. This noise decreases when you adjust the power.

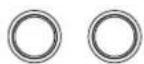
natural_image
Four geometric shapes with intersecting lines, no text or symbols presentLiu the pans up when you want to move them to avoid stains and scratches.
As often as possible, prepare meals with the pan lid on.
Dimensions of the cooking pans
The cooking zones can (to a certain extent) automatically adapt to the diameter of the pan. The base of the pan must have a minimum diameter ( ± 9cm) for working with the selected cooking zone. Place the pan in the middle of the cooking zone in order to optimise the energy transfer. The bottom of the cooking pan must cover as much of the cooking zone as possible. If the diameter of the pan is much larger than the zone, this will not result in an optimal cooking result.
Only the surface of the pan above the induction coil will then generate the heat. The rest of the surface that is not above the induction coil will receive heat via conduction through the pan surface.
Therefore, if the pan is much larger than the cooking zone, it advised to set the cooking zone to a slightly lower level to allow the heat to be divided up more evenly.
Examples of power control
(The values indicated below are only indicative)
| Application | Display | |
| MeltingWarming up | - Sauces, butter,chocolate, gelatine- Pre-prepared meals | 1-2 |
| RisingDefrosting | - Rice pudding andpre-prepared meals- Vegetables, fish, frozenproducts | 2-3 |
| Steaming | - Vegetables, fish, meat | 3-4 |
| Water | - Boiled potatoes, soups,pasta- Fresh vegetables | 4-5 |
| Simmering | - Meat, liver, eggs, grilledsausages- Goulash, rolled meat,black/white pudding | 6-7 |
| CookingRoasting | - Potatoes, fritters,flat biscuits | 7-8 |
| RoastingBringingto cookingtemperature | - Steaks, omelettes- water | 9 |
| Cooking | - Bringing large quantitiesof water to the boil | P |
9CLEANINGAND MAINTENANCE
Follow all instructions as described in the section "Using the appliance" and as mentioned in the separate booklet "Safety instructions" supplied with the appliance and listed on our website www.novy.com.
Before cleaning, check the cooking plate has been fully switched off and the glass above the cooking zones has cooled down.
Follow the cleaning instructions below for a long life and optimum functioning of the device.
9.1 Maintenance of the hob
First let the device cool down, otherwise there is a risk of burns.
Never use "steam" or "pressure" equipment.
Never use objects that could damage the vitro-ceramic glass such as an abrasive sponge, abrasive cleaning liquid or aggressive cleaning agents.
Coated parts of the rotary control knobs
The knobs can be cleaned with a damp cleansing tissue and a mild cleaning agent.
The knobs are not suited for cleaning in the dishwasher and cannot be disassembled for cleaning.
Clean the glass of the cooking hob
Wipe the surface clean with some liquid detergent on a damp cloth or sponge (it is best to do this after every use), then dry the hob by rubbing with a dry cloth or with kitchen paper. Always make sure that all cloths used are clean in order to avoid scratching the surface.
In case of stubborn stains
Heavy contamination and stains (limescale stains, pearl-like shiny spots) are best removed while the hob is still warm. For this apply common cleaning agents and cleaning methods. If this does not work well enough, you can use a specific cleaning product for cleaning vitro-ceramic glass (for example, Vitroclen)
Boiled-over food should first be soaked with a wet cloth; the contamination residues should then be removed with a glass scraper that is specially designed for ceramic hobs. After this, clean the hob as described under “Cleaning glass hob”.
Burnt-on sugar and melted plastics are best removed immediately – while still hot – with a glass scraper. After this, clean the hob as described under “Cleaning glass hob”. Grains of dirt/sand may fall on the cooking plate while peeling potatoes or washing vegetables and may cause scratches when moving the pans. Therefore, ensure there are no grains left on the surface.
Discolouration of the hob does not have any influence on the operation or strength of the vitro-ceramic. It is not a form of damage to the hob, but it is a result of residues that have not been removed and have therefore burnt-in.
Shiny spots occur as a result of wear caused by the base of the pans, in particular when using cooking pans with an aluminium bottom or when using the wrong cleaning agents. These can only be removed with great difficulty using common cleaning agents. If necessary, repeat the cleaning several times.
Due to the use of aggressive cleaning agents and scratching caused by the pan bases, the glass surface is rubbed off over the course of time, leaving dark stains.
Do not use the cooking plate as a table top or for putting utensils on.
Always lift up the pans/pots and do not slide them along the glass plate.
9.2 Maintenance of the extractor
9.2.1 Remove the inlet grille
Do not use any objects that could damage the inlet grille, such as potscourers, scouring agents or aggressive cleaning agents.
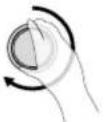
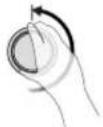
First switch off the hob and the delay before removing components from the extractor.
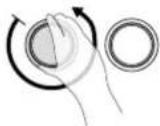
- Press on the right of the inlet grille until it tilts.
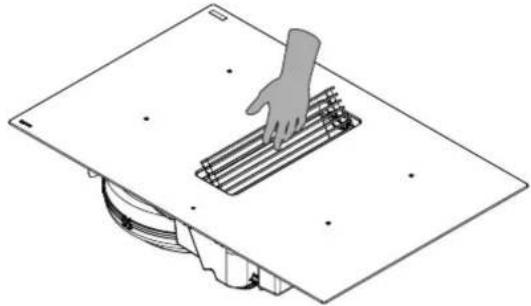
natural_image
Diagram of a hand pressing a grid on a workbench, with no visible text or symbols- Grasp the inlet grille and put it aside safely on the kitchen worktop.
Do not place the inlet grille on the hob glass to avoid scratches. Do not place the inlet grille on a hob that has been switched on to prevent it heating up.
9.2.2 Replace inlet grille
Take care that the Monoblock filter and grease filter have first been placed in the appliance before replacing the inlet grille.
Grasp the inlet grille and insert it in the centre of the extraction opening in line with the position marks.
natural_image
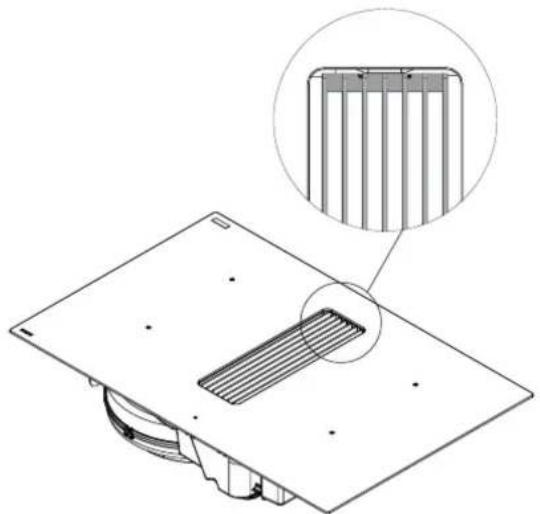
Technical line drawing of a mechanical component with a magnified inset showing internal structure (no text or symbols)9.2.3 Cleaning the grease filter
When the grease filters need to be cleaned, this is indicated by the grease filter cleaning indicator (see 7.1).
Accessing the grease filter
- Remove the inlet grille (see 9.2.1).
- Grasp the grease filter by the grips and lift it out of the extraction opening.
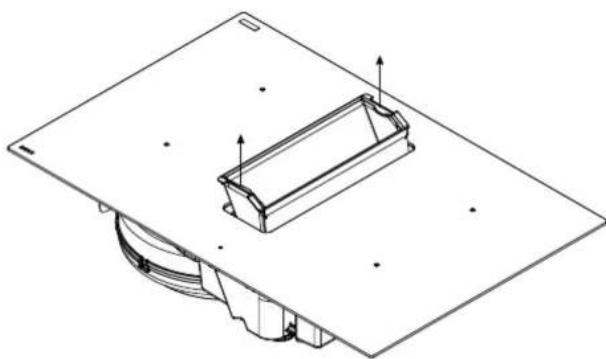
natural_image
Technical line drawing of a mechanical component with mounting base and internal housing (no text or symbols)Cleaning the grease filter
The metal grease filter can be cleaned by hand or in a dishwasher. We recommend cleaning the grease filter by hand.
Cleaning the filter by hand:
Immerse the filter in a solution of boiling water to which a liquid detergent has been added.
Do not use aggressive, acidic or alkaline cleaning products.
- Use a brush for cleaning.
- Then rinse the filters with warm water under a tap and allow them to dry.
Cleaning the filter in a dishwasher:
– Use a customary dishwasher detergent.
Do not put the saturated grease filters together with crockery in the dishwasher.
Select a programme with a low temperature (maximum 65^ C).
– After cleaning allow the filter to drain.
WARNING: When cleaning in a dishwasher the filter may discolour as a result of the salt content. This does not affect its operation.
WARNING: If the instructions above are not carried out, serious soiling can cause a fire hazard.
After cleaning
- Using the grips, replace the grease filter in the right direction in the extraction opening.
- Replace the inlet grille in the extraction opening.
- Reset the grease filter indicator (see 7.1).
9.2.4 Replacing the monoblock recirculation filter (recirculation mode only)
- Remove the inlet grille (see 9.2.1).
- Remove the grease filter (see 9.2.3).
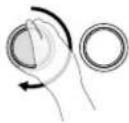
Grasp the monoblock recirculation filter, tilting it forwards.
– Fold both corners over and remove the monoblock recirculation filter from the extraction opening.
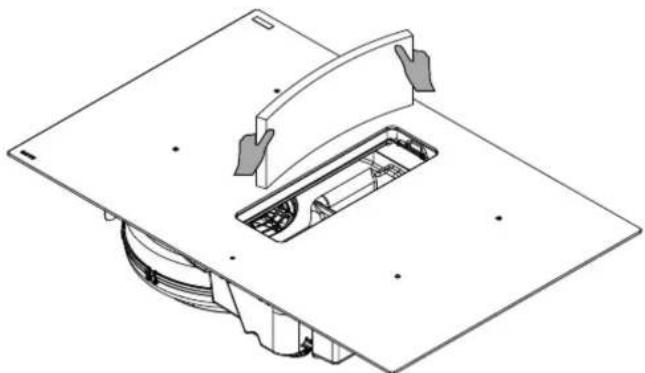
natural_image
Technical line drawing of a mechanical assembly with no visible text or symbolsAfter replacing:
Fold back the corners of the new monoblock recirculation filter and replace it in the frame through the extraction opening.
- Press the filter right up against the frame.
- Using the grips, replace the grease filter in the right direction in the extraction opening.
- Replace the inlet grille in the extraction opening.
- Reset the recirculation indicator (see 7.2)
10TROUBLESHOOTINGMINOR FAULTS
10.1 Messages on the hob
| Code | |
| U | there is no cooking pan on the cooking zone.the cooking pan is not suitable for induction.the diameter of the bottom of the cooking pan is too small when compared to the cooking zone. |
| U | See Chapter 5.3.9 Keep warm function |
| E | - The electronic system is disrupted.- Disconnect and reconnect the hob.- Call the after-sales service. |
| (Er03) | The controller keys are covered by liquid or an item. The symbol will disappear as soon as the keys are released or cleaned. |
| E2 | The hob has overheated, leave to cool, then switch back on. |
| E8 | The fan air supply is blocked.Unblock it. |
| U400 | The hob has not been properly connected to the network. Check the connection. |
| (Er47) | Problem in the device's internal bus system. |
If one of these error messages remains visible, you can contact the after-sales service.
The hob or the cooking zone does not work:
the hob has been poorly connected to the electrical power supply.
– the safety fuse has blown.
– check the locking key has been enabled.
the touch control keys have been splashed with water or fat.
– there is an object on the touch control keys.
A single zone or all zones are not working:
– the safety device has been operated.
this shall engage when a cooking zone has been left on unintentionally.
the safety shall also engage when one or more touch control keys are covered.
- a pan is empty and the base has overheated.
– the hob also has an automatic power reducer and automatic shut-down in the event of overheating.
The fan continues to operate after the hob has switched off:
this is not a defect, the fan is protecting the electronic equipment.
– the fan will stop automatically.
The automatic cooking controller does not seem to be working:
- the cooking zone is still warm.
- the maximum cooking level has been selected. The cooking level was selected using the control key [-].
10.2 Messages at the extraction
The cooker hood does not extract well. What can be the cause of this problem?
Check that the Monoblock filter and grease filter have been correctly inserted with the inlet grille.
Check the grease filter. Follow the cleaning indication. On average, the filter must be cleaned every two weeks to ensure the extraction works correctly.
- Check the air supply in the house. As soon as the cooker hood is switched on, make sure that air is supplied by opening the grates in the windows or by opening a window.
10.3 Service
In case of a malfunction, please do not hesitate to contact our after sales service:
www.novy.com/contact.
Choose you country.
For a proper and prompt handling, the after sales service needs to know the type of your device. This information can be found on sticker at the bottom of the device.
OVERVIEWFUNCTIONS NOVY EASY PRESTIGE
Indicator

Power level indication

Keep warm function key
Control cooker hob
Switch hob on/off
ON - Select the zone by turning the relevant knob clockwise. The control indicator of relevant cooking zone will light up [_-9] .
OFF - Turn the knob counterclockwise until the control indicator shows or H[ / H] .
Set the power control
HIGHER - The knobs of the front cooking zone are used for operation. Turn this knob clockwise until you reach the desired power [1-9].
LOWER - The knobs of the front cooking zone are used for operation. Turn this knob counterclockwise until you reach the desired power [9- i].
Switching Power on and off
ON - Turn the relevant knob clockwise up to the stop and hold for approx. 2 sec. until a signal is heard [P].
OFF- Turn the knob counterclockwise [9-10].
Power limit activated
[9] will be reduced to [8] and flashes [8].
Programming auto heat up
ON - Turn the relevant knob counterclockwise up to the stop and hold for approx. 2 sec. until a signal is heard [R] and immediately return the knob to the desired auto heat up mode [S-R].
OFF - Turn the relevant knob all the way to the left or turn counterclockwise until the desired cooking heat is reached [9-10].
Keep warm function
ON - Turn the relevant knob clockwise up to the first stop [u].
OFF - Turn the knob counterclockwise until the control indicator shows [H], or clockwise to select the desired cooking heat [1-9].
Operate Flexzone manually
ON - Turn the knobs of the front and rear cooking zones (A1 + A2 or B1 + B2) simultaneously clockwise until the stop and hold for approx. 2 seconds until a signal is heard [n].
OFF - Turn the knobs of the front and rear cooking zones (A1 + A2 or B1 + B2) simultaneously counterclockwise until the control indicator shows [H].
Control extractor
Set extraction power regulator
HIGHER - Turn the knob of the fan clockwise for the desired power setting [1-9].
LOWER - Turn the knob of the fan counterclockwise for the desired power setting [9-1].
Automatic extraction power regulator
ON - Turn the knob of the fan clockwise until [R] is shown in the display.
OFF - Turn the knob of the extactor counterclockwise to turn off the fan [☐] or clockwise for the desired fan setting [1-9].
Novy nv reserves the right at any time and without reservation to change the structure and the prices of its products.
NOVY nv
Noordlaan 6
B - 8520 KUURNE
Tel. +32 (0)56 36 51 00
info@novy.com
www.novy.com