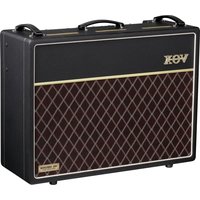
AC30HW - Guitar amp VOX - Free user manual and instructions
Find the device manual for free AC30HW VOX in PDF.


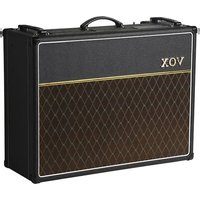
| Product Type | Electric Guitar Amplifier |
| Brand | VOX |
| Model | AC30HW (Hand Wired) |
| Dimensions (W × D × H) | 705 × 263 × 567 mm |
| Weight | 32.0 kg |
| Output Power | 30 W RMS into 8/16 Ω |
| Tubes | ECC83/12AX7 × 4, ECC81/12AT7 × 1, EL84 × 4, GZ34 (rectifier) × 1 |
| Speakers | Celestion Alnico Blue 2×12" 8 Ω |
| Channels | NORMAL and TOP BOOST, each with HIGH and LOW inputs |
| Controls | Volume NORMAL, Bright, Volume TOP BOOST, Treble, Bass, Tone (reverb), Level (reverb), Tone Cut, Master Volume |
| Reverb | Built-in spring reverb, on/off via VFS1 footswitch |
| Effects Loop | Send/Return with level switch -10/+4 dB and true bypass |
| Output Impedance | Selector 8 Ω or 16 Ω for external speakers |
| Inputs | 2 × INPUT HIGH/LOW (NORMAL), 2 × INPUT HIGH/LOW (TOP BOOST), FOOT SWITCH, RETURN |
| Outputs | 2 × POWER OUTPUT, SEND |
| Included Accessories | Power cable, VFS1 footswitch, user manual |
| Power Supply | Mains, specific voltage by country (check on rear panel) |
| Power Consumption | Not specified, estimated approx. 150 W |
| Cleaning | Soft dry cloth only |
| Safety | Do not expose to moisture, do not block vents, unplug during storms or prolonged non-use |
| Repairability | Entrust all repairs to qualified after-sales service |
| General Information | Hand Wired series, authentic reproduction of vintage VOX sound with modern features |
Frequently Asked Questions - AC30HW VOX
User questions about AC30HW VOX
0 question about this device. Answer the ones you know or ask your own.
Ask a new question about this device
Download the instructions for your Guitar amp in PDF format for free! Find your manual AC30HW - VOX and take your electronic device back in hand. On this page are published all the documents necessary for the use of your device. AC30HW by VOX.
USER MANUAL AC30HW VOX
IMPORTANT SAFETY INSTRUCTIONS
- Read these instructions.
- Keep these instructions.
- Heed all warnings.
- Follow all instructions.
- Do not use this apparatus near water.
- Mains powered apparatus shall not be exposed to dripping or splashing and that no objects filled with liquids, such as vases, shall be placed on the apparatus.
- Clean only with dry cloth.
- Do not block any ventilation openings. Install in accordance with the manufacturer's instructions.
- Do not install near any heat sources such as radiators, heat registers, stoves, or other apparatus (including amplifiers) that produce heat.
- Do not defeat the safety purpose of the polarized or grounding-type plug. A polarized plug has two blades with one wider than the other. A grounding type plug has two blades and a third grounding prong. The wide blade or the third prong are provided for your safety. If the provided plug does not fit into your outlet, consult an electrician for replacement of the obsolete outlet. (for USA and Canada)
- Protect the power cord from being walked on or pinched particularly at plugs, convenience receptacles, and the point where they exit from the apparatus.
- Only use attachments/accessories specified by the manufacturer.
- Unplug this apparatus during lightning storms or when unused for long periods of time.
- Turning off the power switch does not completely isolate this product from the power line so remove the plug from the socket if not using it for extended periods of time.
- Install this product near the wall socket and keep the power plug easily accessible.
- WARNING—This apparatus shall be connected to a mains socket outlet with a protective earthing connection.
- Refer all servicing to qualified service personnel. Servicing is required when the apparatus has been damaged in any way, such as power-supply cord or plug is damaged, liquid has been spilled or objects have fallen into the apparatus, the apparatus has been exposed to rain or moisture, does not operate normally, or has been dropped.
- Do not install this equipment on the far position from wall outlet and/or convenience receptacle.
- Do not install this equipment in a confined space such as a box for the conveyance or similar unit.
- Excessive sound pressure from earphones and headphones can cause hearing loss.
- Use only with the cart, stand, tripod, bracket, or table specified by the manufacturer, or sold with the apparatus. When a cart is used, use caution when moving the cart/apparatus combination to avoid injury from tip-over.

WARNING:
TO REDUCE THE RISK OF FIRE OR ELECTRIC SHOCK DO NOT EXPOSE THIS PRODUCT TO RAIN OR MOISTURE.

CAUTION
RISK OF ELECTRIC SHOCK DO NOT OPEN

ATTENTION:
RISQUE DE CHOC ÉLECTRIQUE—NE PAS OUVRIR.
注意
感電の恐れあり、キャビネットをあけるな
The lightning flash with arrowhead symbol within an equilateral triangle, is intended to alert the user to the presence of uninsulated "dangerous voltage" within the product's enclosure that may be of sufficient magnitude to constitute a risk of electric shock to persons.

The exclamation point within an equilateral triangle is intended to alert the user to the presence of important operating and maintenance (servicing) instructions in the literature accompanying the product.
Notice regarding disposal (EU only)

When this “crossed-out wheeled bin” symbol is displayed on the product, owner’s manual, battery, or battery package, it signifies that when you wish to dispose of this product, manual, package or battery you must do so in an approved manner. Do not discard this product, manual, package or battery along with ordinary household waste. Disposing in the correct manner will prevent harm to human health and potential damage to the environment.
Since the correct method of disposal will depend on the applicable laws and regulations in your locality, please contact your local administrative body for details. If the battery contains heavy metals in excess of the regulated amount, a chemical symbol is displayed below the “crossed-out wheeled bin” symbol on the battery or battery package.
Introduction
Thank you very much for purchasing the VOX Hand Wired Series.
For many years, VOX has been designing and manufacturing some of the most renowned amplifiers in recent history... Today is no exception. We're honoured that you have chosen to add the AC Hand Wired series to your sonic arsenal!
To bring the traditional VOX sound that's been used in so many famous songs and performances into the modern era, we researched every facet of our early 1960s-era amplifier from the circuitry to the transformer as well as the structure of the cabinet, reflecting these results into our new model.
This series is not just a revival of our traditional amps. We've introduced modern updates by including a built-in spring reverb, re-designed master volume control and adding an FX loop.
By combining a truer traditional sound with modern specifications, we hope that the VOX Hand Wired Series enhances your musical life.
We believe that this Hand Wired VOX series offers one of the most sonically versatile amplifiers to date, and that the series is well on its way to joining its predecessors in the VOX “hall of fame”.
Enjoy!
VOX Amplification
OPERATION MANUAL
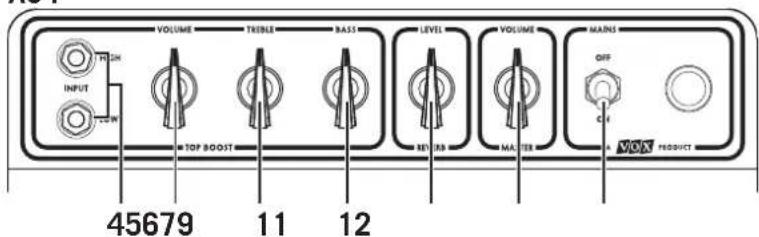
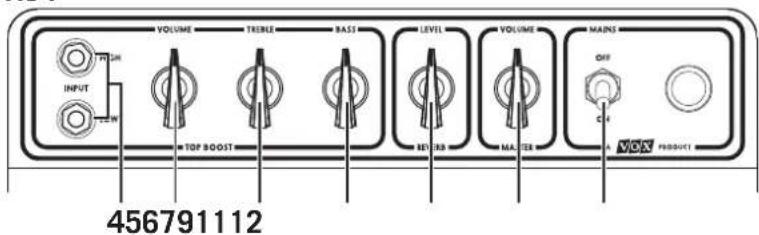
Top panel
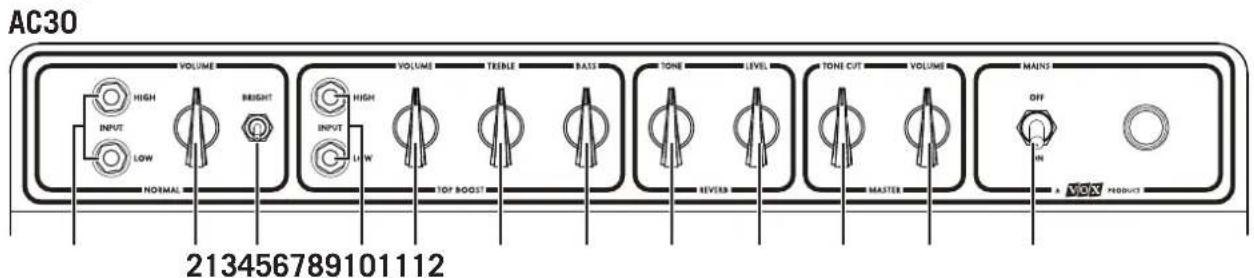
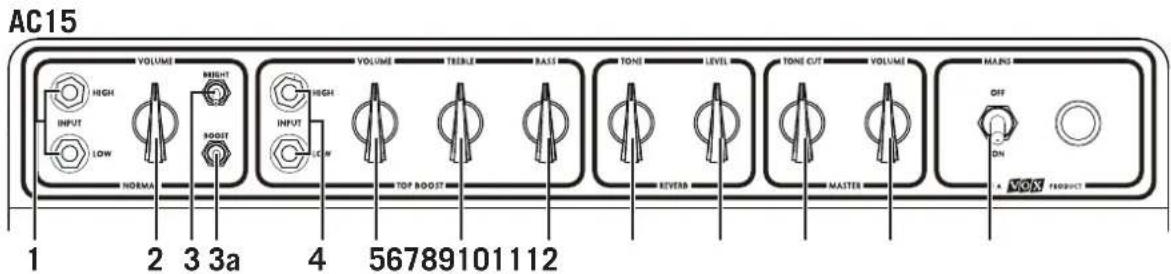
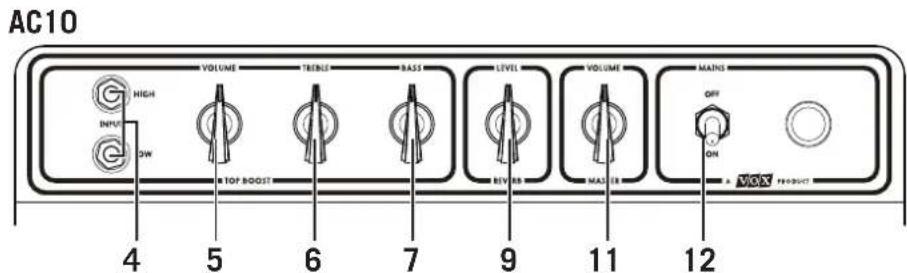
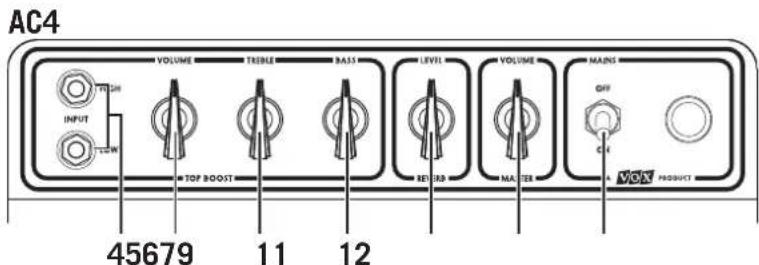
The metal parts of this unit including the top panel, ventilation ports and so on may get hot due to heat transferred from the power vacuum tube or the transformer. This is not a malfunction. Use caution, as you may be subject to low-temperature burns if you touch these parts for an extended period of time.
NORMAL channel
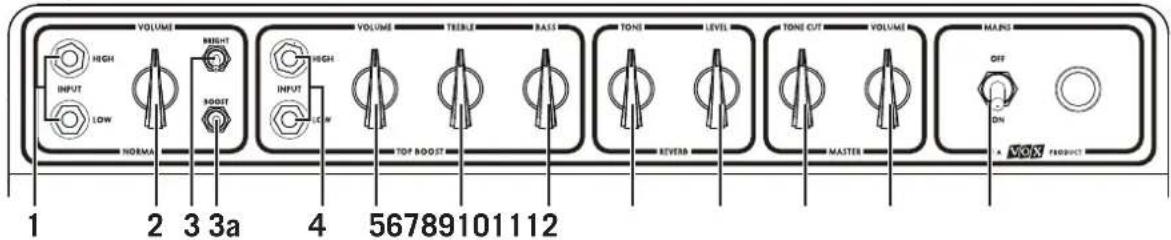
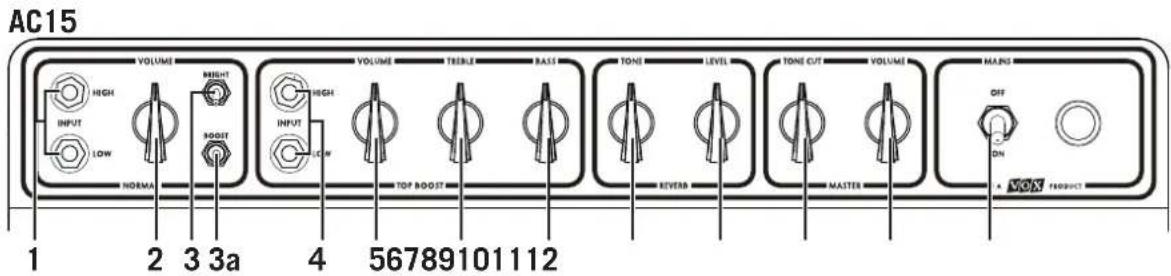
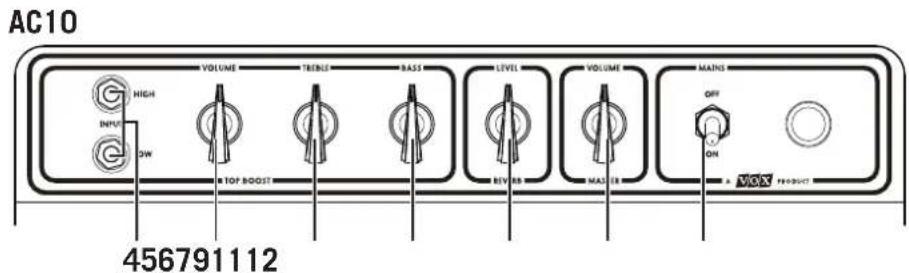
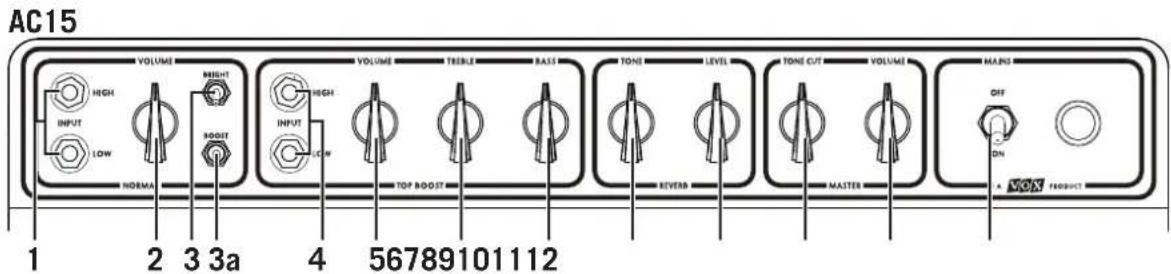
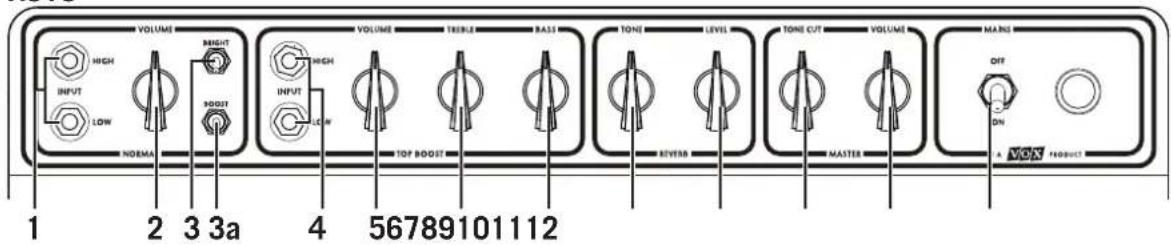
1. INPUT Jack Sockets
Guitar input jacks for the NORMAL channel. The 'HIGH' input will give you more gain and output volume whereas the 'LOW' input will be quieter and have more clean headroom.
2. VOLUME control
This controls the NORMAL Channel pre-amp volume. It can be used in conjunction with the MASTER VOLUME to create the perfect balance between pre/power amp distortion and overall output level.
3. BRIGHT switch
When activated it adds more high-end sparkle to your sound.
3a. BOOST switch (AC15 only)
This increases the gain when turned on.
This gives a rich overdrive sound in the midrange frequencies that's unique to the AC15 of the 1960s.
NOTE: You may hear noise when switching this on/off. Turn the switch on/off only after turning the NORMAL VOLUME or MASTER VOLUME knob all the way down.
TOP BOOST Channel
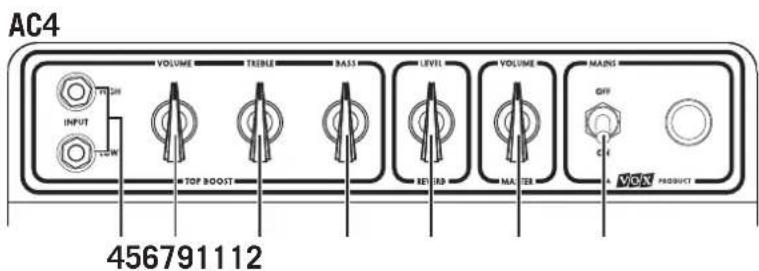
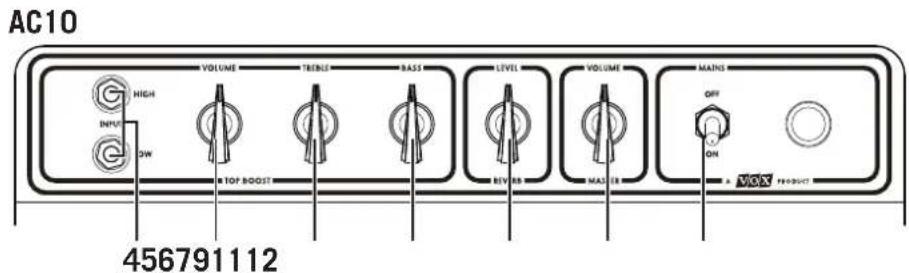
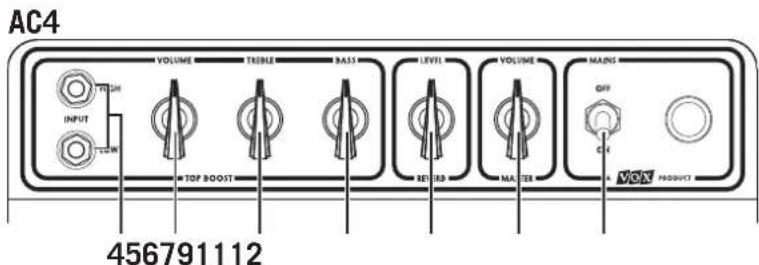
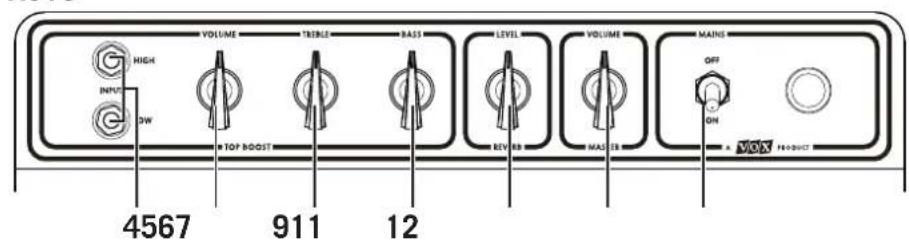
4. INPUT Jack Sockets
Guitar input jacks for the TOP BOOST channel. The 'HIGH' input will give you more gain and output volume whereas the 'LOW' input will be quieter and have more clean headroom.
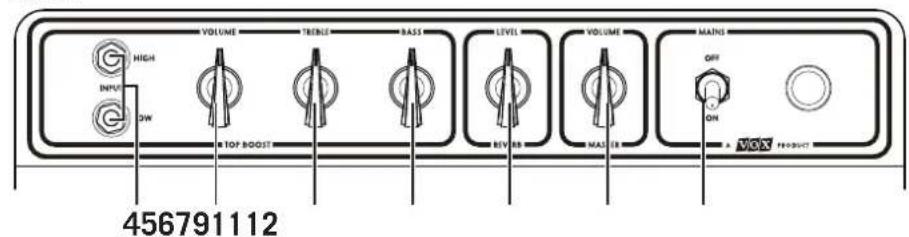
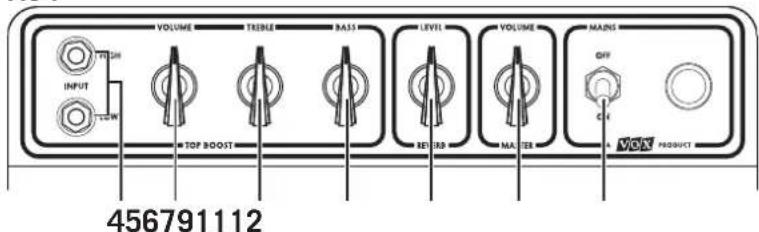
5. VOLUME Control
This controls the TOP BOOST channel pre-amp volume. It can be used in conjunction with the MASTER VOLUME to create the perfect balance between pre/power amp distortion and overall output level.
6. TREBLE Control
This controls the high frequencies in your sound—from soft and smooth when turned down (counter clockwise) to bright and cutting when cranked (clockwise) and all points in-between.
7. BASS Control
This controls the low frequencies in your sound—from thin and light when turned down (counter clockwise) to warm and heavy when turned up full (clockwise) and all points in-between.
REVERB
This adjusts the Reverb tonality and mix level.
8. TONE Control
This controls the high and low frequencies of the REVERB.
9. LEVEL control
This controls the mix (amount) of REVERB in your sound. Turning this knob fully clockwise will give you a wet, saturated sound while counterclockwise will give you a drier sound. You can use the included VFS1 footswitch to turn on and off the Reverb.
MASTER
10. TONE CUT Control
This circuit is placed in the power amp as opposed to the pre-amp section like the TREBLE and BASS controls. What this does is the opposite of what you may expect.
Turning it clockwise will decrease the higher frequencies. Use in conjunction with the TREBLE control to fine tune the high end of your sound.
11. VOLUME Control
This controls the overall or MASTER VOLUME of your amplifier. Use in conjunction with the NORMAL and TOP BOOST volume controls to find the perfect balance between pre/power amp distortion and output volume.
12. MAINS (POWER) switch
This is the ON/OFF switch for the amplifier. Please ensure the amplifier is switched off and unplugged before being moved.
Rear panel
AC30/AC15
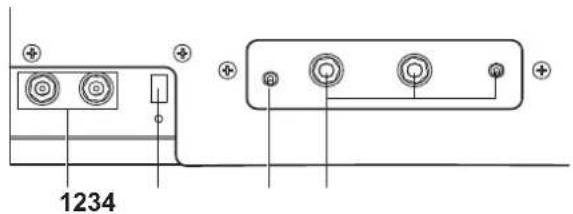
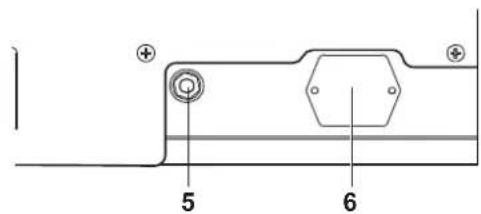
AC10/AC4

⊕
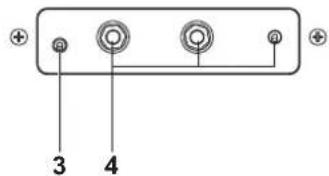
1. POWER OUTPUT jacks (AC30/AC15)
This is where you can hook up an extension or external speaker cabinet(s) if desired.
The AC30/AC15 internal speakers are connected via a speaker jack plug, they are wired for 16 Ω. You can connect another 16 Ω cabinet and run this in parallel with the internal speakers. If you want to disconnect the internal speakers when you're connecting an external speaker cabinet, unplug the built-in speaker plug. Be sure to set the IMPEDANCE SELECT switch accordingly. (See "IMPEDANCE SELECT Switch")
1a. EXTERNAL SPEAKER jack (AC10/AC4)
When you use this, the built-in speaker is disconnected. This lets you connect a 16 Ω speaker cabinet.
WARNING! To ensure that your system works correctly, you must observe the following points.
A) Don't connect a speaker whose rated input capacity is less than 30 W (for AC30) or 15 W (AC15). The speaker may be destroyed if you ignore this caution—not recommended!
B) You must use a speaker cable to connect an external speaker. Don't use a shielded cable like the one you use to connect a guitar to an amp.
C) You must turn off the power before connecting the speaker cable. Connecting the cable while the power is turned on may damage your amp.
NOTE: Always use a non-screened VOX approved speaker lead with the AC30/AC15 Amplifier and extension cabinets. It is recommended that all audio cables (with the exception of the speaker lead), used to connect to the AC30/AC15 are of a high quality, screened type. These should not exceed 10 metres in length.
2. IMPEDANCE SELECT switch (AC30/AC15)
16 OHMS: Combos allow for the following configurations:
A) Set it to this if you use the internal speakers only.
B) Set it to this if you connect an external 16 Ω speaker cabinet through the External jack (internal speakers disconnected).
8 OHMS: Combos allow for the following configurations:
A) Set it to this if you connect an extension cabinet.
B) Set it to this if you connect an external 8 Ω speaker cabinet through the External jack (internal speakers disconnected).
3. Level -10/+4 dB switch
If you run a rack processor through the FX Loop set the Level switch to +4. If you run a stomp box effect set the level to -10.
NOTE: There is no rule set in stone for these levels. Please try both settings and use what works best for you as every playing and effect situation will be different.
NOTE: You may hear noise when toggling this switch. Toggle the switch only after turning the MASTER VOLUME knob all the way down.
4. EFFECT LOOP jacks
The EFFECTS LOOP allows effects to be added further down the signal chain, rather than just plugging them in line with your guitar and amplifier. By using the Effects loop with Delay stomp boxes, for example, will prevent any strange distortions to the time delayed repetitions.
RETURN: Think of this as the "input" of the effects loop and will be connected to the output of your effect(s).
SEND: Think of this as the "output" of the FX loop and will be connected to the input of your effect(s).
BYPASS: The effects loop offers true bypass. None of the signal is routed through the effect loop when this switch is set to "BYPASS".
NOTE: You may hear noise when switching this on/off. Turn the switch on/off only after turning the MASTER VOLUME knob all the way down.
NOTE: Be sure to use shielded guitar cables only! NEVER use unshielded speaker cables.
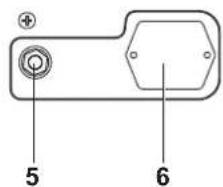
5. FOOT SWITCH jack
Connect the included VFS1 foot switch here.
You can use the connected foot switch to switch the reverb on/off.
6. MAINS INPUT connector
Connect the included power cord here.
The specific mains input voltage rating that your amplifier needs to run at is located on the rear panel of your amplifier. Before making any connections or powering up the amplifier, make sure the correct voltage is set. If you have any doubt, refer to your local VOX dealer.
Specification
AC30HWR2X:
• Dimensions (W × D × H) 705 × 263 × 567 mm / 27.76" × 10.35" × 22.32"
• Weight 32.0 kg / 70.55 lb
• Output power 30 W RMS into 8/16 Ω
- Tube complement ECC83/12AX7 × 4, ECC81/12AT7
× 1, EL84 × 4, GZ34 (rectifier) × 1
- Speakers 12" 8 Ω Celestion Alnico Blue × 2
- Inputs NORMAL INPUT jack (HIGH and LOW), TOP BOOST INPUT jack (HIGH and LOW), FOOT SWITCH jack, RETURN jack
- Outputs POWER OUTPUT jacks × 2, SEND jack
- Included items Power cable, Owner's Manual, VFS1 footswitch
AC15HWR1X:
• Dimensions (W × D × H) 591 × 263 × 567 mm / 23.27" × 10.35" × 22.32"
• Weight 22.7 kg / 50.04 lb
• Output Power 15 W RMS into 8/16 Ω
- Tube complement ECC83/12AX7 × 4, ECC81/12AT7
× 1, EL84 × 2, GZ34 (rectifier) × 1
- Speakers 12" 16 Ω Celestion Alnico Blue × 1
- Inputs NORMAL INPUT jack (HIGH and LOW), TOP BOOST INPUT jack (HIGH and LOW), FOOT SWITCH jack, RETURN jack
- Outputs POWER OUTPUT jacks × 2, SEND jack
- Included items Power cable, Owner's Manual, VFS1 footswitch
AC10HWR1:
• Dimensions (W × D × H) 530 × 243 × 474 mm / 20.87" × 9.57" × 18.66"
• Weight 16.4 kg / 36.16 lb
• Output power 10 W RMS into 16 Ω
• Tube complement ECC83/12AX7 × 2, EL84 × 2
- Speakers 12" 16 Ω Celestion G12M Green Back × 1
- Inputs TOP BOOST INPUT jack (HIGH and LOW), FOOT SWITCH jack, RETURN jack
• Outputs EXTERNAL SPEAKER jack, SEND jack
- Included items Power cable, Owner's Manual, VFS1 footswitch
AC4HWR1:
- Dimensions (W × D × H) 416 × 243 × 474 mm / 16.38" × 9.57" × 18.66"
• Weight 13.6 kg / 29.98 lb
• Output power 4 W RMS into 16 Ω
• Tube complement ECC83/12AX7 × 2, EL84 × 1 - Speakers 12" 16 Ω Celestion G12M Green Back × 1
- Inputs TOP BOOST INPUT jack (HIGH and LOW), FOOT SWITCH jack, RETURN jack
• Outputs EXTERNAL SPEAKER jack, SEND jack - Included items Power cable, Owner's Manual, VFS1 footswitch
* Specifications and appearance are subject to change without notice for improvement.
INFORMATIONS IMPORTANTES DE SECURITE
TO REDUCE THE RISK OF FIRE OR ELECTRIC SHOCK DO NOT EXPOSE THIS PRODUCT TO RAIN OR MOISTURE.

CAUTION
RISK OF ELECTRIC SHOCK DO NOT OPEN

ATTENTION:
RISQUE DE CHOC ÉLECTRIQUE—NE PAS OUVRIR.
注意
感電の恐れあり、キャビネットをあけるな
AC15
AC10
AC4
TO REDUCE THE RISK OF FIRE OR ELECTRIC SHOCK DO NOT EXPOSE THIS PRODUCT TO RAIN OR MOISTURE.

CAUTION
RISK OF ELECTRIC SHOCK DO NOT OPEN

ATTENTION:
RISQUE DE CHOC ÉLECTRIQUE—NE PAS OUVRIR.
注意
感電の恐れあり、キャビネットをあけるな
TO REDUCE THE RISK OF FIRE OR ELECTRIC SHOCK DO NOT EXPOSE THIS PRODUCT TO RAIN OR MOISTURE.

CAUTION
RISK OF ELECTRIC SHOCK DO NOT OPEN

ATTENTION:
RISQUE DE CHOC ÉLECTRIQUE—NE PAS OUVRIR.
注意
感電の恐れあり、キャビネットをあけるな
6. Conector MAINS INPUT
AC15
AC10
AC4
TO REDUCE THE RISK OF FIRE OR ELECTRIC SHOCK DO NOT EXPOSE THIS PRODUCT TO RAIN OR MOISTURE.
AC4
This warranty is valid only in Japan.
https://korg.com/support_j/

WARNING!
この英文は日本国内で購入された外国人のお客様のための注意事項です This Product is only suitable for sale in Japan. Properly qualified service is not available for this product if purchased elsewhere. Any unauthorised modification or removal of original serial number will disqualify this product from warranty protection.
This product has been manufactured according to strict specifications and voltage requirements that are applicable in the country in which it is intended that this product should be used. If you have purchased this product via the internet, through mail order, and/or via a telephone sale, you must verify that this product is intended to be used in the country in which you reside. WARNING: Use of this product in any country other than that for which it is intended could be dangerous and could invalidate the manufacturer's or distributor's warranty. Please also retain your receipt as proof of purchase otherwise your product may be disqualified from the manufacturer's or distributor's warranty.
REMARQUE IMPORTANTE POUR LES CLIENTS
- IMPORTANT SAFETY INSTRUCTIONS
- WARNING:
- CAUTION
- ATTENTION:
- Notice regarding disposal (EU only)
- Introduction
- OPERATION MANUAL
- NORMAL channel
- INPUT Jack Sockets
- VOLUME control
- BRIGHT switch
- 3a. BOOST switch (AC15 only)
- TOP BOOST Channel
- INPUT Jack Sockets
- VOLUME Control
- TREBLE Control
- BASS Control
- REVERB
- TONE Control
- LEVEL control
- MASTER
- TONE CUT Control
- VOLUME Control
- MAINS (POWER) switch
- Rear panel
- POWER OUTPUT jacks (AC30/AC15)
- 1a. EXTERNAL SPEAKER jack (AC10/AC4)
- IMPEDANCE SELECT switch (AC30/AC15)
- Level -10/+4 dB switch
- EFFECT LOOP jacks
- FOOT SWITCH jack
- MAINS INPUT connector
- Specification
- AC30HWR2X:
- AC15HWR1X:
- AC10HWR1:
- AC4HWR1:
- INFORMATIONS IMPORTANTES DE SECURITE
- Conector MAINS INPUT
- WARNING!
- REMARQUE IMPORTANTE POUR LES CLIENTS
Brand : VOX
Model : AC30HW
Category : Guitar amp