
MINI GO 3 - Guitar amp VOX - Free user manual and instructions
Find the device manual for free MINI GO 3 VOX in PDF.

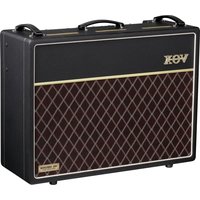
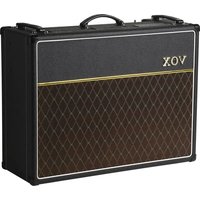
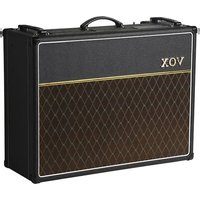
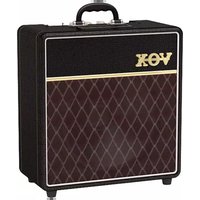
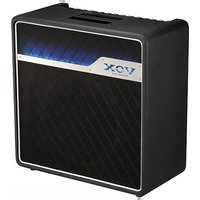
| Product type | Portable modeling guitar amplifier |
| Brand | VOX |
| Model | MINI GO 3 |
| Dimensions (W x D x H) | 256 x 180 x 249 mm |
| Weight | 3.5 kg |
| Power supply | DC 12 V power adapter (included) or USB-C mobile battery (5 V/3 A max) |
| Power consumption | 1 A (with power adapter) |
| Battery life (10,000 mAh) | Approximately 12 hours |
| Speaker | 5" (12.7 cm) 4 Ω |
| Output power | 3 W RMS into 4 Ω |
| Number of amp models | 11 (including VOCODER and LINE) |
| Number of effects | 8 (Modulation/Octave + Delay/Reverb) |
| Number of rhythm patterns | 33 |
| Tempo range | 40 to 240 BPM |
| Built-in tuner | Yes (range E1 to E6) |
| Looper function | Not available (reserved for models 10/50) |
| Footswitch | Not compatible (reserved for models 10/50) |
| User programs | Not available (manual mode only) |
| Inputs | INPUT (guitar), MIC IN (dynamic microphone), AUX IN (audio player) |
| Outputs | PHONES (headphone / line) |
| Auto power-off | Yes (approximately 1 hour, adjustable) |
| Included accessories | DC 12 V power adapter, quick start guide |
| Optional accessories | VFS3 footswitch (not compatible with this model) |
| Manual available | Free PDF in multiple languages (FR, EN, etc.) |
Frequently Asked Questions - MINI GO 3 VOX
User questions about MINI GO 3 VOX
0 question about this device. Answer the ones you know or ask your own.
Ask a new question about this device
Download the instructions for your Guitar amp in PDF format for free! Find your manual MINI GO 3 - VOX and take your electronic device back in hand. On this page are published all the documents necessary for the use of your device. MINI GO 3 by VOX.
USER MANUAL MINI GO 3 VOX
Parts and their function 4
Top Panel 4 Rear Panel 6
Setup 7 Using the stand (VOX MINI GO 10/50) 7 Auto Power Off Function 7
Using the Rhythm Section 8 Selecting a rhythm pattern 8 Starting and stopping the playback of a rhythm pattern 8 Adjusting the volume of a rhythm pattern 8 Changing the tempo of a rhythm pattern 8
Using the looper function (VOX MINI GO 10/50)....8 Basic usage of looper....8 Synchronous operation of rhythm and looper....9
Using the Tuner 10 User programs and Manual mode
(VOX MINI GO 50 only)....10
Saving a program (VOX MINI GO 50 only) ..... 10
Restoring the factory settings 11
Using the foot switch (VOX MINI GO 10/50)…11 Changing the foot switch function ……11 Foot Switch Function Setting mode ……11 Foot switch function list ……12 Foot switch function details (additional info) ……13
Amp Models and Effects 13 AMP model 13 EFFECTS 1 (Modulation types/Oclave) 14 EFFECTS 2 (Delay/Reverb types) 14
Troubleshooting 15 Specifications 16
Thank you for your purchasing the VOX MINI GO 3/10/50 Portable Modeling Guitar Amplifier. To help you get the most out of your new instrument, please read this manual carefully.
Main Features
11 amp types
The amplifier features 9 amp sounds using the "VET" modeling technology, as well as a vocoder setting and a line setting for electric acoustic guitars or keyboards.
Available effects
The amplifier features eight high-quality effects: four delay and reverb effects in addition to three modulation effects and an octave effect.
Rhythm function
Includes 33 types of rhythm patterns with a wide range of variations.
Tuner function
You can tune the guitar or bass connected to the INPUT terminal.
Looper function (VOX MINI GO 10/50)
Provides a simple and user-friendly looper function, which can be used together with the rhythm function.
Supports mobile batteries
Off-the-shelf mobile batteries can be used as the power supply.
Use with microphone or audio player
Inputs include an AUX IN jack, for connecting an external audio device (MP3 player, etc.), and a MIC IN jack, to where you can connect a microphone. You can play along with recorded music or accompany your vocals on guitar.
Supports a foot switch (VOX MINI GO 10/50)
By connecting an optional foot switch VFS3, you can manipulate rhythm and looper functions using your foot.
Parts and their function
Top Panel
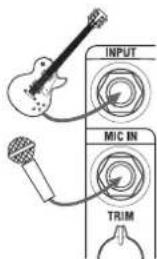
INPUT Section
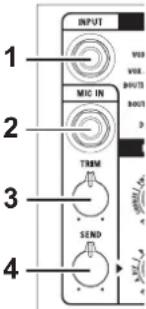
- INPUT jack
This is where you plug in your guitar.
- MIC IN jack
Connect the microphone (dynamic microphone).
- TRIM knob
This knob enables you to adjust the volume level of the microphone input.
- SEND knob
Adjust the volume sent from the MIC input to Effect 2 (delay/reverb).
Not available when the AMP selector is set to VOCODER.
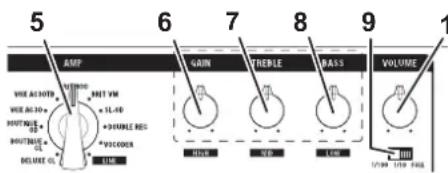
AMP section
This section enables you to adjust various amplifier settings.
7b VOX MINI GO 3
VOX MINI GO 10
5. AMP selector
This selector enables you to choose an amp model (for additional details, refer to "Amp model" on page 13). The gain circuit, tone control characteristics, and circuit layout will be set automatically in accordance with the selected amp model. You can also select the amplifier model or vocoder appropriate for the LINE input.
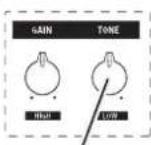
6. GAIN knob
This knob enables you to adjust the pre amp gain for the selected amp model.
- TREBLE knob (VOX MINI GO 50 only)
Used to adjust the tone in the high-tone range. The tone will be changed automatically in accordance with the selected amp model.
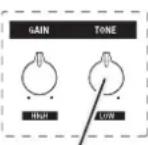
7b. TONE knob (VOX MINI GO 3/10)
Used to adjust the tone. The tone will be changed automatically in accordance with the selected amp model.
- BASS knob (VOX MINI GO 50 only)
Used to adjust the tone in the low-tone range. The tone will be changed automatically in accordance with the selected amp model.
- Power select switch (VOX MINI GO 10/50)
This switch adjusts the output wattage of the power amp.
This switch does not affect the PHONES output.
- VOLUME knob
Used to adjust the output level of the pre-amplifier.
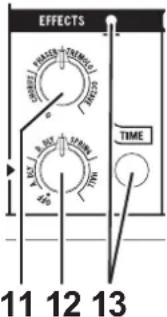
EFFECTS section
Here is where you can adjust the settings for the effects. For additional details on each effect, refer to "EFFECTS 1", "EFFECTS 2" on page 14.
- EFFECTS knob 1
Adjust the knob position to switch Effect 1 (modulation/octave) and set the depth of an effect. To bypass the effects, rotate the knob all the way to the left.
- EFFECTS knob 2
Adjust the knob position to switch Effect 2 (delay/reverb) and set the depth of an effect. To bypass the effects, rotate the knob all the way to the left.
- TIME button, LED
This button enables you to set the time of Effect 2 (delay/reverb). Tap this button twice to set the time. The duration between two taps will be used as the time value. The LED will flash in sync with the time.
RHYTHM section
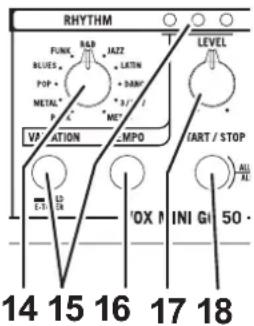
- Genre selector
This enables you to select the genre for a rhythm pattern.
- VARIATION button, LED
This is where you can select one of nine variations for each genre. (see p.8 "Using the Rhythm Section")
To enable the tuner function, press and hold down the VARIATIONS button for more than one second. (see p.10 "Using the Tuner")
- TEMPO button
Set the rhythm tempo. Tap this button twice to set the tempo. The duration between two taps will be used as the tempo value.
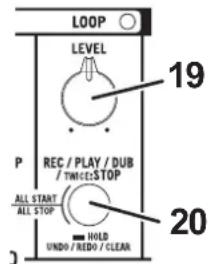
- RHYTHM LEVEL knob
This knob controls the volume level of the rhythm pattern.
- RHYTHM START/STOP button
This button starts or stops playback of the rhythm pattern.
Looper section (VOX MINI GO 10/50)
Perform looper operations and settings. For details about how to use the looper, refer to "Using the looper function (VOX MINI GO 10/50)" on p.8.
- LOOP LEVEL knob
Used to adjust the volume during loop playback
- LOOP button, LED
Perform operations such as loop recording, playback, and erasing.
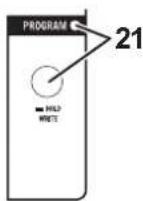
Program section (VOX MINI GO 50 only)
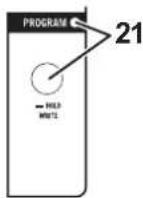
- PROGRAM button, LED
Use this button to choose a program. Each time the PROGRAM button is pressed, the PROGRAM LED turns green → orange and Off→(Refer to "User programs and Manual mode" on page 10.) This button is also used to save new programs. (Refer to "Saving a program" on page 10.)
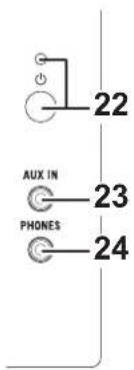
Power/AUX IN/PHONES Section
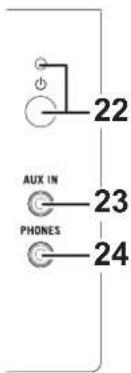
- (Power) button, LED
Pressing and holding down this button enables you to turn the power on or off. The power LED will light up when the power is turned on.

The color of the power LED varies depending on the type of the connected power supply equipment (maximum current that can be consumed by this instrument).
Green: Lights up when the current of up to 3A can be consumed by connecting the AC adapter supplied with this product to the DC19V terminal (DC 12V terminal for VOX MINI GO 3/10) or by the battery connected to the DC 5V IN terminal.
Orange: Lights up when the current of up to 1.5A can be consumed depending on the equipment connected to the DC 5V IN terminal.
- AUX IN jack
Connect an external audio device to this jack. This enables you to conveniently connect an audio player and play your guitar along with the player's output.
- PHONES jack
Use this jack if you're plugging directly in to a mixer, recording device, or if you're using headphones. The output signal from this jack is taken before the power amp, and the character of the guitar amp cabinet is applied to it.
Connecting headphones to this jack will mute the internal speaker.
Be sure to make a stereo connection at the PHONES jack.
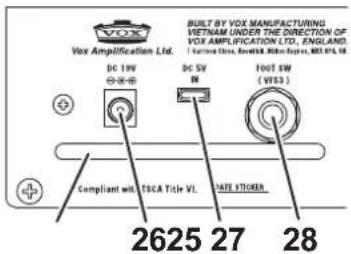
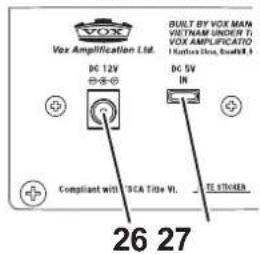
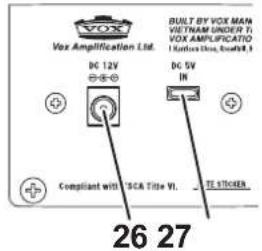
Rear Panel
VOX MINI GO 3VOX MINI GO 50
- Connector protection bar (VOX MINI GO 10/50)
Do not use this protection bar to carry this instrument. To carry the instrument, use the carry strap provided with this product.
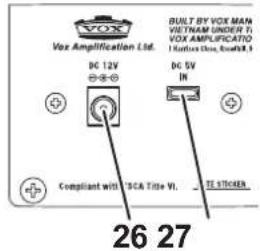
- DC 19V jack* (*DC 12V jack at VOX MINI GO 3/10)
Connect this jack to the included AC adapter.
The AC adapter should only be used with the main unit. Do not use the adapter with other devices since doing so may cause a malfunction.
- DC 5V IN jack (USB type-C connector)
Connect a commercially available mobile battery.
Noise may be heard when the power is supplied from a commercially available USB AC adapter, so use a mobile battery.
This terminal is only used for input. It cannot supply power to another device.
Not compatible with USB Power Delivery (USB PD).
- FOOT SW jack (VOX MINI GO 10/50)
Connect the dedicated foot switch VFS3. For details, refer to "Using the foot switch" on page 11.
Setup
- Set the VOLUME knob (10), TRIM knob (3) and RHYTHM LEVEL knob (17) to the minimum level.

- Connect the included AC adapter to the DC19V jack (DC 12V jack for VOX MINI GO 3/10) on the rear panel (26), then plug the adapter into an AC outlet.
To use an off-the-shelf mobile battery, connect it to the DC 5V IN jack (27) using a USB type-C cable.
Use a mobile battery with an output of at least 1.5A. Depending on the mobile battery or USB Type-C used, the power may not be turned on, or the battery may not be able to provide sufficient power.
When using a mobile battery, the output may be distorted or there may be noise.
-
Plug your guitar into the INPUT jack on the top panel. If you also plan to use a CD or MP3 player or a microphone, connect the player to the AUX IN jack, or the microphone to the MIC IN jack on the top panel.
-
Press and hold down the Power button until the power LED lights up and the power turns on.
-
Slowly raise the VOLUME Knob to the desired level.
-
When turning off the power, press and hold down the Power button until the power LED turns off.
Using the stand (VOX MINI GO 10/50)
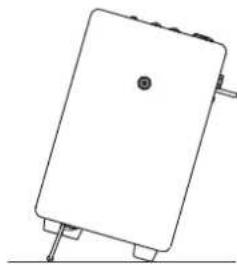
natural_image
Simple line drawing of a rectangular electronic device with pins and a circular button (no text or symbols)The VOX MINI GO 10/50 can be set at an angle by pulling out two stands at the bottom of the main unit (refer to the figure on the left).
Be sure to install the stand on a flat surface. If you set the stand at an angle on a slope, it may fall over.
Do not apply an excessive load such as by leaning against the amplifier.
Auto Power Off Function
The Auto Power Off function automatically turns the power off when the amplifier is not used or when the sound is not output for approximately one hour. When the power is turned off, it's not restored even if a knob or selector is used. Turn on the power again.
The Auto Power Off function does not work during rhythm playback or looper operation (during recording, playback, or overdubbing).
If the volume or variation of the output sound is extremely small, the Auto Power Off function may be activated. Also, depending on the settings and environment, the Auto Power Off function may not be activated due to noise even if you are not playing.
Setting the Auto Power Off function to enable or disable
- Press and hold down the TEMPO button (16) and turn on the power.
- The VARIATION LED (15) will indicate the current setting.

Enable

Disable
- Press the TEMPO button (16) to switch between the enable and disable setting.
- Wait a few seconds without using any of the buttons or controls. The unit will automatically switch to normal operation.
The Auto Power Off function enable and disable setting will be saved even when the power is turned off.
Using the Rhythm Section
Selecting a rhythm pattern
- Select a genre for each rhythm pattern using the GENRE selector (14).
- Select a variation for each rhythm pattern using the VARIATION button (15). One of three VARIATION LEDs lights up green, orange or red in the following sequence each time you press the button.

Variation 1

Variation 2

V
ar
Starting and stopping the playback of a rhythm pattern
Press the RHYTHM START/STOP button (18) to start or stop playing a rhythm pattern. During playback, the VARIATIONS LED that corresponds to the selected rhythm pattern will flash in sync with the tempo.
[TIP] The three VARIATION LEDs light up momentarily at the beginning of each bar.
Adjusting the volume of a rhythm pattern
Use the LEVEL knob (17) to adjust the volume of a rhythm pattern.
Changing the tempo of a rhythm pattern
You can adjust the rhythm tempo within the range of 40 to 240 BPM by pressing the TEMPO button twice at the required interval.
[TIP] If you press the button several times in time with the song, it will help you set the correct tempo.
[TIP] If you press the TEMPO button while playback is suspended, the VARIATION LED will blink in time with the tempo (the rhythm will not be played back). If you change the rhythm pattern or turn the RHYTH LEVEL knob fully counterclockwise, the blinking will stop.
Using the looper function (VOX MINI GO 10/50)
The looper function allows you to perform jam sessions while looping phrases recorded using a guitar or microphone, or play a performance in real time while repeating overdubbing.
Basic usage of looper
- Press the LOOP button (20) to enable record standby mode. (The LOOP LED blinks red.)
- Press the LOOP button again or start playing the guitar to start recording. (The LOOP LED lights up red.)
The minimum recording time is approximately 0.25 seconds and the maximum recording time is approximately 45 seconds.
The sound being input via the AUX IN jack or the rhythm pattern is not recorded.
Depending on the equipment used or settings, recording may start due to noise even if you are not playing.
- Press the LOOP button to exit recording and play back the recorded interval. (The LOOP LED lights up green.)
- Press the LOOP button during playback to start overlap recording, or quickly press the LOOP button twice to stop playback.
- If you hold down the LOOP button during playback after overdubbing, the overdubbing is undone (the overdubbed phrase is muted), and is redone (the mute is released) when you press and hold the LOOP button again.
Pressing and holding the LOOP button while playback is suspended erases recorded data.
- If you press the LOOP button while playback is suspended, the recorded phrase will be played back in a loop from the beginning. Also, if you press and hold the LOOP button while playback is suspended, the recorded phrase will be deleted (the phrase will be played back for a moment).
List of the LOOP button operations and functions
| LOOP LED status | Short-press LOOP button | Twice-press LOOP button (*1) | Press-hold LOOP button | |
| Suspended (does not record) | Turns OFF Turns | OFF | (The twice-press and press-hold functions are not available.) | |
| Recording standby | Blinks red | Recording starts | ||
| Recording Lights | up red | Recording ends → Plays back | Recording ends → Stops | Cancels recording, Stops |
| Suspended (recorded) | Blinks green | Back starts Stops Erases | ||
| Plays back | Lights up green (*2) | Overdubbing Stops | Undoes/Redoes (*3) | |
| Overdubbing | Lights up orange (*2) | Plays back Stops | Undoes → Plays back | |
*1 Press the button twice within half a second.
*2 The LED turns off for a moment at the beginning of a loop.
*3 If you have never overdubbed, the recorded phrases will be erased.
Synchronous operation of rhythm and looper
The looper function can be used together with the rhythm function.
Looper recording during rhythm playback (quantize)
If you record a looper during rhythm playback, the loop length is automatically adjusted to match the rhythm beat or bar length when recording is stopped (quantize).
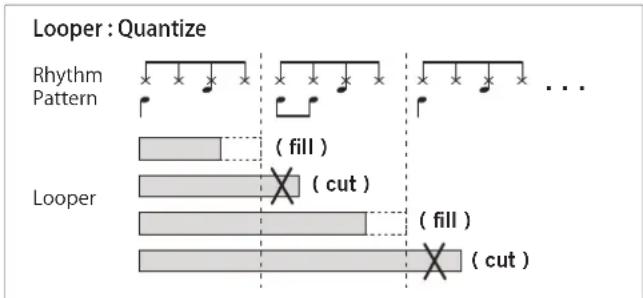
bar
Looper : Quantize | Pattern | Value | |---|---| | Rhythm Pattern | (fill) | | Looper | (cut) | | Looper | (fill) | | Looper | (cut) |[TIP] The rhythm tempo is quantized to one beat, two beats, or a well-separated bar length.
If the genre is 3/5/7, the rhythm tempo is not quantized to two beats long.
[TIP] The relative position between the beginning of the rhythm and the beginning of the looper is stored, and when simultaneous playback is performed, the rhythm and looper are played back while the same relative position as Recording mode is maintained (refer to "Simultaneous playback of rhythm and looper").
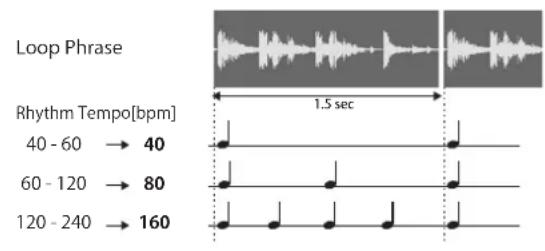
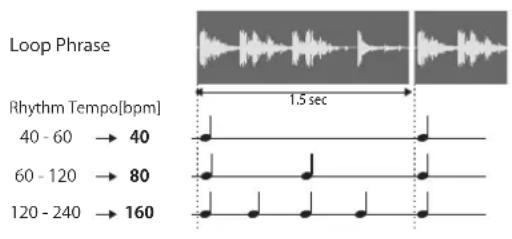
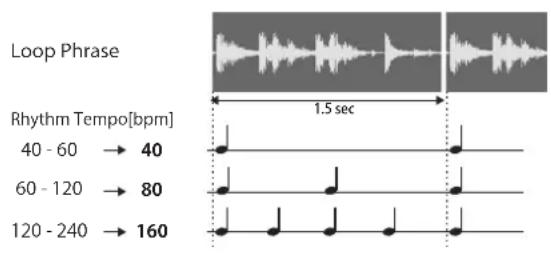
Rhythm playback during looper playback (Automatic tempo adjustment)
If the rhythm is played back during loop playback, the rhythm tempo is automatically set based on the rhythm tempo before playback and the length of the recorded phrase.
Rhythm: Auto Tempo Adjustment
![Loop Phrase Rhythm Tempo[bpm] 40 - 60 → 40 60 - 120 → 80 120 - 240 → 160 1.5 sec](/content/2026/04/666382/images/b04d06388af9a5a1a8edd65bc69bfdd93e4d4fe805d20f45811b0db845bcaf06.jpg)
[TIP] Calculate the tempo at which the looper's phrase length is one beat, two beats, or a well-separated bar length. The number of bars is 1, 2, 4, 8, 12, 16, 24, 32, or 48.
If the genre is 3/5/7, the rhythm is not set to a tempo that is two beats long
[TIP] When the looper is recorded and quantized during rhythm playback, the tempo will not change even if you stop the rhythm and play it back again.
Simultaneous playback of rhythm and looper
When a looper has already been recorded and both the rhythm and the looper are suspended, if you press both the RHYTHM button and the LOOP button, the rhythm and looper start playback at the same time. If a looper is recorded during rhythm playback, the rhythm and looper are played back while the same relative position as Recording mode is maintained.
[TIP] The looper is always played from the beginning, and the rhythm is played from the middle according to the relative position.
[TIP] The rhythm tempo is automatically adjusted even in the case of the simultaneous playback.
If a looper is recorded while the rhythm is suspended, the relative position is cleared to 0.
If the rhythm tempo is changed, the relative positions of the rhythm and looper are cleared to 0.
Using the Tuner
The tuner function lets you tune a guitar that's connected to the INPUT jack. The tuner detects the pitch of the input sound, then indicates the discrepancy from the standard pitch of E.
- Press and hold down the VARIATION button for more than one second. Effect 1 will be bypassed, and the tuner function will turn on.

All effects are bypassed. (No valid signal is being input.)
- Play the open 6th string.
Be careful not to touch any other strings.
- Tune the guitar so that only the center green LED lights up, as shown on the right.
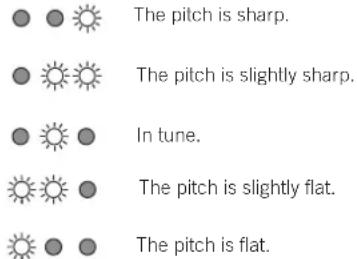
![[TIP] The tuner recognizes the pitch of E in any octave. This is useful if you want to tune to harmonics or tune other musical instruments, such as a bass guitar. [TIP] Once you tune the 6th string using the tuner function, tune the other strings in reference to the 6th string. 4. Press the VARIATION button again or turn the EFFECTS knob 1 to switch the type of Effect 1; the tuner ends, and the bypass is released. [TIP] In the VOX MINI GO 50, the tuner ends even if the program is switched.](/content/2026/04/666382/images/0a63091a765e2236a00ee044879aecc62e19e882718bf45c1fd55fbb0951d6ee.jpg)
User programs and Manual mode (VOX MINI GO 50 only)
You can save the tones produced by adjusting the amplifier or EFFECTS knob as user programs A, B, and C. The saved programs can be easily called using the PROGRAM button (21) or the foot switch.
The power select switch, TRIM, SEND, RHYTHM section, and LOOP section settings cannot be saved in a program.
Each time you press the PROGRAM button, user programs A, B, and C (green, orange, and red) and Manual mode (LED off) are called in sequence. In Manual mode, all the knob positions are reflected on sounds as they are.
[TIP] The VOX MINI GO 3/10, which does not provide any user programs, is always in Manual mode.
Saving a program (VOX MINI GO 50 only)
After adjusting the various knobs and buttons on the top panel to create your desired sound, it can be saved (written) as a user program.
[TIP] The saved programs can be called using the PROGRAM button or the foot switch.
- Hold down the PROGRAM button (21) for at least one second (until the PROGRAM LED starts blinking).
- Press the PROGRAM button to select the save location. [TIP] To cancel the write operation, press the TIME button (13).
- Hold down the PROGRAM button for at least 2 seconds (until the LED changes from blinking to lit). The program is saved at the selected location, and the saved program is selected.
If you switch to another program or turn off the amp before saving the sound that you are creating, the changes that you made will be lost.
Restoring the factory settings
Here's how to restore all settings of the VOX MINI GO to their factoryset state.
-
Turn off the power.
-
While holding down the VARIATION button, turn on the amp. After the VARIATION LED blink, release the pressed button.
[TIP] If you decide to cancel initialization at this point, press the TIME button.
- Hold down the VARIATION button for at least 2 seconds (until the LED changes from blinking to lit).
Initialization is completed, and the amp returns to normal operation.

Never turn off the power while initialization is in progress.
Using the foot switch (VOX MINI GO 10/50)
By connecting the foot switch VFS3 to the FOOT SW terminal (28) on the rear panel, you can control effects, rhythms, and loopers with your foot.
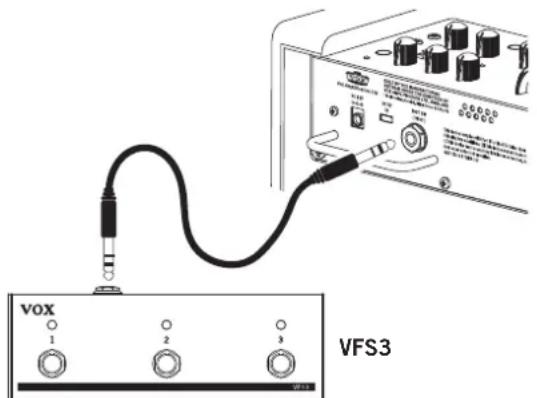

Do not connect a product other than the VFS3.
The following functions are assigned at the time of factory shipment.
| SW1 SW2 SW3 | |||
| VOX MINI GO 10 | Effect 2 On/Off | Rhythm playback/stop | Looper recording/Playback/Overdub |
| VOX MINI GO 50 | Program switch | Rhythm playback/slop | Looper recording/Playback/Overdub |
Changing the foot switch function
Each function of the foot switch can be changed simply by operating the foot switch on the top panel while holding it down during normal operation. For information about the functions that can be assigned, refer to "Foot switch function list" on the following page.
Operate the top panel and foot switch separately, except when changing a function.
[TIP] To prevent a function from being changed unintentionally, you can disable the function change operation during normal operation (refer to "Foot Switch Function Setting mode).
[TIP] The assigned functions are stored in this instrument side, so settings are retained even when the power is turned off.
Foot Switch Function Setting mode
This is the dedicated mode for setting the foot switch function.
- Start with the power turned off.
- Connect the foot switch, and while pressing the LOOP button (20), turn the power on.
- When all LEDs except (power) LED (22) start blinking slowly, release the button you are pressing. The blinking color of the LED indicates whether the function change operation during normal operation is enabled (orange) or disabled (green). Press the LOOP button to switch Enable and Disable.
If you set to Disable, you cannot change the foot switch function during normal operation.
- Press the foot switch corresponding to the settings you want to change (do not keep the switch held down). The LED on the pressed switch lights up green to indicate that it is a setting target. The function currently assigned to the target switch is displayed on the top panel.
- Operate the knob or switch to change the function (refer to "Foot switch function list" on the following page).
- Press and hold the (power) button to turn the power off.
Foot switch function list
| Function Operation when the foot switch is pressed | Assignment method (While holding down the foot switch during normal operation, perform the following operation.) | Display in Foot Switch Function Setting mode | |
| Effect 1 On/Off | Each time it is pressed, Effect 1 is switched on or off. Turn the EFFECTS knob | 1. The TIME LED (green) blinks regularly. | |
| Effect 2 On/OII | Each time it is pressed, Effect 2 is switched on or off. Turn the EFFECTS knob | 2. The TIME LED (red) blinks regularly. | |
| Delay/reverb time | The delay/reverb time is set at the interval at which the switch is pressed twice. | Press the TIME button. The TIME LED (red) blinks. | |
| Turner On/OII Each time | is pressed, the turner is switched on or off.For details, refer to "Foot switch function details (additional info)" on the next page. | Press and hold the VARIATION button. The VARIATION LED (red - green - red) moves smoothly from side to side. | |
| Rhythm variation | Each time it is pressed, the rhythm variation is switched 1 → 1 → | Press the VARIATION button. The VARIATION LED (green) lights up in the order of 1 → 2 → 3. | |
| Rhythm tempo | The rhythm tempo is set at the interval at which the switch is pressed twice. | Press the TEMPO button. The center (green) of the VARIAT ON LED blinks. | |
| Rhythm playback/slop | Each time it is pressed, the rhythm is switched to playback or stop. | Press the START/STOP button. | During normal operation, the LED turns in the same way as rhythm playback. |
| Rhythm mute On/Off | Each time it is pressed, the rhythm mute is switched on or off. | Turn the RHYTHM LEVEL knob. | The VARIATION LED (green) blinks regularly. |
| Looper recording/playback/overdub | Each time you press the foot switch, the looper operation transitions.LOOP mode 1: Record → Playback ↔ OverdubLOOP mode 2: Record → Overdub ↔ PlaybackLOOP mode 3: Record → Playback ↔ RecordFor details, refer to "Foot switch function details (additional info)" on the next page. | Press the LOOP button.LOOP mode 1 is only available during normal operation. In Foot Switch Function Setting mode, each time the LOOP button is pressed, LOOP mode is switched to 1 → 2 → 3 (green → orange red).To continuously switch LOOP mode, wait at least half a second before pressing the LOOP button. If you press the LOOP button twice within half a second, "looper stop" will be assigned. | LOOP mode 1: The LOOP LED (green) lights up.LOOP mode 2: The LOOP LED (orange) lights up.LOOP mode 3: The LOOP LED (red) lights up.[TIP] You can assign different modes to respective switches to make usage more convenient. |
| Looper stop | Press once to stop the looper. | Press the LOOP button quickly twice.(During normal operation: Performs the looper stop operation.) | The LOOP LED (green) blinks.The looper is suspended (with phrase) during normal operation. |
| Looper undo/redo | Each time it is pressed, undo/redo is performed.If you press and hold the button while suspended, the recorded phrases will be erased.If you press and hold the button during playback and overdubbing has never been performed, the recorded phrases are erased, and the looper is stopped. | Press and hold the LOOP button.(During normal operation: Performs undo/redo operation.) | The LOOP LED (green) blinks quickly twice every second. |
| Looper mute On/OII | Each time it is pressed, the looper rule is switched on or off. | Turn the LOOP LEVEL knob. | The LOOP LED (green) blinks regularly. |
| Collective control of rhythm and looper | Control the rhythm and looper all at once.Looper not recorded: Start rhythm playback → Start looper recording End recording (start playback)Looper recorded: Start simultaneous playback of rhythm and looper (except LOOP mode 3)Press twice quickly to stop both.For details, refer to "Foot switch function details (additional info)" on the next page. | Press both the START/STOP button and the LOOP button at the same time.[TIP] In Foot Switch Function Setting mode, you can press the LOOP button while holding down the START/STOP button to switch LOOP mode. | VARIATION LED:Turns in the same way as rhythm playback during normal operation.LOOP LED:LOOP mode 1: The LOOP LED (green) lights up.LOOP mode 2: The LOOP LED (orange) lights up.LOOP mode 3: The LOOP LED (red) lights up. |
| Program switching(VOX MINI GO 50 only) | Each time it is pressed, the user program is switched to A → B →A...Press the | The PROGRAM button.(During normal operation: Switches the program.) | The PROGRAM LED turns green orange red→ |
| No assignment | (Nothing occurs.) | Press and hold the foot switch.("No assignment" cannot be set during normal operation.) | All turns off. |
Foot switch function details (additional info)
Tuner On/Off
If the tuner is turned on by operating the foot switch, three LEDs of the foot switch are switched to tuner display (the VARIATION LED remains set to the original display).
If you press and hold the VARIATION button, the VARIATION LED is switched to the tuner display, but the display of the foot switch remains unchanged. In any case, when the foot switch is pressed while the tuner is on, the tuner is turned off.
[TIP] When the LED of the foot switch is in the tuner display, the tuner is turned off even if you press the foot switch when it is assigned to another function.
Looper recording / playback / overdub and LOOP mode
Each time you press the foot switch, the looper operation transitions. You can use three modes of operation, including the same operation as the LOOP button on the top panel (LOOP mode 1) (refer to "Foot Switch Function Setting mode" on page page 11).
LOOP mode 1: Basically operates in the same way as the LOOP button. However, if the switch is pressed in the suspended (unrecorded) state, the recording standby is skipped, and recording starts immediately.
LOOP mode 2: If the switch is pressed while recording, recording is stopped and switched to Overdubbing mode. Others are the same as LOOP mode 1.
LOOP mode 3: If the switch is pressed while suspended (including the recorded state), during playback, or during overdubbing, the previous phrases are erased, and new recording starts.
[TIP] A different mode can be assigned to multiple switches, so you can freely combine the recording - playback - overdubbing order when playing.
Collective control of rhythm and looper
You can control both the rhythm and the looper at once with a single foot switch.
When both the rhythm and the looper are suspended while no looper has been recorded (or in LOOP mode 3), the mode transitions in the order of Start rhythm playback → Start looper recording End recording (Start playback) each time the button is pressed.
[TIP] If you press both during playback, operation will be the same as "Looper recording / playback / overdubbing". Press twice quickly to stop both the rhythm and the looper.
If you press this button when both the rhythm and the looper are suspended while the looper is recorded, the rhythm and looper start playback at the same time (excluding LOOP mode 3).
[TIP] The looper is always played back from the beginning, and the rhythm is played back from the middle according to the relative position when recording the looper (refer to "Simultaneous playback of rhythm and looper" on page 9).
When either button is pressed during playback, the relative position is not reflected.
If the button is pressed while the looper is playing back and the rhythm is stopped, the looper status does not change and the rhythm starts playing from the beginning.
Amp Models and Effects
This section describes characteristics of each amp model and effect.
AMP model
DELUXE CL
This dual channel, 22W blackface design from the 60's used 6V6 power tubes and a tube driven reverb to produce a big sound at a lower wattage. Our modeling is based on the Vibrato channel.
BOUTIQUE CL
This models the clean channel of a high-quality amp that was produced only on special order, and was known as the overdrive special. With a beautifully rounded low range, a sharp midrange attack, and a sweet treble register, this is ideal for single coil pickups.
BOUTIQUE OD
This models the overdrive channel of a 100W high-quality amp that was produced only on special order, and was known as the overdrive special. The wonderful sustain obtained by raising the GAIN control is smooth and soulful.
VOX AC30
This is a modeling of the normal channel of AC30, which is a typical guitar amplifier of VOX. The clear high range of the Celestion alnico "Blue" speaker, as well as the rich midrange, deliver a captivating clean sound.
VOX AC30TB
This models an AC30 amp with the “top boost” circuit of the 1964 AC30. It delivers a smooth and refined top end, a majestically deep overdrive, and a rich, brilliant clean sound.
BRIT 800
This models a UK-manufactured 100W single-channel head with master volume made in 1983. Turn the GAIN control all the way up to get the thick, snarling hard rock and heavy metal sound that dominated the 80's.
BRIT VM
This models an English-made 100W amp head released in 2007 that boasts a four-channel design with powerful tone. We've used the "Overdrive 2" channel, which produces a tight low-end and transparent high-gain metal sound.
SL-OD
This models the overdrive channel of a snakeskin-covered 100W amp head built in 1991. With an open low-end and a compressed mid/high range, its powerful, heavy sound delivers a forceful tone that will not break down even with the most extreme gain settings.
DOUBLE REC
This models the modern high-gain channel from a wild beast of an amp. Its deep and loose low-end, sparkling highs, and monstrous gain are ideal for guitars tuned as low as possible, or for metal acts wielding seven-string guilars.
VOCODER
When you sing or speak into the microphone while playing the guitar, the talking modulation effect is activated, which makes it sounds as if the guitar is singing. This is effective when you speak clearly while changing your voice.
[TIP] When the microphone is not connected, talking modulation is applied in connection with guitar picking.
LINE
Only a tone control amplifier that produces a clean tone. This works best with audio signal input from a line-level instrument like an electric acoustic guitar or keyboard. In the VOX MINI GO 50, the high frequency (HIGH), mid frequency (MID), and low frequency (LOW) tones are adjusted using the GAIN, TREBLE, and BASS knobs, respectively. In the VOX MINI GO 3/10, the high frequency (HIGH) tone is adjusted using the GAIN knob, and the low frequency (LOW) tone is adjusted using the TONE knob.
EFFECTS 1 (Modulation types/Octave)
CHORUS
A standard chorus effect that gives the sound a sway and rich expanse. Adjust the modulation speed with the knob.
PHASER
A phaser effect that creates a cyclical swell. Adjust the modulation speed with the knob.
TREMOLO
A typical tremolo that modulates the volume up and down cyclically.
OCTAVE
An effect that adds a bass sound that is one octave lower. You can adjust the knob to achieve a subtle octave or one that is fully present, and increasing the knob further provides synth bass sound with good resonance.
If you play multiple strings at the same time, it may cause a malfunction, so play with a single note.
EFFECTS 2 (Delay/Reverb types)
A.DLY
This models an analog delay that uses a Bucket Brigade Device (BBD). Its audio quality is lo-fi, but it is popular for its warm sound. Adjust the mix amount of the delay sound with the knob. Set the delay time with the TAP button. The maximum delay time is approximately 1.45 seconds.
D.DLY
This creates a clear sound delay unique to digital systems. This is effective for rhythmic play that matches the delay time to the tempo of the song. The usage of knobs or buttons and the maximum delay time are the same as A.DLY.
SPRING
This simulates the spring reverb that's built into many guitar amps. Adjust the mix amount of the reverb sound with the knob. Set the reverb time with the TIME button (13).
The reverb time is about four times the interval at which the TIME button is pressed.
HALL
This models the reverberation of a concert hall containing numerous echo components. The operation of the knob and button is the same as with SPRING.
Troubleshooting
The power does not turn on even when the power button is pressed and held down.
- Is the AC adapter cord connected to the rear panel of the amp correctly?
• Is the AC adapter plugged into an AC outlet?
• Is the AC outlet switched on and working?
• Is the AC adapter damaged?
If you are using a mobile battery:
• Is the mobile battery charged?
- Has it been a while since you connected the mobile battery?
If no power is consumed after a while, the mobile battery may stop operating and may not turn on even if you press and hold the power button on the unit. Press the power button on the mobile battery, or disconnect and reconnect the USB cable.
• Did you connect the USB cable slowly?
If you connect it slowly or stop midway, it may not be recognized correctly. Quickly insert it all the way.
There's no sound coming from the amp
• Is your guitar turned up?
- Are both ends of your guitar cable plugged into where they should be?
• Is your guitar cable working?
- Are the top panel VOLUME and GAIN knobs turned up?
- Do you have headphones or anything else plugged into the amp's top panel PHONES jack?
If "yes," unplug!
- Is the amplifier model VOCODER selected with the microphone connected to MIC IN?
VOCODER does not produce sound unless data is input to both MIC IN and INPUT.
The amp doesn't seem very loud
• Is your guitar turned up?
- Is the top panel VOLUME or GAIN knob turned down low?
- Are you using a mobile battery?
Use a mobile battery with an output of at least 1.5A. Depending on the mobile battery or USB Type-C used, the power may not be turned on, or the battery may not be able to provide sufficient power.
The rhythm sound is not output
- Is the rhythm section LEVEL knob set to a low value?
- Did you switch mute on by operating the foot switch?
The rhythm tempo changes arbitrarily.
- Are you using the rhythm simultaneously with the looper?
If the rhythm is played back during loop playback, the rhythm tempo is automatically set based on the rhythm tempo before playback and the length of the recorded phrase.
Looper recording is not possible.
- Are you trying to record a rhythm or an input from AUX IN?
The rhythm sound and the input from AUX IN are not recorded in the looper.
There's no looper playback sound.
- Is the LOOP LEVEL knob set to a small value?
• Is foot switch operation muted? - Was the GAIN knob or VOLUME knob reduced during looper recording?
No sound is output from the microphone connected to the MIC IN terminal.
• Is the microphone connected correctly?
• Is the microphone switch turned off?
• Is the TRIM knob set to a small value?
- Is the amplifier model VOCODER selected with the microphone connected to MIC IN?
VOCODER does not produce sound unless data is input to both MIC IN and INPUT.
No effect is applied.
• Is the tuner function turned on?
When the tuner function is turned on, Effect 1 is bypassed. Press the VARIATION button to turn the tuner off.
- Is the EFFECTS knob set to the OFF position or a small value?
- If Effect 2 is not applied to the microphone, is the SEND knob set to a small value?
• Did you turn the effect off by operating the foot switch?
The function of the foot switch changes arbitrarily.
- Are you operating the top panel while pressing the foot switch?
Operate the top panel and foot switch separately, except when changing the foot switch function.
[TIP] To prevent a function from being changed unintentionally, you can disable the function change operation during normal operation (refer to "Foot Switch Function Setting mode).
The function of the foot switch cannot be changed.
- Did you disable function change during normal operation in the foot switch function setting mode? (Refer to "Foot Switch Function Setting mode" on Page page 11)
Specifications
(VMG-3/10/50 = VOX MINI GO 3/10/50)
Number of amp types: 11
Number of effects: 8
Number of program: 3 (VMG-50 only)
Number of rhythm patterns: 33
Tempo: 40-240BPM
Looper Recording Time: 0.25-45 sec. (VMG-10/50 only)
Tuner range: E1-E6 (41.2Hz - 1318.5Hz)
Input/Output jacks: INPUT, MIC IN, AUX IN, PHONES, FOOT SW (VMG-10/50 only)
Power amp output:
VMG-3 Maximum approx. 3W RMS@4 ohms
VMG-10 Max approx. 10W RMS@16 ohms
VMG-50 Max approx. 50W RMS@4 ohms
Speaker:
VMG-3 5 inch 4 ohms
VMG-10 6.5 inch 16 ohms
VMG-50 8 inch 4 ohms
Power supply: Included AC adapter or USB mobile battery
Battery life with the 10000 mAh mobile battery used (approximate)
VMG-3: approx. 12 hours / VMG-10: approx. 6 hours / VMG-50: approx. 3 hours
Current consumption:
VMG-3/VMG-10 1A
VMG-50 3.42A
(when using the AC adapter; max. 5V/3A when using a mobile battery)
Dimensions (W x D x H):
VMG-3 256 x 180 x 249 mm/10.08 x 7.09 x 9.80 inches
VMG-10 296 x 210 x 294 mm/11.65 x 8.27 x 11.57 inches
VMG-50 390 x 250 x 358 mm/15.35 x 9.84 x 14.09 inches
Weight:
VMG-3 3.5 kg/7.72 lbs
VMG-10 4.5 kg/9.92lbs
VMG-50 7.3 kg/16.09 lbs
Included Items: Quick Start Guide, AC adapter (VMG-3/VMG-10 DC 12V, VMG-50 DC 19V), strap
Accessories (option): VOX VFS3 Foot switch
Fr Introduction
7b VOX MINI GO 3
VOX MINI GO 10
5. Sélecteur AMP
Section programme (VOX MINI GO 50 uniquement)
21. Bouton et diode PROGRAM
Section alimentation/AUX IN/PHONES
VOX MINI GO 3VOX MINI GO 50
- Prise FOOT SW (VOX MINI GO 10/50)
natural_image
Simple line drawing of a rectangular device with a circular button on top and two legs, no text or symbols present.Rhythm: Auto Tempo Adjustment
line
| Rhythm Tempo [bpm] | Value | | ------------------ | ----- | | 40 - 60 | 40 | | 60 - 120 | 80 | | 120 - 240 | 160 |EFFECTS 1 (Modulation/Octave)
CHORUS
(VMG-3/10/50 = VOX MINI GO 3/10/50)
- INPUT-Buchse
- Steckerschutzschiene (VOX MINI GO 10/50)
natural_image
Simple line drawing of a rectangular electronic component with pins and a circular symbol on top (no text or labels)Rhythm: Auto Tempo Adjustment
line
| Rhythm Tempo [bpm] | Value | | ------------------ | ----- | | 40 - 60 | 40 | | 60 - 120 | 80 | | 120 - 240 | 160 |(VMG-3/10/50 = VOX MINI GO 3/10/50)
- Mando EFFECTS 1
VOX MINI GO 3VOX MINI GO 50
- Jack FOOT SW (VOX MINI GO 10/50)
natural_image
Simple line drawing of a rectangular electronic device with pins and a circular button (no text or symbols)Rhythm: Auto Tempo Adjustment
other
| Rhythm Tempo [bpm] | Value | | ------------------- | ----- | | 40 - 60 | 40 | | 60 - 120 | 80 | | 120 - 240 | 160 |natural_image
Simple line drawing of a rectangular electronic device with pins and a circular button (no text or symbols)Rhythm: Auto Tempo Adjustment

Vox Amplification Ltd.
1 Harrison Close, Knowlhill, Milton Keynes, MK5 8PA. UK
www.voxamps.com
© 2020 VOX AMPLIFICATION LTD.
Published 01/2021
- Main Features
- amp types
- Available effects
- Rhythm function
- Tuner function
- Looper function (VOX MINI GO 10/50)
- Supports mobile batteries
- Use with microphone or audio player
- Supports a foot switch (VOX MINI GO 10/50)
- Parts and their function
- Top Panel
- INPUT Section
- AMP section
- AMP selector
- GAIN knob
- EFFECTS section
- RHYTHM section
- Looper section (VOX MINI GO 10/50)
- Program section (VOX MINI GO 50 only)
- Power/AUX IN/PHONES Section
- Rear Panel
- Setup
- Using the stand (VOX MINI GO 10/50)
- Auto Power Off Function
- Setting the Auto Power Off function to enable or disable
- Using the Rhythm Section
- Selecting a rhythm pattern
- Starting and stopping the playback of a rhythm pattern
- Adjusting the volume of a rhythm pattern
- Changing the tempo of a rhythm pattern
- Using the looper function (VOX MINI GO 10/50)
- Basic usage of looper
- Synchronous operation of rhythm and looper
- Looper recording during rhythm playback (quantize)
- Rhythm playback during looper playback (Automatic tempo adjustment)
- Simultaneous playback of rhythm and looper
- Using the Tuner
- User programs and Manual mode (VOX MINI GO 50 only)
- Saving a program (VOX MINI GO 50 only)
- Restoring the factory settings
- Using the foot switch (VOX MINI GO 10/50)
- Changing the foot switch function
- Foot Switch Function Setting mode
- Foot switch function details (additional info)
- Tuner On/Off
- Looper recording / playback / overdub and LOOP mode
- Collective control of rhythm and looper
- Amp Models and Effects
- AMP model
- DELUXE CL
- BOUTIQUE CL
- BOUTIQUE OD
- VOX AC30
- VOX AC30TB
- BRIT 800
- BRIT VM
- SL-OD
- DOUBLE REC
- VOCODER
- LINE
- EFFECTS 1 (Modulation types/Octave)
- CHORUS
- PHASER
- TREMOLO
- OCTAVE
- EFFECTS 2 (Delay/Reverb types)
- A.DLY
- D.DLY
- SPRING
- HALL
- Troubleshooting
- The power does not turn on even when the power button is pressed and held down.
- There's no sound coming from the amp
- The amp doesn't seem very loud
- The rhythm sound is not output
- The rhythm tempo changes arbitrarily.
- Looper recording is not possible.
- There's no looper playback sound.
- No sound is output from the microphone connected to the MIC IN terminal.
- No effect is applied.
- The function of the foot switch changes arbitrarily.
- [TIP] To prevent a function from being changed unintentionally, you can disable the function change operation during normal operation (refer to "Foot Switch Function Setting mode).
- The function of the foot switch cannot be changed.
- Specifications
- Fr Introduction
- Sélecteur AMP
- Section programme (VOX MINI GO 50 uniquement)
- Bouton et diode PROGRAM
- Section alimentation/AUX IN/PHONES
- EFFECTS 1 (Modulation/Octave)
- Vox Amplification Ltd.
Brand : VOX
Model : MINI GO 3
Category : Guitar amp